
Transform Your Employee Management with Automated Data Processing: Your Ideal Ally for Sequential Approvals in HR
In Human Resources, every minute counts—especially when it comes to administrative processes that, while essential, are often slow and manual. A clear example is the clearance request for an employee’s exit or transfer, which typically requires multiple approvals, tracking, and coordination. Implementing automated data processing helps streamline this workflow, reduce human error, and save valuable time on repetitive tasks.
What if you could optimize this entire process with just a few clicks?
Turn manual tasks into digital efficiency with automated data processing
Thanks to Power Automate, this repetitive task can be transformed into a clear, efficient, and fully automated workflow. In this article, we’ll show you how to implement a solution that connects Microsoft Forms, OneDrive, and Outlook, allowing sequential approvals to flow smoothly—saving time and ensuring the process is followed accurately.
👉 New to Power Automate? Discover what it is and how to start using it here.
Ready to take it a step further?
If you’re looking to optimize your business processes, we encourage you to explore how business process automation can transform your organization. Learn more about this through Microsoft Power Automate.
Follow our step-by-step guide to implement automation in the employee clearance request process with sequential approvals. Keep reading and discover how to take your HR management to the next level!
To get started, access Power Automate (PA) from the Microsoft 365 applications. Once inside the PA environment, click on “Create”, and then select “Automated cloud flow” (see Image 1).
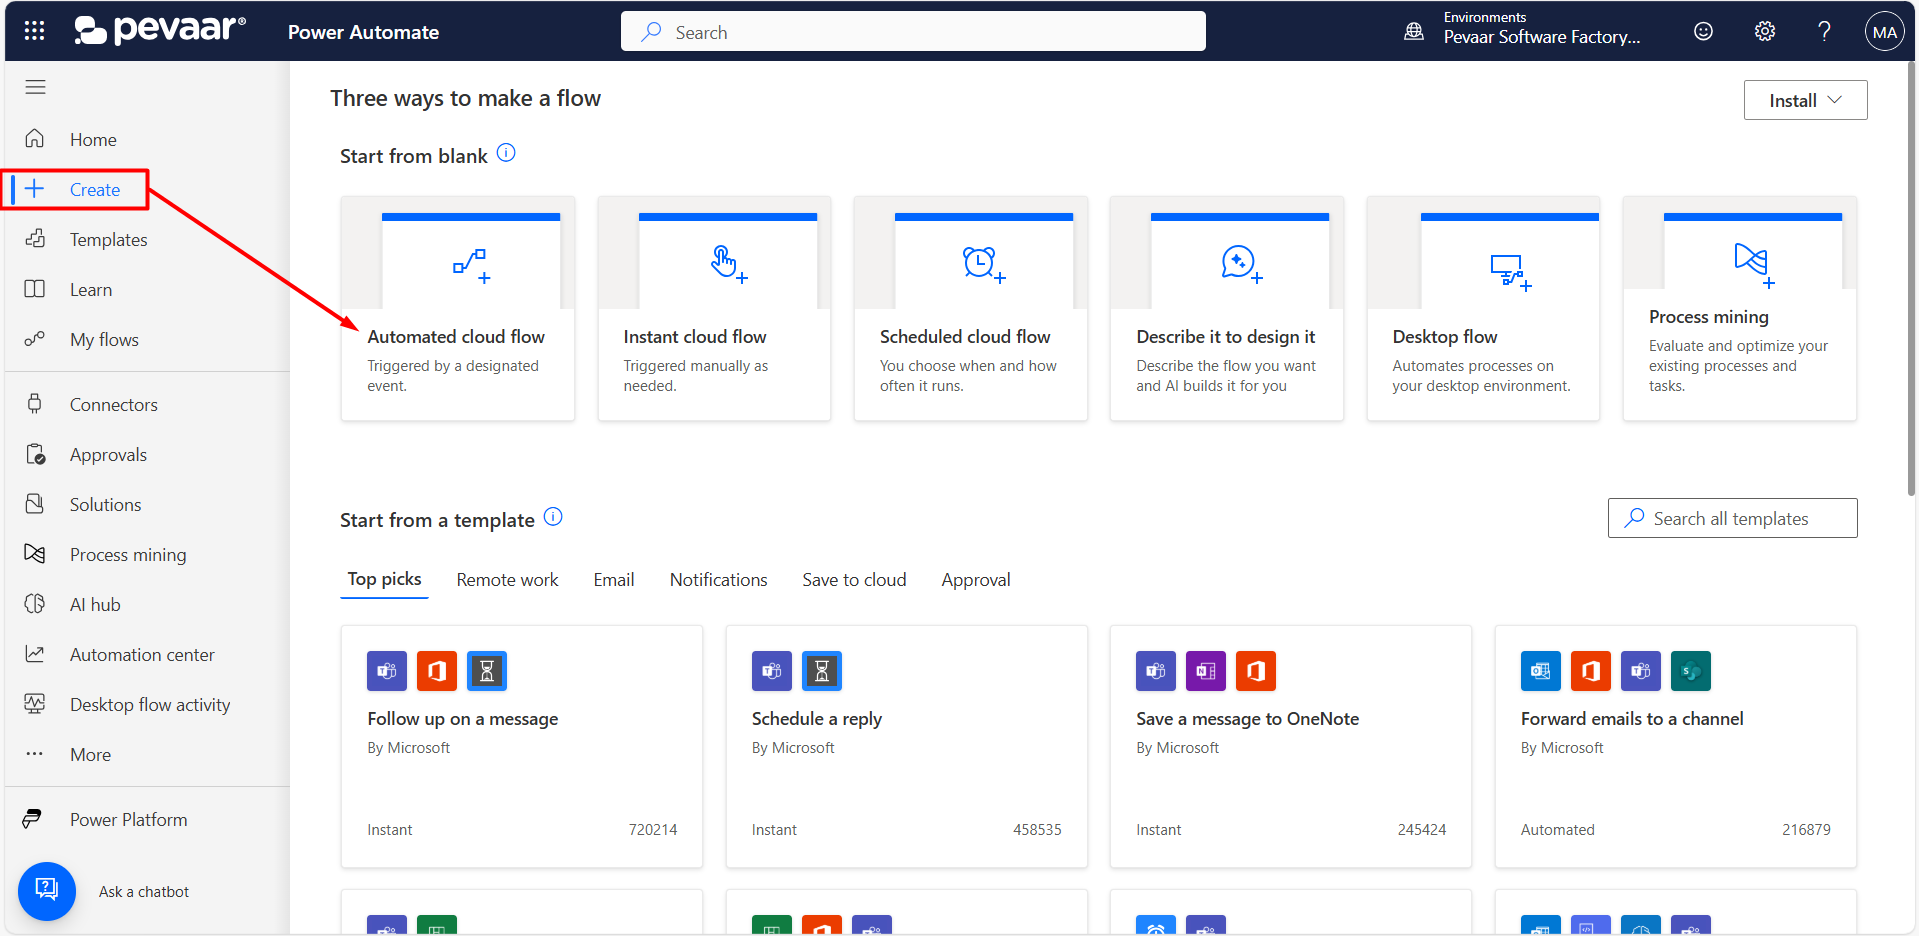
Image 1
Next, you need to name your flow and select a trigger, which in this case will be “When a new response is submitted” (see Image 2).

Image 2
Next, we’ll break down the flow and its connections:
1. The flow begins with a trigger from Microsoft Forms. From the automatically loaded options, the corresponding Form ID was selected: “Paz y salvo administrativo – Código RH-F-008-V02″, chosen from the list of all forms created by the user who designed the flow (see Image 3).
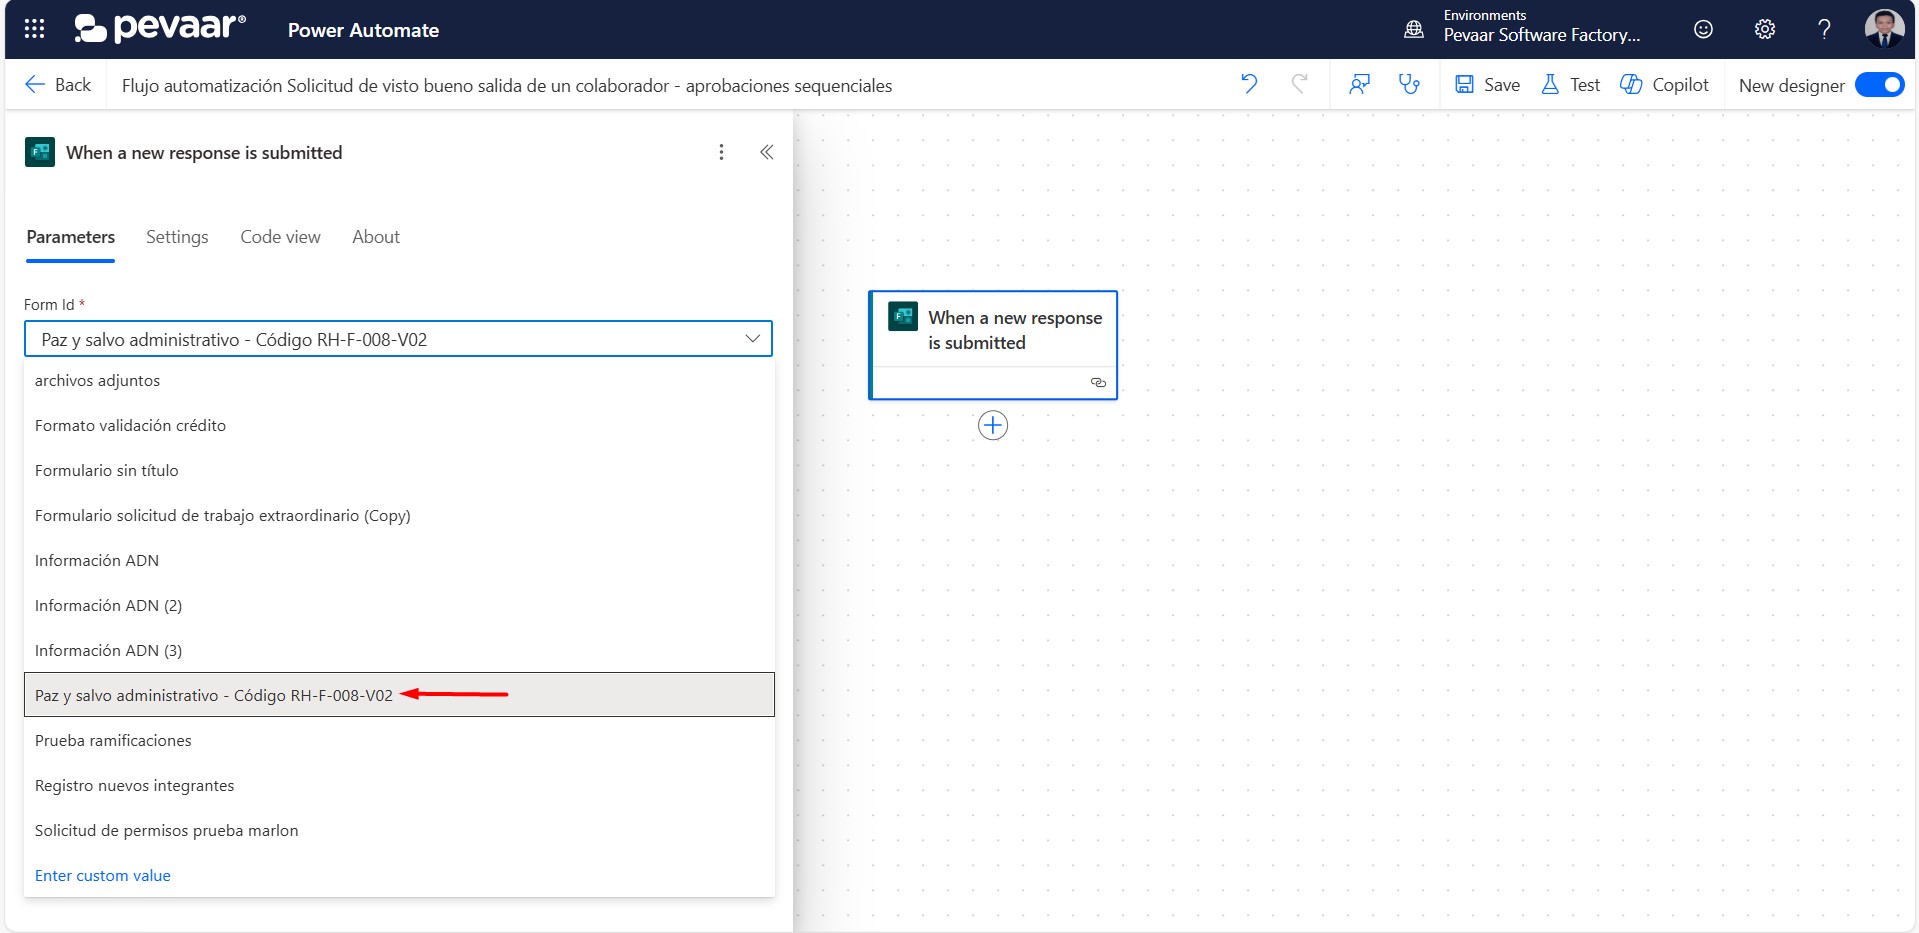
Image 3
To continue building the flow, you need to add a new action by clicking the “+” icon. This step must be repeated each time you want to add another action (see Image 4).
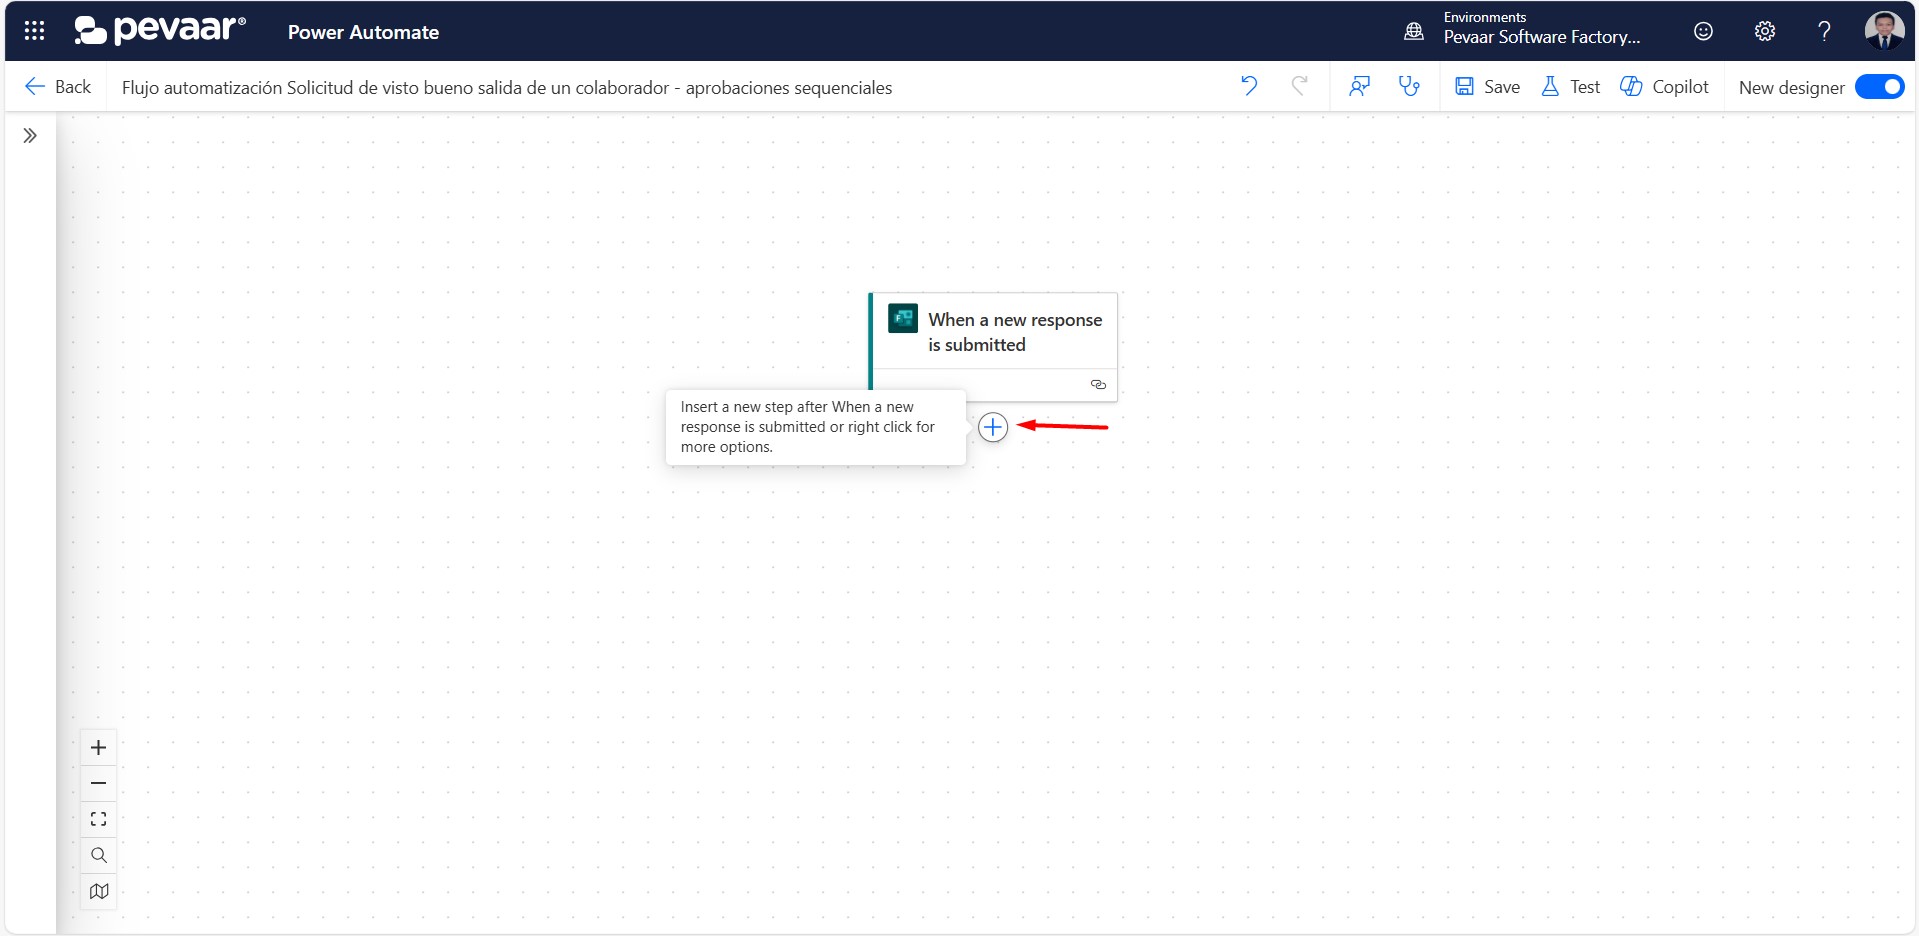
Image 4
In the search bar, type the name of the application associated with the new action—in this case, Forms—and select the appropriate option from the list (see Image 5).
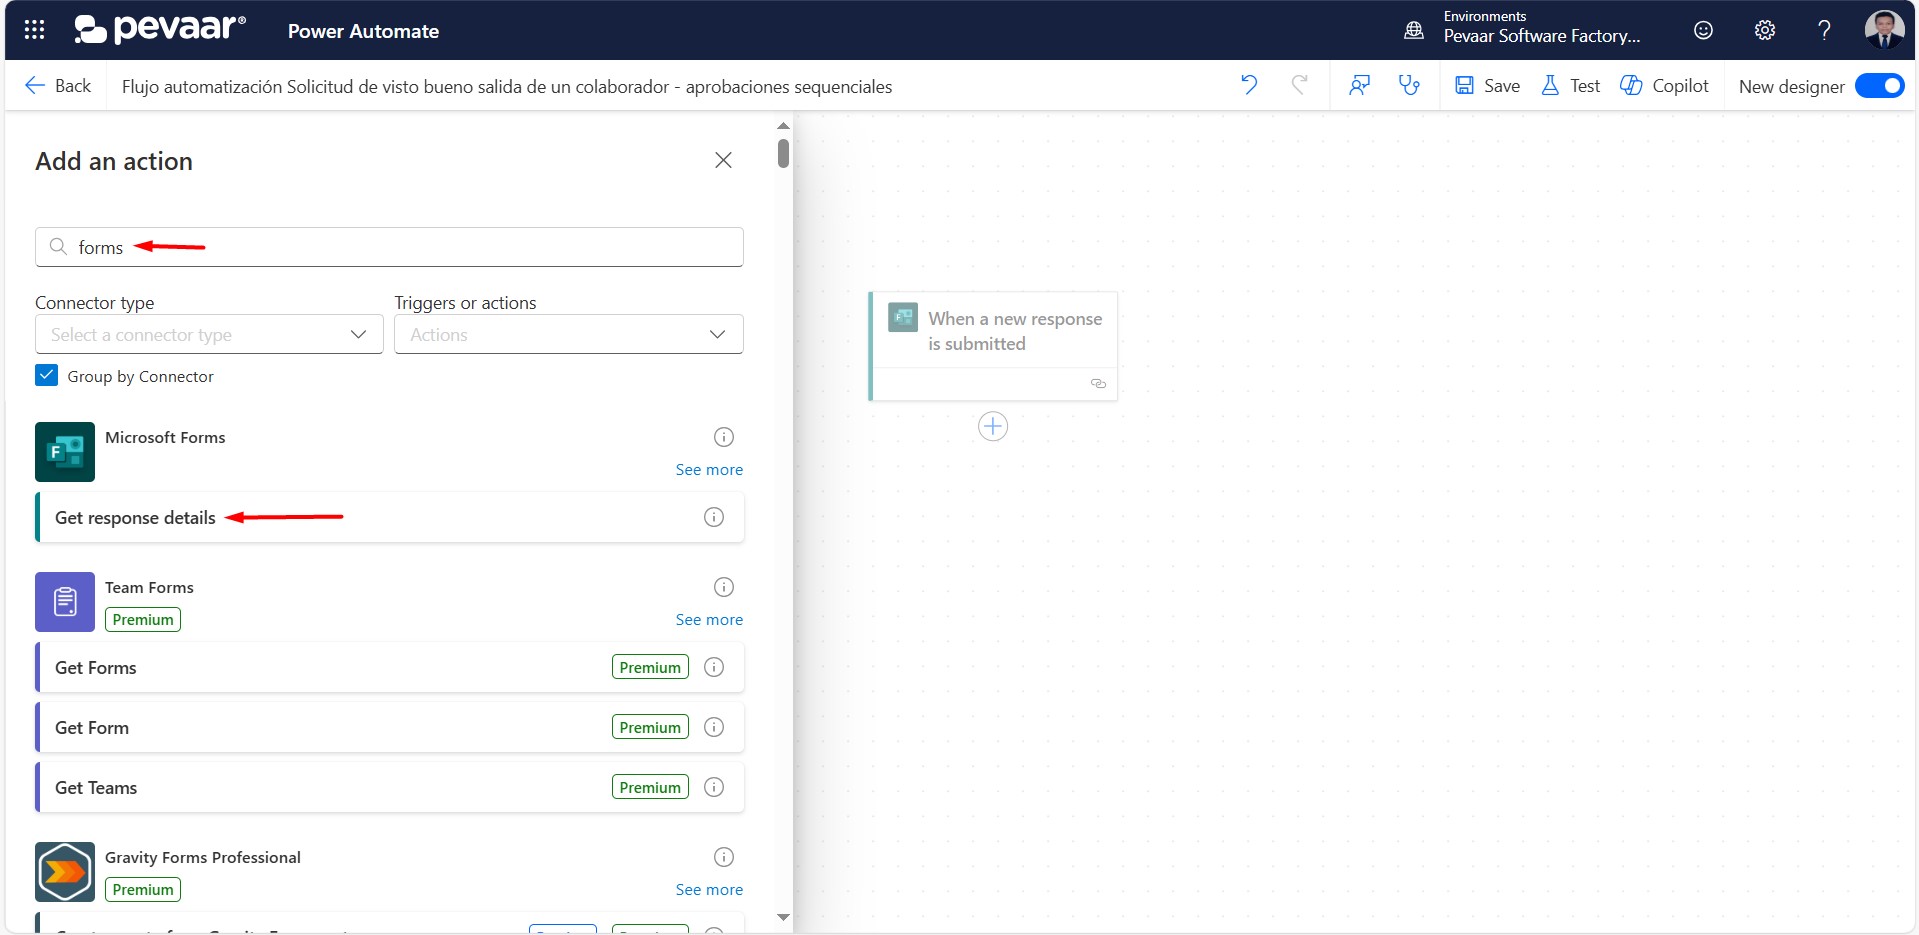
Image 5
1.2. The next action to add to the flow is “Get response details”. Here, you also need to select the corresponding Form ID: “Paz y salvo administrativo – Código RH-F-008-V02″ (see Image 6). As before, all the forms created by the user will appear in the dropdown list. Next, select “Response ID” from the dynamic content options (see Image 7).
This step allows the flow to retrieve the answers to all the questions in the form.
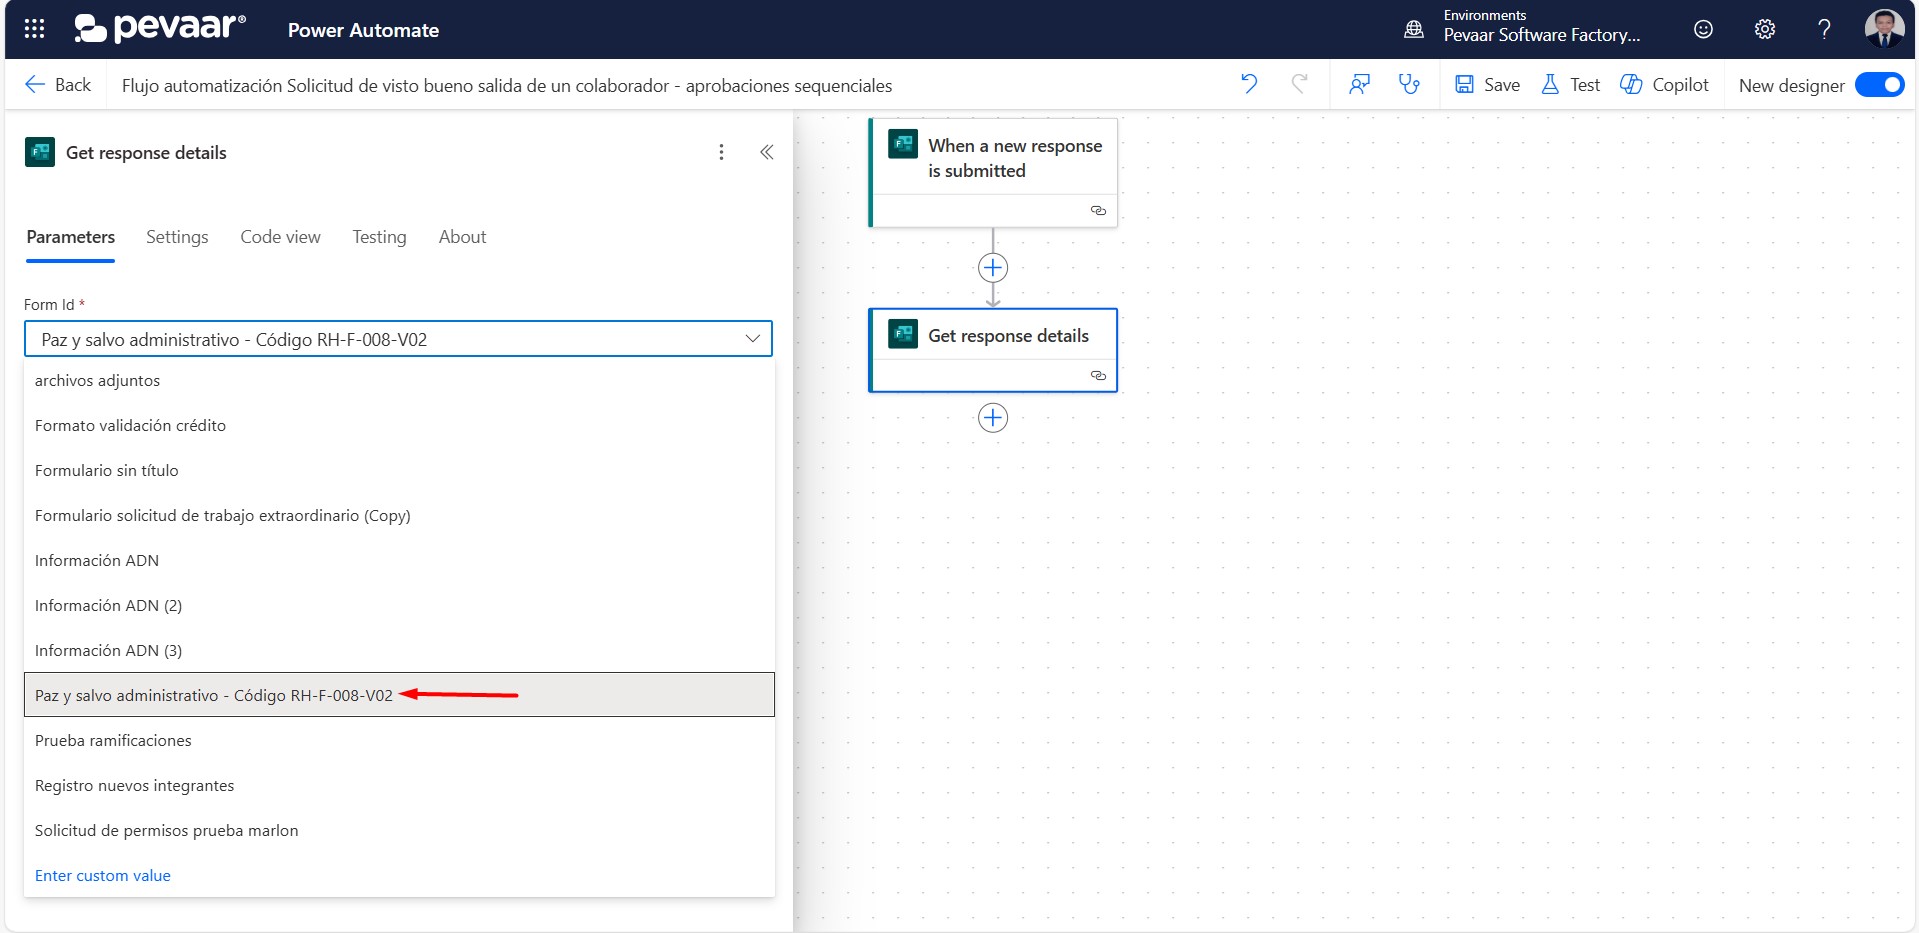
Image 6
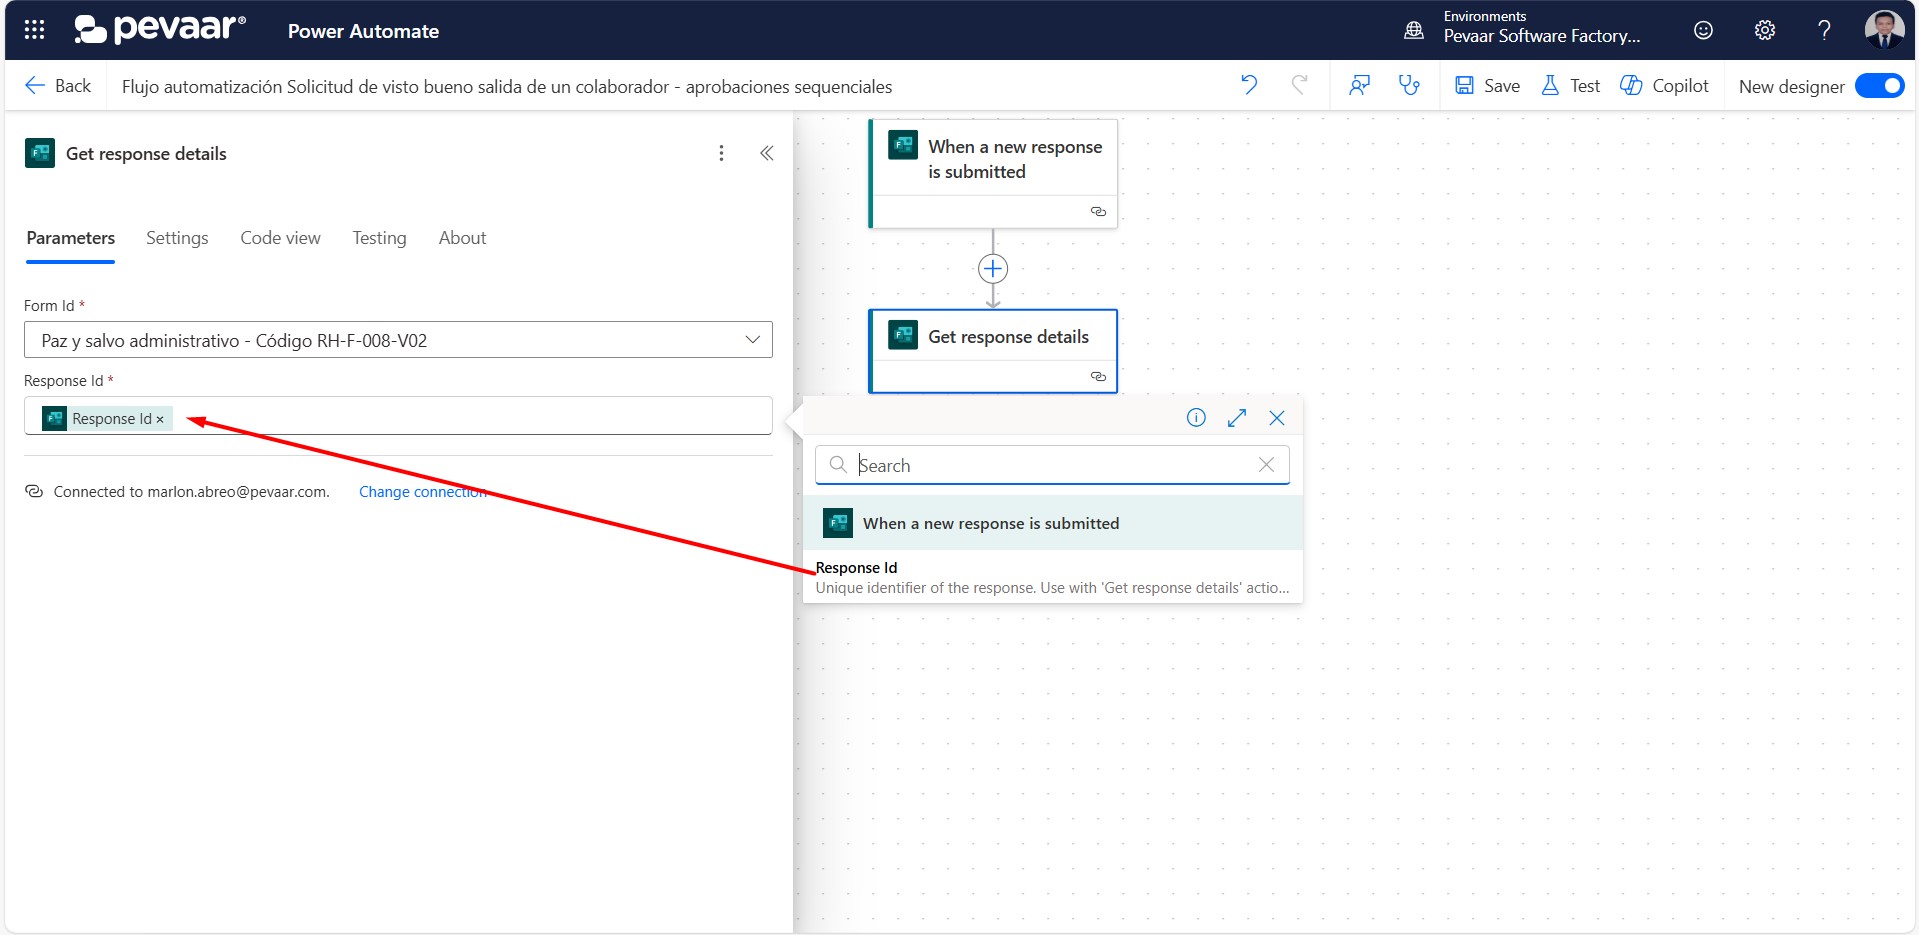
Image 7
1.3. The third action is “Convert time zone”, which is used to retrieve the date when the form was submitted. This date will later be used to populate the “Date” field in the Word document.
In the action search bar, type the keyword “convert time zone” and select the “Convert time zone” option from the list (see Image 8).
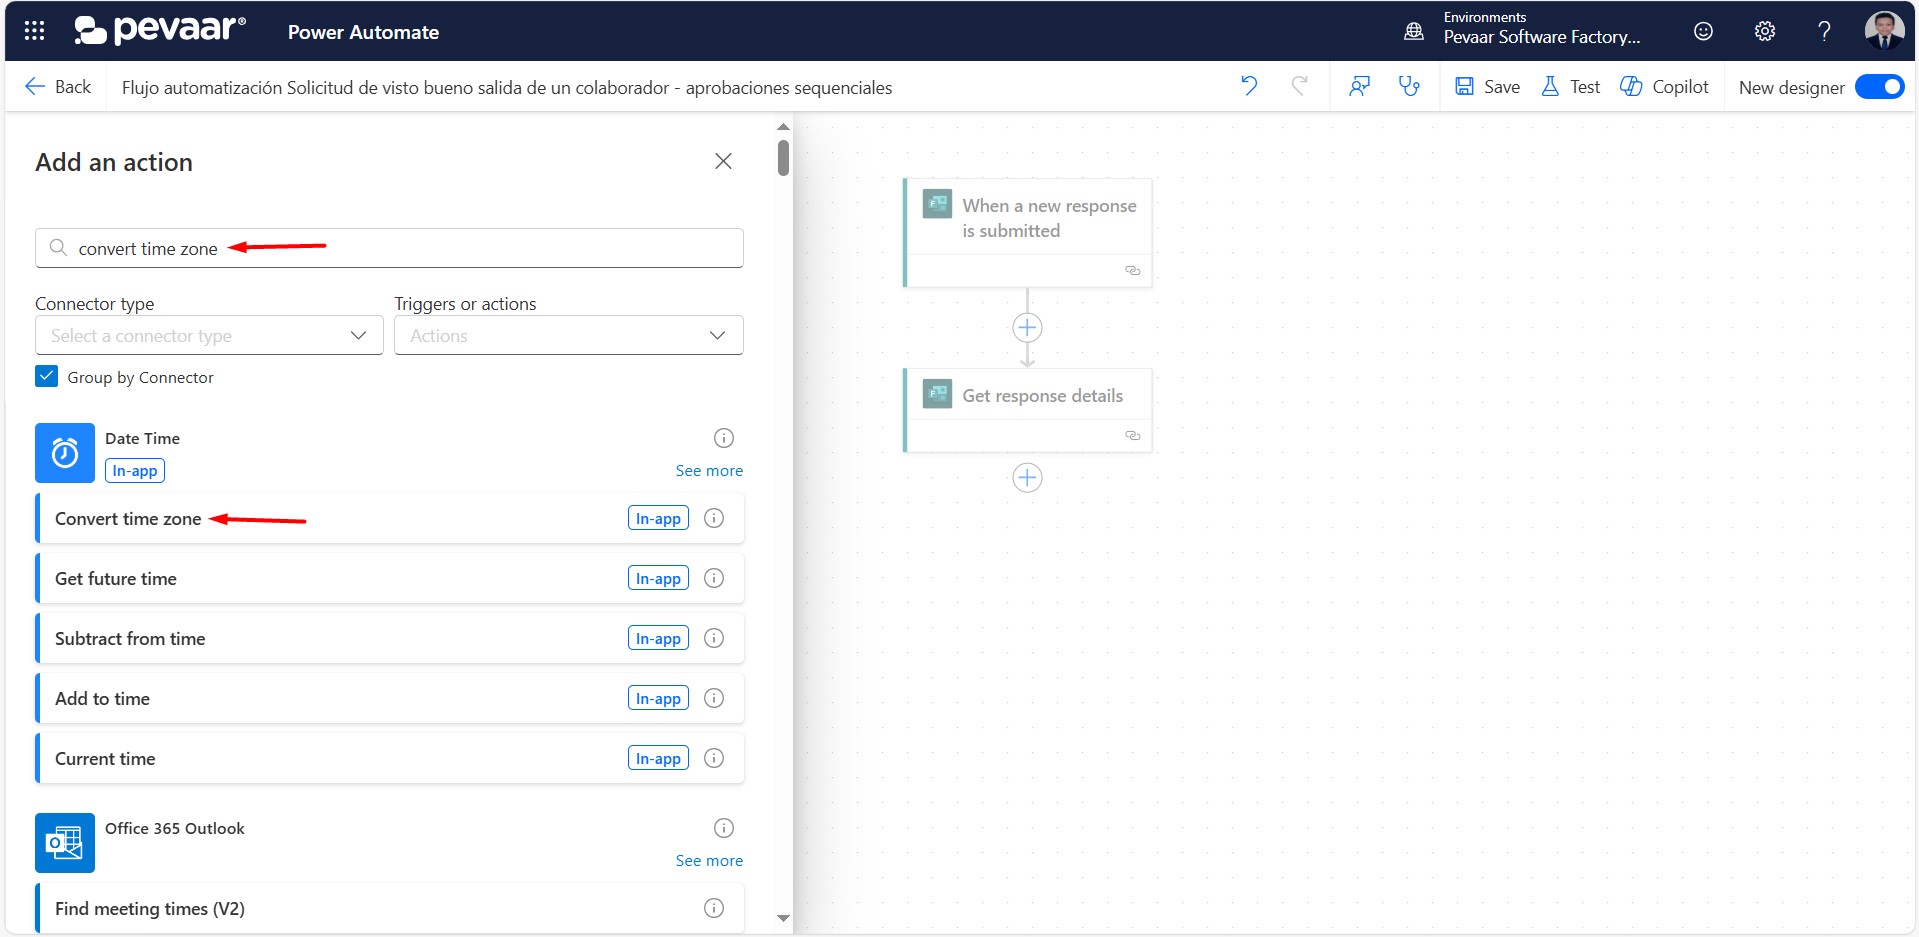
Image 8
1.3.1 Once the action has been added, you must complete the fields: “Base Time”, which refers to the base time to be converted; “Source Time Zone”, which is the original time zone; “Destination Time Zone”, the target time zone to which you want to convert the base time; and “Time Unit”, which defines the desired date format. (See Image 9)
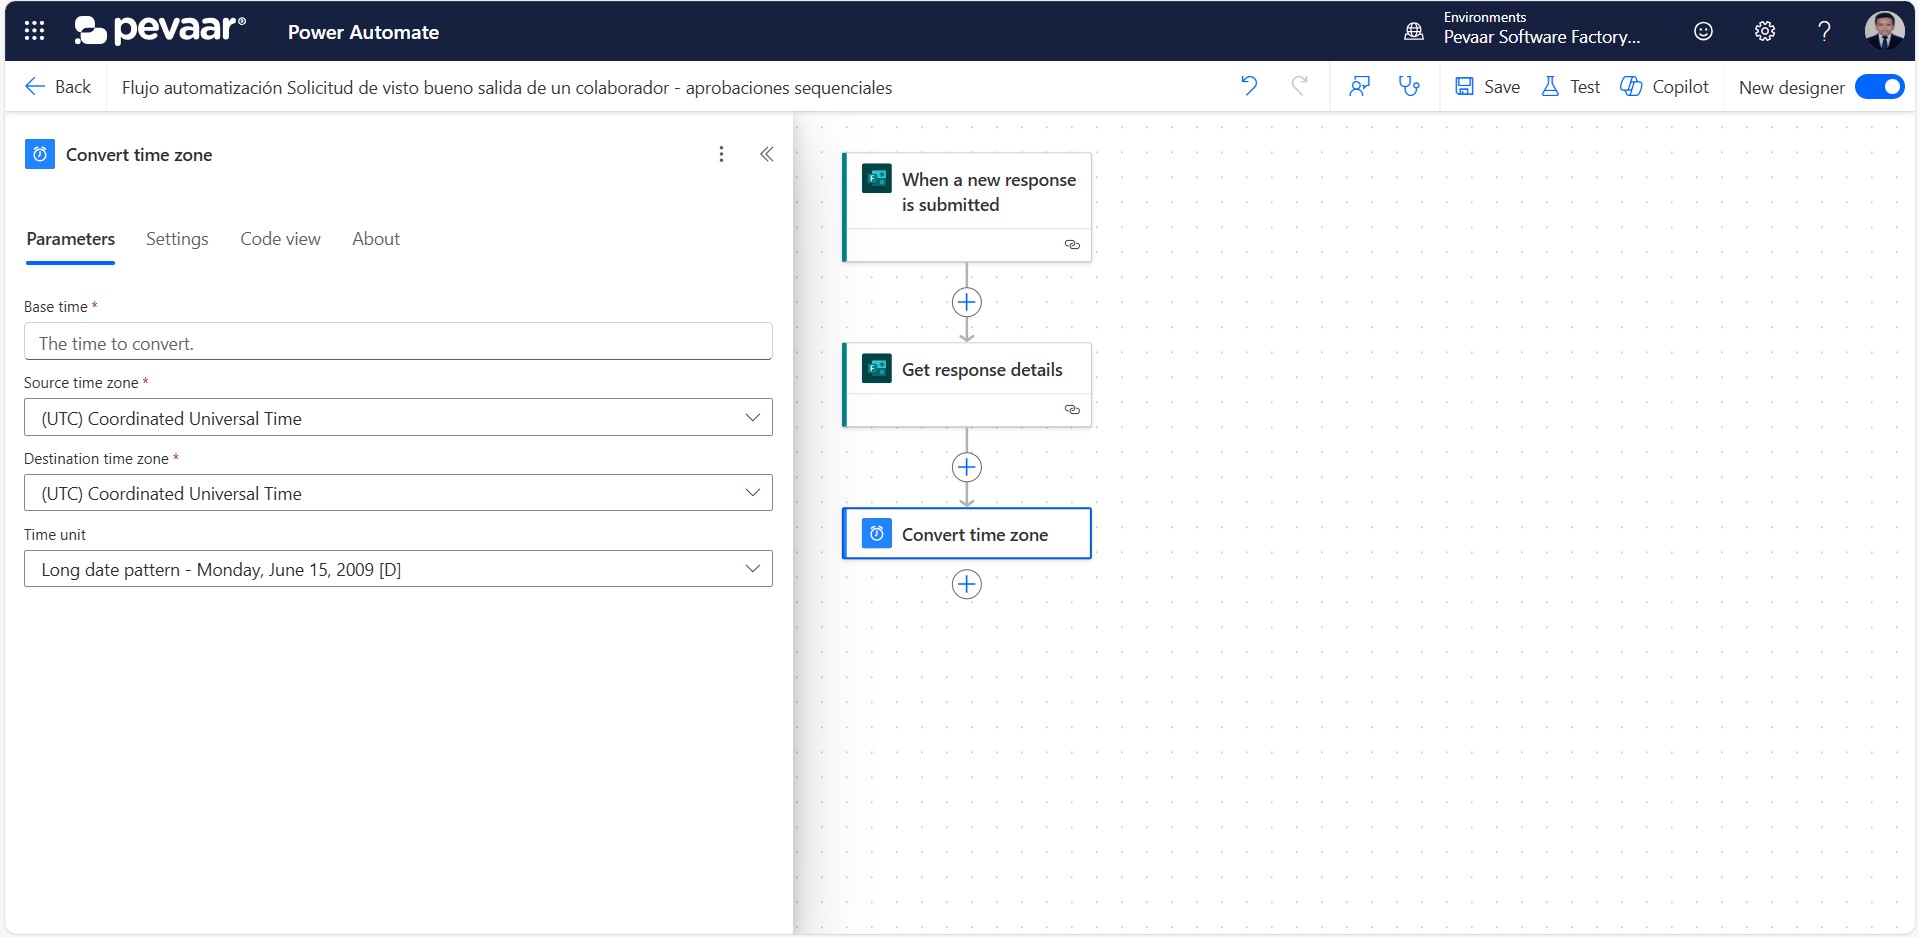
Image 9
In Base Time, you will select the form submission date dynamically. To find the submission date, click on “See more” next to the “Get response details” action (see Image 10).
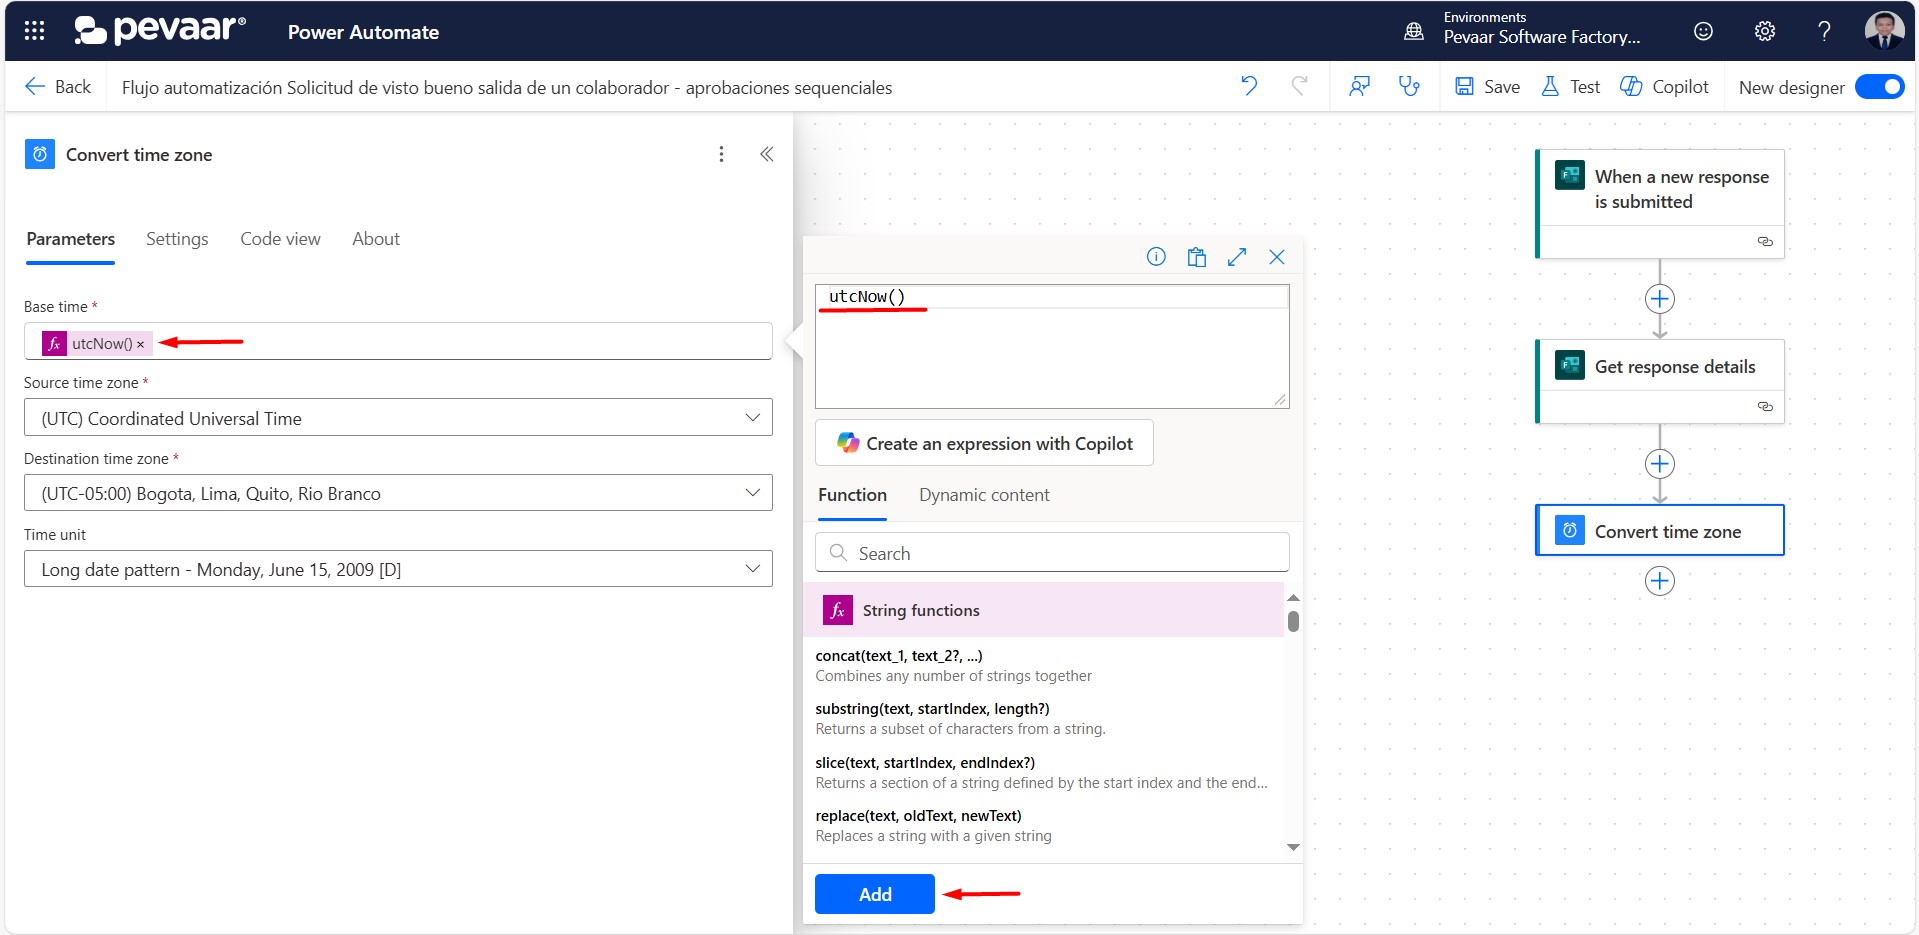
Image 10
In Source Time Zone, leave the default option: “(UTC) Coordinated Universal Time”. For Destination Time Zone, select your local time zone—in this case, UTC -05:00 (see Image 11).
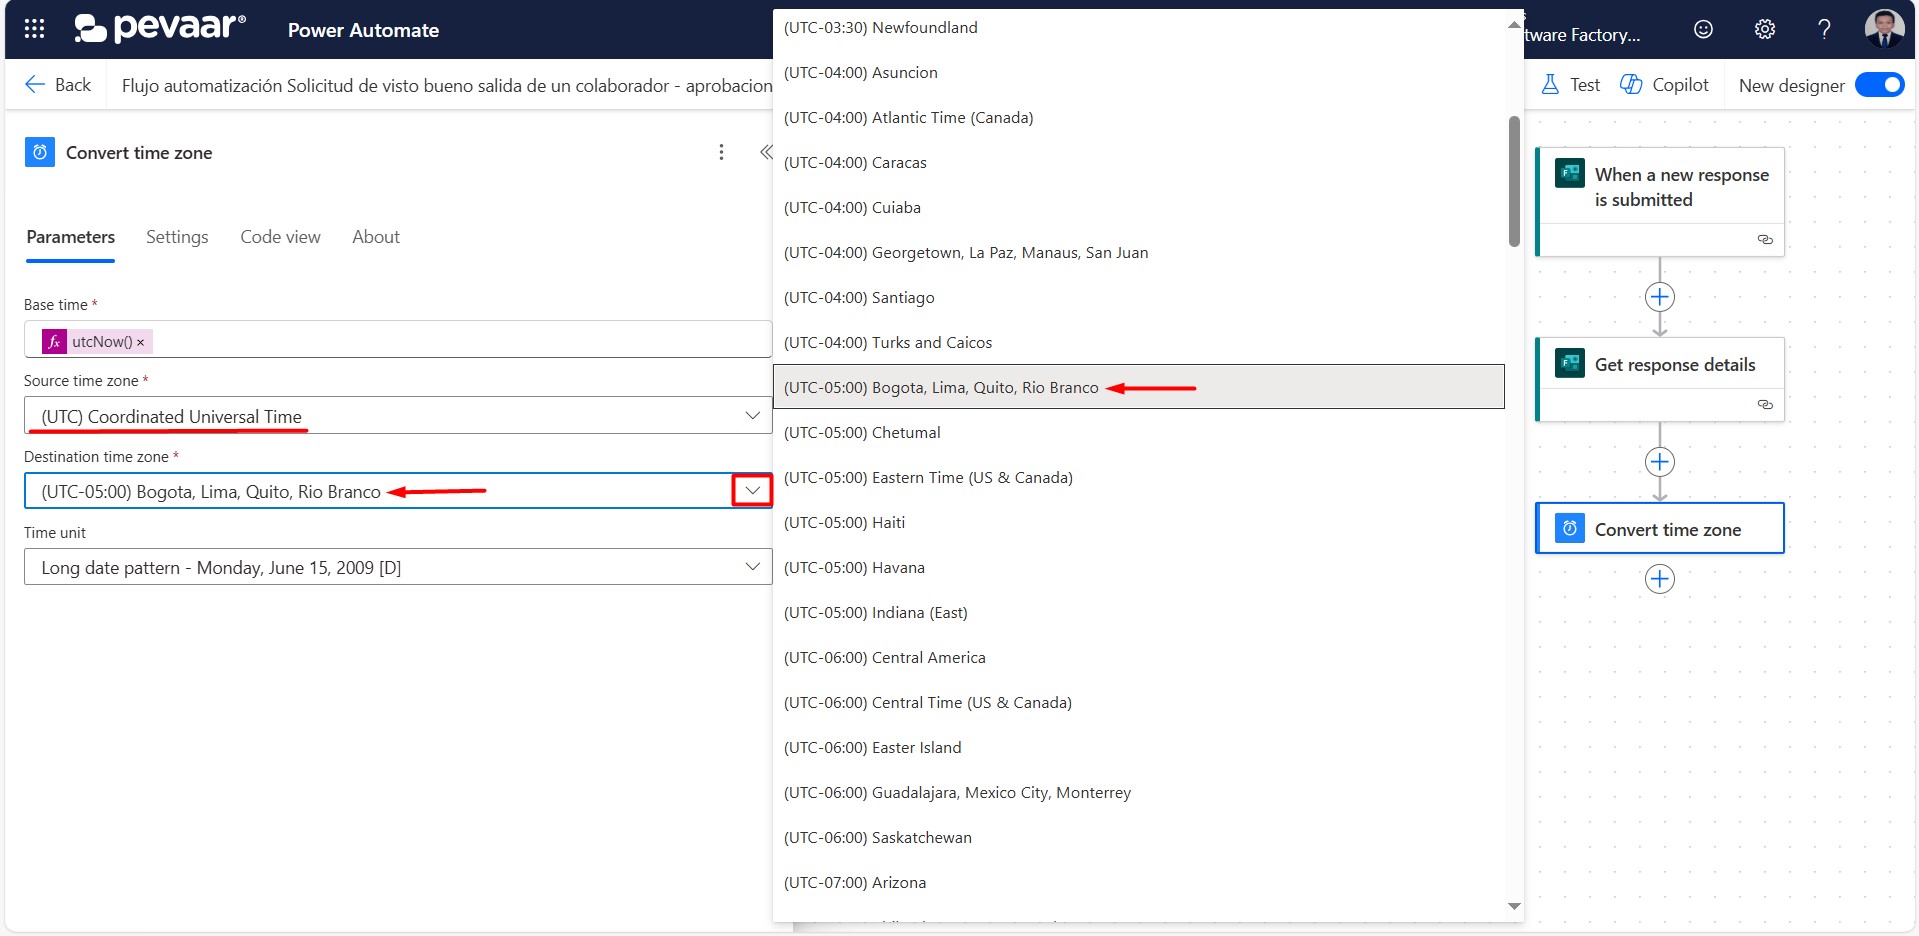
Image 11
In Time Unit, select the date format that best suits your needs. In this case, choose “Long date pattern [D]” (see Image 12).
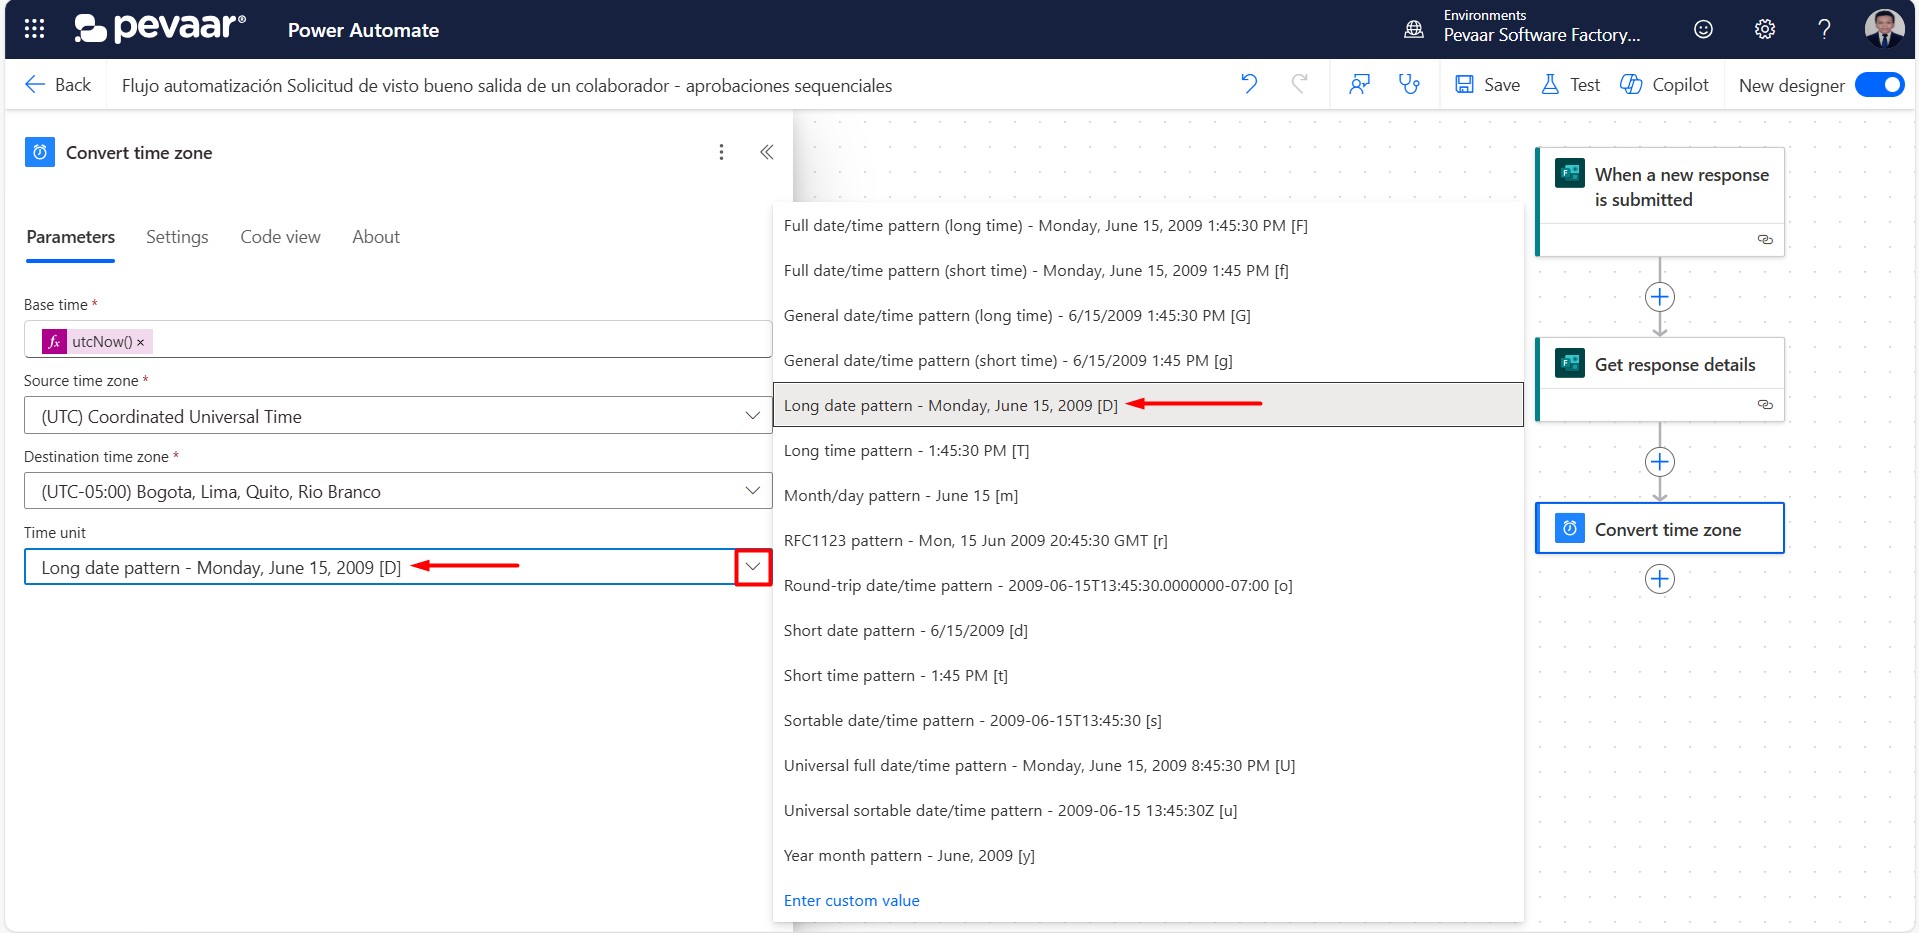
Image 12
1.4. The fourth action is a “Condition”. It checks whether the reason for issuing the clearance form is resignation. If the condition is true, the “Reason: Resignation” field will be filled in the document. If the condition is false, the “Reason: Transfer” field will be filled instead.
In the action search bar, type the keyword “condition” and select the “Condition” option (see Image 13).
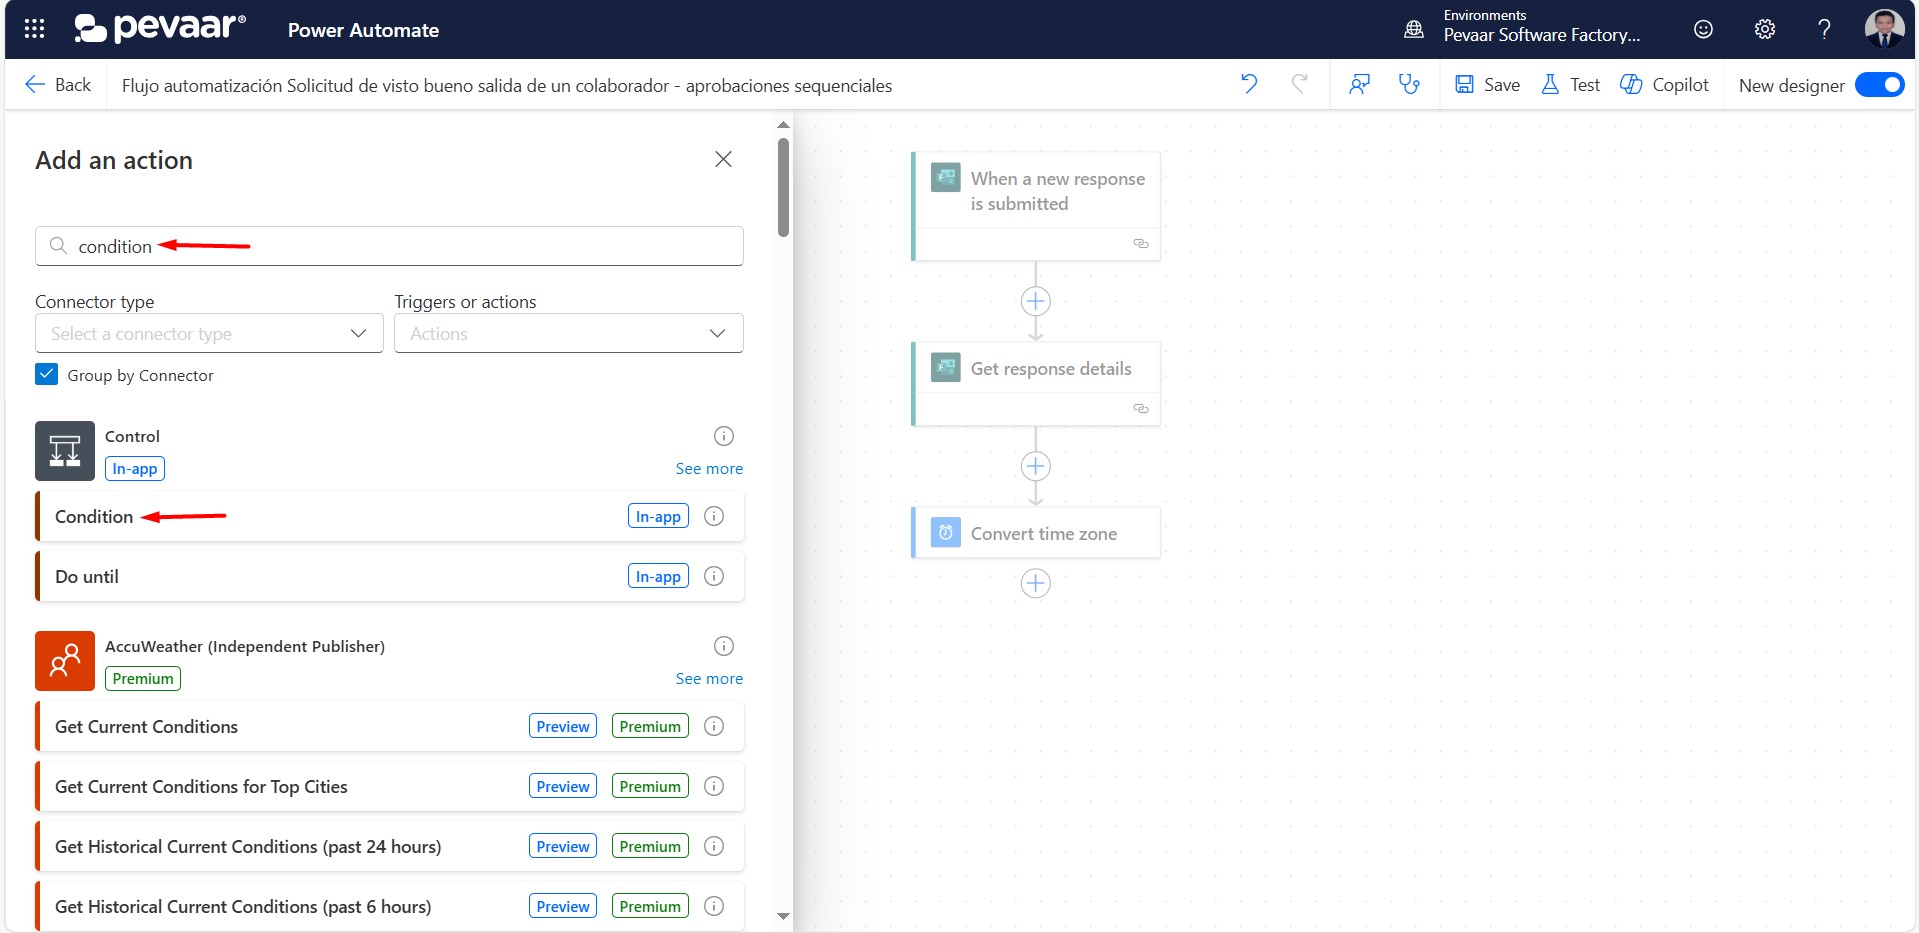
Image 13
1.4.1. In the first parameter of the condition expression, you must dynamically select the reason for issuing the clearance form from the form responses (see Image 14).
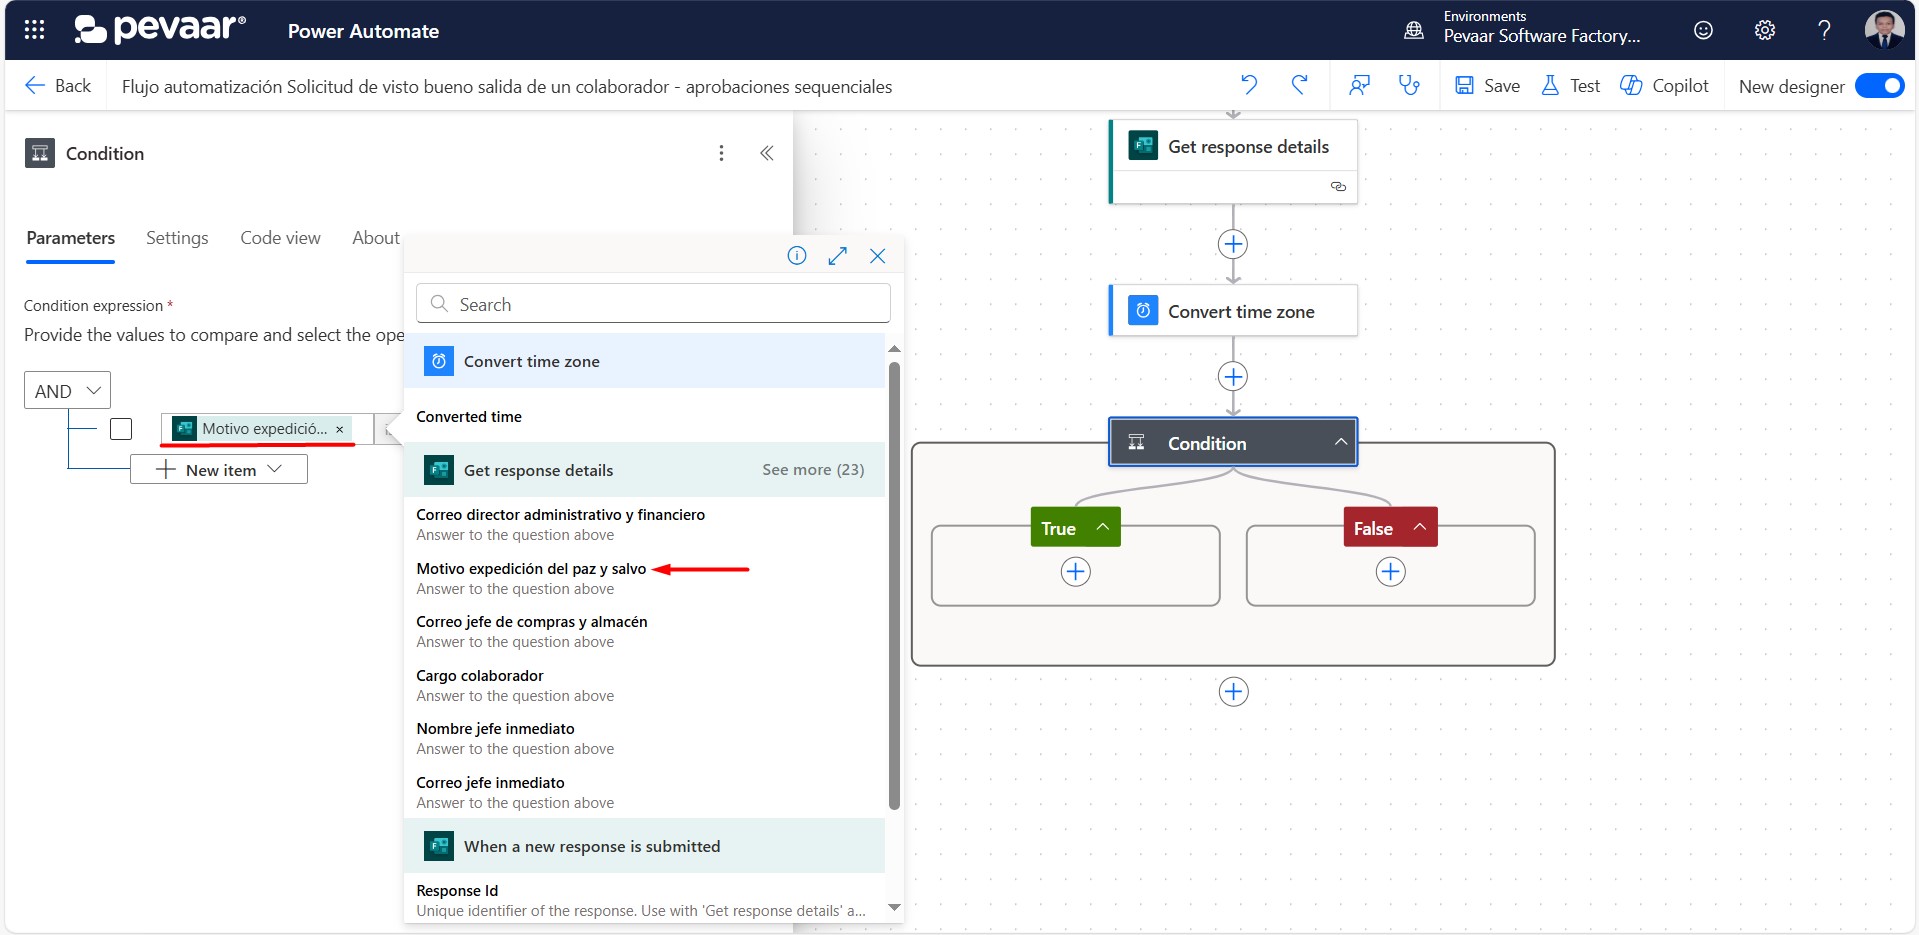
Image 14
In the second parameter, which compares the expression, leave the default option “is equal to”. In the third field, enter “Retiro”, exactly as it appears in the form (see Image 15).
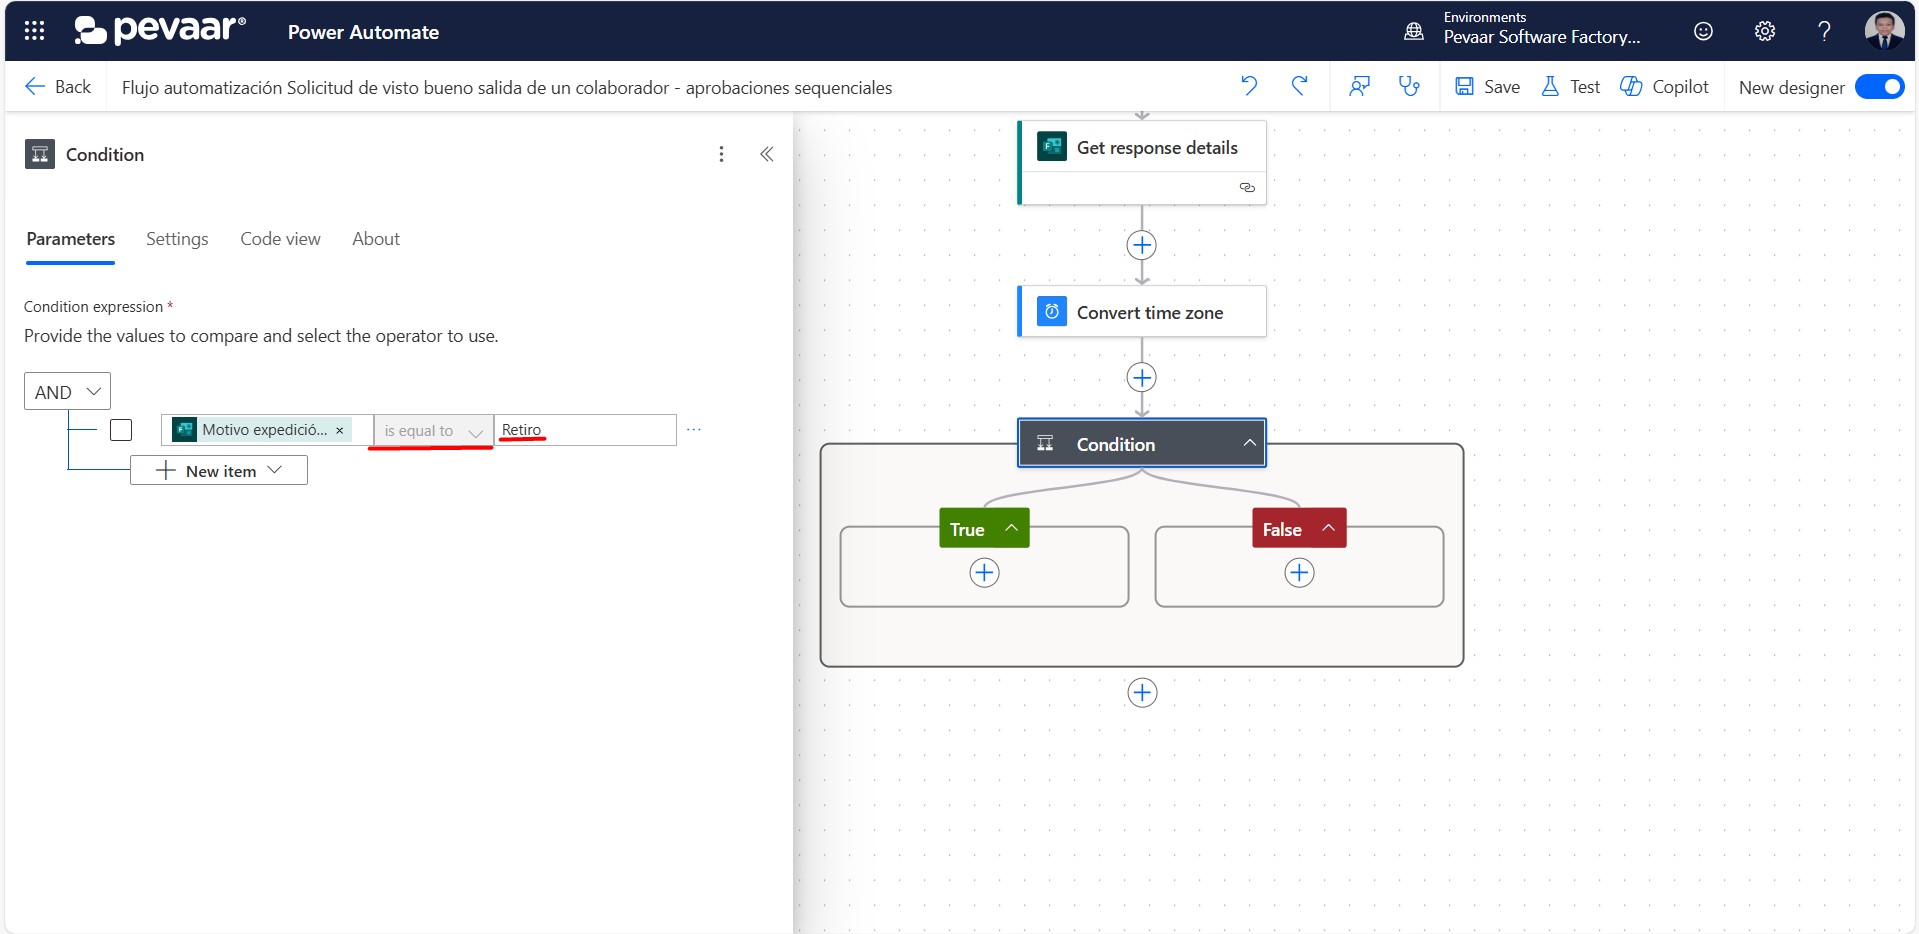
Image 15
1.5. Before continuing, you need to have a template ready to which dynamic content will be added. Once the template is created as desired, the following steps must be done using the desktop version of Word (see Image 16).
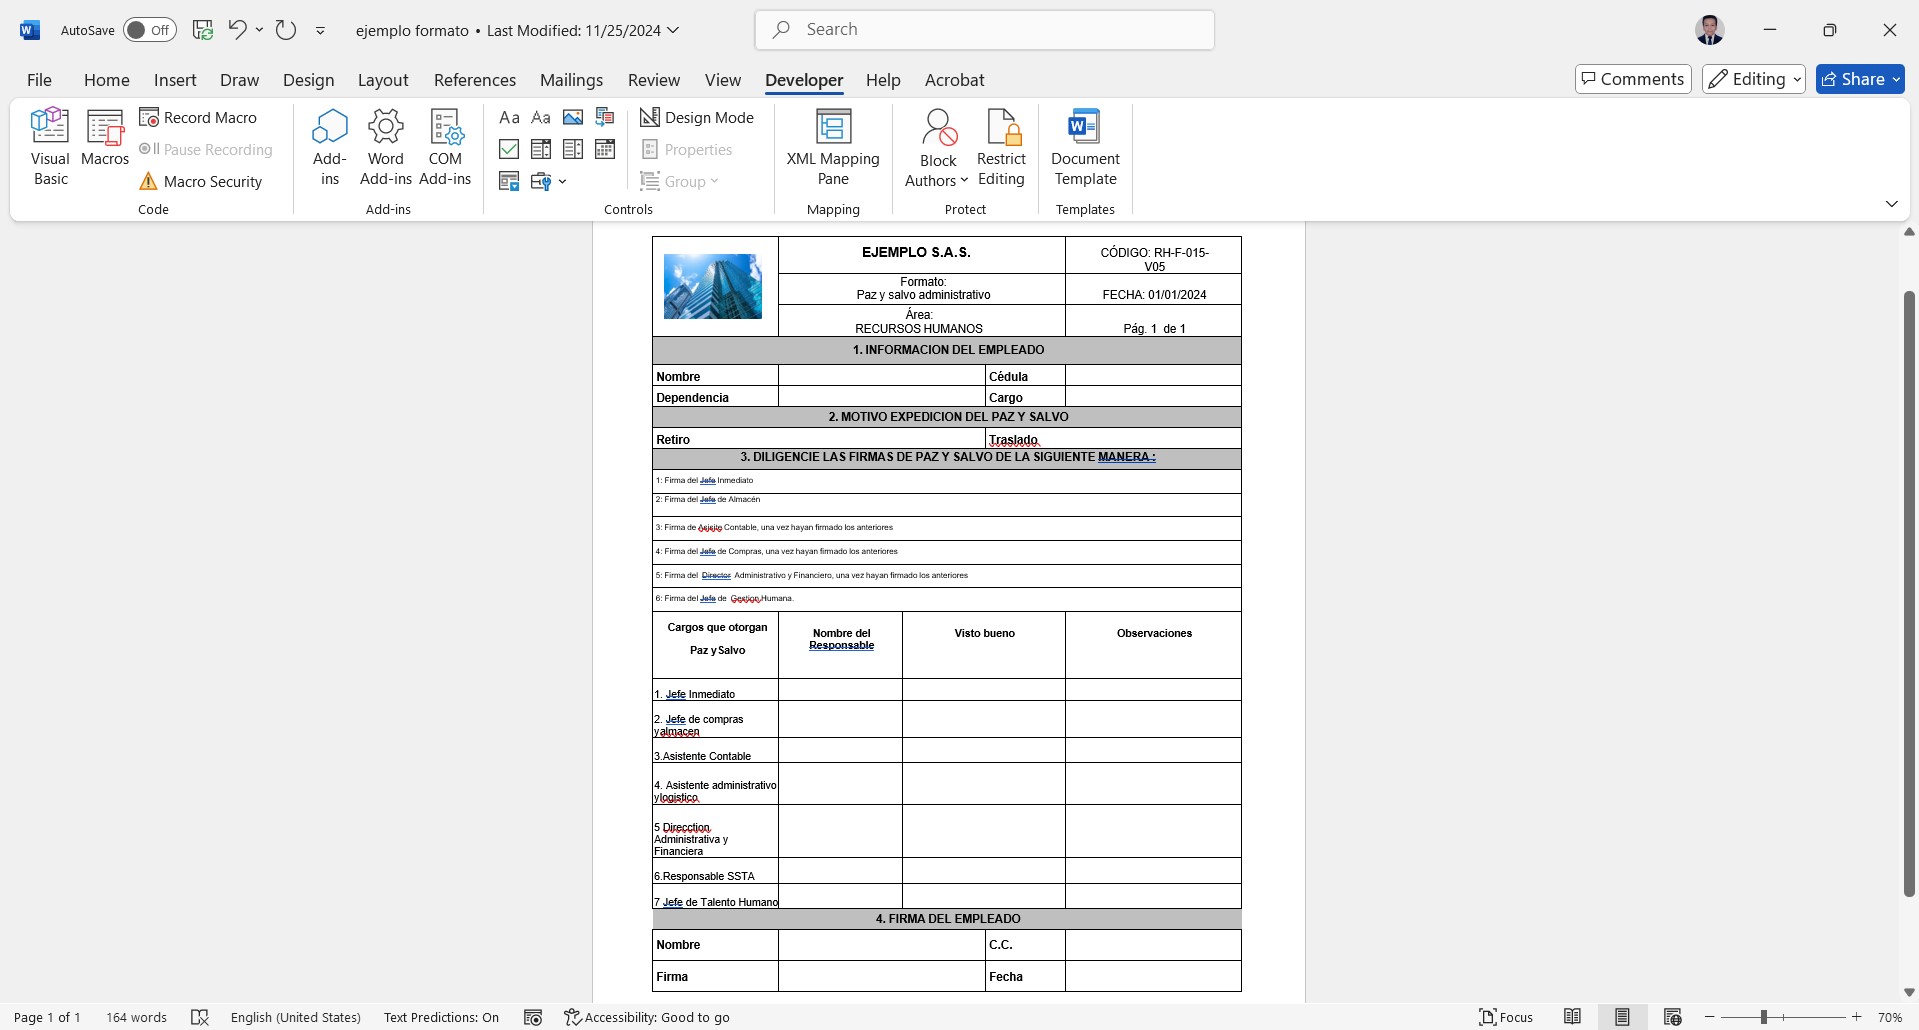
Image 16
1.5.1. The first thing we need to do is enable the Developer tools. To do this, and without closing the designed template, go to File, which is the first tab in the menu (see Image 17).
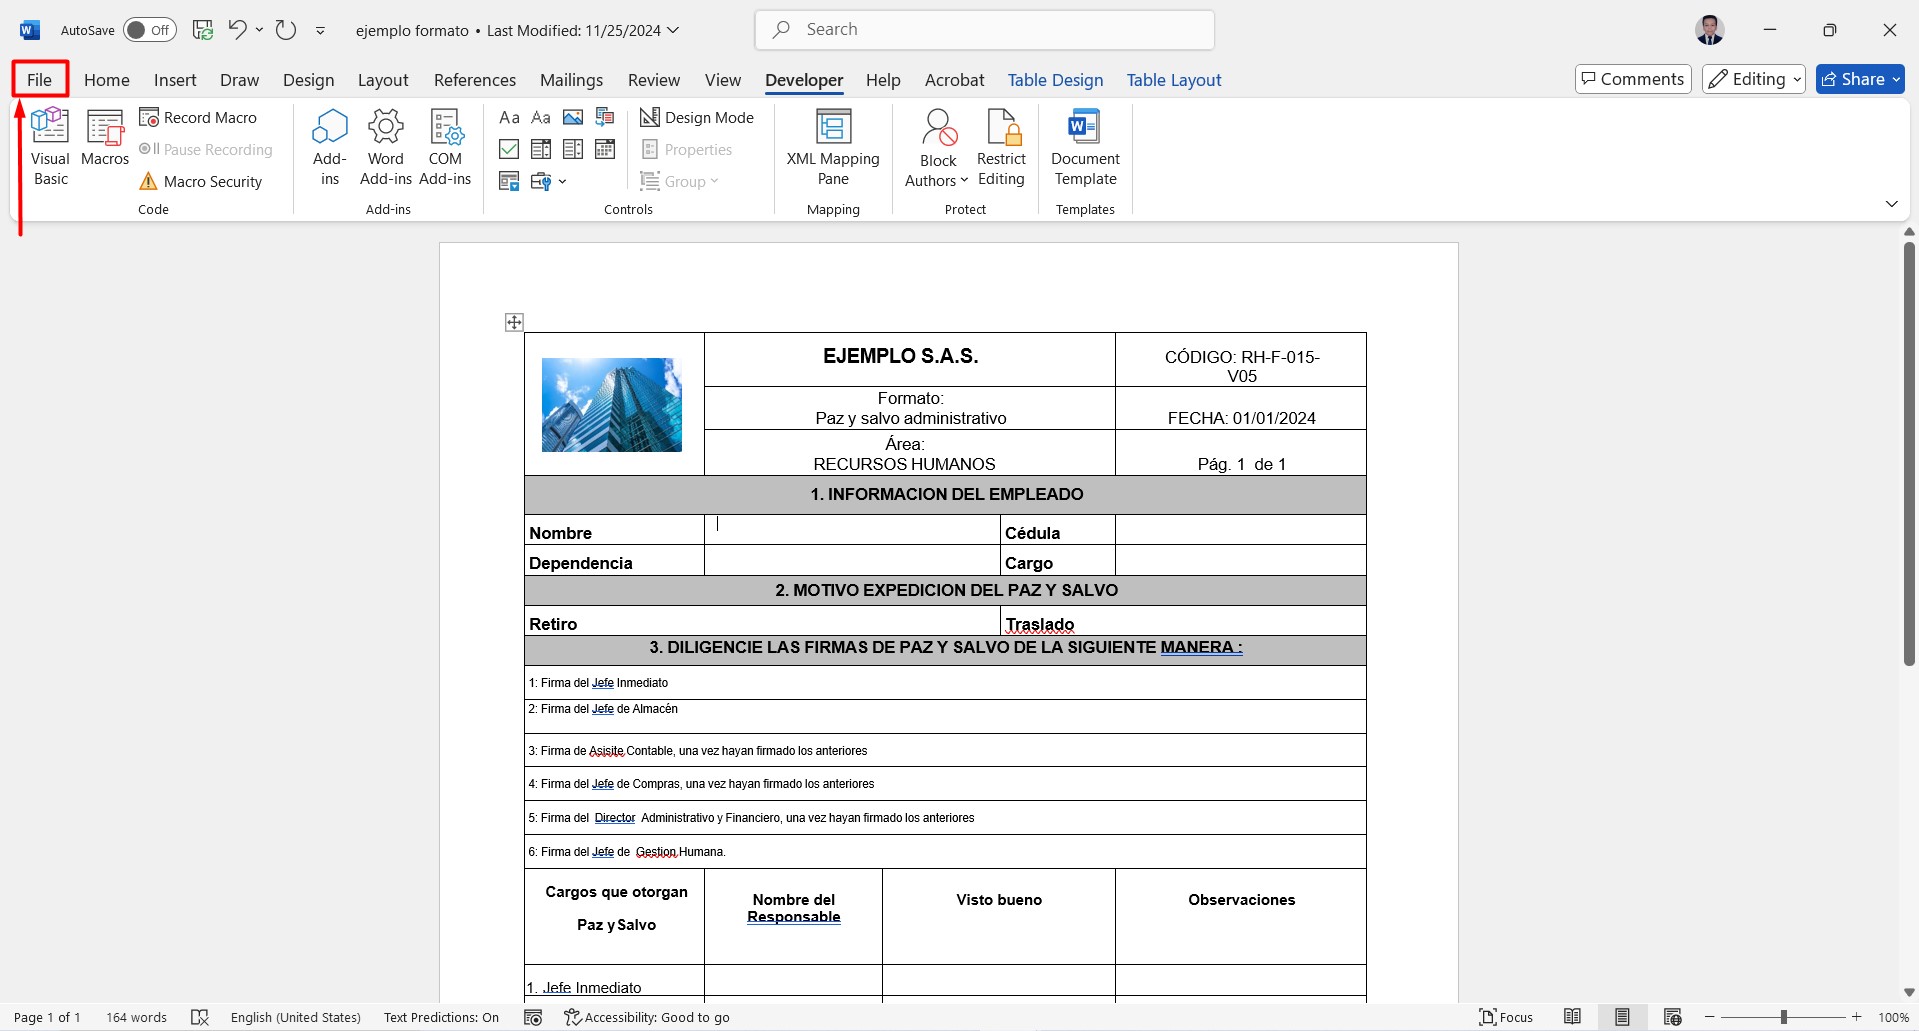
Image 17
Once inside File, click on Options (see Image 18).
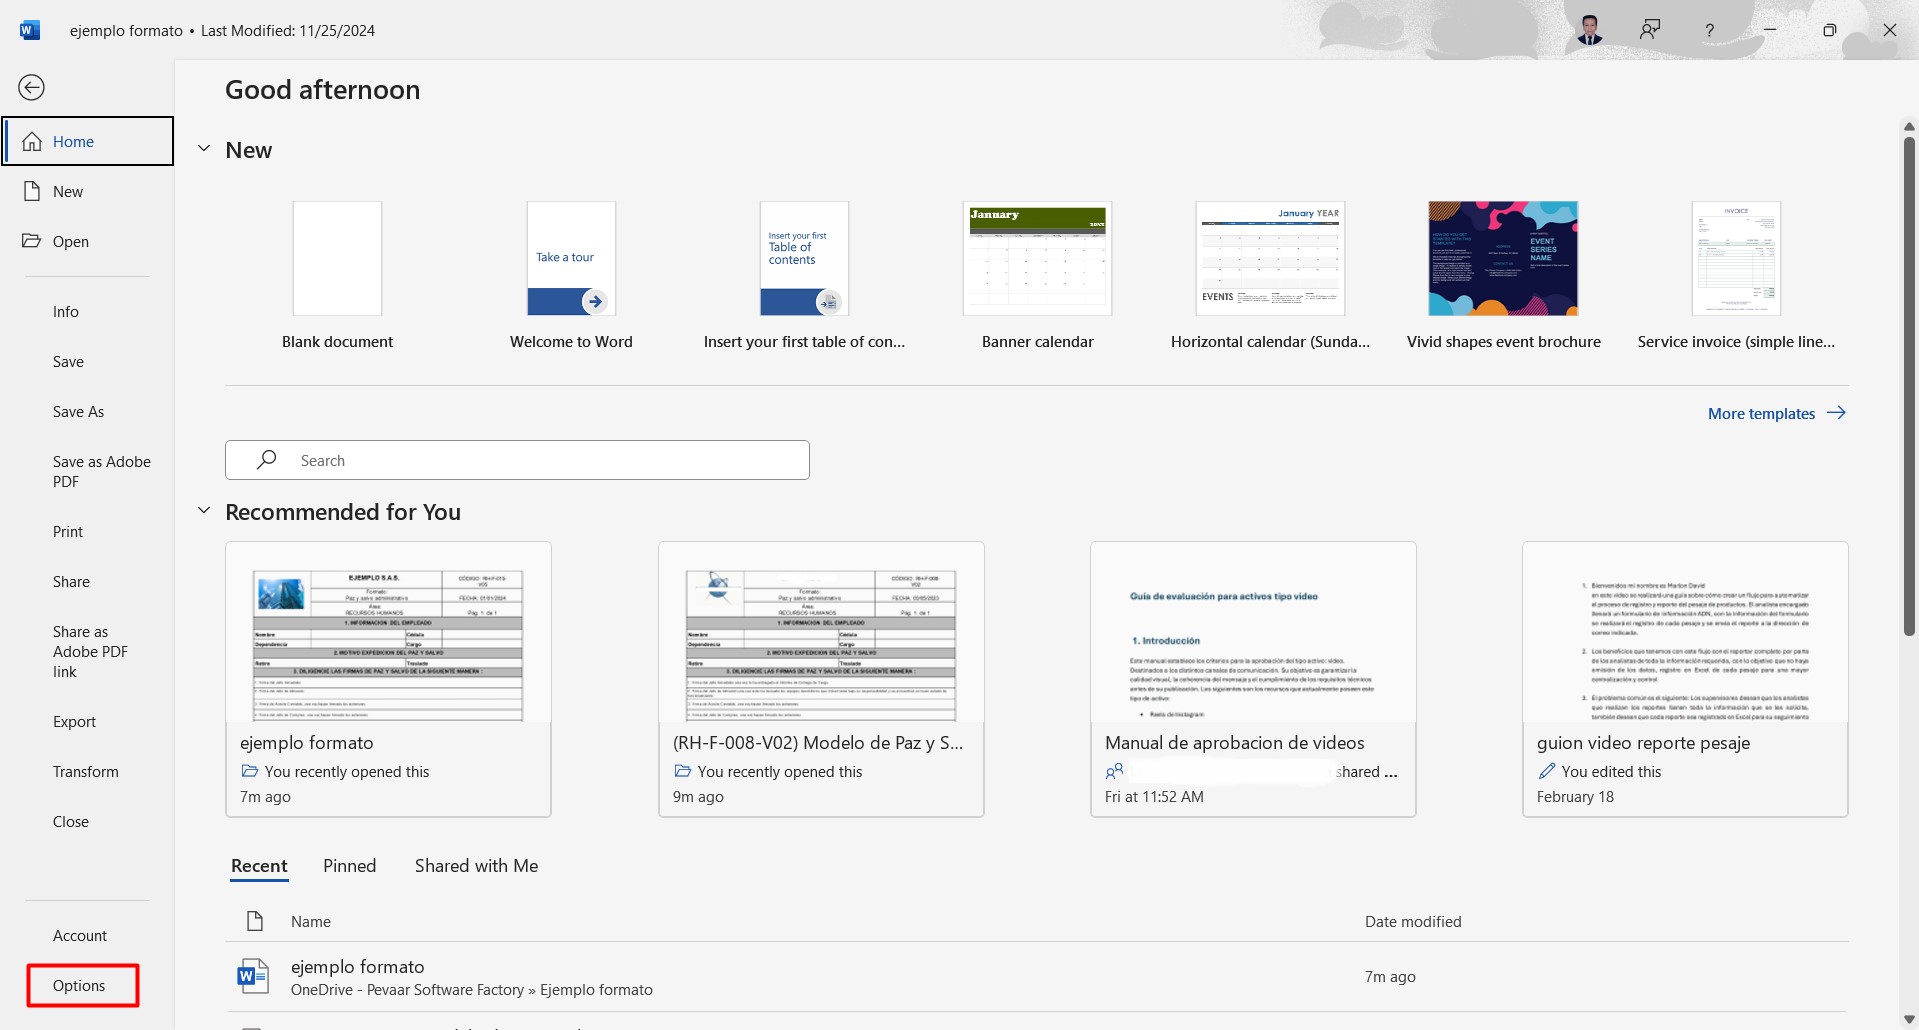
Image 18
In the window that appears, go to the Customize Ribbon section, find the Developer option and check it. Finally, click OK (see Image 19).
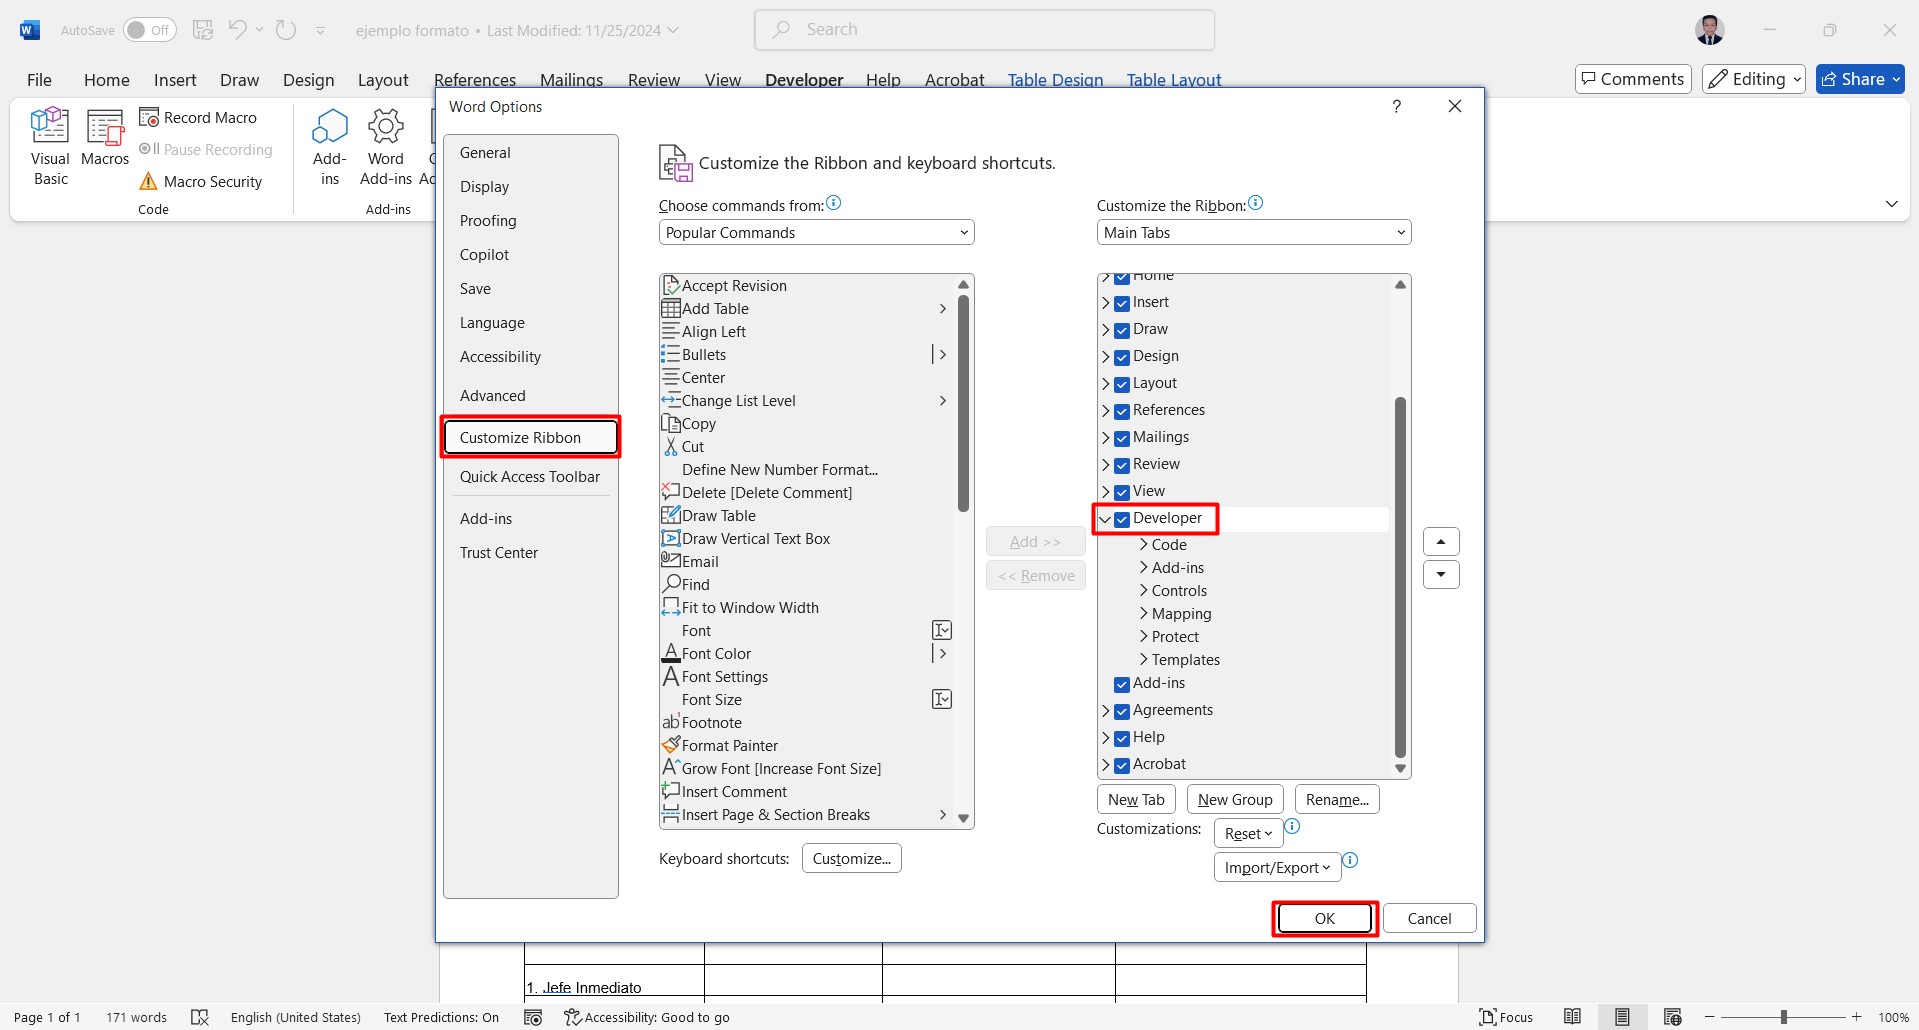
Image 19
1.5.2. Once this is done, we can add dynamic text using the Developer commands. Click on the field where you want to insert the text, then click on Plain Text Content Control (see Image 20).
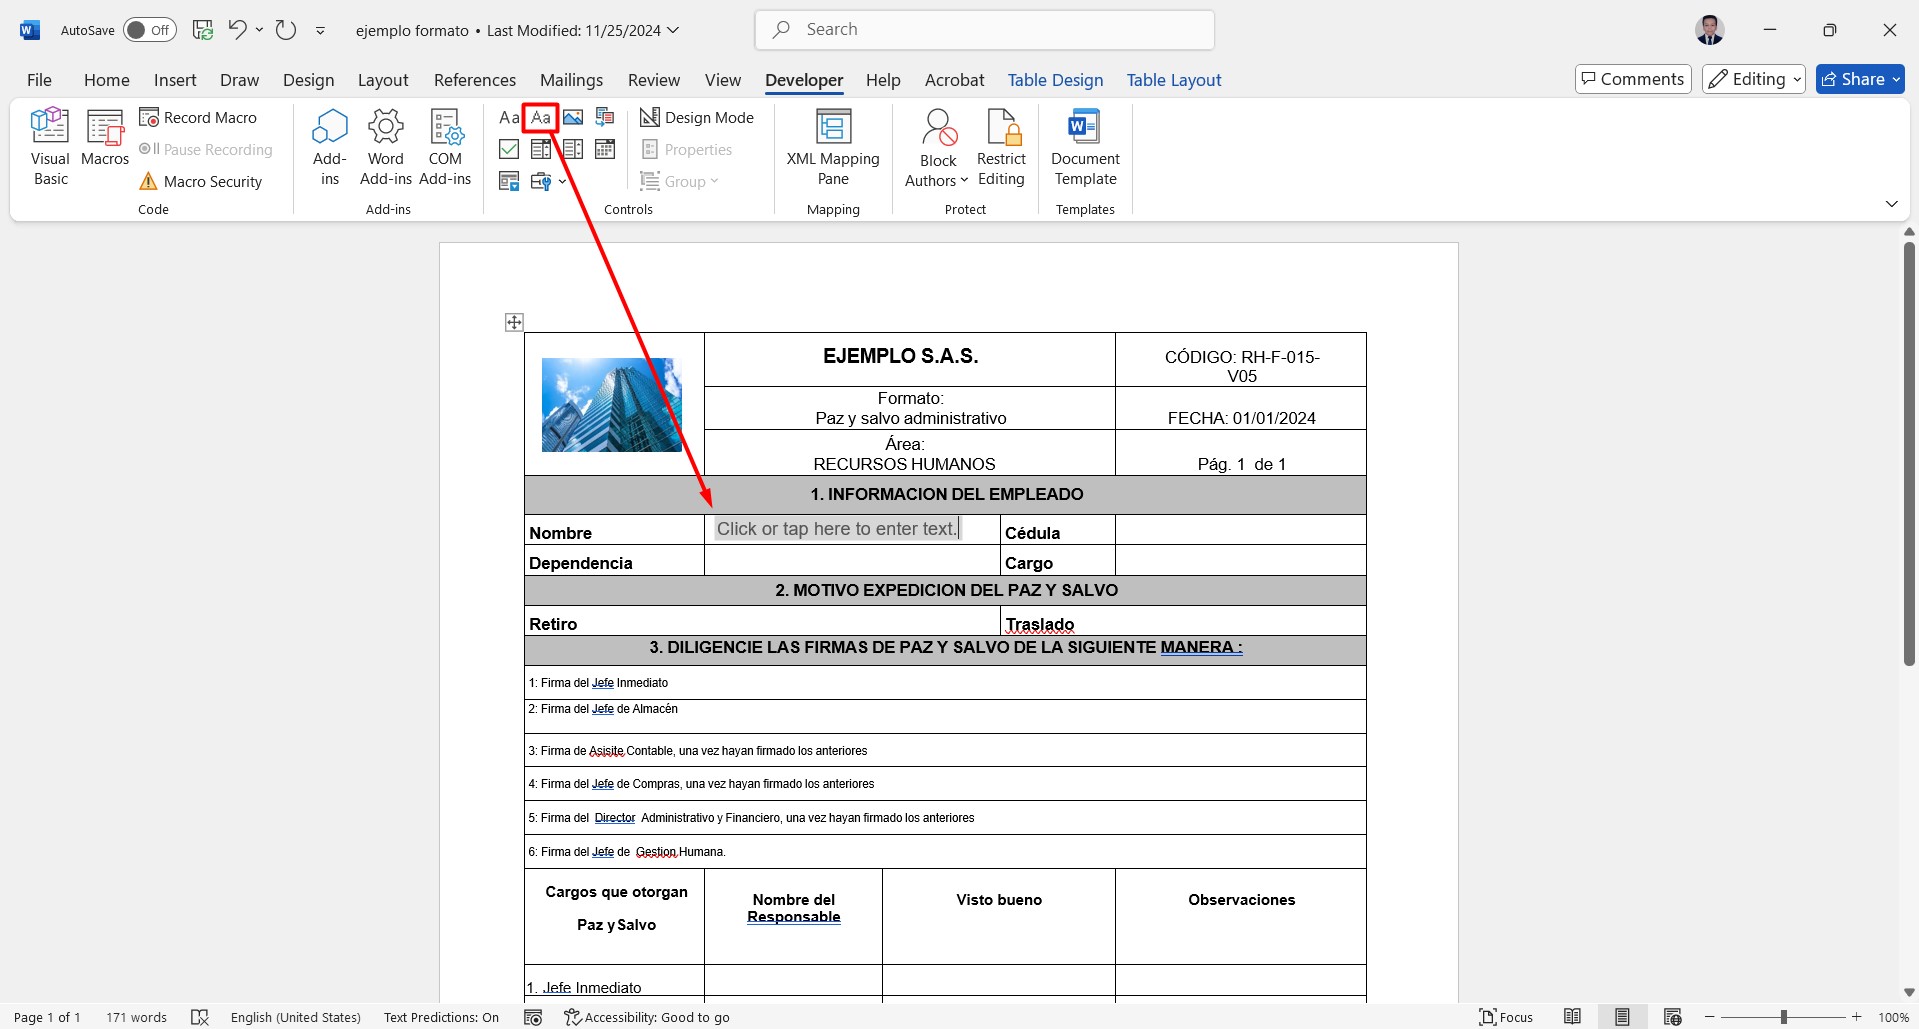
Image 20
To remove the default placeholder text, you can paste a blank space. We recommend the following page: Espacio invisible — Pequeño ( ) Mediano (ᅠ) Grande (ㅤ) ❤️ , Then, assign a title to the text field. To do this, without exiting the selected text box, click on Properties, add a descriptive Title for the field, and click OK. The Tag will be automatically added once you exit the properties window (see Image 21).
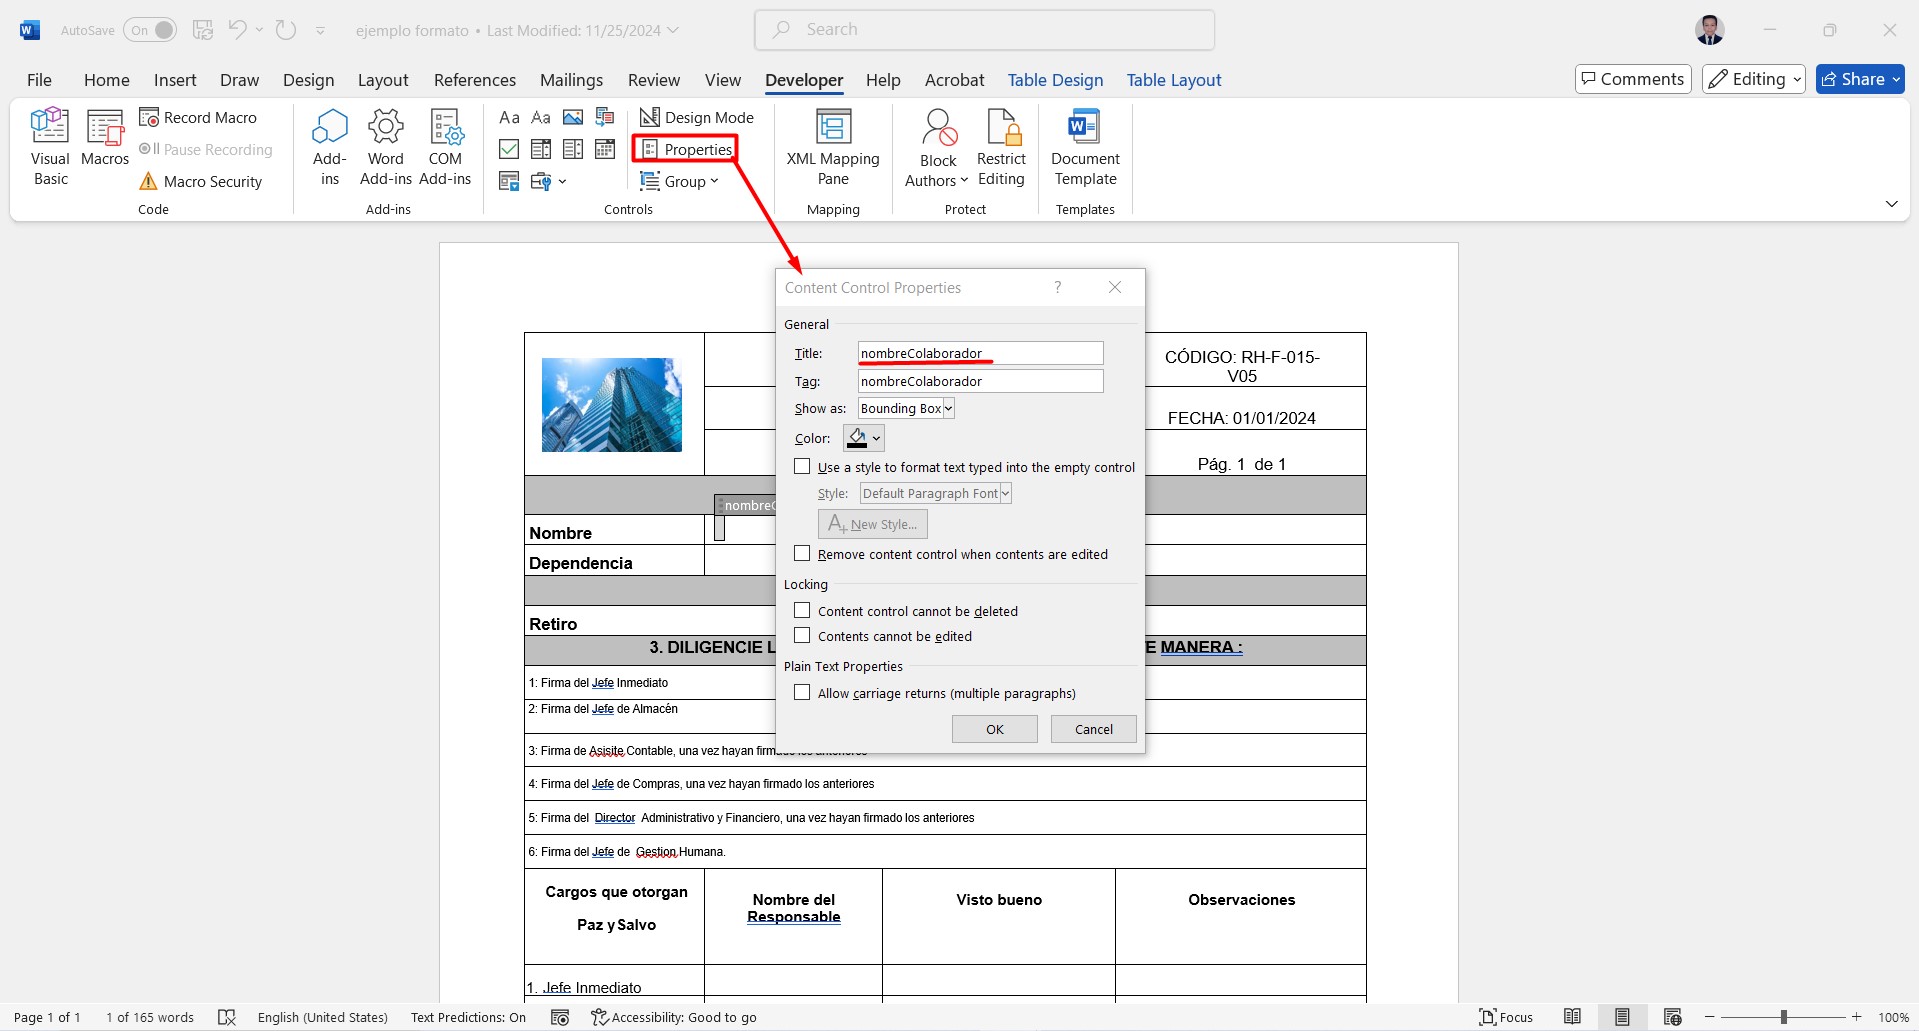
Image 21
In this case, repeat the process from section 1.5.2 for all the fields highlighted in red. Once finished, save the template in a folder on OneDrive. You can also save the file to a SharePoint site (see Image 22).
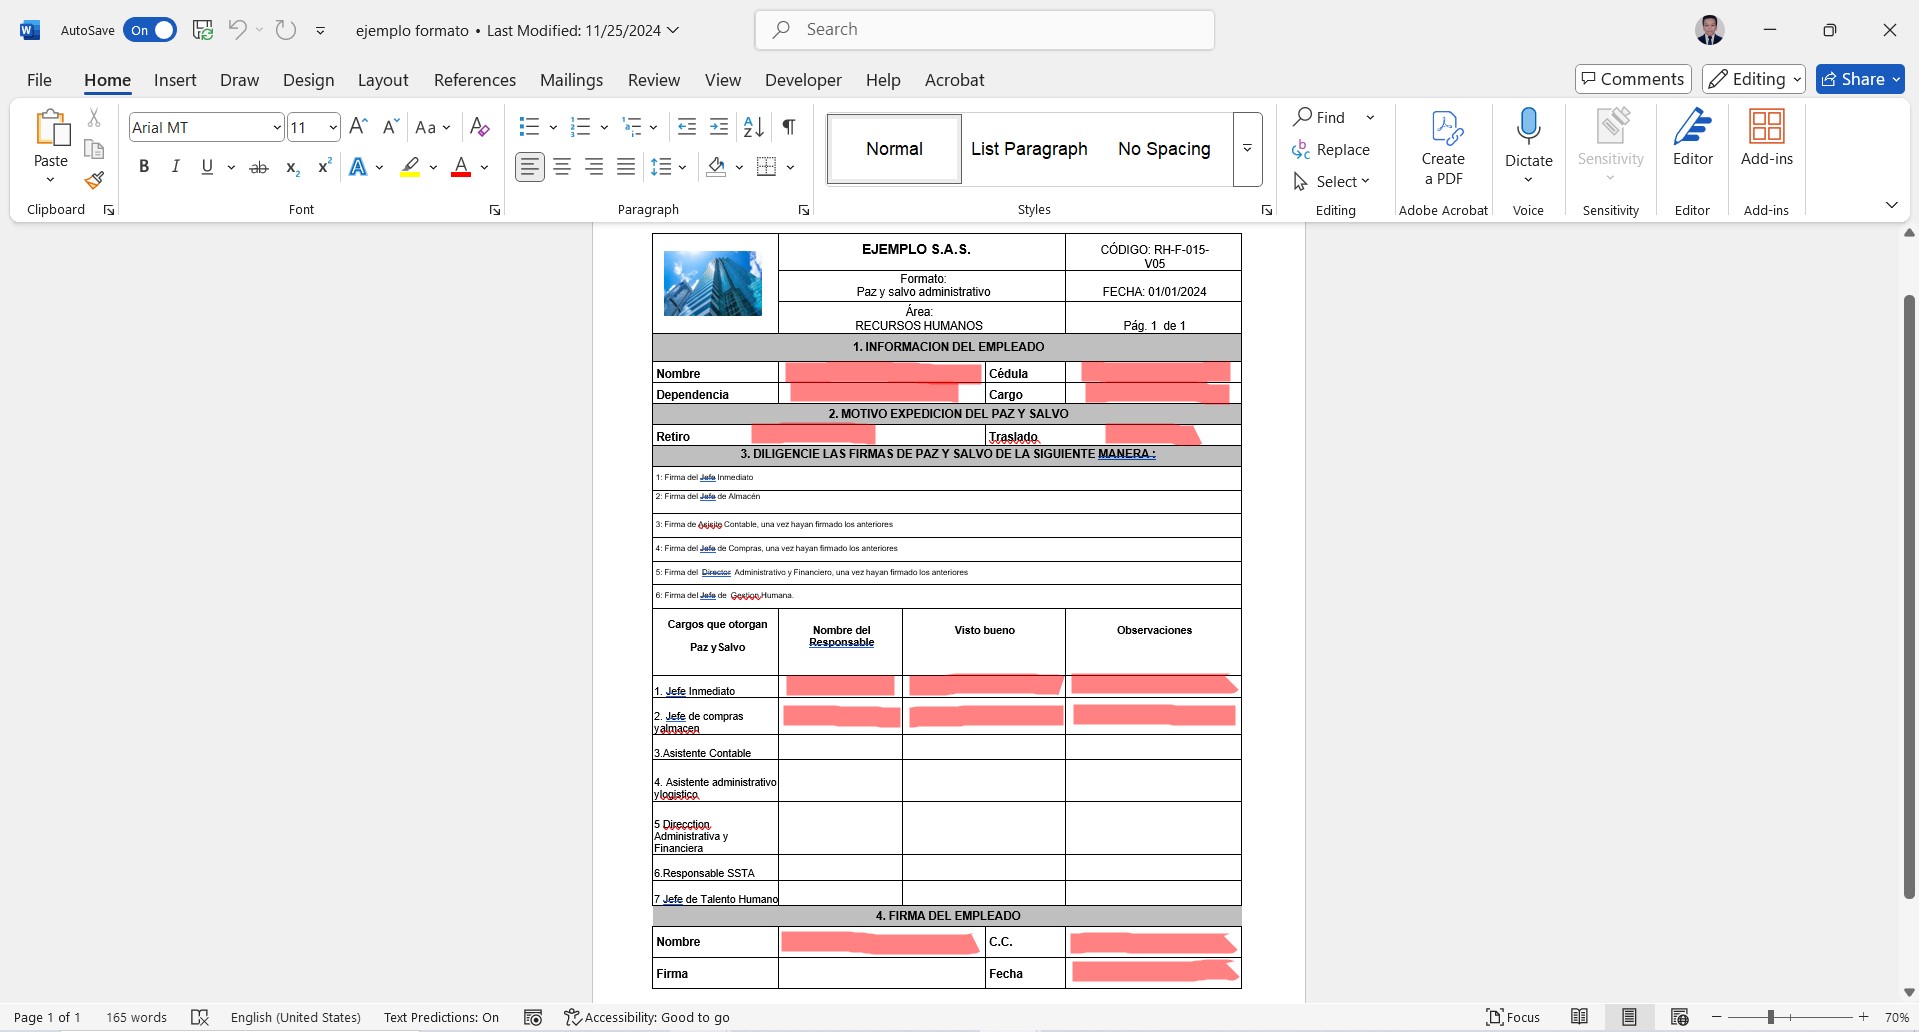
Image 22
1.6. We now return to our flow in Power Automate. On the “True” side of the condition, add the action “Populate a Microsoft Word template”. With this action, we create the dynamic Word document based on the template we previously designed.
In the action search bar, type the keyword “populate a word template” and select the “Populate a Microsoft Word template” option (see Image 23).
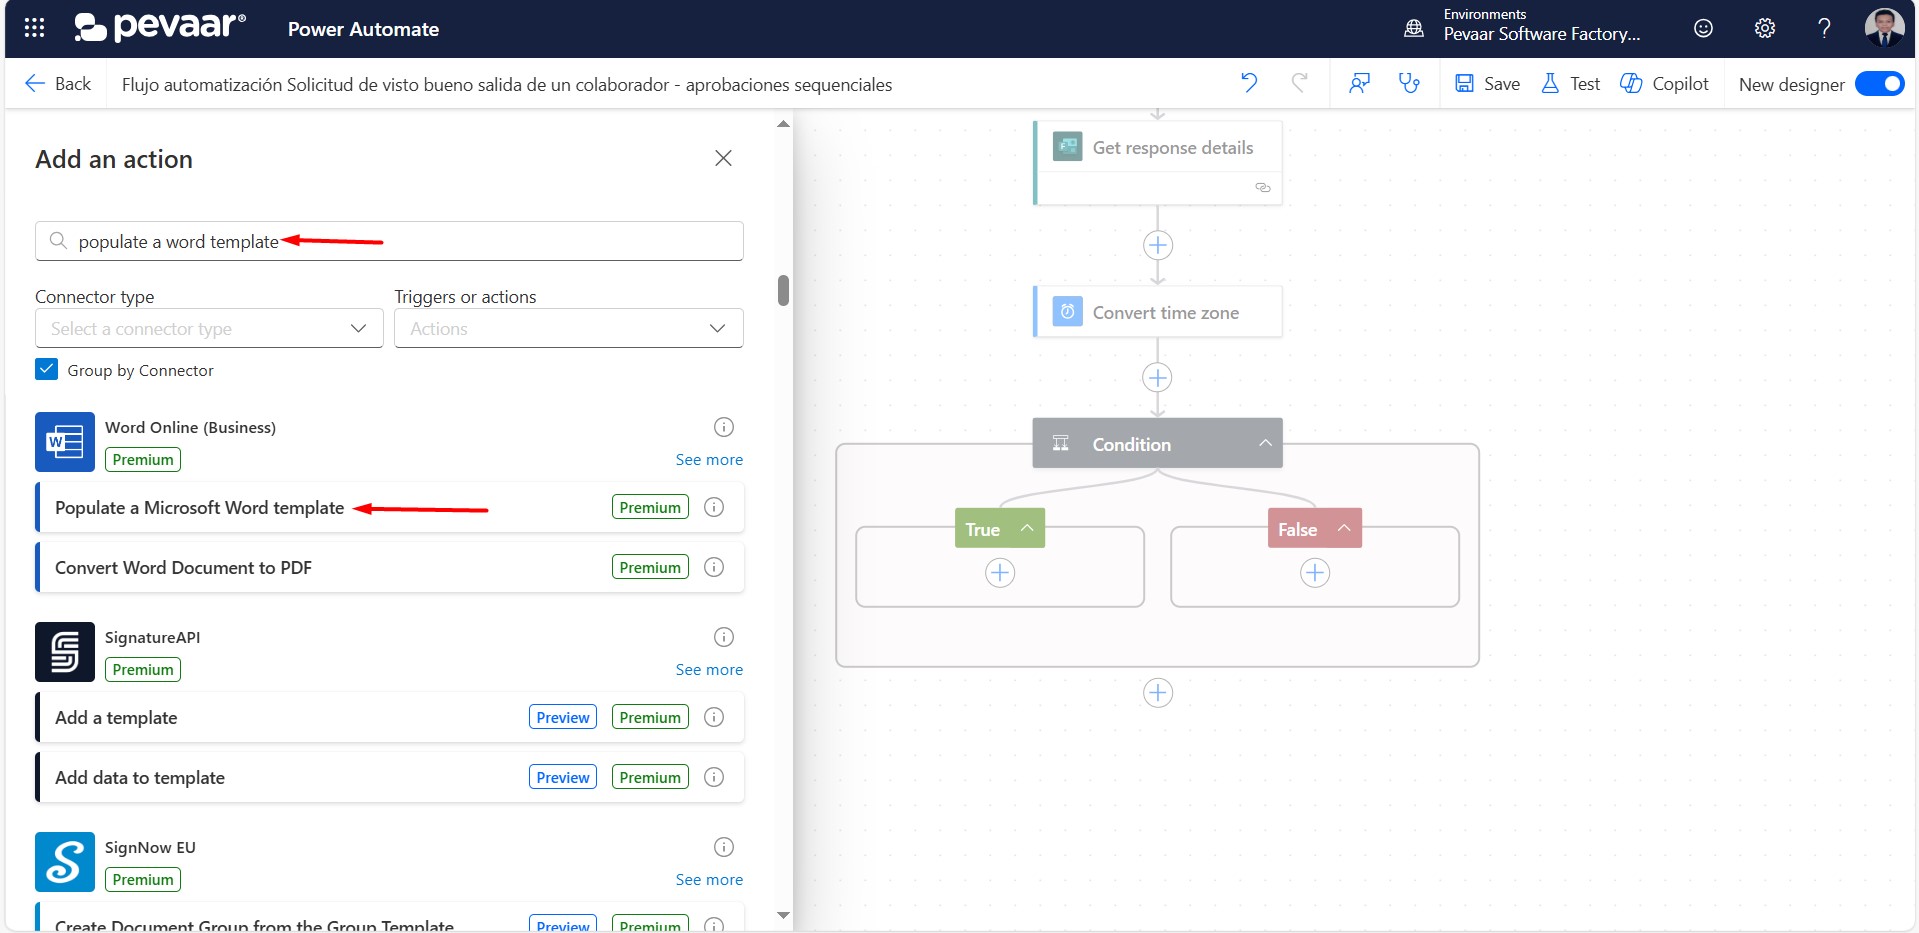
Image 23
1.6.1. Once the action is added, we need to select the file we saved in OneDrive. In Location, select “OneDrive for Business”. In Document Library, choose “Documents”, and in File, browse for the file you created and saved (see Image 24).
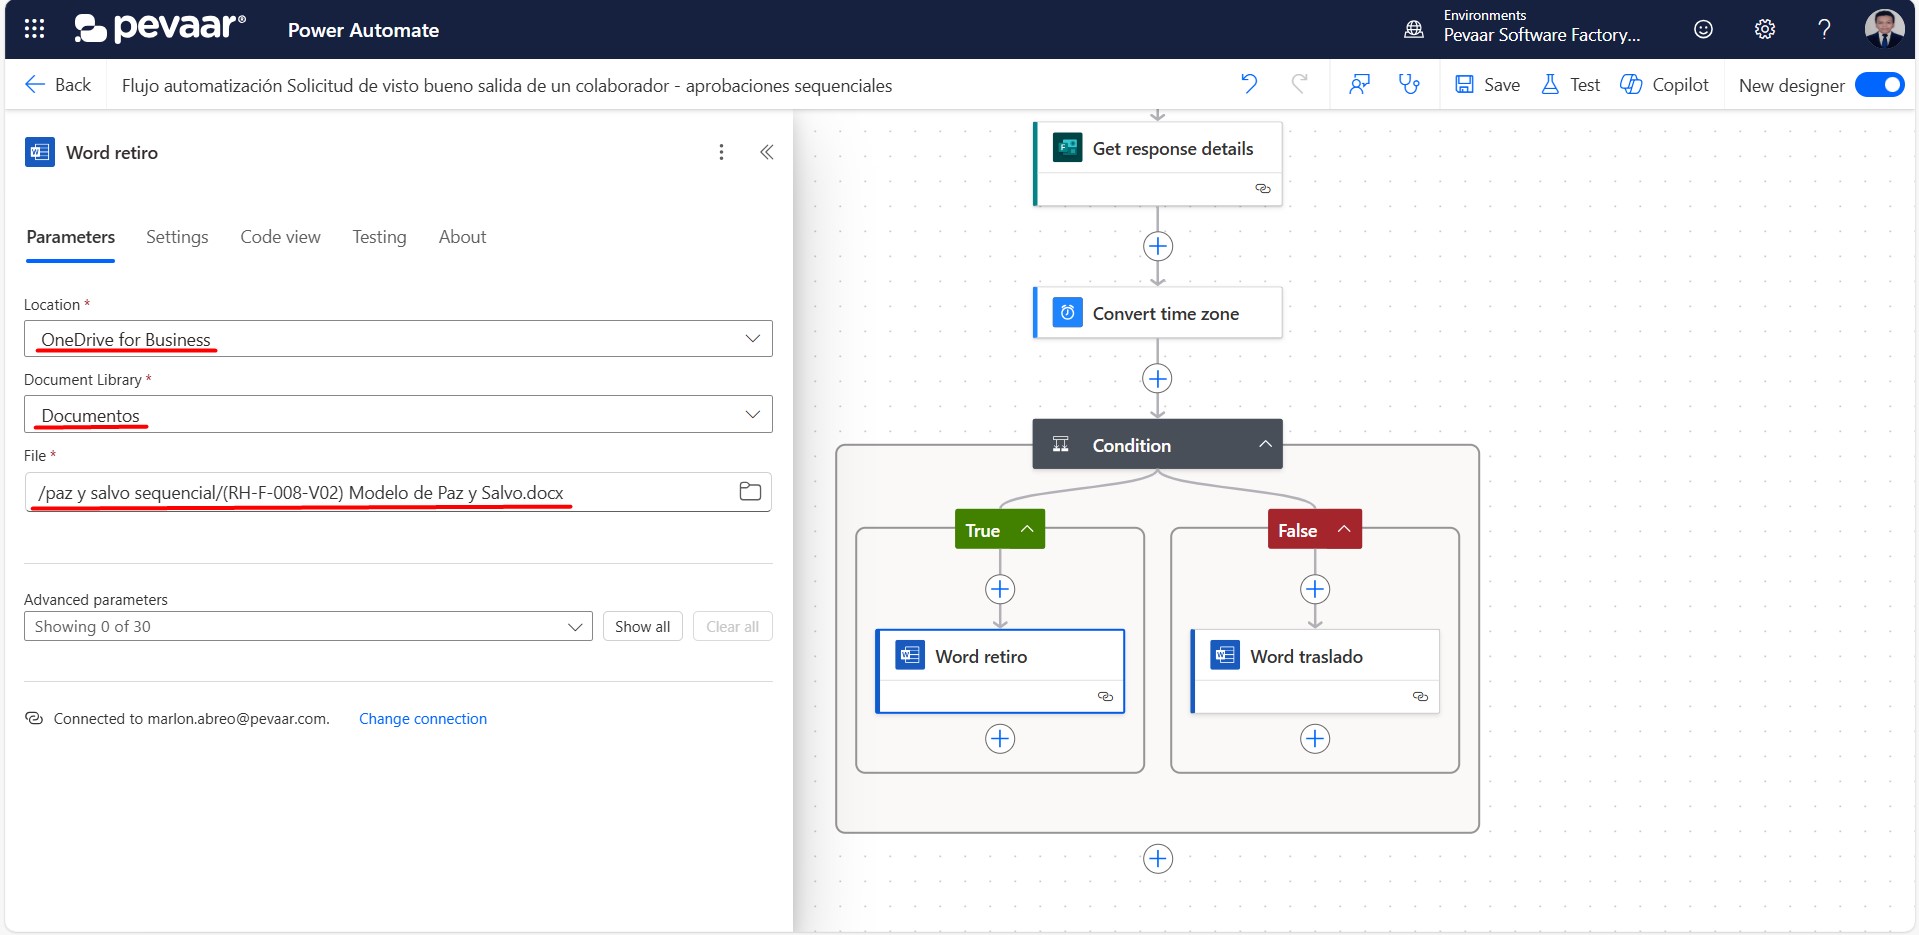
Image 24
Next, select from the advanced parameters the fields related to the employee, the “Retirement” field, and the “Date” field (Image 25).
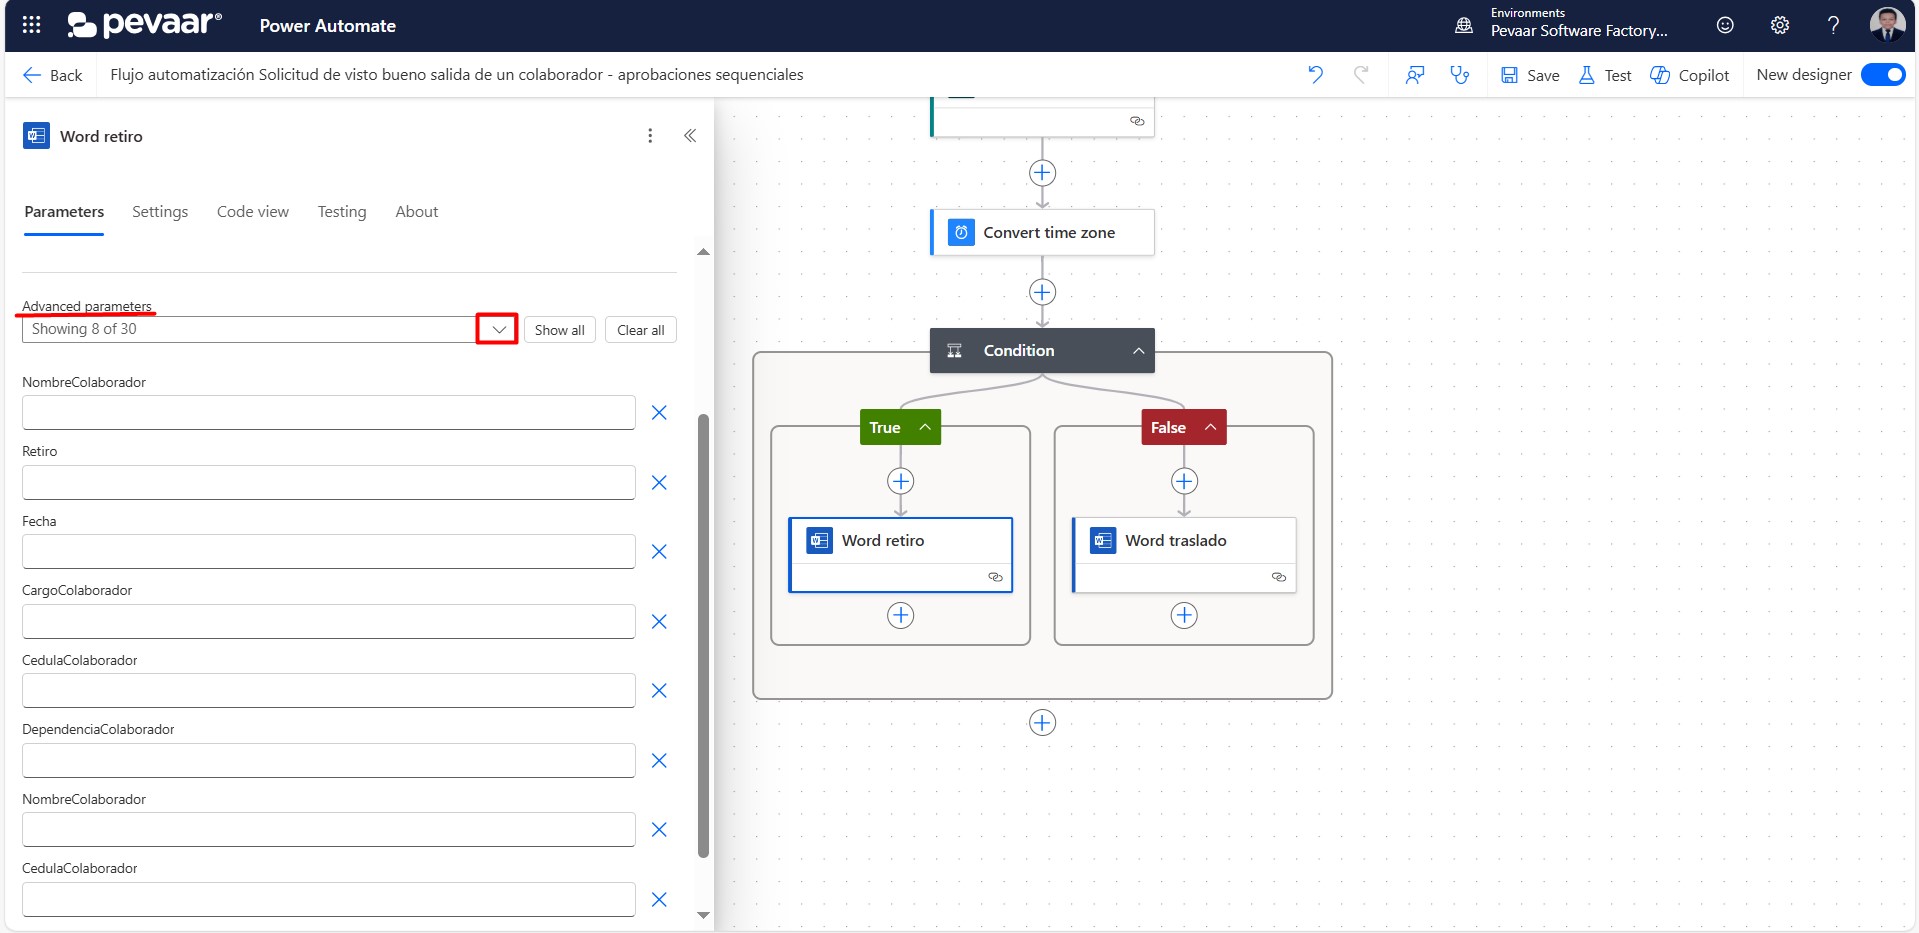
Image 25
1.6.2. We will fill in the fields related to the collaborator with the corresponding information from the form (see Image 26).
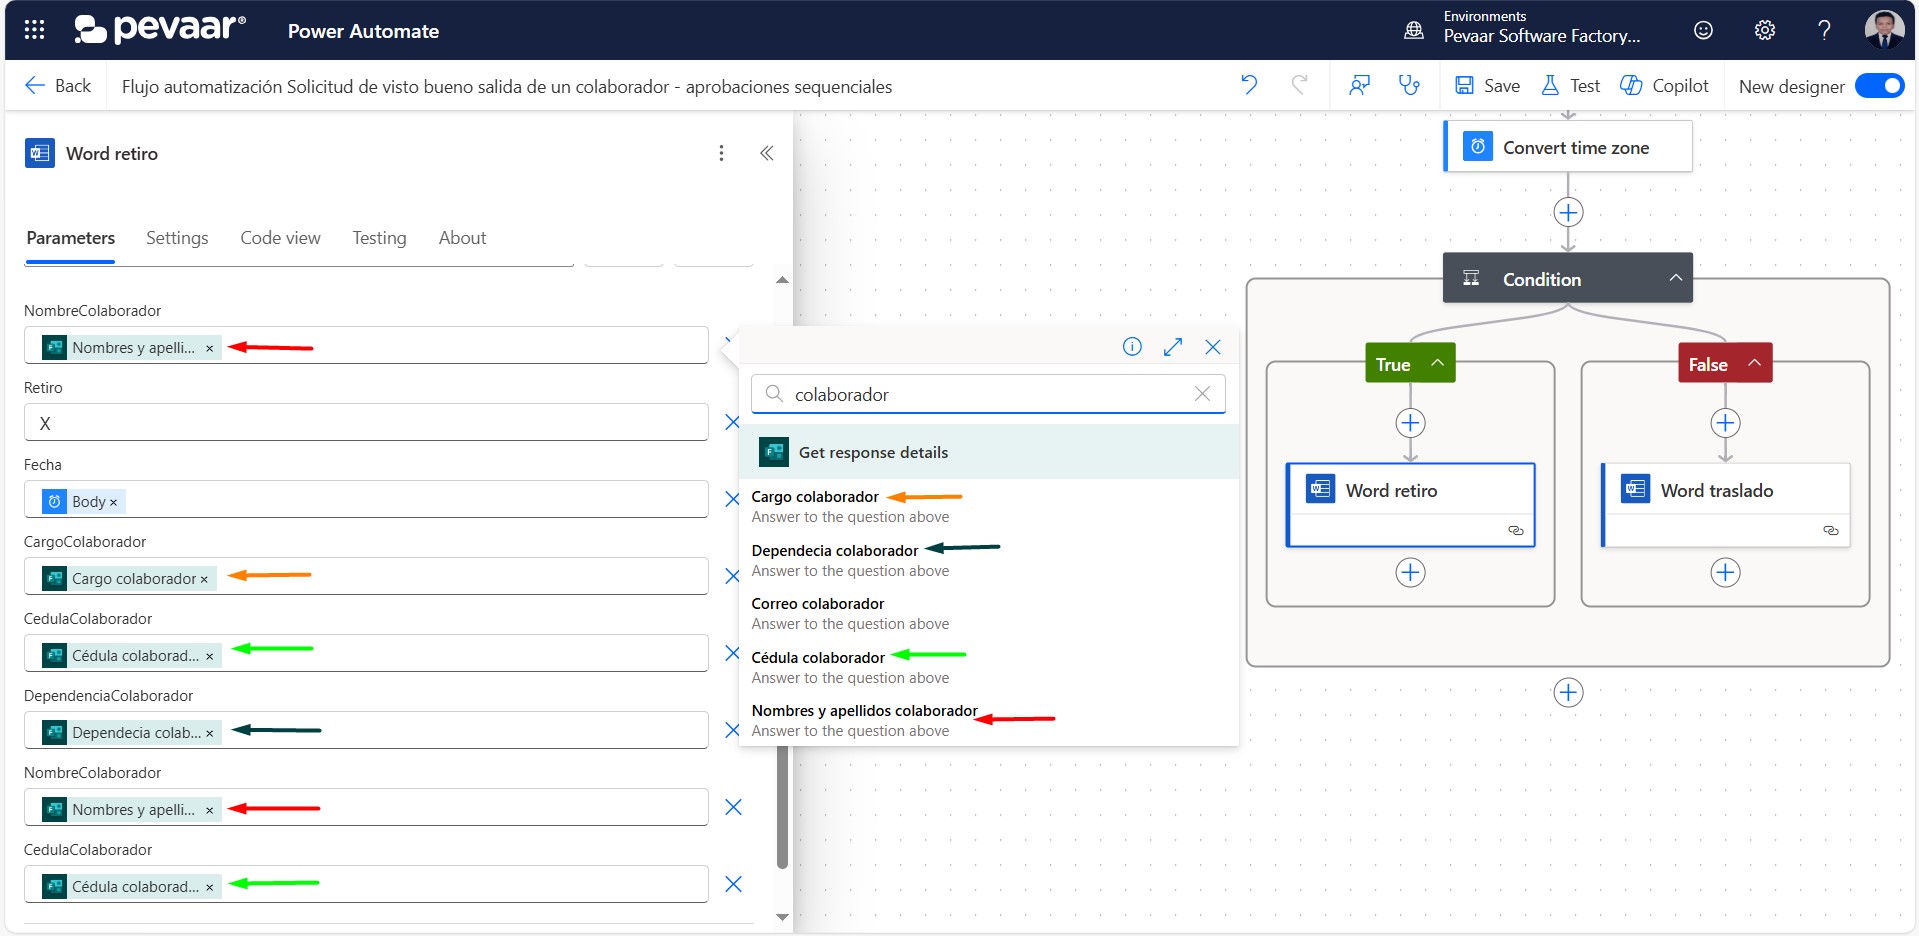
Image 26
1.6.3. In the Retiro field, we will enter an “X”, and for the Date field, we will select the value dynamically from the result of the Convert time zone action (see Image 27).
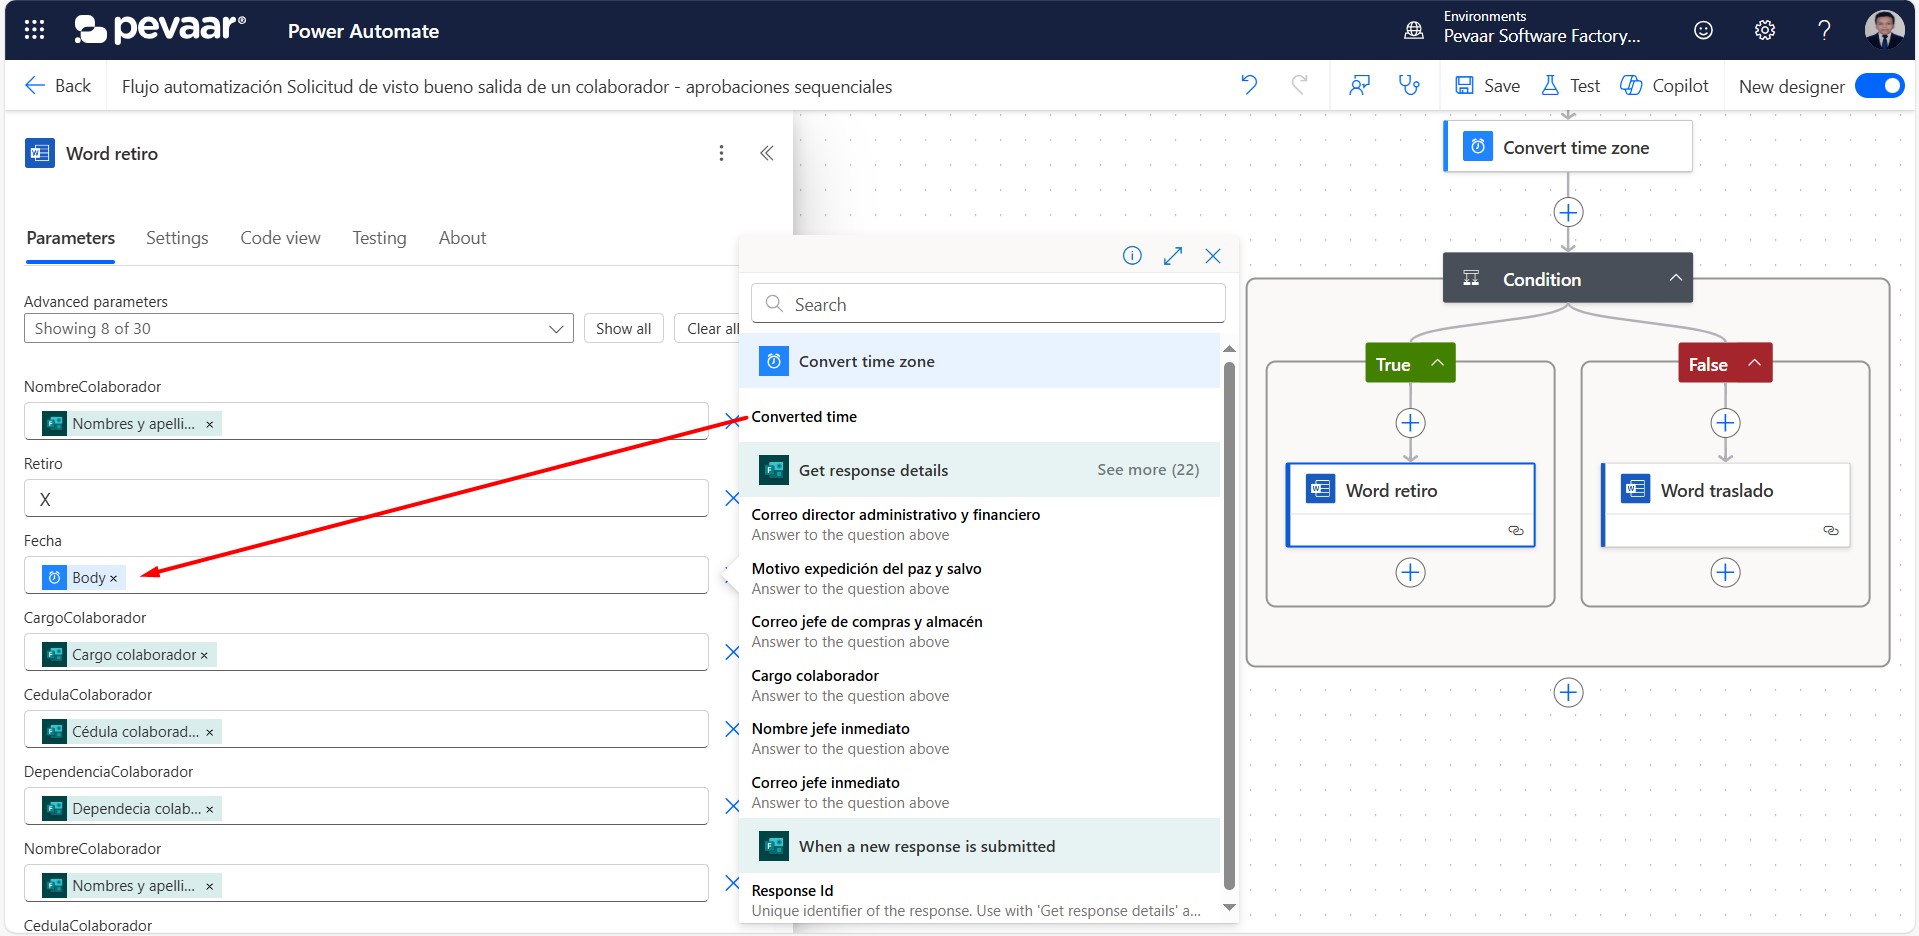
Image 27
On the “False” side of the condition, you must repeat steps 1.6, 1.6.1, 1.6.2, and 1.6.3. In this case, you should select the Traslado field instead of the Retiro field.
1.7. The next action to add is “Start and wait for an approval”, which will allow the first responsible approver to authorize the collaborator’s exit or transfer.
In the action search bar, type the keyword “approval”, and select the “Start and wait for an approval” option (see Image 28).
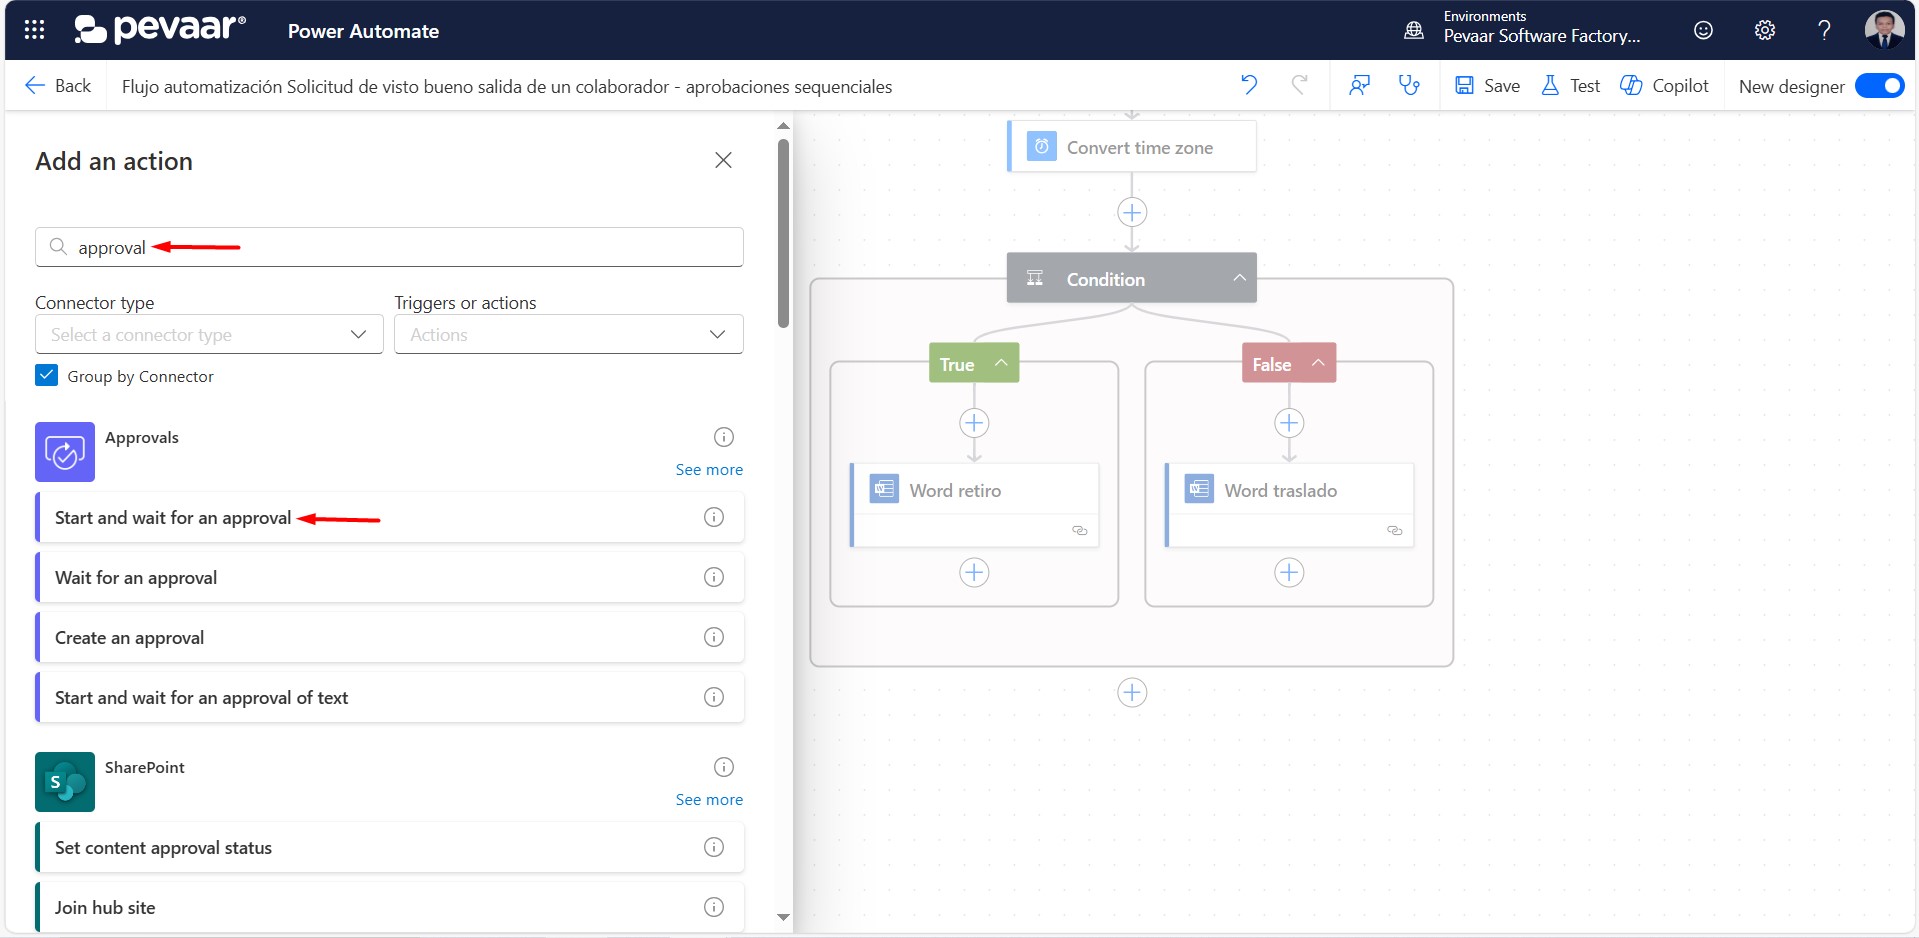
Image 28
In the Approval type, select Custom Responses – Wait for one response (see Image 29).
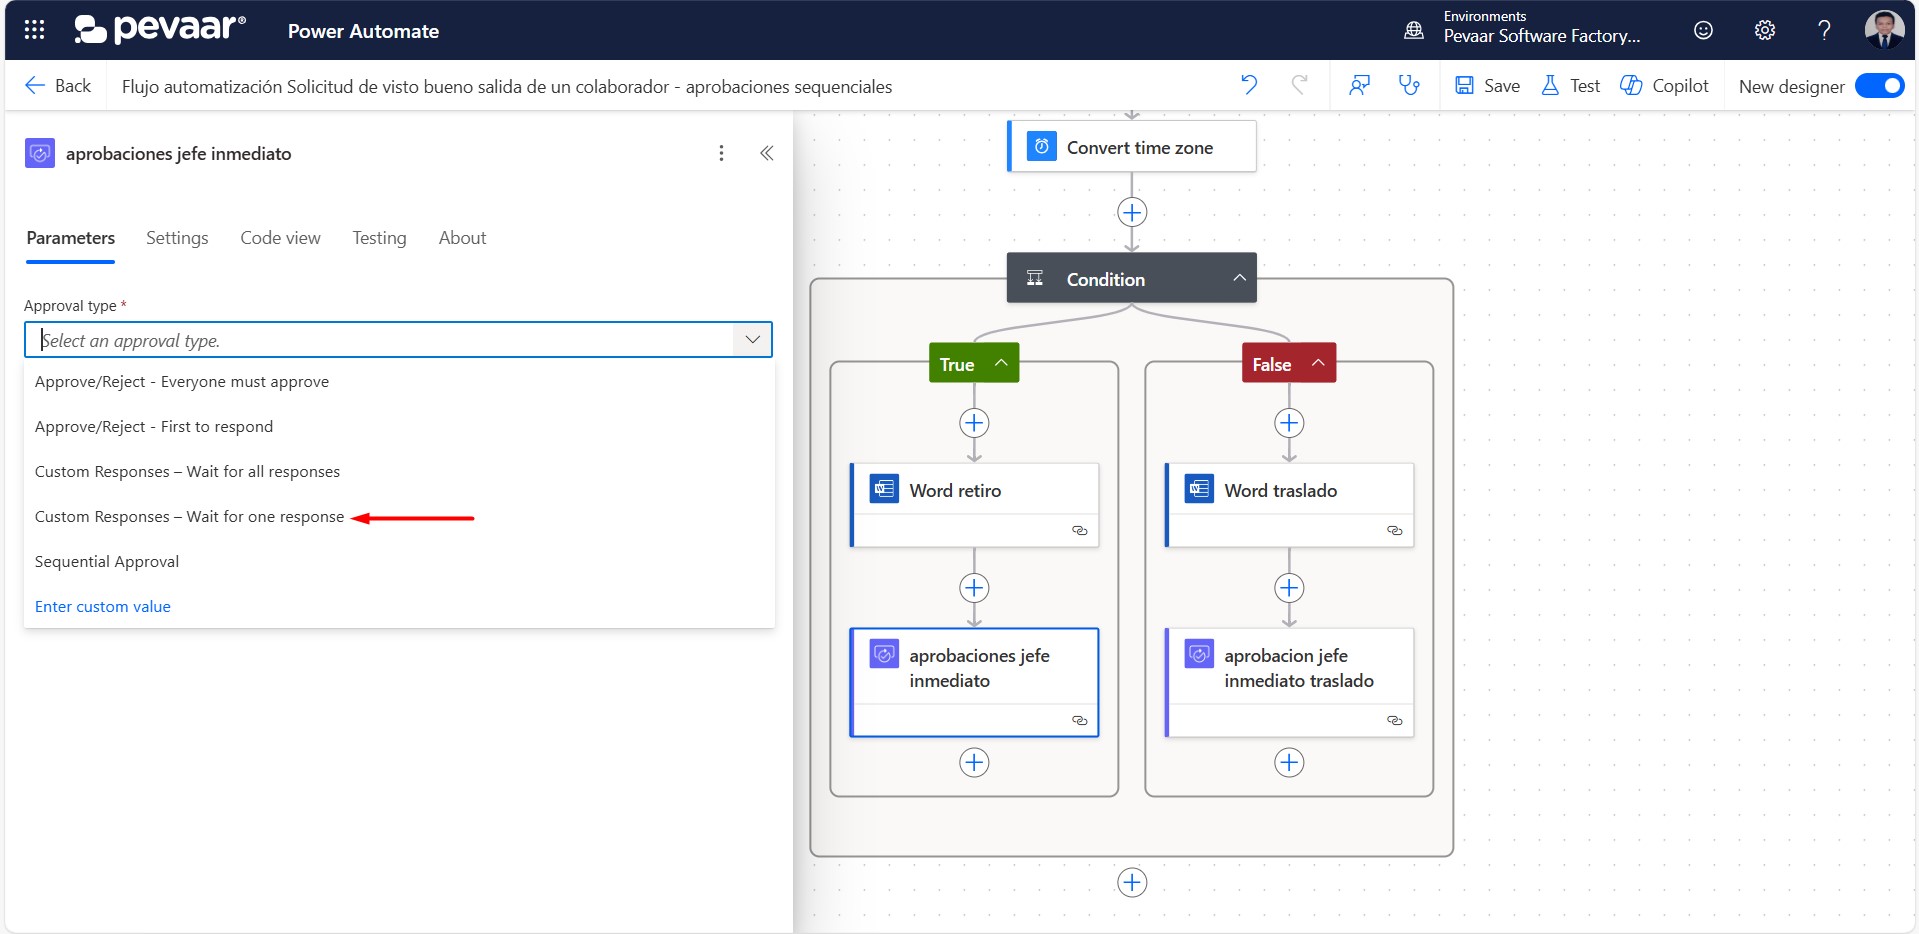
Image 29
In Response options, we will enter only one option: “Paz y salvo”. In the Title, write something related to the approval along with the name of the collaborator requesting it—the name is added dynamically from the form. In Assigned To, enter the email address of the first person responsible for approving (see Image 30).

Image 30
In the Approval details, include information related to the collaborator and the reason for issuing the paz y salvo (see Image 31).
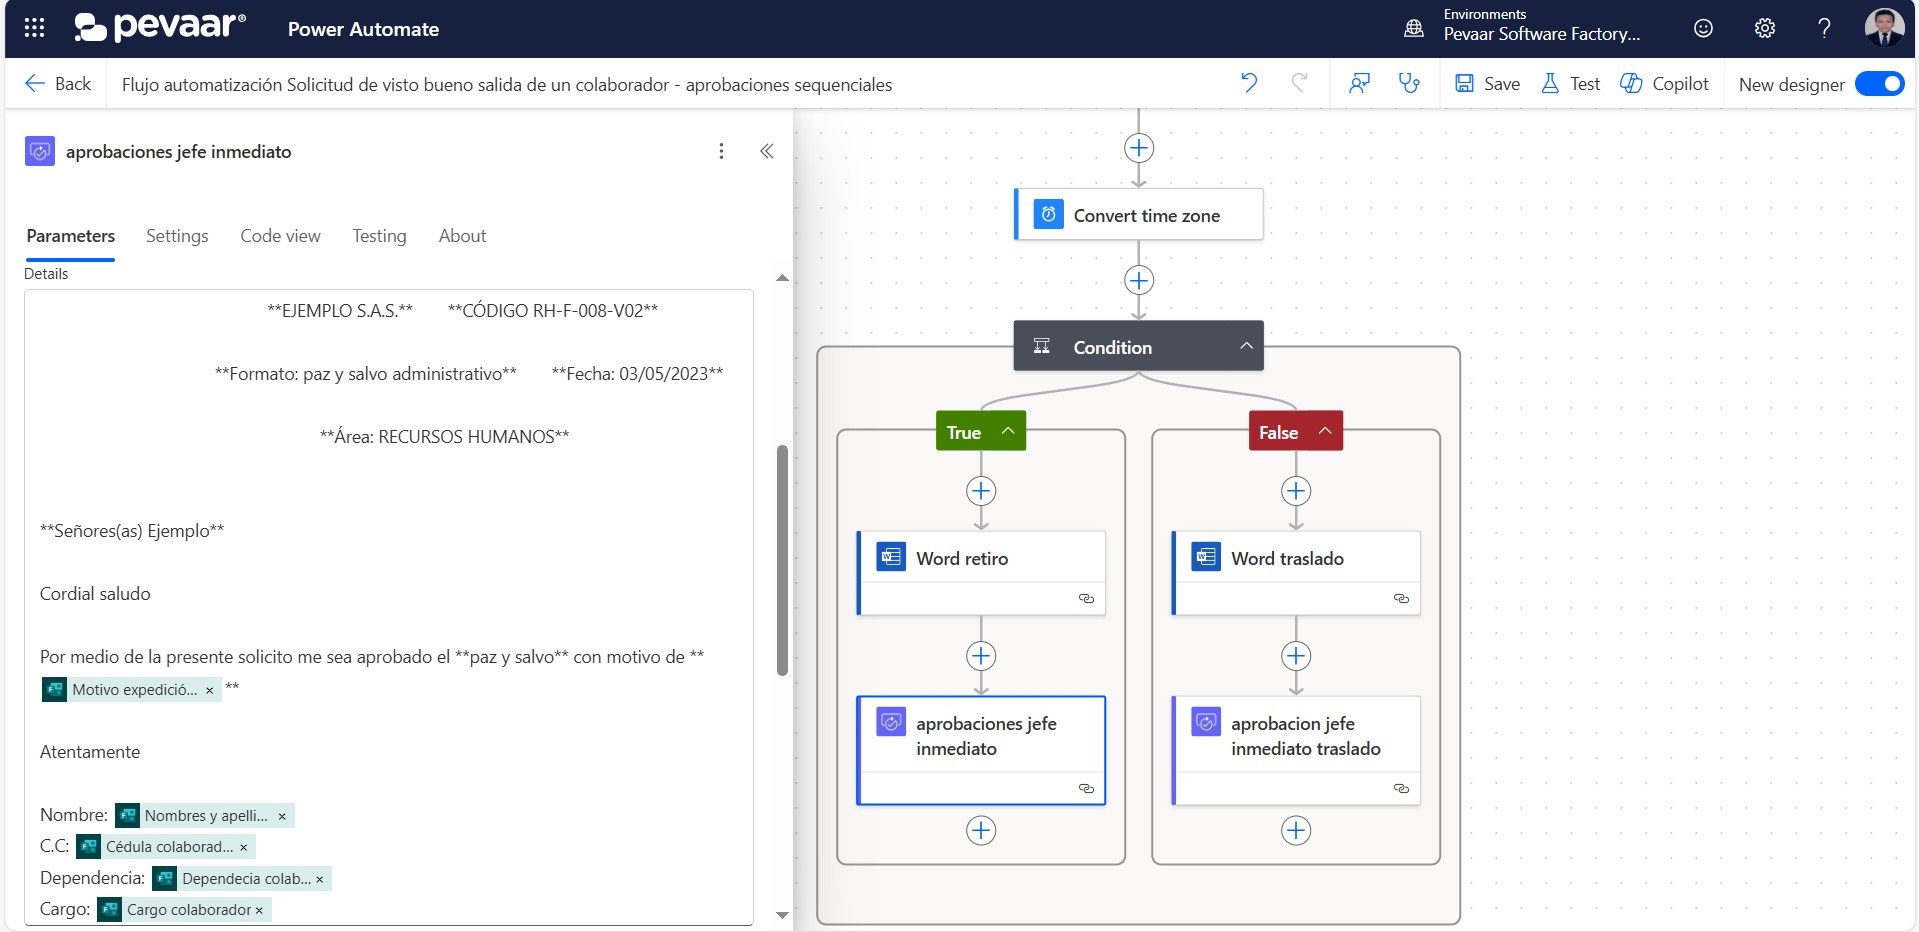
Image 31
In the advanced parameters of the approval, click on “Show all” to display all fields and fill in the requestor and attachments fields (see Image 32).
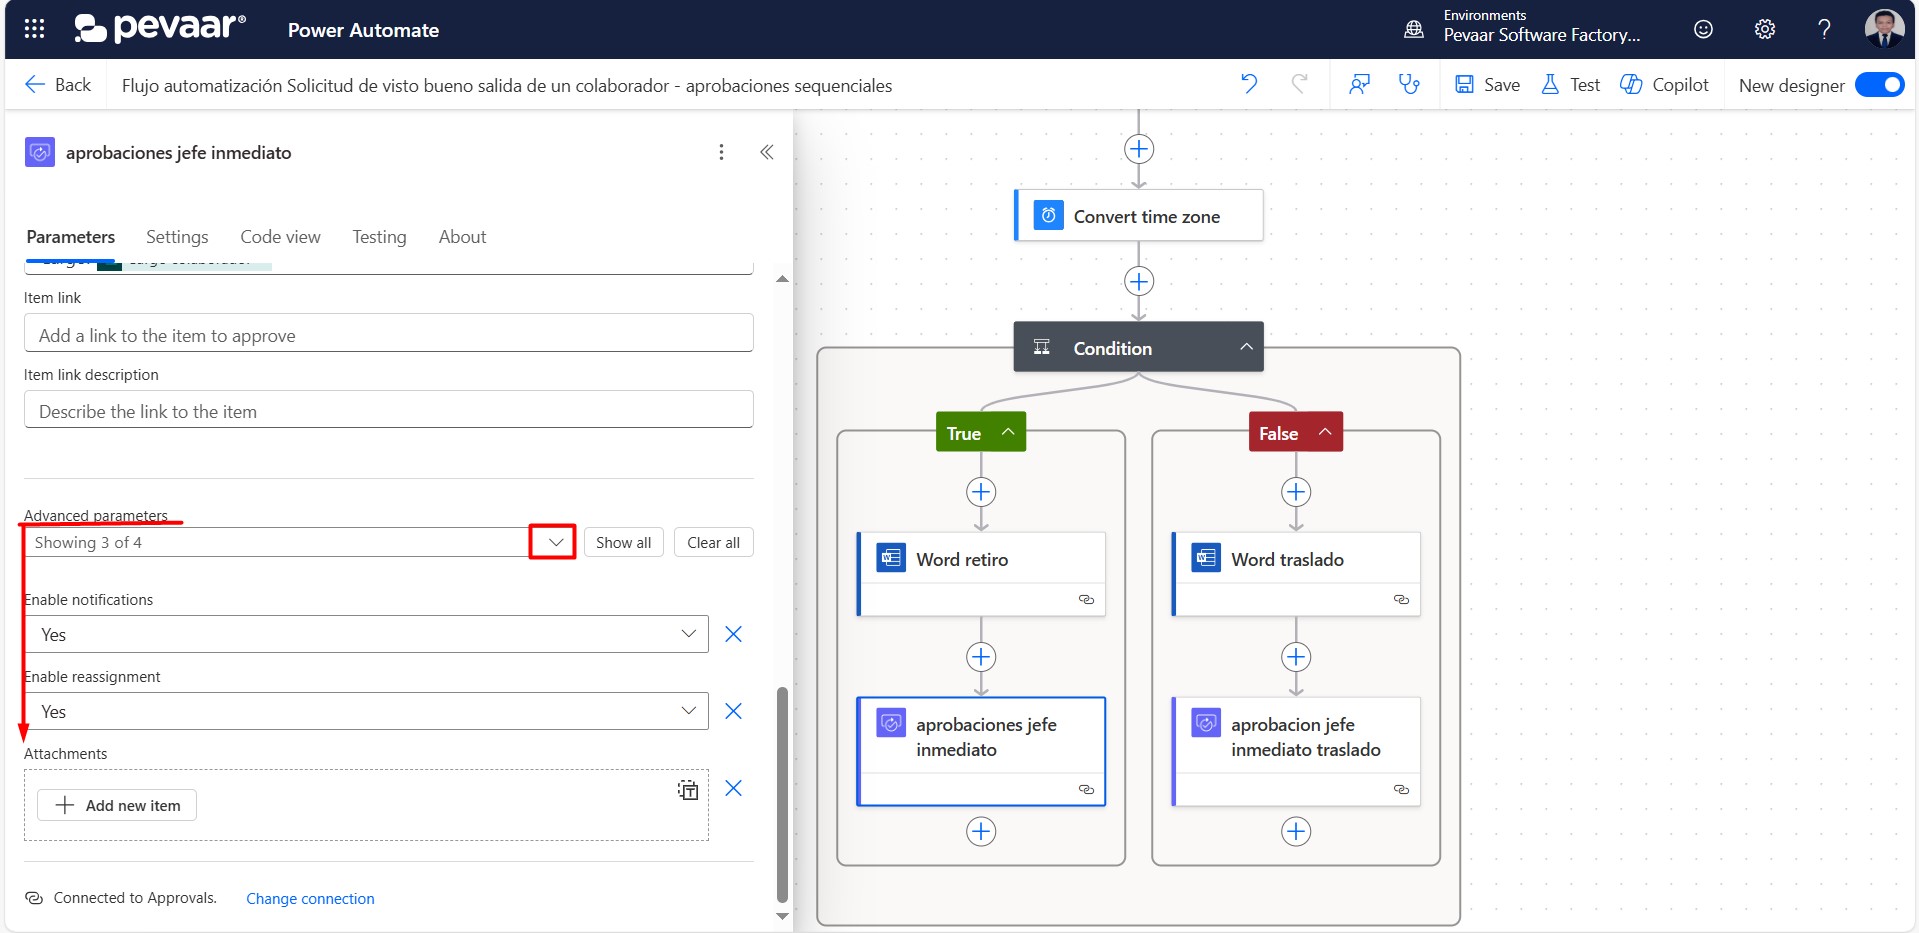
Image 32
In “Requestor”, click on “Switch to advanced mode”, and then dynamically add the email address of the person who submitted the form (see Image 33).
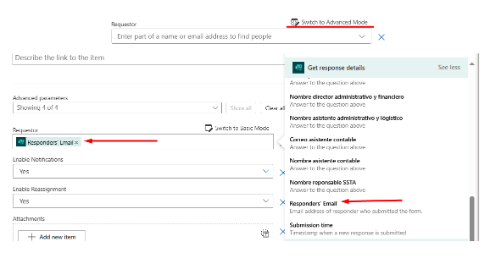
Image 33
In the Attachments field, add a new item. Provide a descriptive name that ends with the .docx extension. For the attachment content, select the output from the previous action “Populate a Microsoft Word template” (see Image 34).
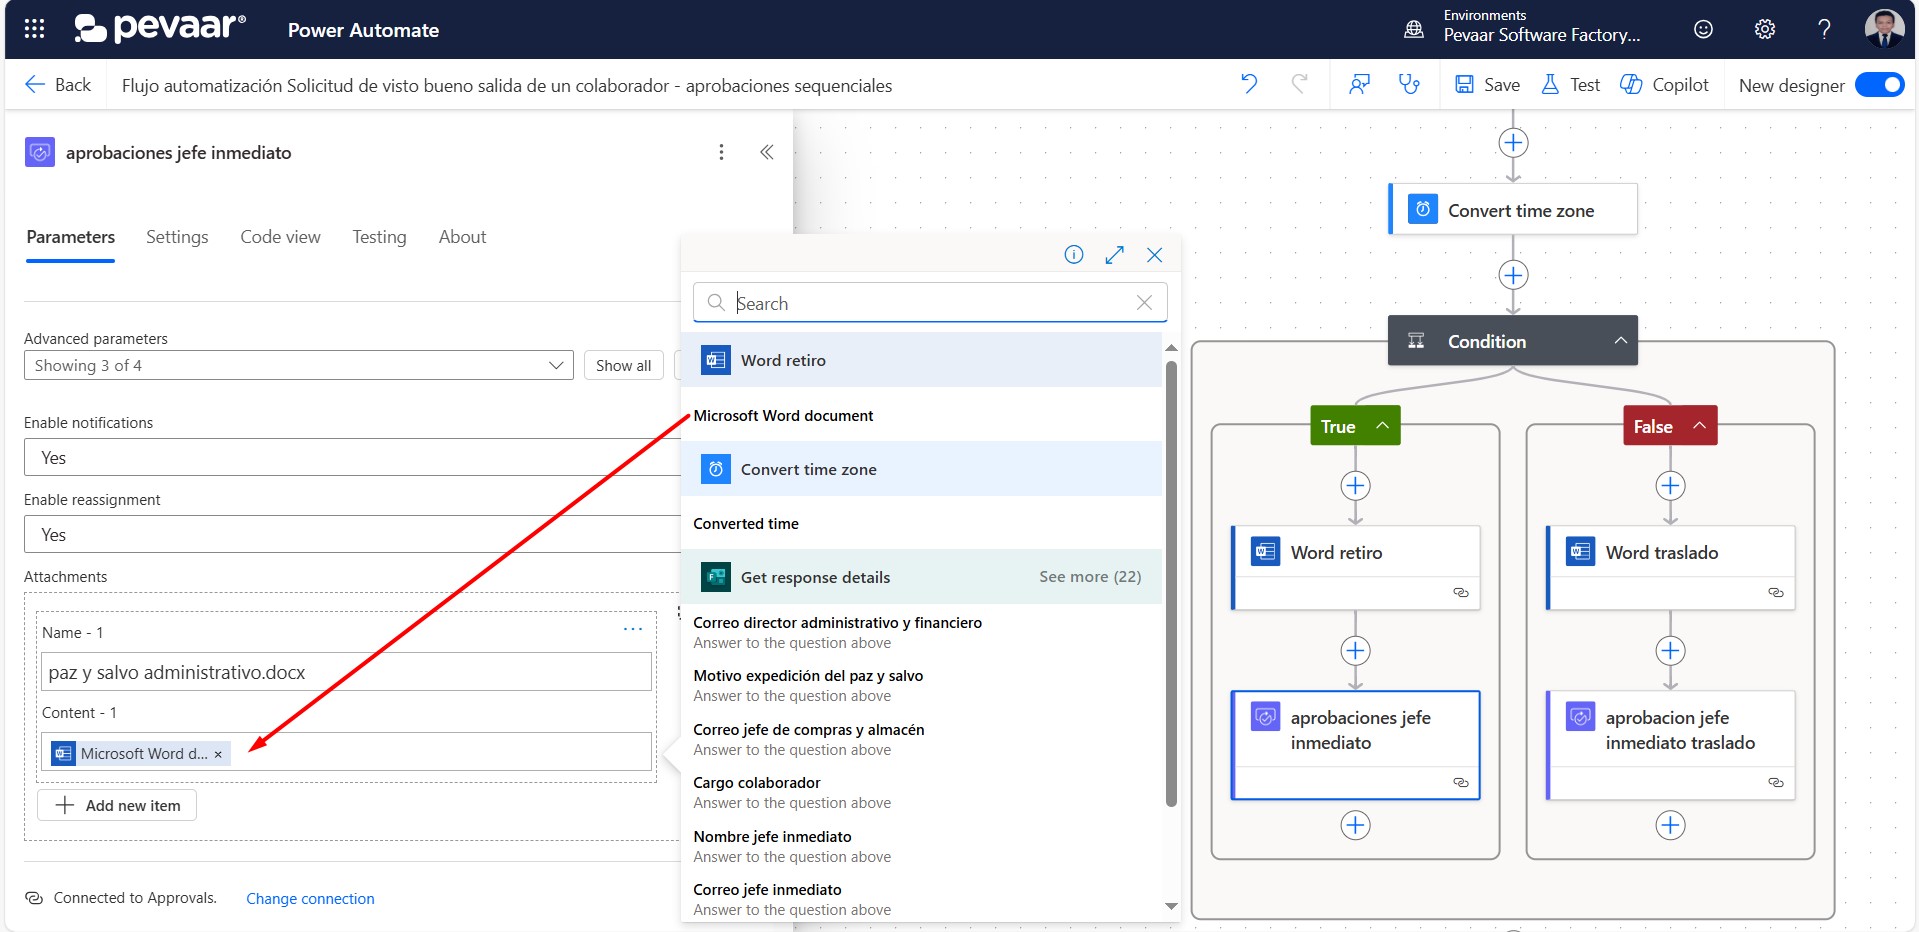
Image 34
On the “False” side of the condition, you must repeat step 1.7 after having added the previous “Populate a Microsoft Word template” action.
1.8. With the previous action, the first responsible approver has already given their approval for the employee’s clearance form. The next step is to populate the fields for name, approval, and comments from that approver in the Word template.
We will copy the “Populate a Word Template” action previously named “word retiro”, and paste it right after the approval step from the first responsible (Image 35-1) (Image 35-2).
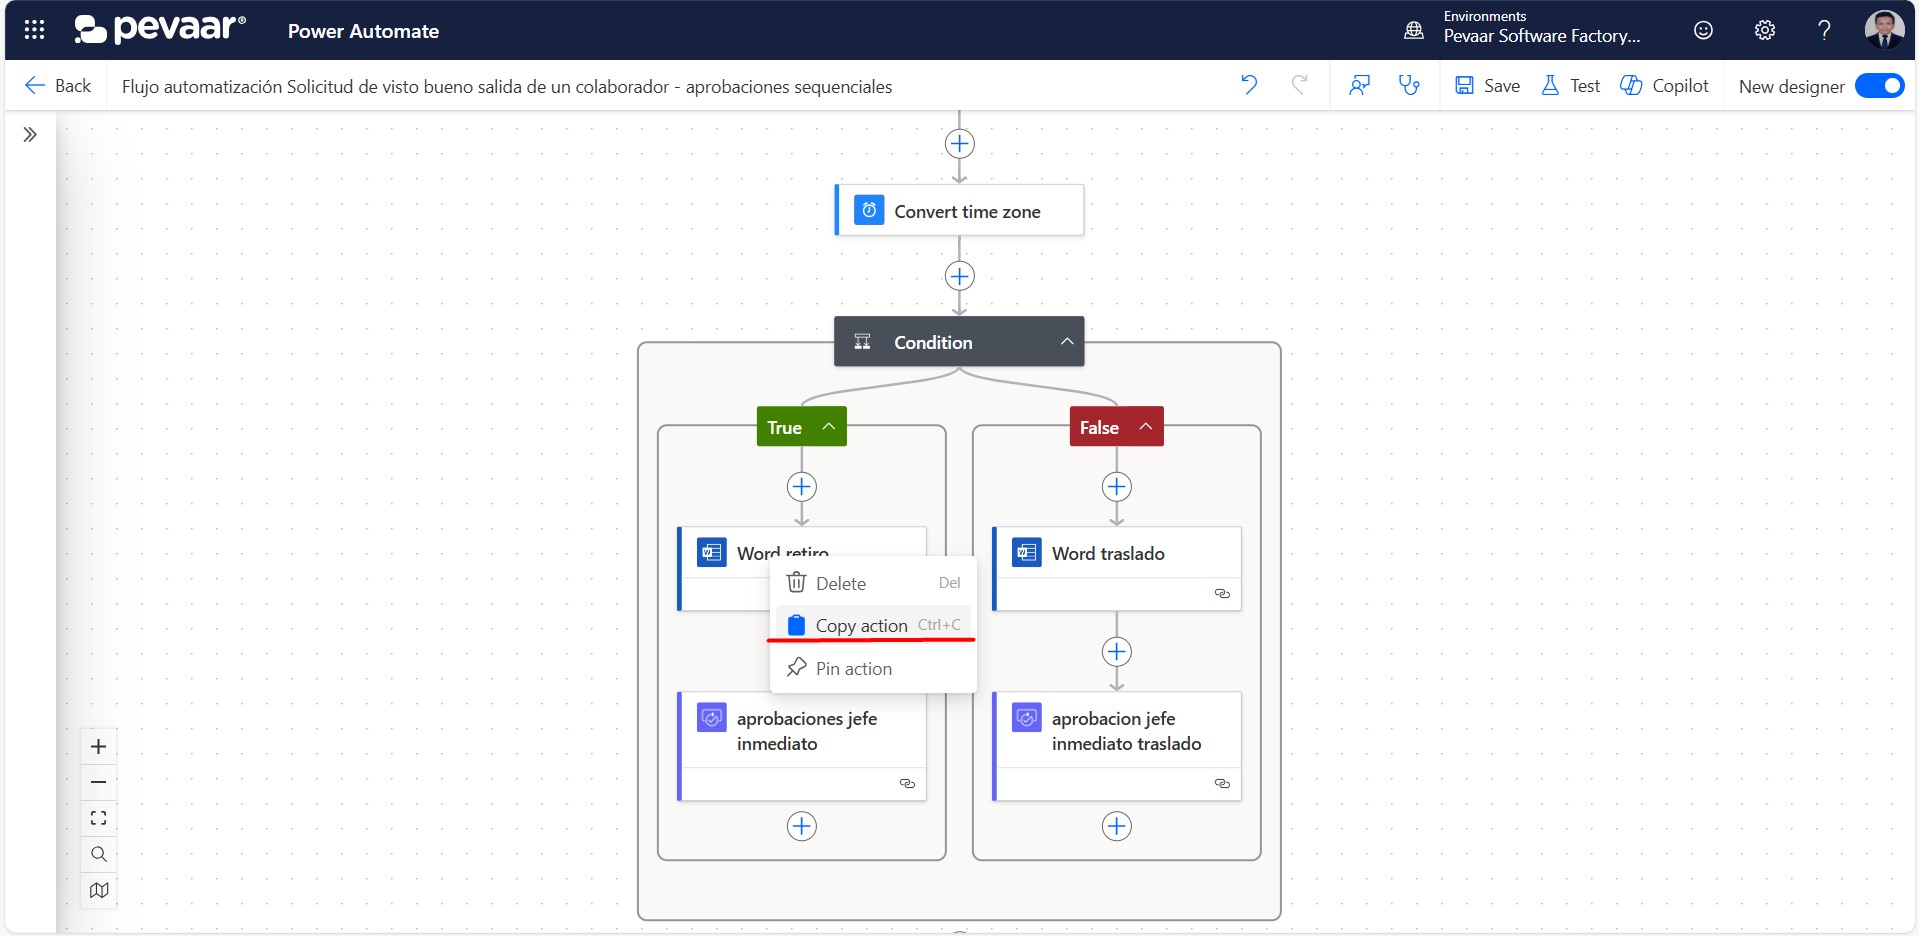
Image 35-1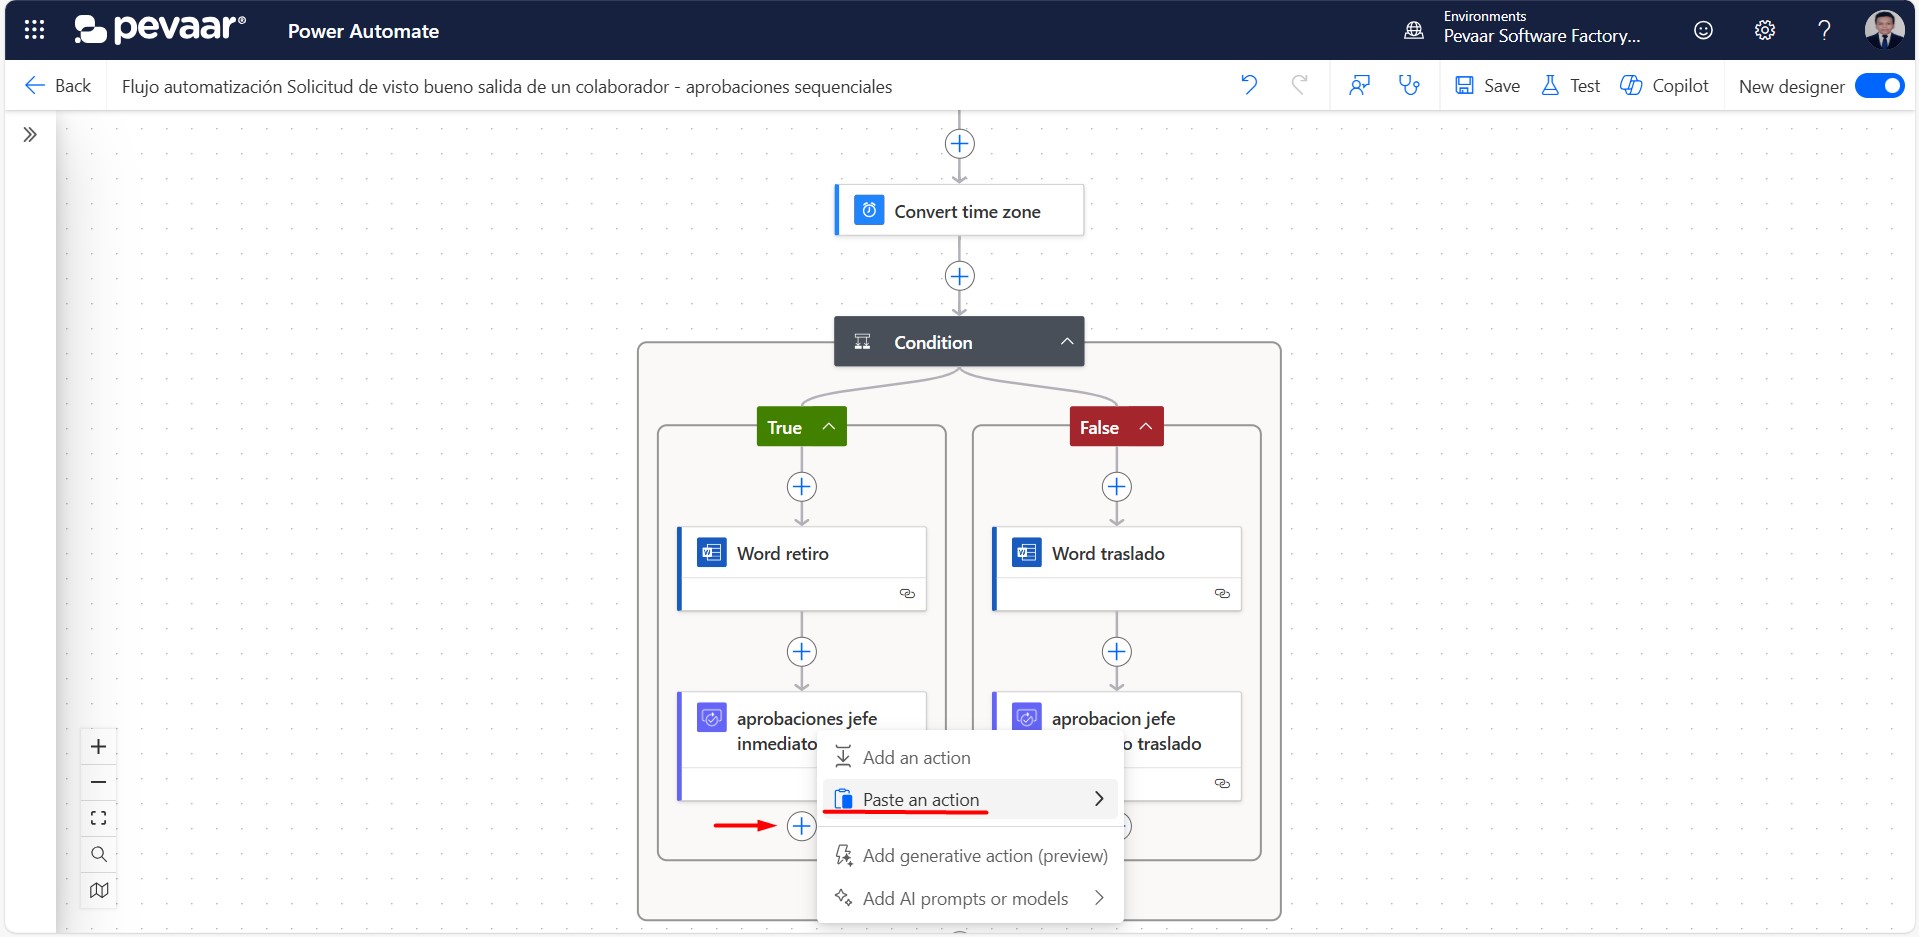
Image 35-2
Once the action has been copied, rename it to easily identify it among the others. Then, in the advanced parameters, add the fields for Name, Approval, and Comments from the first approver (Image 36).
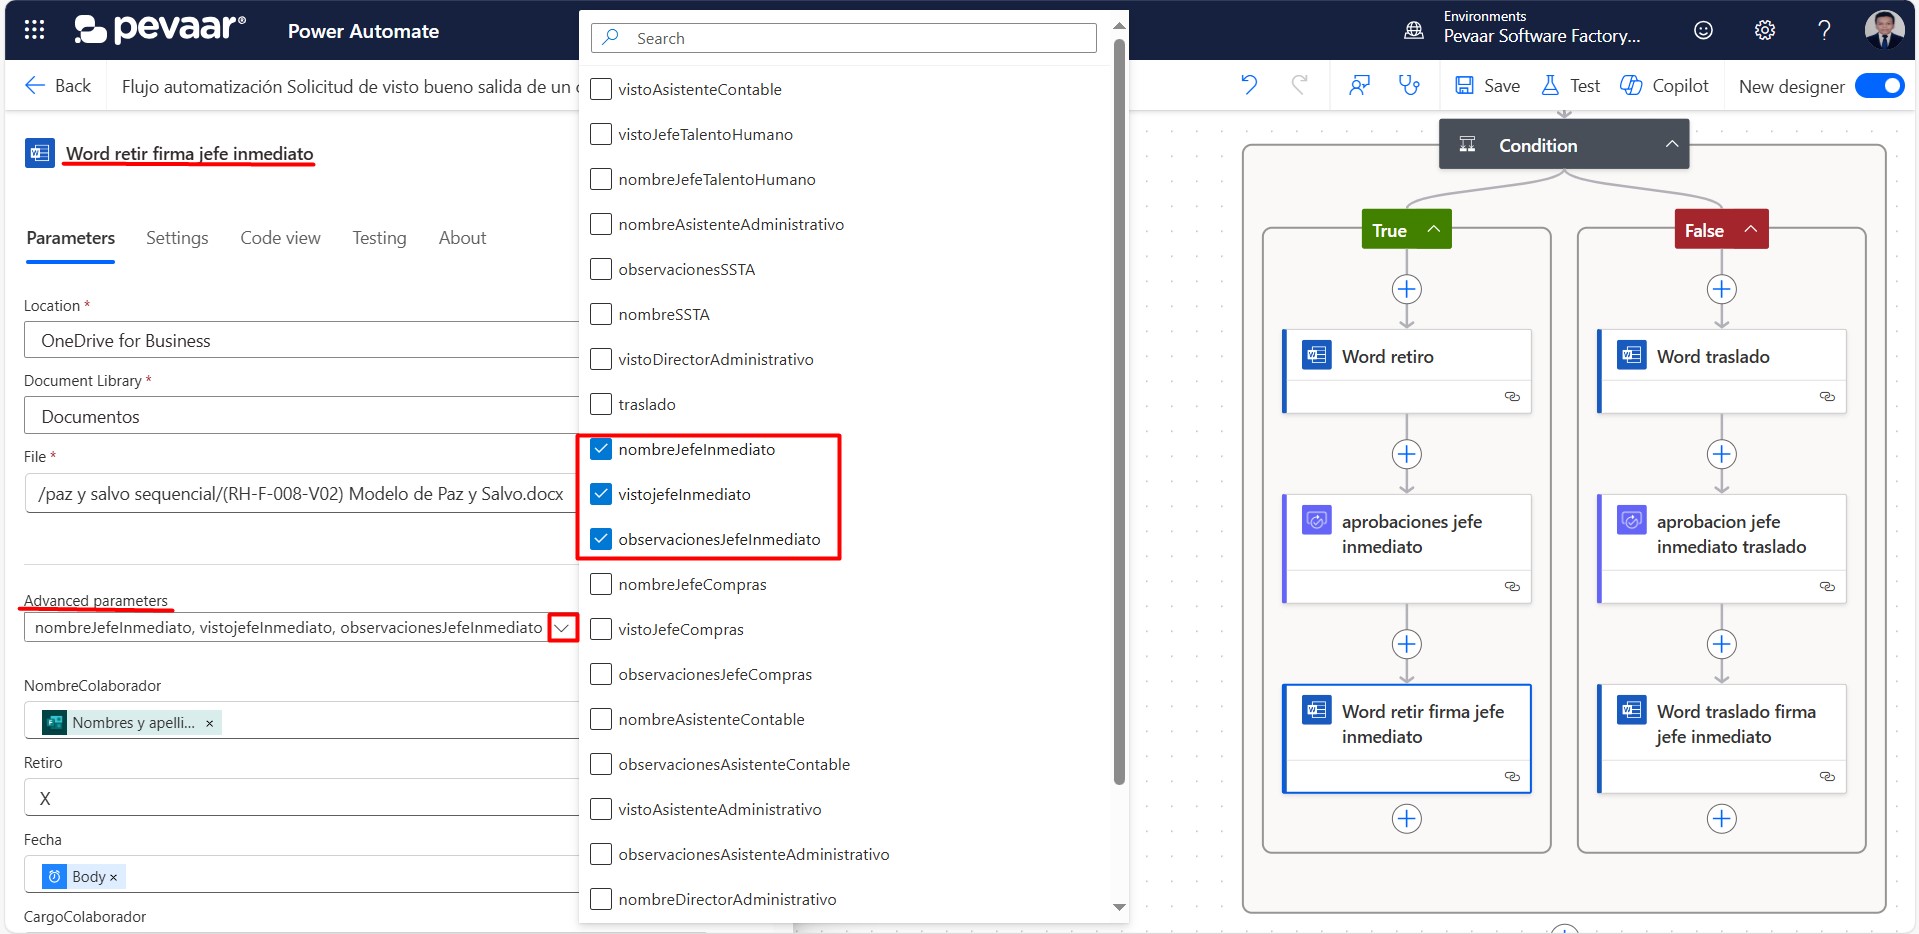
Image 36
The Name of the responsible person will be added dynamically from the form response (Image 37).

Image 37
1.8.1. To fill in the Approval field, click on the Fx option and add the following expression: body(‘aprobaciones_jefe_inmediato‘)[‘responses’][0][‘approverResponse‘]
The name inside the quotation marks and parentheses of body(‘ ‘) must match the name of the previous approval action. After entering the expression, click on Add. This function retrieves the approver’s response — in this case, “Paz y salvo” (Image 38).
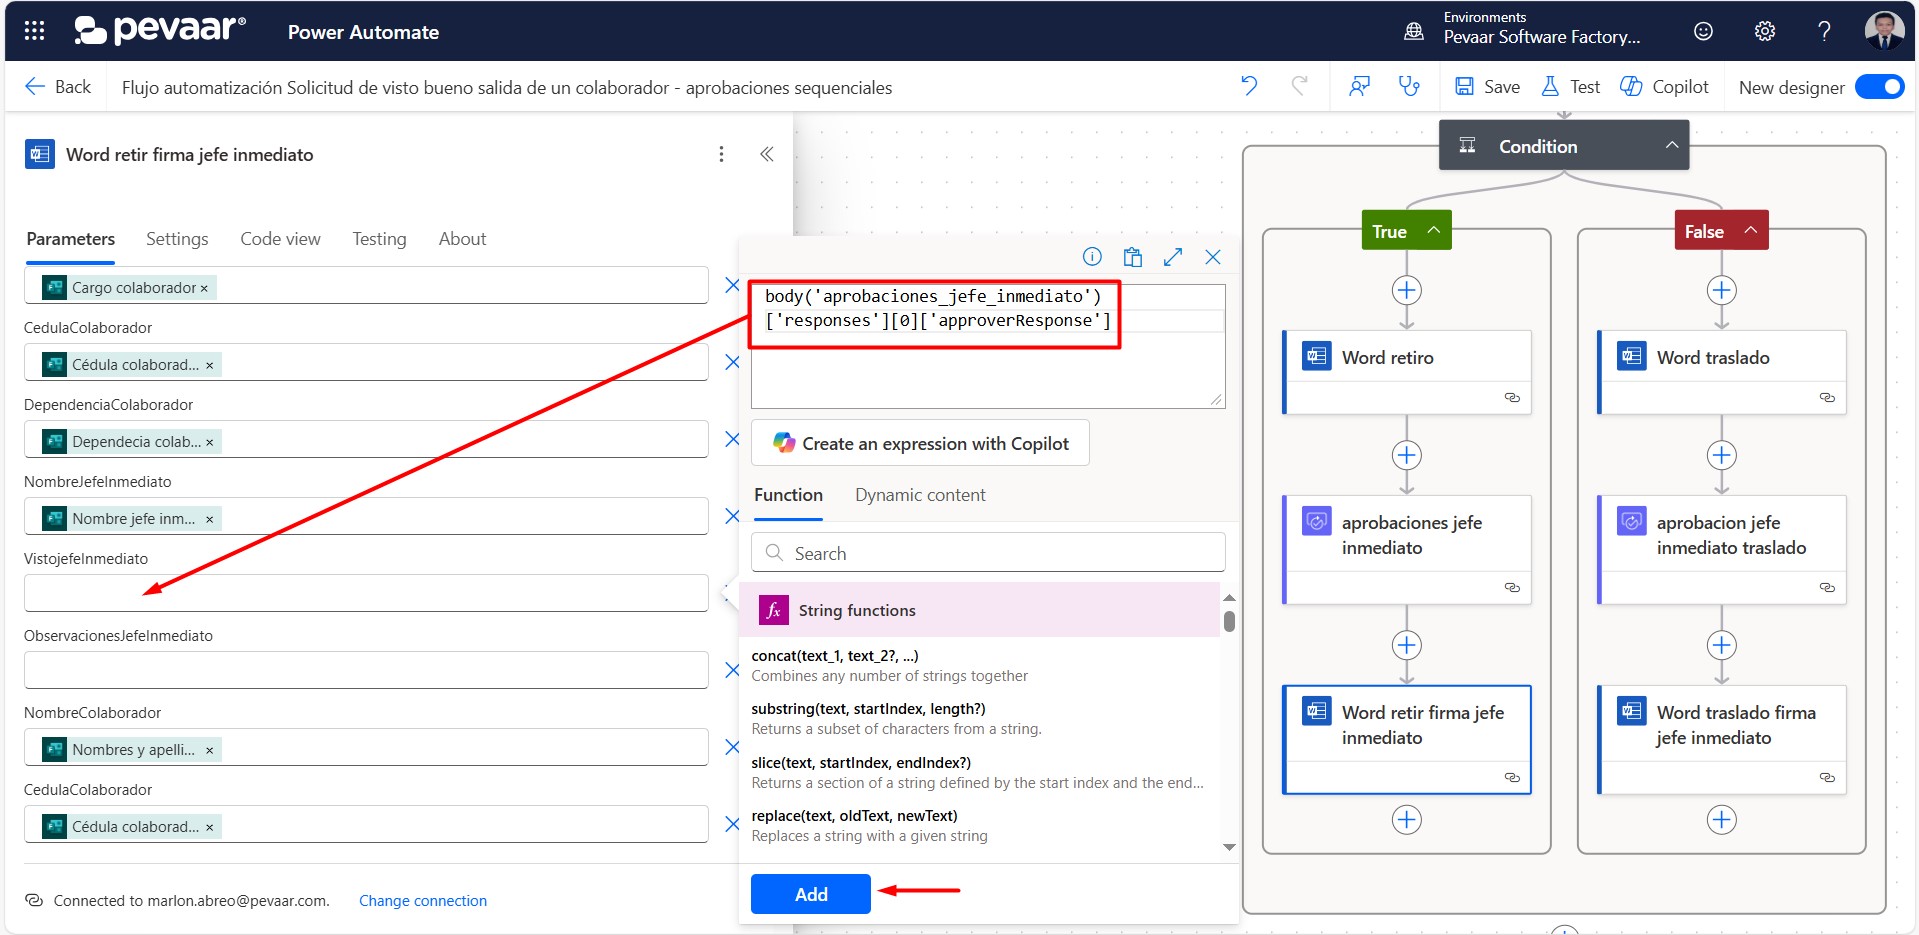
Image 38
1.8.2. In the Observations field, likewise, click on Fx to enter the following expression: coalesce(body(‘aprobaciones_jefe_inmediato‘)[‘responses’][0]?[‘comments’],’No observations’)
After entering the expression, click on Add. This function allows us to retrieve the approver’s comments. If no comments were provided, the default text “No observations” will be displayed. Likewise, the name inside the quotation marks and parentheses of body(‘ ‘) must match the name of the previous approval action (Image 39).
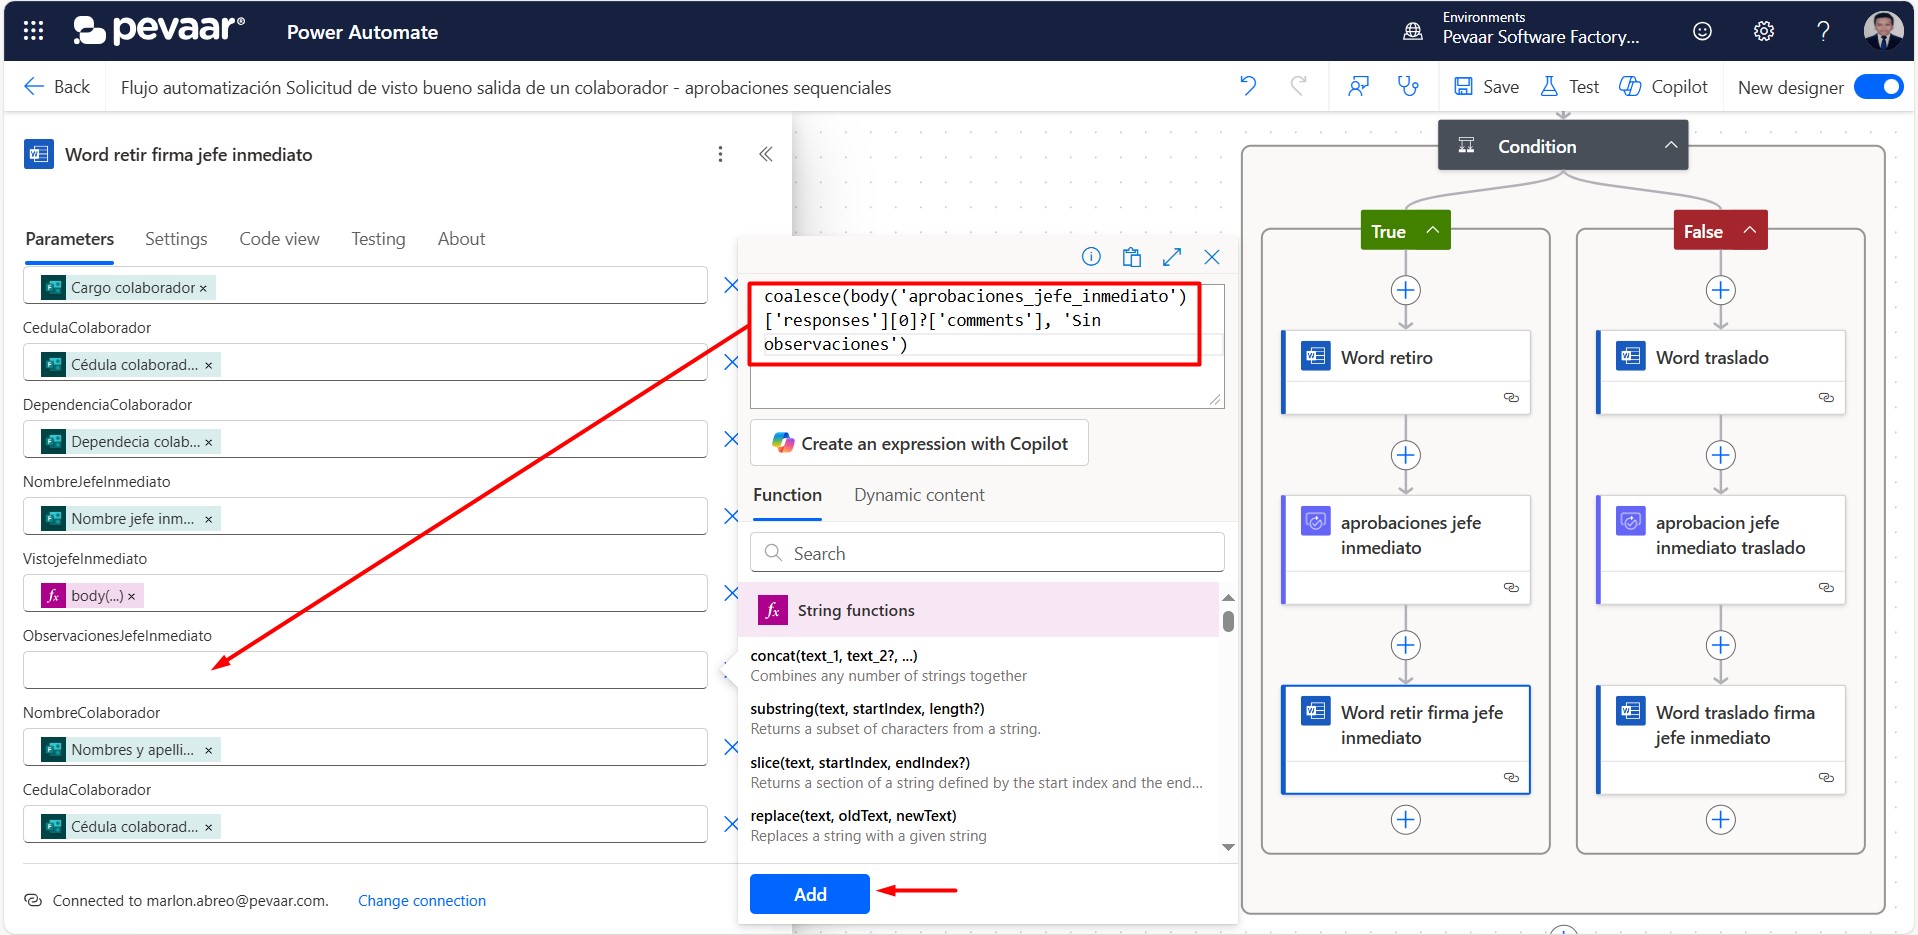
Image 39
On the “False” side of the condition, you must repeat steps 1.8, 1.8.1, and 1.8.2 after adding the previous “Start and wait for an approval” action.
1.9. The next step is to add an approval action for the second responsible person to approve the collaborator’s clearance. To do this, copy the approval action used for the first approver and paste it right after the previous “Populate a Word template” action named “Word retiro firma jefe inmediato” (Image 40).
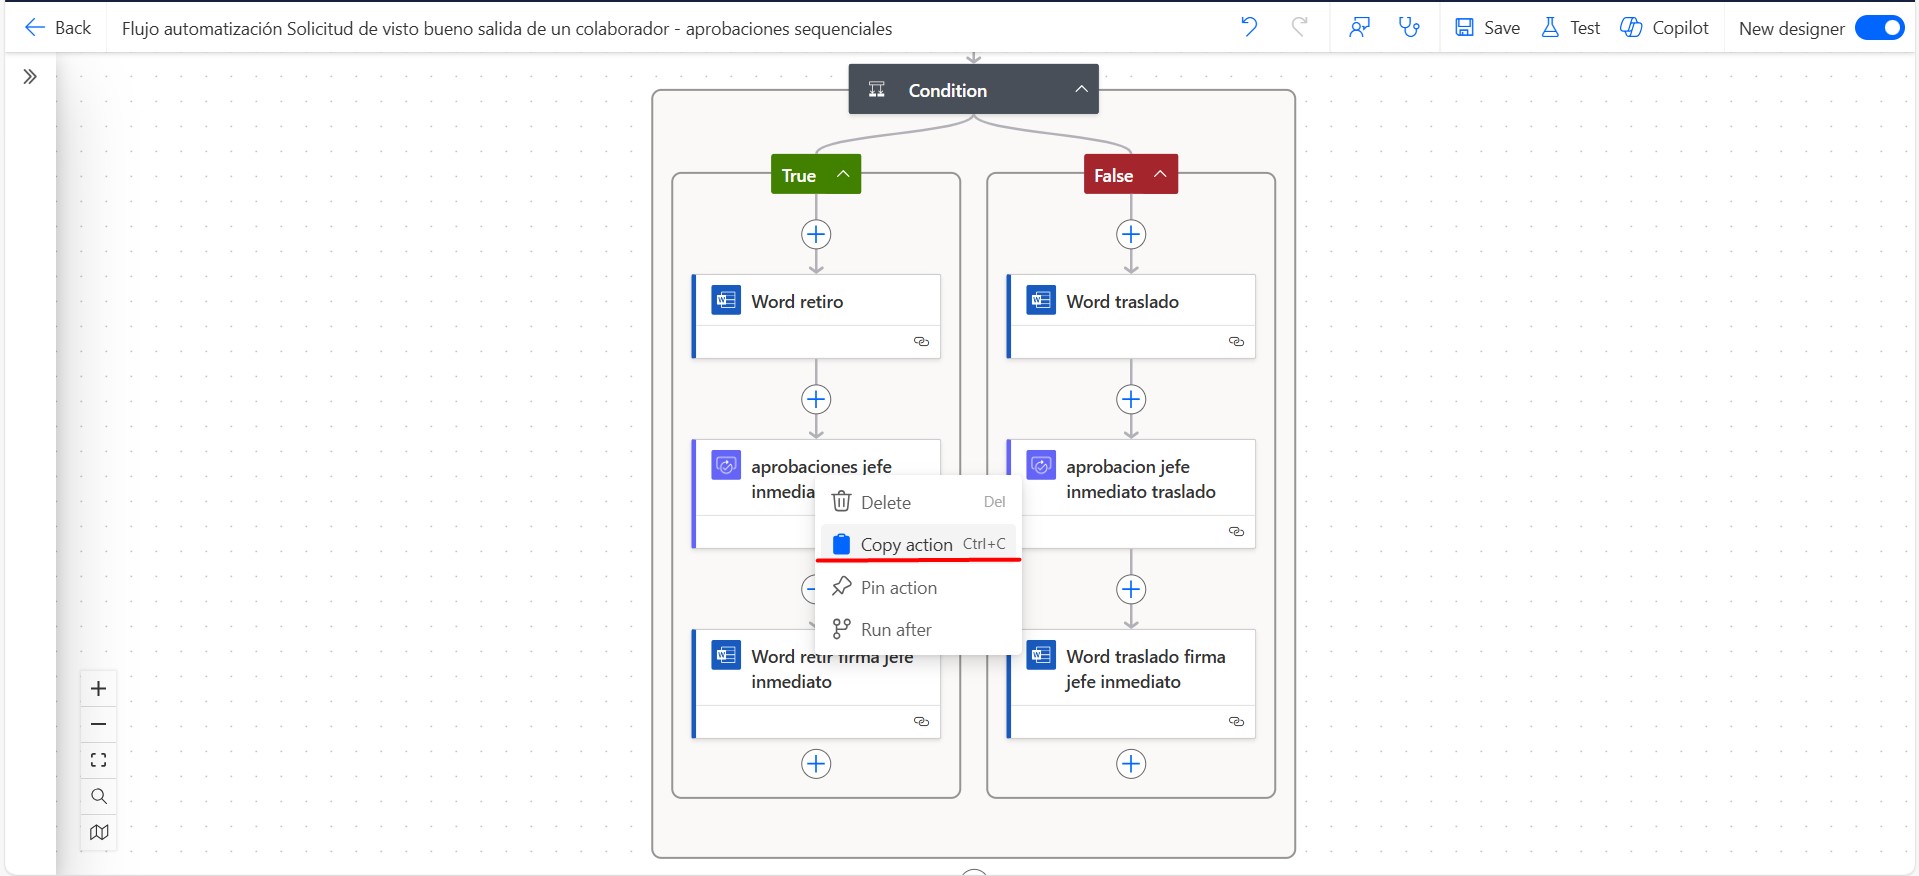
Image 40-1
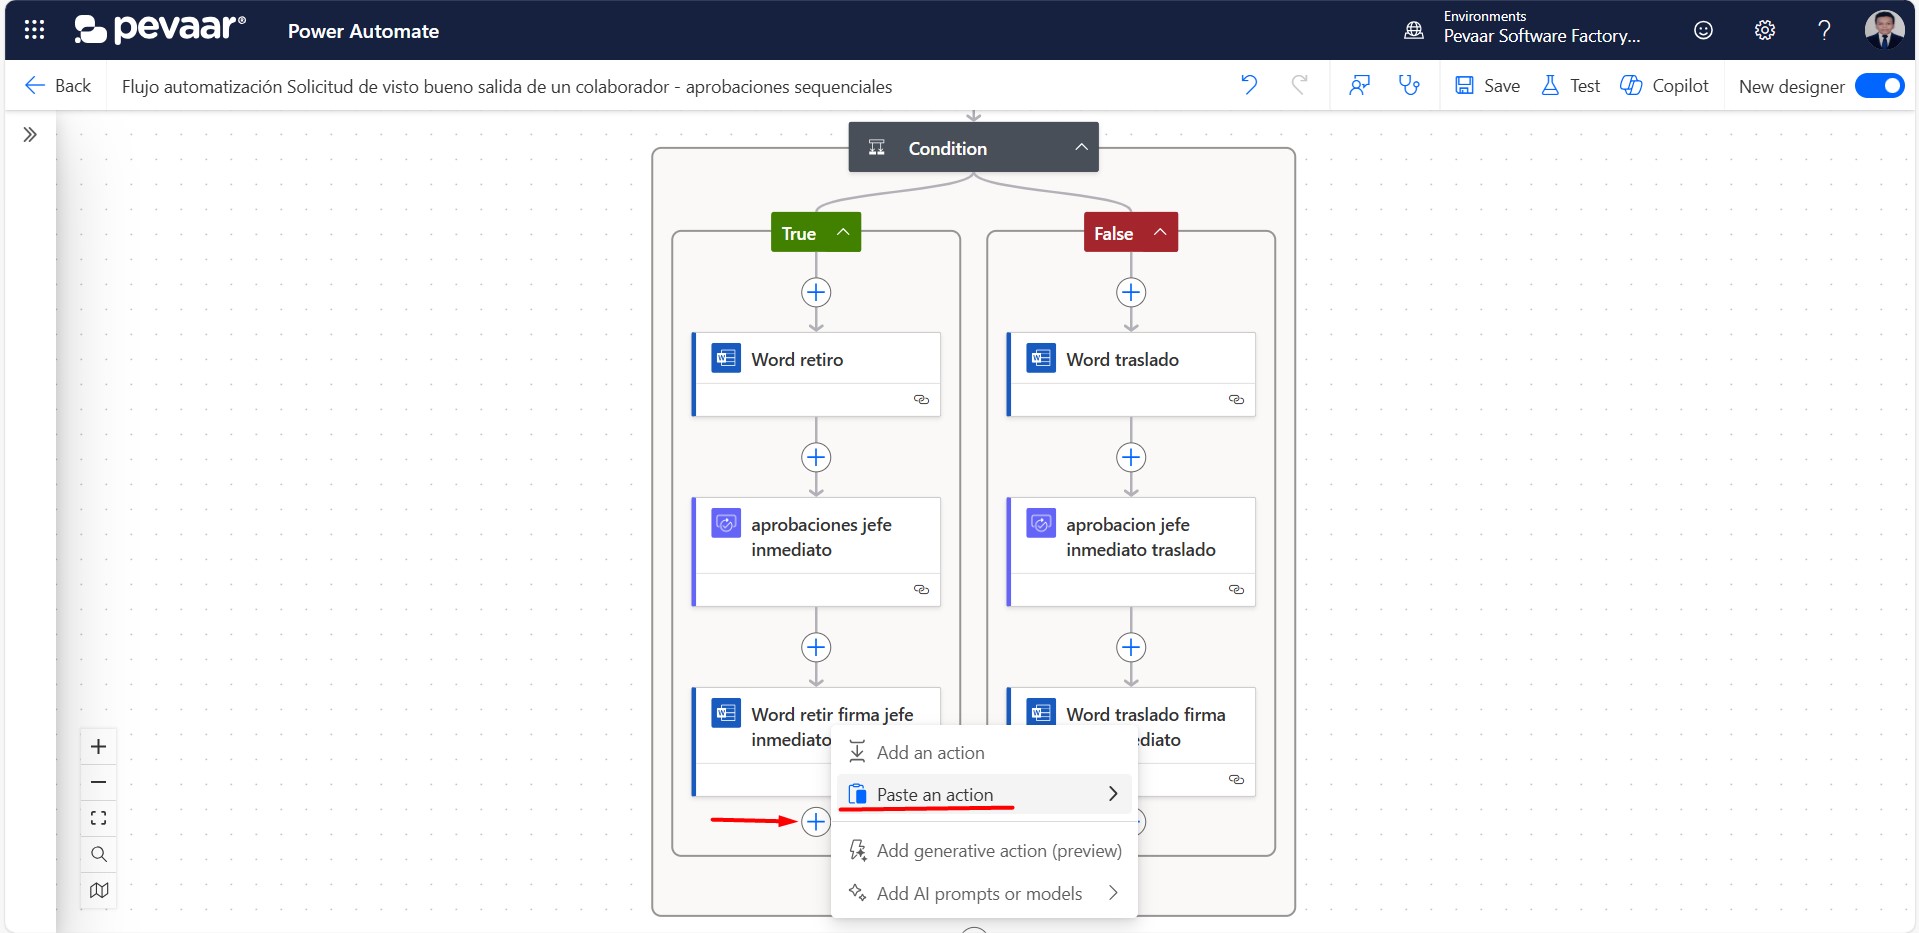
Image 40-2
We will rename the copied action to identify it more easily. In the “Assigned To” field, we will dynamically add the email address of the second person responsible for approving the clearance (Image 41). The details section will remain unchanged.

Image 41
1.9.1. We won’t make any changes to the “Requestor” field, as it already contains the email of the person who submitted the form. However, in the Attachments field, we’ll do the following:
Step 1: Select everything currently inside the Attachments field. (Image 42-1)
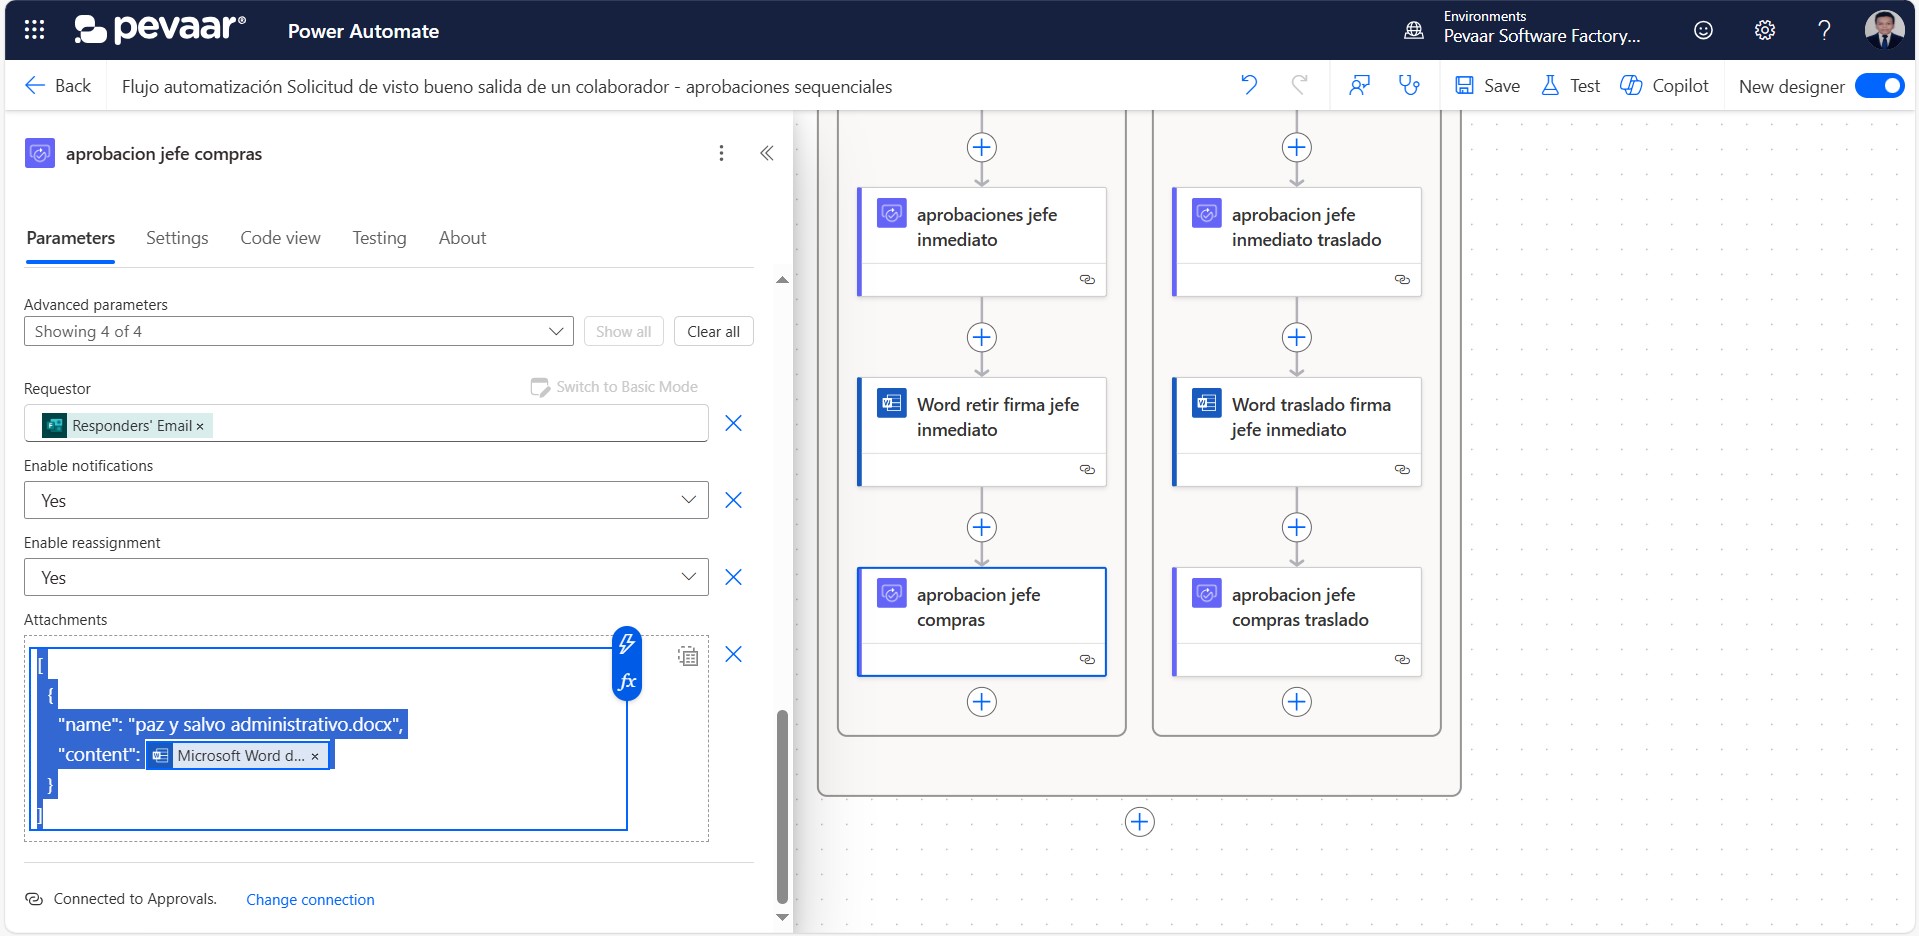
Image 42-1
Step 2: Delete the selection and click on the highlighted option. (Image 42-2)
 Image 42-2
Step 3: Add a new item. (Image 42-3)
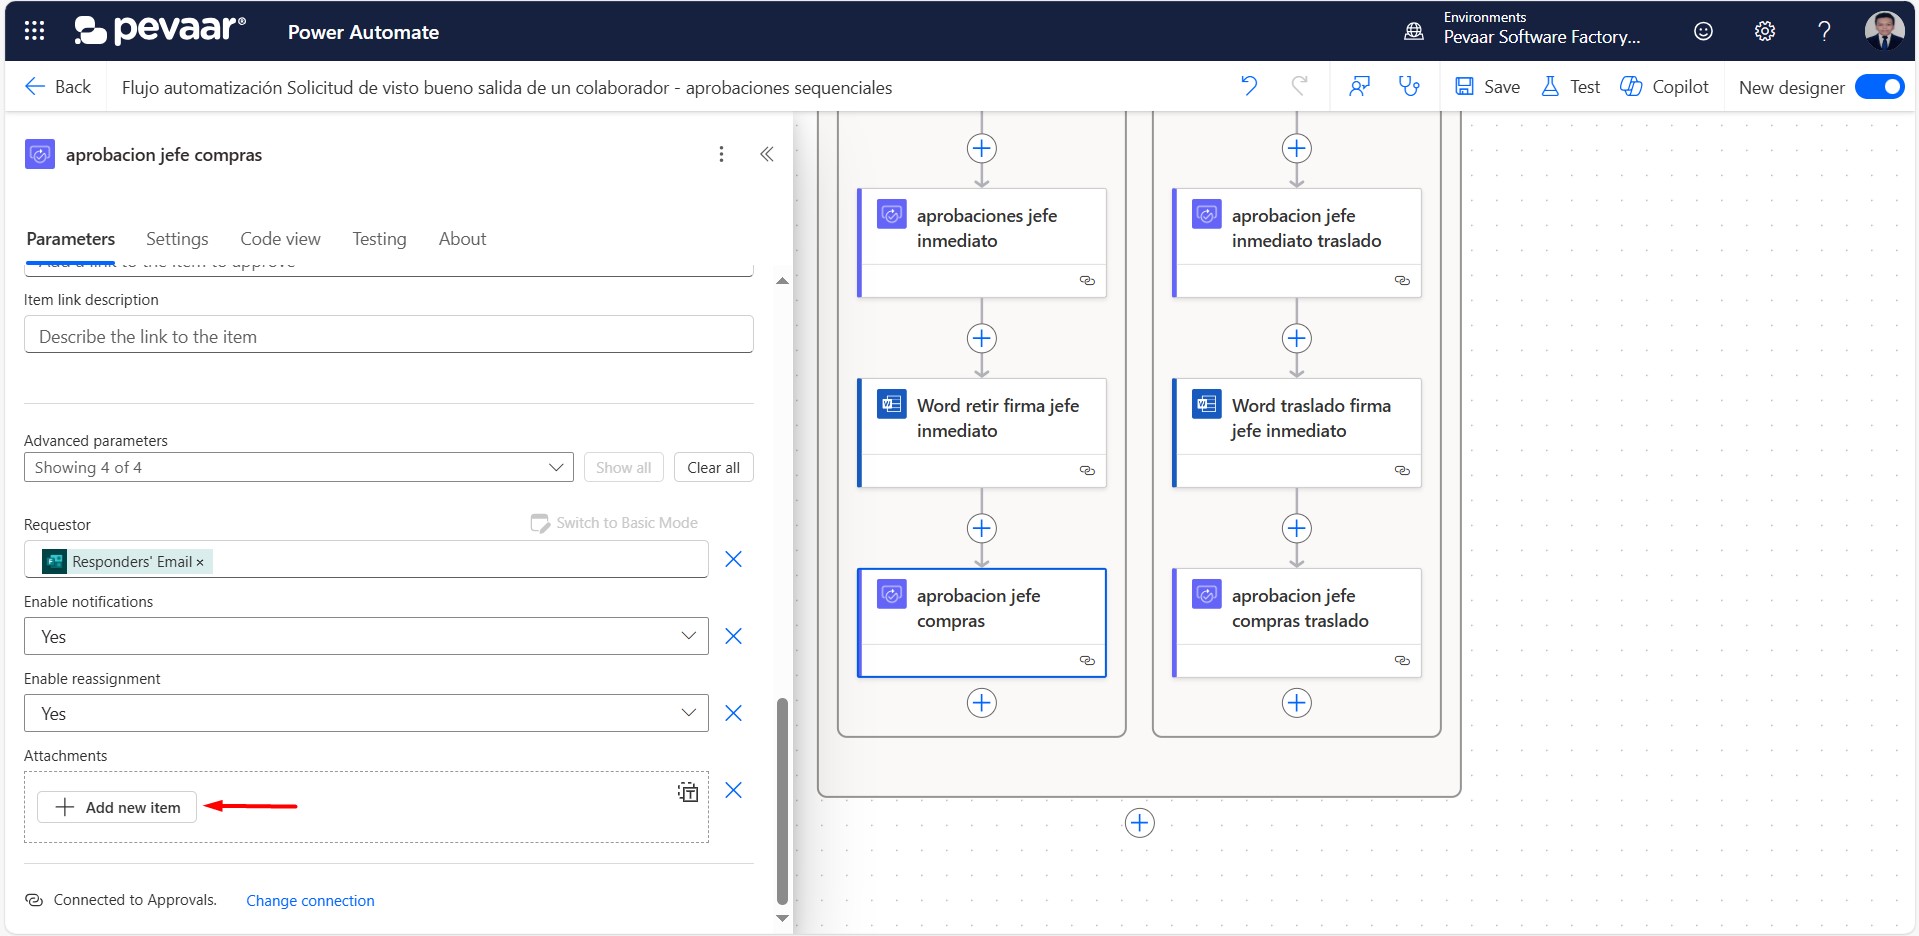 Image 42-3
Step 4: Give it a name ending in .docx, and for the attachment content, select the output from the previous “Populate a Microsoft Word template” action named “word retiro firma jefe inmediato” (Image 42-4)
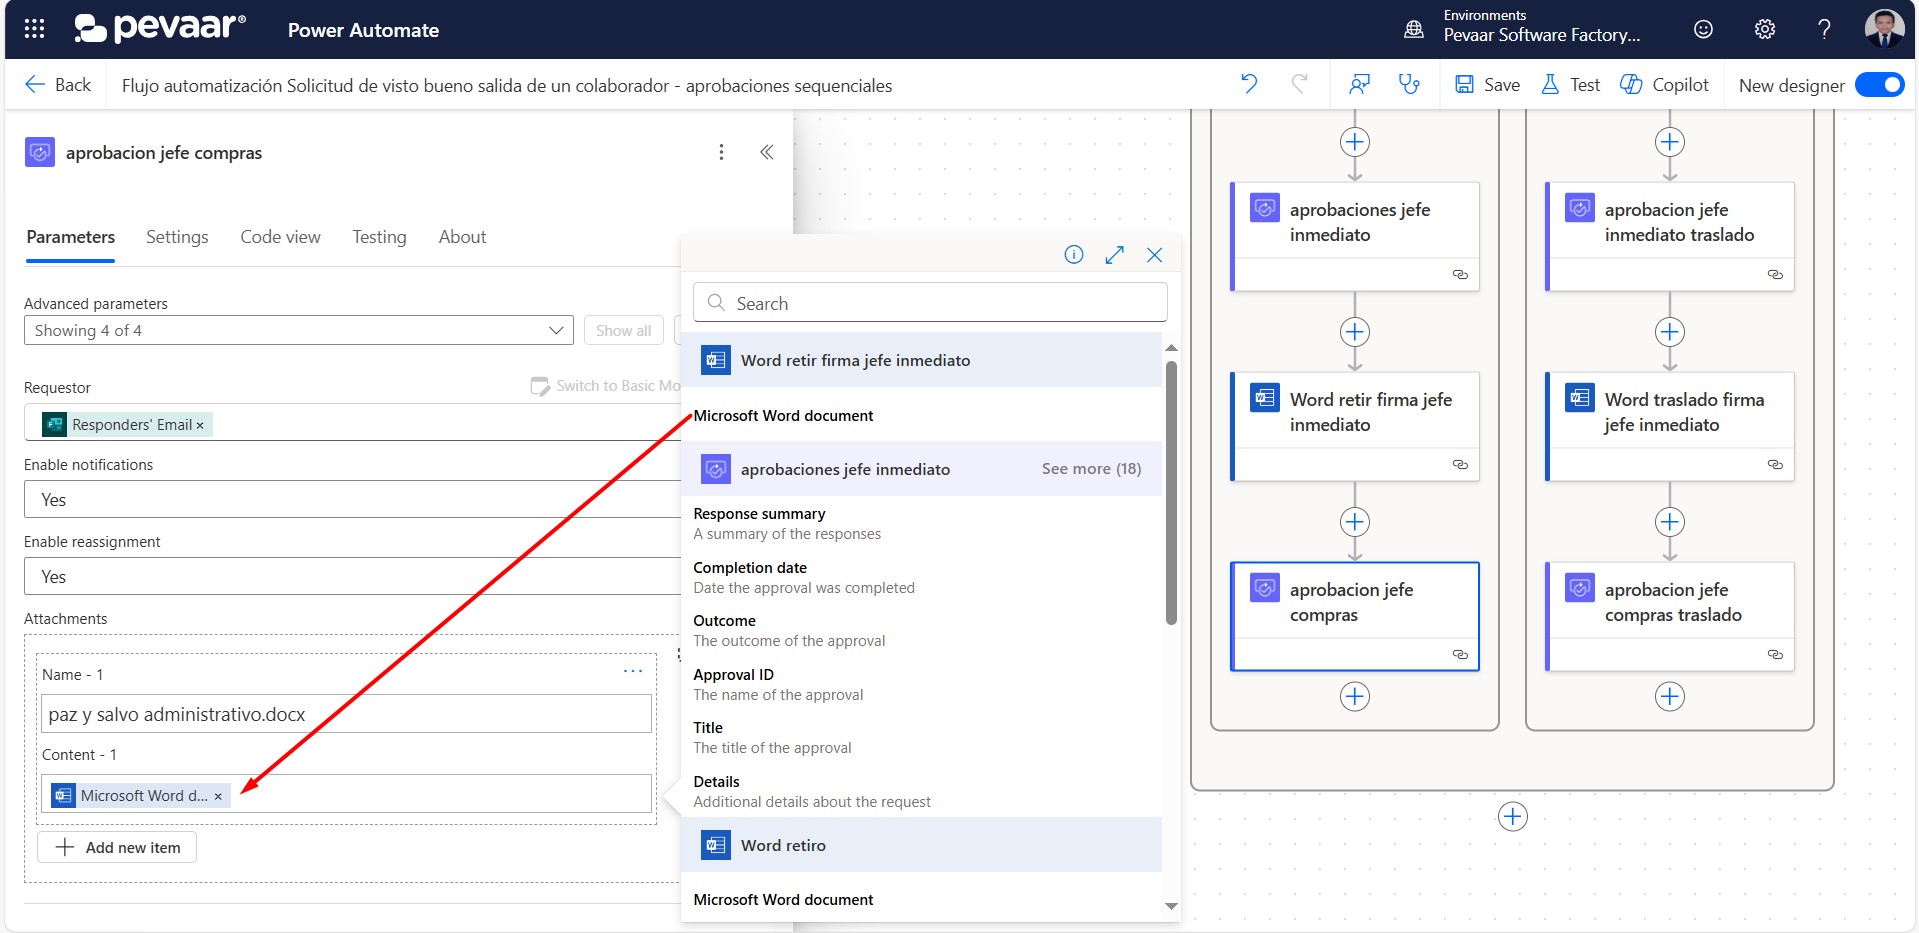
Image 42-4
On the “False” side of the condition, you must repeat steps 1.9 and 1.9.1 after having added the previous “Populate a Microsoft Word template” action.
1.10. With the previous action, the second approver has given their approval for the collaborator’s clearance. The next step is to fill in the fields for name, approval status, and comments of that approver in the document template.
We will copy the “Populate a Microsoft Word template” action named “word retiro firma jefe inmediato” that we created earlier and paste it after the second approver’s approval action (Image 43-1) (Image 43-2)
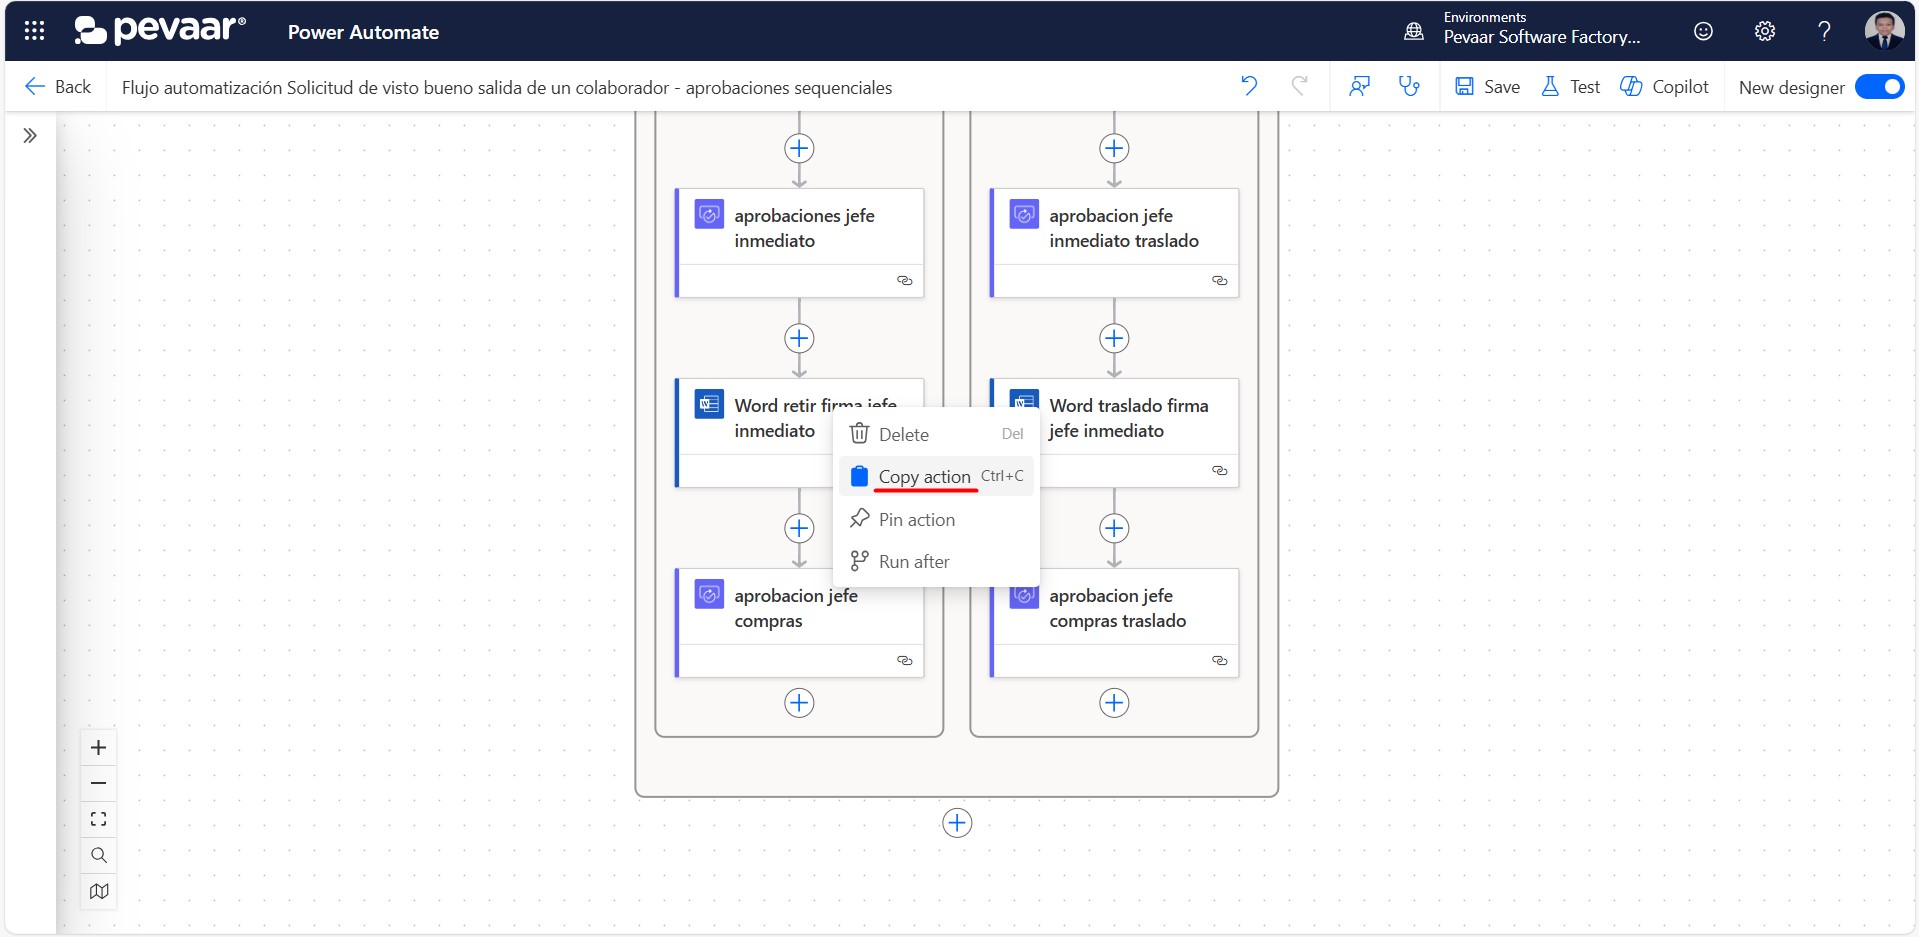
Image 43-1
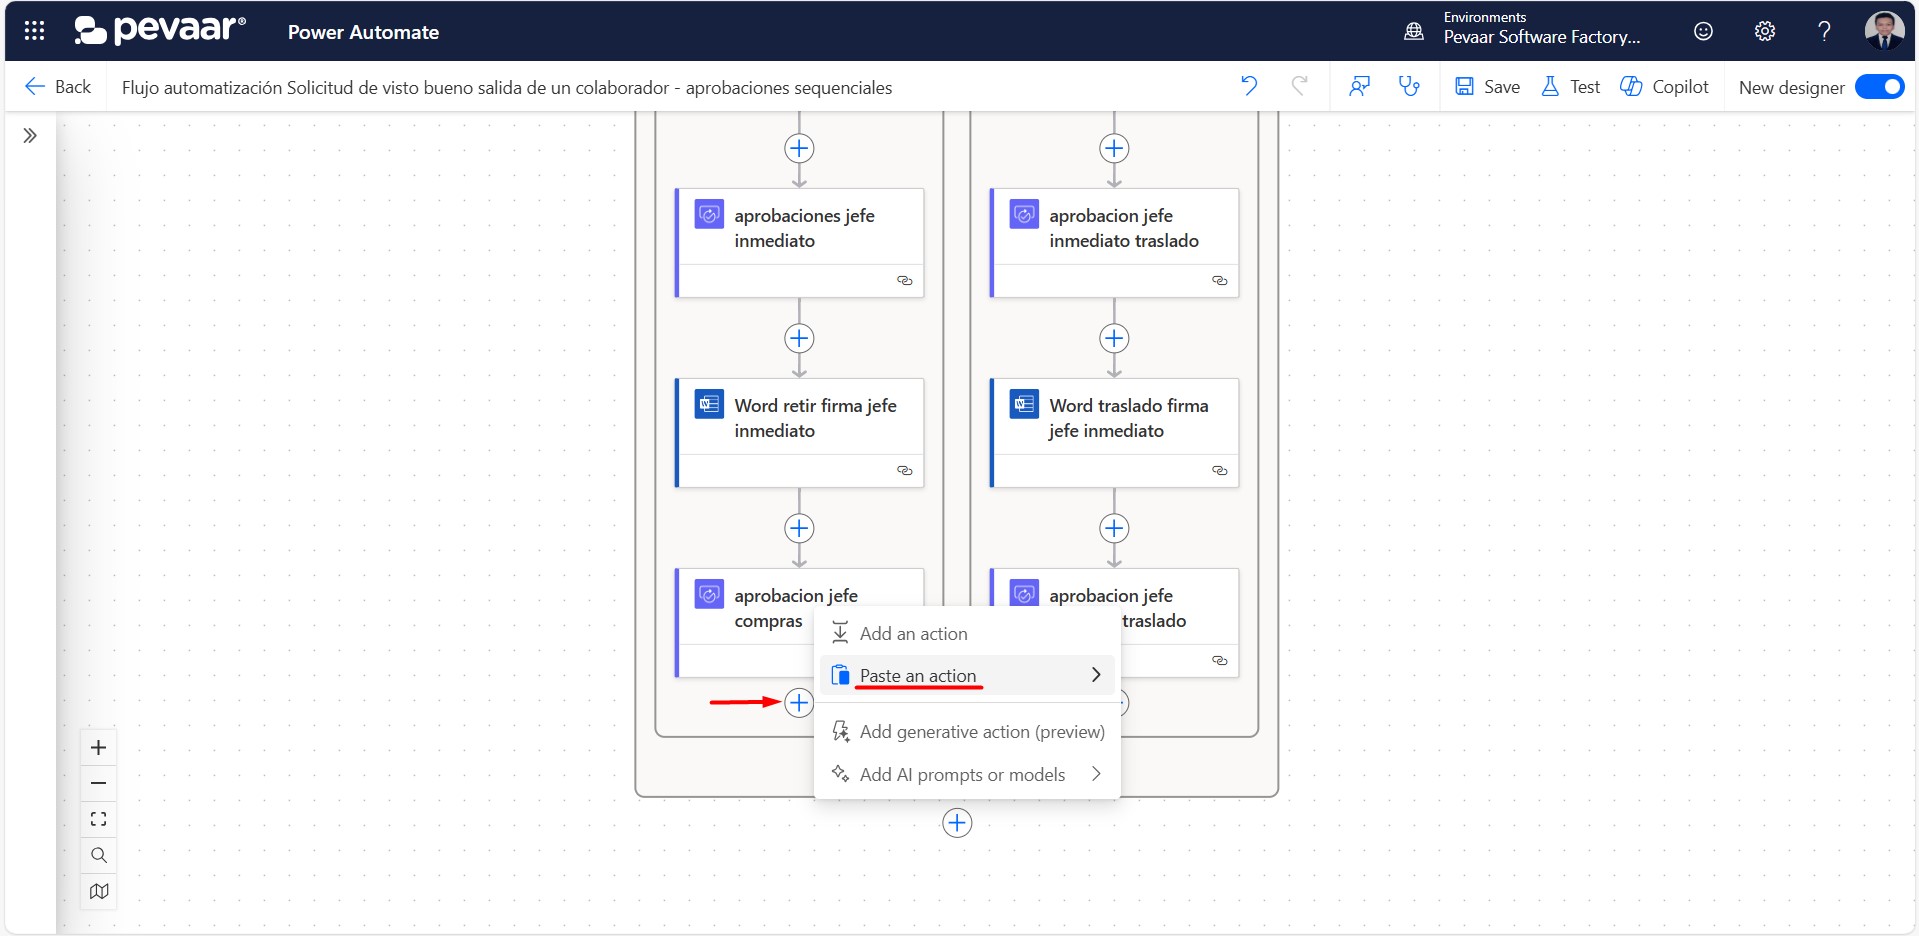
Image 43-2
After copying the action, we will rename it to differentiate it from the others. In the advanced parameters, we will add the fields for name, approval status, and comments of the second approver (Image 44).
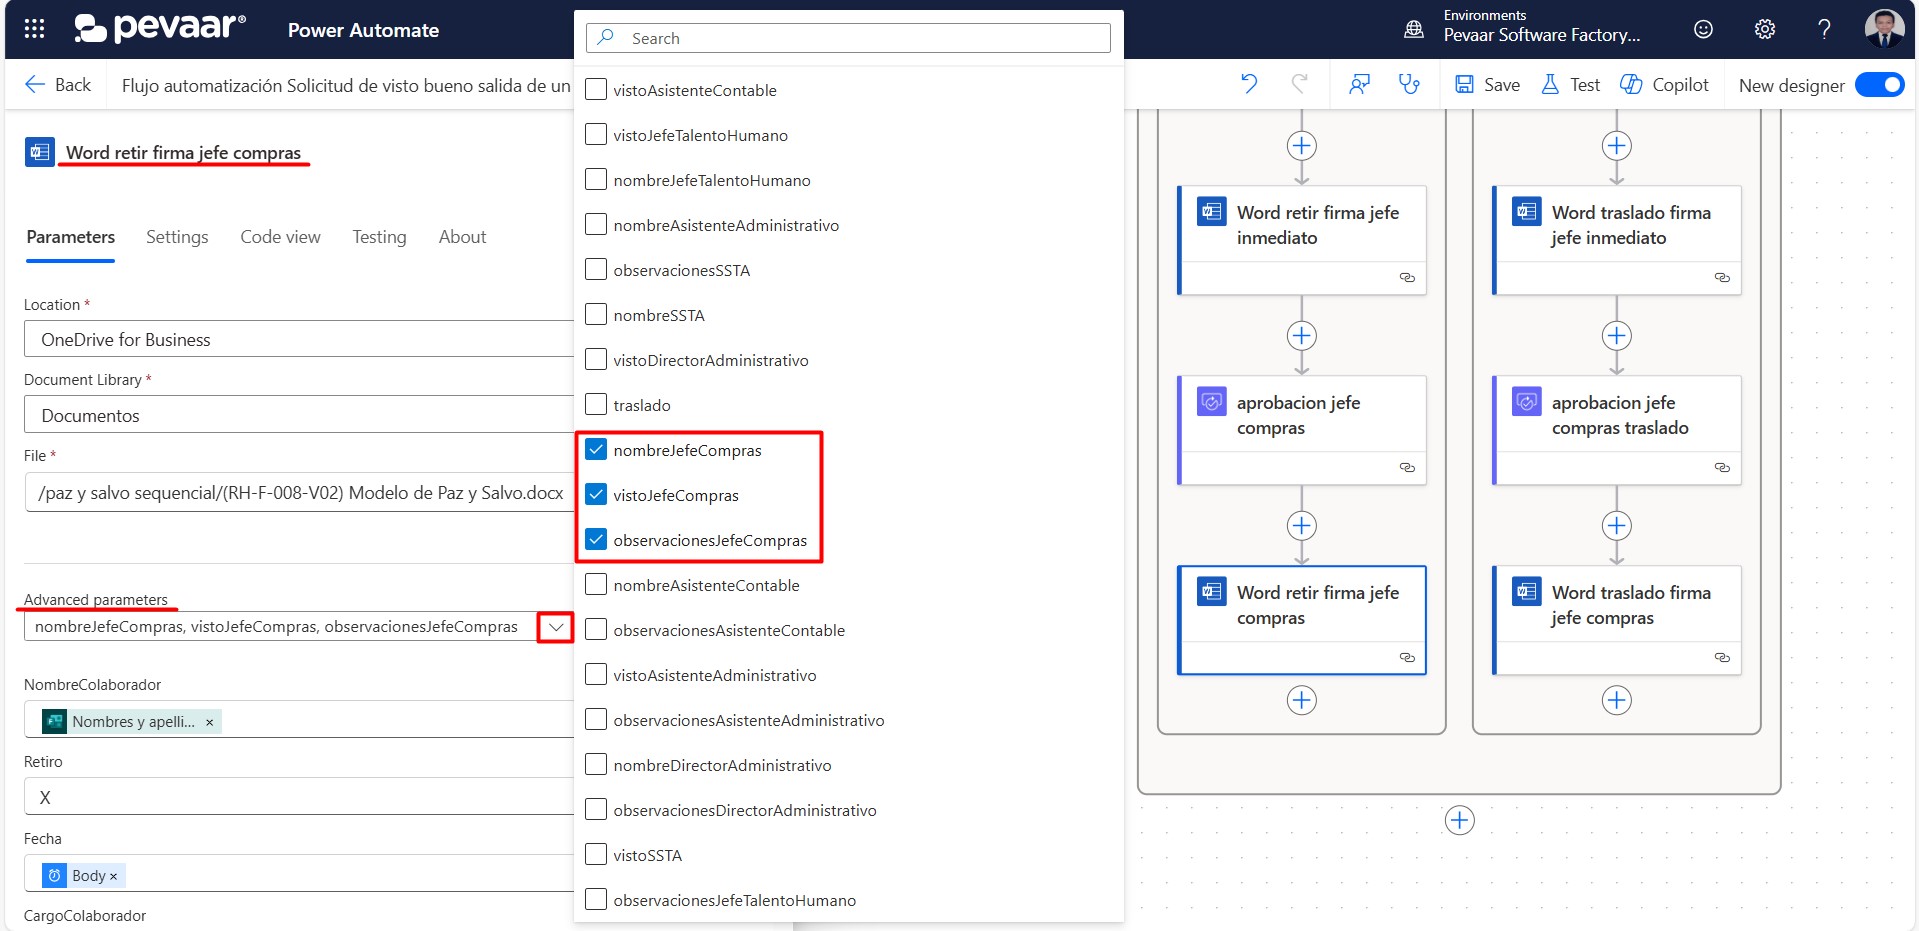
Image 44
The name of the approver will be added dynamically from the form (Image 45).
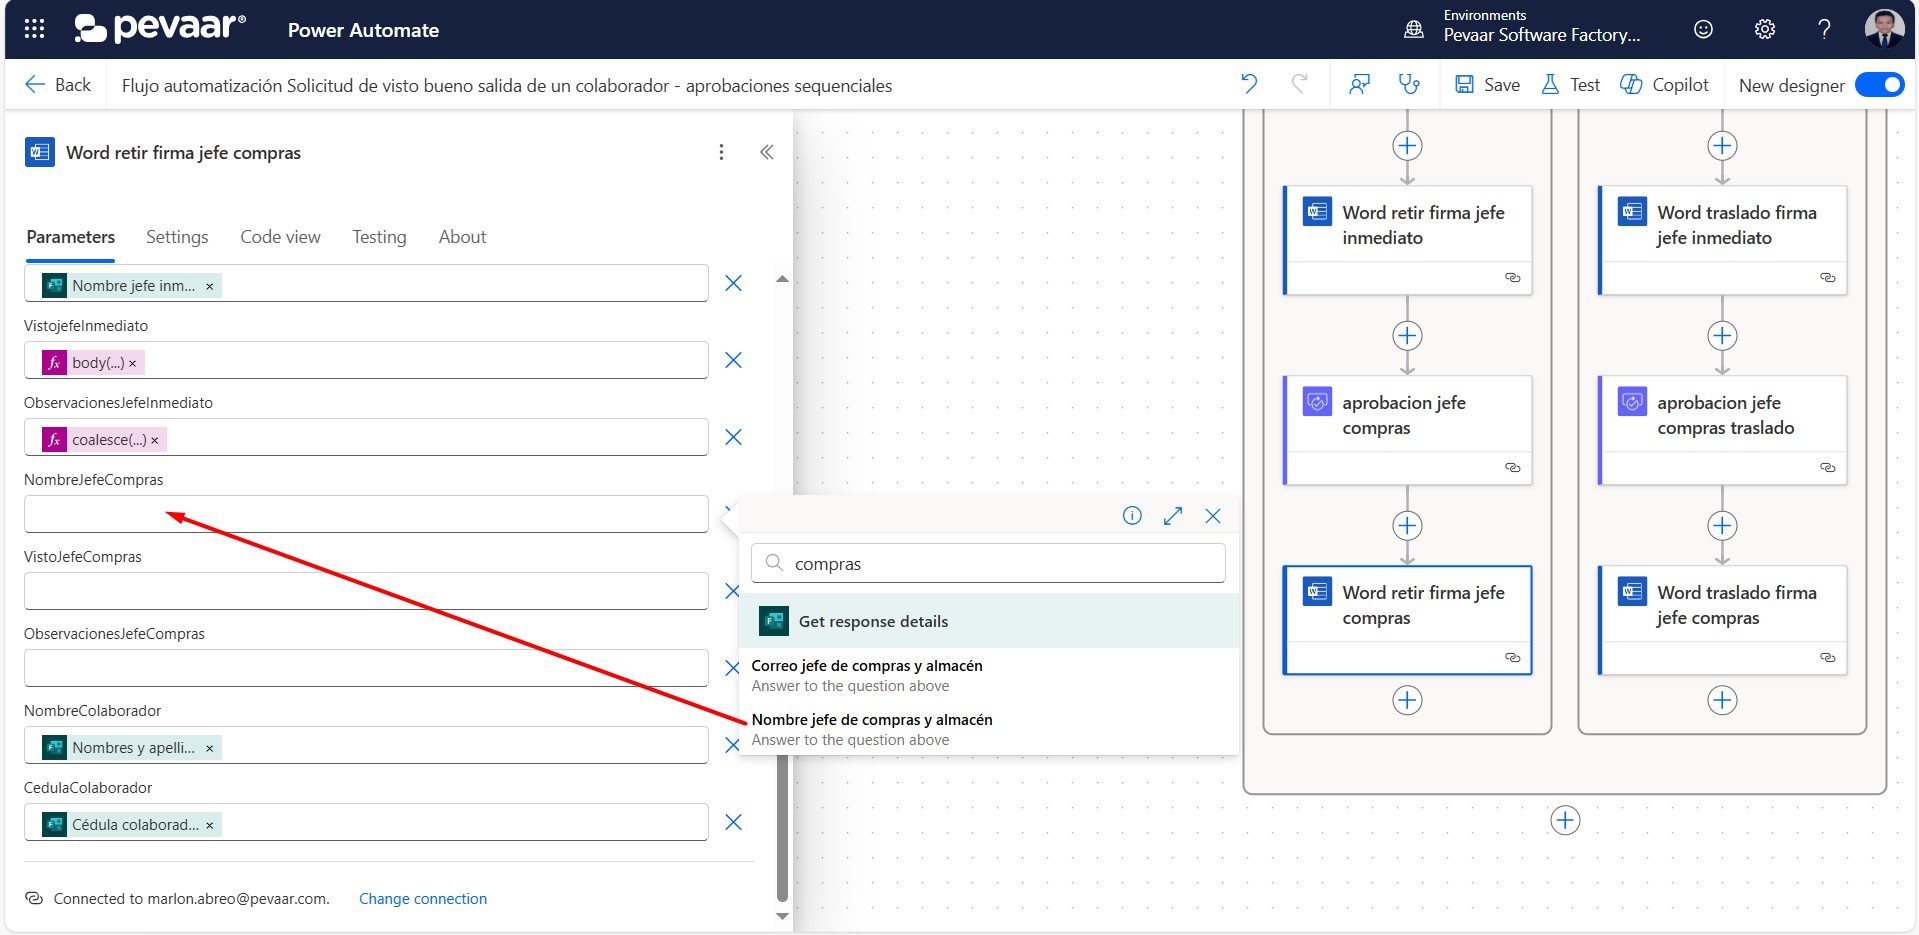
Image 45
1.10.1. To fill in the approval field, click on the Fx option and add the following expression: body(‘aprobacion_jefe_compras’)[‘responses’][0][‘approverResponse’]
The name inside the quotation marks and parentheses of body(‘ ‘) must match the name of the previous approval action. After typing the expression, click Add. This function is used to retrieve the approver’s response, in this case, “Paz y salvo” (Image 46).
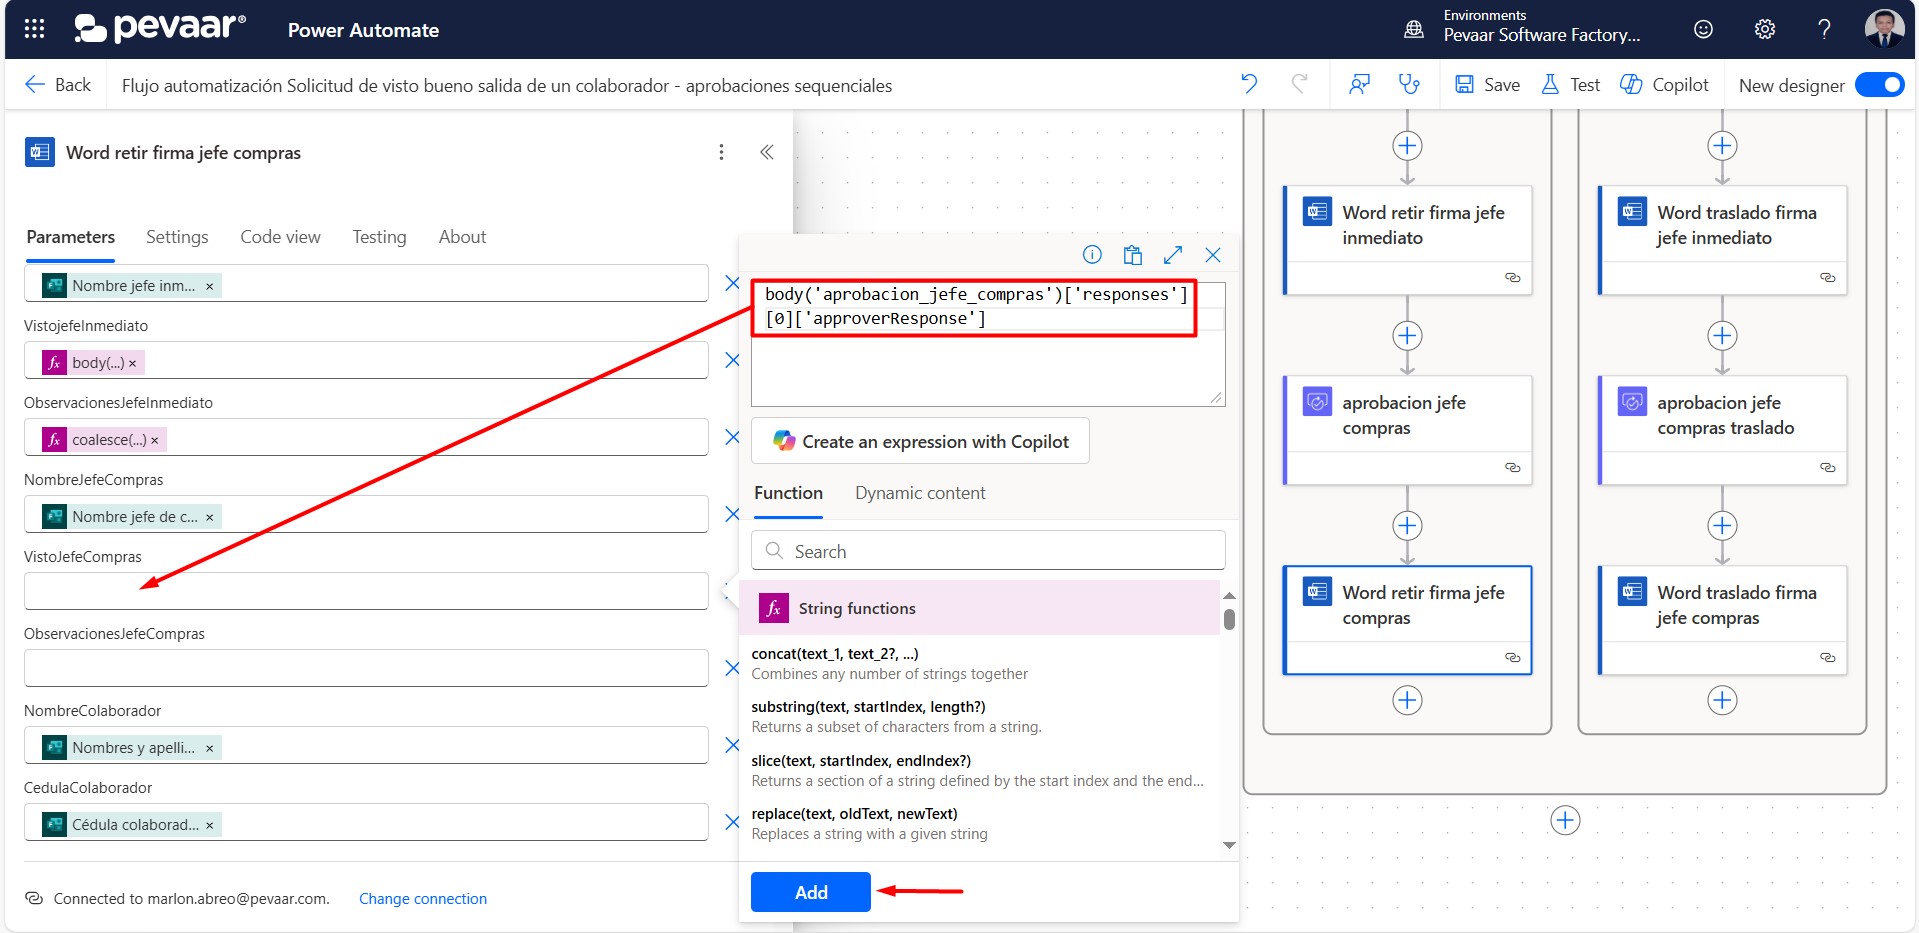
Image 46
1.10.2. In the Observations field, similarly click on Fx and enter the following expression: coalesce(body(‘aprobaciones_jefe_inmediato‘)[‘responses’][0]?[‘comments’], ‘Sin observaciones‘)
After entering the expression, click Add. This function retrieves the approver’s comments. If there were no comments, it will display the default text “Sin observaciones“. As before, the name inside the quotation marks and parentheses of body(‘ ‘) must match the name of the previous approval action (Image 47).
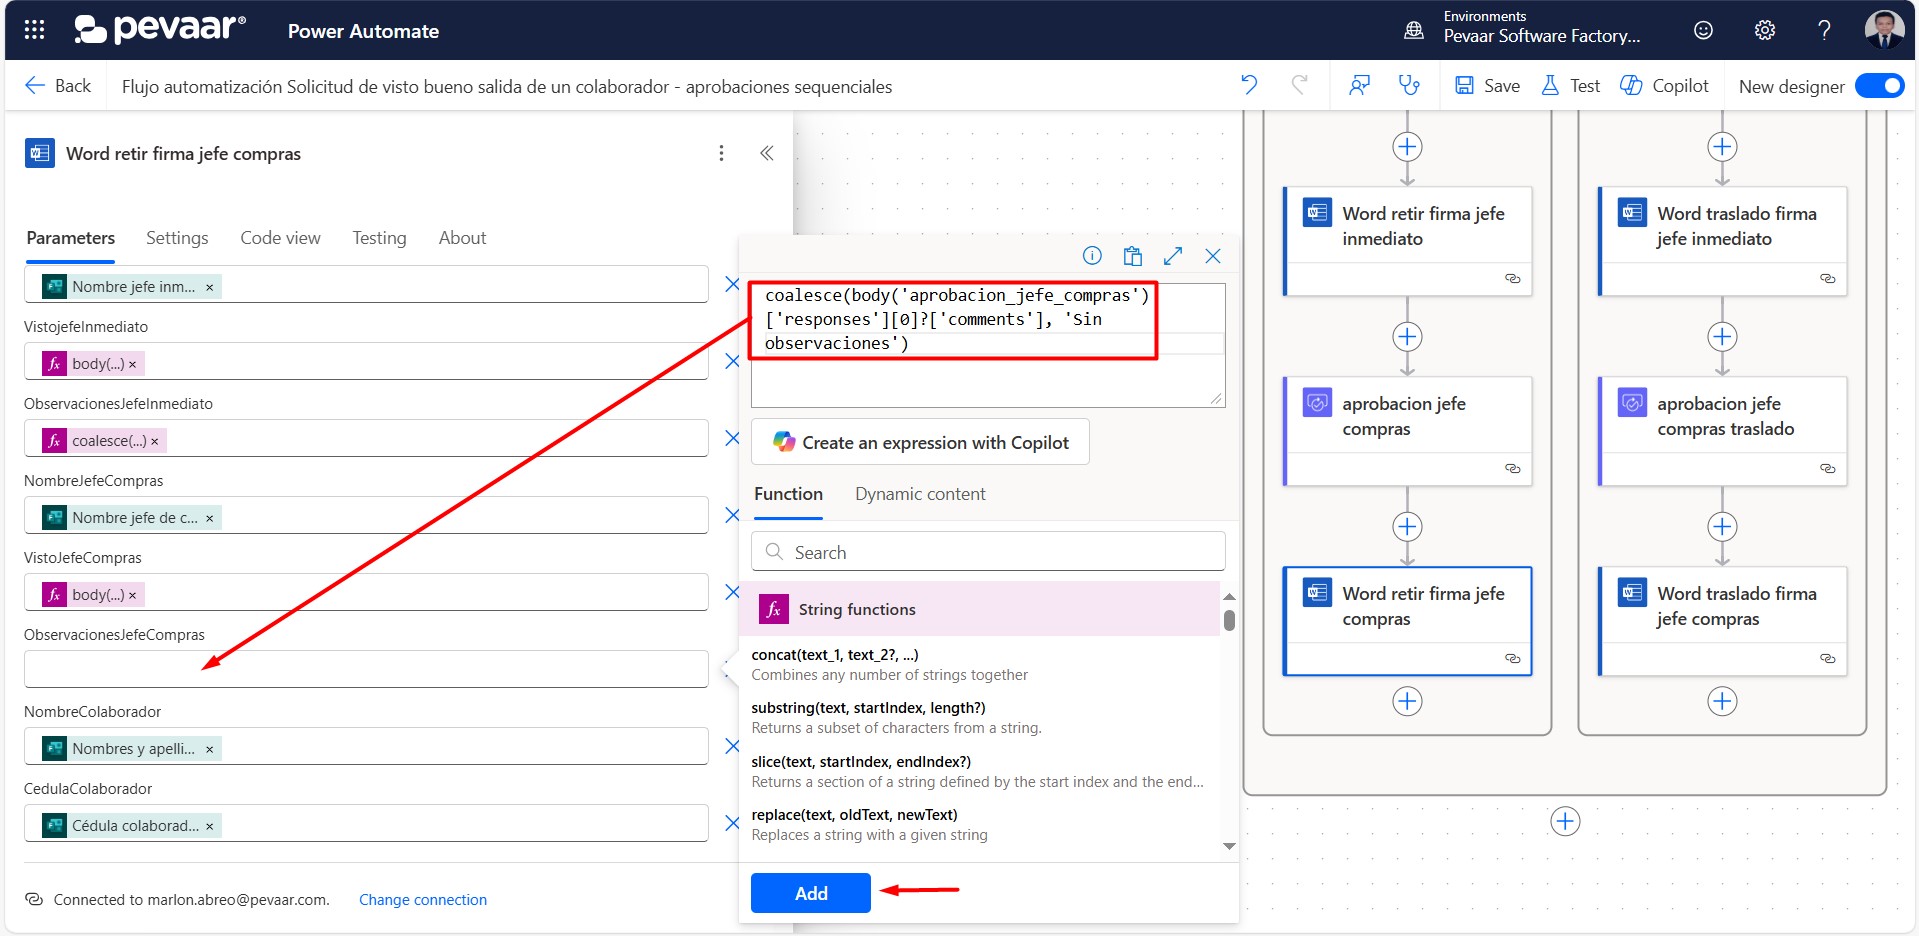
Image 47
On the “False” side of the condition, you must repeat steps 1.10, 1.10.1, and 1.10.2 after having added the previous “Start and wait for approval” action.
1.11. So far, the file we’ve modified hasn’t been saved as if we had manually created it. What we need to do now is create a new file with that content. To do this, we’ll use the “Create file” action from OneDrive for Business.
In the action search bar, type the keyword “create file” and select the option “Create file” (Image 48).

Image 48
1.12. We rename the action. In the “Folder Path”, we search for the folder where we want to save the file. In “File name”, we’ll enter a descriptive name that includes information about the collaborator and the date, followed by the .docx extension. In “File content”, we select the output from the previous “Populate a Microsoft Word template” action (Image 49).
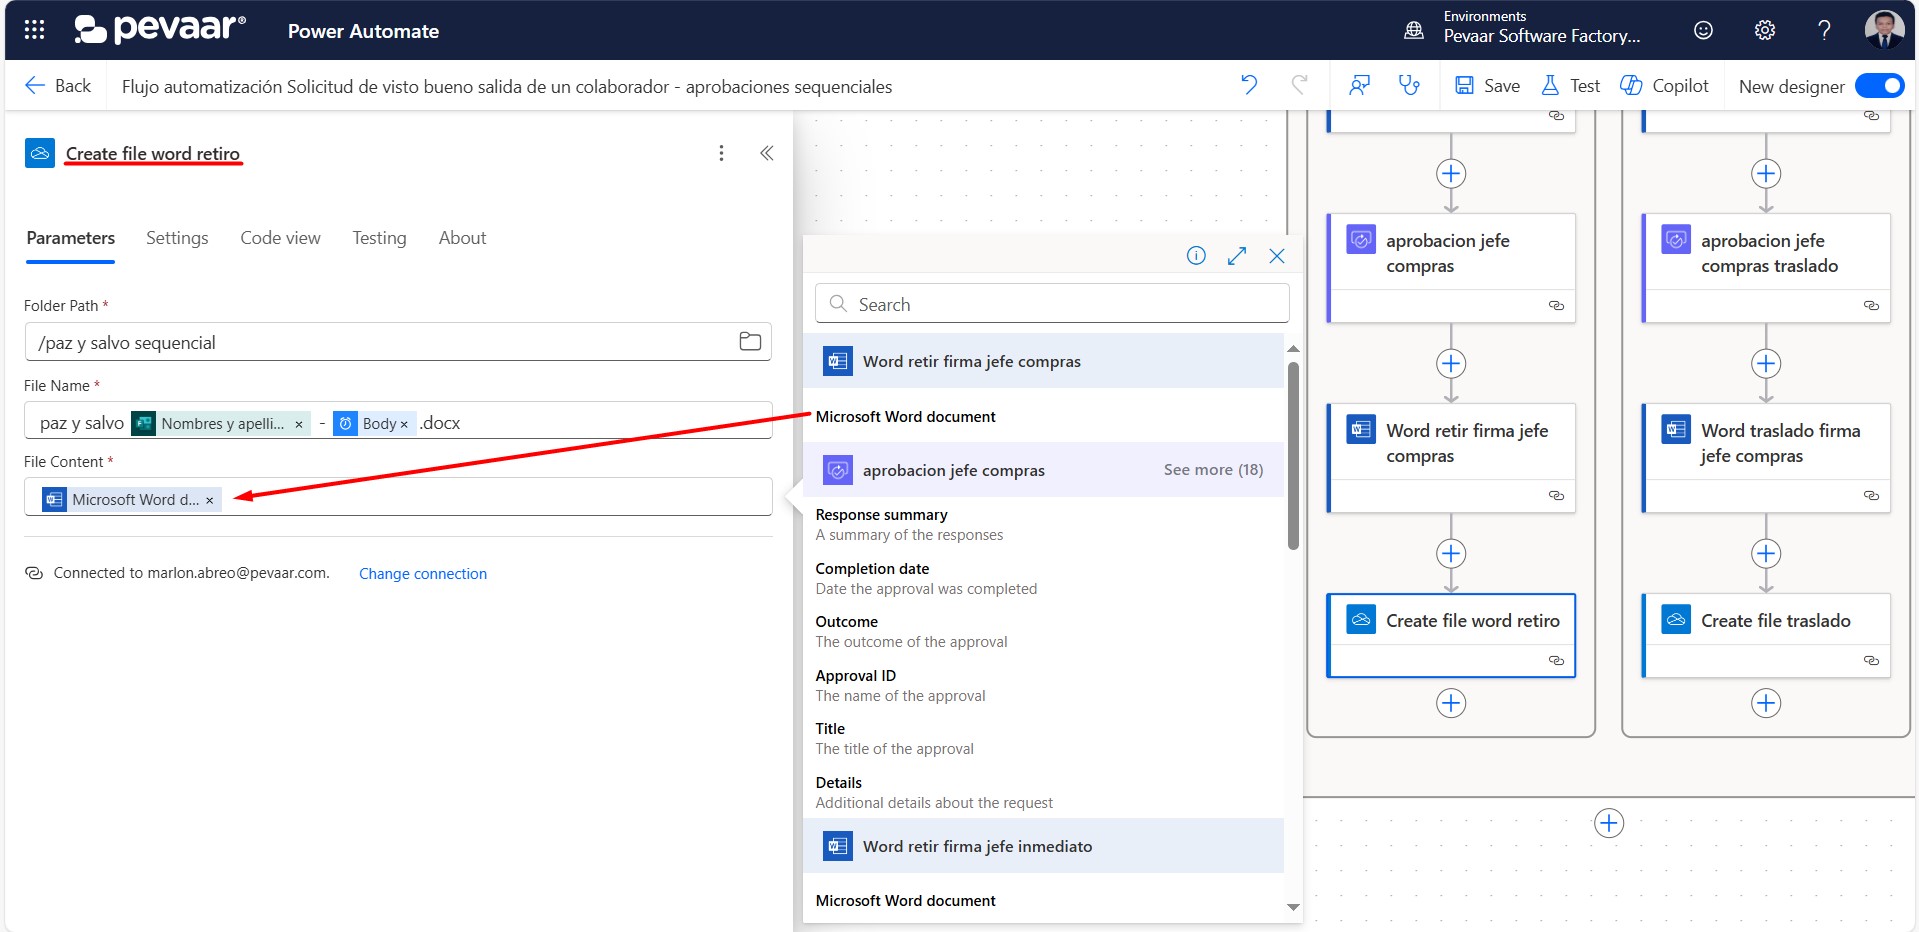
Image 49
On the “False” side of the condition, you must repeat step 1.12 after having added the previous “Populate a Microsoft Word template” action.
1.13. The next step is to convert the created Word file into a PDF. To do this, we will use the “Convert file” action from OneDrive for Business. In the action search bar, type the keyword “convert file” and select the option “Convert file” (Image 50).
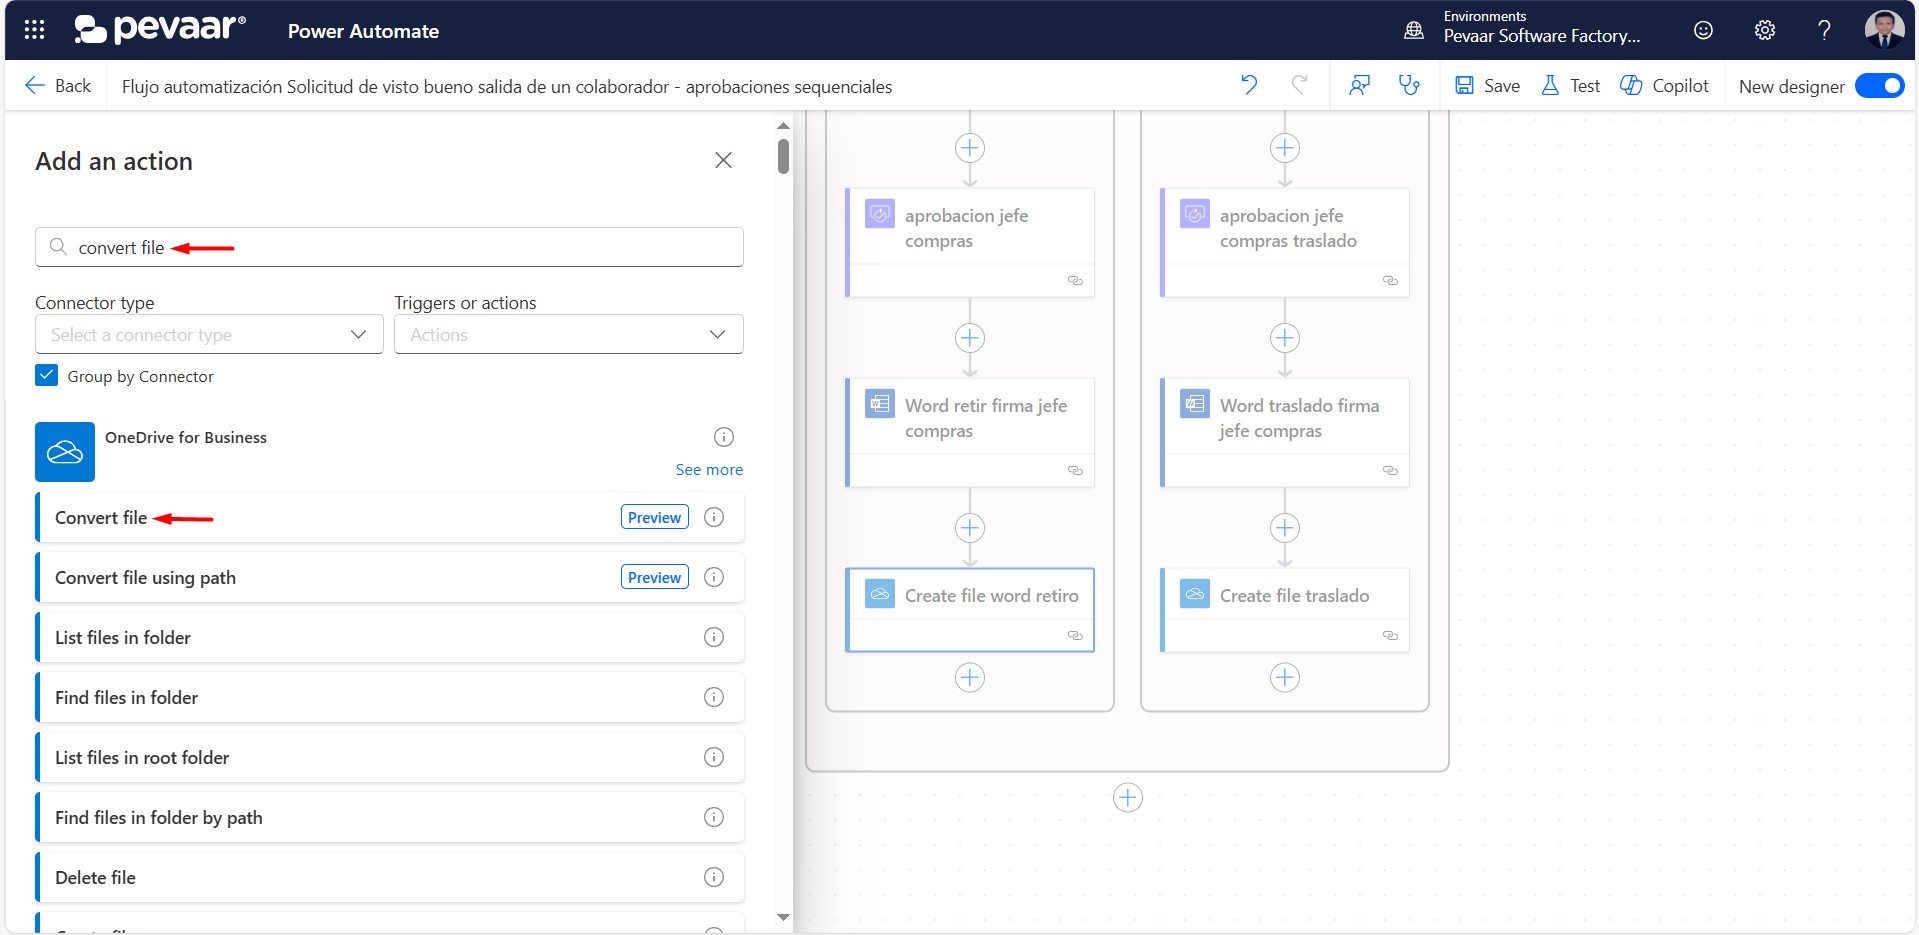
Image 50
We will rename the action. In the “File” field, select the file ID dynamically from the file created in the previous action. In the “Target type” field, leave it as PDF (Image 51).

Image 51
On the “False” side of the condition, you must repeat steps 1.13 after having added the previous “Create file” action.
1.14. The PDF file is also intended to be saved, so we need to create a file with that content. To do this, we will use the “Create file” action from OneDrive for Business.
In the action search bar, type the keyword “create file” and select the “Create file” option (Image 52).
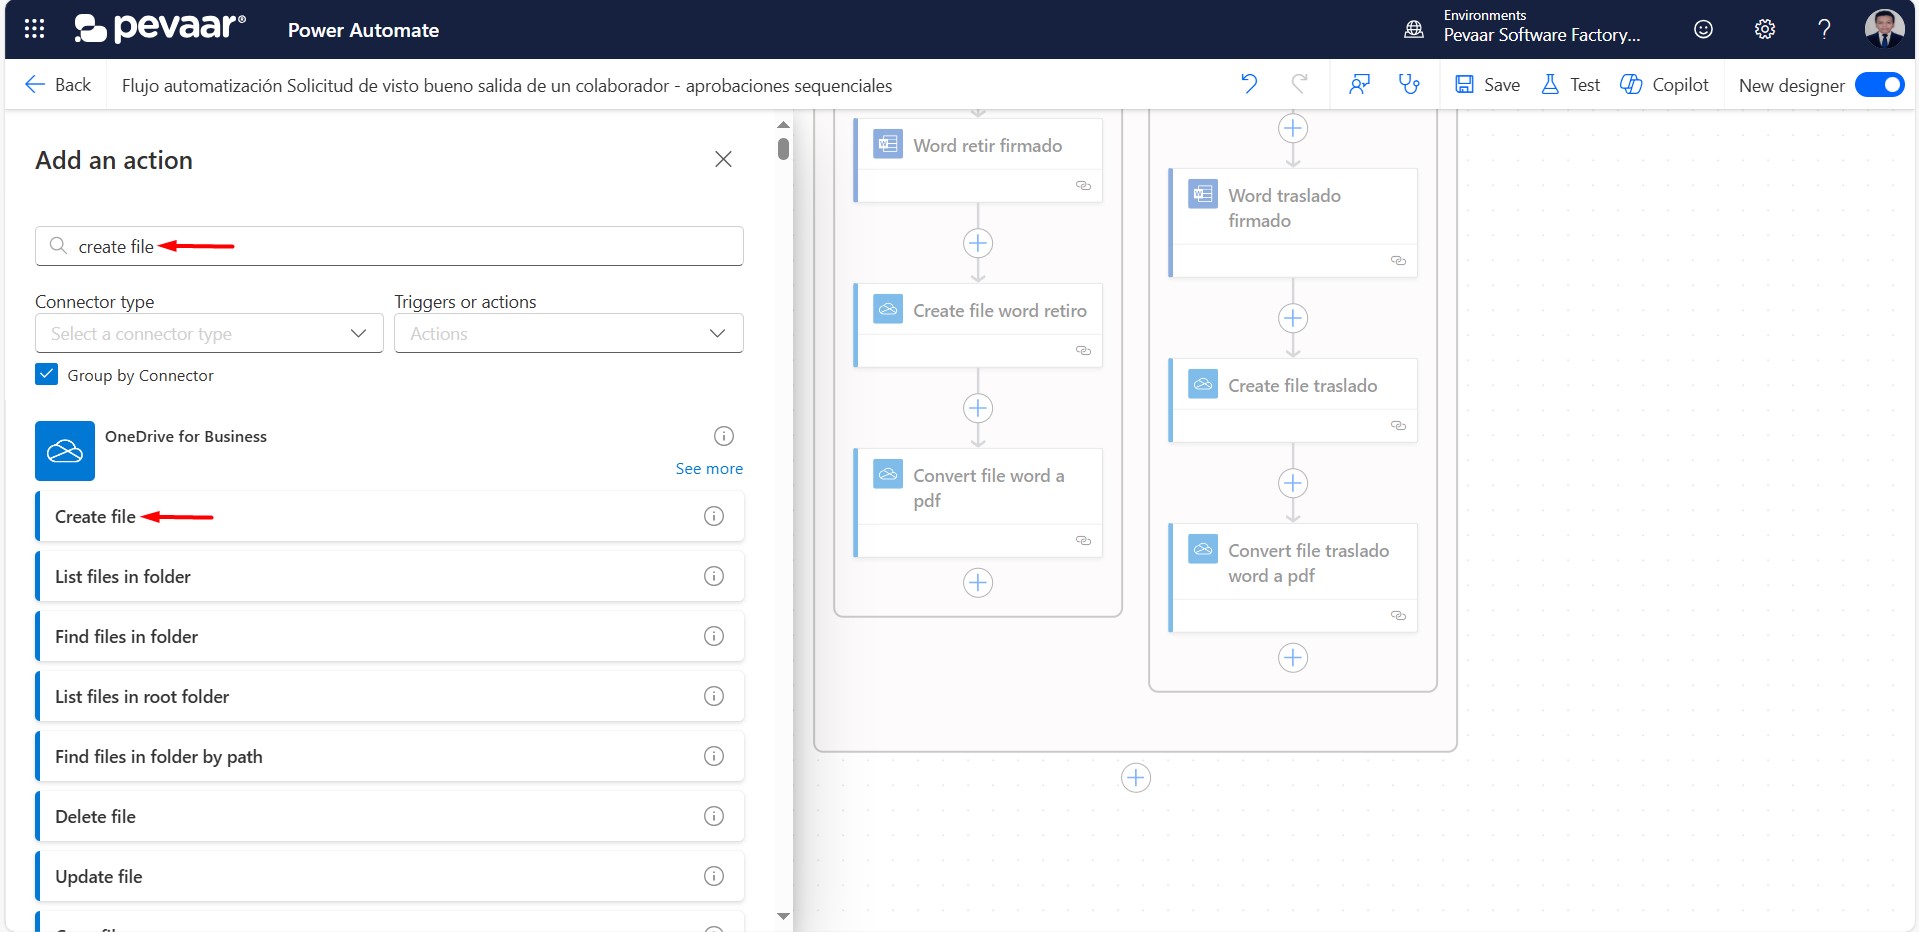
Image 52
We rename the action. In the “Folder Path,” we select the location where we want to save the file. In the “File name,” we write a descriptive name that includes information about the employee and the date, ending with the .pdf extension. In the “File content” field, we select the output from the previous “Convert file” action (Image 53).
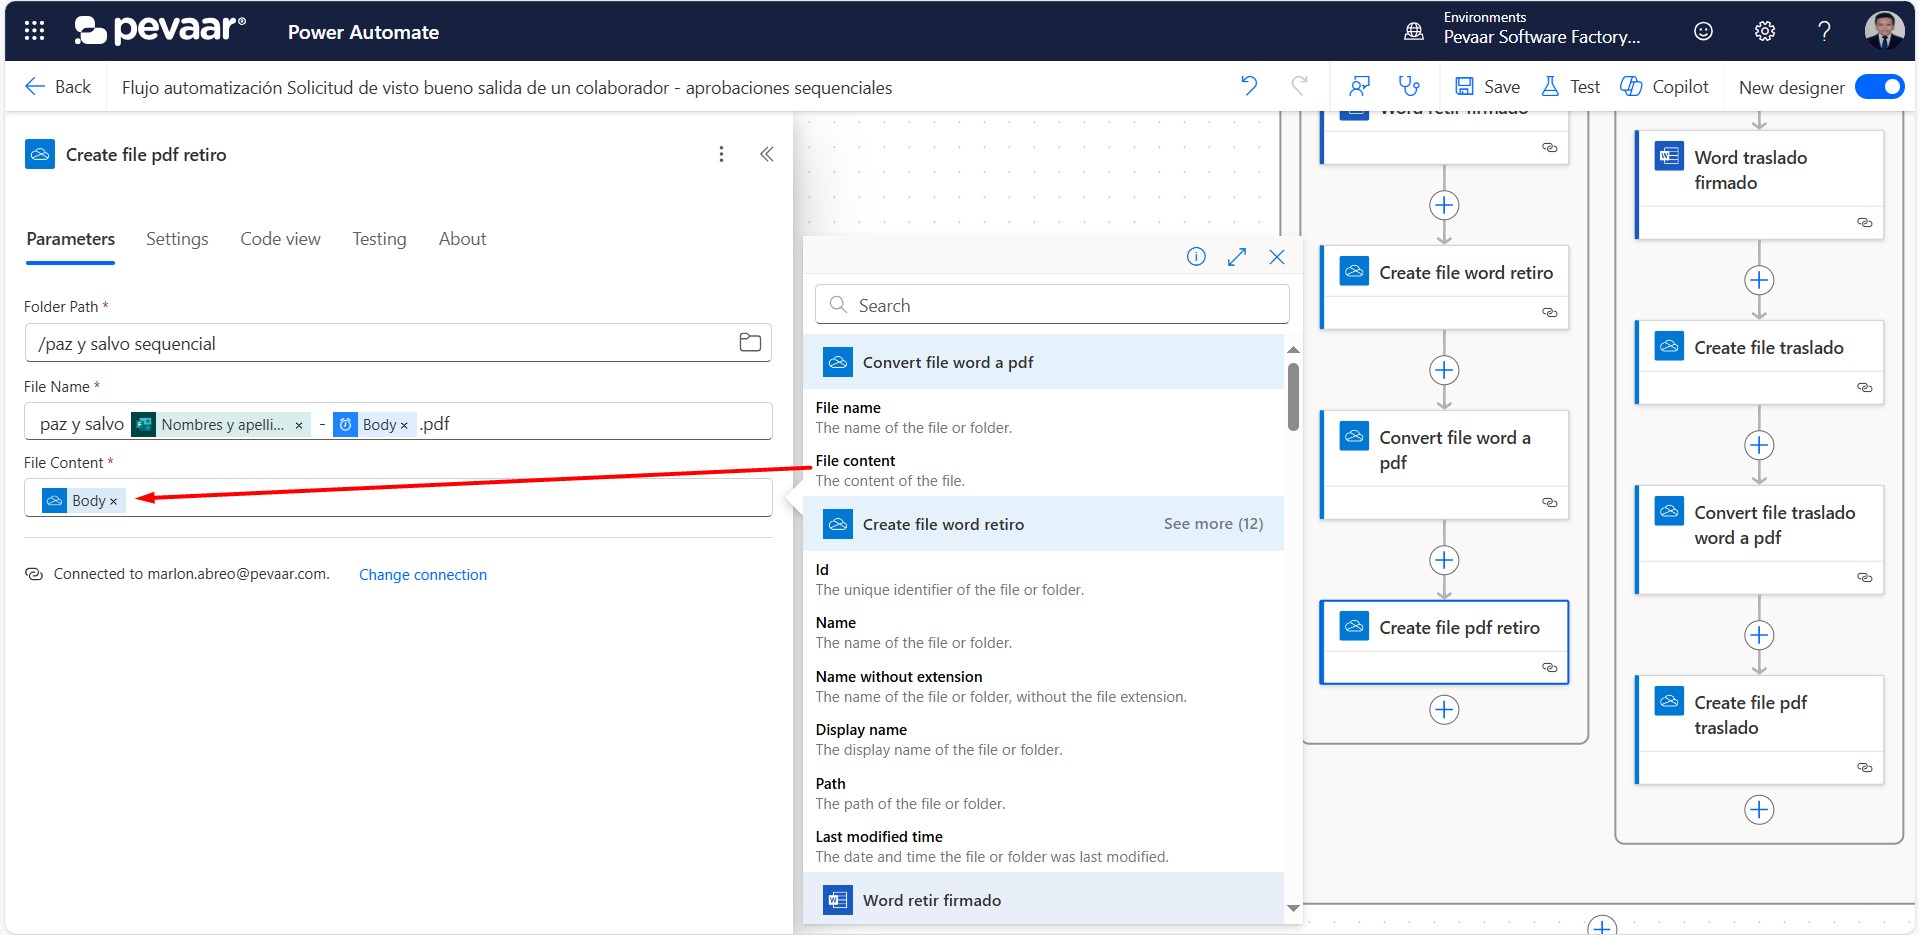
Image 53
On the “False” side of the condition, you must repeat steps 1.14, after having added the previous “Convert file” action.
1.15. The final action is to send an email to the collaborator notifying the approval of their clearance letter. To do this, we will use the “Send an email” action from the Office 365 Outlook connector group.
In the action search bar, type the keyword “send email” and select the “Send email” option (Image 54).
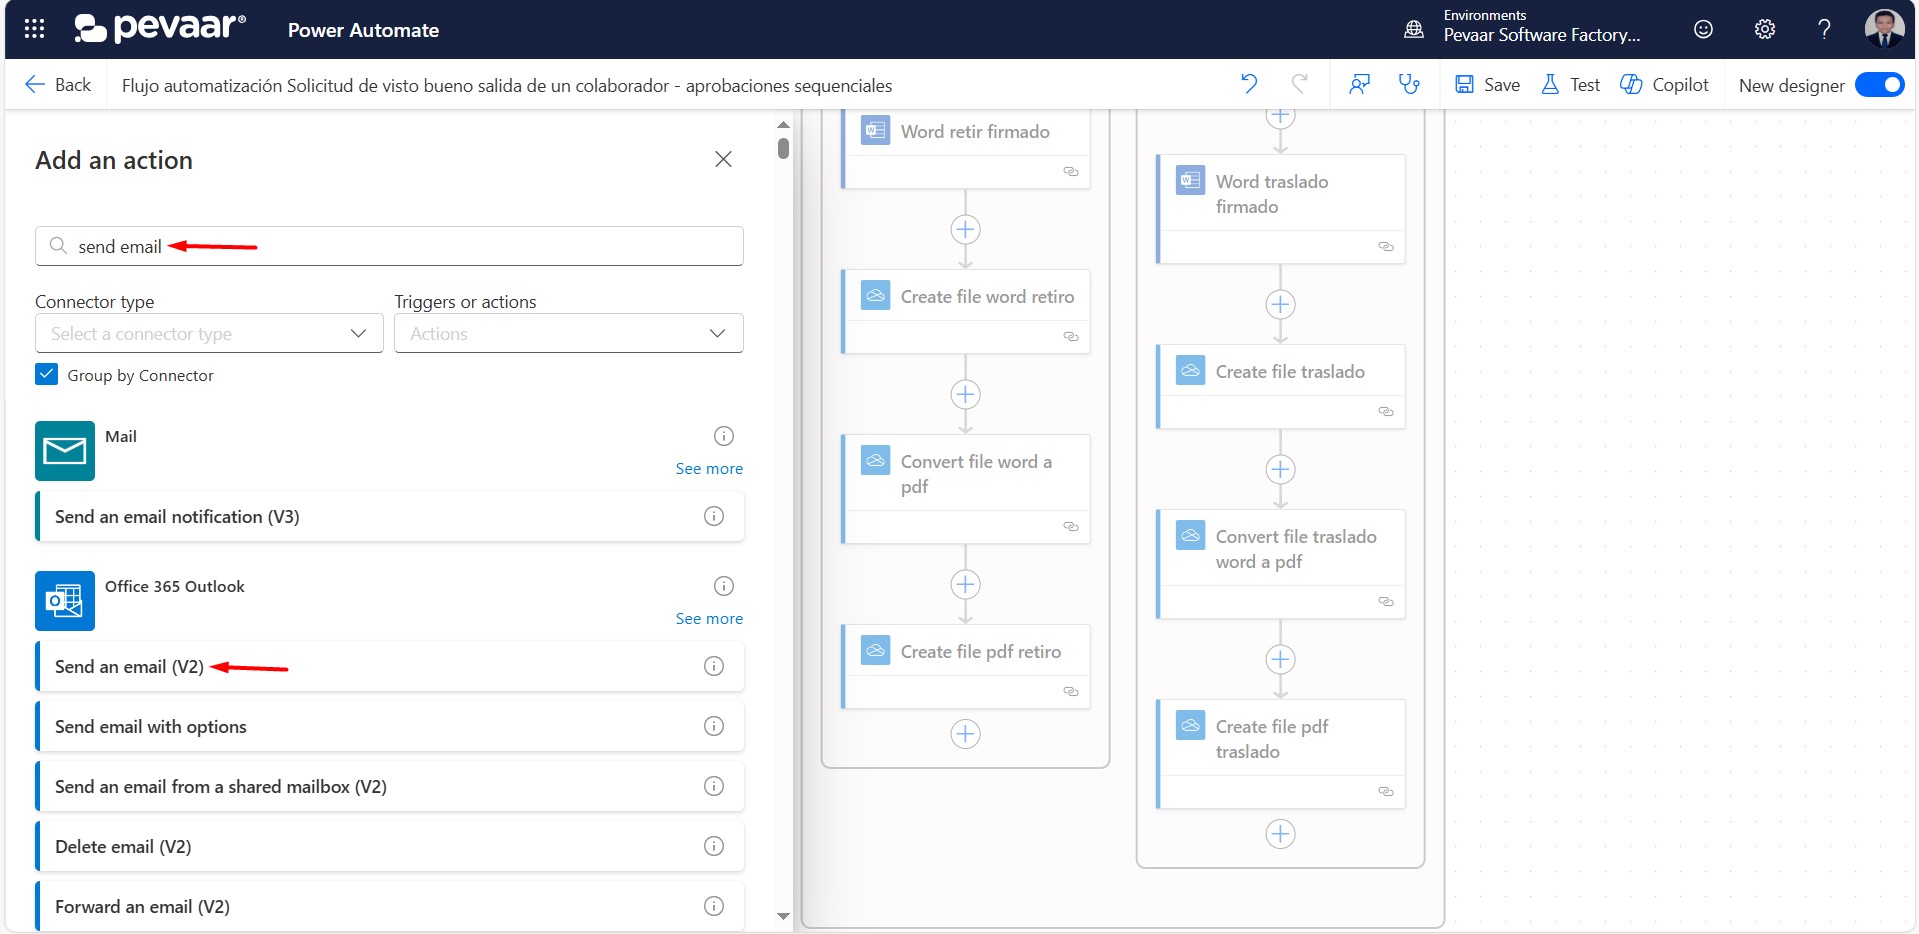
Image 54
The person who will receive the email is the same one who submitted the form. To do this, we dynamically select the email address from Forms. The Subject and Body fields will be filled with information related to the process and the collaborator. Additionally, we will add the dynamic parameter Attachments (Image 55).
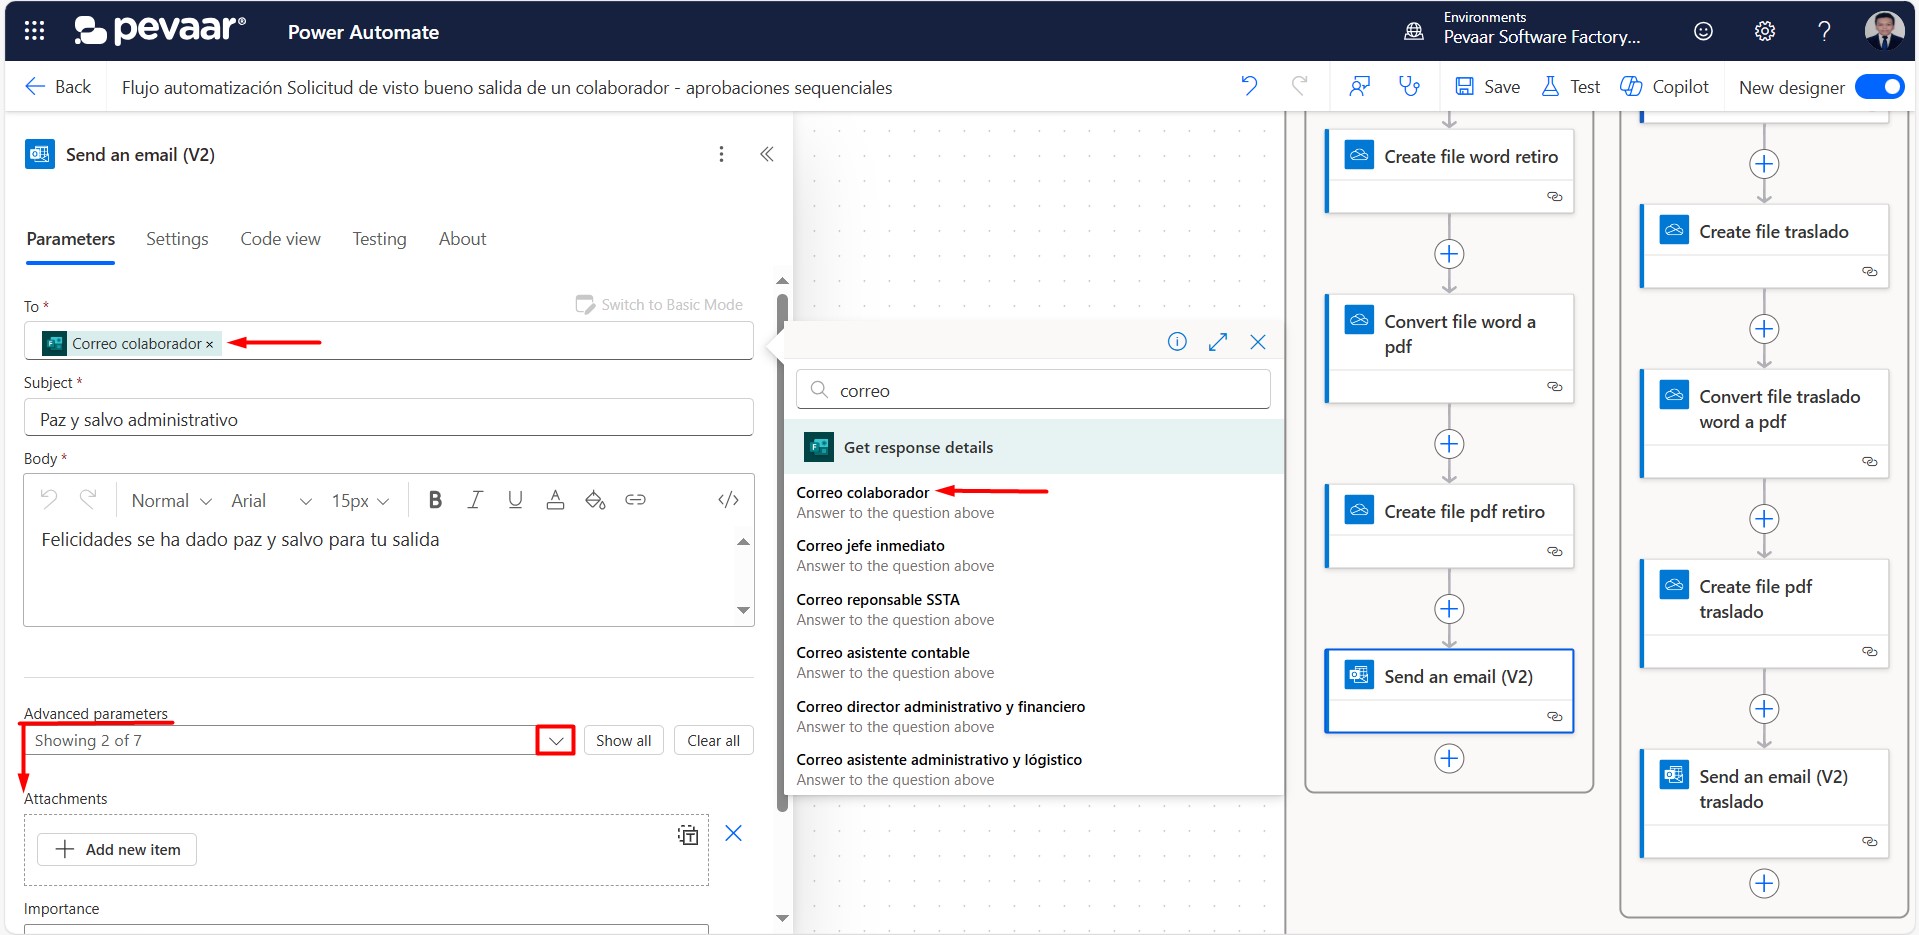
Image 55
We will add a new item in the Attachments parameter. Then, in the Attachment Name, we will dynamically insert the name of the file previously converted to PDF, and do the same for the Content (Image 56-1) (Image 56-2)
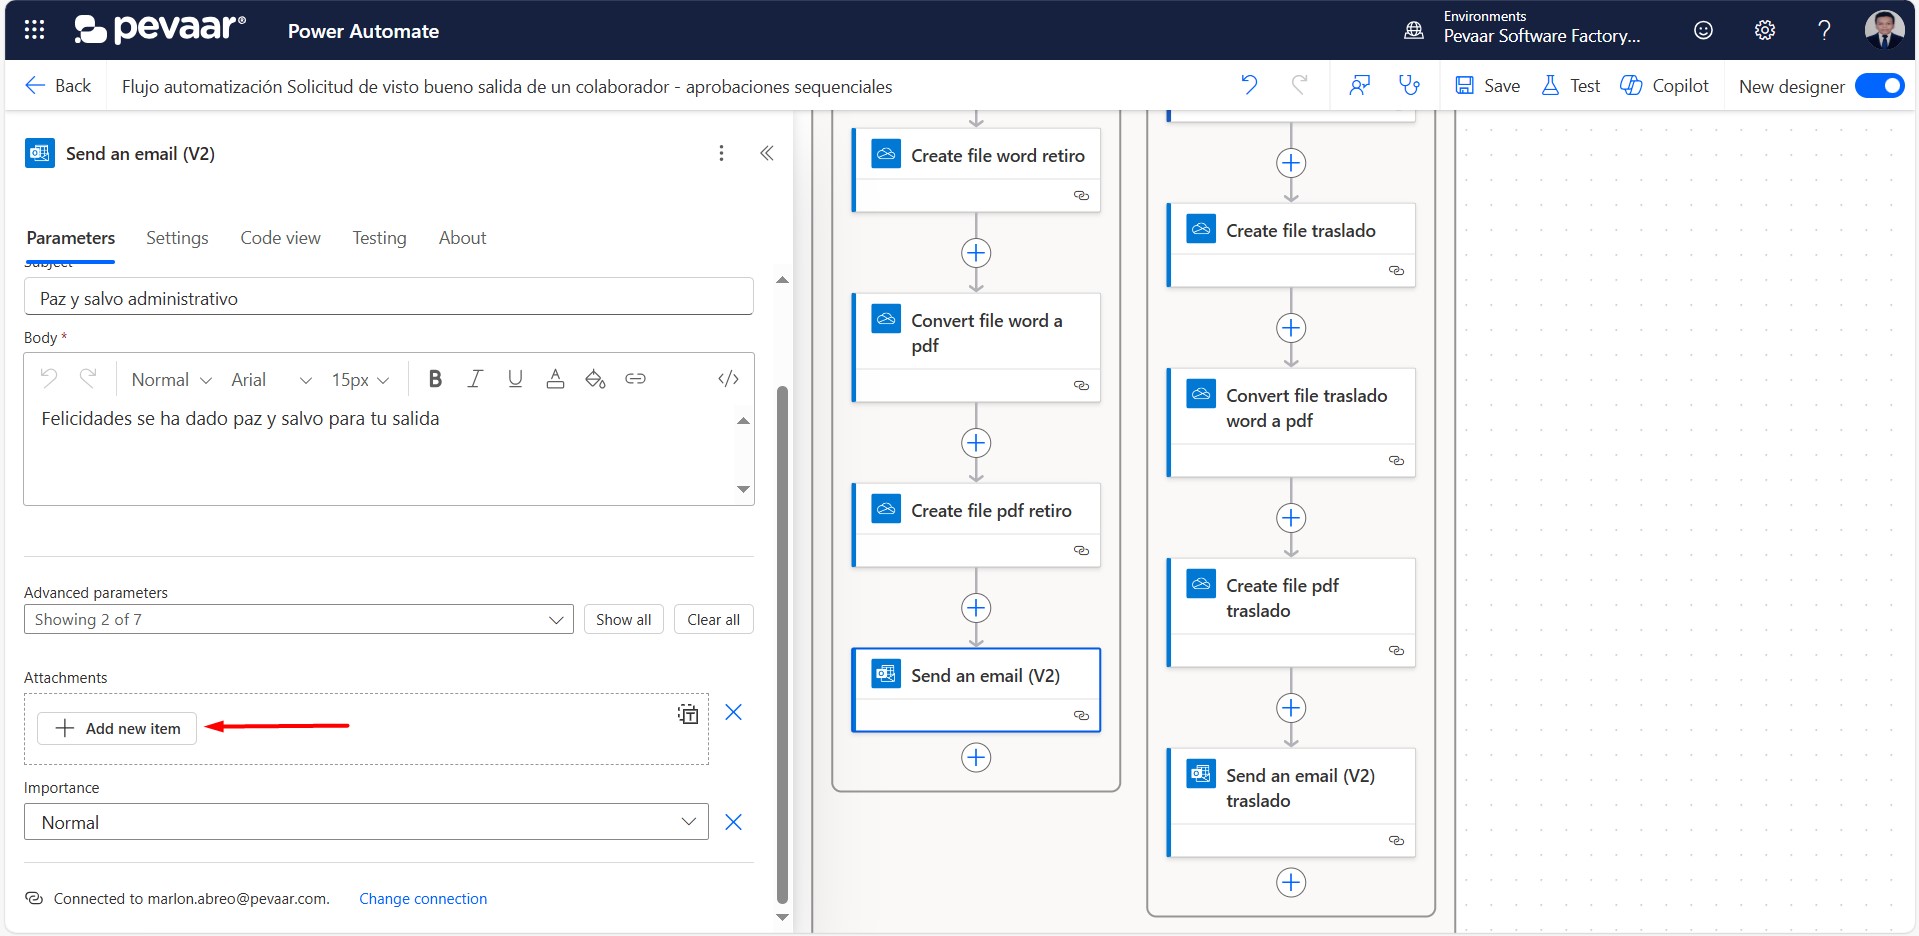
Image 56-1
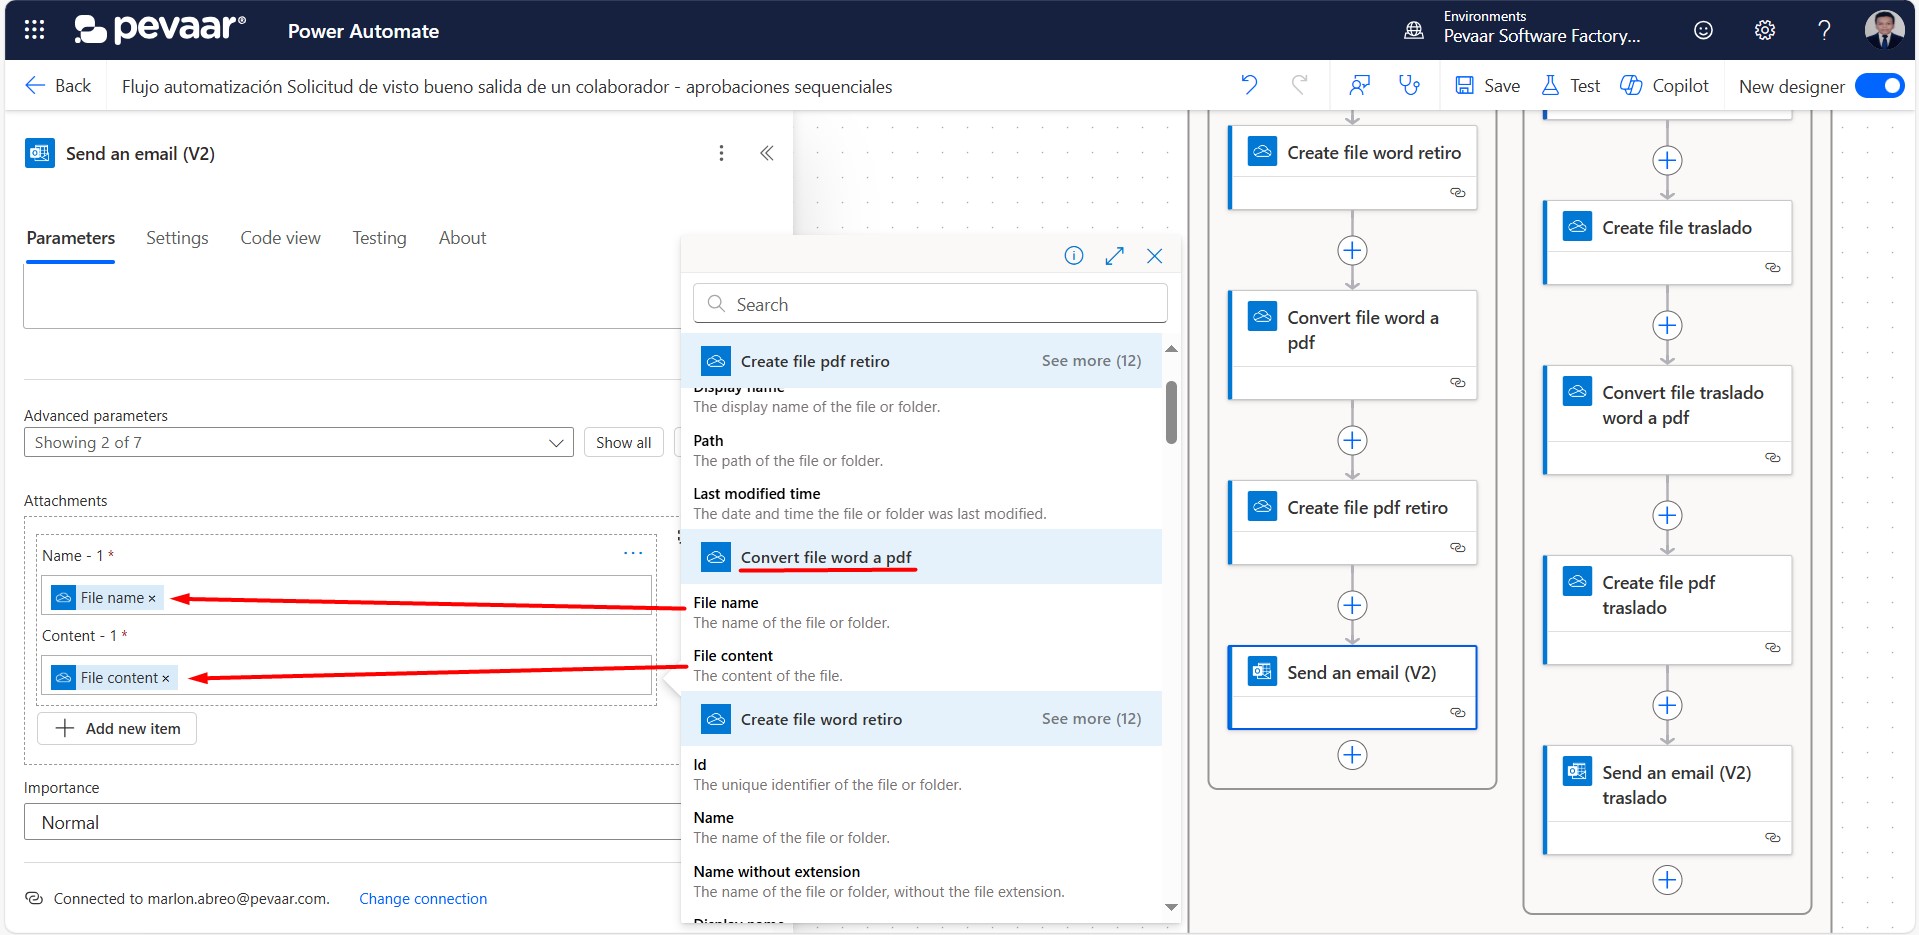
Image 56-2
On the “False” side of the condition, you must repeat steps 1.15 after having added the previous “Create file” action.
This marks the end of the flow.
Transform Your Business with Automated Data Processing Solutions
Implementing automated data processing in employee clearance workflows enables companies to reduce response times, minimize human errors, and ensure that each approval reaches the right person at the right time. The result? Faster processes, more productive teams, and an improved experience for everyone involved.
Optimize Your Business with Pevaar
At Pevaar, we specialize in process automation, custom software development, and workflow optimization. Our team of experts is ready to help you implement innovative solutions that boost your company’s efficiency and reduce administrative workload.
🚀 Save time and increase efficiency. Discover how automated data processing can enhance your HR management. Contact us and start transforming your processes with smart automation solutions.


Comments (4)
I very delighted to find this internet site on bing, just what I was searching for as well saved to fav
We really appreciate your visit and are thrilled to hear that you found what you were looking for! Thanks for saving us to your favorites, and feel free to explore more whenever you need.
This is my first time pay a quick visit at here and i am really happy to read everthing at one place
We’re glad to hear that you found everything in one place. Feel free to reach out if you have any questions or need more information. We hope you continue enjoying the content!”