
Invite External Users with Automated Logic Using Power Automate and Microsoft Graph
Has it happened to you that every time an external collaborator needs access, you have to repeat the entire process from scratch? Filling out forms, sending emails, waiting for admin approval… A flow that should be simple ends up consuming more time and attention than it should. Implementing automated logic allows you to eliminate these repetitive steps and ensure everything runs smoothly with minimal manual intervention.
Inviting external users is one of those tasks that checks all the boxes for automation: it’s repetitive, follows a fixed sequence, and involves simple but frequent actions.
If you’re doing it more than twice a week, it’s time to automate it.
From Form to Invitation: All with Automated Logic
With Microsoft Power Automate this process can become much smoother, allowing for greater efficiency and agility. In the following section, you’ll learn how to implement a solution that connects Microsoft Forms, the HTTP Premium connector, and the Microsoft Graph API.
👉 Heard of Microsoft Graph API? Learn how to use it to connect Microsoft 365 services seamlessly.
Discover how to simplify the onboarding process for external users by eliminating manual tasks and reducing errors. Keep reading and we’ll show you how to automate this workflow using Power Automate and Microsoft Graph.
To start the flow, you need to create a form in Microsoft Forms with the following fields: Full Name and Email Address. Both fields must be required, and validation is especially important for the email field to ensure it has the correct format. Once the form is created, you’ll get a shareable link to send to the users who need to submit their information. This form will capture the necessary data to trigger the external user invitation process within the automated workflow. (Img.1)
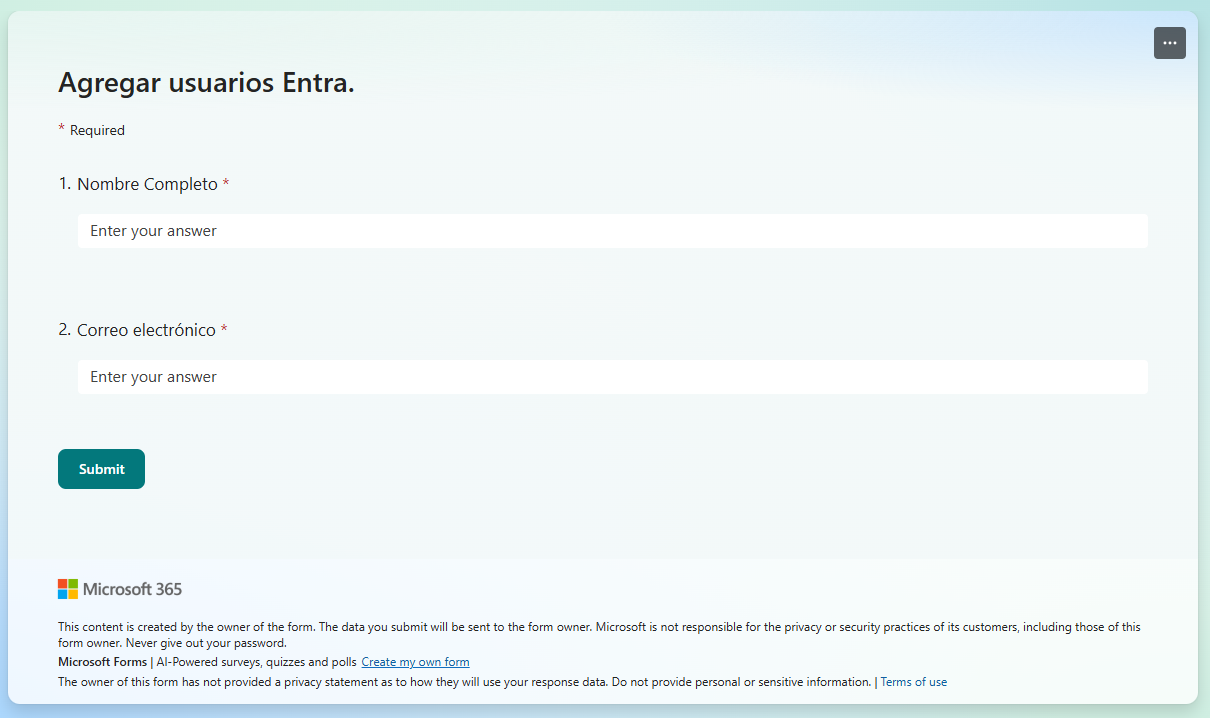
Img.1
To allow Power Automate to securely call the Microsoft Graph API and create the invitation, we need to configure a registered application in the Microsoft Entra Admin Center (formerly Azure Active Directory). This app registration will handle the required authentication within the Active Directory environment.
Follow these steps:
- Access Microsoft Entra Admin Center:
Go to the Microsoft Entra Admin Center portal
- Register a new application:
In the left-hand panel, select App registrations under Microsoft Entra Admin Center. (Img.2)
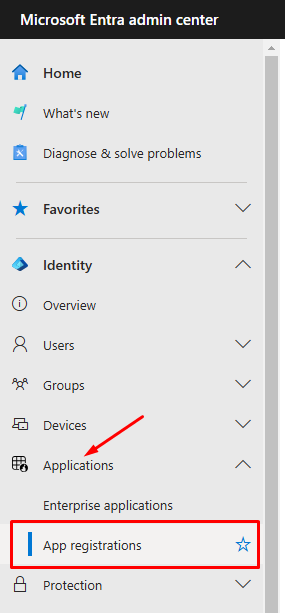
Img.2
Click on New registration to create a new application. (Img.3)
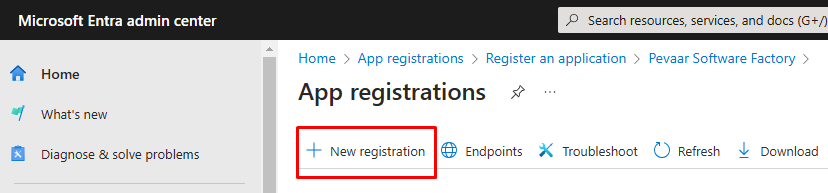
Img.3
- Configure the application registration:
Assign a name to the application (for example, “External Invitations”).
Leave the account type as Accounts in any organizational directory (Any Microsoft Entra ID tenant – Multitenant) and personal Microsoft accounts (e.g. Skype, Xbox).
For Redirect URI (optional), you can leave it blank for now. This field can be configured later if needed (Img.4)
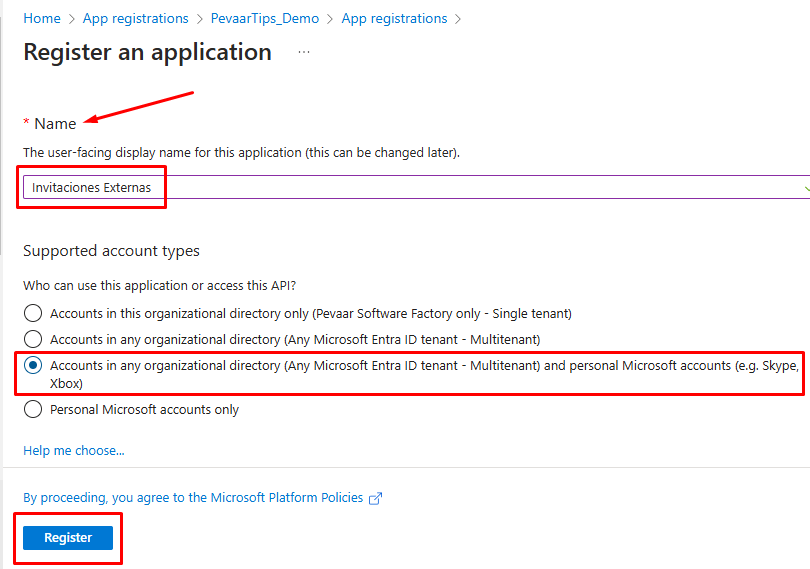
Img.4
You will now see that the app has been successfully created. (Img.5)
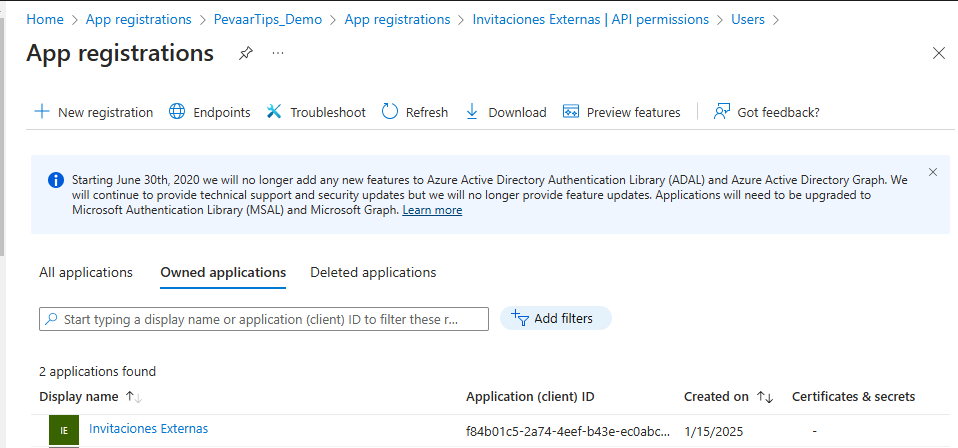
Img.5
- Authentication and Permissions:
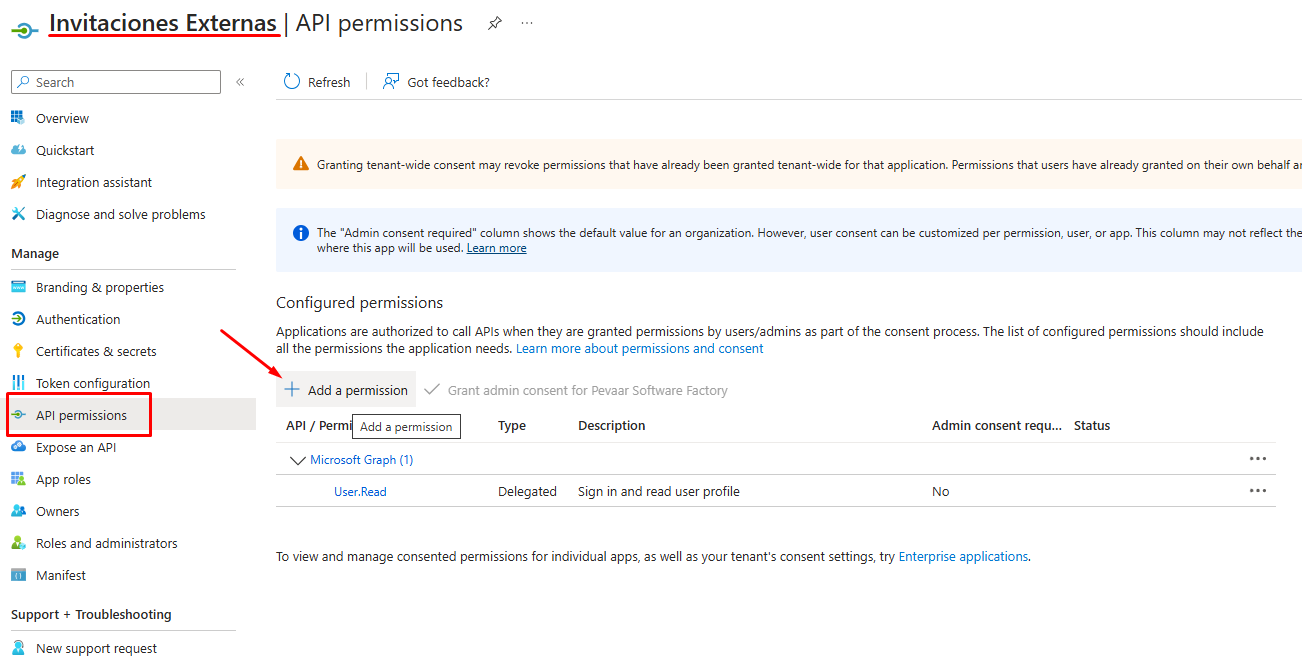
Once the application is registered, configure the API permissions so it can make calls to the Microsoft Graph API. (Img.6)
Img.6
You will need permissions to send invitations and manage external users. Make sure to grant Delegated or Application permissions as needed, such as User.ReadWrite.All and Directory.ReadWrite.All. (Img.7 & Img.8)
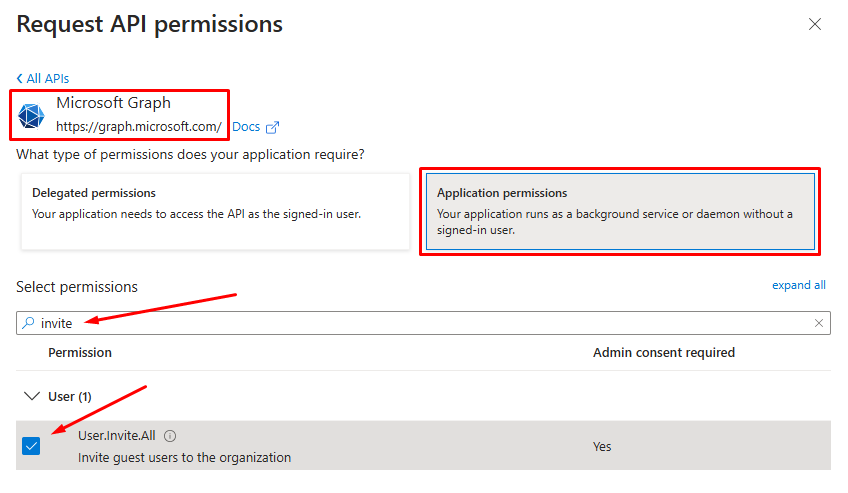
Img.7
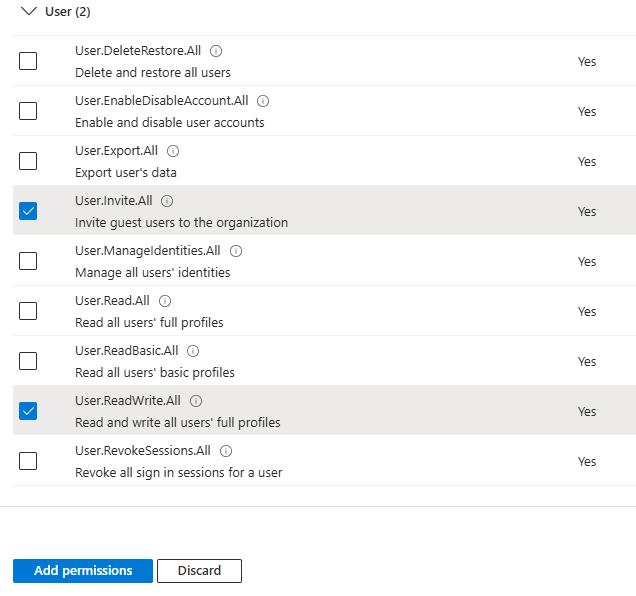
Img.8
For now, we cannot use the registered application, as we need an Azure Active Directory administrator to grant us the necessary permissions. (Img.9)
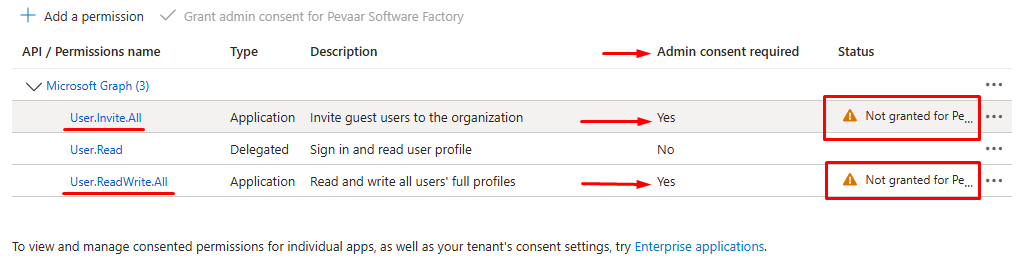
Img.9
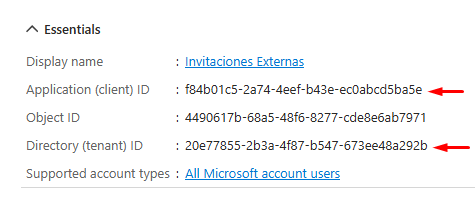
To request the permissions, we need to create a direct link that contains all the relevant information for our application. The consent link is constructed using the Application ID (Client ID) and the Directory ID (Tenant ID) of the registered application. (Img.10)
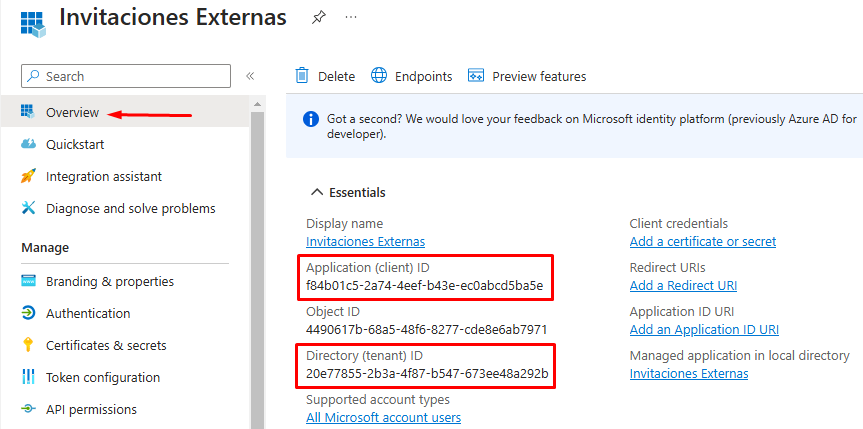
Img.10
Use the following template to create the request link for the administrator:
https://login.microsoftonline.com/{tenant_id}/adminconsent?client_id={application_id}
Replace the red values with the corresponding Tenant ID and Application ID.
Once the link is generated, simply send it to the administrator, who can click on it to approve the required permissions. By doing this, the application will receive the necessary admin permissions to work properly with the Microsoft Graph API. (Img.11)
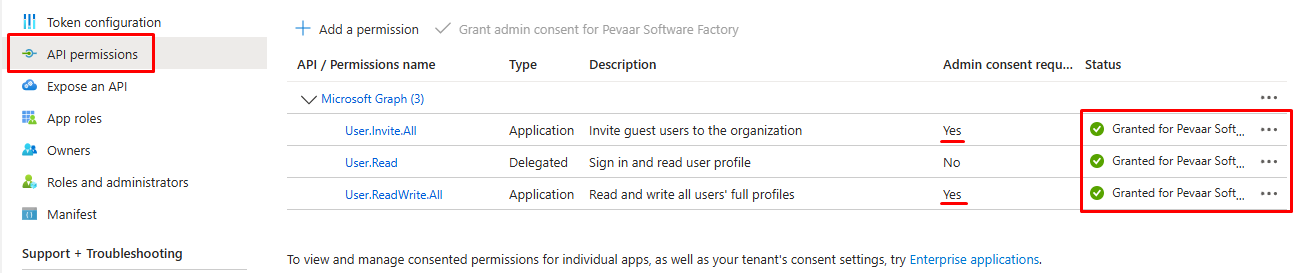
Img.11
- Create the Secret:
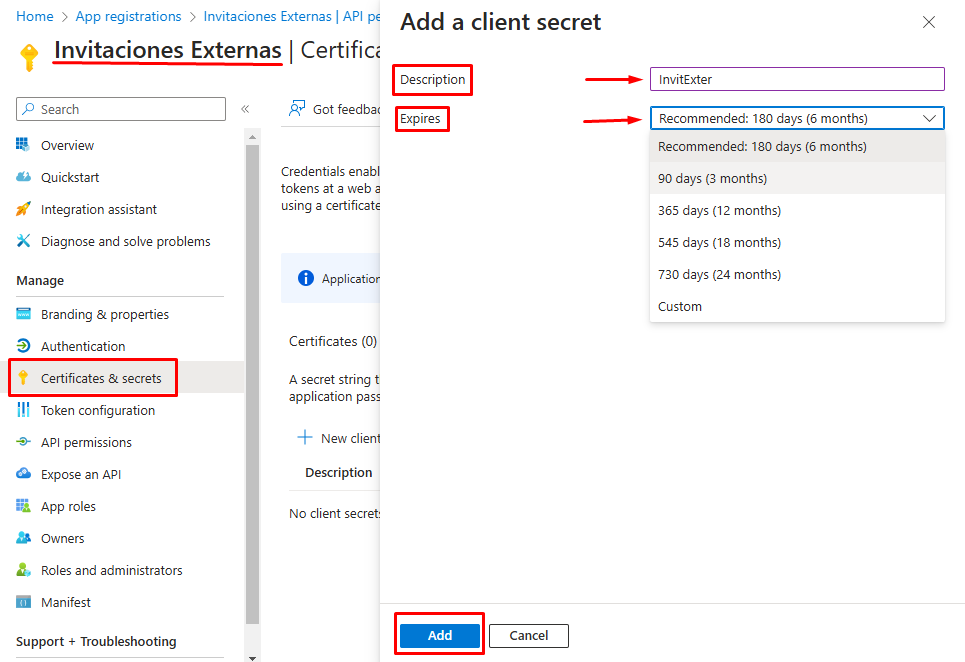
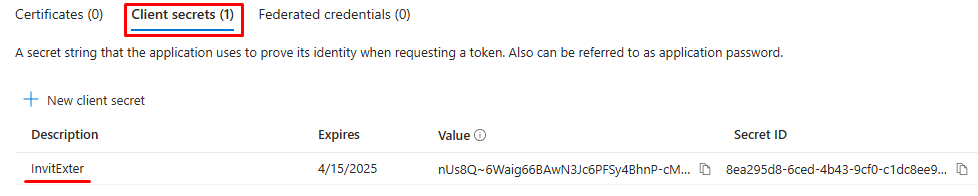
Also, create a client secret in the Certificates & Secrets section, which will be used to authenticate the calls to the Graph API securely.
With this registration, authentication will be managed through Microsoft Entra Admin Center each time Power Automate makes a request to the Microsoft Graph API, ensuring the call is valid and secure. (Img.12)
Img.12
Verify that the secret for the API has been created successfully. (Img.13)
Img.13
Creating the workflow in Power Automate
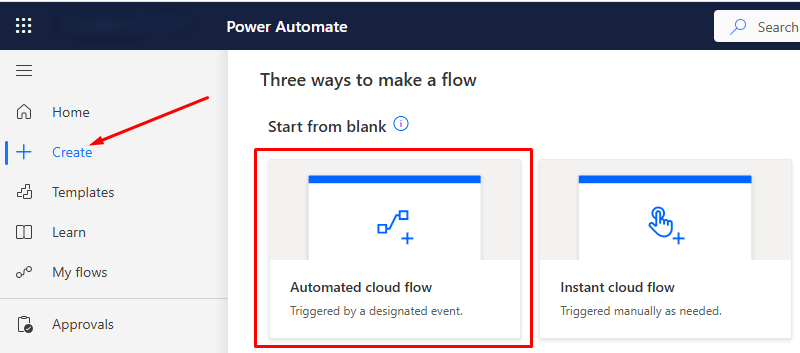
To begin creating the flow in Power Automate, go to the platform and click “Create” on the left sidebar. Then, select Automated cloud flow. We choose this type of flow because it is triggered automatically in response to a specific event, such as receiving a submission from the Microsoft Forms form. This allows us to start the external user invitation process without manual intervention. (Img.14)
Img.14
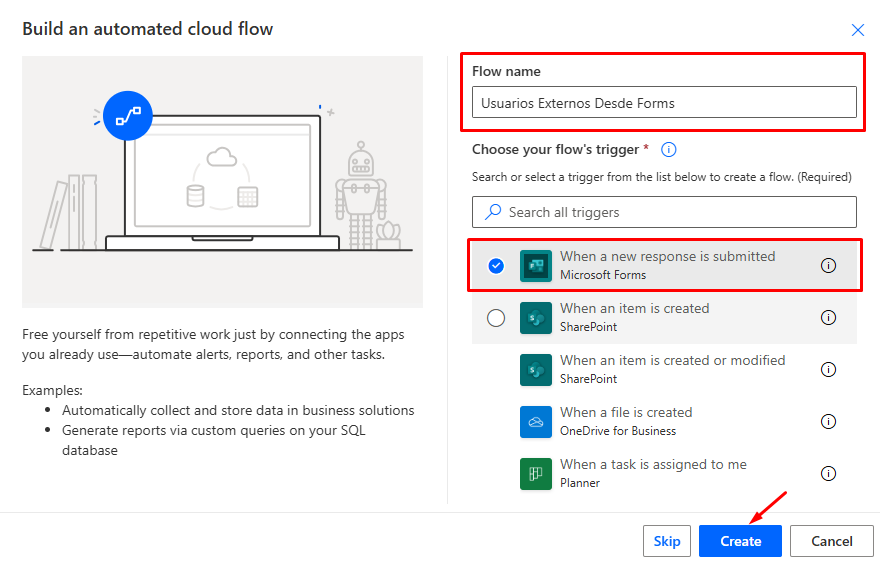
When creating an automated flow, give it a clear name for easy identification. Then, select the trigger: “When a new response is submitted” from Forms. This ensures that the flow runs automatically every time the form is completed. (Img.15)
Img.15
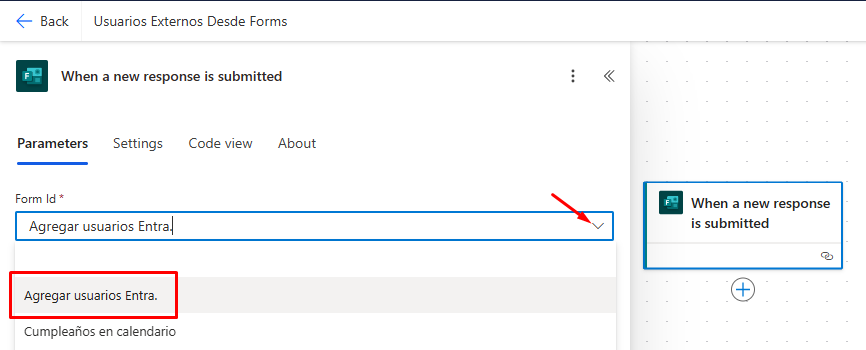
Once you’ve selected the automated flow type, the next step is to configure the trigger. For this, in the “When a new response is submitted” action, you will need to choose the form you previously created in Microsoft Forms. When selecting this action, you’ll be prompted to specify the form that will trigger the flow. Simply select the invitation form you created earlier, and the flow will automatically activate every time a new response with the user’s data (name and email) is received. (Img.16)
Img.16
Next, we need to add a new action to retrieve the details of the response submitted through the form. Add a new action and select “Get response details“ from Microsoft Forms. This action allows us to retrieve specific information from the response, such as the full name and email address provided by the user in the form.
When configuring it, you will be prompted to select the form you created earlier and provide the Response ID using the dynamic value from the previous trigger, which is the “Response Id”. This will ensure the flow correctly captures the data entered in each submitted form. (Img.17)

Img.17
The final action we need to add to the flow is the “HTTP” action, which will allow us to make the call to the Microsoft Graph API to generate the external user invitation. It’s important to note that this action uses a premium connector, so a Power Automate license is required to use it. (Img.18)
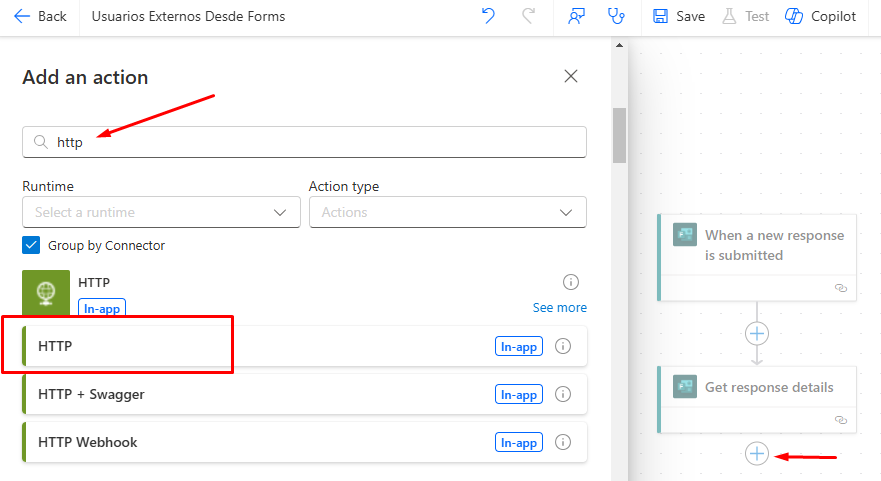
Img.18
To configure the HTTP action, we will use the POST method, since we need to send data to the API in order to create the invitation. (Img.19).
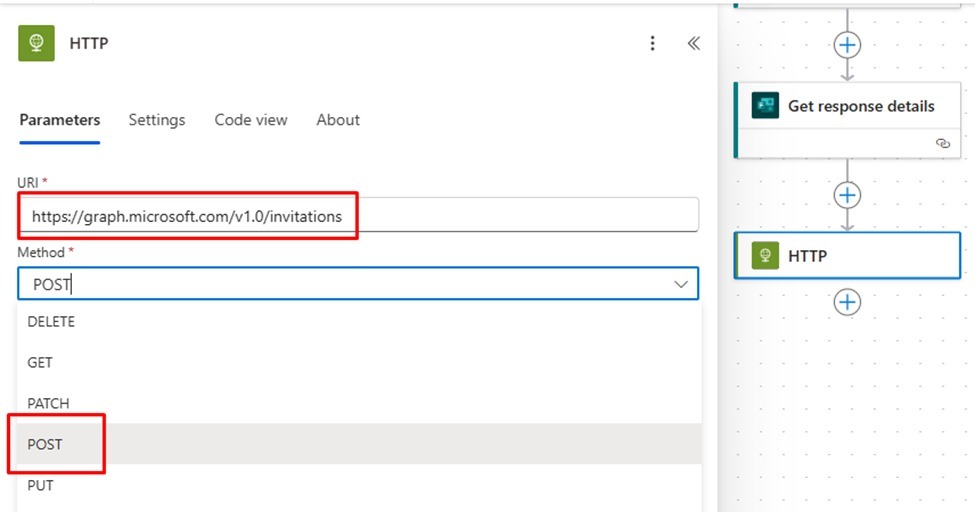
Img.19
The URI for the request will be taken directly from the official Microsoft Graph documentation, specifically from the section related to creating invitations. (Img.20)
You can access the documentation to get the corresponding values using the following link: https://learn.microsoft.com/en-us/graph/api/invitation-post?view=graph-rest-1.0&tabs=http
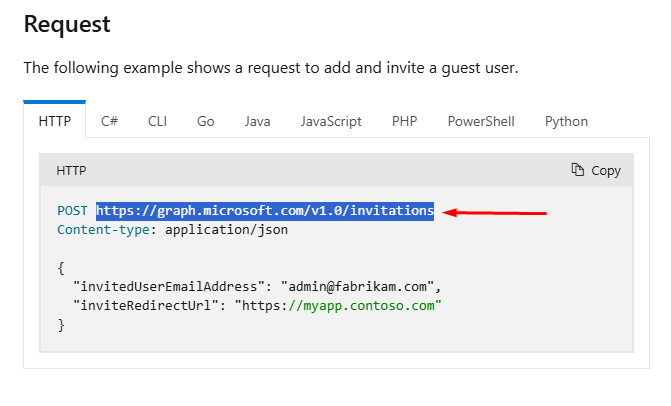
Img.20
To complete the configuration of the HTTP action, we need to add the required headers. In this case, the key header will be “Content-Type”, and its value should be “application/json“, indicating that we are sending data in JSON format. This setup is essential for the API to correctly interpret the request body and process the information properly. (Img.21) (Img.22)
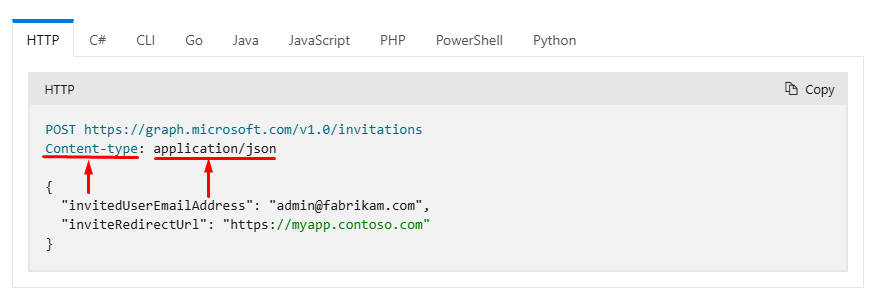
Img.21
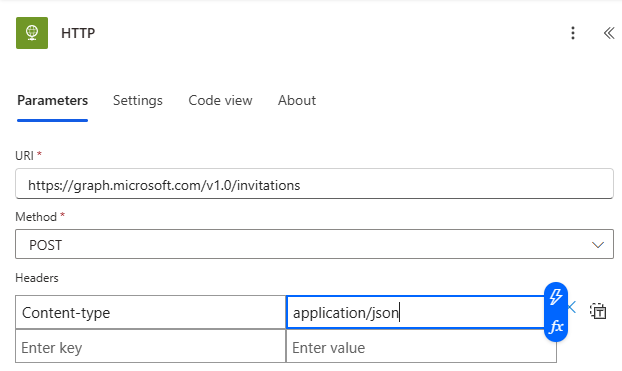
Img.22
Next, we need to configure the authentication parameter for the HTTP action. In this case, we will use the “Active Directory OAuth” authentication type, which is required to authorize and authenticate requests made to the Microsoft Graph API.
By selecting “Active Directory OAuth”, the flow will handle authentication using Azure Active Directory (AAD) credentials. (Img.23)
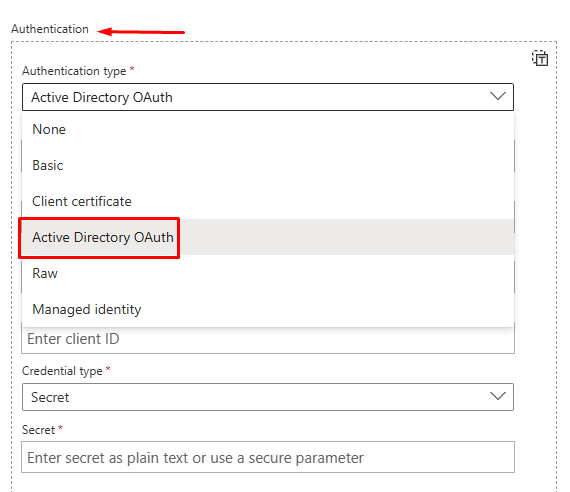
Img.23
To complete the authentication setup, we need to provide a few additional parameters that can be found in Microsoft Entra Admin Center. These include the Tenant ID, which is the unique identifier for your Azure Active Directory, the Audience, which should be set to https://graph.microsoft.com to indicate that the request is being made to the Microsoft Graph API, and the Client ID, which is the identifier of the app registered in Azure AD.
Additionally, you’ll need the Client Secret, which we previously created in Microsoft Entra Admin Center. This secret is used to securely authenticate the application and allow the Power Automate flow to access the API with the necessary authorization. (Img.24) (Img.25) (Img.26)
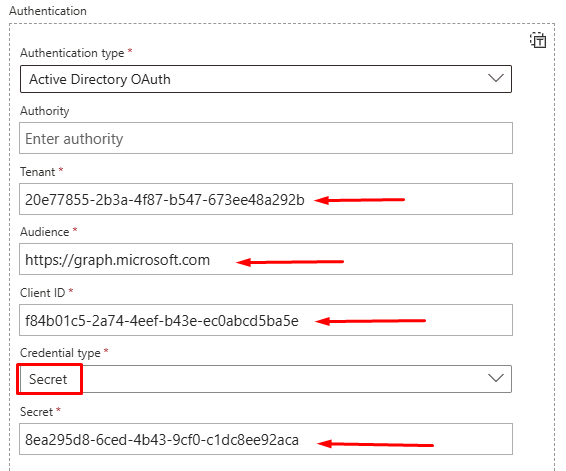
Img.24
Img.25

Img.26
At this point, we need to include the required parameters in the body of the request, such as the user’s email address and the invitation settings. The official Microsoft documentation provides the exact format needed to properly structure this request.
The schema for the HTTP request body is taken directly from the official Microsoft Graph documentation. This documentation specifies how to structure the request to create an invitation for an external user. (Img.27)

Img.27
In this body, the “invitedUserEmailAddress“ field is where we include the email address of the user we want to invite, which we previously collected through the Microsoft Forms form. The “inviteRedirectUrl“ field is used to specify the URL where the user will be redirected after accepting the invitation. This URL can point to a sign-in page, an internal application, or any other destination we’ve configured according to our needs. With this structure, the Power Automate flow will send a request to the Microsoft Graph API to create the invitation successfully. (Img.29)
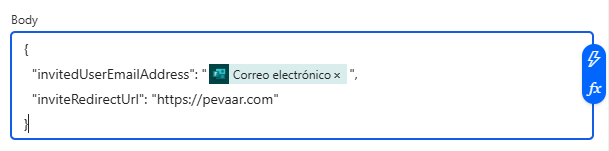
Img.29
In addition to the basic parameters, we also need to include some additional ones found in the Microsoft Graph documentation, specifically in the “JSON representation” section. Two of these parameters are “invitedUserDisplayName“ and “sendInvitationMessage“. (Img.30)
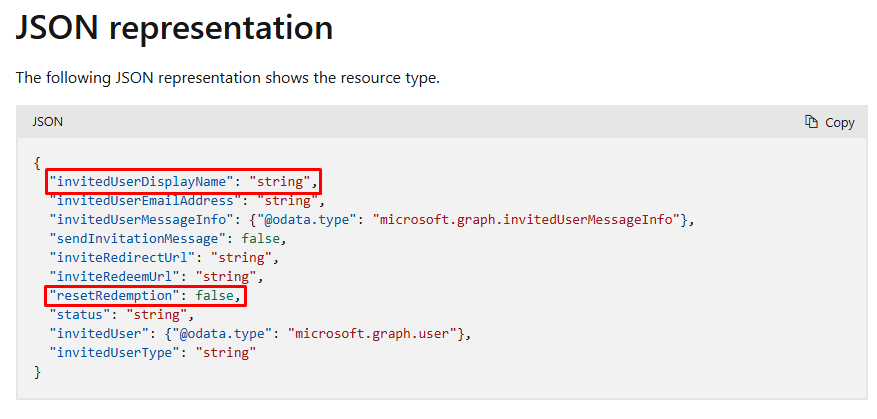
Img.30
The “invitedUserDisplayName“ parameter is used to specify the full name of the invited user, which improves the personalization of the invitation. Instead of only displaying the email address, the user’s full name will appear in the invitation, making it easier for the recipient to recognize who the invitation is for.
On the other hand, the “sendInvitationMessage“ parameter, when set to true, ensures that Microsoft automatically sends an invitation email to the user. This email includes a link for the guest to accept the invitation and join the organization. Setting this value to true simplifies the process, as there’s no need to manually send the invitation message—making it a fully automated experience.
This is how the final configuration of the request body should look, with the “invitedUserDisplayName“ and “sendInvitationMessage“ parameters properly set according to the Microsoft Graph documentation. (Img.31)
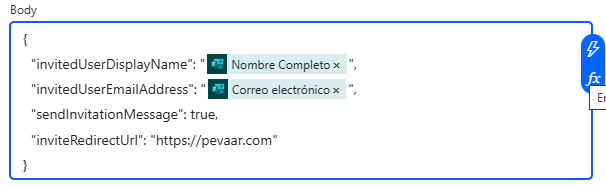
Img.31
Once the entire flow is configured, the next step is to save it to ensure that the changes are applied correctly. After saving, we can test the flow by submitting a response to the form we previously created. When the response is submitted, the flow will automatically trigger, initiating the invitation process and allowing you to verify that everything works as expected.
When the user has accepted the invitation and integrated into your environment, there are several ways to maximize this integration:
- Permission Assignment: You can automate the assignment of specific permissions or roles to invited users, whether in SharePoint, Teams, or any other application within your Microsoft 365 environment, ensuring they have access to the necessary resources.
- Integration with Microsoft Teams: After inviting the user, you can add them to specific channels or teams in Microsoft Teams, facilitating collaboration on projects or discussions in real-time.
- Integration with Custom Applications: If your organization uses internal applications, you can automate the process of registering invited users in these platforms, ensuring a seamless workflow.
Keep learning and improving your processes with automated logic
This automated logic is just one of the many possibilities offered by Power Automate and Microsoft Graph, enabling you to create a wide range of customized solutions that optimize external user collaboration and management. Optimizing processes is an ongoing journey. If you want to keep learning and applying real-world solutions, visit our blog and explore everything we have to offer.
Optimize Your Business with Pevaar
At Pevaar, we are passionate about helping you do more with less effort. We specialize in automation, custom solutions development, and process optimization that truly make a difference in your day-to-day operations. In this article, we’ve shown how automated logic can simplify the management of external users, but this is just a glimpse of what we can achieve together.
🚀 If you want to take your processes to the next level, get in touch with us. We’ll help you implement smart solutions with tools like Power Automate and Microsoft Graph. Start transforming the way you work today!


Leave a Reply