
Optimize Your Operations: Automate Time Off Requests Using an internal user in Power Automate.
Tired of wasting time managing time off requests that arrive in different formats and through multiple platforms, causing delays and confusion for both the HR team and employees? You’re not alone. Many companies still face these challenges, which ultimately impact productivity and workplace morale. But it doesn’t have to be this way. With tools like Power Automate, it’s possible to turn this traditional manual process into a streamlined, efficient, and error-free experience.
 Img 1
Next, click on the “Add a user” button (Img 2).
Img 2
After clicking the “Add a user” button, a form will appear where you must fill in the First name, Last name, Display name, and User name fields, and select the domain for the user account. Once all the fields are completed, click the “Next” button to continue (Img 3).
Img 3
Next, select the Power Automate license and then click the “Next” button to continue (Img 4).
Img 4
After that, click Next again to proceed (Img 5).
Img 5
Then, click the “Finish adding” button to complete the process (Img 6).
Img 6
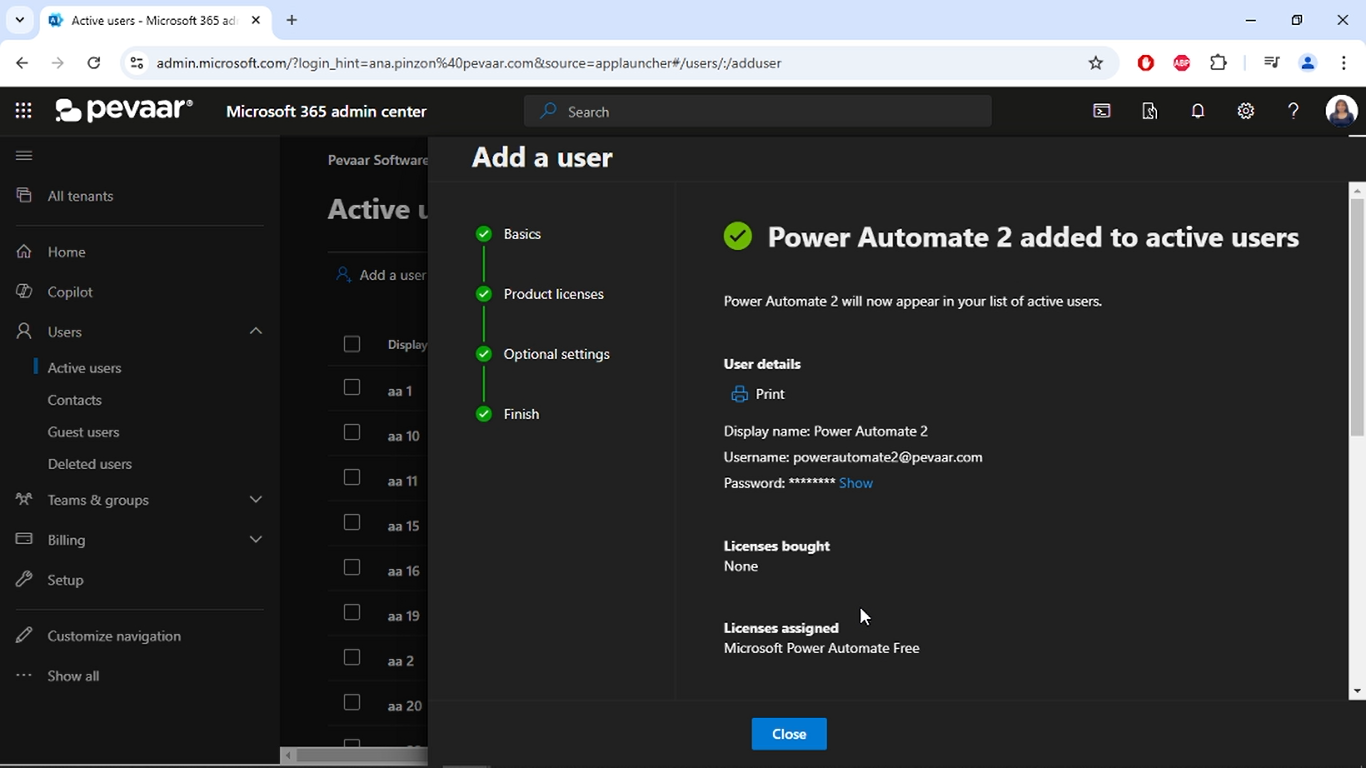
On the next screen, the details of the newly created user will be displayed. After reviewing them, click on “Close” to finish the setup (Img 7).
Img 8
Img 10
After that, you need to select the connection, and if there isn’t any available, click on “Add new” (Img 11).
Img 11
Next, you need to sign in with the account that will be used for the connections in this flow (Img 12).
Img 12
Img 13
Img 14
In the search bar, type the application to which the new action belongs. For this step, it will be Forms. Then select the corresponding option (Img 15).
Img 16
Img 17
Img 18
You need to create an Initialize Variable action for the Permission Start Date (Img 19).
Img 19
Also, create another Initialize Variable action for the Permission End Date (Img 20).
Img 20
Img 21
Img 1
Next, click on the “Add a user” button (Img 2).
Img 2
After clicking the “Add a user” button, a form will appear where you must fill in the First name, Last name, Display name, and User name fields, and select the domain for the user account. Once all the fields are completed, click the “Next” button to continue (Img 3).
Img 3
Next, select the Power Automate license and then click the “Next” button to continue (Img 4).
Img 4
After that, click Next again to proceed (Img 5).
Img 5
Then, click the “Finish adding” button to complete the process (Img 6).
Img 6
On the next screen, the details of the newly created user will be displayed. After reviewing them, click on “Close” to finish the setup (Img 7).
Img 8
Img 10
After that, you need to select the connection, and if there isn’t any available, click on “Add new” (Img 11).
Img 11
Next, you need to sign in with the account that will be used for the connections in this flow (Img 12).
Img 12
Img 13
Img 14
In the search bar, type the application to which the new action belongs. For this step, it will be Forms. Then select the corresponding option (Img 15).
Img 16
Img 17
Img 18
You need to create an Initialize Variable action for the Permission Start Date (Img 19).
Img 19
Also, create another Initialize Variable action for the Permission End Date (Img 20).
Img 20
Img 21
empty(outputs(‘Check_Attachments‘)) (Img 22).
Img 22
Img 23
Then, in the dropdown menu, select the option “is not equal to” (Img 24).
Img 24
Finally, in the “Choose a value” field, enter “True” (Img 25).
Img 25
Img 26
Inside the “Apply to each”, you need to write an expression that converts the list of attachments to JSON format, which will make it easier to handle those files within the flow (Img 27).
Img 27
items()?[‘id’]
This expression is used to get the metadata of each attached file. Keep in mind that since the flow is being created with an account that only has a Power Automate license, the connection for this action must be made with an account that has a license to access OneDrive (Img 28).
Img 28
Img 29
Img 30
Inside the Value field, you need to create a JSON schema that includes the file name and content. To get the file name, use the output from the Get File Metadata action—select the Display Name field. For the content, select the output from the Get File Content action (Img 31) (Img 32).
Img 31
Img 32
Img 33
Img 34
Img 35
In the “Table” field, you need to select the table where you want to add the information from the form. The table must have the same fields as those in the form, and it’s also necessary that the table includes an ID field, as this is where the GUID created earlier in a compose will be added (Img 36).
Img 36
After selecting the table, all the fields in the table will appear, and you need to fill those fields by selecting the outputs from the “Get Response Details” action (Img 37).
Img 37
The Id field should contain the GUID that was previously created in a compose action (Img 38).
Img 38
Img 39
Img 40
In the “Assigned to field”, enter the email address of the person who will approve or reject the time off request. (Img 41)
Img 41
In the Requestor field, use the email address of the person who submitted the form. This email is obtained by selecting the “Responder’s email” option from the list of outputs in Get Response Details. (Img 42)
Img 42
And finally, in the Attachments field, select the output from the Attachments JSON action. (Img 43) (Img 44)
Img 43
Img 44
Img 45
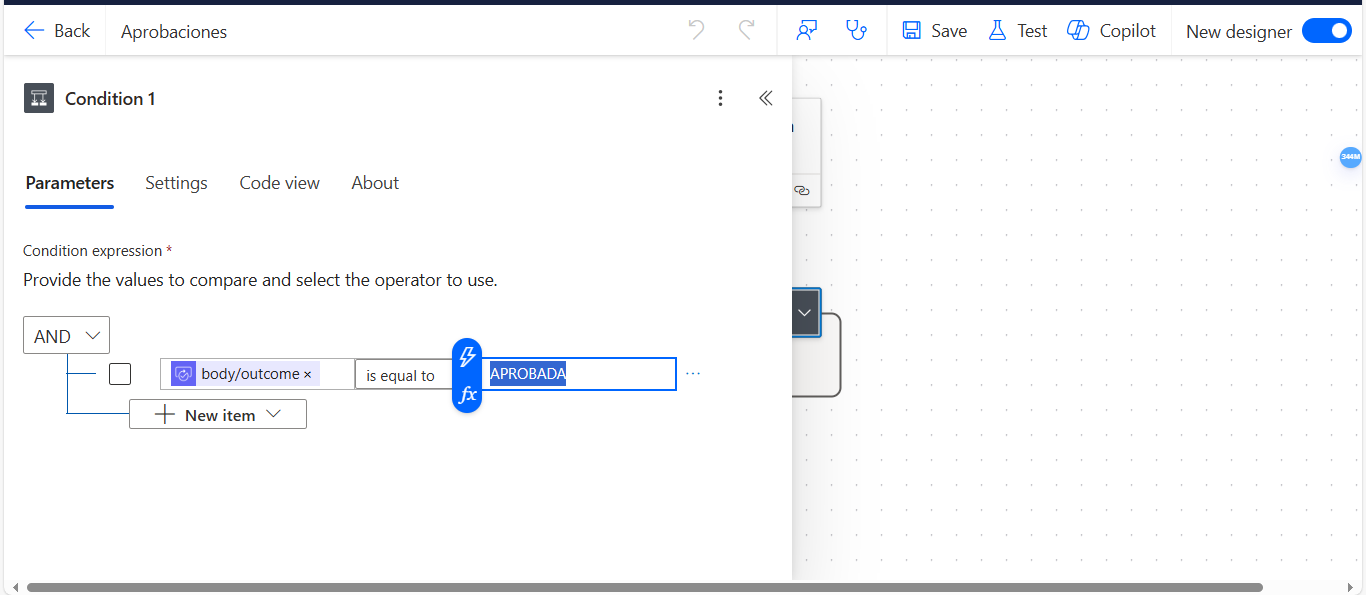
In the dropdown, select the option “is equal to“ (Img 46).
Img 46
And finally, in the “Choose a value” field, type “APPROVED” (Img 47).
Img 47
Img 48
In the Name field, select StartTime, and in the Value field, select the start time from the “Add a row into a table” action. (Img 49)
Img 49
Img 50
Img 51
In the Key Column field, select the Name property from the “Add a row into a table action”. (Img 52)
Img 52
In the Advanced Parameters, within the Status field, select the Outcome property from the “Start and wait for an approval action”. This will update the Status column in the Excel file, indicating that the permission request has been approved. (Img 53)
Img 53
Img 54
Img 55
In the Subject field, write the subject of the email. In the Body field, write the message you want to send to the person who filled out the form. In this case, the person will be notified that their time off request has been approved. (Img 56)
Img 56
Img 57
Img 58
formatDateTime(variables(‘Starttime‘),’HH:mm:ss‘) (Img 59)
Img 59
Img 60
Img 61
Img 62
Img 63
In the Subject field, select the properties “Type of permission“ and “Name” (Img 64)
Img 64
And in the StartTime field, select the output from the Permission Start Date action (Img 65)
Img 65
And in the End time field, select the output from the Permission End Date action (Img 66)
Img 66
Implementing automated flows like the time off request process not only demonstrates a smart use of technology, but also a strong commitment to more organized and efficient operations. These kinds of solutions allow companies to operate with greater accuracy, reduce repetitive tasks, and focus on what truly matters: their team’s well-being.
👉 Want to streamline your internal management with no hassle? At Pevaar, we help you build solutions tailored to your reality.
Efficient Time Off Requests: The Key to Better Workforce Management
Automating the time off request and approval process not only significantly reduces administrative burden, but also improves communication, transparency, and satisfaction among everyone involved. In this blog, we’ll show you how we designed and implemented an automated workflow using an internal user in Power Automate to simplify the management of employee time off and vacation requests. You’ll also discover how this solution can help you optimize resources, reduce errors, and ensure a standardized and reliable process across your organization. Now that you understand the purpose and scope of our time off request approval flow, let’s walk you through how we built it step-by-step using Power Automate. This solution was designed to be clear, functional, and easily replicable by any organization looking to optimize its internal processes without relying on complex or expensive tools. Below, we break down each component of the flow—from initial setup to the final notification—so you can fully understand how it works and adapt it to your company’s unique needs.Step 1: Creating a User with a Power Automate License
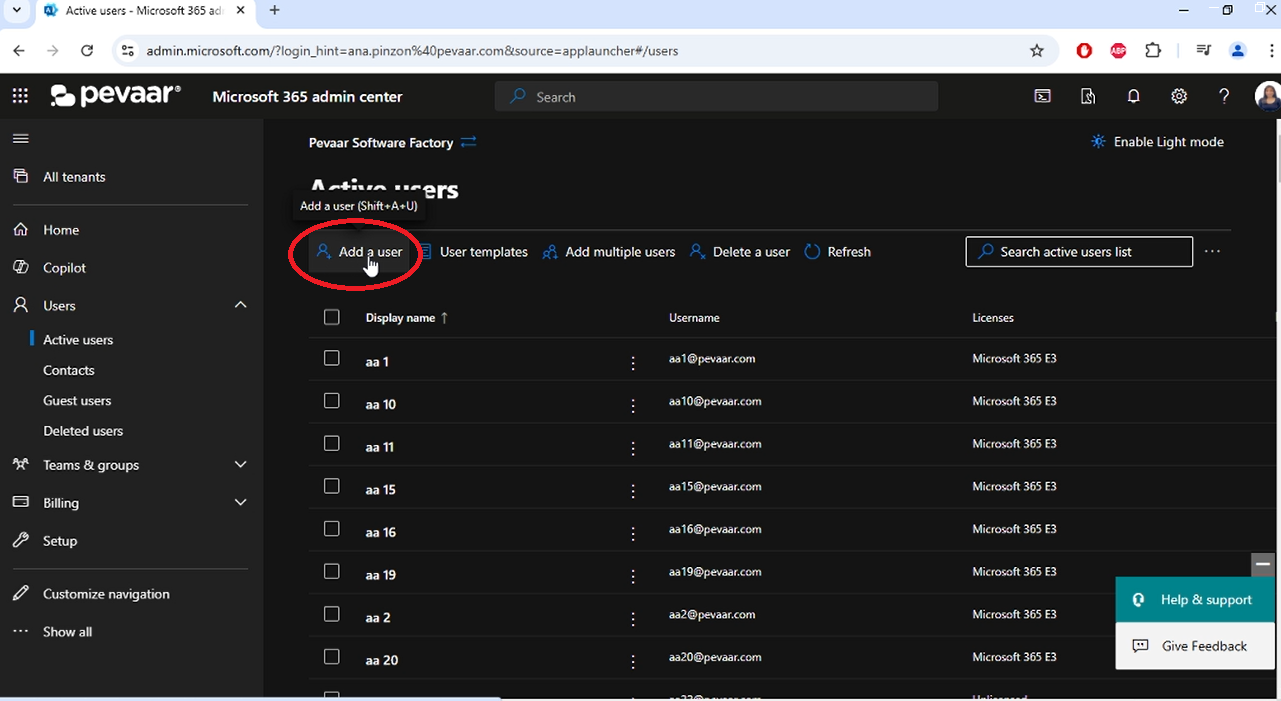
To get started, go to the Microsoft 365 Admin Center. Once inside the platform, click on the Active Users option (Img 1). Img 1
Next, click on the “Add a user” button (Img 2).
Img 1
Next, click on the “Add a user” button (Img 2).
 Img 2
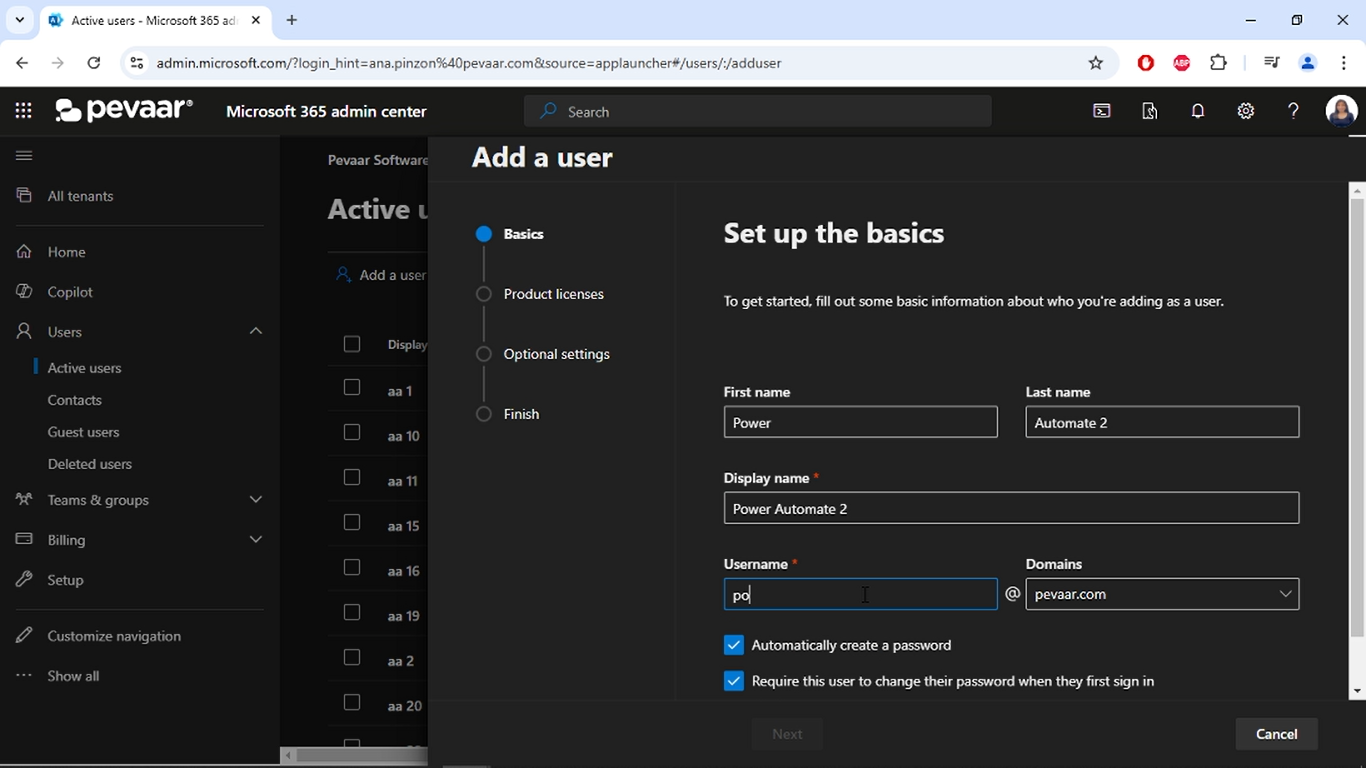
After clicking the “Add a user” button, a form will appear where you must fill in the First name, Last name, Display name, and User name fields, and select the domain for the user account. Once all the fields are completed, click the “Next” button to continue (Img 3).
Img 2
After clicking the “Add a user” button, a form will appear where you must fill in the First name, Last name, Display name, and User name fields, and select the domain for the user account. Once all the fields are completed, click the “Next” button to continue (Img 3).
 Img 3
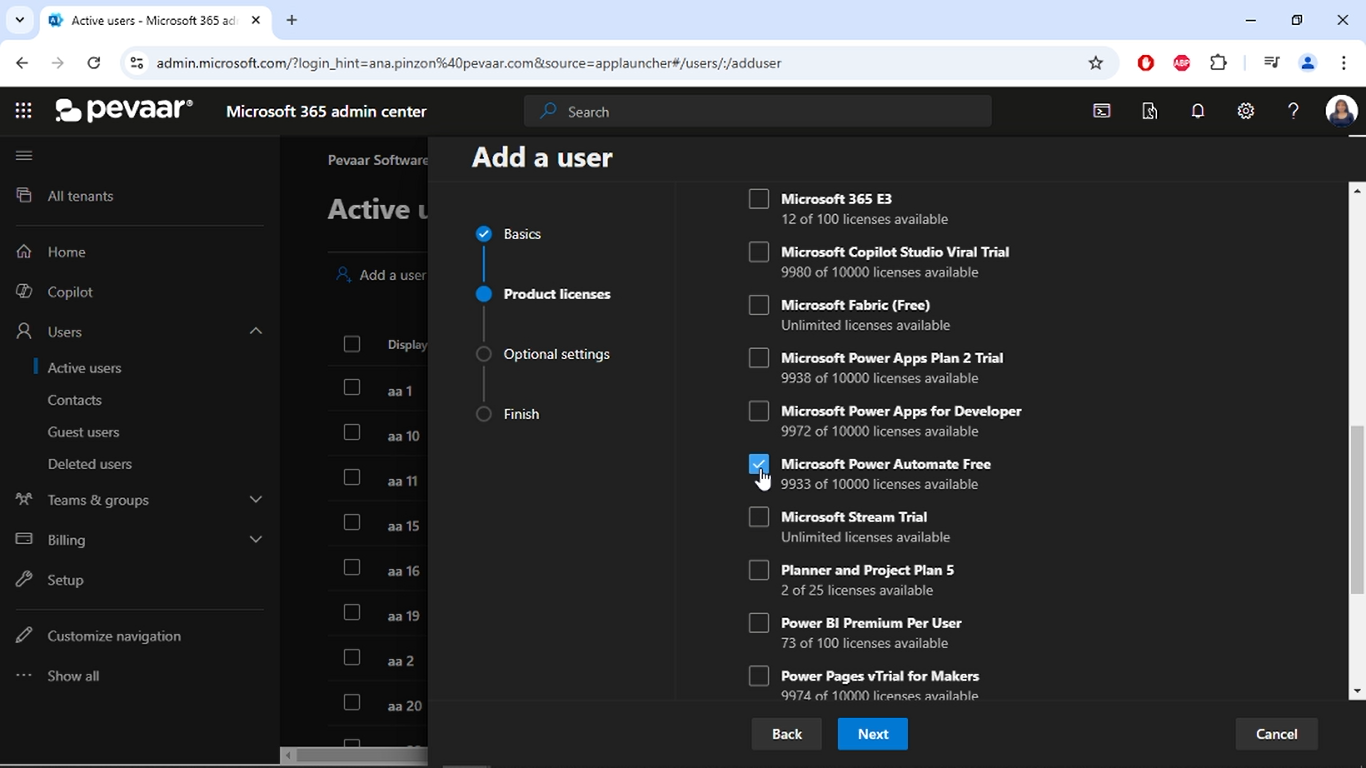
Next, select the Power Automate license and then click the “Next” button to continue (Img 4).
Img 3
Next, select the Power Automate license and then click the “Next” button to continue (Img 4).
 Img 4
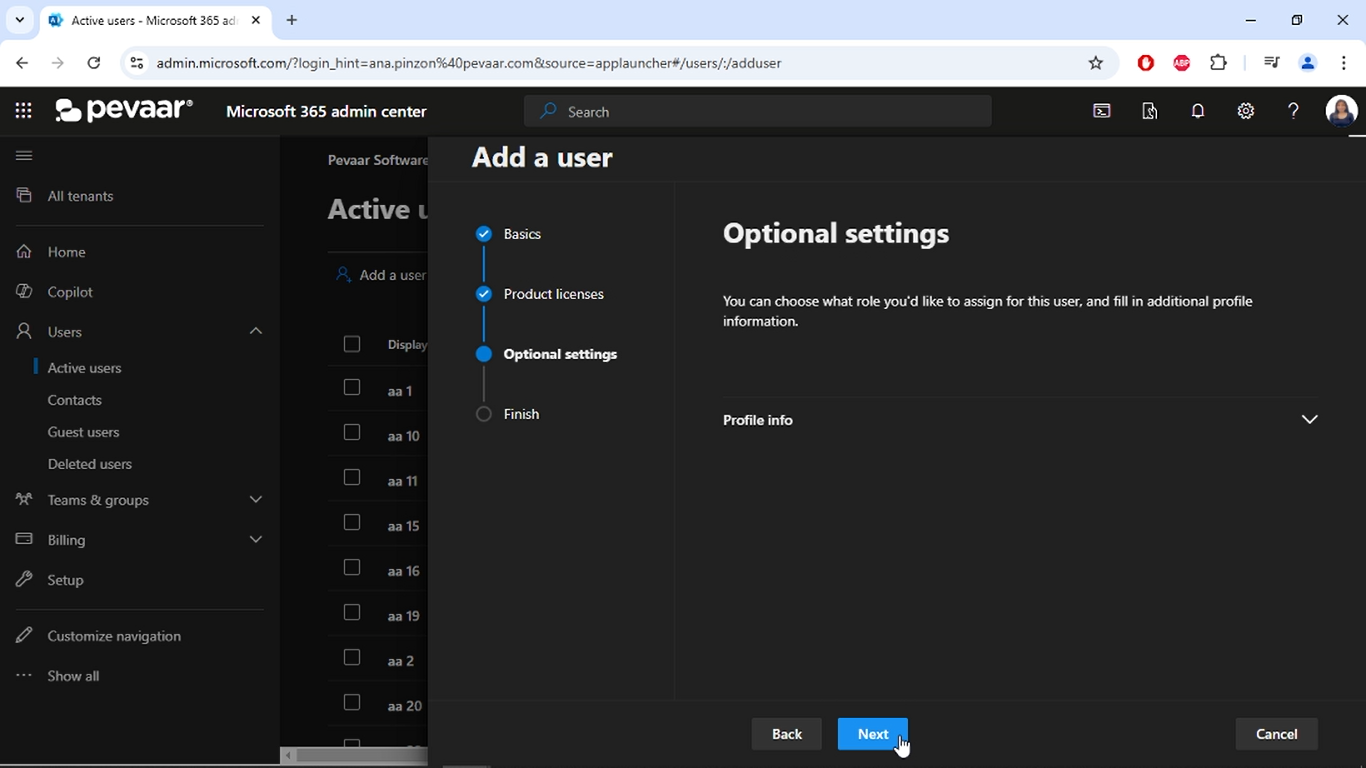
After that, click Next again to proceed (Img 5).
Img 4
After that, click Next again to proceed (Img 5).
 Img 5
Then, click the “Finish adding” button to complete the process (Img 6).
Img 5
Then, click the “Finish adding” button to complete the process (Img 6).
 Img 6
On the next screen, the details of the newly created user will be displayed. After reviewing them, click on “Close” to finish the setup (Img 7).
Img 6
On the next screen, the details of the newly created user will be displayed. After reviewing them, click on “Close” to finish the setup (Img 7).
Img 7
Step 2: Creating the Flow
To begin, access Power Automate using the account created in the previous step. Then, click on “Create” and subsequently select “Automated cloud flow” (Img 8).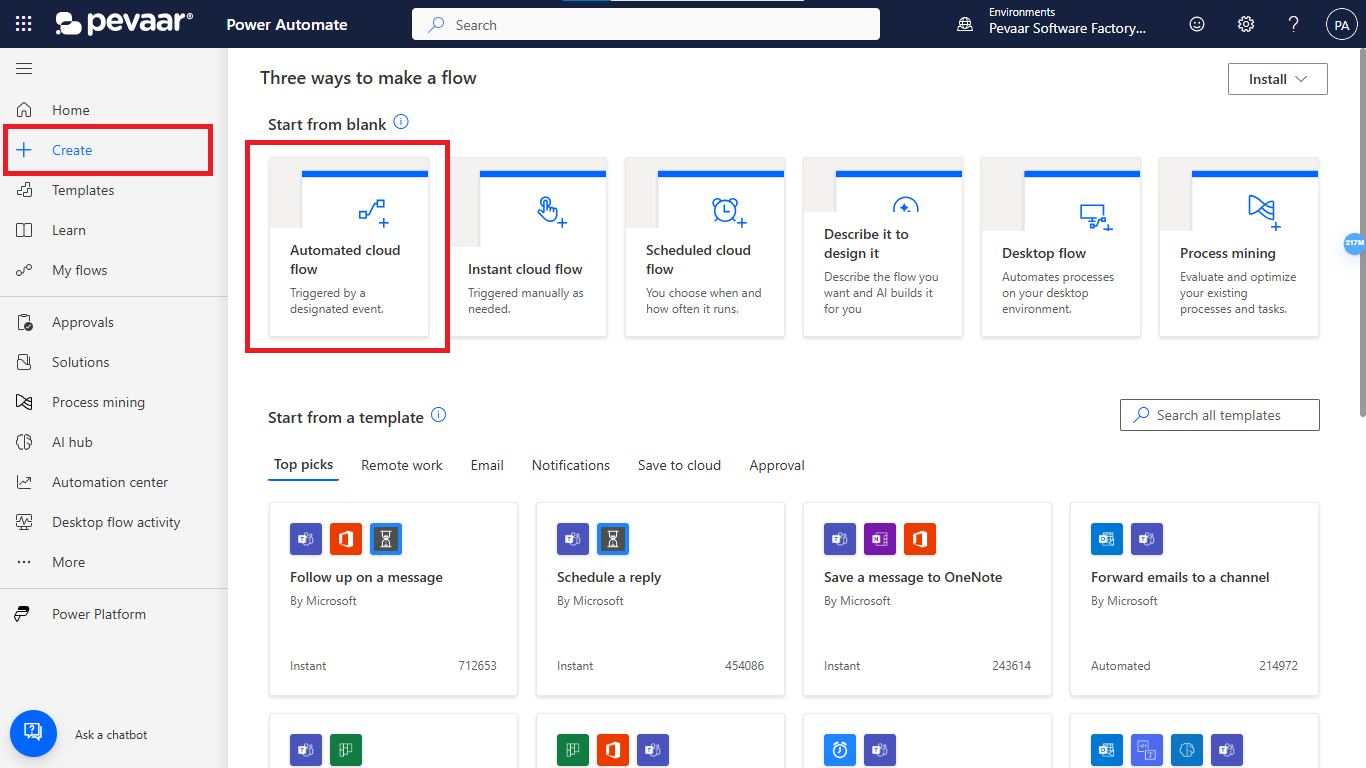 Img 8
Img 8
Step 3: Add the Flow Trigger
Next, give your flow a name and select the flow trigger, which in this case will be “When a new response is submitted” (Img 9).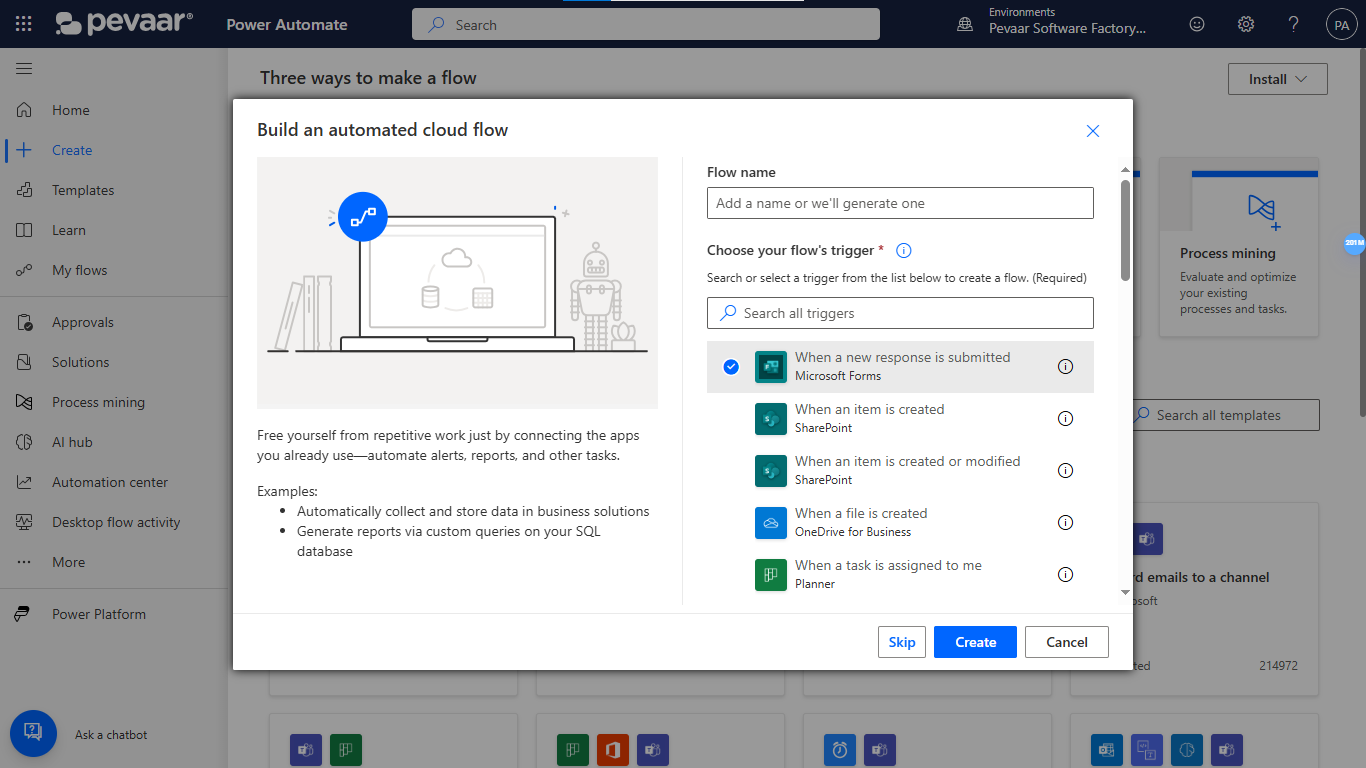
Img 9
Step 4: Select the conection
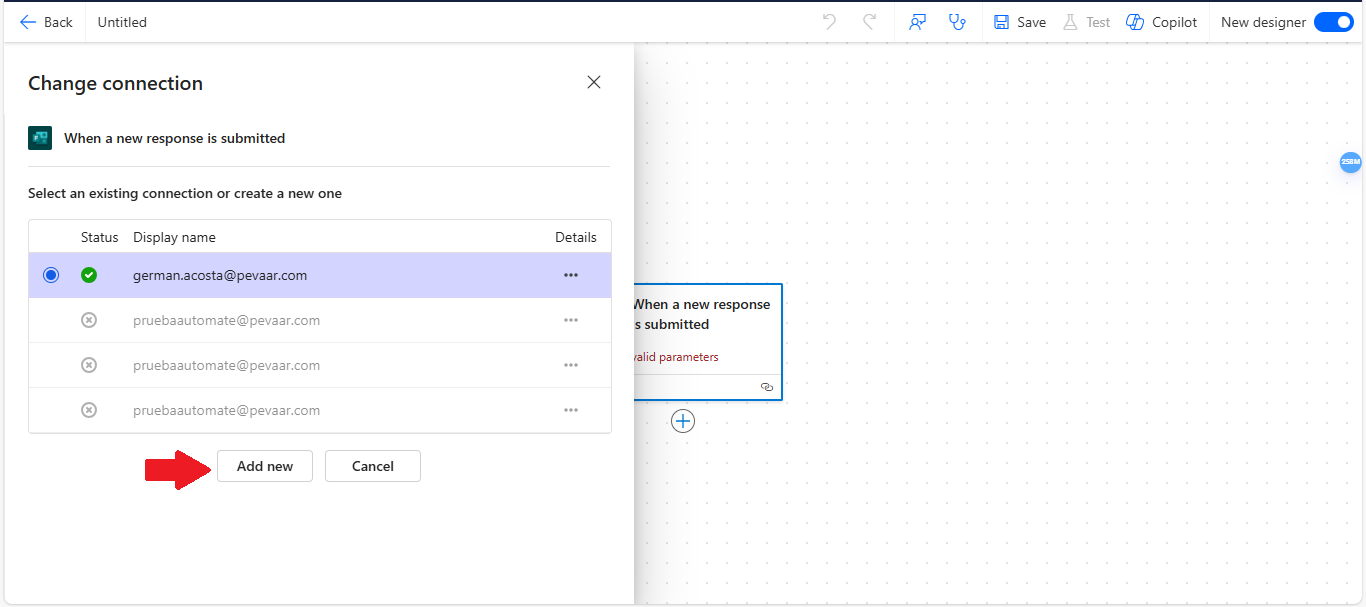
In this case, it’s important to note that since the flow is being created with an account that only has a Power Automate license, it will not have access to other Microsoft services. Therefore, each action in the flow must be linked to a different account that has the necessary licenses for those Microsoft services. For this reason, the connection is made using another account that has a license to use Microsoft Forms. To change the connection, first click on “Change connection” (Img 10).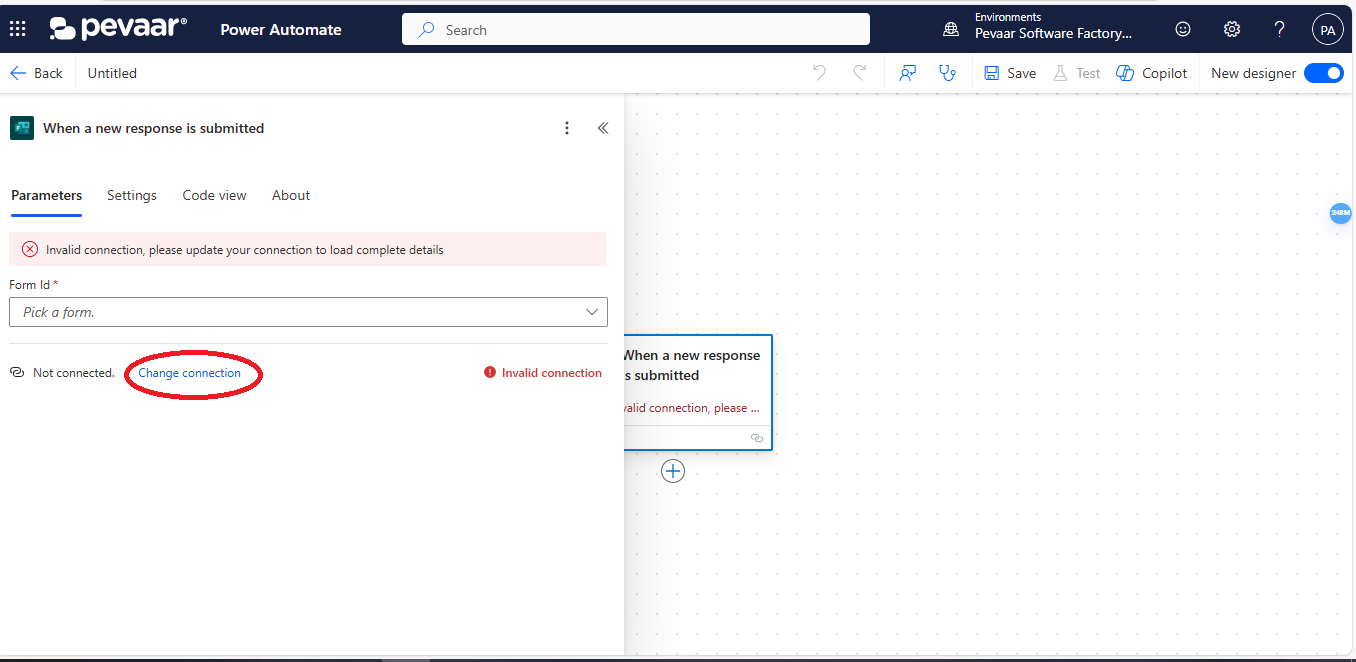 Img 10
After that, you need to select the connection, and if there isn’t any available, click on “Add new” (Img 11).
Img 10
After that, you need to select the connection, and if there isn’t any available, click on “Add new” (Img 11).
 Img 11
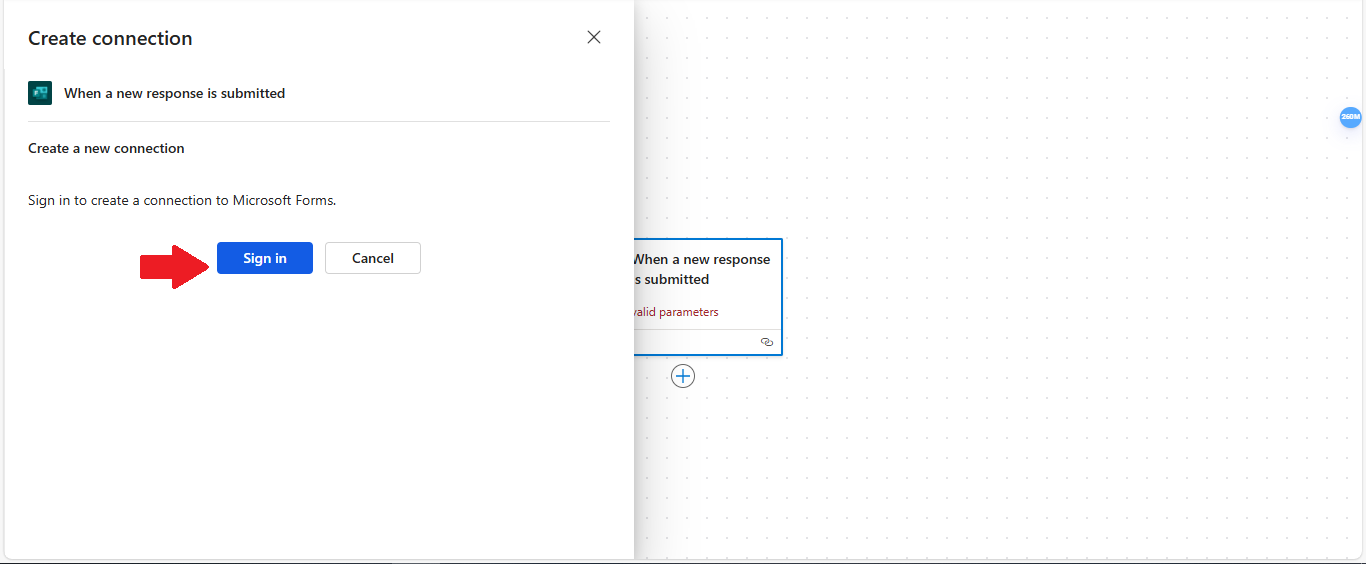
Next, you need to sign in with the account that will be used for the connections in this flow (Img 12).
Img 11
Next, you need to sign in with the account that will be used for the connections in this flow (Img 12).
 Img 12
Step 5: Select the Form
Once the connection is configured, click on the Form Id field. This will display a list of Microsoft Forms that have been created in the account connected to the trigger (Img 13).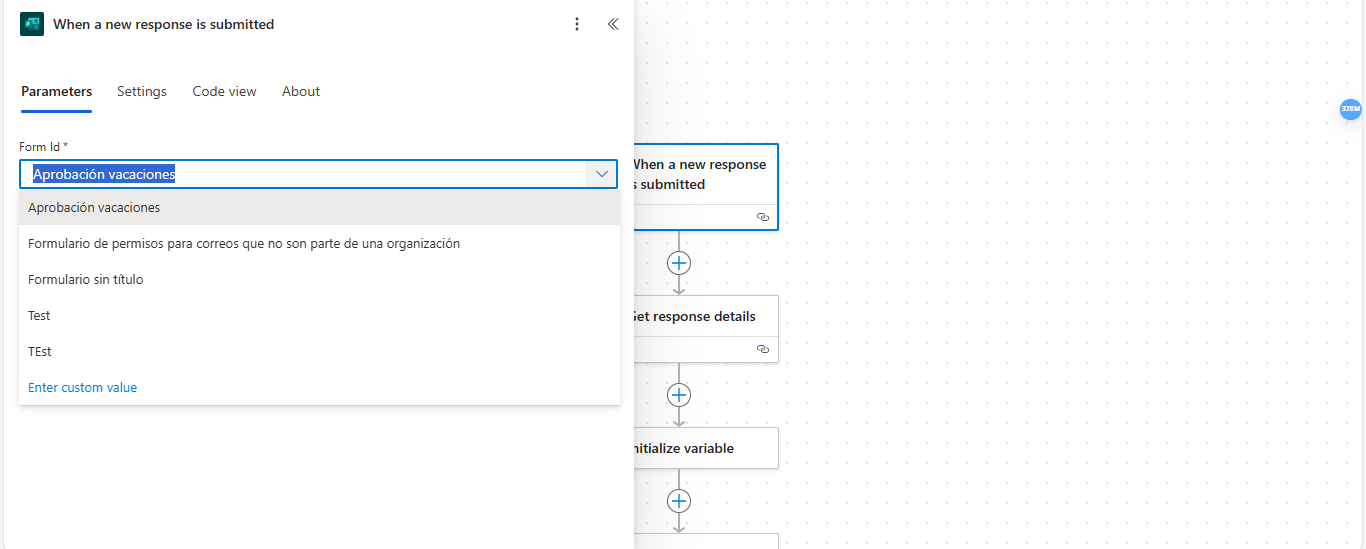 Img 13
Step 6: Add the “Get Response Details” action
To continue building the flow, you need to add a new action by clicking on the + icon. This step is required every time you want to add a new action (Img 14).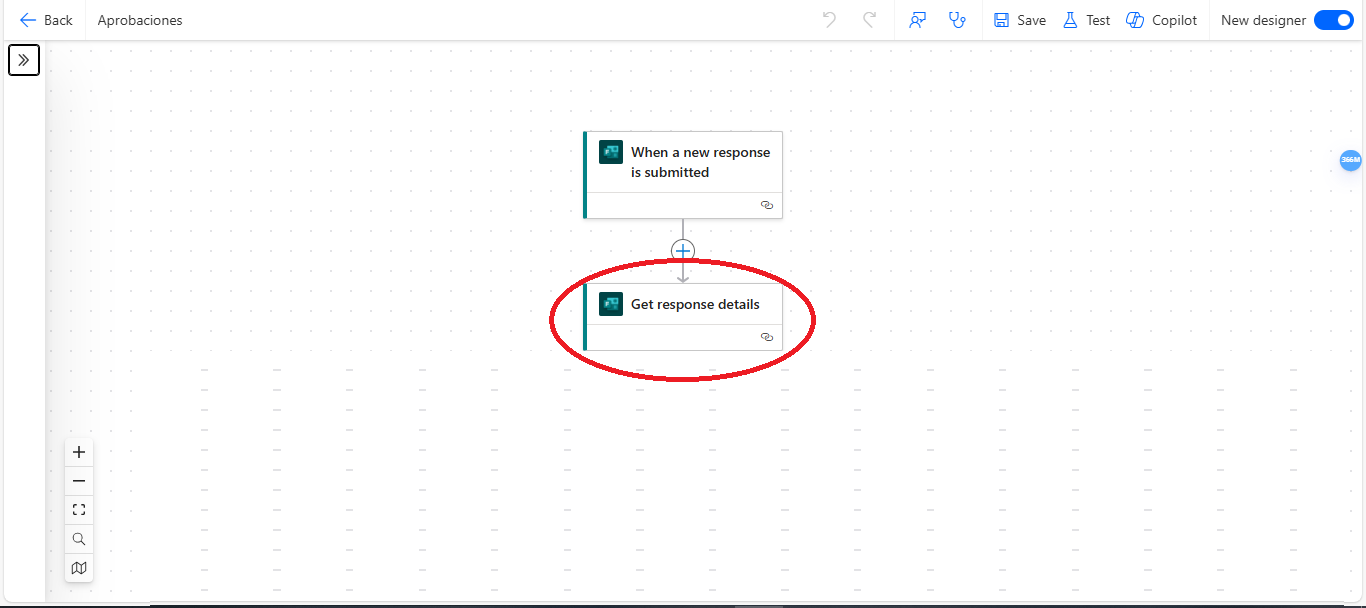 Img 14
In the search bar, type the application to which the new action belongs. For this step, it will be Forms. Then select the corresponding option (Img 15).
Img 14
In the search bar, type the application to which the new action belongs. For this step, it will be Forms. Then select the corresponding option (Img 15).
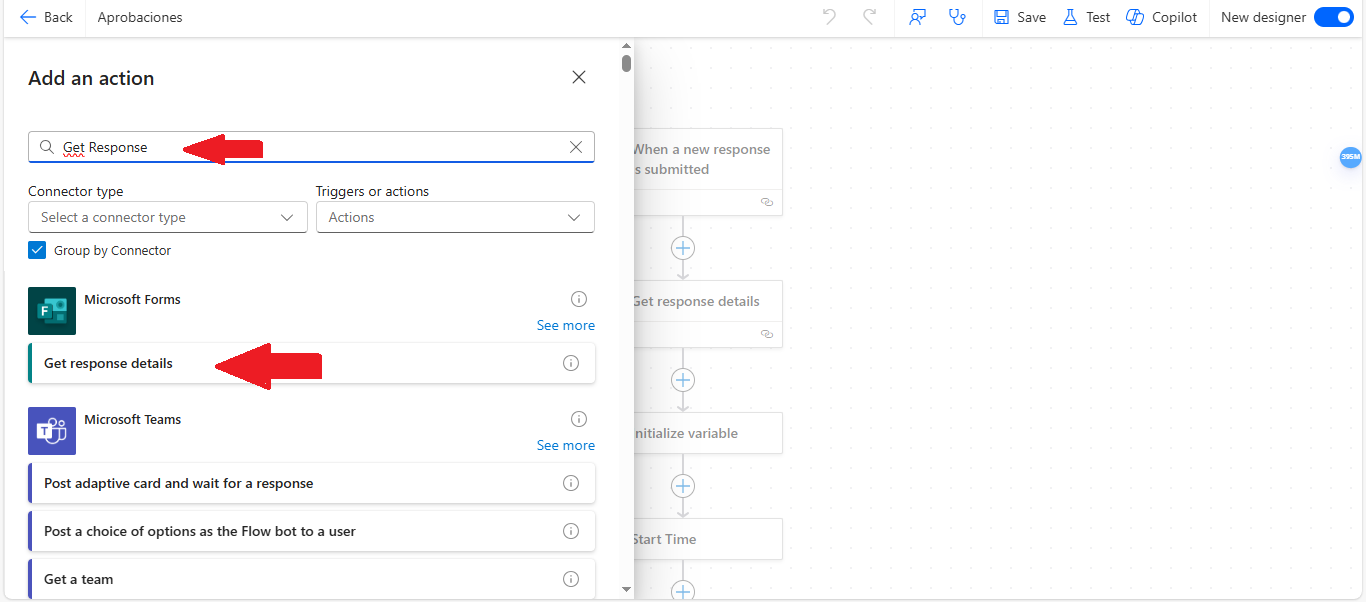
Img 15
Step 7: Configure the “Get Response Details” action.
Just like with the trigger, this action requires a connection, so it needs to be set up to display the forms. After configuring the connection, select the form and select the Response Id from the trigger “When a new response is submitted” (Img 16).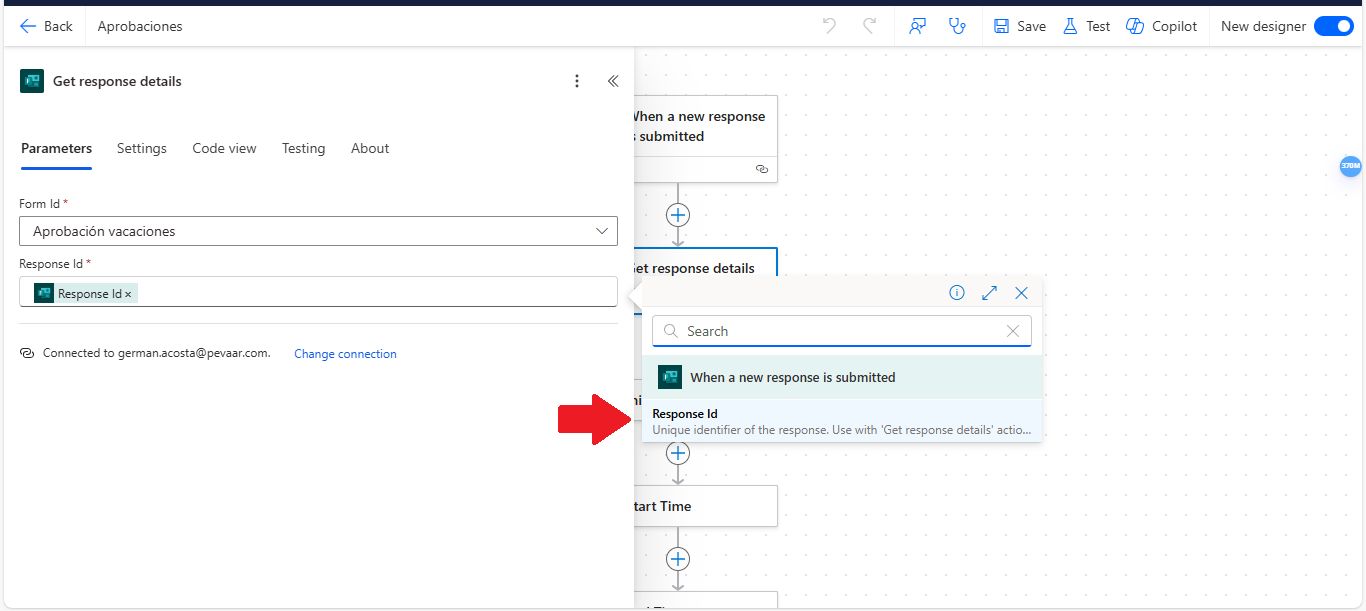 Img 16
Step 8: Create the “Initialize Variable” action
Now, create an action of the type “Initialize Variable.” This action will be used to store the attachments included in the form. In the Name field, enter a name for the variable, and in the Type field, select the option “Array” (Img 17). Img 17
Step 9: Create variables for the dates
In the search bar, type Initialize Variable and create two actions of type String (Img 18).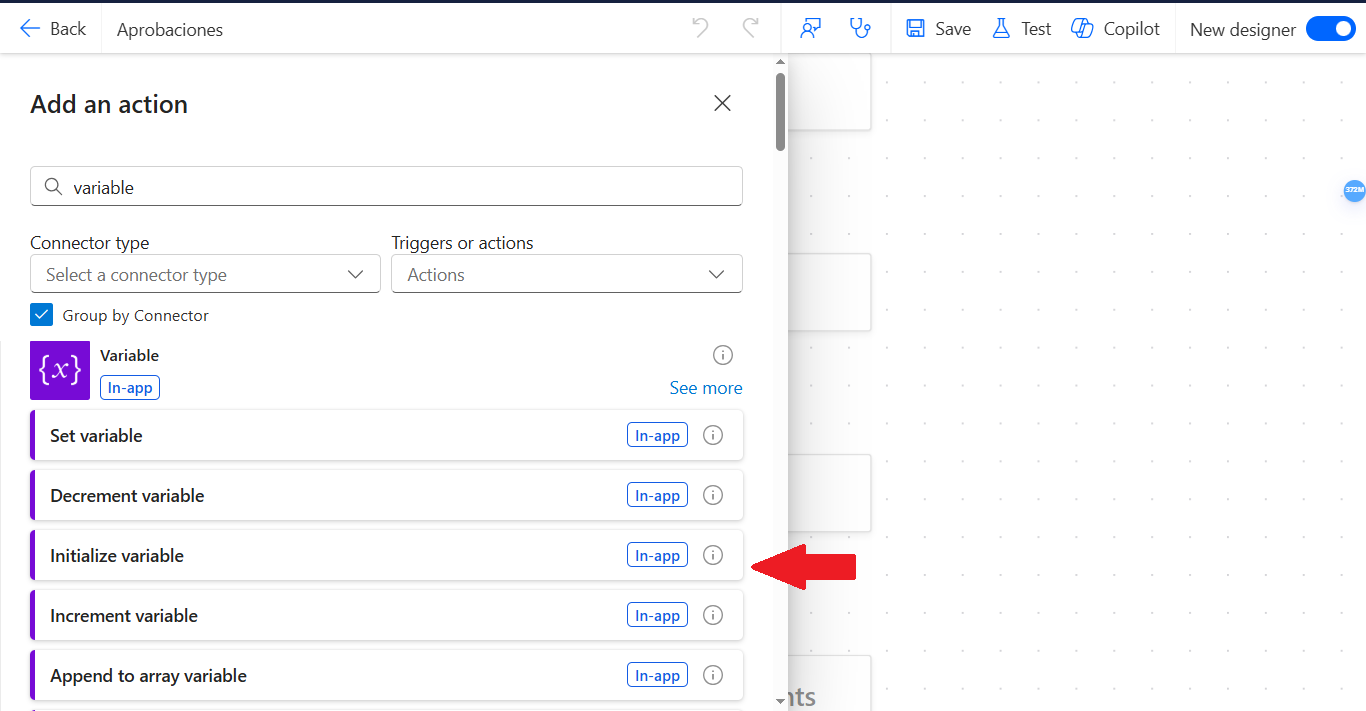 Img 18
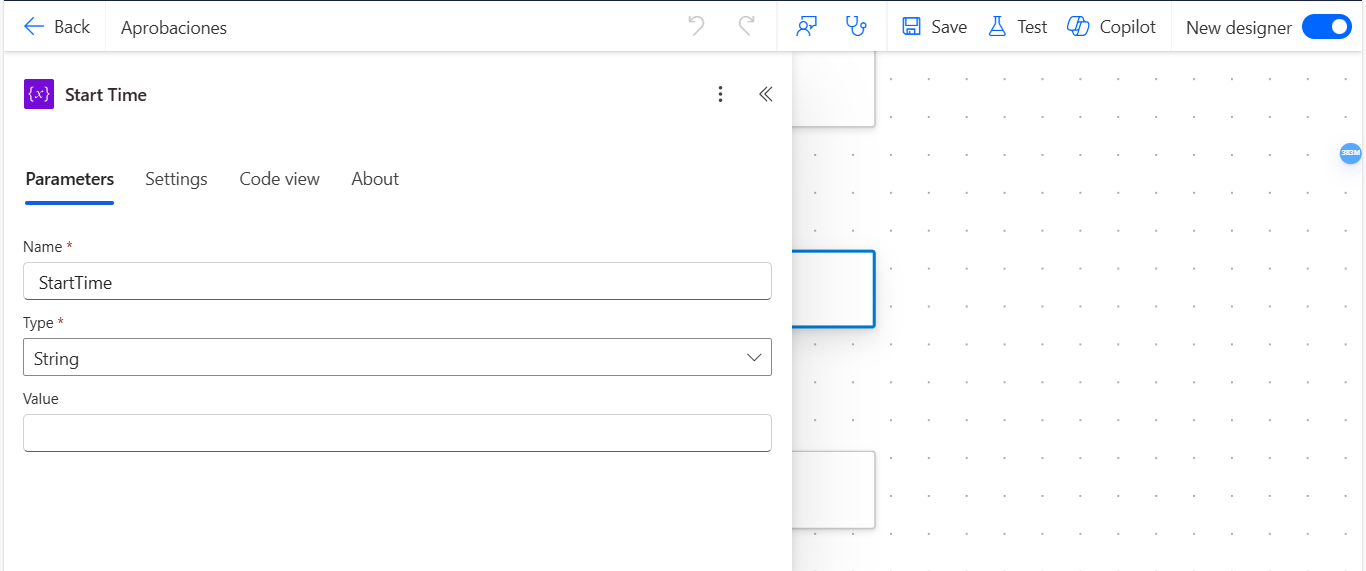
You need to create an Initialize Variable action for the Permission Start Date (Img 19).
Img 18
You need to create an Initialize Variable action for the Permission Start Date (Img 19).
 Img 19
Also, create another Initialize Variable action for the Permission End Date (Img 20).
Img 19
Also, create another Initialize Variable action for the Permission End Date (Img 20).
 Img 20
Step 10: Create a Compose action to store the reference of the attachments from the form.
Now, create a Compose action and select the attachments field from the “Get Response Details” action (Img 21).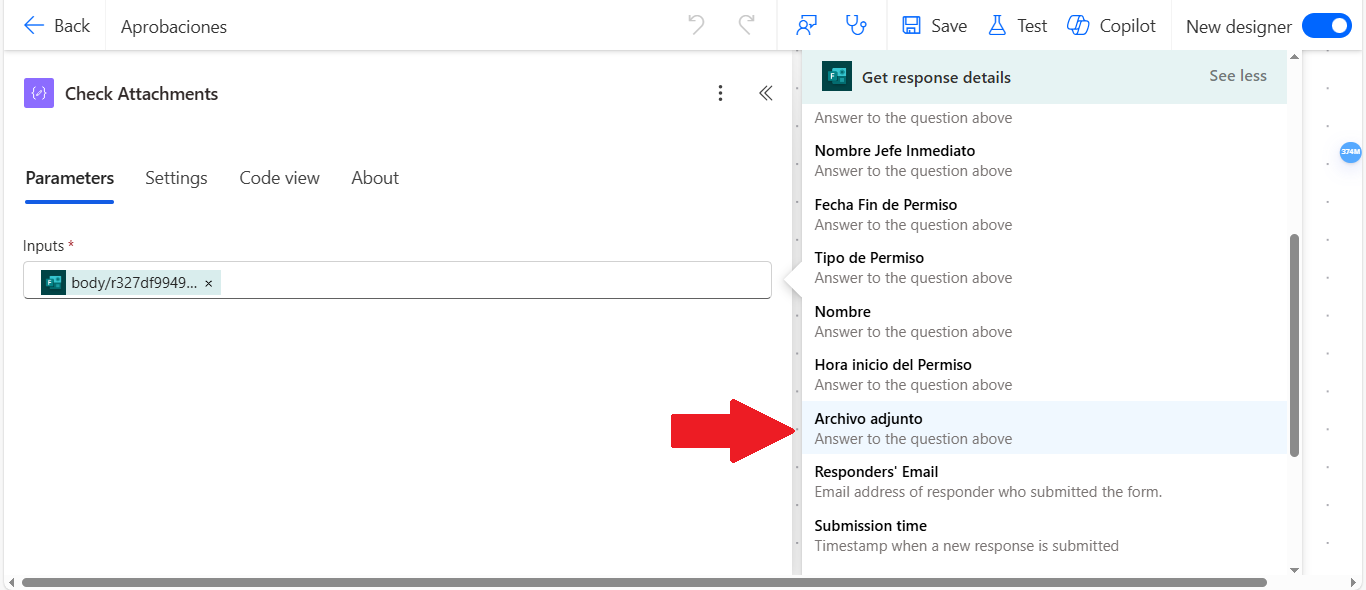 Img 21
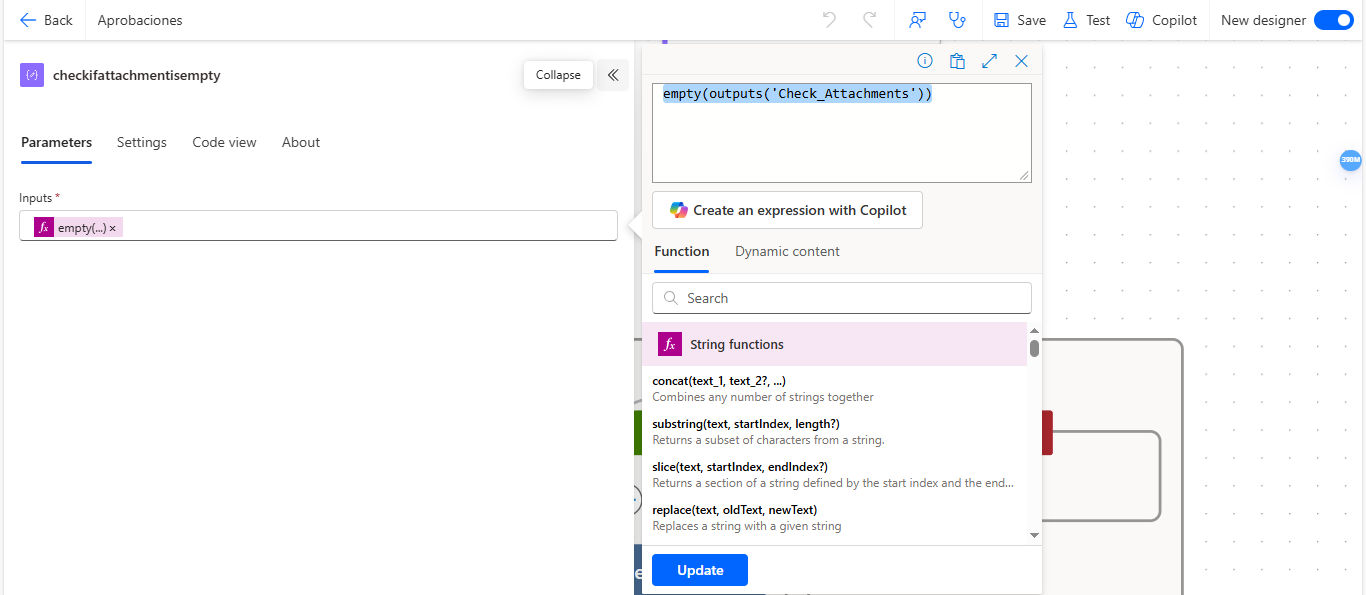
Step 11: Create an action to detect if the form has attachments.
To check whether the form contains attachments, create a Compose action and use the following expression:empty(outputs(‘Check_Attachments‘)) (Img 22).
 Img 22
Step 12: Create a condition to detect if there are attachments
Now, create a condition that will check if the form contains any attachments. In the condition, in the field labeled “Choose a value”, insert the output from the action CheckIfAttachmentIsEmpty (Img 23).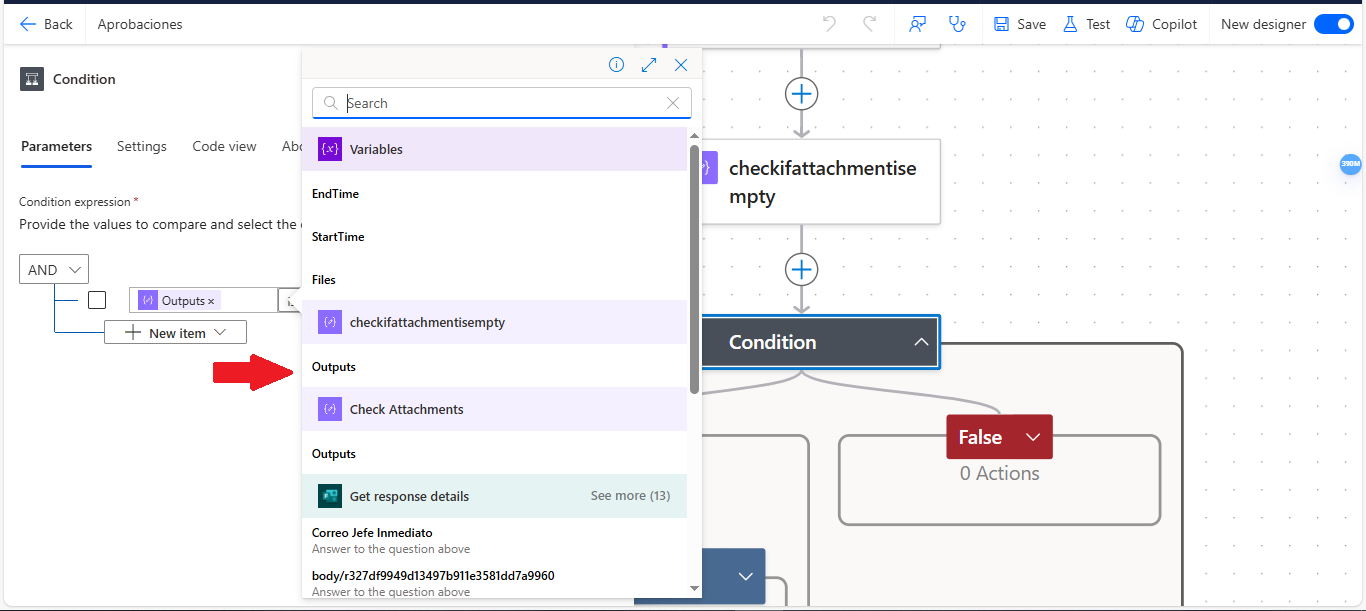 Img 23
Then, in the dropdown menu, select the option “is not equal to” (Img 24).
Img 23
Then, in the dropdown menu, select the option “is not equal to” (Img 24).
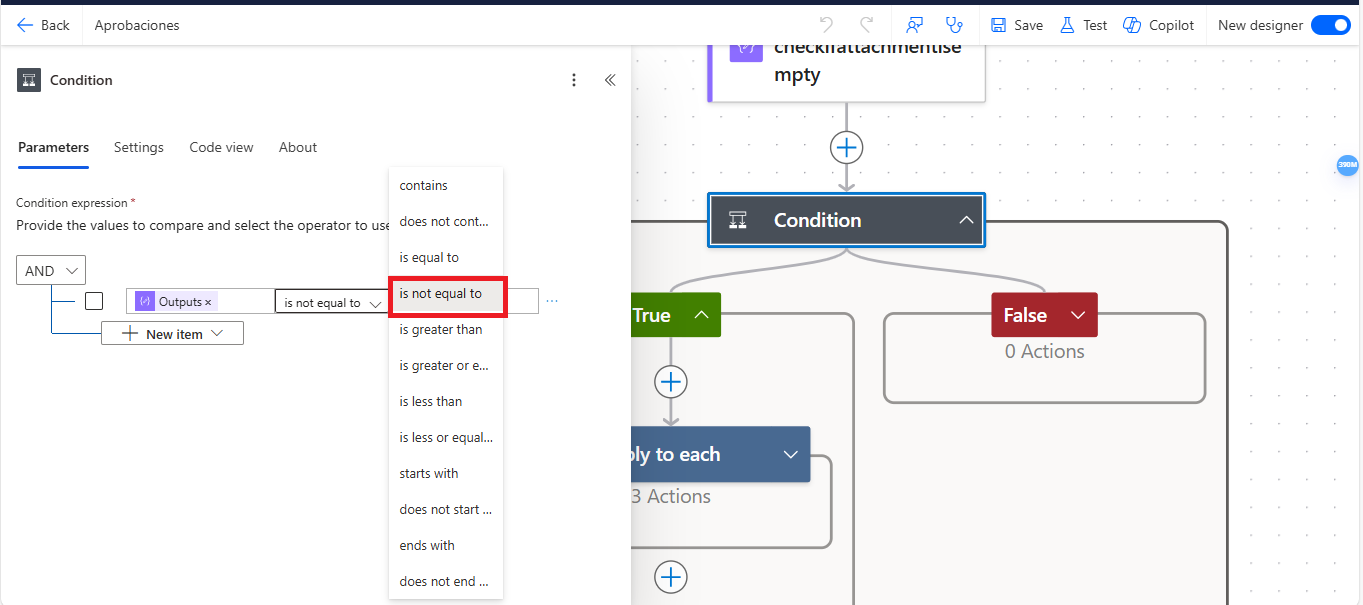 Img 24
Finally, in the “Choose a value” field, enter “True” (Img 25).
Img 24
Finally, in the “Choose a value” field, enter “True” (Img 25).
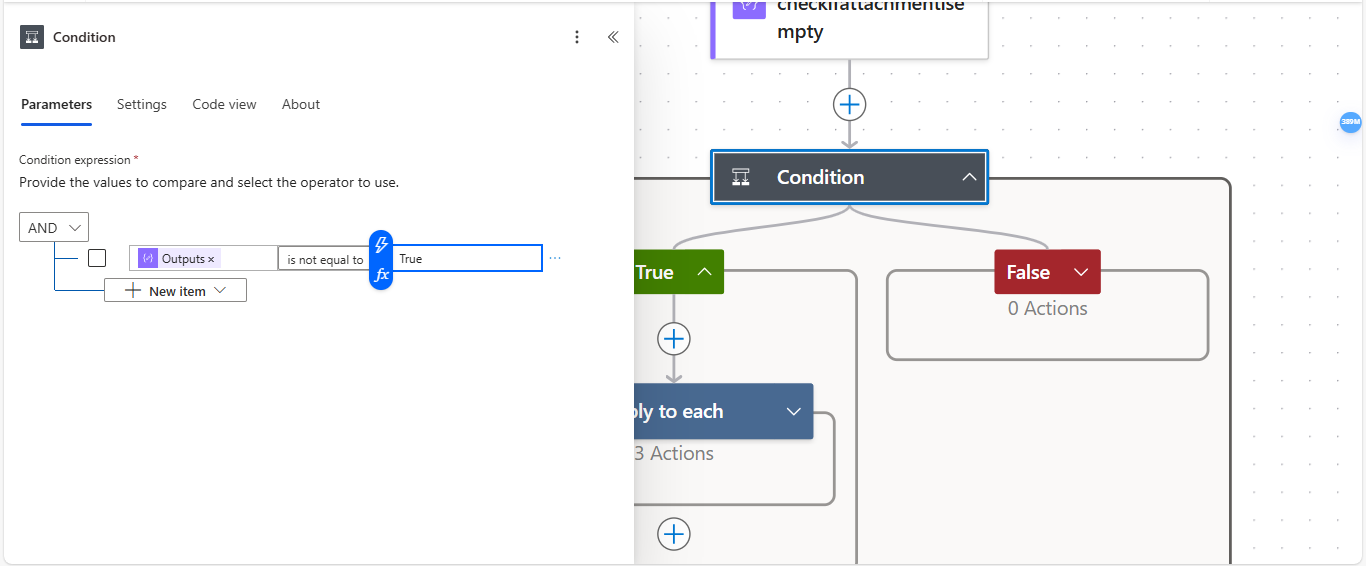 Img 25
Step 13: Add an “Apply to each” to iterate through the list of attachments in the form.
Inside the condition, you need to add an “Apply to each” action (Img 26).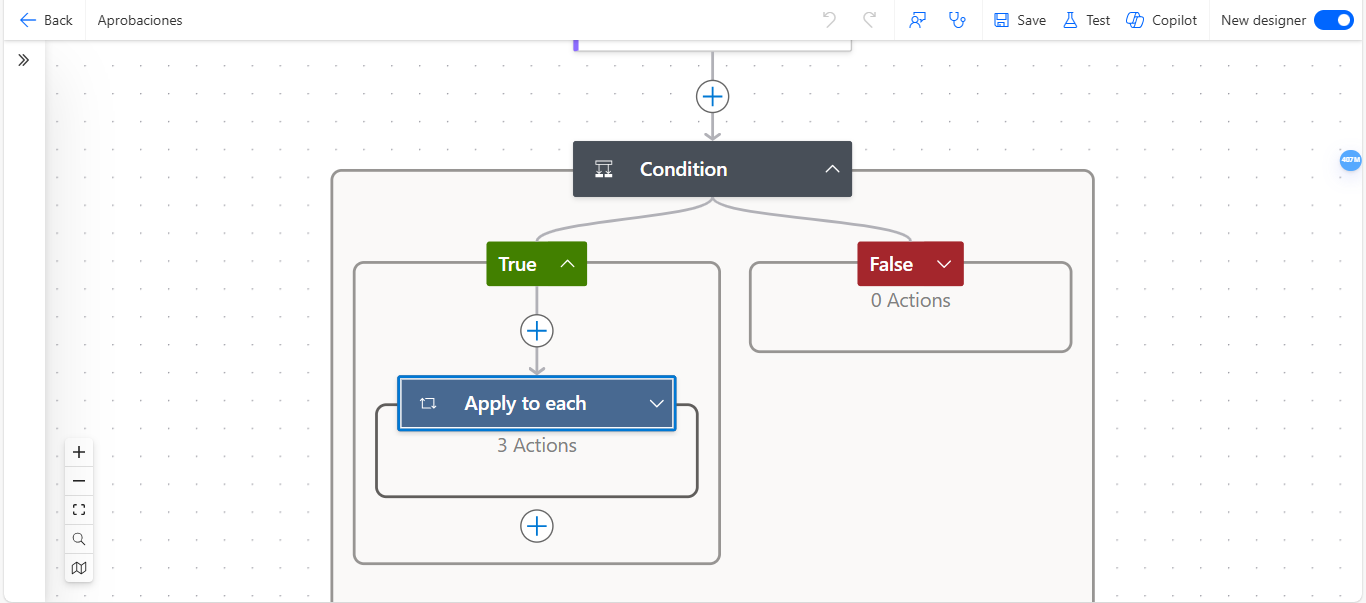 Img 26
Inside the “Apply to each”, you need to write an expression that converts the list of attachments to JSON format, which will make it easier to handle those files within the flow (Img 27).
Img 26
Inside the “Apply to each”, you need to write an expression that converts the list of attachments to JSON format, which will make it easier to handle those files within the flow (Img 27).
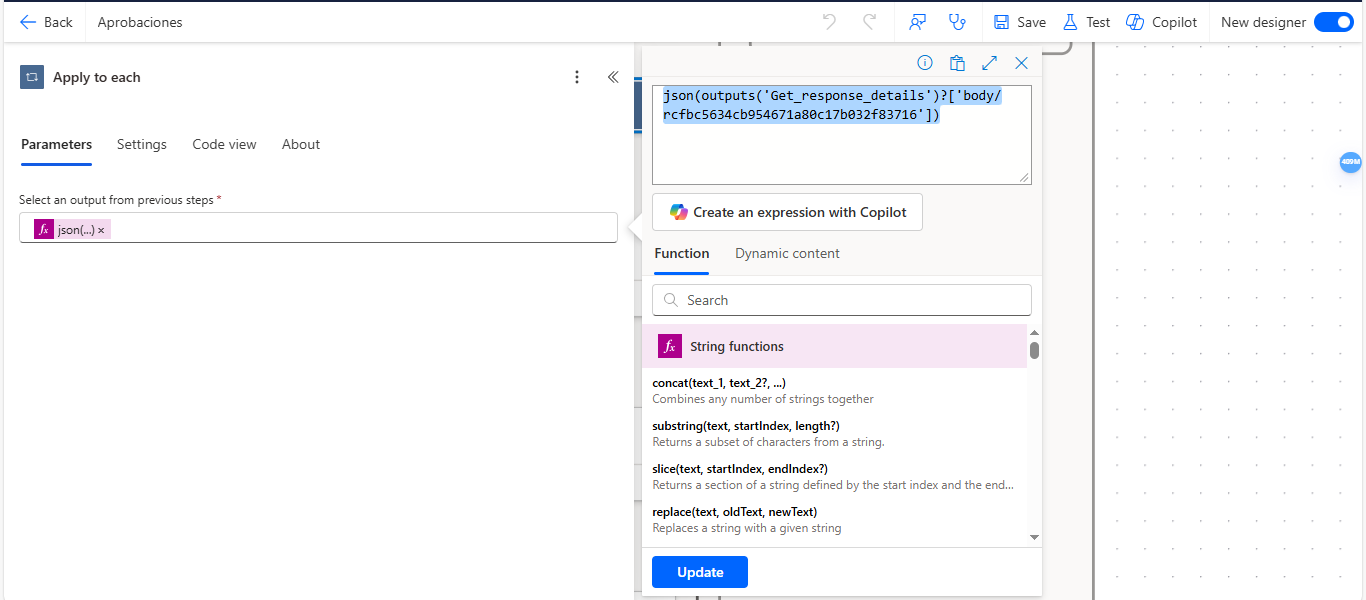 Img 27
Step 14: Add action to get file metadata
Now, add the “Get File Metadata” action, which will retrieve the metadata for each of the attachments in the form. You need to enter the following expression:items()?[‘id’]
This expression is used to get the metadata of each attached file. Keep in mind that since the flow is being created with an account that only has a Power Automate license, the connection for this action must be made with an account that has a license to access OneDrive (Img 28).
 Img 28
Step 15: Get file content
Next, add the “Get File Content” action, which will retrieve the content of the attached files. In the File field, select the Id obtained from the Get File Metadata action (Img 29).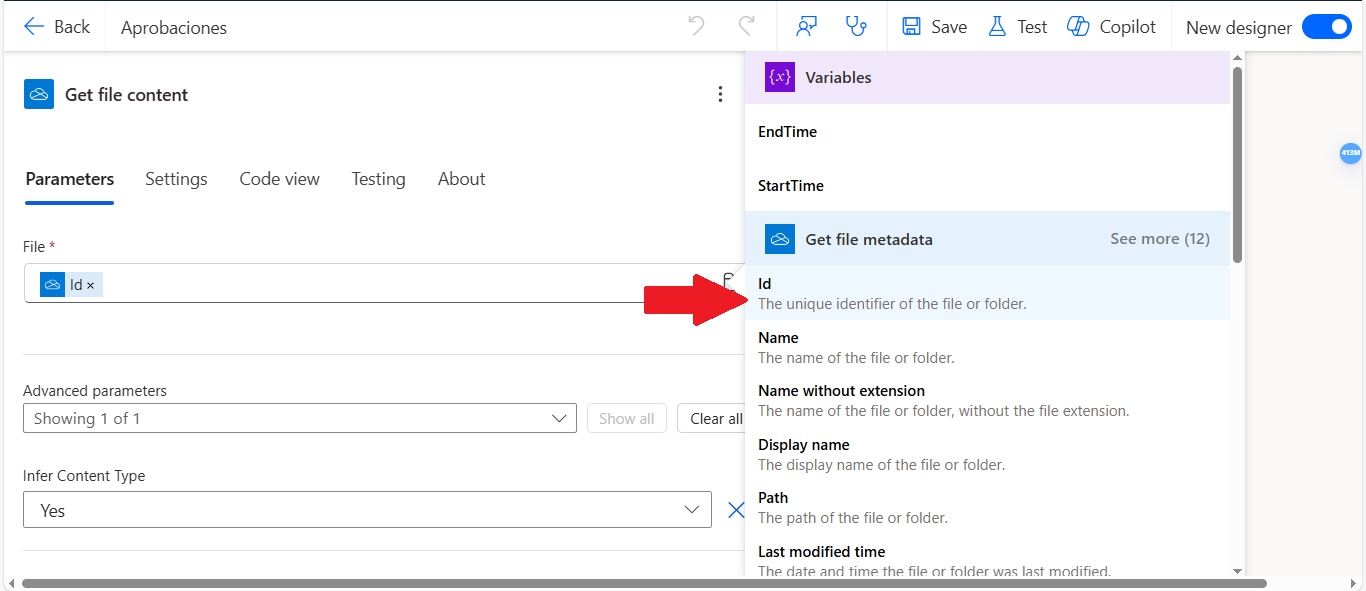 Img 29
Step 16: Add attachments to the Initialize Variable action
Previously, an Initialize Variable action was created to store the files. This action initially had no content because the only way to add content to a variable is within an Apply to each loop. However, this also limits the use of any variable, since the output of any action inside a loop cannot be used outside of it. In this case, you need to add an Append to Array Variable action. In the Name field, select the variable named Files (Img 30).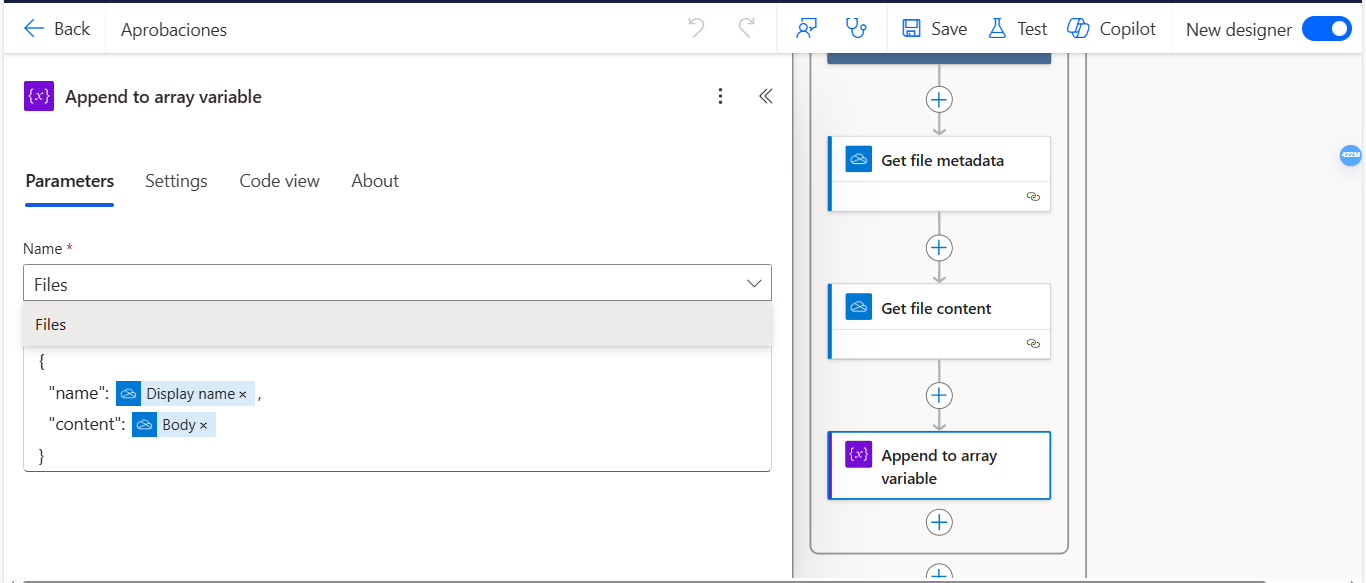 Img 30
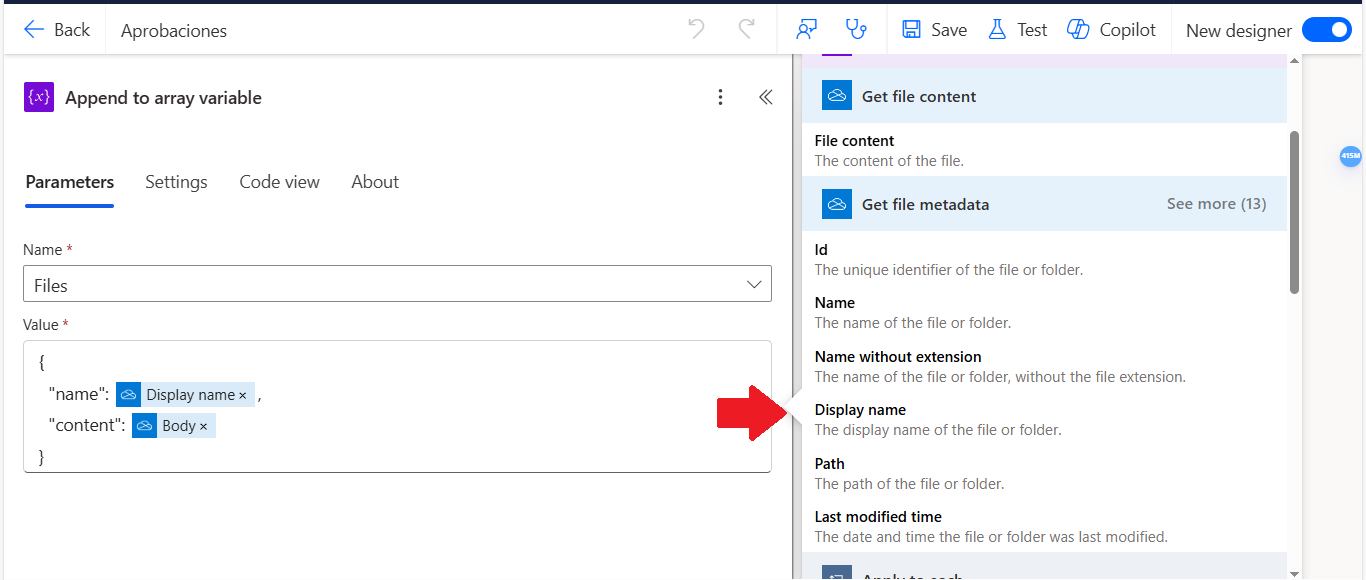
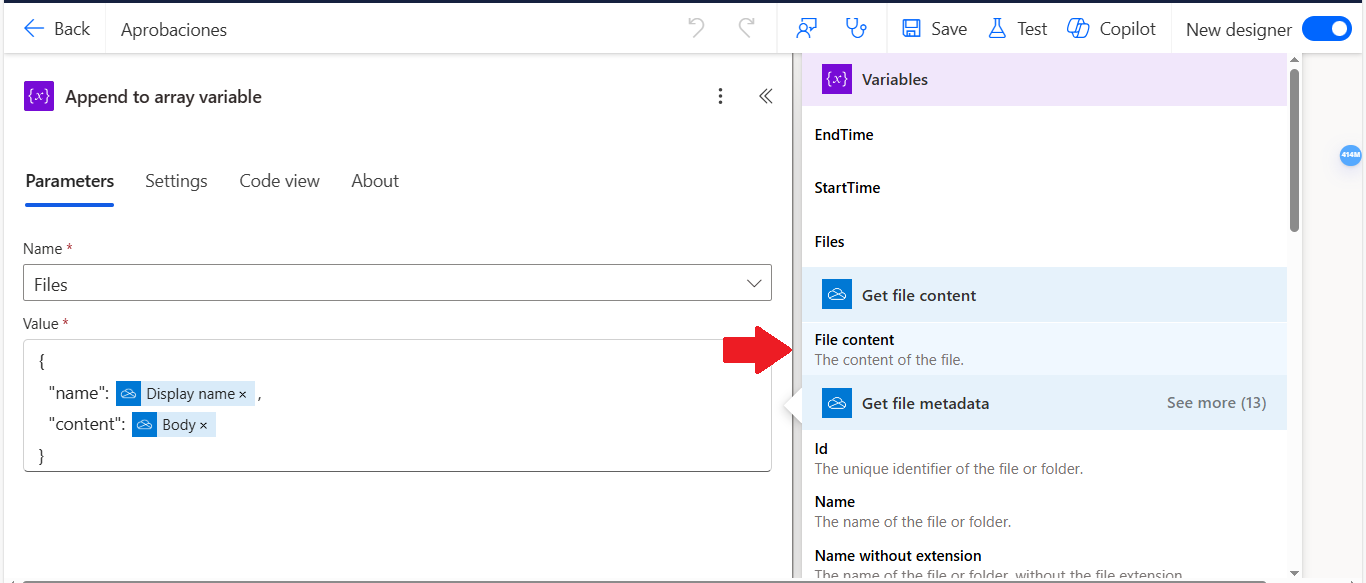
Inside the Value field, you need to create a JSON schema that includes the file name and content. To get the file name, use the output from the Get File Metadata action—select the Display Name field. For the content, select the output from the Get File Content action (Img 31) (Img 32).
Img 30
Inside the Value field, you need to create a JSON schema that includes the file name and content. To get the file name, use the output from the Get File Metadata action—select the Display Name field. For the content, select the output from the Get File Content action (Img 31) (Img 32).
 Img 31
 Img 32
Step 17: Add a Compose action to store the attachments
Now, add a Compose action and in the Inputs field, insert the Files variable (Img 33).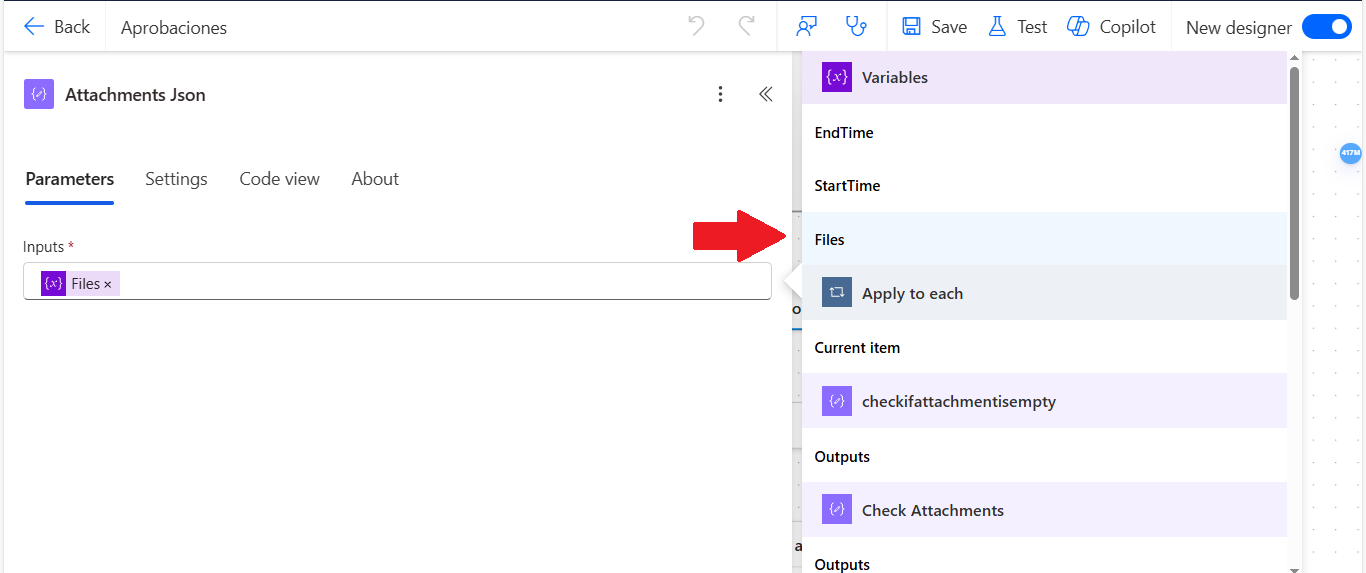 Img 33
Step 18: Add a Compose action to generate a GUID
Add a new Compose action and enter this expression: guid() (Img 34).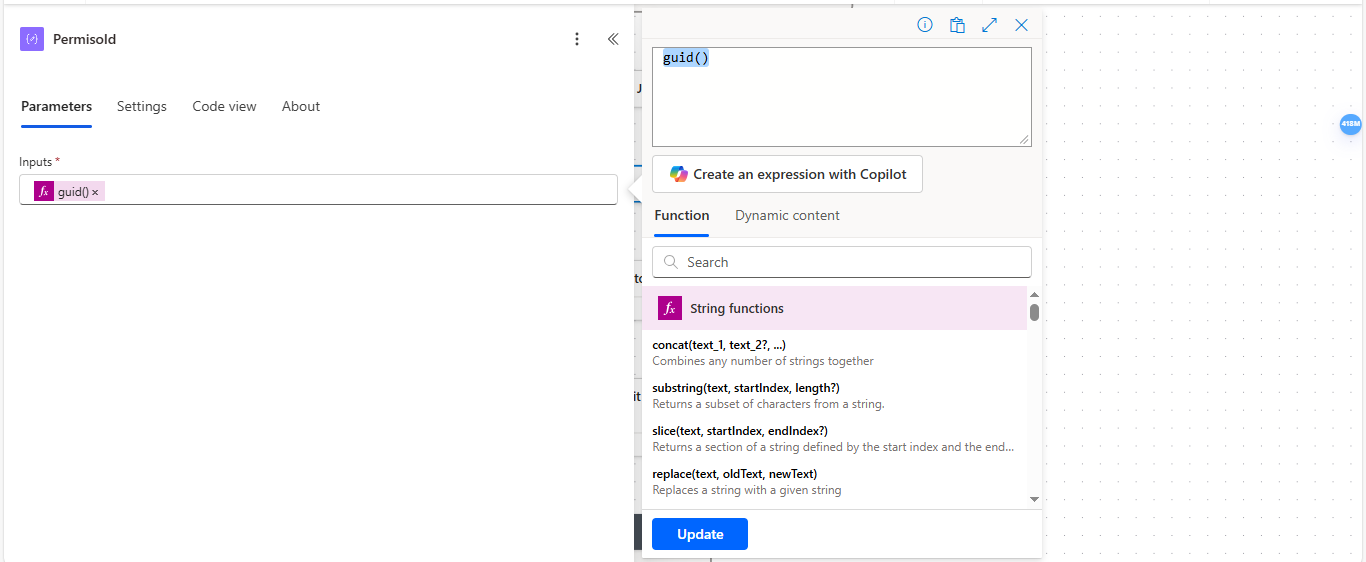 Img 34
Step 19: Add form information to an Excel file
Now, add a new action of type “Add a row into a table”. In this action, select OneDrive for Business for the Location field, and select “Documentos” in the Documents field (Img 35).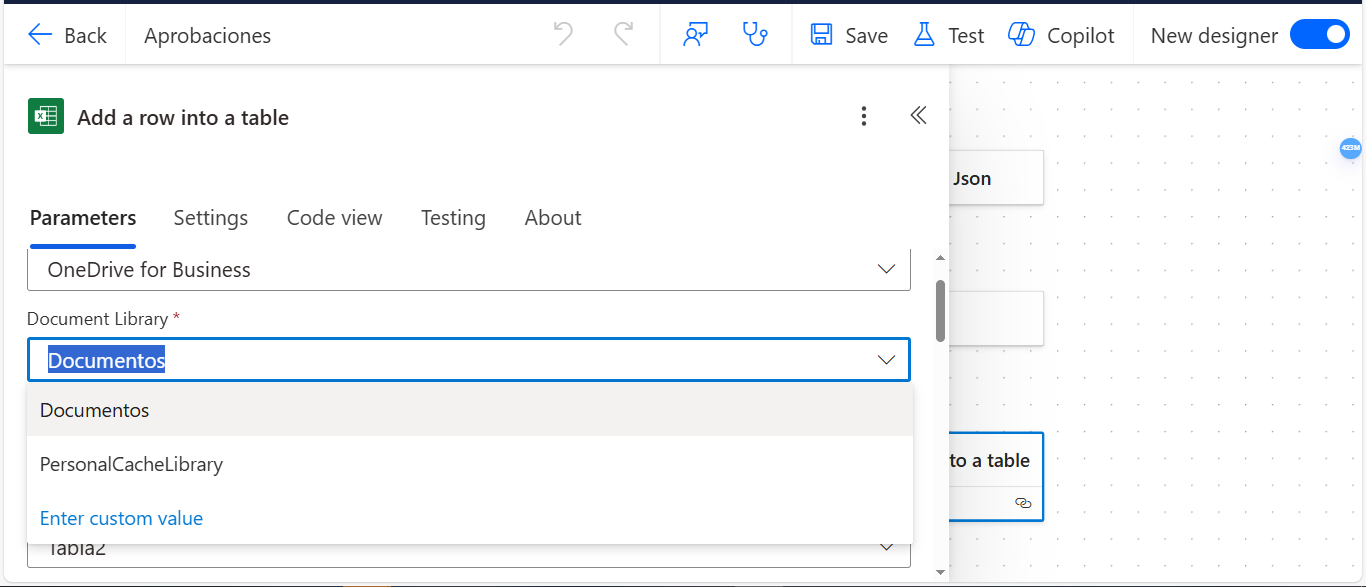 Img 35
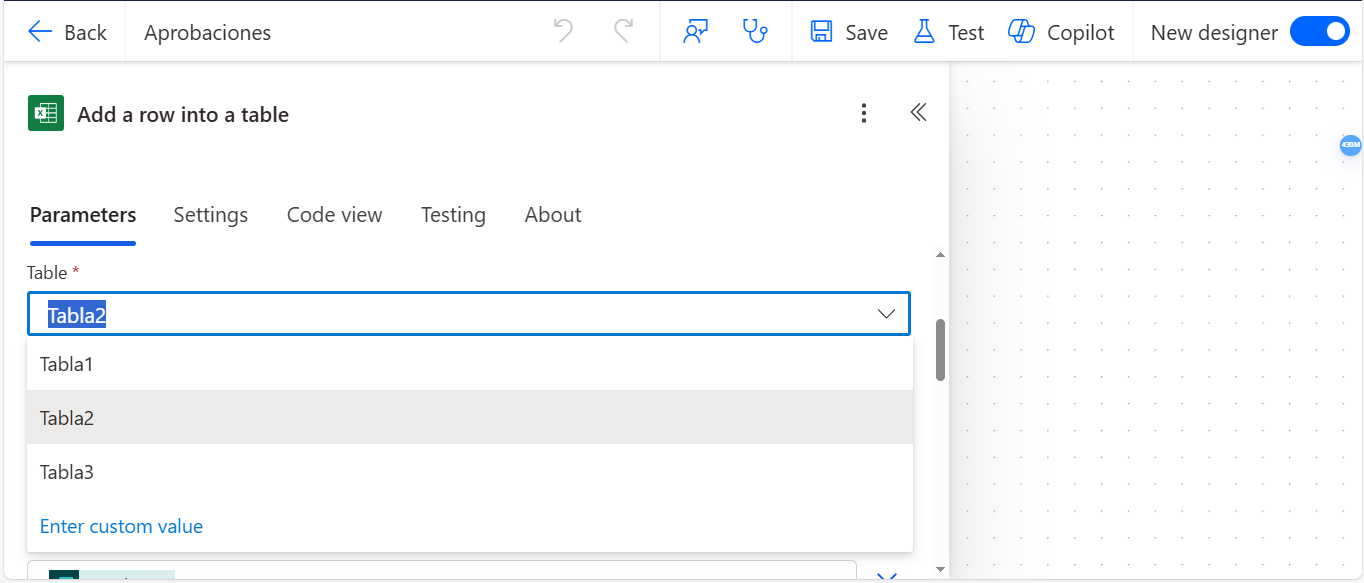
In the “Table” field, you need to select the table where you want to add the information from the form. The table must have the same fields as those in the form, and it’s also necessary that the table includes an ID field, as this is where the GUID created earlier in a compose will be added (Img 36).
Img 35
In the “Table” field, you need to select the table where you want to add the information from the form. The table must have the same fields as those in the form, and it’s also necessary that the table includes an ID field, as this is where the GUID created earlier in a compose will be added (Img 36).
 Img 36
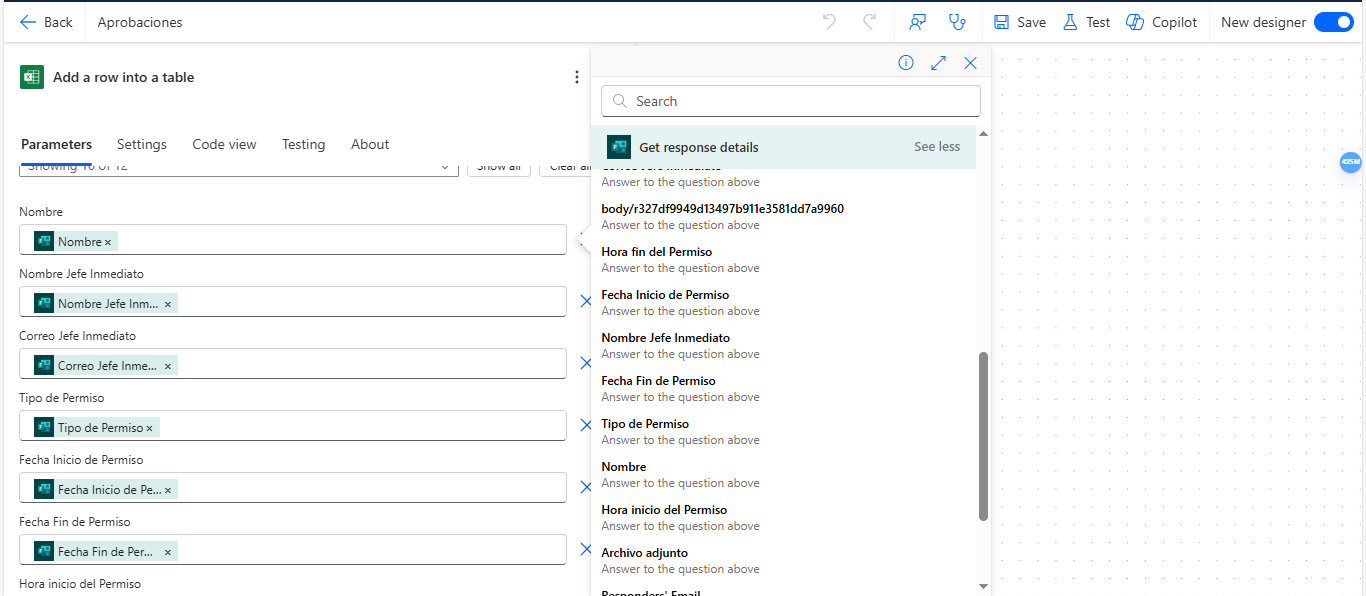
After selecting the table, all the fields in the table will appear, and you need to fill those fields by selecting the outputs from the “Get Response Details” action (Img 37).
Img 36
After selecting the table, all the fields in the table will appear, and you need to fill those fields by selecting the outputs from the “Get Response Details” action (Img 37).
 Img 37
The Id field should contain the GUID that was previously created in a compose action (Img 38).
Img 37
The Id field should contain the GUID that was previously created in a compose action (Img 38).
 Img 38
Step 20: Add the approval action
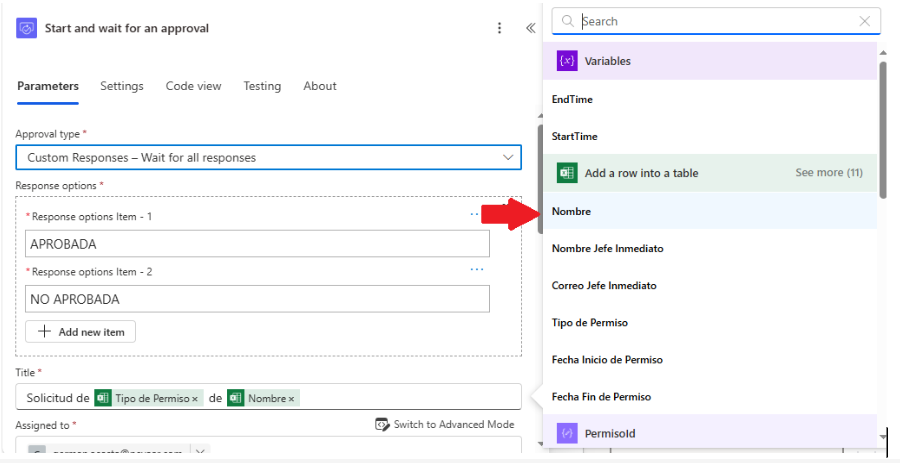
Now it’s necessary to add the action “Start and wait for an approval“. In the Approval Type field, select the option Custom responses. In the Title field, write the title of the time off request using the outputs from the “Add a row into a table” action. In the Response options field, enter the options APPROVED and NOT APPROVED (Img 39) (Img 40).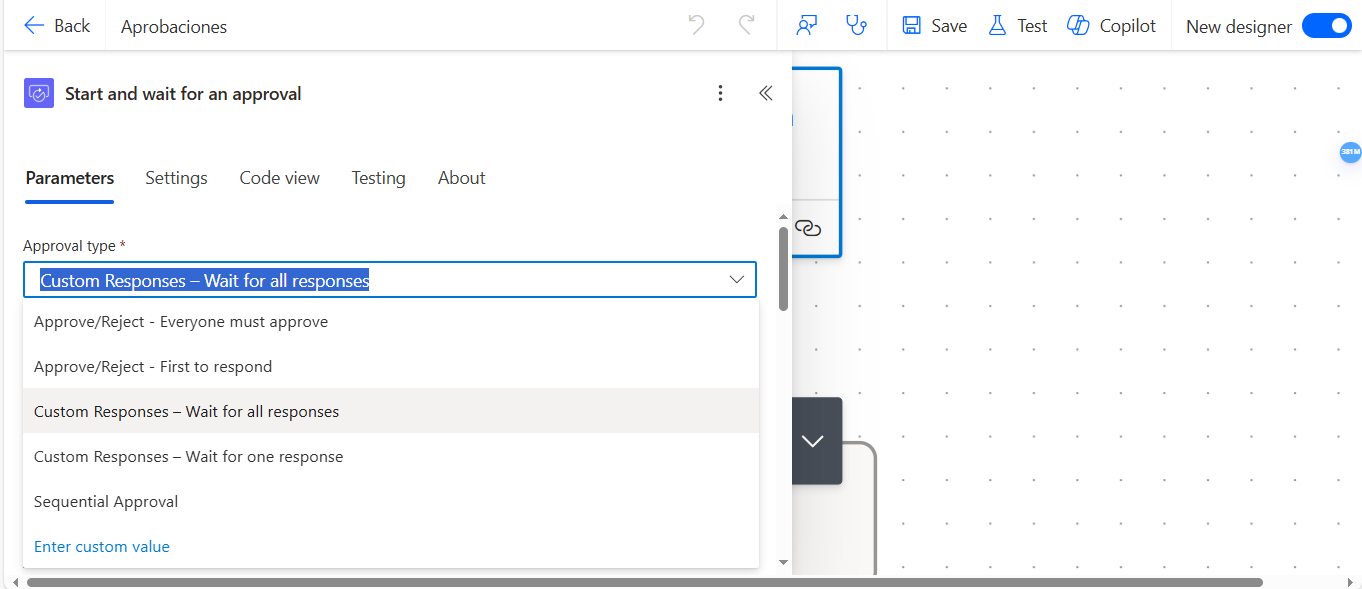 Img 39
 Img 40
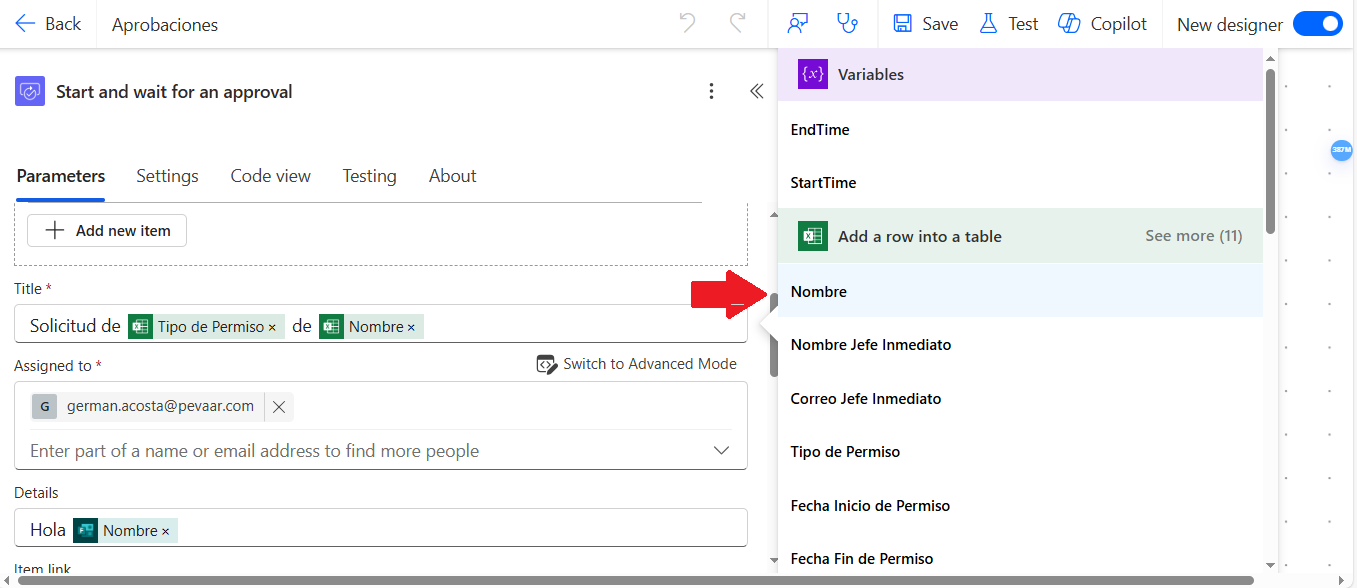
In the “Assigned to field”, enter the email address of the person who will approve or reject the time off request. (Img 41)
Img 40
In the “Assigned to field”, enter the email address of the person who will approve or reject the time off request. (Img 41)
 Img 41
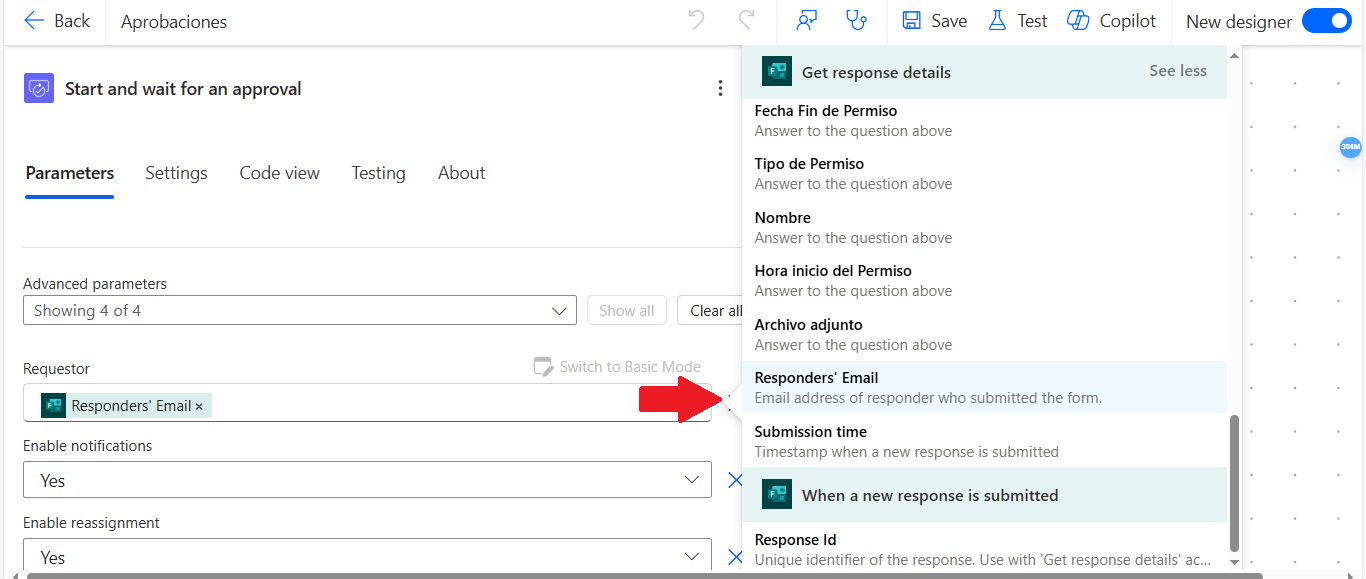
In the Requestor field, use the email address of the person who submitted the form. This email is obtained by selecting the “Responder’s email” option from the list of outputs in Get Response Details. (Img 42)
Img 41
In the Requestor field, use the email address of the person who submitted the form. This email is obtained by selecting the “Responder’s email” option from the list of outputs in Get Response Details. (Img 42)
 Img 42
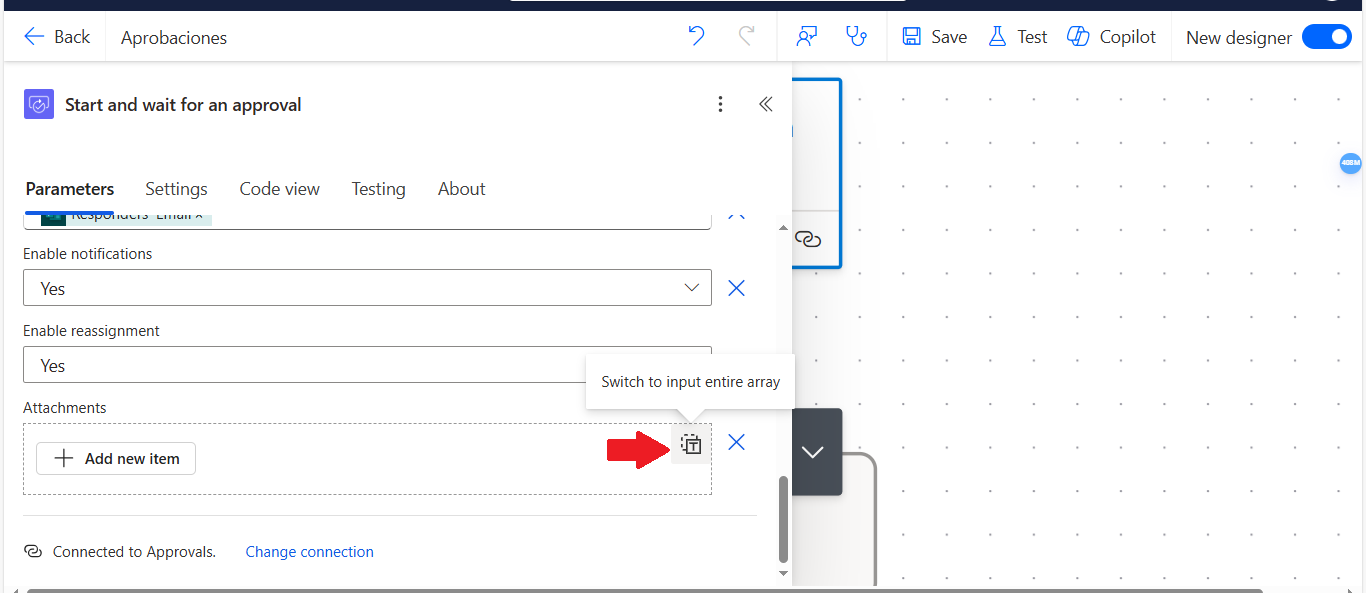
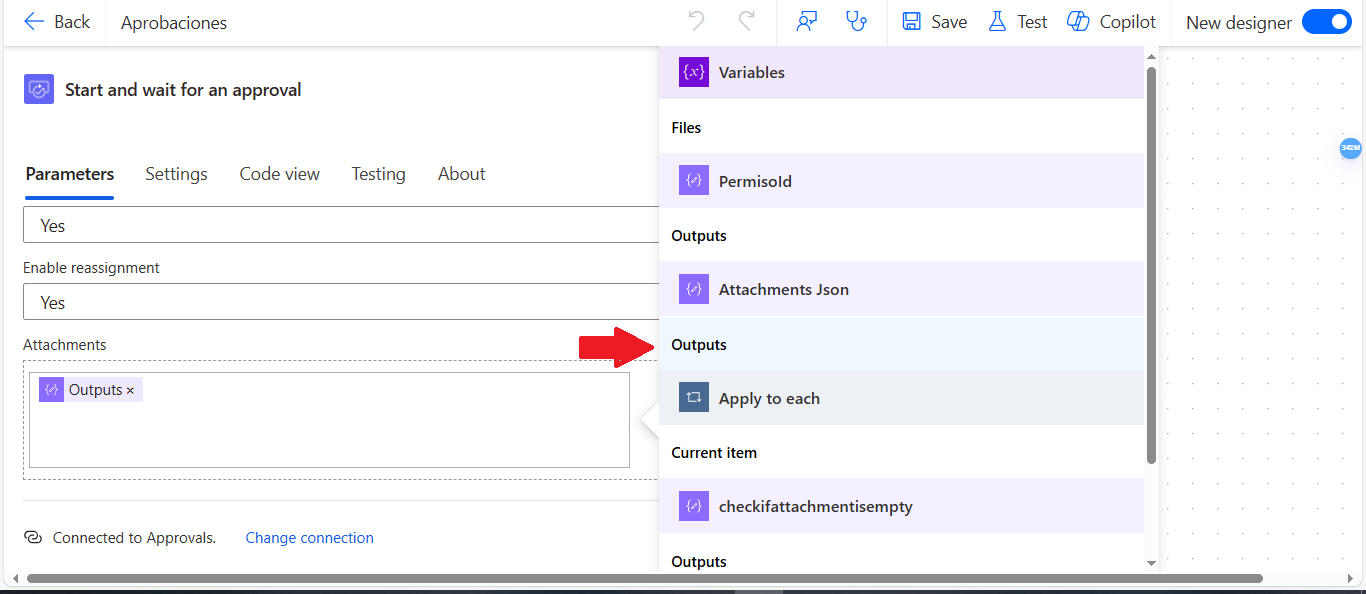
And finally, in the Attachments field, select the output from the Attachments JSON action. (Img 43) (Img 44)
Img 42
And finally, in the Attachments field, select the output from the Attachments JSON action. (Img 43) (Img 44)
 Img 43
 Img 44
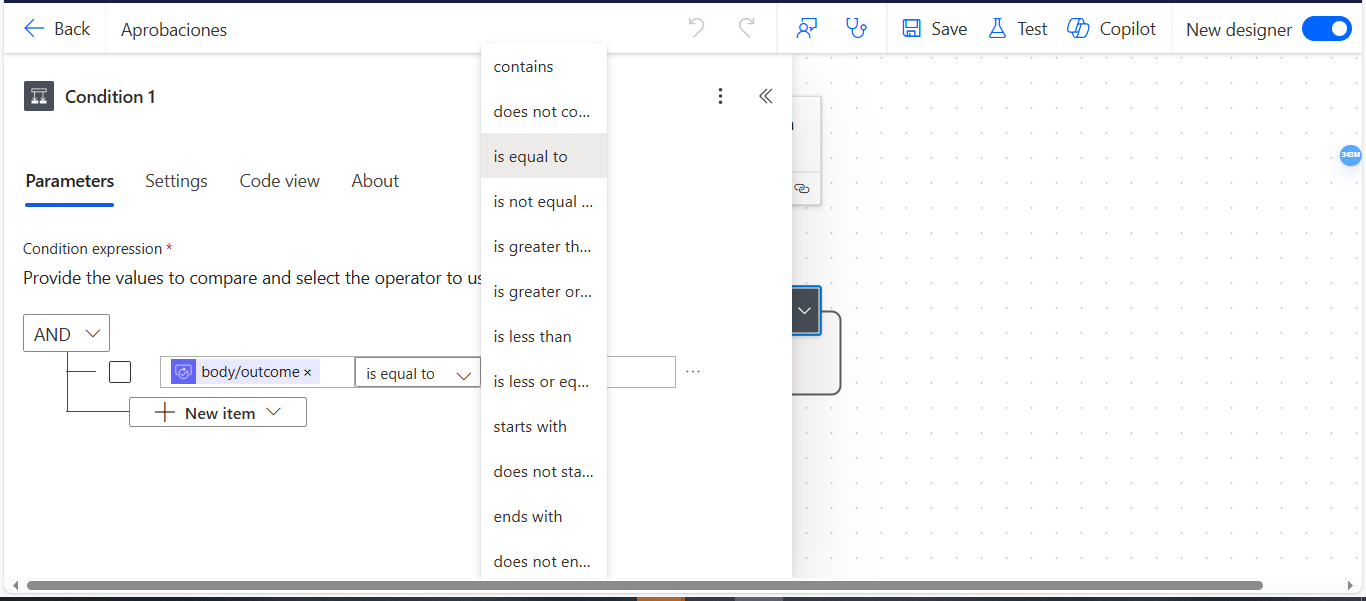
Step 21: Add a Condition to Detect If the Time Off Request Was Approved
Now, add a new Condition, which will check whether the time off request was approved. In the first field, select the Outcome from the “Start and wait for approval action.” (Img 45)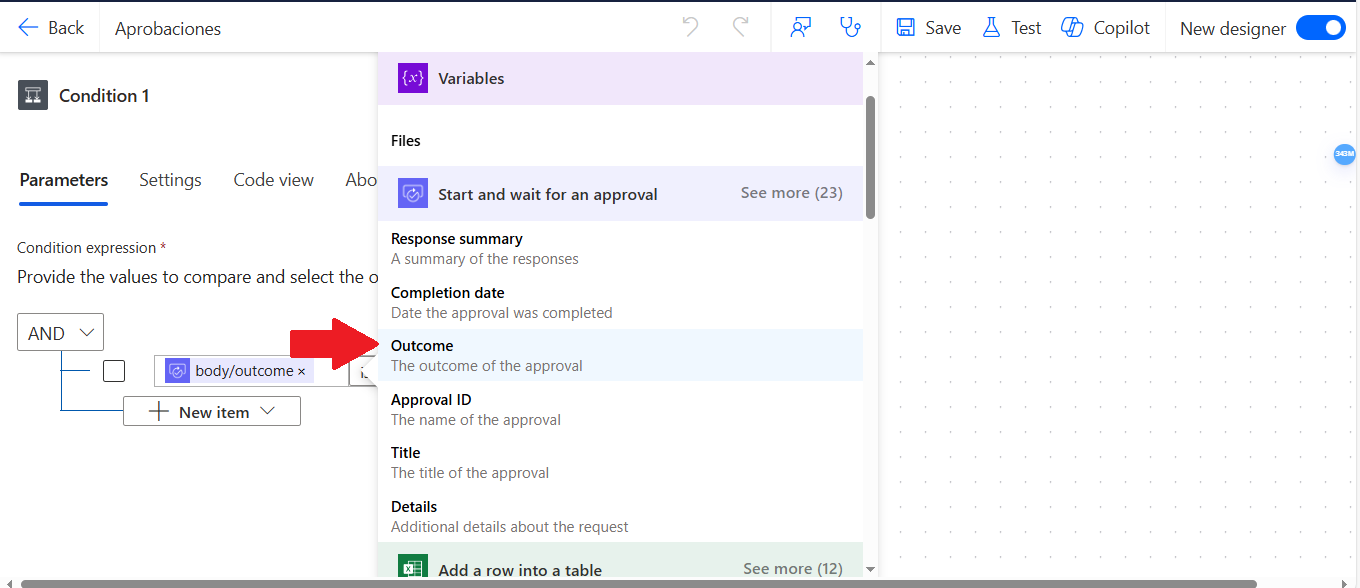 Img 45
In the dropdown, select the option “is equal to“ (Img 46).
Img 45
In the dropdown, select the option “is equal to“ (Img 46).
 Img 46
And finally, in the “Choose a value” field, type “APPROVED” (Img 47).
Img 46
And finally, in the “Choose a value” field, type “APPROVED” (Img 47).
 Img 47
Step 22: Add a delay to retrieve updated Excel file data
Now, add a Delay action. This step is necessary because content was recently added to the Excel file using the ‘Add a row into a table’ action. Since the Excel file was just modified, Power Automate may not detect the changes immediately. To ensure updated data is accessible, set the Count field to 90 and the Unit field to Second. This action forces the flow to wait 90 seconds before continuing. (Img 48)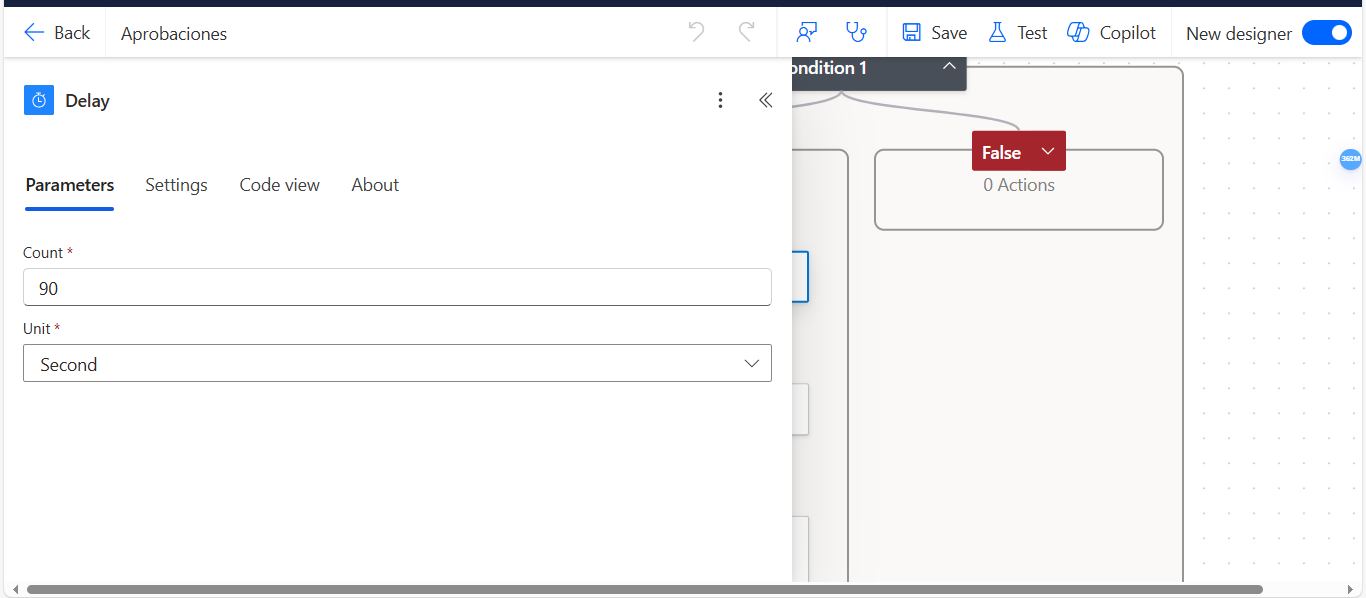
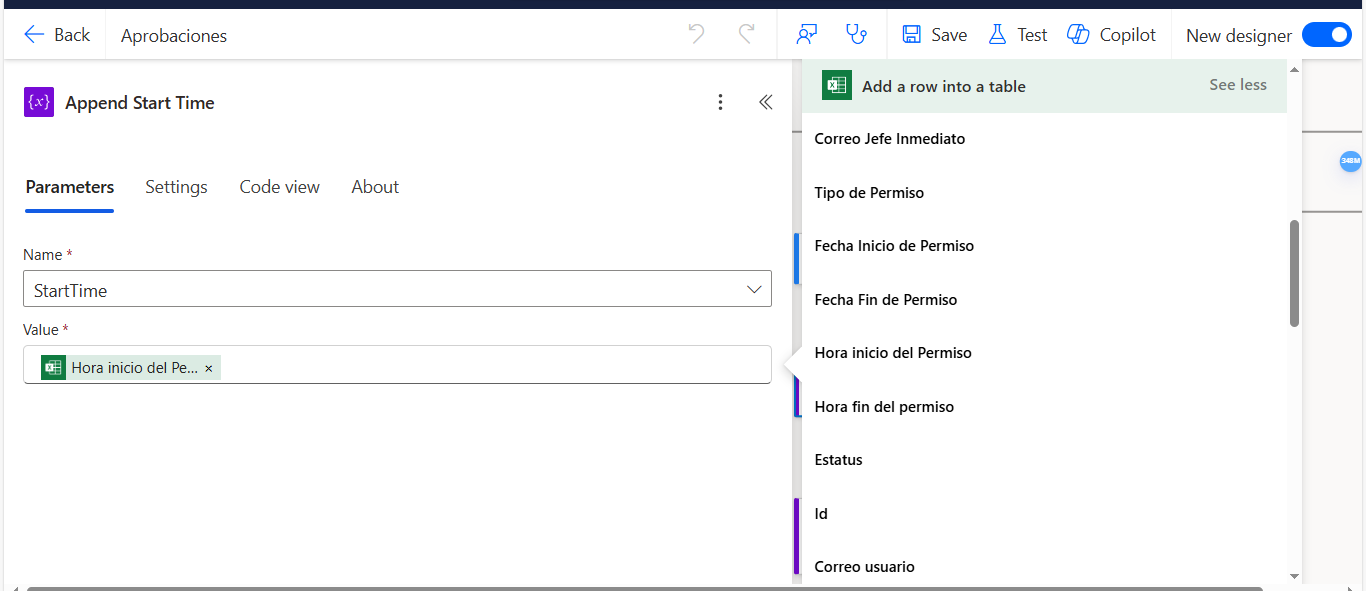
Step 23: Add an Append to String Variable action
Now we will store the start date of the leave request in the StartTime variable that was created earlier in the flow.In the Name field, select StartTime, and in the Value field, select the start time from the “Add a row into a table” action. (Img 49)
 Img 49
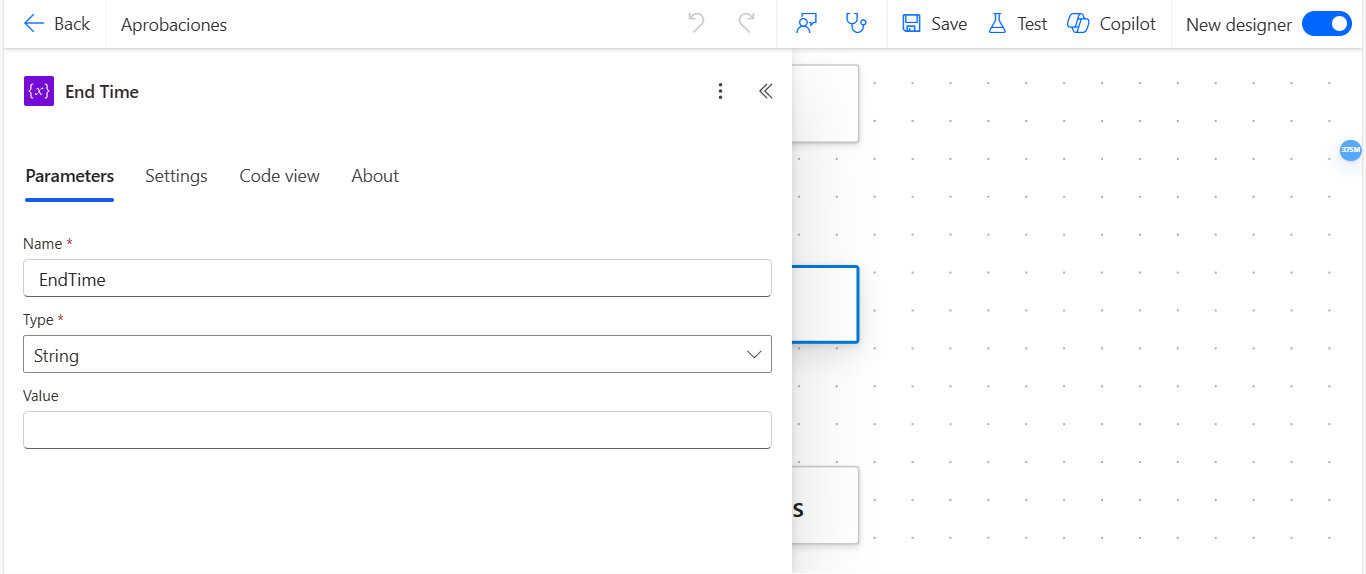
Step 24: Add an Append to String Variable action to store the leave end time in the EndTime variable
Add a new Append to string variable action. In the Name field, select EndTime, and in the Value field, select the end time of the leave request from the “Add a row into a table” action. (Img 50)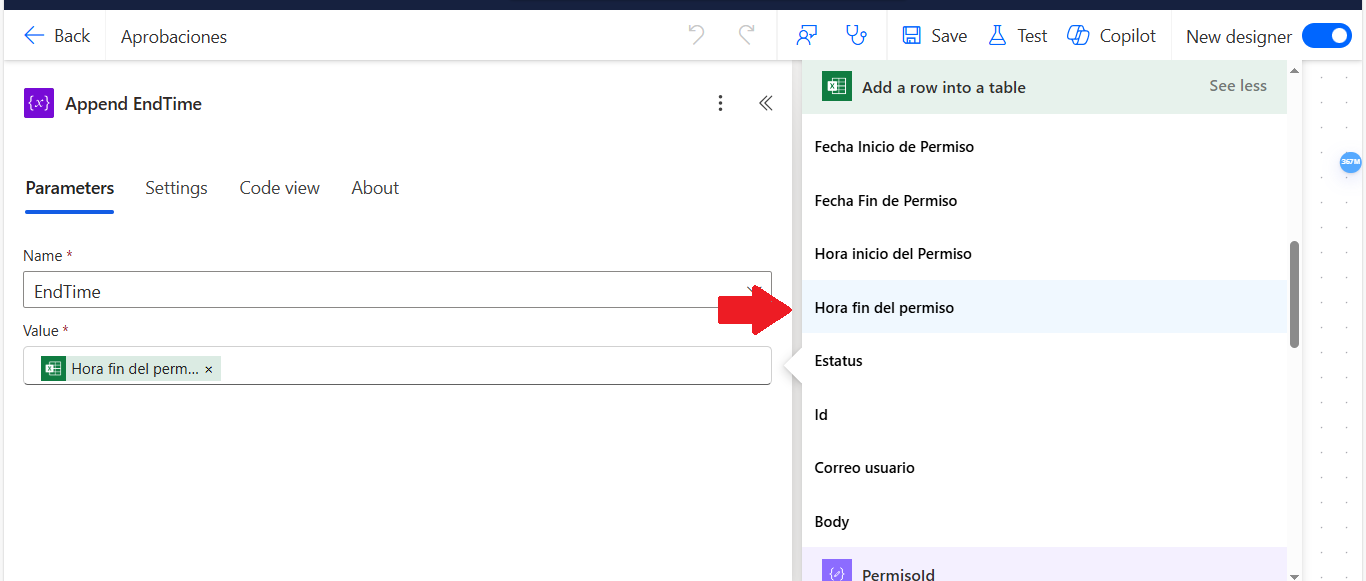 Img 50
Step 25: Update the Excel File
Now, add an “Update a row” action. In the Location field, select OneDrive for Business. In the Document Library field, choose Documents or the folder where the Excel file is stored. In the File field, select the Excel file you want to update. (Img 51)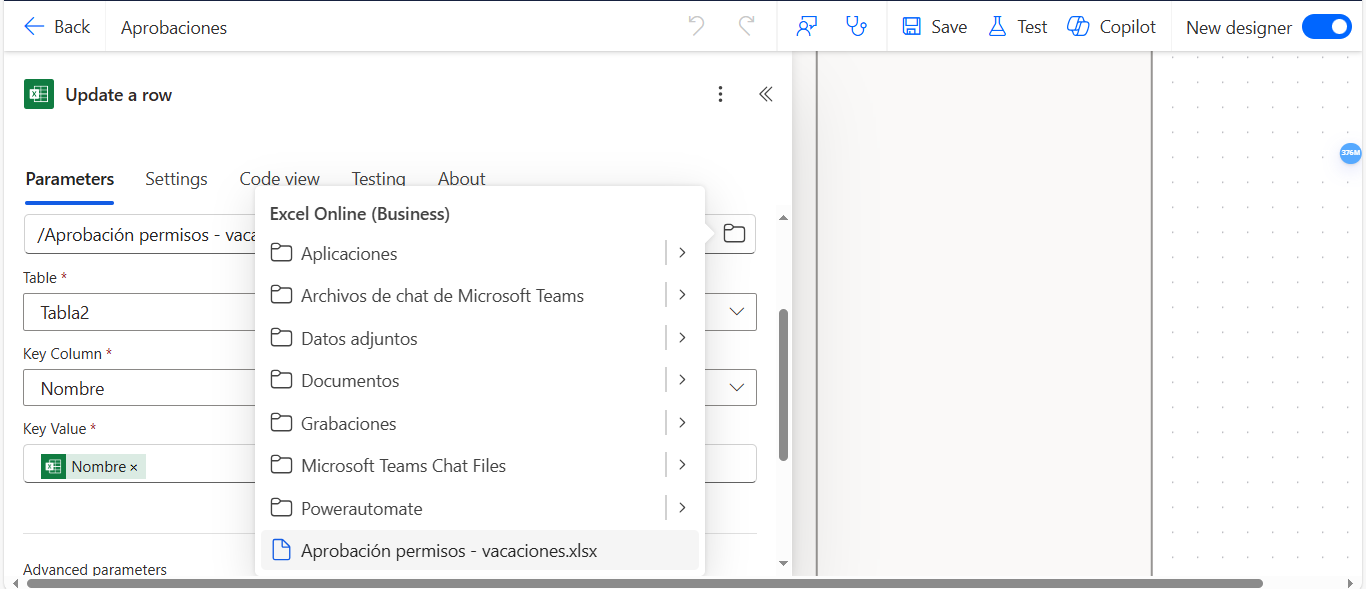 Img 51
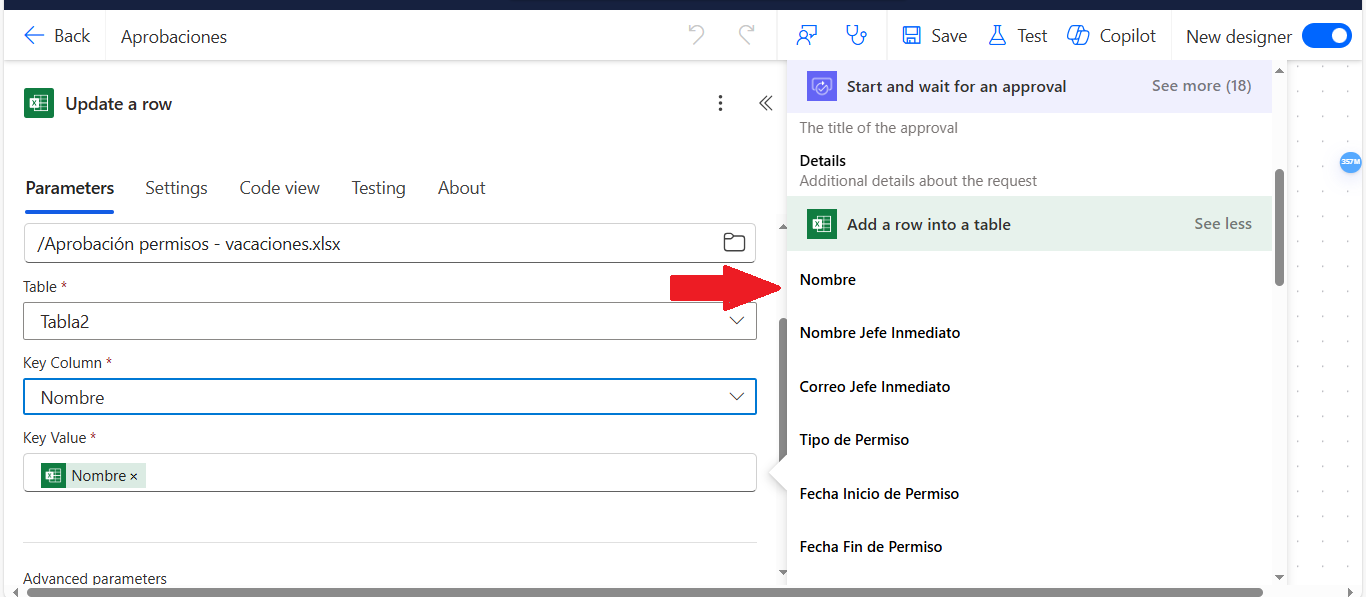
In the Key Column field, select the Name property from the “Add a row into a table action”. (Img 52)
Img 51
In the Key Column field, select the Name property from the “Add a row into a table action”. (Img 52)
 Img 52
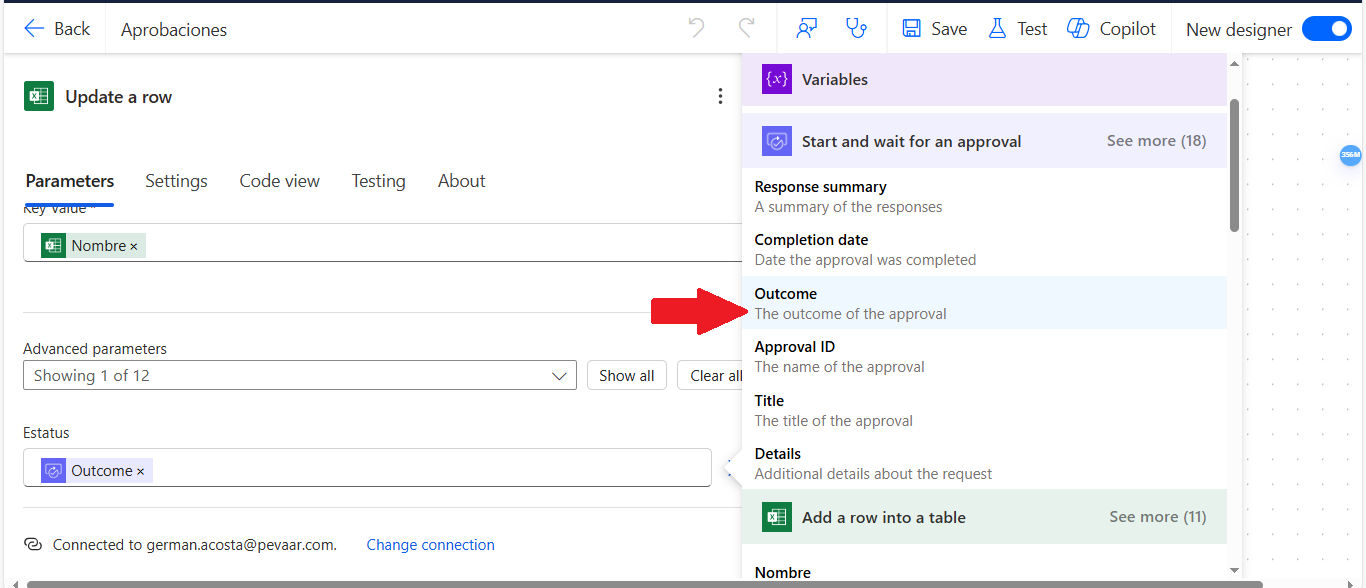
In the Advanced Parameters, within the Status field, select the Outcome property from the “Start and wait for an approval action”. This will update the Status column in the Excel file, indicating that the permission request has been approved. (Img 53)
Img 52
In the Advanced Parameters, within the Status field, select the Outcome property from the “Start and wait for an approval action”. This will update the Status column in the Excel file, indicating that the permission request has been approved. (Img 53)
 Img 53
Step 26: Add a delay to give the flow time to retrieve the updated data from the Excel file.
A Delay action is added to the flow. In the Count field, enter 1, and in the Unit field, select the option “Minute“ (Img 54).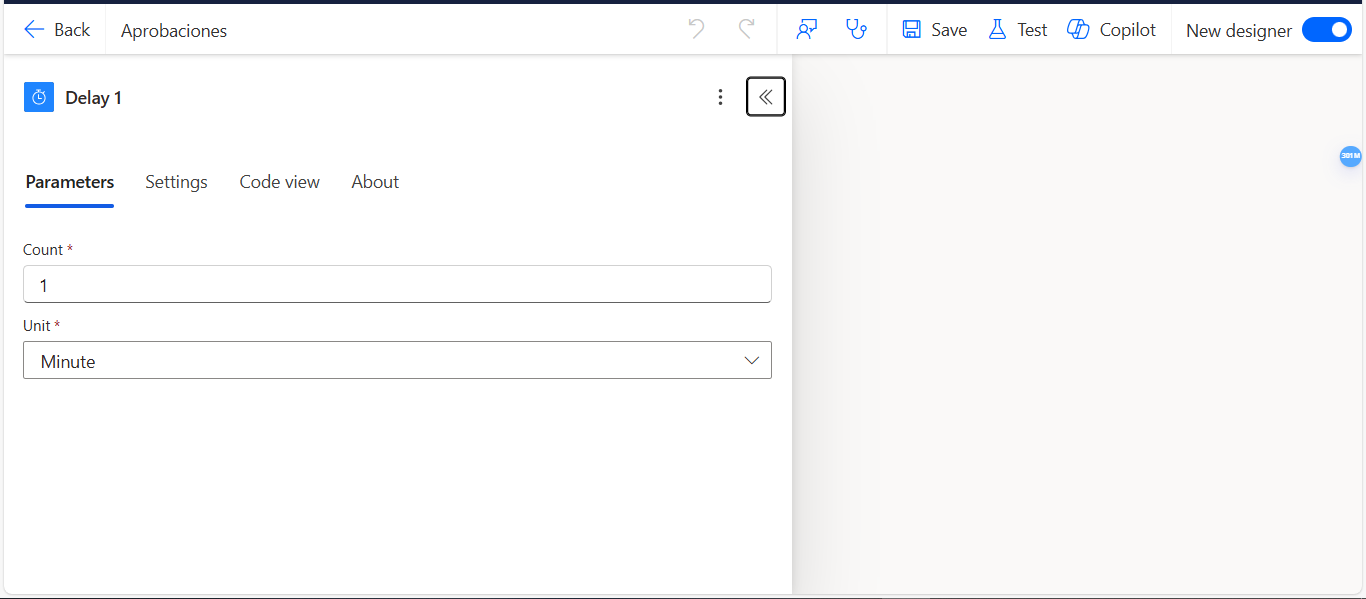 Img 54
Step 27: Add action to send an email
Add the Send an Email action. Then, click the button that says “Switch to advanced mode”, and in the To field, select the property “Responders Email” (Img 55)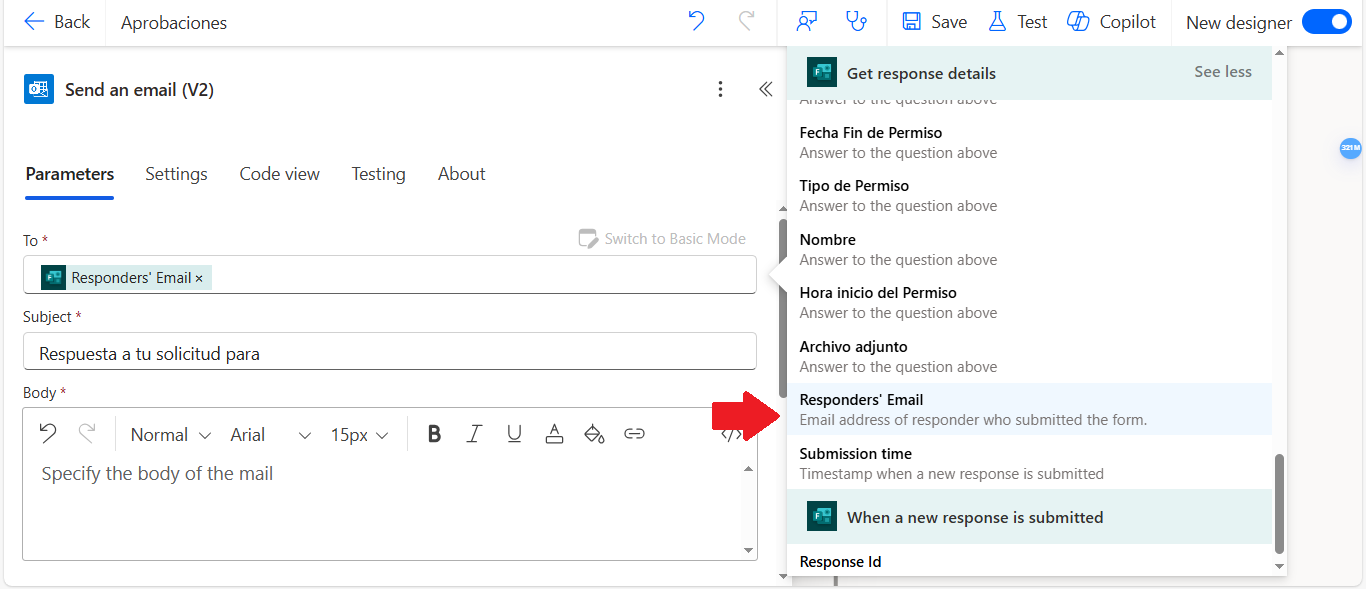 Img 55
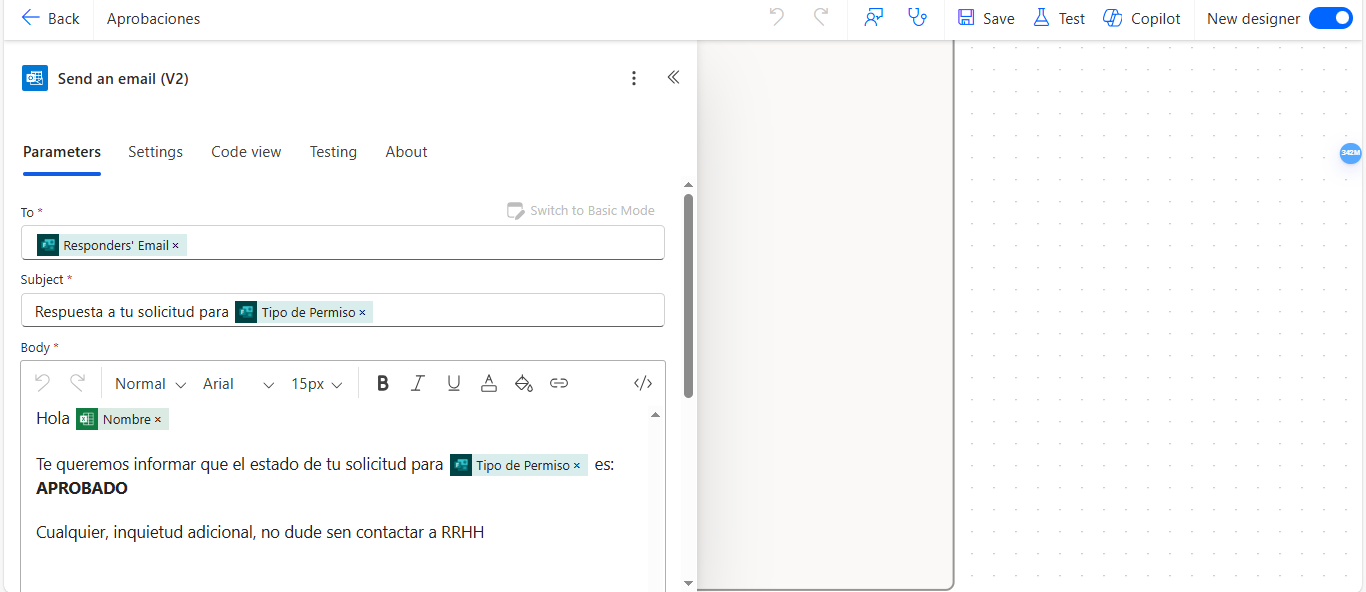
In the Subject field, write the subject of the email. In the Body field, write the message you want to send to the person who filled out the form. In this case, the person will be notified that their time off request has been approved. (Img 56)
Img 55
In the Subject field, write the subject of the email. In the Body field, write the message you want to send to the person who filled out the form. In this case, the person will be notified that their time off request has been approved. (Img 56)
 Img 56
Step 28: Add the action List rows present in a table to retrieve the information added to the Excel file.
You need to add an action called “List rows present in a table” because this information is necessary to create a calendar event. In this action, select the Excel file, and in the Filter Query field, enter the expression Id eq ‘ ‘ placing the output of the previously created Compose PermisoID inside the quotes. This filter ensures the action retrieves only the data that was recently added in the flow. (Img 57)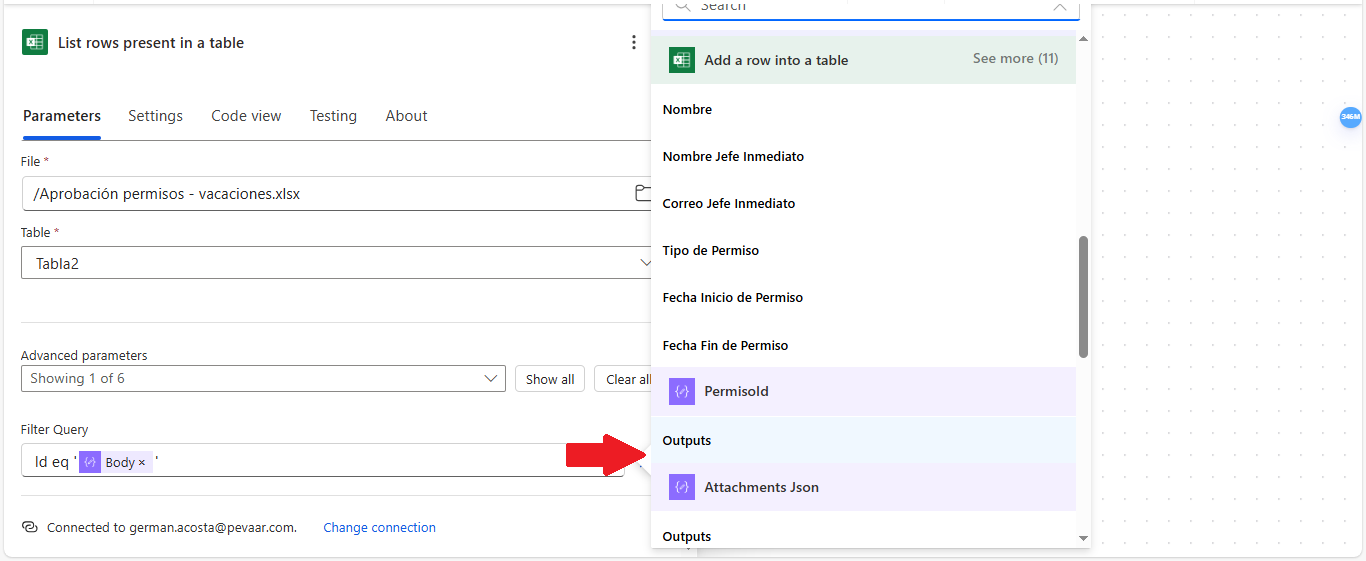 Img 57
Step 29: Add an Apply to each to process the output data from List rows present in a table.
You need to add a new Apply to each action, and in the field Select an output from previous steps, insert the output from the List rows present in a table action.(Img 58) Img 58
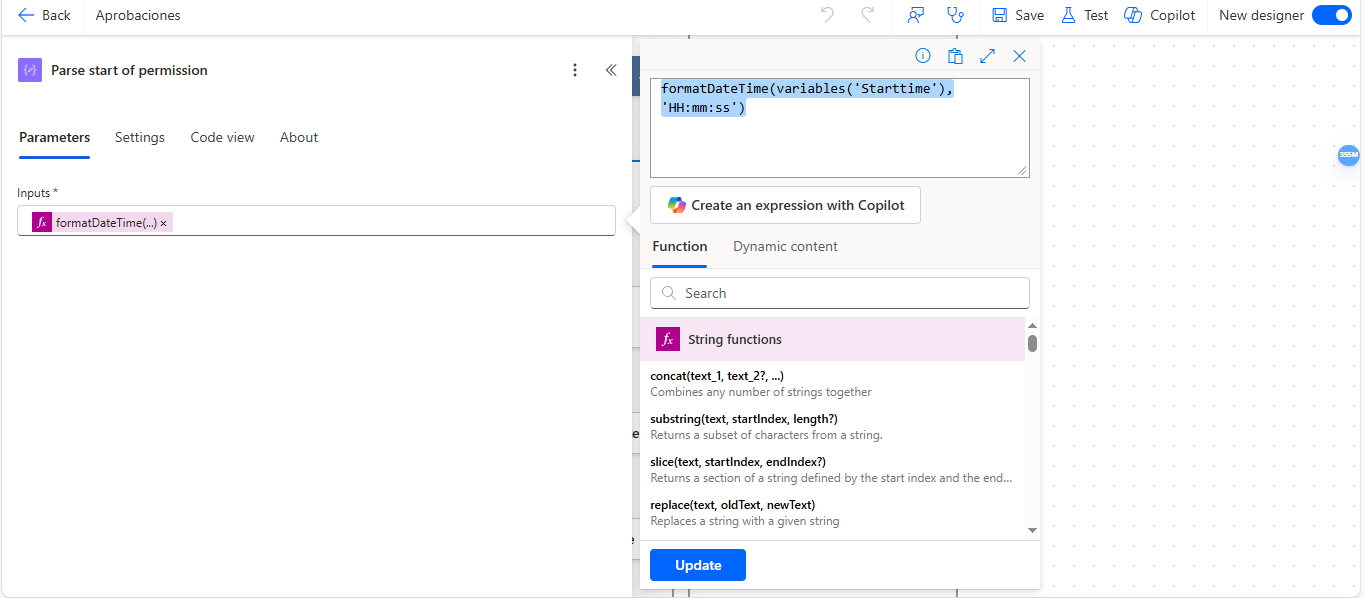
Step 30: Add a Compose to format the permission start time.
Now, add a Compose action to format the start time of the permission. In the Inputs field, enter the following expression:formatDateTime(variables(‘Starttime‘),’HH:mm:ss‘) (Img 59)
 Img 59
Step 31: Add a Compose to format the permission end time.
Now, add a Compose action that will format the time when the permission ends. In the Inputs field, enter this expression: “formatDateTime(variables(‘Endtime’),’HH:mm:ss’)” (Img 60)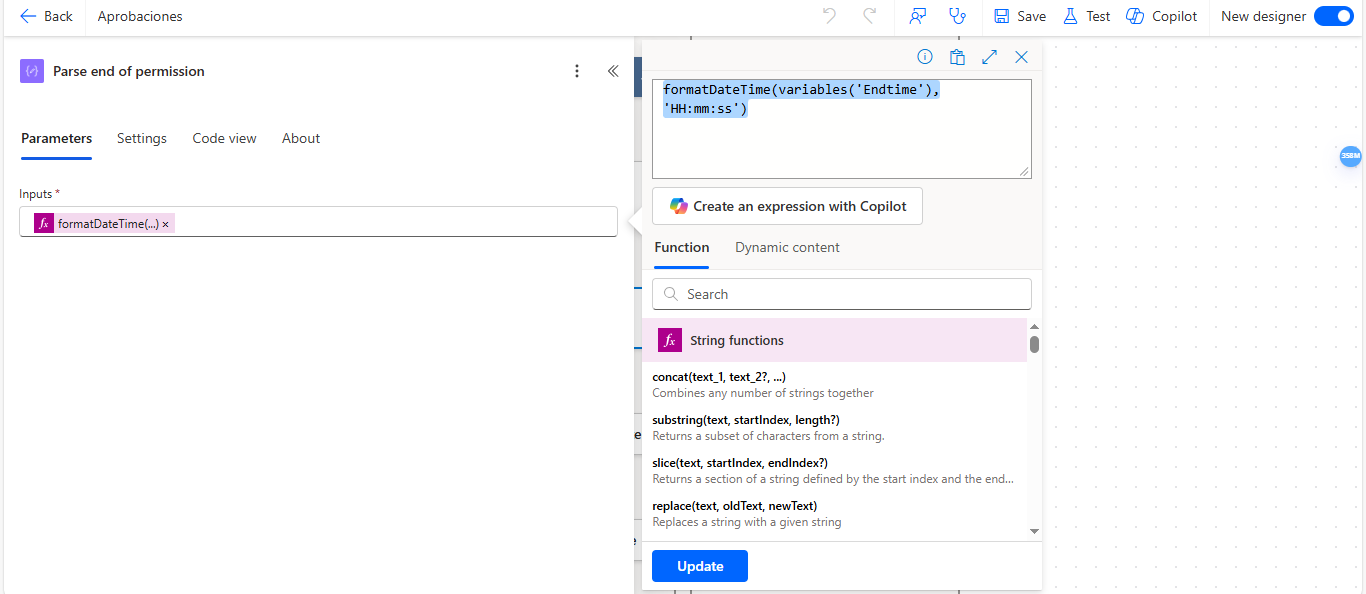 Img 60
Step 32: Add a Compose to format the start date of the permission.
Now add a Compose action that will format the date when the permission starts. In the Inputs field, enter this expression: “concat(addDays(‘1899-12-30’, int(items(‘Apply_to_each_1’)?[‘Fecha Inicio de Permiso’]), ‘yyyy-MM-dd’),’T’,outputs(‘Parse_Start_of_permission’)) (Img 61)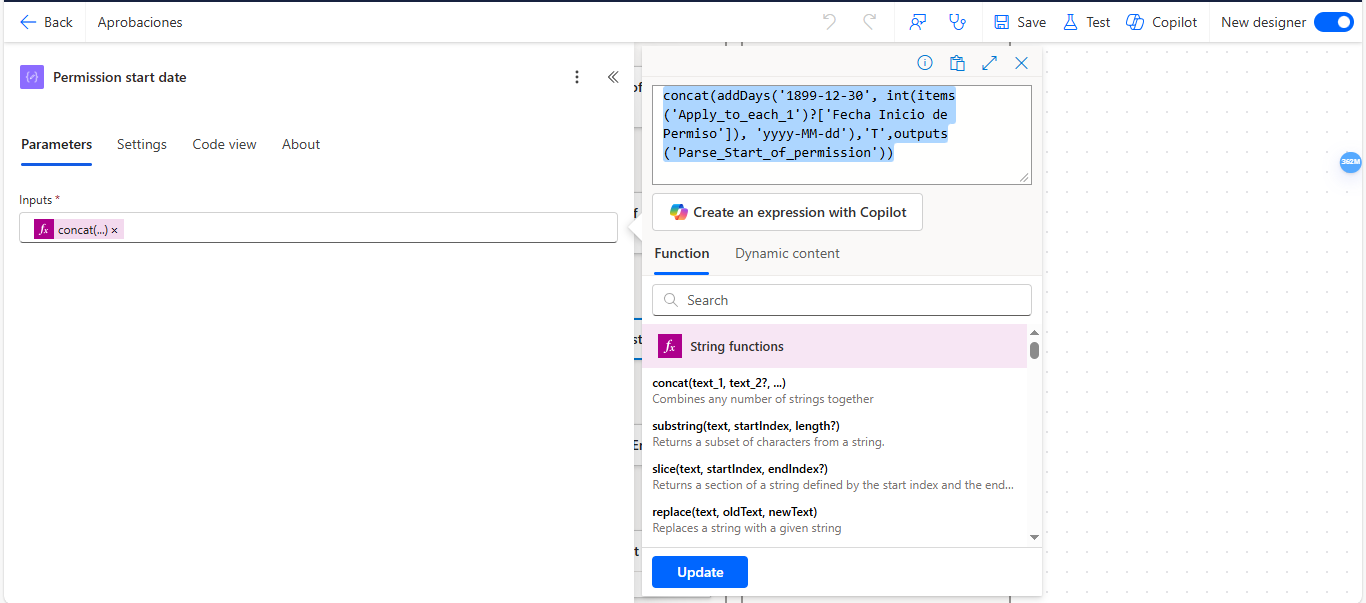 Img 61
Step 33: Add a Compose to format the end date of the permission.
Now add a Compose action that will format the date when the permission ends. In the Inputs field, enter this expression: “concat(addDays(‘1899-12-30’, int(items(‘Apply_to_each_1’)?[‘Fecha Fin de Permiso’]), ‘yyyy-MM-dd’),’T’,outputs(‘Parse_End_of_permission’))” (Img 62)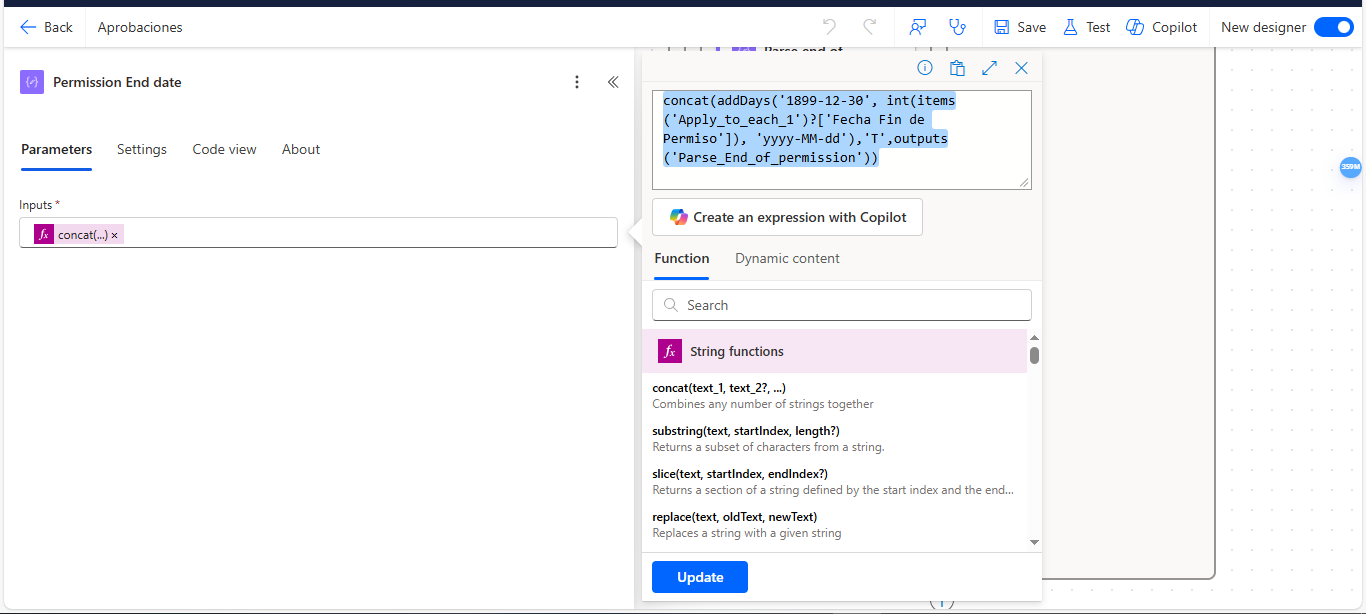 Img 62
Step 34: Add an action to create an event in the calendar.
Now add a Create Event action. In the Calendar ID field, select the calendar where you want to create the event. (Img 63)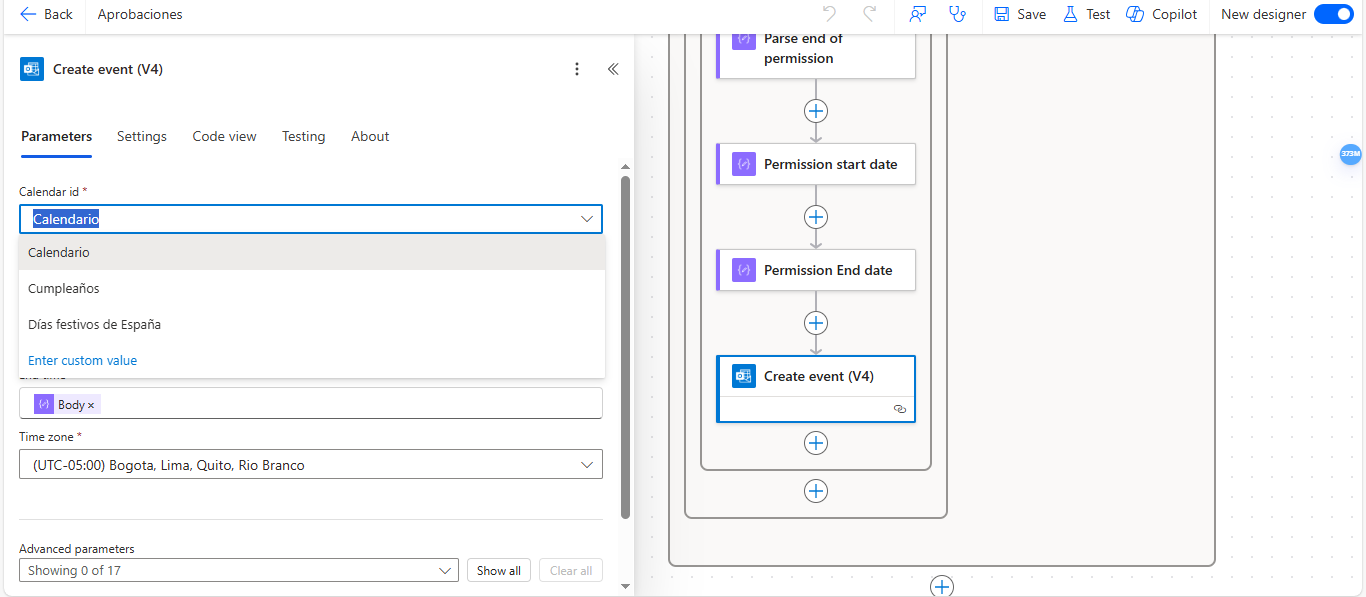 Img 63
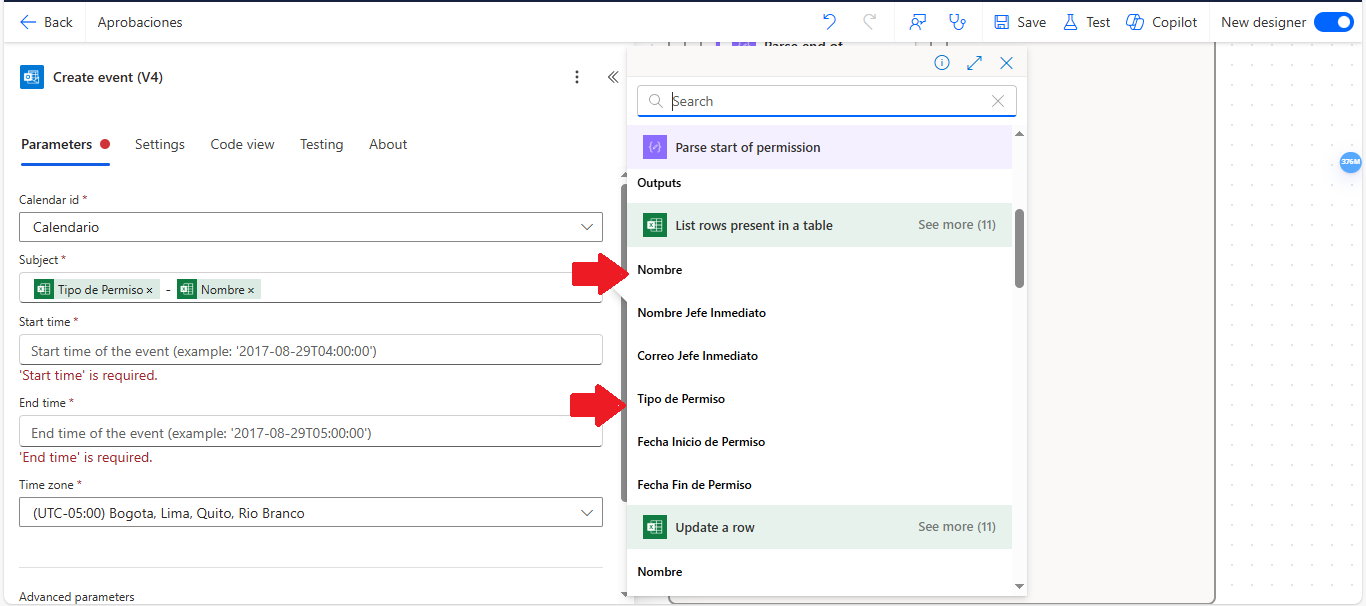
In the Subject field, select the properties “Type of permission“ and “Name” (Img 64)
Img 63
In the Subject field, select the properties “Type of permission“ and “Name” (Img 64)
 Img 64
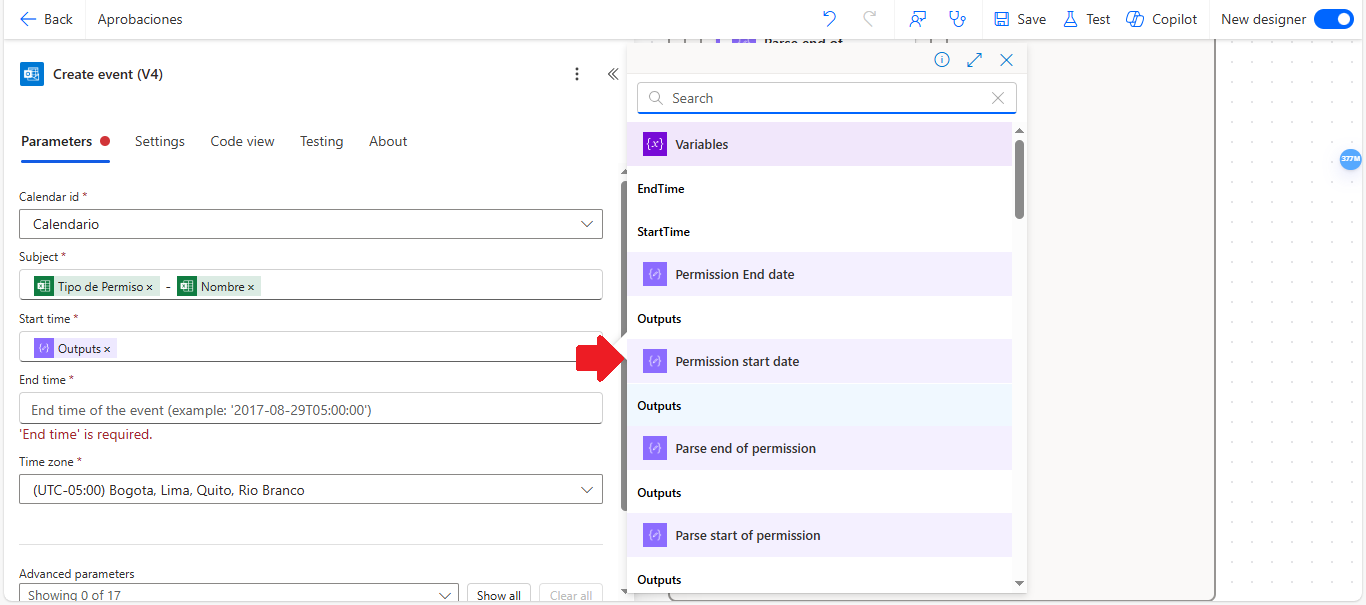
And in the StartTime field, select the output from the Permission Start Date action (Img 65)
Img 64
And in the StartTime field, select the output from the Permission Start Date action (Img 65)
 Img 65
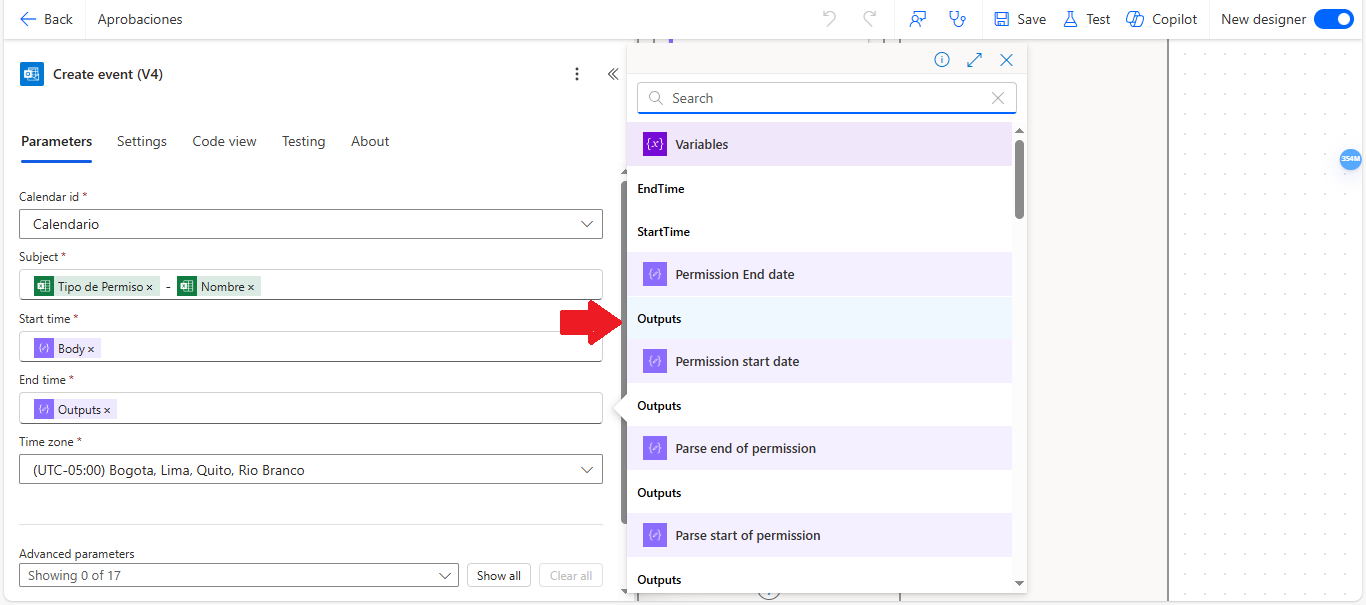
And in the End time field, select the output from the Permission End Date action (Img 66)
Img 65
And in the End time field, select the output from the Permission End Date action (Img 66)
 Img 66
Implementing automated flows like the time off request process not only demonstrates a smart use of technology, but also a strong commitment to more organized and efficient operations. These kinds of solutions allow companies to operate with greater accuracy, reduce repetitive tasks, and focus on what truly matters: their team’s well-being.
👉 Want to streamline your internal management with no hassle? At Pevaar, we help you build solutions tailored to your reality.
Img 66
Implementing automated flows like the time off request process not only demonstrates a smart use of technology, but also a strong commitment to more organized and efficient operations. These kinds of solutions allow companies to operate with greater accuracy, reduce repetitive tasks, and focus on what truly matters: their team’s well-being.
👉 Want to streamline your internal management with no hassle? At Pevaar, we help you build solutions tailored to your reality.


Comments (3)
I am truly thankful to the owner of this web site who has shared this fantastic piece of writing at at this place.
This was beautiful Admin. Thank you for your reflections.
Good post! We will be linking to this particularly great post on our site. Keep up the great writing