How a Power Automate Flow Can Simplify Vacation Request Management
In today’s workplace, implementing a Power Automate Flow can be the key to overcoming the barriers posed by manual processes in managing vacation requests. From long email chains to unnecessary paperwork, these traditional methods are time-consuming and frustrating for both employees and HR managers.
With tools like Power Automate, it’s possible to automate this workflow, eliminating repetitive tasks and reducing errors. In this article, we’ll guide you step by step on how to implement a Power Automate Flow to transform the way you manage vacation requests in your organization. Discover how this solution not only optimizes processes but also allows you to focus on strategic goals, leaving behind the inefficiencies of manual processes.
Related Documents
- Vacation Request Form
- Vacation Control Excel Sheet
The Power Automate Flow: Vacation Request and Approval Flow
The Vacation Request and Approval Flow was created to automate and streamline both the request and approval of vacations. This flow connects Forms, Excel, Approvals, Outlook, and Calendar. To establish the necessary connections within the flow, the person responsible for the process must have already created the Vacation Request Form and an Excel file with a table containing the required request fields (full name, ID number, department, immediate supervisor’s name, supervisor’s email, start date, and end date of the vacation). This file will serve as a database to store all the vacation request information from employees.
To begin, access Power Automate (PA) from the Microsoft 365 applications. Once in the PA environment, click on “Create” and then select “Automated Cloud Flow.”
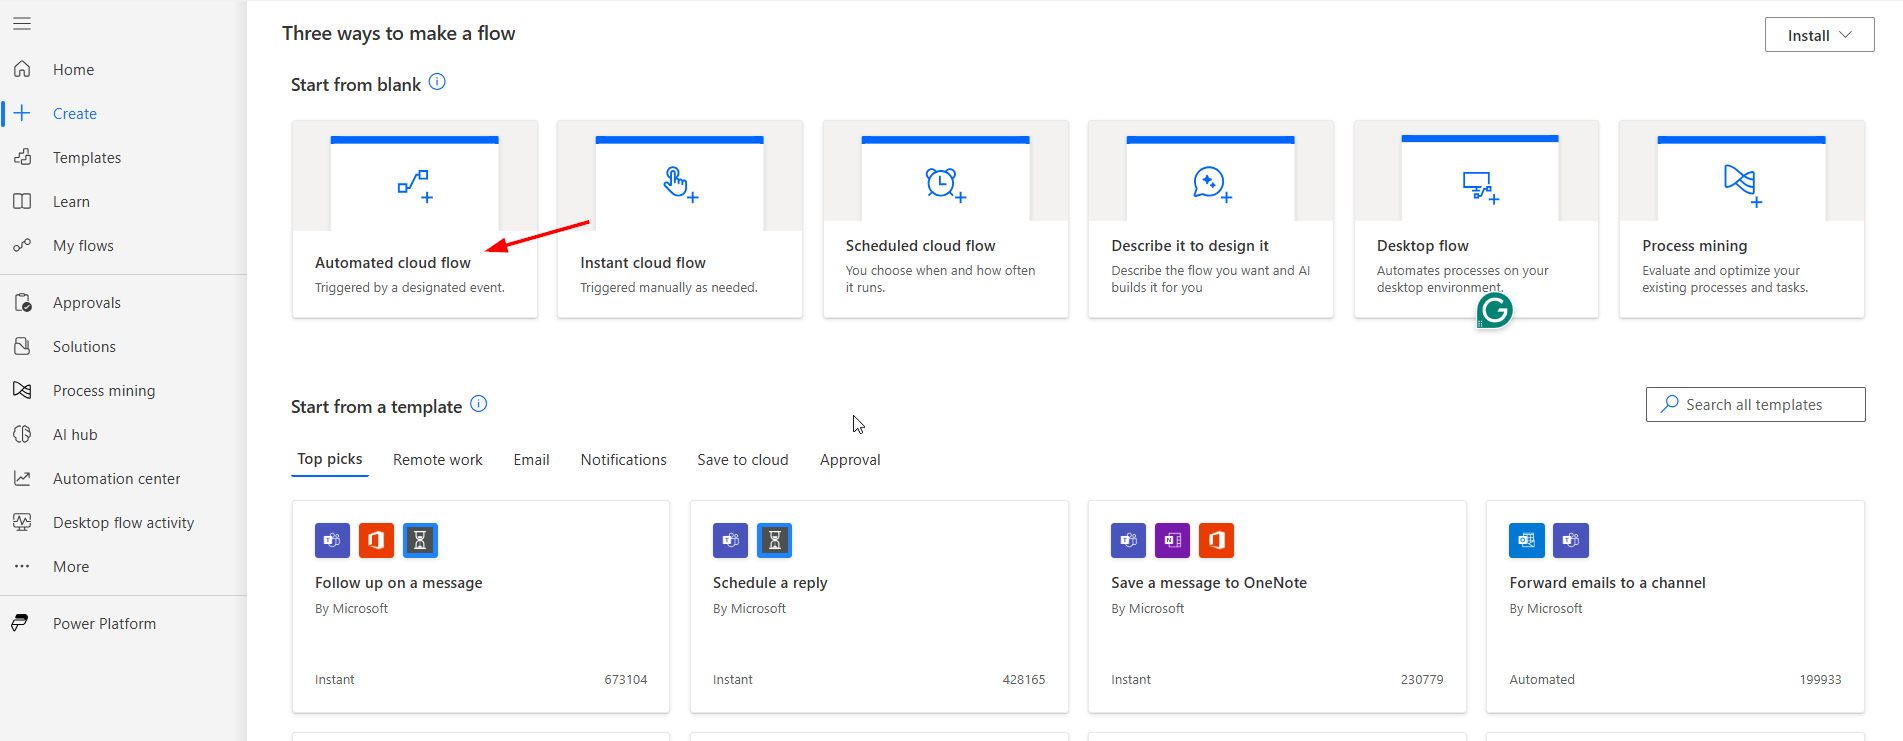
Next, you need to assign a name to the flow and select the flow trigger, which in this case will be “When a new response is submitted.”

The flow begins with a trigger from Forms, where the “Form Id” corresponding to the Vacation Request Form is selected from the list of all forms created by the user who designed the flow. This option is loaded automatically from the available forms.

The flow begins with a trigger from Forms, where the “Form Id” corresponding to the Vacation Request Form is selected from the list of all forms created by the user who designed the flow. This option is loaded automatically from the available forms.

In the search bar, type the name of the application to which the new action belongs. For this step, it will be Forms, and you should select the corresponding option from the list.

The next action to add to the flow is “Get response details.” In this step, you must also select the “Form Id” corresponding to the Vacation Request Form (Image 6). At this stage, all forms created by the user will appear in the list. Then, select “Response Id” from the dynamic content.
This step allows the flow to retrieve the details of the responses to all the questions in the form.


The third action will be “Initialize a variable”, which in this case will be of type array. This allows the extraction of any object and access to file properties, such as name, ID, file type, modification date, etc. Additionally, it helps prevent errors, for example, when extracting information from an “Apply to each” loop.
In the action’s search bar, type the keyword “Variable” and select the corresponding “Initialize variable” option.

For this exercise, name the variable “File” and select Array as the type, as mentioned earlier.

The flow continues with another Compose action, which we name “VacationId”, to generate a unique ID for each request. This information will be added to an Excel table and is essential for filtering data and preventing errors during the execution of subsequent actions.
In the action’s search bar, type the keyword “Compose” and select the corresponding option.

To complete the inputs, you need to add the expression guid().
The next action in the flow connects to Microsoft Excel by adding a row to a table (search for the action “Add a row into a table”).
An Excel document in table format must be created to allow the information to be added. This table should include the fields to be extracted from the form, such as Full Name, Document Number, Vacation Start Date, and Vacation End Date. Additionally, it should have a Request Status field and an ID field.
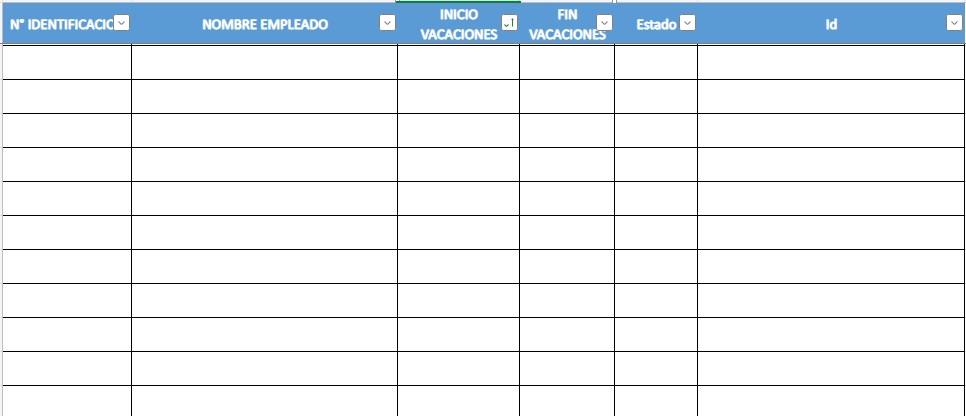
In this step, you need to select the following for the previously created Excel file:
- File location: The location of the Excel file.
- Document library: The document library where the file is stored.
- File: The specific Excel file to be used.
- Table: The table within the Excel file where the data will be added.

The parameters were also completed using the dynamic content provided by Power Automate, which consists of data extracted from the form. The only field that will not use dynamic content is Status, which will initially be set to “Pending.” At the end of the flow, this field will automatically update with the approval result.

To complete the ID field, select the dynamic content outputs generated by the VacationId compose action.

The next action is a Condition. To add this action, type “control” in the search bar and select the “Condition” action

Within this action, select the “AND” condition. In the box for the first value, choose the corresponding question for the type of vacation from the dynamic content.

In the comparison, select “Is equal to”, and in the second value, enter the word “Disfrutadas“ (enjoyed), as it directly relates to the type of vacation the person selected.

If the condition is true, the next step will connect the flow to Approvals. Search for the action “Start and wait for an approval.”

For this flow, initially select “Custom Responses – Wait for all responses” as the approval type. This option allows you to customize the approval responses and ensures that the flow waits for all involved users to respond before providing the final result.
Two custom response options were added: APPROVED and NOT APPROVED, respectively.
Next, the approval request details were completed using dynamic content:
- Title: The title of the approval request.
- Assigned to: By default, this is set to the email address of Human Resources, which ensures double approval.
- Request details: Includes the relevant details about the request.
In the Advanced Options, information about the requester was also included.

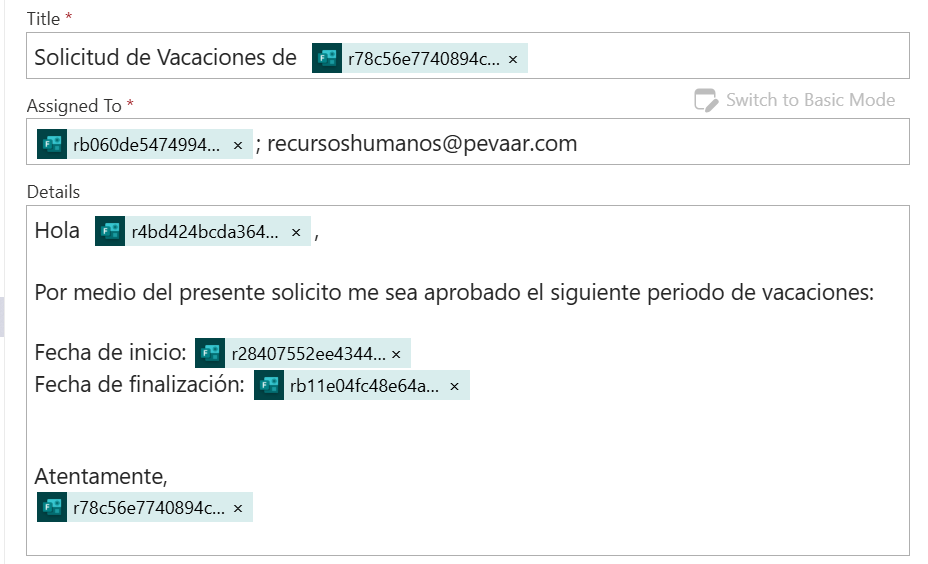
It is important to select the email of the person who submitted the request in the Requestor field. This can be found as Responders Email in the dynamic content automatically generated by Power Automate.

The next action in the flow involves an “OR” condition (search for the Condition action). This condition allows for two options to meet the criteria: “APPROVED, APPROVED” or just “APPROVED.”
In the Value field, select the “Outcome” that would result from the approval.

In the second value, manually add the options defined in the approval step. In this case, it will be “APPROVED, APPROVED” or “APPROVED.”
It is crucial to write them exactly as they appear in the approval settings. Any change in characters or formatting could result in errors during the execution of the flow.

If the responses are “APPROVED,” the condition will be considered true, and the following actions will be executed:
- Delay: This action pauses the flow for a specific period, in this case, 90 seconds. This pause ensures that the table’s information is updated and prevents errors.
The delay duration can be adjusted based on specific requirements.

Update a Row: In this step, the status of the request is updated with the result of the approval, which was previously set as “Pending.”
- In the Key Column, select ID.
- In the Key Value, select the ID from the dynamic content, which is retrieved from the Excel table.
- Additionally, manually update the Status field to “Approved.”

Delay: This action pauses the flow for 90 minutes to prevent errors from occurring in subsequent steps .
Send an Email: In this step, the response email that the employee will receive if the request is approved is customized. The response can be enhanced with data from the dynamic content retrieved from previous actions.

“List rows present in a table”: This action is used to retrieve all the information from the table.
In the Advanced Options, select the Filter Query field and add the expression:
Id eq ‘Outputs’
This expression is used to filter the unique ID generated in a previous step.

“Apply to each”: This action allows the flow to iterate through the rows in the Excel document to find the information added from the form. In this case, it will focus on the data related to the date when the vacation period will be taken.

Vacation Start Date: This is a Compose action that formats the start date of the vacation period so it can be used later when adding the event to the calendar.
You need to add the following expression (the field “INICIO VACACIONES” corresponds to how the data is labeled in the Excel table and can be modified as needed):
plaintext
Copy code
concat(addDays(‘1899-12-30’, int(items(‘Apply_to_each’)?[‘INICIO VACACIONES’]), ‘yyyy-MM-dd’))
This expression calculates the correct date by adding the number of days from “INICIO VACACIONES” to the base date 1899-12-30 and formats it as “yyyy-MM-dd” for further use.

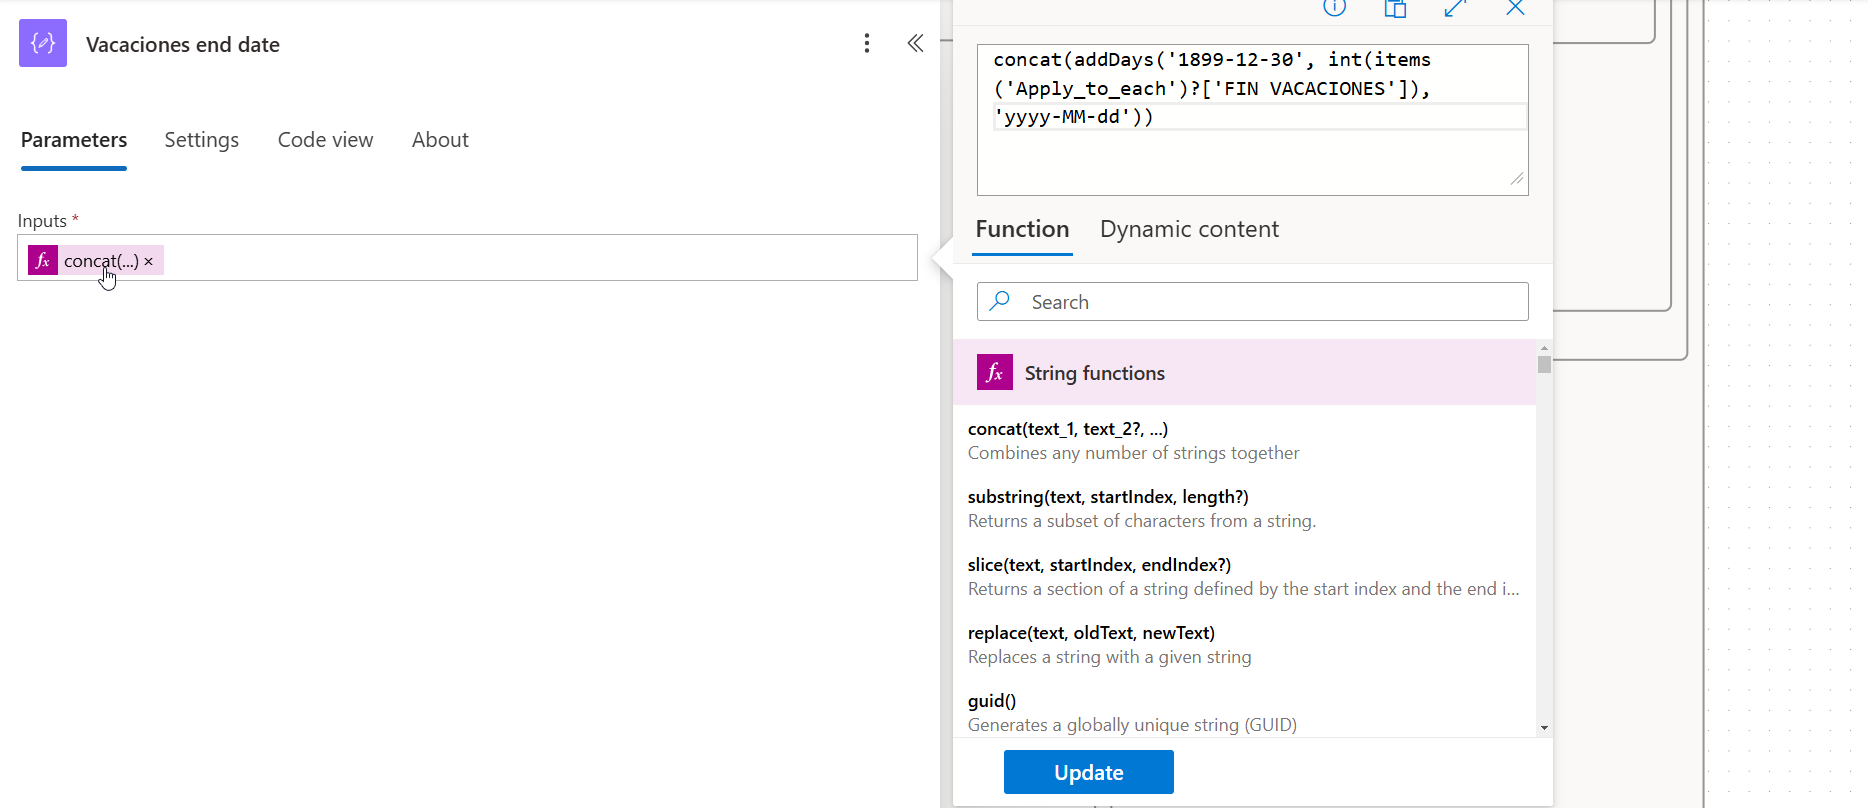
Vacation End Date: This is a Compose action that formats the end date of the vacation period so it can be used later when adding the event to the calendar.
You need to add the following expression (the field “FIN VACACIONES” corresponds to how the data is labeled in the Excel table and can be modified as needed):
plaintext
Copy code
concat(addDays(‘1899-12-30’, int(items(‘Apply_to_each’)?[‘FIN VACACIONES’]), ‘yyyy-MM-dd’))
This expression calculates the correct date by adding the number of days from “FIN VACACIONES” to the base date 1899-12-30 and formats it as “yyyy-MM-dd” for proper use.

The expression for Start Time is:
plaintext
Copy code
formatDateTime(outputs(‘Vacaciones_start_date’), ‘yyyy-MM-ddT00:00:00’)
This formats the start date as the beginning of the specified day in the required date-time format.

The expression for End Time is:
plaintext
Copy code
formatDateTime(addDays(outputs(‘Vacaciones_end_Date’), 1), ‘yyyy-MM-ddT00:00:00’)
This expression adds one day to the End Date and formats it to start at midnight on the following day, ensuring the event spans the entire end date as part of an all-day event.
Additionally, you must select the appropriate time zone for the country, which in this case is Colombia.
If the request response is “APPROVED, NOT APPROVED,” “NOT APPROVED, NOT APPROVED,” or “NOT APPROVED,” the condition will be considered false, and the following actions will be executed:
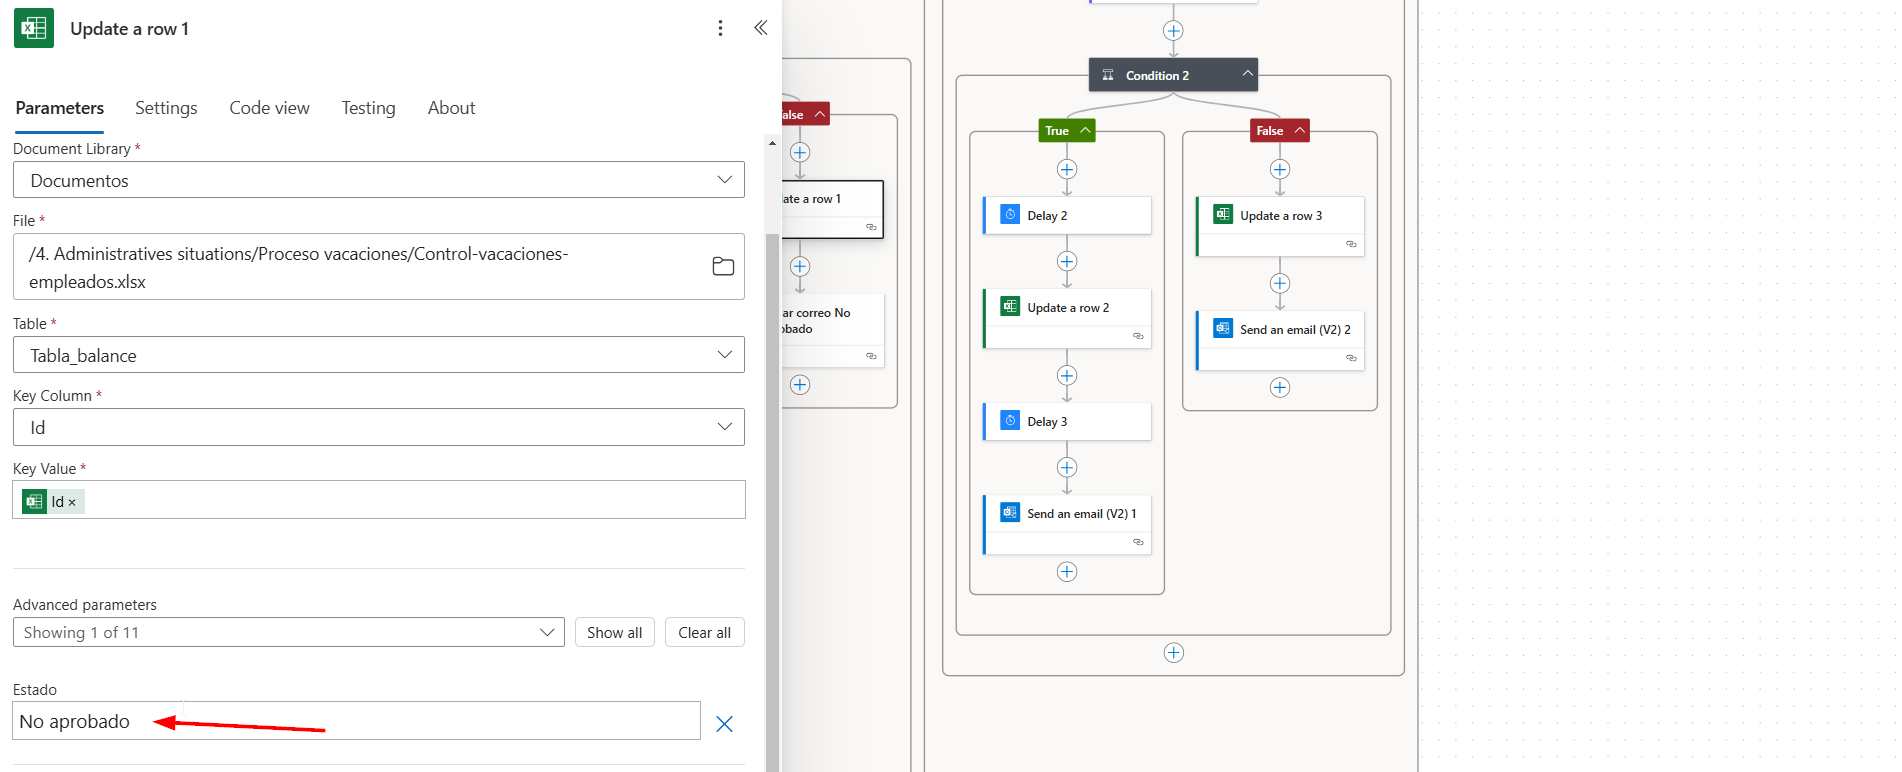
- Update a Row: In this step, the status of the request is updated to reflect the approval result, which was previously set to Pending. You need to manually update the Status field to Not Approved.
- Key Column: Select ID.
- Key Value: Use the ID from the dynamic content retrieved from the Excel table.
- Status: Manually set to Not Approved.
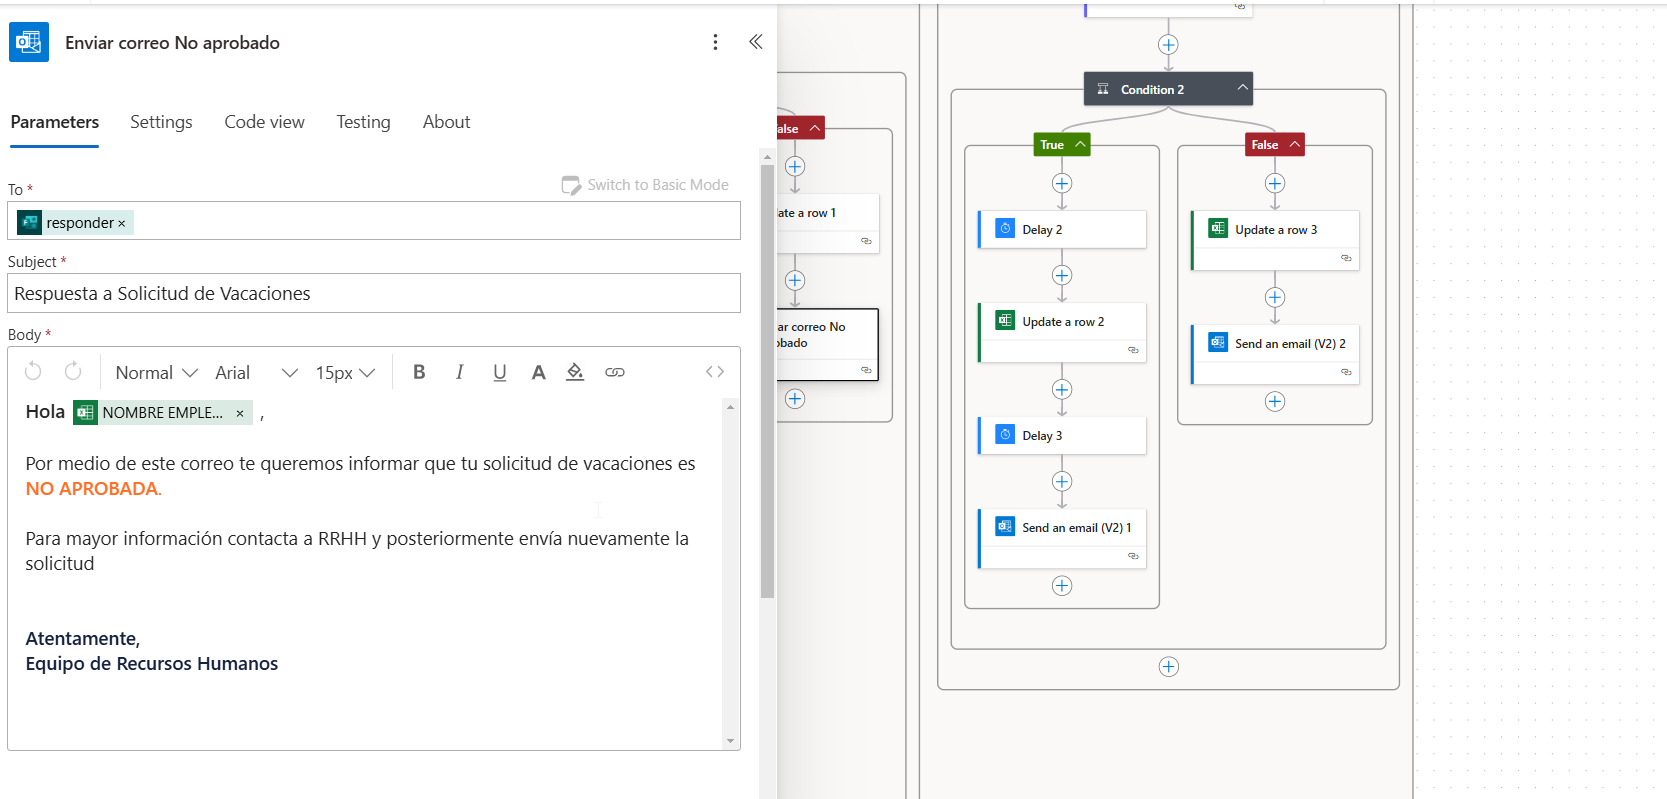
Send an Email: In this step, a response email is customized to notify the employee if their request is not approved.
You can enhance the email with data from the dynamic content generated in previous actions, such as the employee’s name, request details, and any specific comments or reasons related to the decision. This ensures the response is clear, informative, and tailored to the situation.
Compensated Vacations
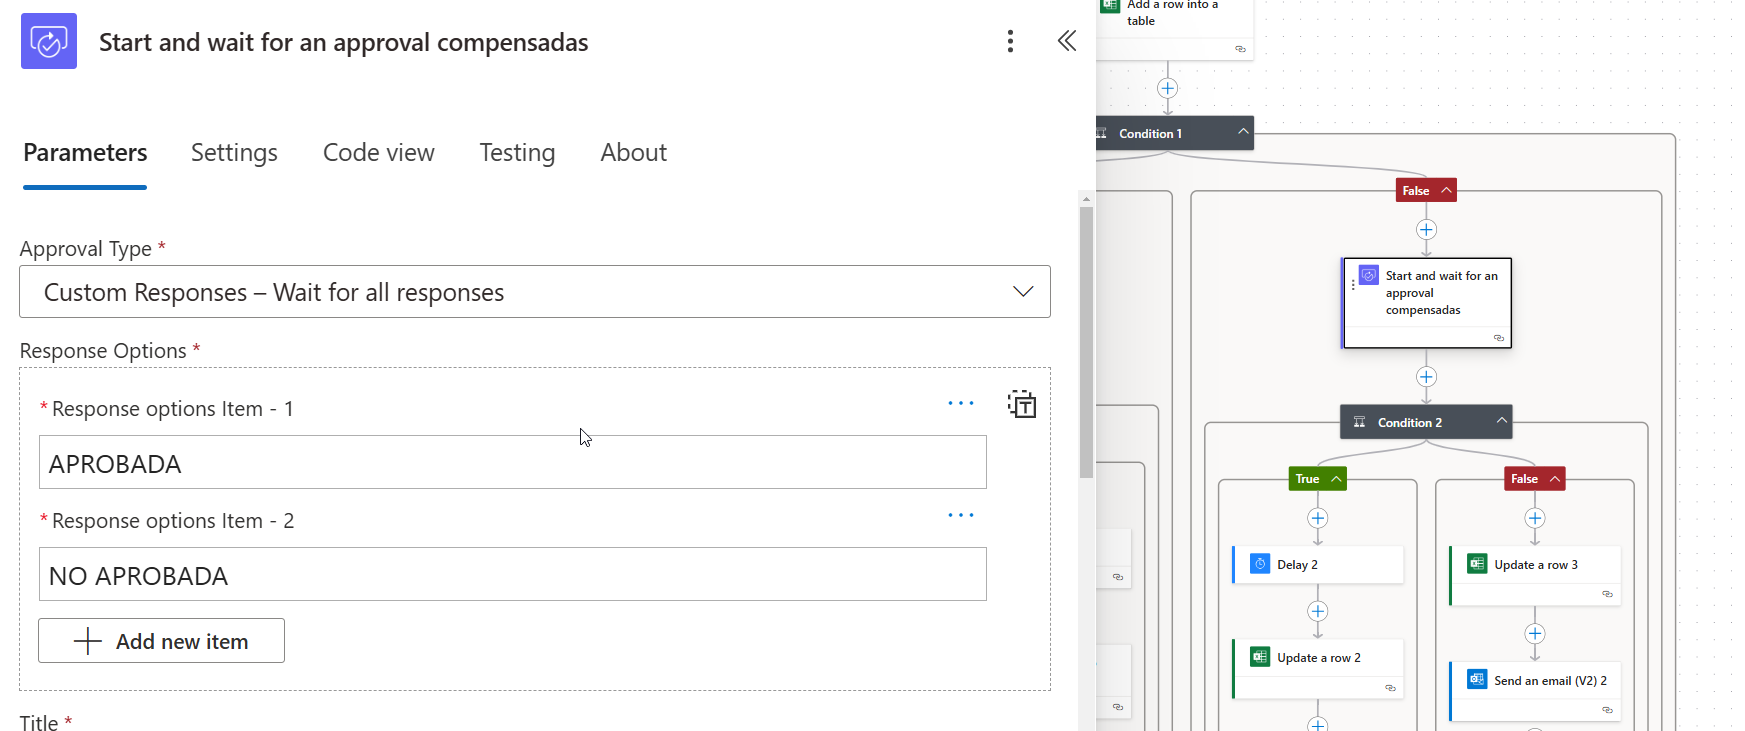
If the condition is false, the flow will connect to Approvals by adding the action “Start and wait for an approval” (Image 20). This will work similarly to the true condition but with a few changes detailed below:
- Approval Type: Select “Custom Responses – Wait for all responses” for this flow.
- Custom Response Options: Add two custom response options: APPROVED and NOT APPROVED.
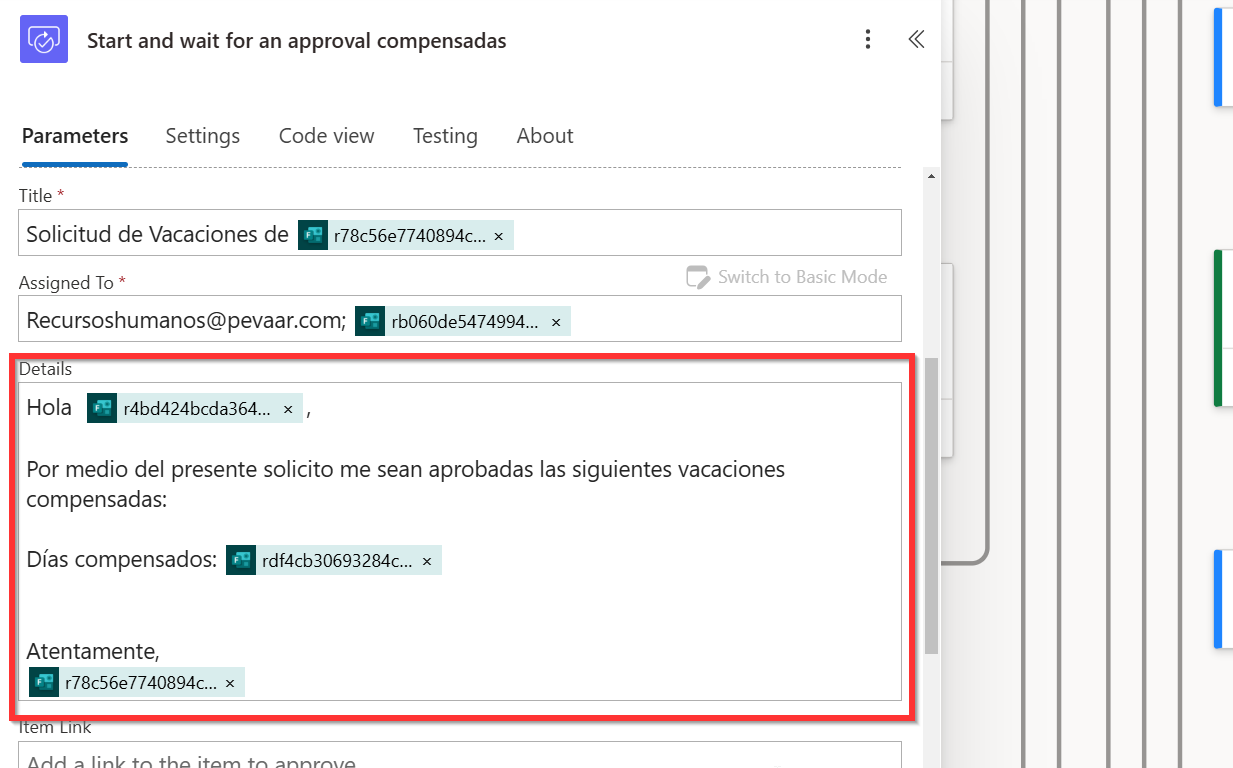
- Approval Request Details: Complete the approval request information using dynamic content, including:
- Title: Specify the purpose, such as “Compensated Vacation Request.”
- Assigned To: Default to the Human Resources email for double approval.
- Request Details: Include relevant details about the compensated vacation request.
- Advanced Parameters: Add the requestor’s information from the dynamic content, ensuring a personalized and comprehensive request.
Compensated Vacations Flow (Detailed Steps)
- Requestor Field: In the Requestor field, select the email of the person who submitted the request. This is available in the dynamic content as Responders Email.
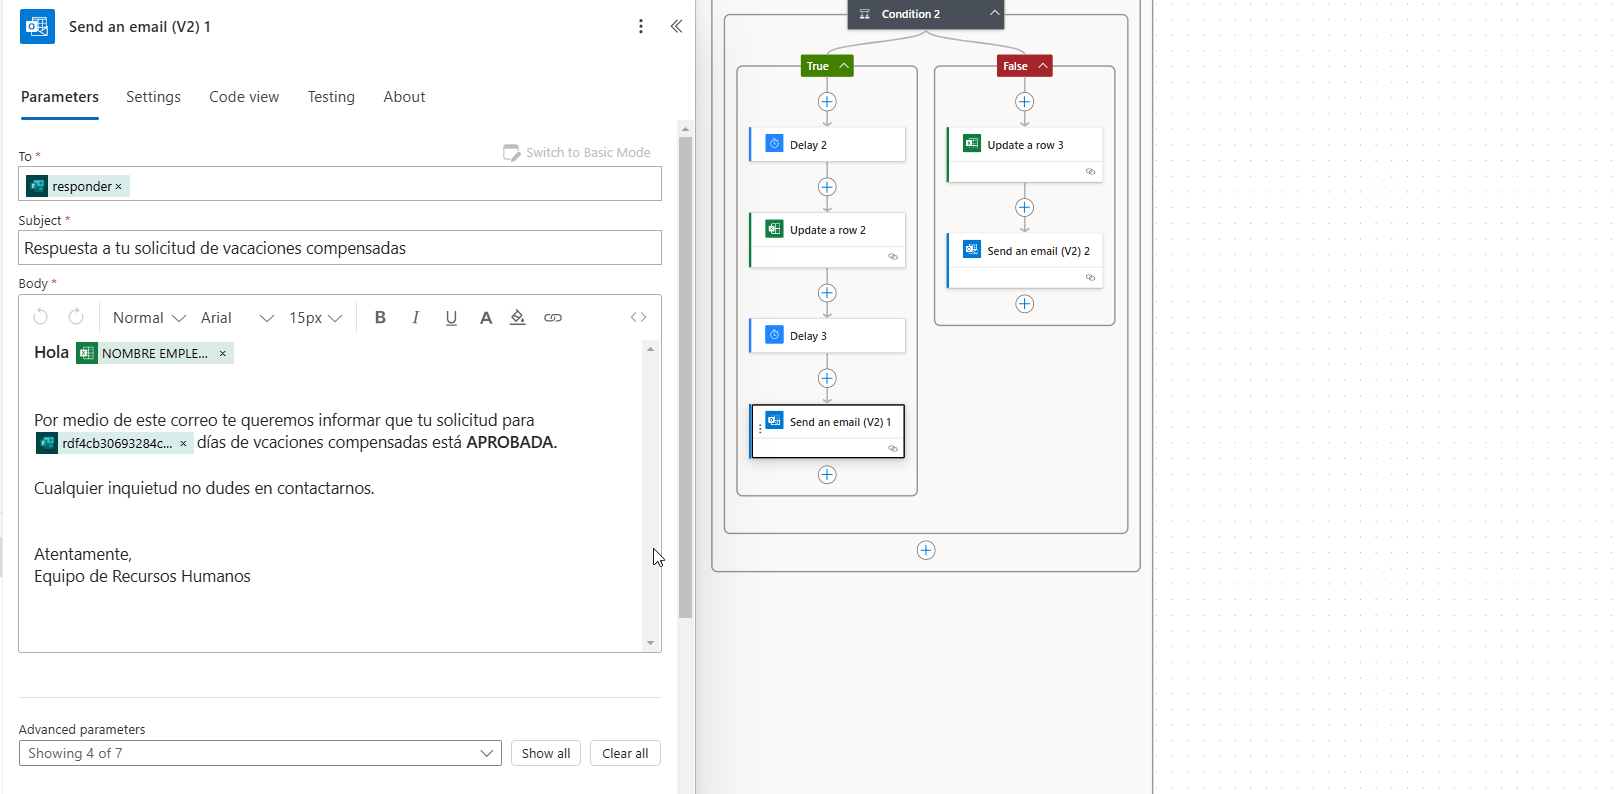
- Actions for Compensated Vacations: From this point, the flow will implement the same actions used for enjoyed vacations up to the email notification. However, for this scenario, no calendar event will be added.
- Condition “OR”: Add a condition action (Condition) to check for two possible outcomes:
- “APPROVED, APPROVED”
- “APPROVED”
- In the Value field, select Outcome from the dynamic content.
- Manually add the responses “APPROVED, APPROVED” or “APPROVED” in the second value field. Ensure these are entered exactly as they appear in the approval step to avoid errors.
- If the Condition is True:
- Delay (90 seconds): Add a delay action to pause the flow for 90 seconds, ensuring that the data updates correctly before proceeding .
- Update a Row: Update the status of the request in the Excel table:
- Key Column: Select ID.
- Key Value: Use the ID from the dynamic content.
- Status: Manually set the status to Approved.
- Delay (90 minutes): Add another delay action to pause the flow for 90 minutes to prevent errors in subsequent steps.
- Send an Email: Customize an email response to notify the employee that their request has been approved. Enhance the email with dynamic content such as the employee’s name, request details, and any additional relevant information.
These steps ensure a smooth handling of compensated vacation requests with all necessary notifications and updates.
If the Request Response is Not Approved
If the request response is “APPROVED, NOT APPROVED,” “NOT APPROVED, NOT APPROVED,” or “NOT APPROVED,” the condition will be considered false, and the following actions will be executed:
- Update a Row:
- Update the status of the request in the Excel table.
- Key Column: Select ID.
- Key Value: Use the ID from the dynamic content.
- Status: Manually set the status to Not Approved.
- Send an Email:
- Customize the response email to notify the employee that their request was not approved.
- Include relevant details using dynamic content extracted from previous actions to provide a clear explanation.
By automating vacation request management with a Power Automate flow, you not only optimize time and resources but also enhance your team’s experience by simplifying repetitive tasks and ensuring efficient collaboration.
At Pevaar, our experts in workflow automation can help you implement tailored solutions to meet your business needs.
If you’re ready to transform your manual processes into efficient and effective automated flows, contact us today! Our team is here to guide you every step of the way, ensuring you get the most out of this powerful tool. Let us help you take your productivity to the next level!


Comments (2)
This article kept my attention from start to finish!
The site’s design makes it a joy to explore.
Thank you! We’re thrilled to know that both the article and the site design kept you engaged. We look forward to continuing to provide valuable content!