
Automated Businesses to Manage Overtime Requests
Automated businesses are transforming the way everyday business processes, such as overtime requests for employees, are managed. Automating this workflow not only optimizes time and reduces errors but also ensures more efficient and transparent control of information.
In this article, we guide you step-by-step through the creation of an automated workflow for overtime requests using tools like Power Automate and SharePoint. Discover how automated workflows simplify complex processes, improve communication between teams, and ensure agile and precise information management. If you’re looking to enhance your business’s operational efficiency, this guide is the perfect starting point.
The workflow is designed to:
- Receive overtime requests from leaders through a dynamic form.
- Validate and record the information in an Excel file hosted on SharePoint.
- Send automatic notifications to responsible leaders and the involved employees, including all necessary details.
- Manage approval documents and ensure their storage in a specific folder within SharePoint.
1. General Context
This workflow addresses the need to simplify and standardize the overtime request process, reducing the associated administrative burden. By automating key tasks, it achieves:
- Greater agility in managing requests.
- Reduction of manual errors when processing data and documents.
2. Problem It Solves
The workflow eliminates inefficiencies associated with manually managing overtime requests, such as collecting scattered data and disorganized information exchange. It provides a structured and automated solution that ensures consistent request handling, facilitates traceability, and optimizes response times.
Overtime Request Workflow for an Employee
Step 1. Access the Power Automate Environment:
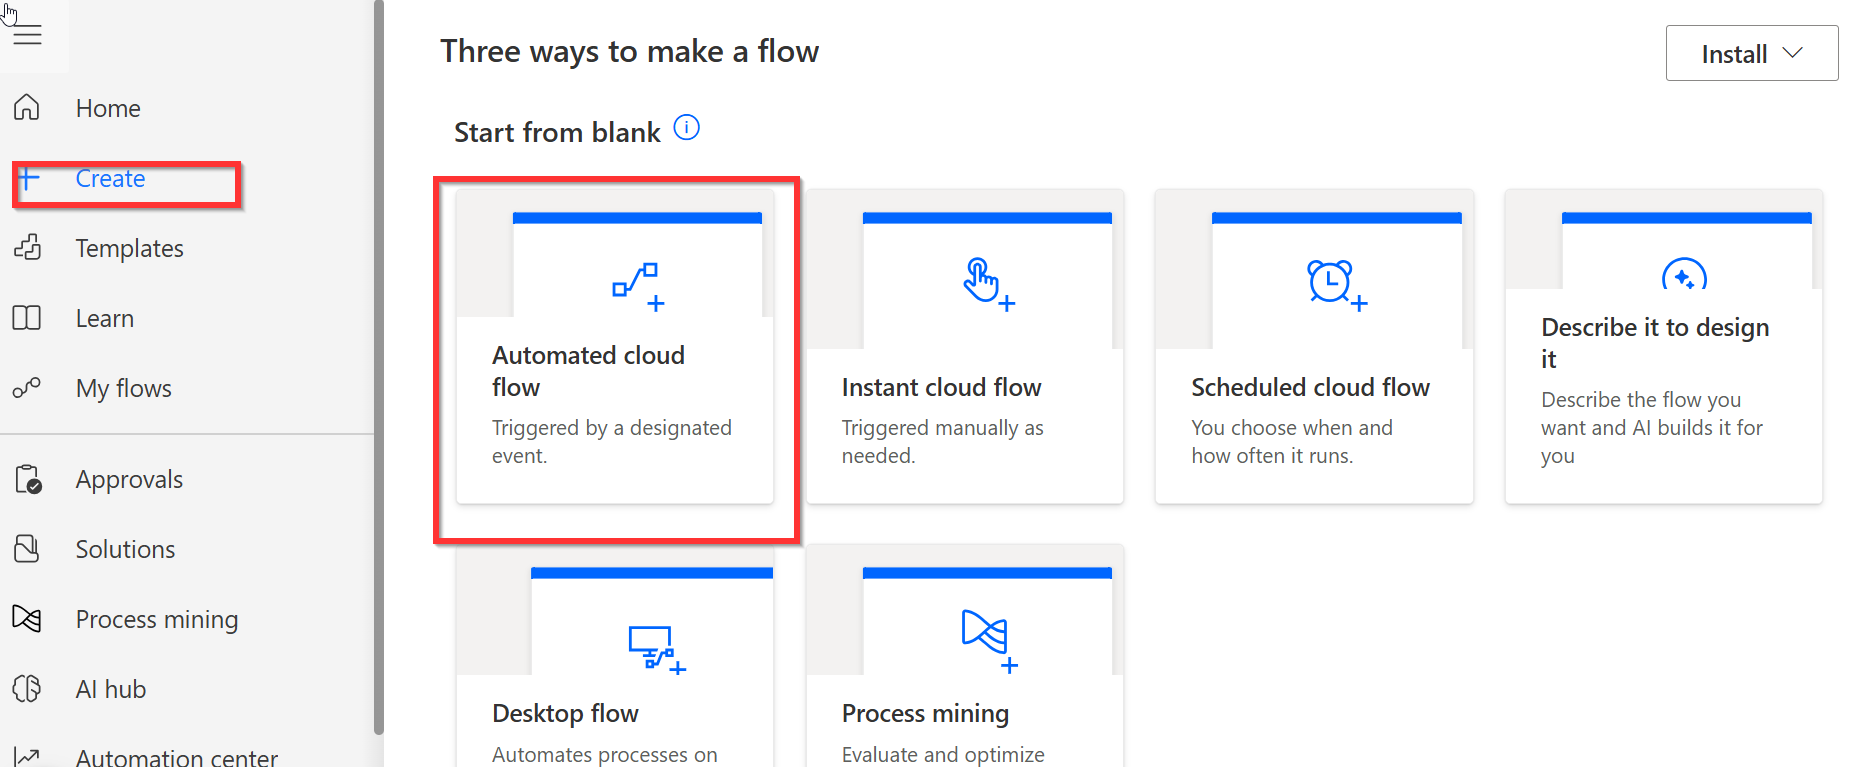
To get started, access Power Automate from the Microsoft 365 application panel. Once inside the environment, you’ll land on the main screen. From this view, click on the “Create” option in the left-hand menu. Then, select “Automated Cloud Flow” to begin creating your automated workflow based on cloud events.
Step 2: Add the Flow Trigger:
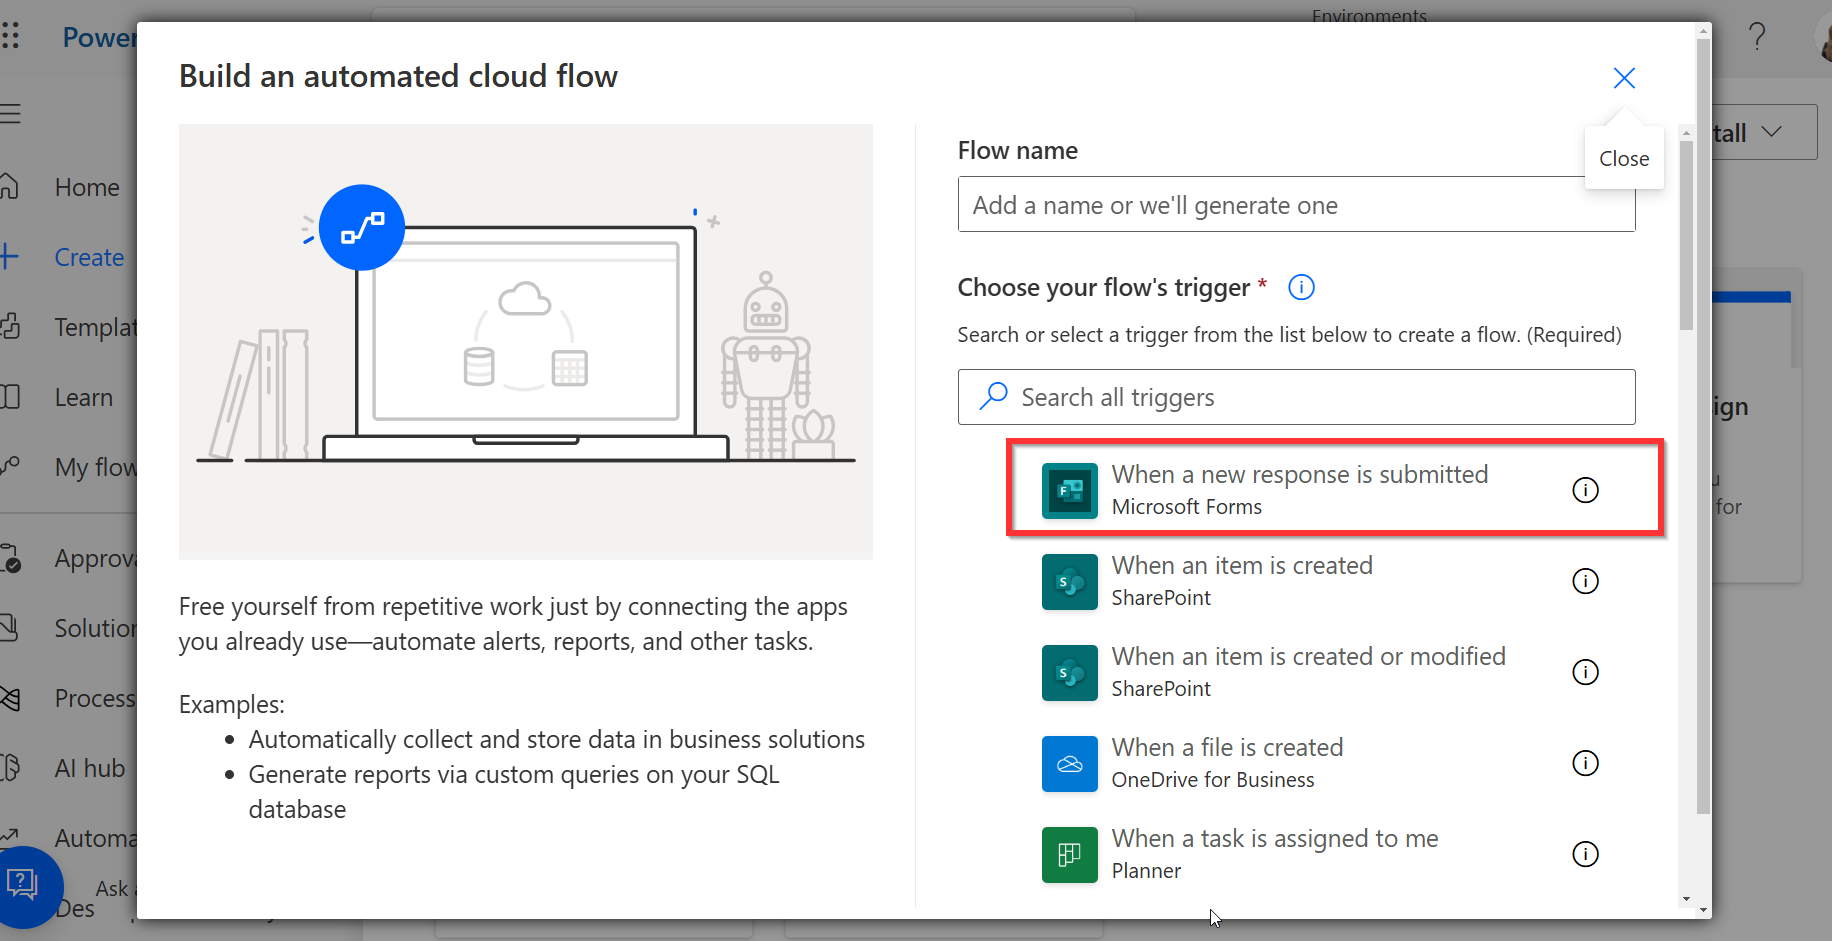
The workflow will begin when a new response is submitted in Microsoft Forms. To achieve this, add the trigger “When a new response is submitted” from Microsoft Forms. This trigger will be responsible for activating the flow each time someone completes the previously created overtime request form.
Step 3: Select the Overtime Request Form:
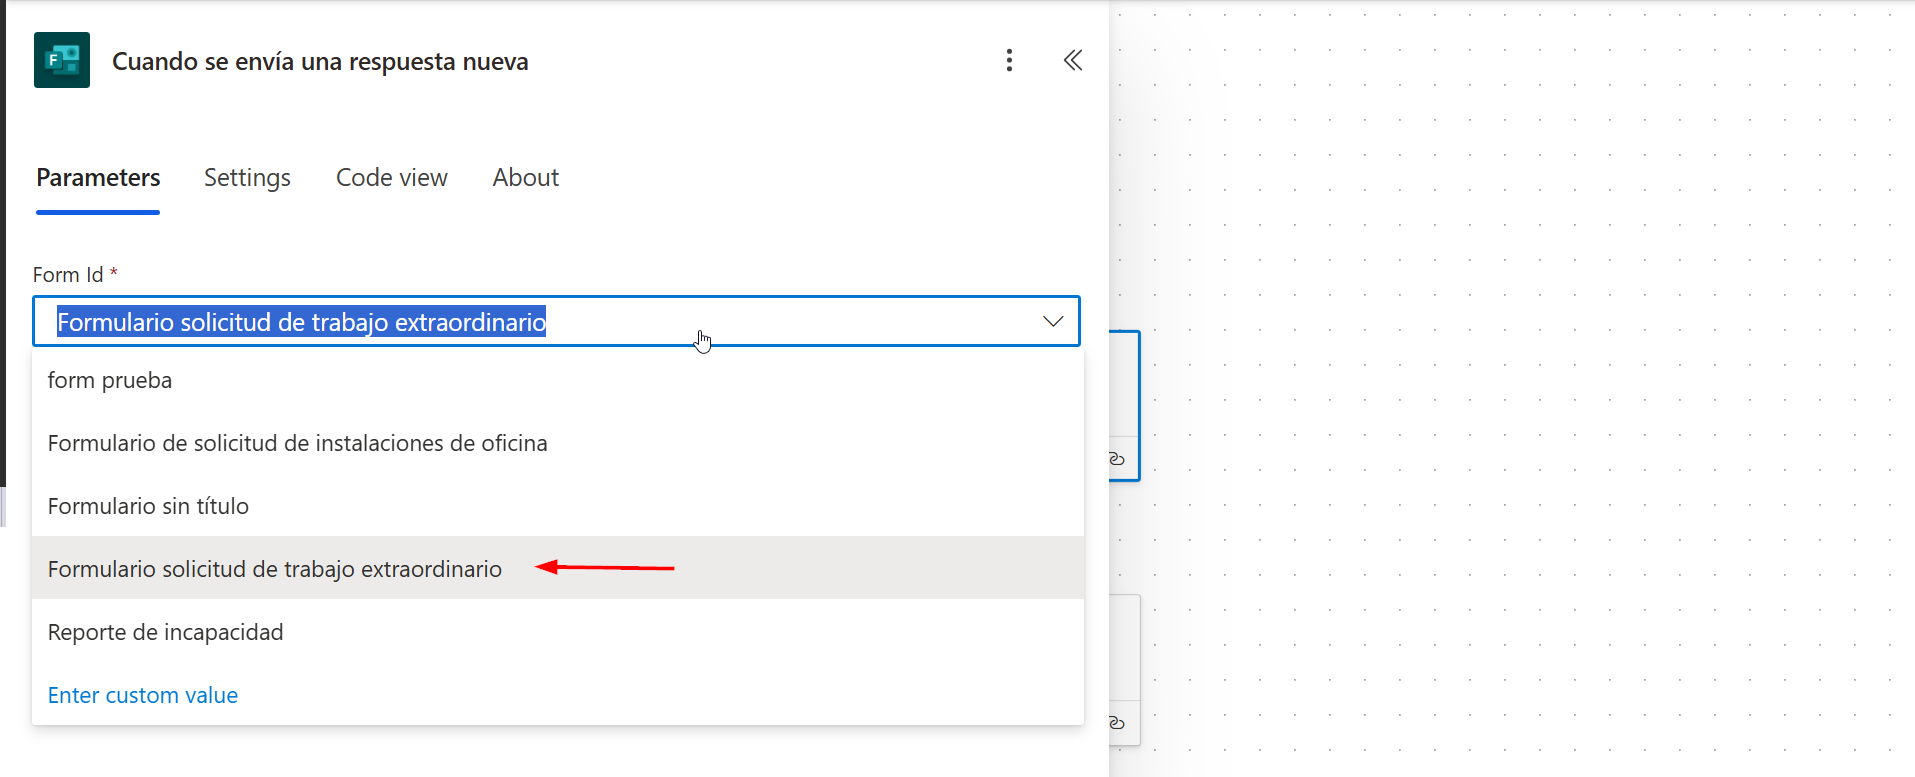
Within the trigger options, in the “Form ID” property, select the appropriate overtime request form. At this step, all previously created forms in Microsoft Forms will appear, so simply select the form corresponding to the overtime request.
Step 4: Retrieve Response Details:
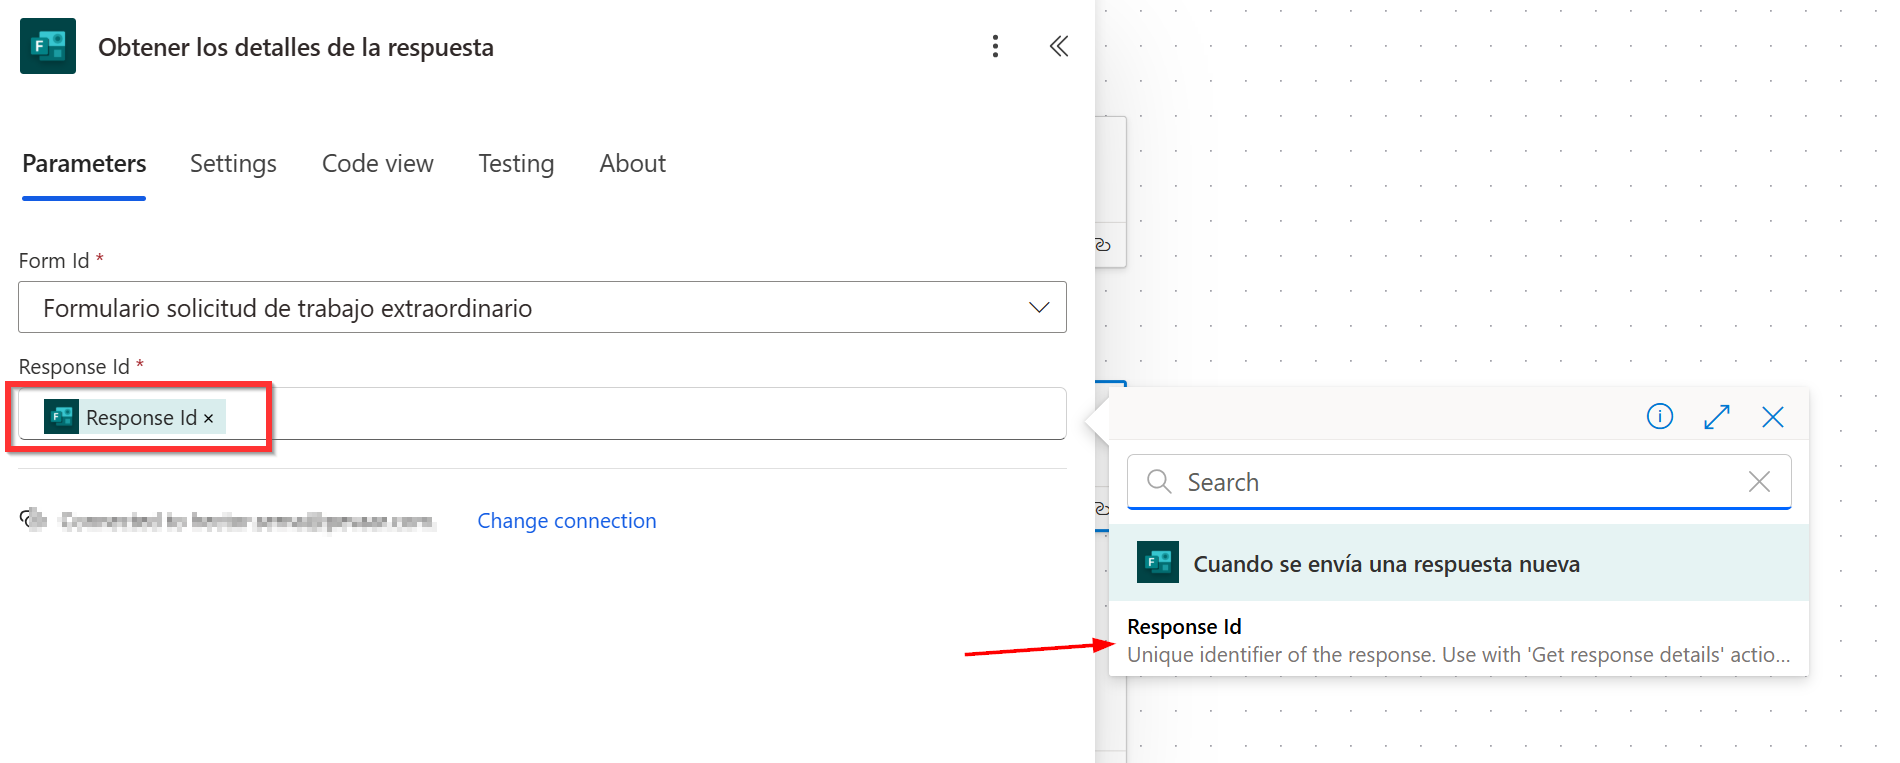
Add a new action called “Get response details” to extract all the information submitted through the form. In this action, re-select the overtime request form in the “Form ID” field. For the “Response ID”, choose the dynamic variable automatically generated by the previous trigger, called “Response ID”.
Step 5: Send the Request to Human Resources
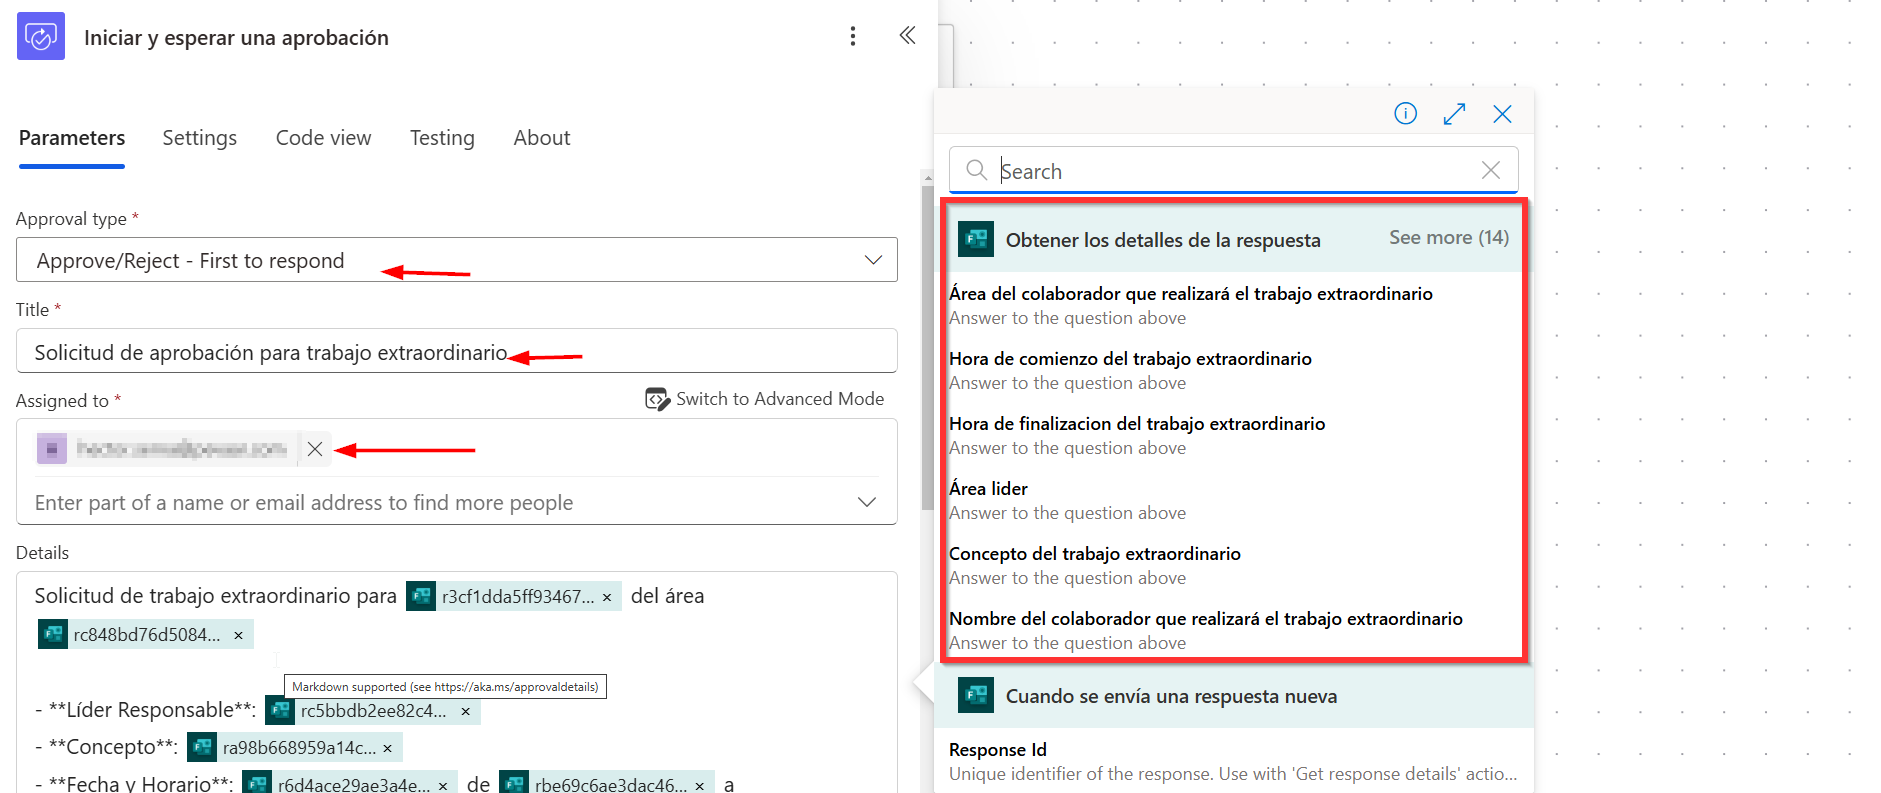
Add the action “Start and wait for an approval”. Configure the following values:
- Approval Type: “Approve/Reject – First to respond”
- Assigned To: talentohumano@hogarsaludips.com
- Title: Request for Overtime Approval
- Details: Include the message with the data collected from the form:
Ensure that the details field contains the key information extracted in previous steps, such as the name of the requester, the collaborator involved, requested hours, and any relevant notes submitted through the form.
Step 6: Create Variables for Emails and Mentions
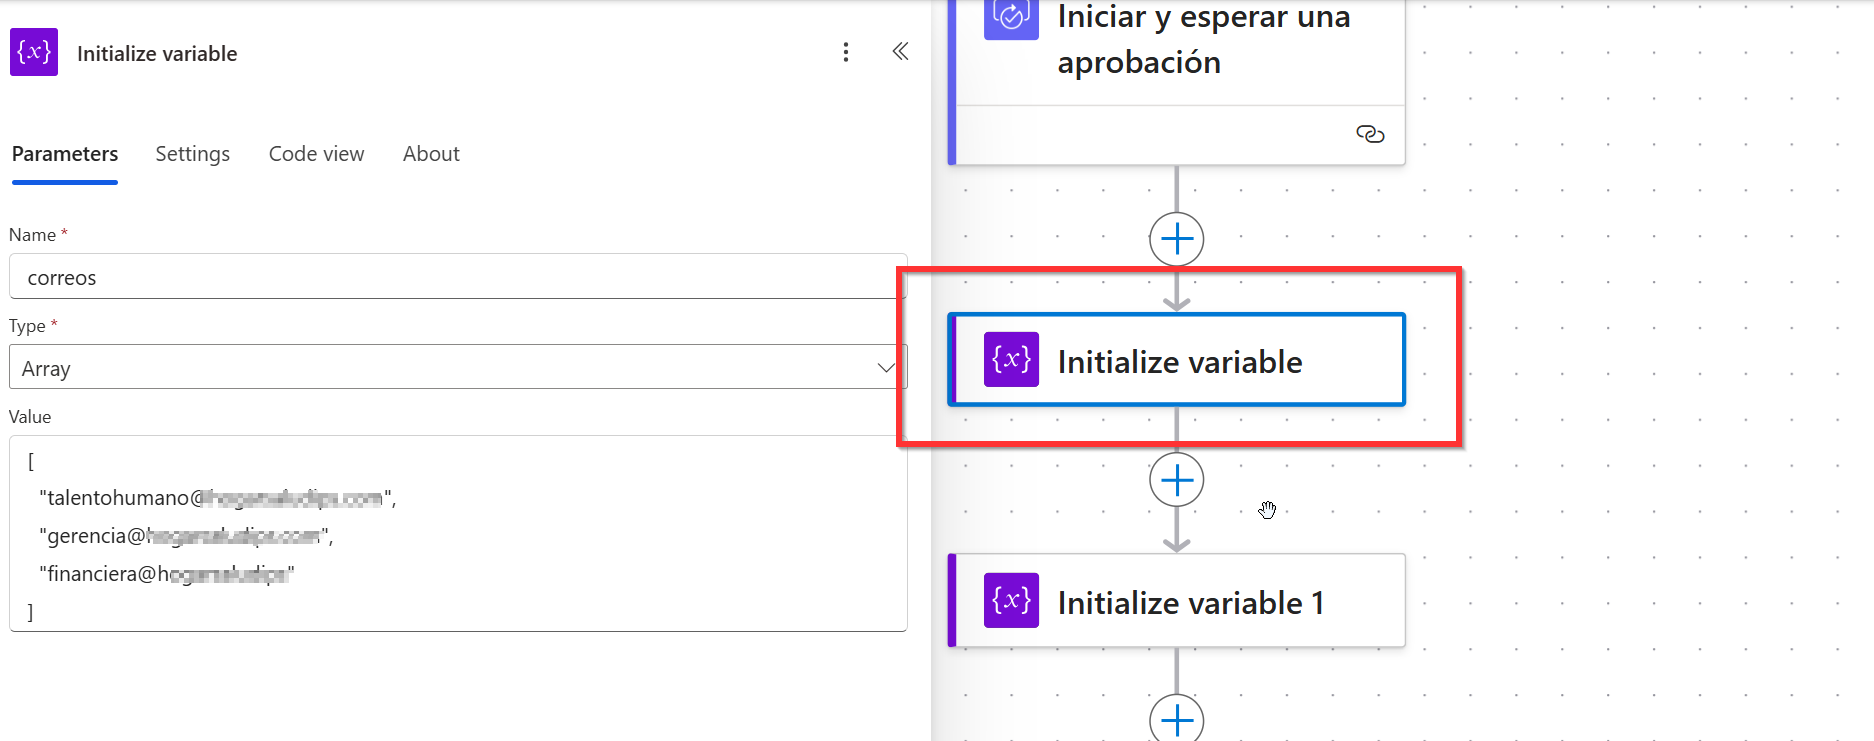
In certain actions within the flow, we will need to send emails and create mentions. To achieve this, we will initialize these values for later use. Add the action “Initialize variable” and configure it with the following values:
- Name: “Correos”
- Type: “Array”
- Value: A list of all the email addresses to be mentioned, enclosed in square brackets and separated by commas (as shown in the following image).
This variable will allow the flow to dynamically handle email notifications and mentions in tools like Teams throughout the process.
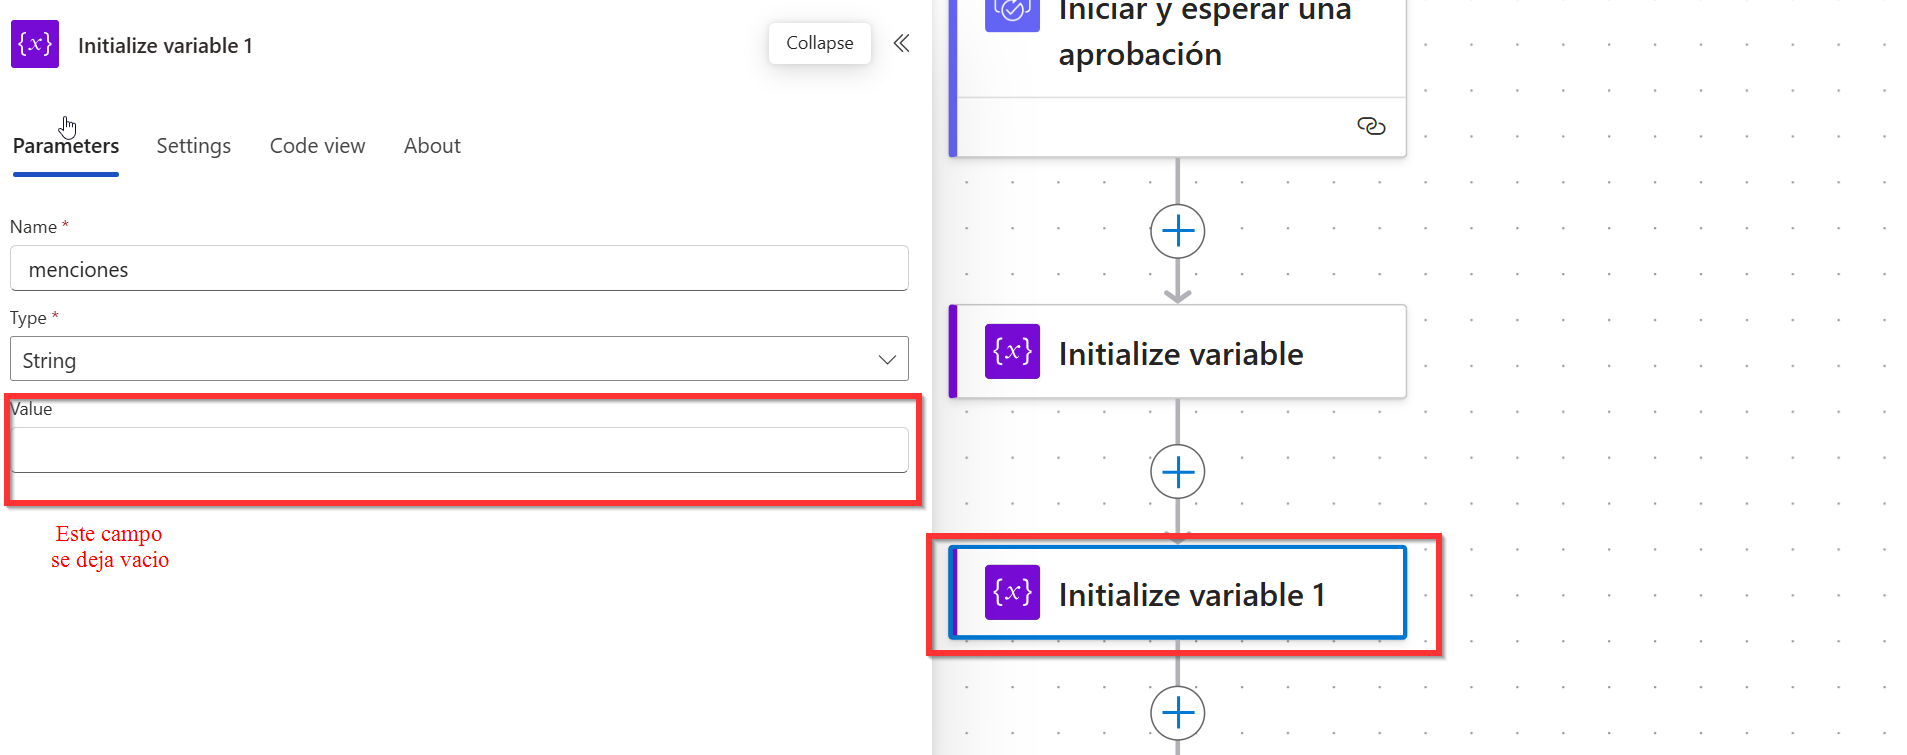
Next, add another “Initialize variable” action to store the mentions that will be used later in the Teams groups.
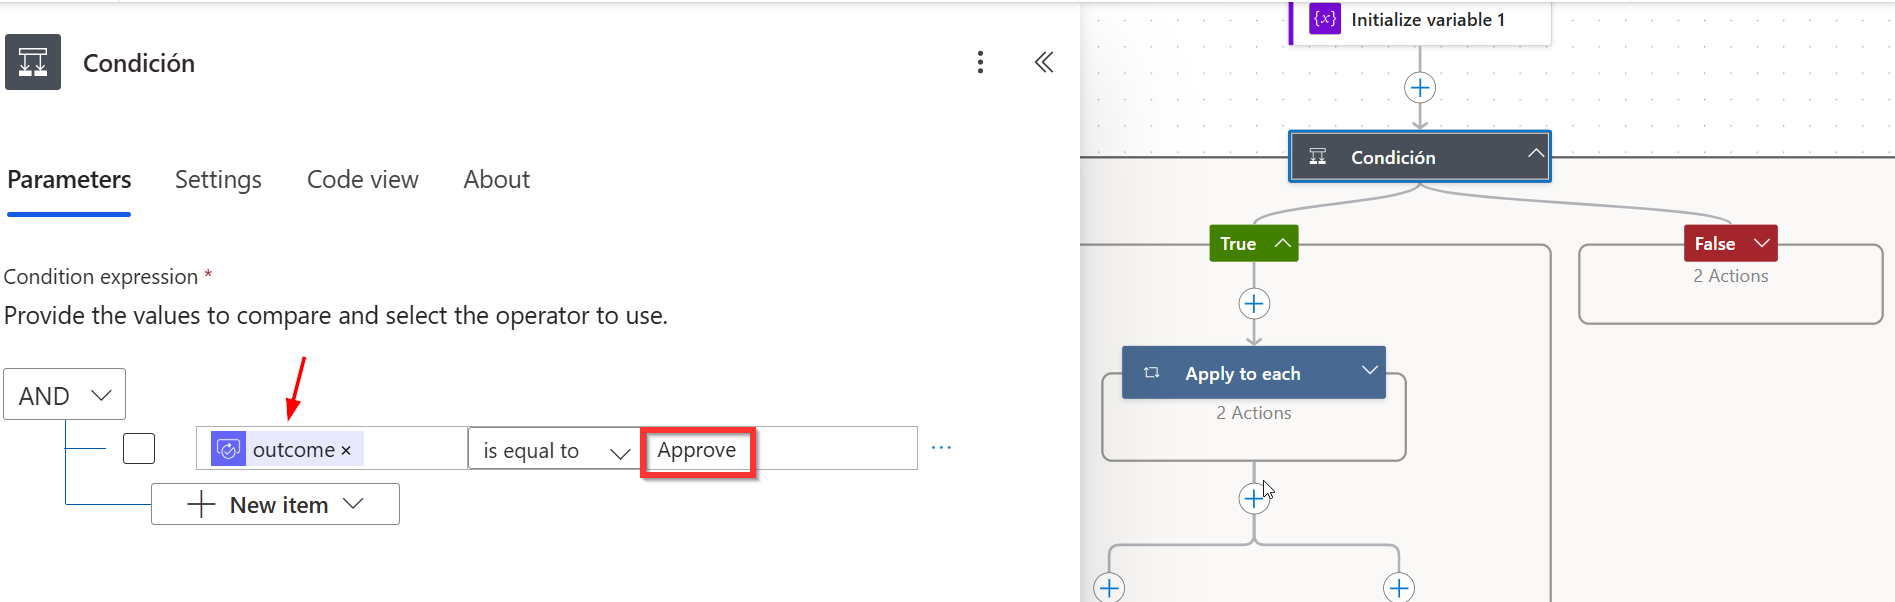
Step 7: Condition if the Request Was Approved or Rejected
Add a Condition to evaluate the result of the approval. Configure the condition to check if the value of “Outcome” from the previous approval action is equal to “Approve” (or “Aprobado” if Power Automate is set to Spanish).
- If approved: Proceed with the steps to notify and store the request.
- If rejected: Define an alternate flow with the corresponding notifications.
Step 8: Send Email Notification in Case of Rejection
If the request is rejected, add the action “Send an email (V2)” or “Enviar un Email (V2)”. Configure the fields as follows:
- To: Dynamically select the leader’s email, obtained from the form responses.
- Subject: “Overtime Request Rejected”
- Body: Customize the content with the form data and the reason for the rejection, as shown:
Include relevant details, such as the name of the requester, the collaborator involved, and any additional comments explaining the rejection.
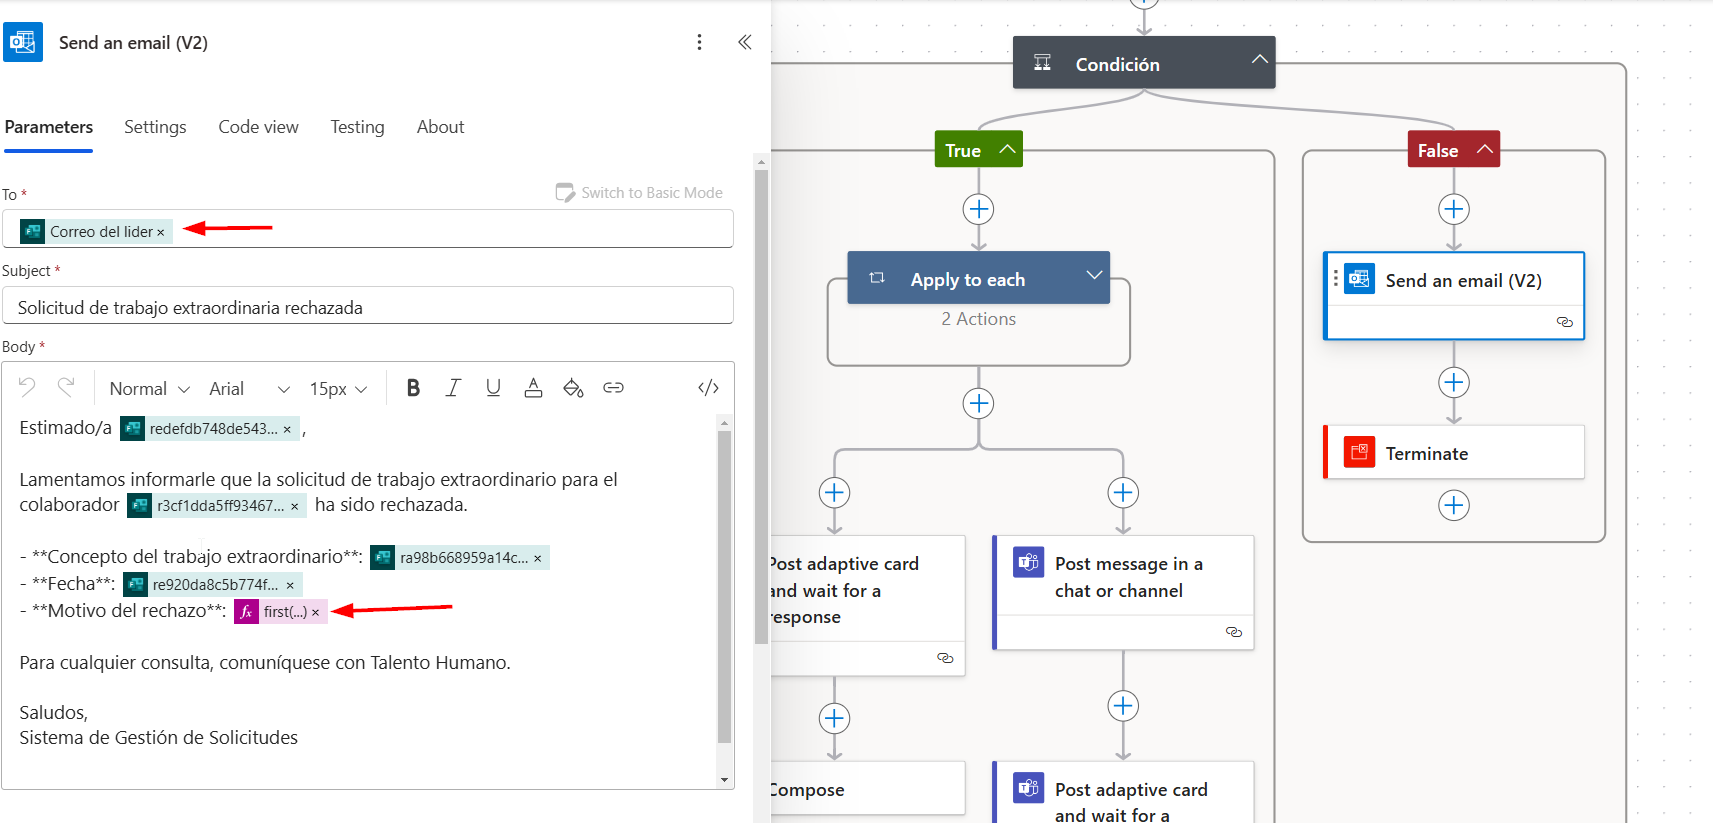
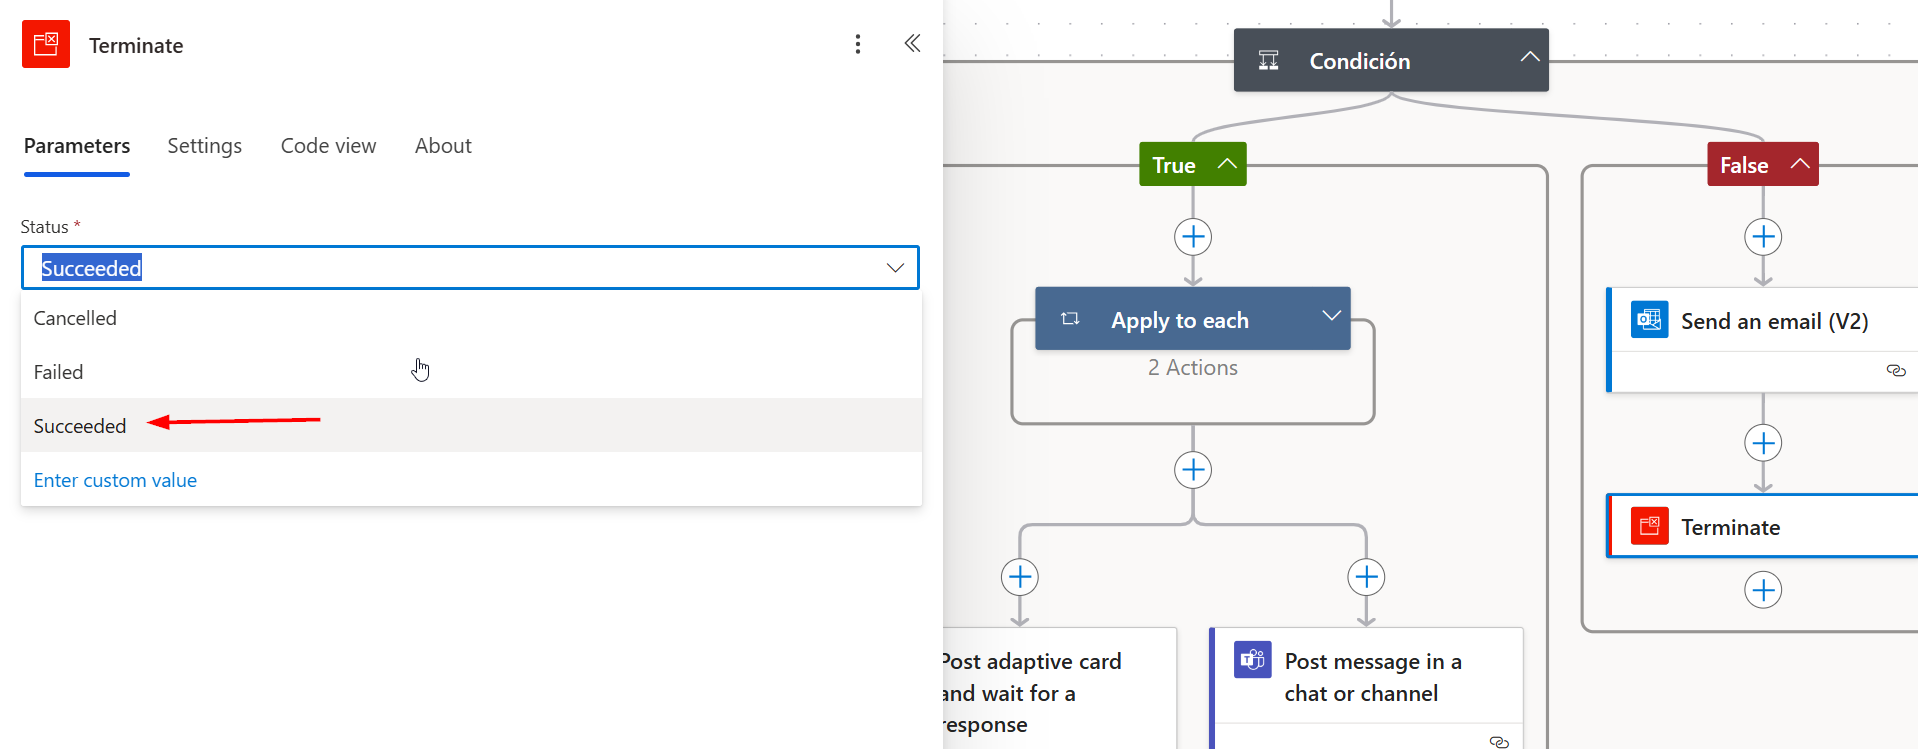
After sending the notification email, add the action “Terminate.” Configure the field “Status” as Succeeded or Exitoso to finalize the flow without continuing with the subsequent steps.
Step 9: Configuration for Approved Requests
In the True branch (approved requests), additional approvals will be sent to the corresponding Teams groups (Human Resources and Area Leaders) using Adaptive Cards. Before sending the cards, mentions will be generated for the users included in the “Correos” variable.
Obtain Mention Tokens:
Create a control action “Apply to Each” and select the “Correos” variable as the input.
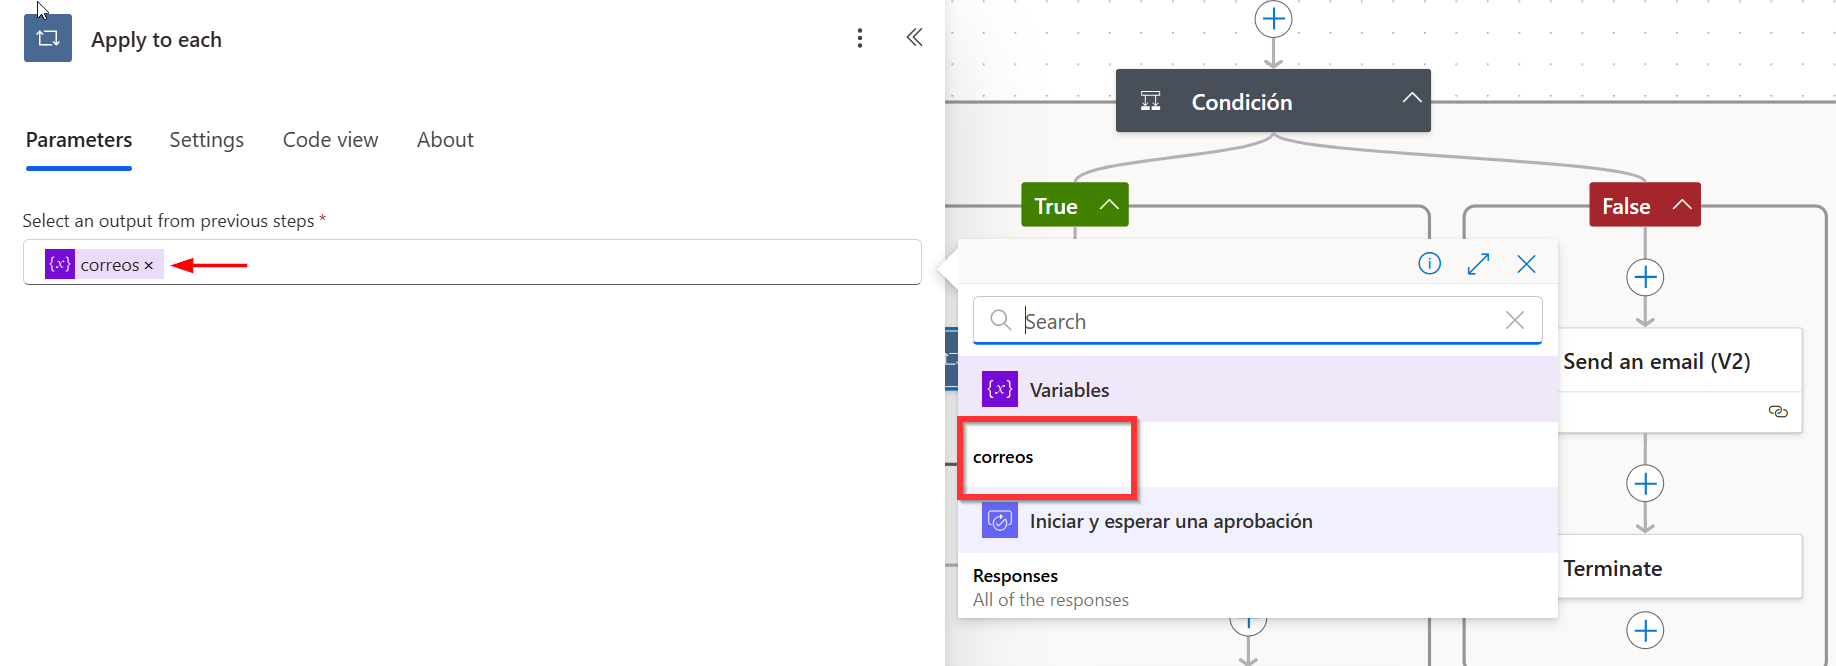
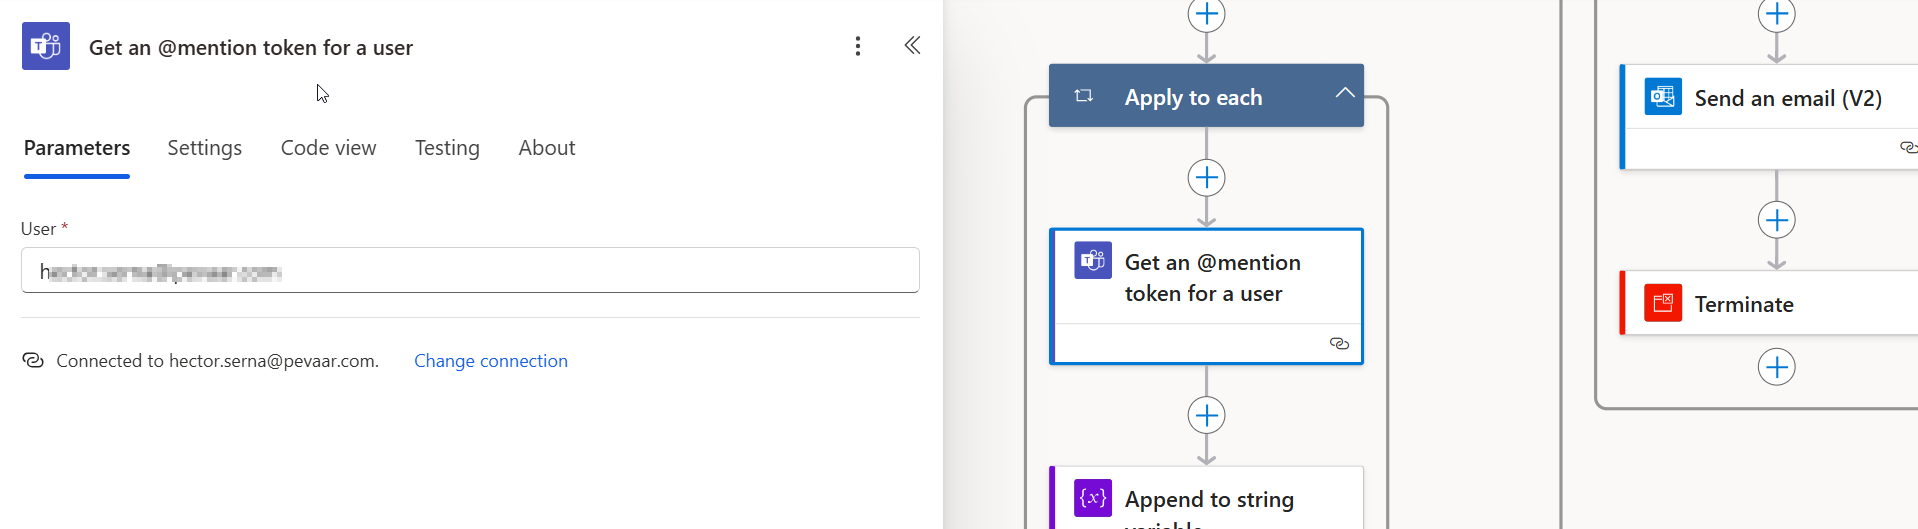
Within the loop, use the action “Get a mention token for a user”. In the User field, select the dynamic value “Current item” provided by the loop.
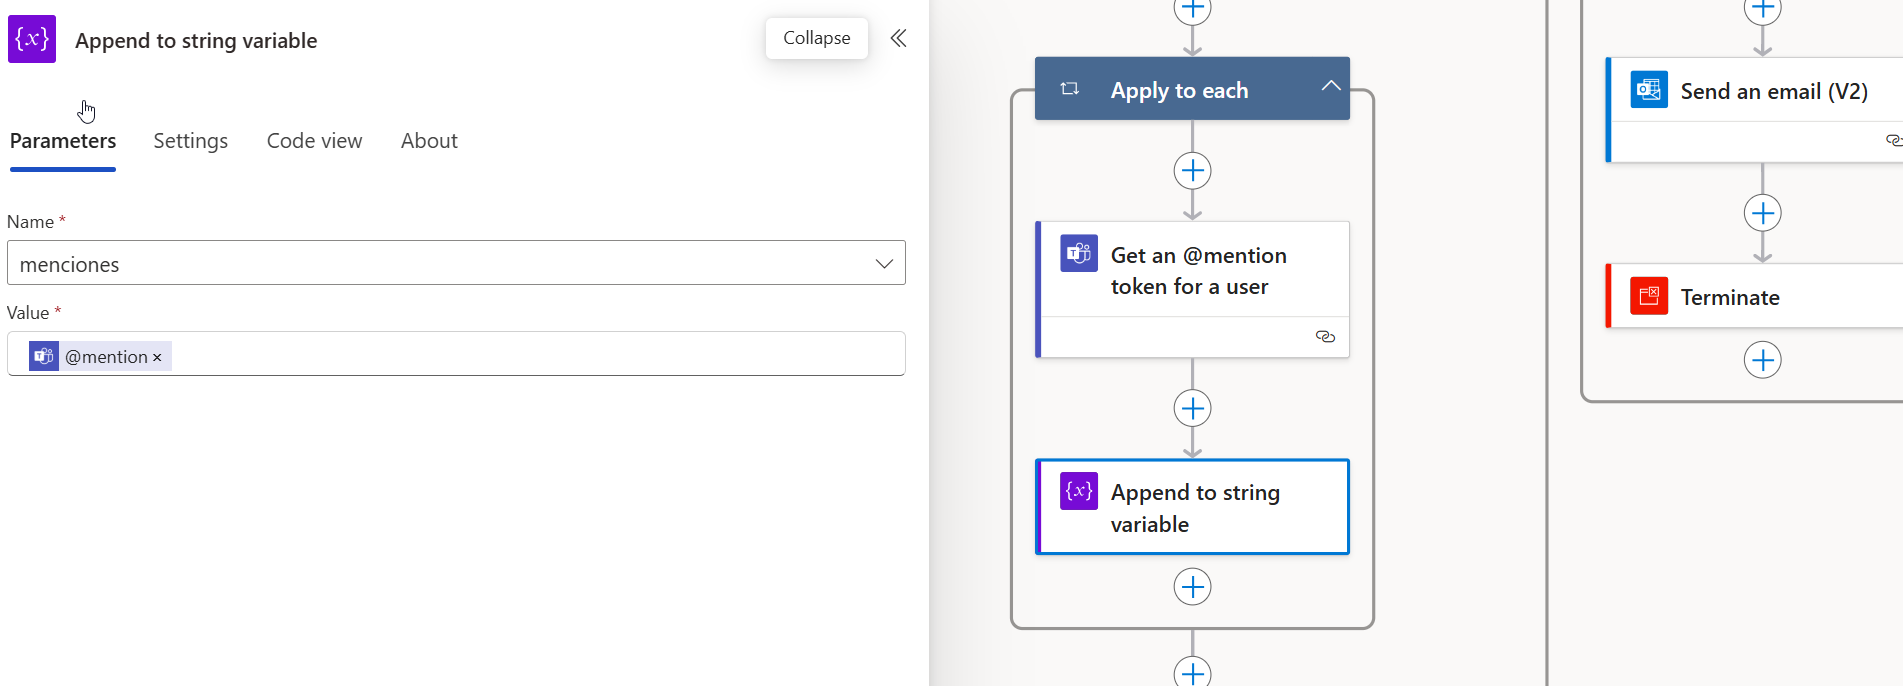
Inside the same loop, add an action “Append to string variable”. Configure the values as follows:
- Name: Select the variable “Menciones”.
- Value: Dynamically select the Mention token obtained from the previous action.
Next, add the “Append to string variable” action. In the Name field, select the variable “Menciones“, and in the Value field, select the mention dynamically generated by the previous action.
Step 10: Post a Message with Mentions in Teams
To send mentions to the corresponding channel, add the action “Post a message in a chat or channel”. Configure the fields as follows:
- Post as: Select Flow bot to send the message on behalf of the flow.
- Post in: Choose Channel to post directly in a desired team channel.
- Team: Select the team where you want to send the notification, e.g., “Talento Humano”.
- Channel: Choose the channel where the message will be posted, such as “Notificaciones de Aprobación”.
- Message: Use the “Menciones” variable and add the text: “Por favor, revisen esta solicitud de aprobación.”
This ensures the message includes mentions for the relevant users and notifies the team to review the approval request.

Step 11: Create and Configure an Adaptive Card
To create a detailed Adaptive Card for the request, go to the Adaptive Cards Designer. Select Microsoft Teams as the host and delete all the default content. Start with a basic JSON structure, defining a title with the text “Solicitud de Aprobación de Horas Extra”. The initial structure will look like this:
{
“type”: “AdaptiveCard”,
“body”: [
{
“type”: “TextBlock”,
“size”: “Medium”,
“weight”: “Bolder”,
“text”: “${title}”
}
],
“$schema”: “<http://adaptivecards.io/schemas/adaptive-card.json>”,
“version”: “1.5”
}
To add additional fields such as “Líder Solicitante”, within the body section, include elements of type ColumnSet. Each ColumnSet will display a title and its corresponding value. For example, to display the leader’s name, the field would have the following structure:
{
“type”: “ColumnSet”,
“columns”: [
{
“type”: “Column”,
“width”: “auto”,
“items”: [
{
“type”: “TextBlock”,
“text”: “Líder Solicitante:”,
“weight”: “Bolder”,
“wrap”: true
}
]
},
{
“type”: “Column”,
“width”: “stretch”,
“items”: [
{
“type”: “TextBlock”,
“text”: “NOMBRE DEL LIDER SOLICITANTE”,
“wrap”: true
}
]
}
]
}
As we can see, this will be reflected in the Adaptive Cards Designer visualizer. In this case, we already have a field for Líder Solicitante. Repeat this structure for all the fields you want to display in the Adaptive Card.
Finally, add action buttons to approve or reject the request. This is done after the body section by adding an array in the actions property. The buttons will include a data field to send approval or rejection values, along with the request identifier. The structure would look like this:
“actions”: [
{
“type”: “Action.Submit”,
“title”: “Aprobar”,
“data”: {
“aprobacion”: “Aprobado”,
“solicitudId”: “”
},
“style”: “positive”
},
{
“type”: “Action.Submit”,
“title”: “Rechazar”,
“data”: {
“aprobacion”: “Rechazado”,
“solicitudId”: “”
},
“style”: “destructive”
}
]
You can also customize the design of the text, titles, positioning, and color as per your preference. Finally, the JSON code should look like this:
{
“type”: “AdaptiveCard”,
“body”: [
{
“type”: “TextBlock”,
“text”: “Solicitud de Aprobación de Horas Extra”,
“wrap”: true,
“spacing”: “Large”,
“horizontalAlignment”: “Center”,
“style”: “heading”,
“fontType”: “Monospace”,
“size”: “Large”,
“weight”: “Lighter”,
“color”: “Accent”,
“isSubtle”: false
},
{
“type”: “ColumnSet”,
“columns”: [
{
“type”: “Column”,
“width”: “auto”,
“items”: [
{
“type”: “TextBlock”,
“text”: “Líder Solicitante:”,
“weight”: “Bolder”,
“wrap”: true
}
]
},
{
“type”: “Column”,
“width”: “stretch”,
“items”: [
{
“type”: “TextBlock”,
“text”: “”,
“wrap”: true
}
]
}
]
},
{
“type”: “ColumnSet”,
“columns”: [
{
“type”: “Column”,
“width”: “auto”,
“items”: [
{
“type”: “TextBlock”,
“text”: “Colaborador Solicitado:”,
“weight”: “Bolder”,
“wrap”: true
}
]
},
{
“type”: “Column”,
“width”: “stretch”,
“items”: [
{
“type”: “TextBlock”,
“text”: “”,
“wrap”: true
}
]
}
]
},
{
“type”: “ColumnSet”,
“columns”: [
{
“type”: “Column”,
“width”: “auto”,
“items”: [
{
“type”: “TextBlock”,
“text”: “Concepto:”,
“weight”: “Bolder”,
“wrap”: true
}
]
},
{
“type”: “Column”,
“width”: “stretch”,
“items”: [
{
“type”: “TextBlock”,
“text”: “”,
“wrap”: true
}
]
}
]
},
{
“type”: “ColumnSet”,
“columns”: [
{
“type”: “Column”,
“width”: “auto”,
“items”: [
{
“type”: “TextBlock”,
“text”: “Horario Solicitado:”,
“weight”: “Bolder”,
“wrap”: true
}
]
},
{
“type”: “Column”,
“width”: “stretch”,
“items”: [
{
“type”: “TextBlock”,
“text”: “”,
“wrap”: true
}
]
}
]
}
],
“actions”: [
{
“type”: “Action.Submit”,
“title”: “Aprobar”,
“data”: {
“aprobacion”: “Aprobado”,
“solicitudId”: “”
},
“style”: “positive”
},
{
“type”: “Action.Submit”,
“title”: “Rechazar”,
“data”: {
“aprobacion”: “Rechazado”,
“solicitudId”: “”
},
“style”: “destructive”
}
],
“$schema”: “http://adaptivecards.io/schemas/adaptive-card.json“,
“version”: “1.5”
}
After this, copy the entire JSON structure and go to your flow in Power Automate. Create an action called “Post an adaptive card and wait for a response”. In the configuration options, set the following:
- Post as: Select Flow bot to send the message on behalf of the flow.
- Post in: Choose Channel to post the message directly in a specific team channel.
- Message: Paste the JSON structure you copied earlier into this field.
This will ensure that the Adaptive Card is displayed in the selected Teams channel, ready for user interaction and response.

In the Team field, select the corresponding group, in this case Líderes de Área, and in Channel, choose the channel where you want to post the card, such as “Notificaciones de Aprobación”. Finally, in the Update message field, you can include a thank-you message, for example: “Gracias por tu respuesta”.
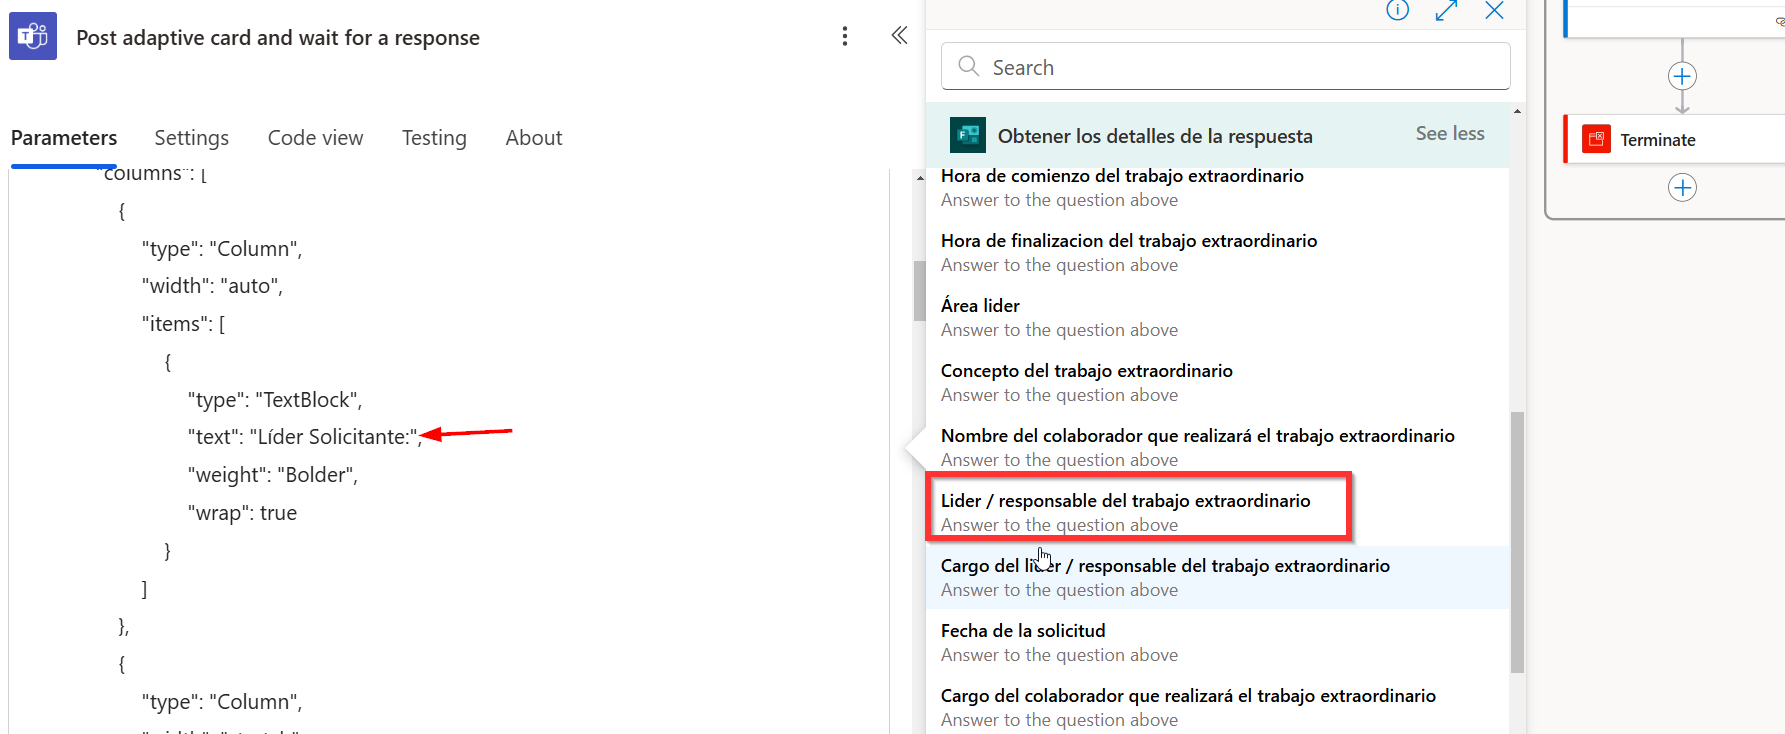
Next, focus on the ColumnSets within the JSON. These contain two main elements: the title of the field (e.g., “Líder Solicitante”) and the value associated with that field. Replace the static text values within the “text” property of each field with the corresponding dynamic variables generated by the form responses (Microsoft Forms).
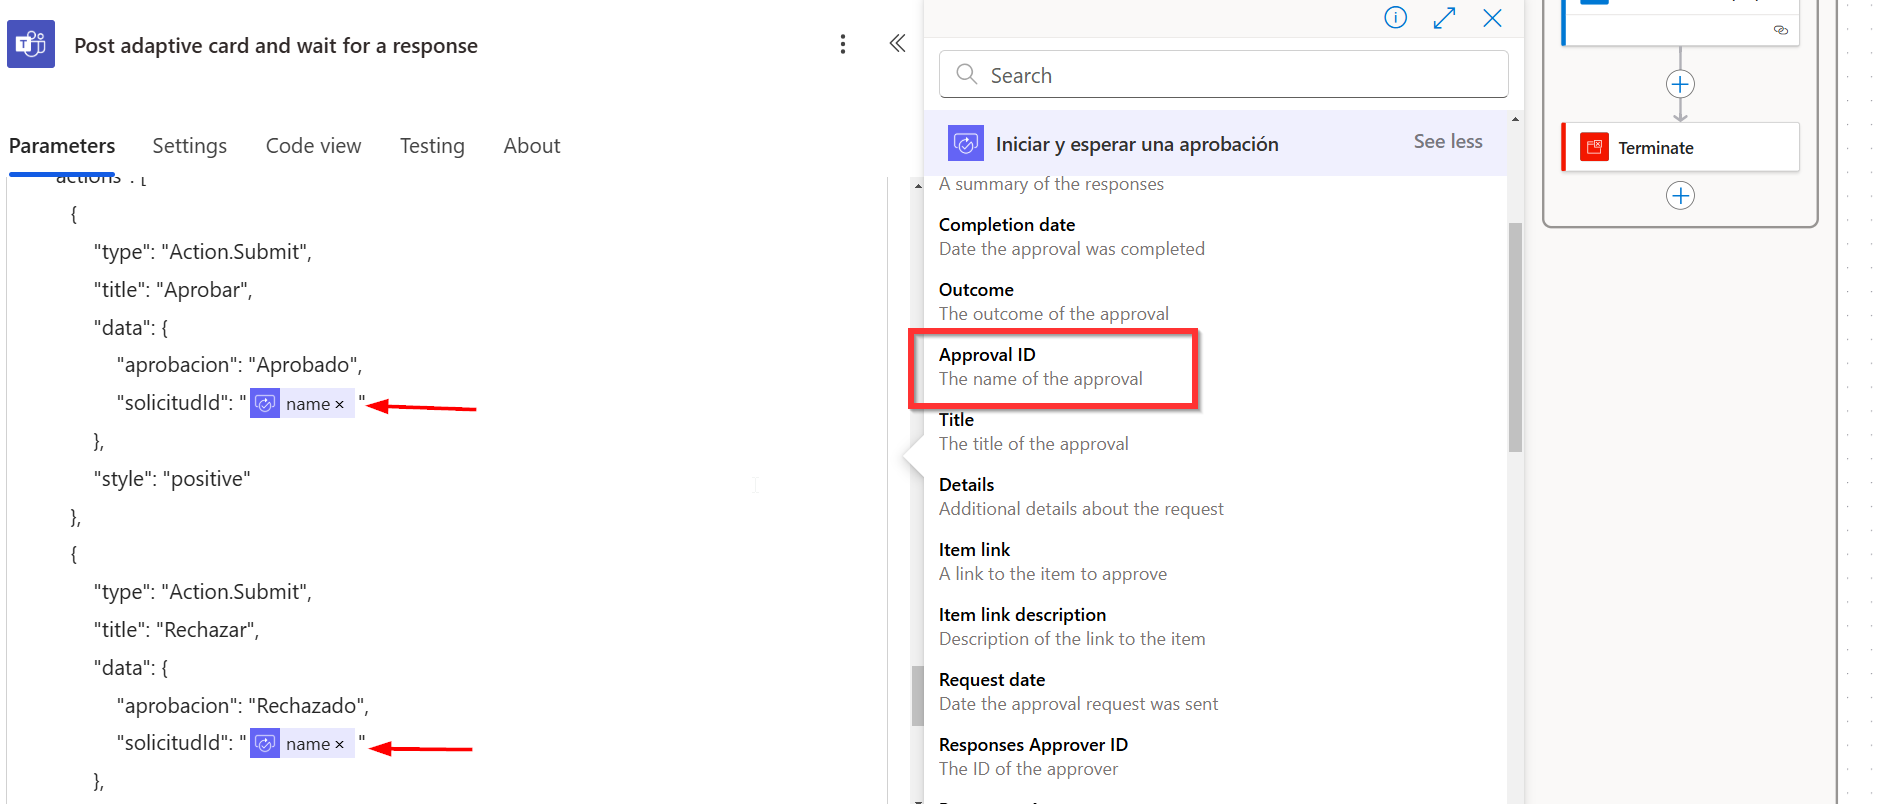
Now, scroll down to the actions section to correctly configure the Approve and Reject buttons. Within the quotes corresponding to the solicitudId field, assign the dynamic variable for the Approval ID, which is provided by the “Start and wait for approval” action.
After this, it is recommended to save the flow to ensure there are no errors. Since we are working with a complex JSON structure, it’s possible that a comma, bracket, or other essential element might have been accidentally omitted. These errors can prevent Power Automate from interpreting the code correctly and rendering the Adaptive Card as expected. Saving the flow will allow us to identify and fix any issues before proceeding.
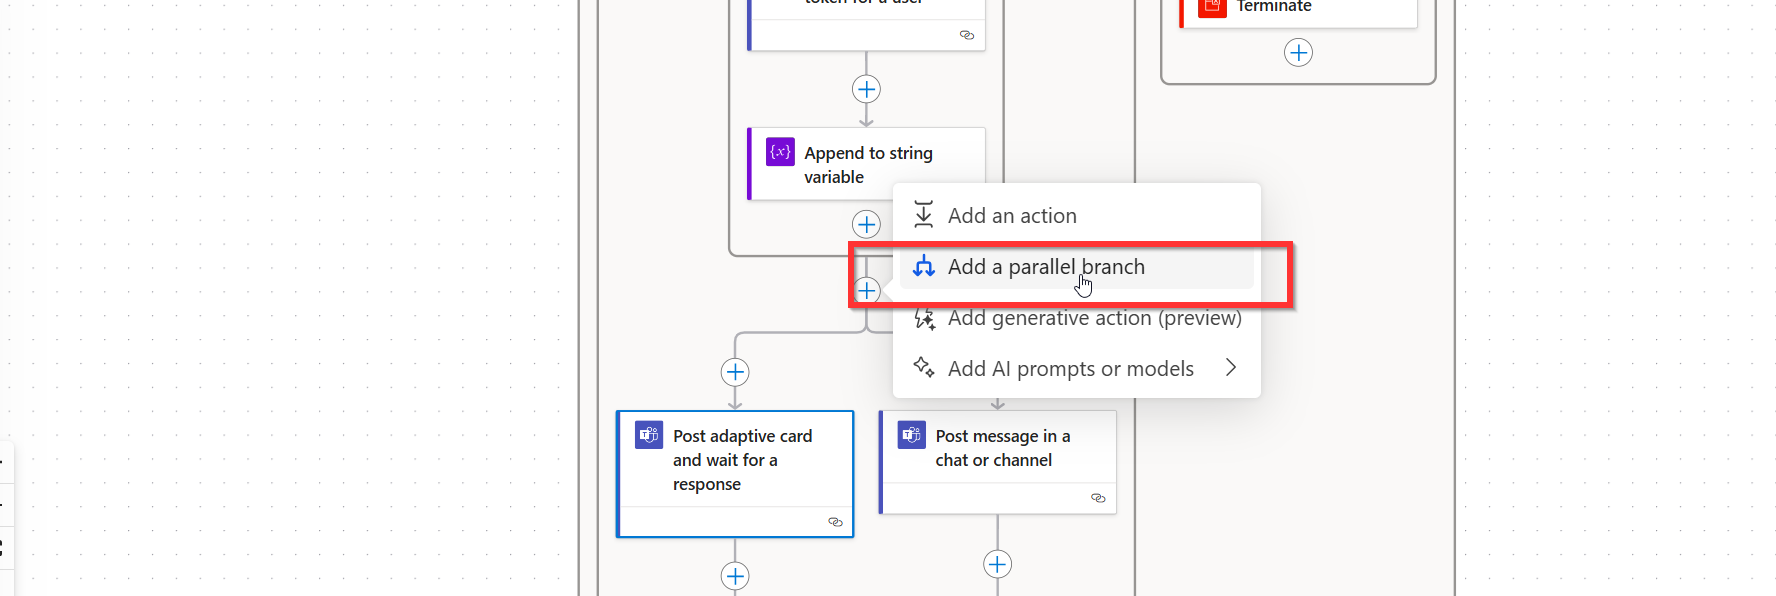
Step 12: Create Parallel Branches for Simultaneous Sending
To ensure that requests are sent simultaneously to both groups (Human Resources and Area Leaders), create a parallel branch before the action to post the Adaptive Card. In this new branch:
- Replicate the actions for sending messages and Adaptive Cards.
- Adjust the Team and Channel fields to correspond to the “Líderes de Área” group.
This setup ensures that both teams receive the notifications at the same time and can respond simultaneously, preventing delays in the approval process.
Finally, the flow should look something like this:
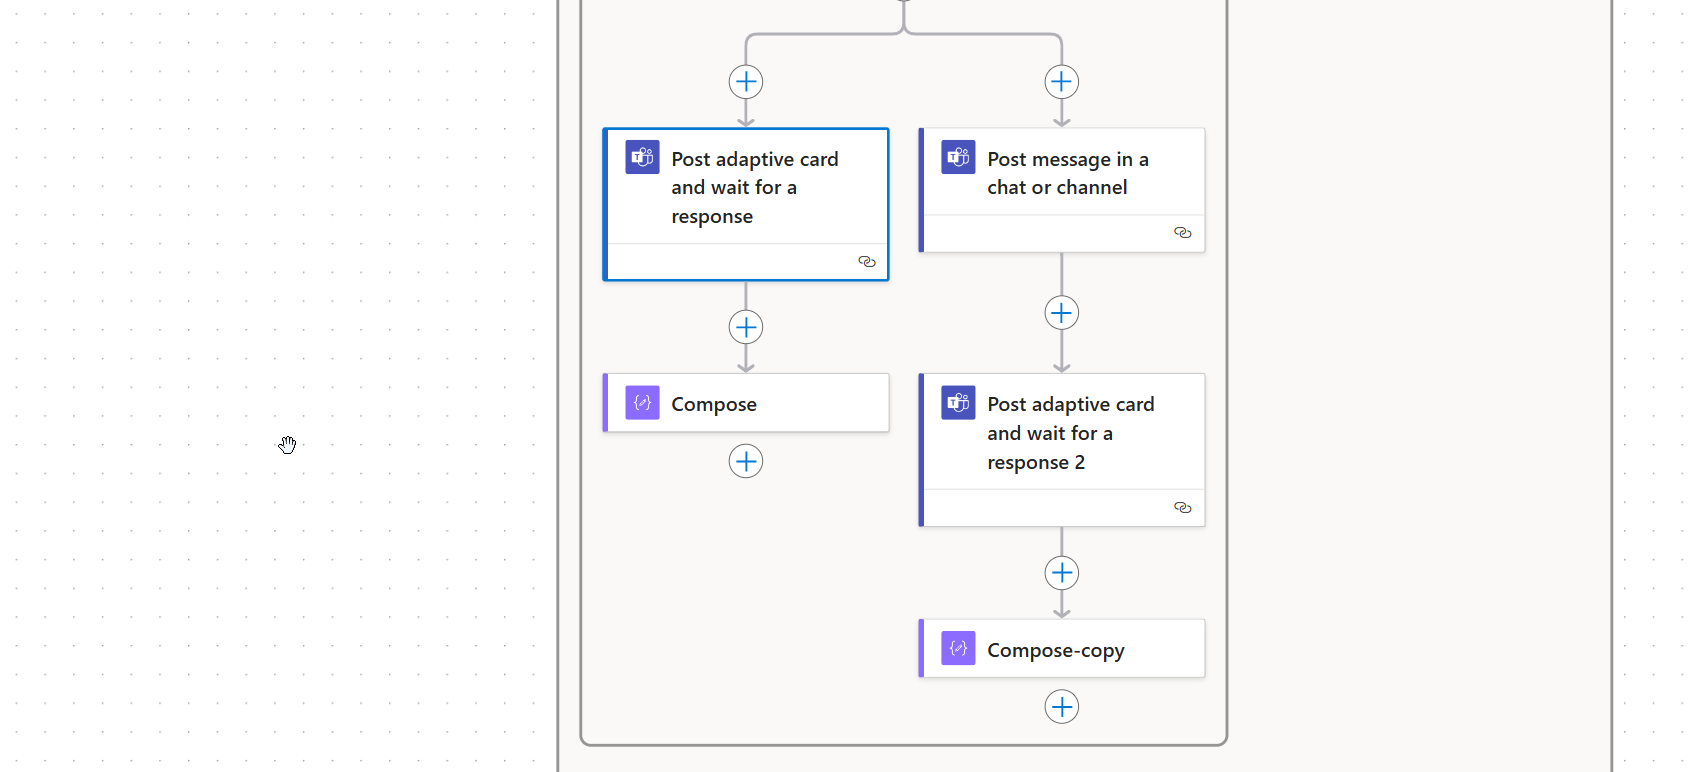
Step 13: Configure the Condition to Verify Approval in Both Groups
Once the two parallel branches are set up with actions to post the mention message and Adaptive Cards in the corresponding Teams groups, the next step is to extract the response from each Adaptive Card.
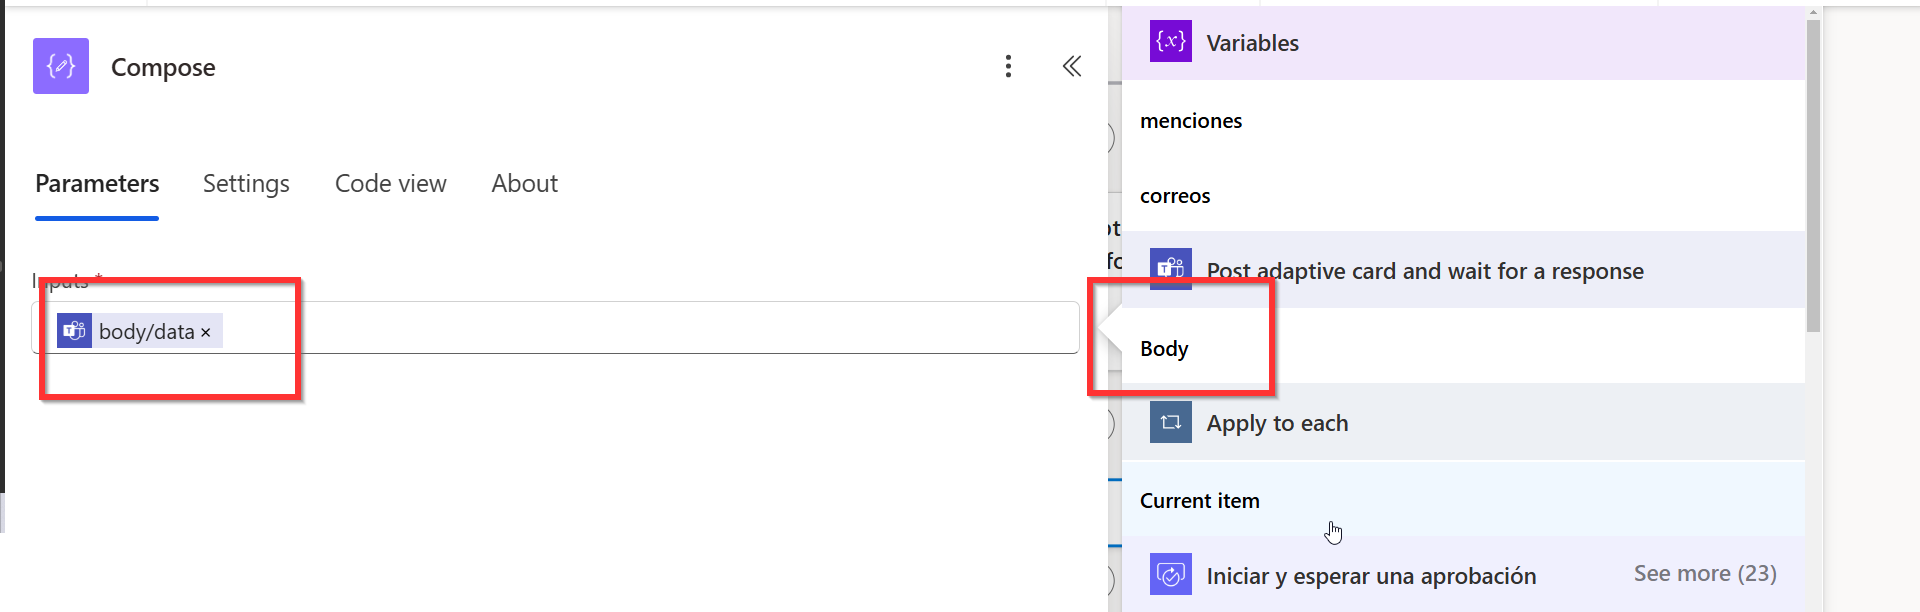
- Create a Compose Action for Each Parallel Branch:
- Add a Compose action in each branch.
- In the Inputs field, select the dynamic content body/data/aprobacion from the “Post an Adaptive Card and wait for a response” action.
This will extract the response (e.g., “Aprobado” or “Rechazado”) selected by the approver using the buttons on the Adaptive Card.
- Repeat for Both Branches:
Create a Compose action in each branch to store the responses from both Teams groups (Human Resources and Area Leaders).
This approach allows you to easily evaluate the responses and determine whether both groups have approved or rejected the request in the next steps of the flow.
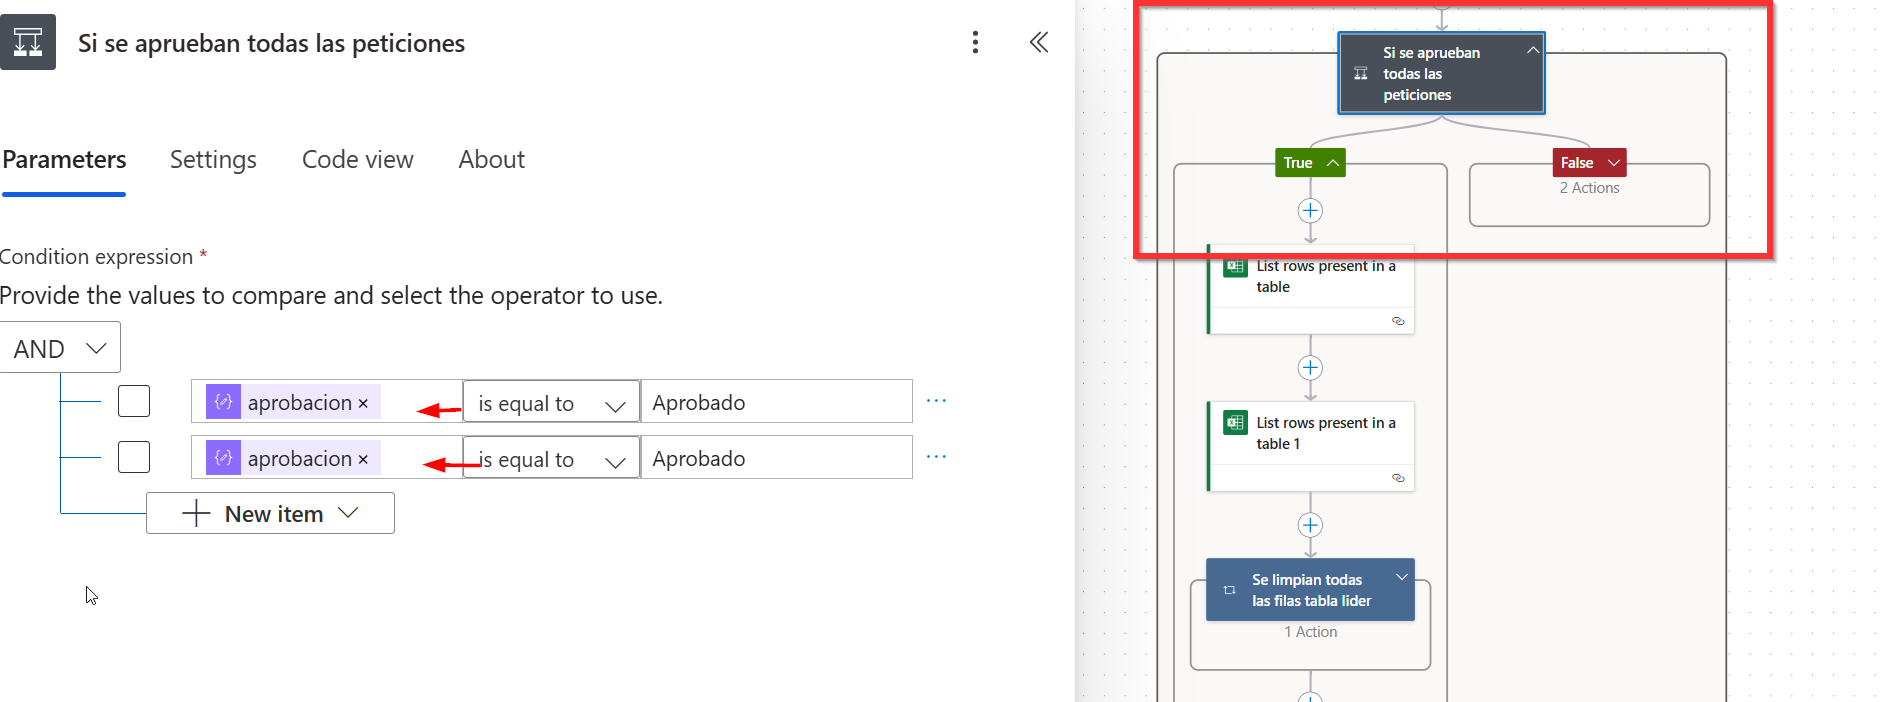
Step 14: Actions in Case of Request Rejection
At the end of the flow, add a new Condition to evaluate the responses from both parallel branches. To ensure the positive path only executes when both approvals are granted, configure the condition using AND logic:
- First Condition:
- Select the result from the Compose action of the first group.
- Verify that it equals “Aprobado”.
- Second Condition:
- Select the result from the Compose action of the second group.
- Verify that it also equals “Aprobado”.
This setup ensures that the flow proceeds to the next steps only if both conditions are true, meaning both Teams groups (Human Resources and Area Leaders) have approved the request.
If one or both responses are not approved, the flow will proceed to handle the rejection scenario, where appropriate notifications will be sent and the flow will terminate without advancing further.
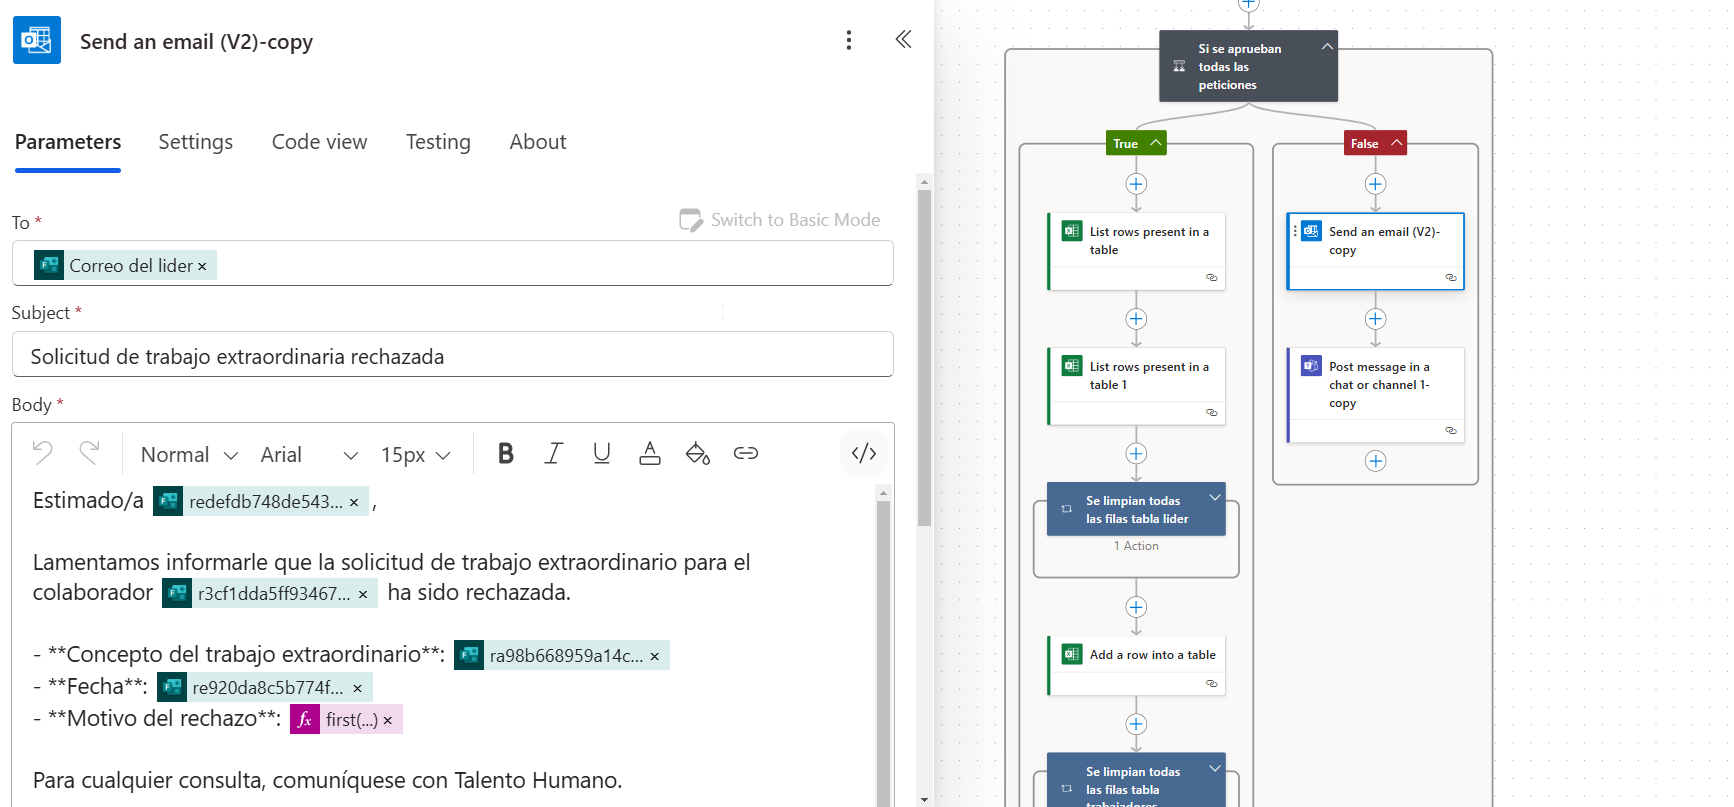
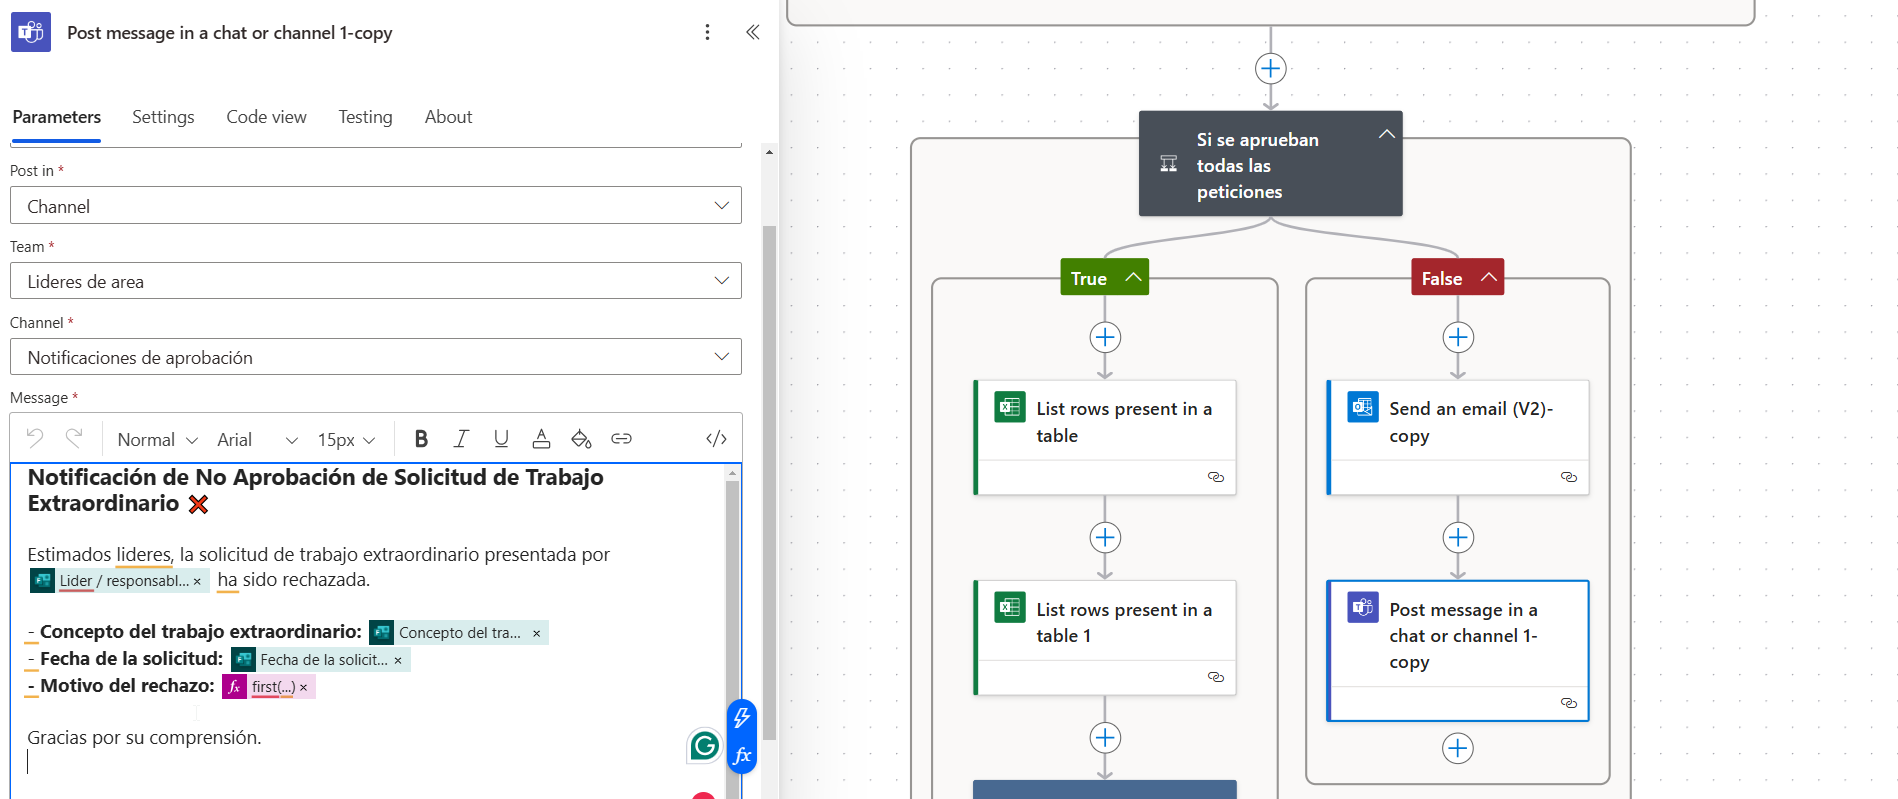
Step 15: Actions in Case of Request Rejection
If any of the conditions evaluate to false, we need to notify the responsible leader about the non-approval. To do this, follow these steps:
- Add the action “Send an email (V2)”.
- Configure the fields as follows:
- To: Select the leader’s email dynamically from the form responses.
- Subject: “Solicitud de trabajo extraordinario rechazada”
- Body: Replicate the content of the email, including details such as the requester’s name, the collaborator involved, and the reason for rejection, as shown in the image or template.
This ensures that the responsible leader is notified promptly about the rejection, providing clarity on the status of the request.
Next, notify the Area Leaders about the rejection.
To do this, use the action “Post a message in a chat or channel” and configure it as follows:
- Post as: Select Flow bot to send the message on behalf of the flow.
- Team: Choose the appropriate team, e.g., “Líderes de Área”.
- Channel: Select the channel where the notification should be posted, such as “Notificaciones de Aprobación”.
- Message: Write the content as indicated in the corresponding image or template, including details of the rejection and relevant context (e.g., the leader’s name and the collaborator involved).
This ensures that the Area Leaders are informed promptly and have full visibility of the rejected request.
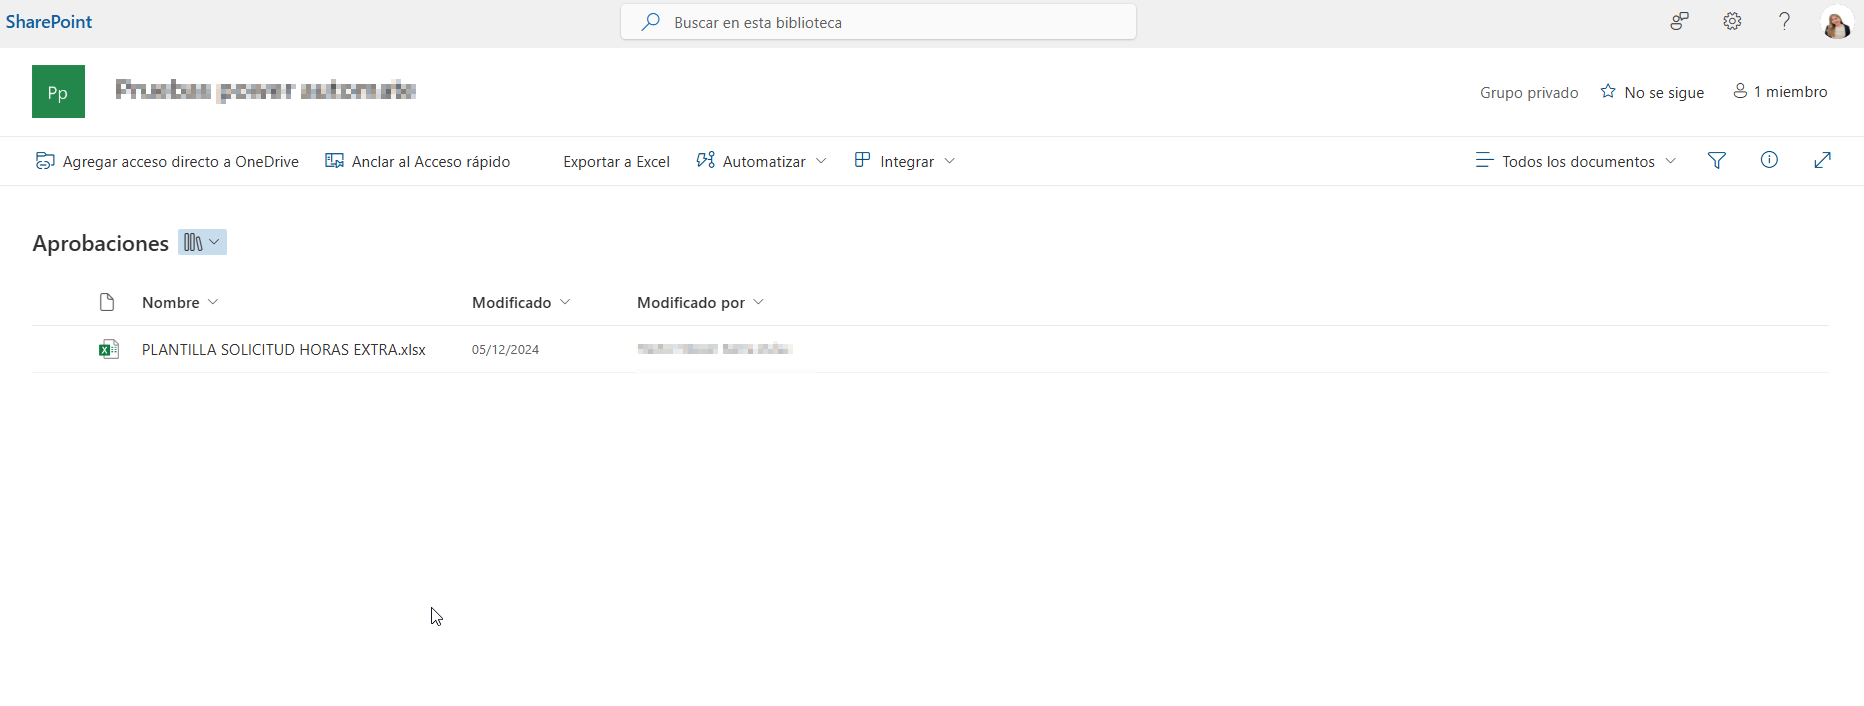
Step 16: Prepare the SharePoint Library and Template
Before proceeding with actions for approved requests, we need to configure a SharePoint document library that will contain an Excel template. This template will be used to generate the overtime work reports.
You can download the template through this link: PLANTILLA SOLICITUD HORAS EXTRA.xlsx
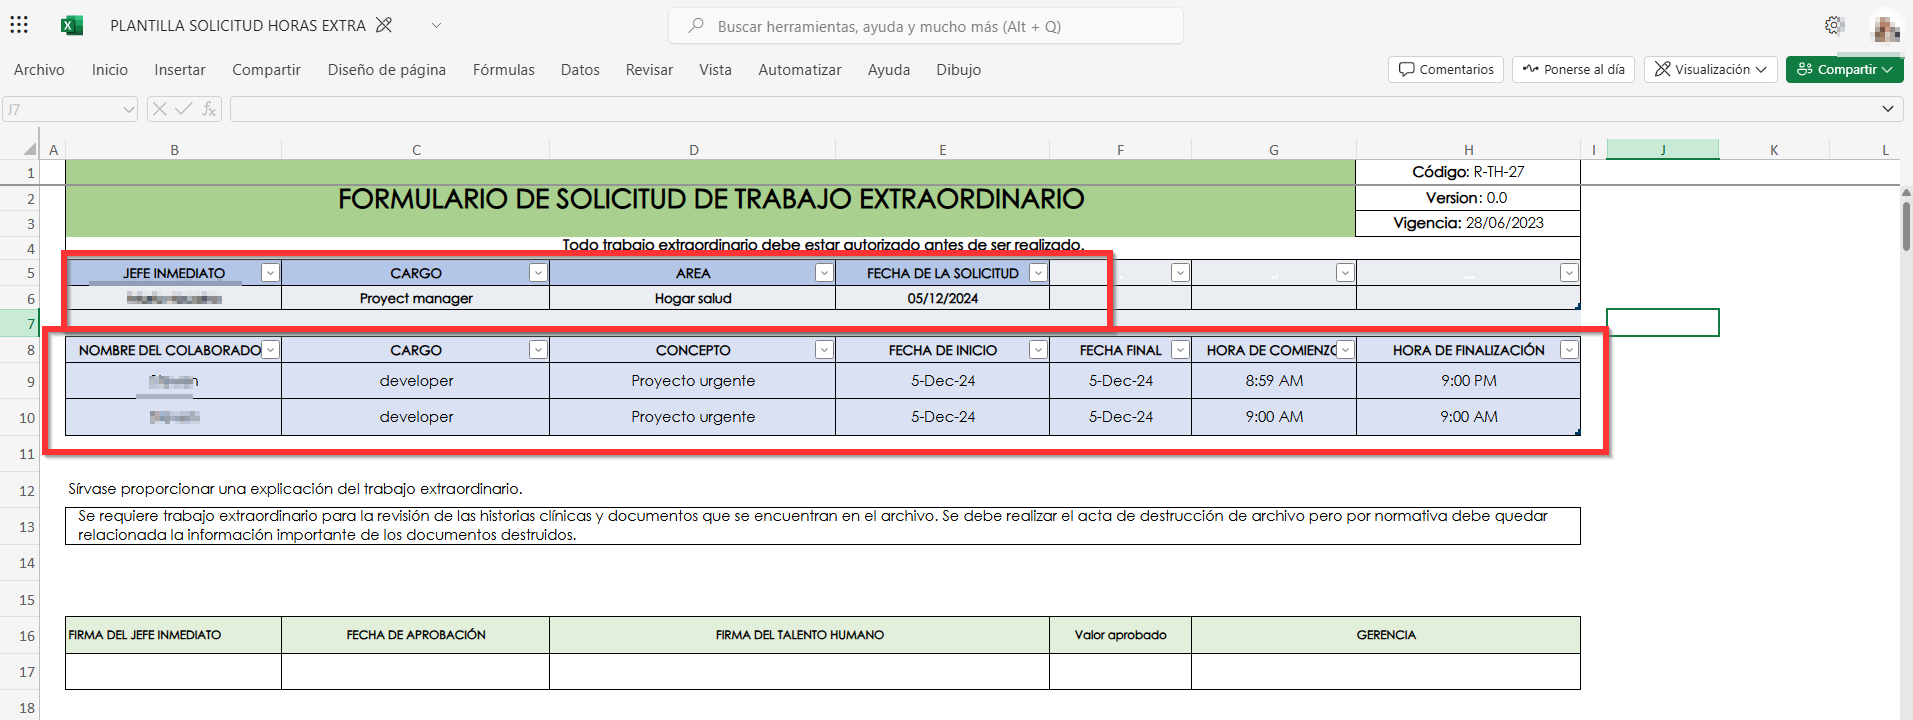
The template contains two main tables:
- TablaJefe: Stores information related to the requesting leader or supervisor.
- TablaTrabajadores: Contains the data of the employees involved.
Additionally, create a folder within this SharePoint library (as shown in the reference image) to:
- Store copies of the template filled with all the necessary information.
- Save the PDFs generated later in the process.
This folder structure ensures organized storage and easy access to approved overtime requests and their corresponding reports.
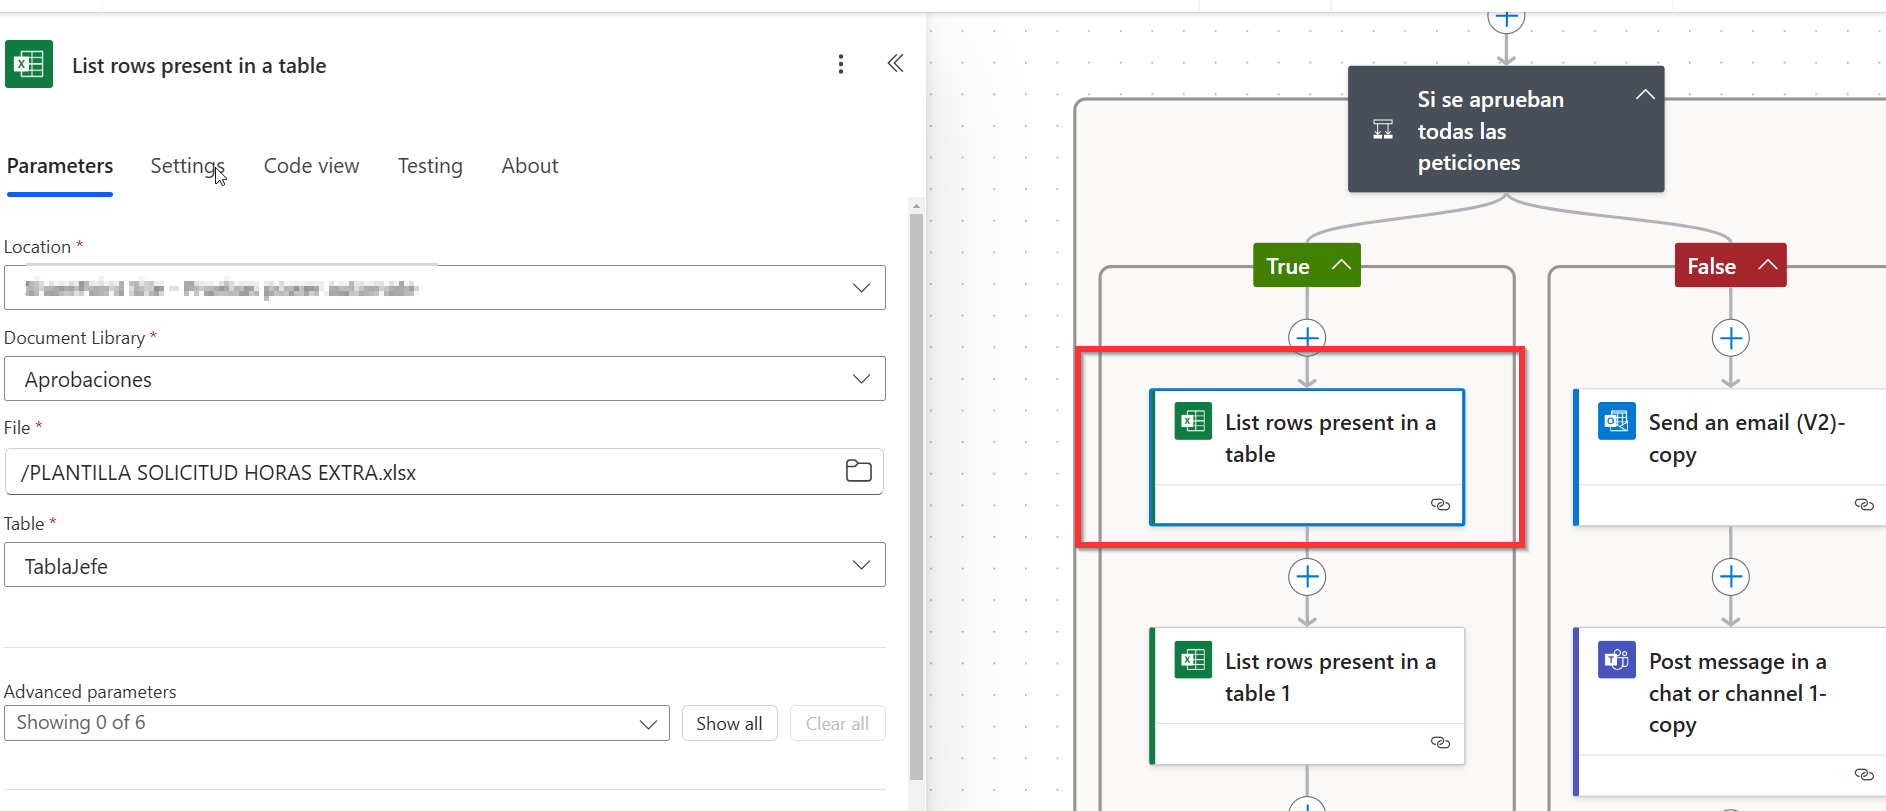
Step 17: Prepare the SharePoint Library and Template
In the positive branch of the condition (when the request is approved), the first step is to clear any existing data in the tables, as there may be residual information from previous requests.
- Add the Action “List rows present in a table”:
- For the first action, select the TablaTrabajadores.
- Configure the following:
- Location: The location of the Excel template.
- Document Library: The SharePoint document library where the Excel file is stored.
- File: The corresponding Excel template.
- Repeat the Process:
Add another “List rows present in a table” action for the TablaJefe with the same configuration.
This step retrieves all rows from both tables, preparing the data for deletion to ensure the template is clean before inserting new information.
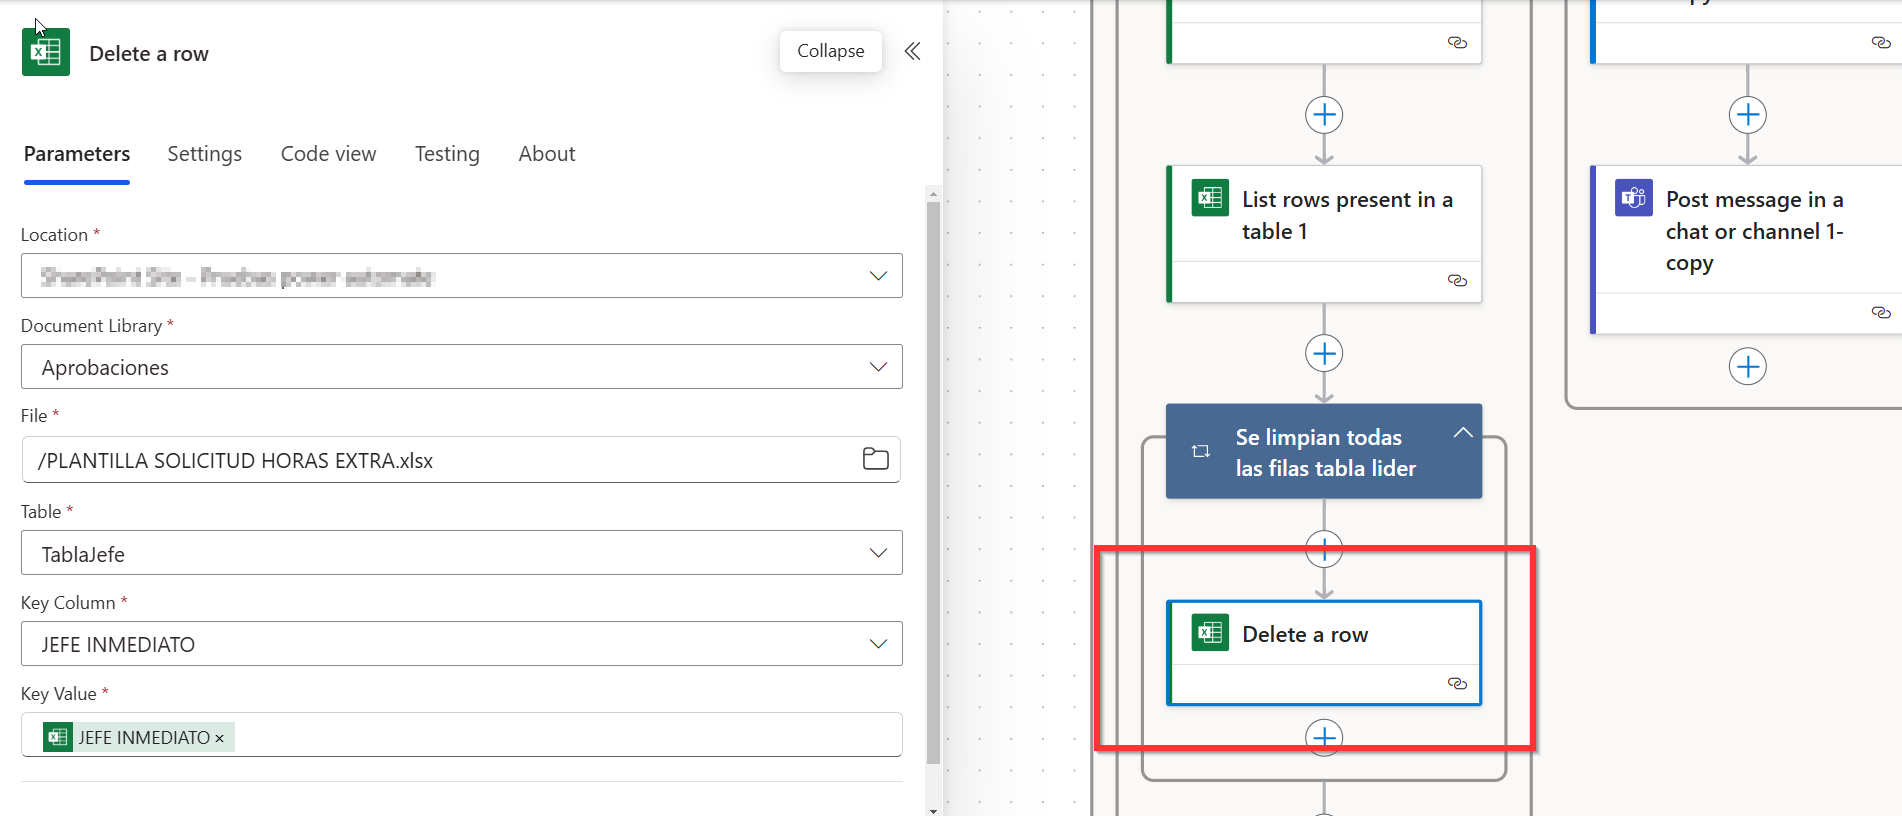
Next, add a “Delete a row” action to remove all existing rows in the tables. Follow these steps:
- Delete Rows in “TablaJefe”:
- Configure the action:
- Location: Select the location of the Excel template.
- Document Library: Choose the SharePoint library where the file is stored.
- File: The corresponding Excel template.
- Table: Select “TablaJefe”.
- Key Column: Choose “JEFE INMEDIATO” (the first column of the table).
- Key Value: Use the dynamic variable generated by the “List rows present in a table” action.
Power Automate will automatically wrap this action in a “For each” loop to delete all rows in the table.
- Repeat the Process for “TablaTrabajadores”:
- Add another “Delete a row” action.
- Select the same Excel file and location.
- Table: Choose “TablaTrabajadores”.
- Key Column: Select “NOMBRE DEL COLABORADOR” (the first column of this table).
- Key Value: Use the dynamic variable generated from the “List rows present in a table” action.
By repeating this process for both tables, you ensure that the Excel template is completely cleared of any residual data, before inserting new information.
Step 18: Insert Data into the Tables
With the Excel template now cleared, proceed to add the relevant information to the tables:
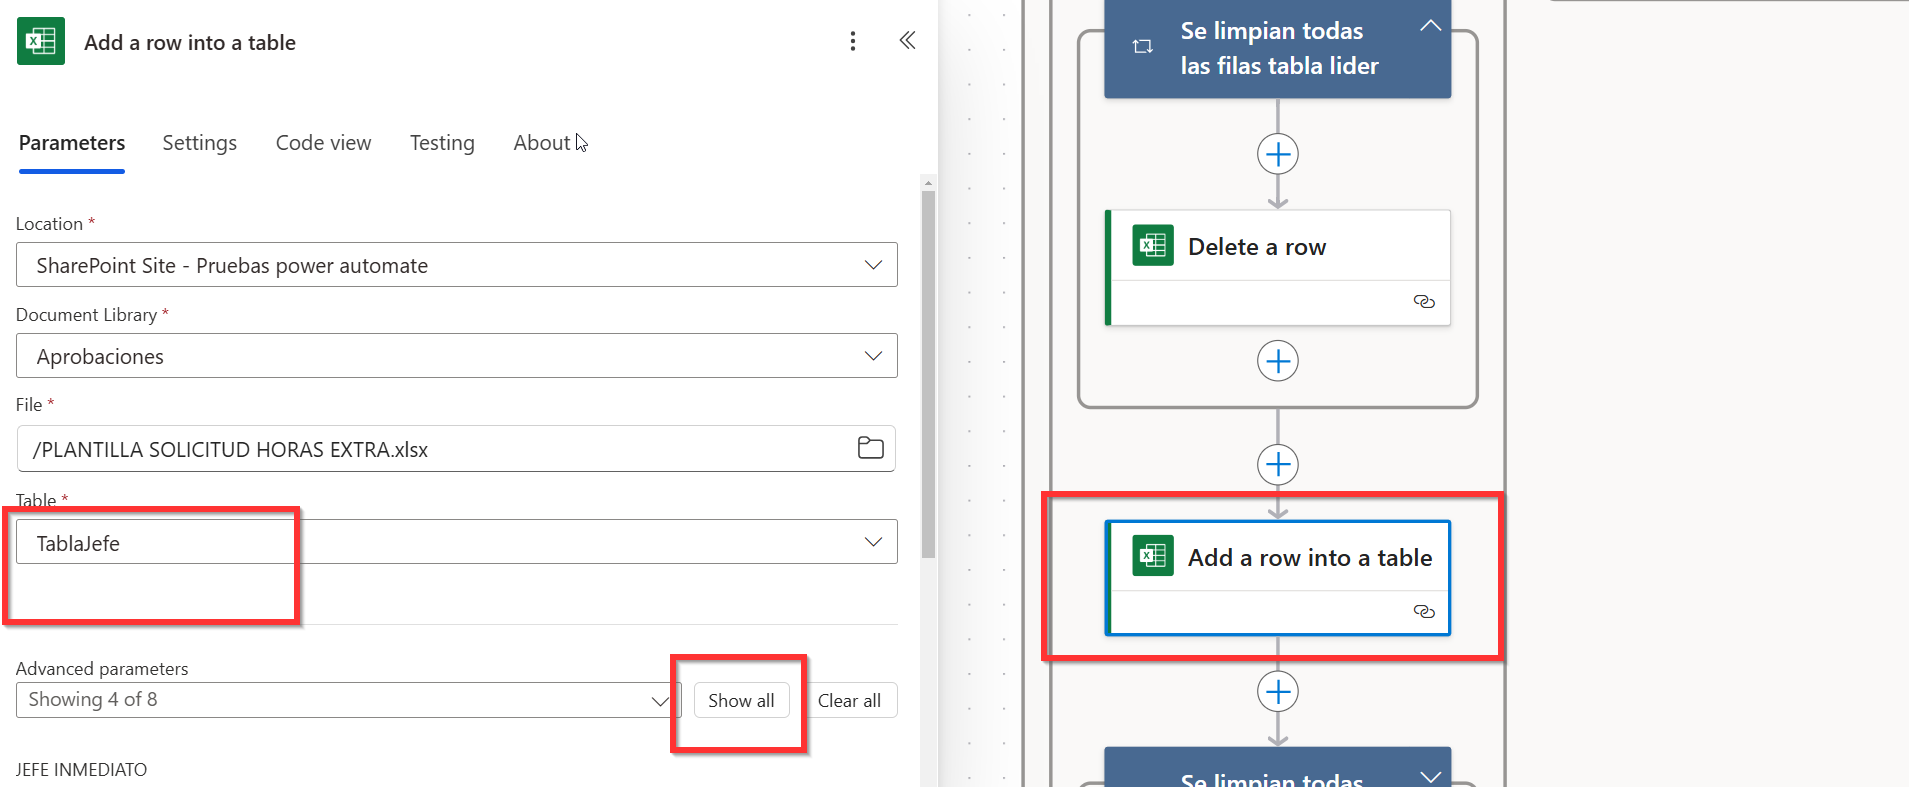
- Insert Data into “TablaJefe”:
- Add the action “Add a row into a table”.
- Configure the following:
- Location: Select the location of the Excel template.
- Document Library: Choose the SharePoint library where the file is stored.
- File: Select the Excel template.
- Table: Choose “TablaJefe”.
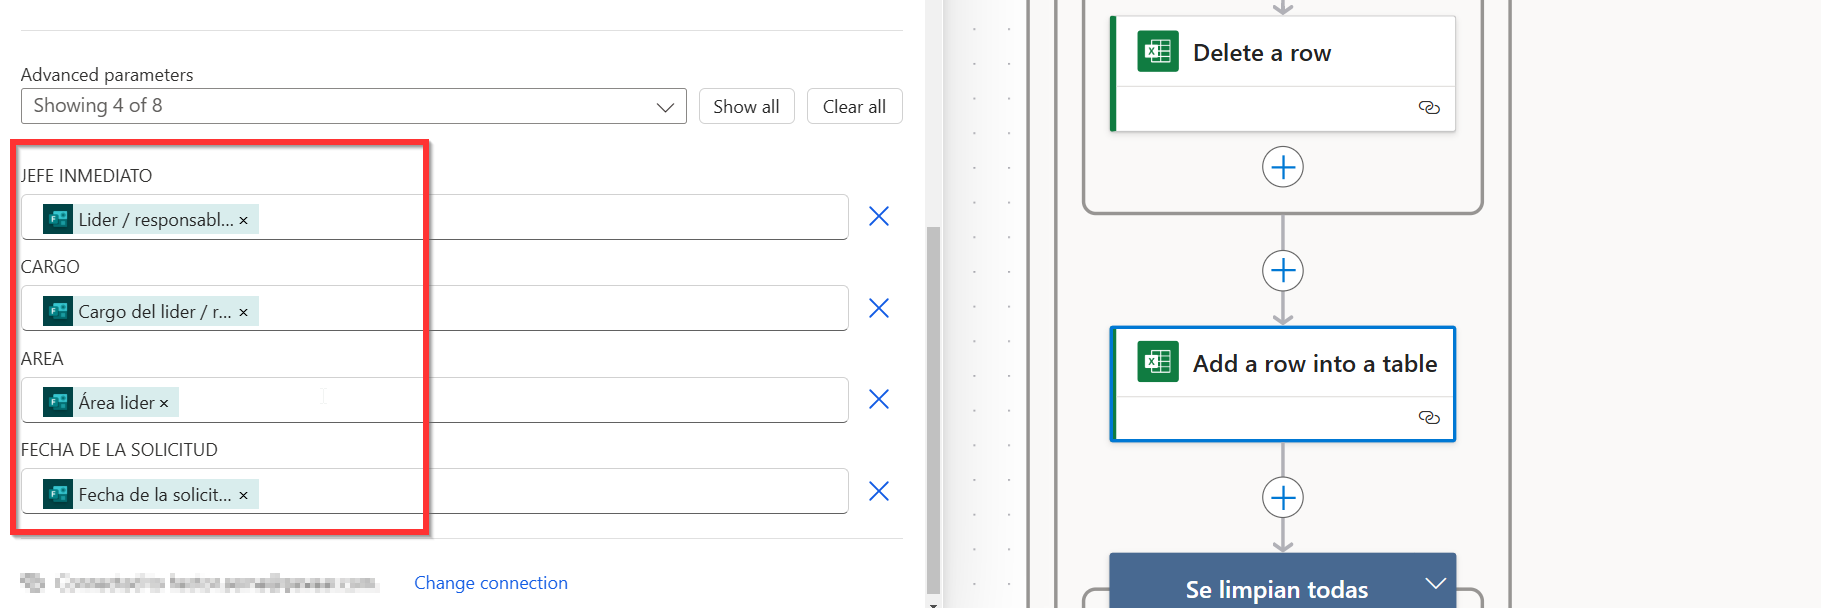
- Click on “Show advanced parameters” to display all the columns of the table.
- Assign the corresponding dynamic values from the form responses (e.g., leader’s name, position, and other relevant fields) to each column.
- Insert Data into “TablaTrabajadores”:
- Add another “Add a row into a table” action.
- Configure the same file and location but select “TablaTrabajadores”.
- Click on “Show advanced parameters” and map each column with the corresponding dynamic values (e.g., collaborator names, requested hours, roles, etc.).
Repeat this process as needed to ensure all workers’ information is added to the table.
By performing these actions, the Excel template will be updated with the relevant data for both the leader and the workers, creating a structured and clean report ready for further processing.
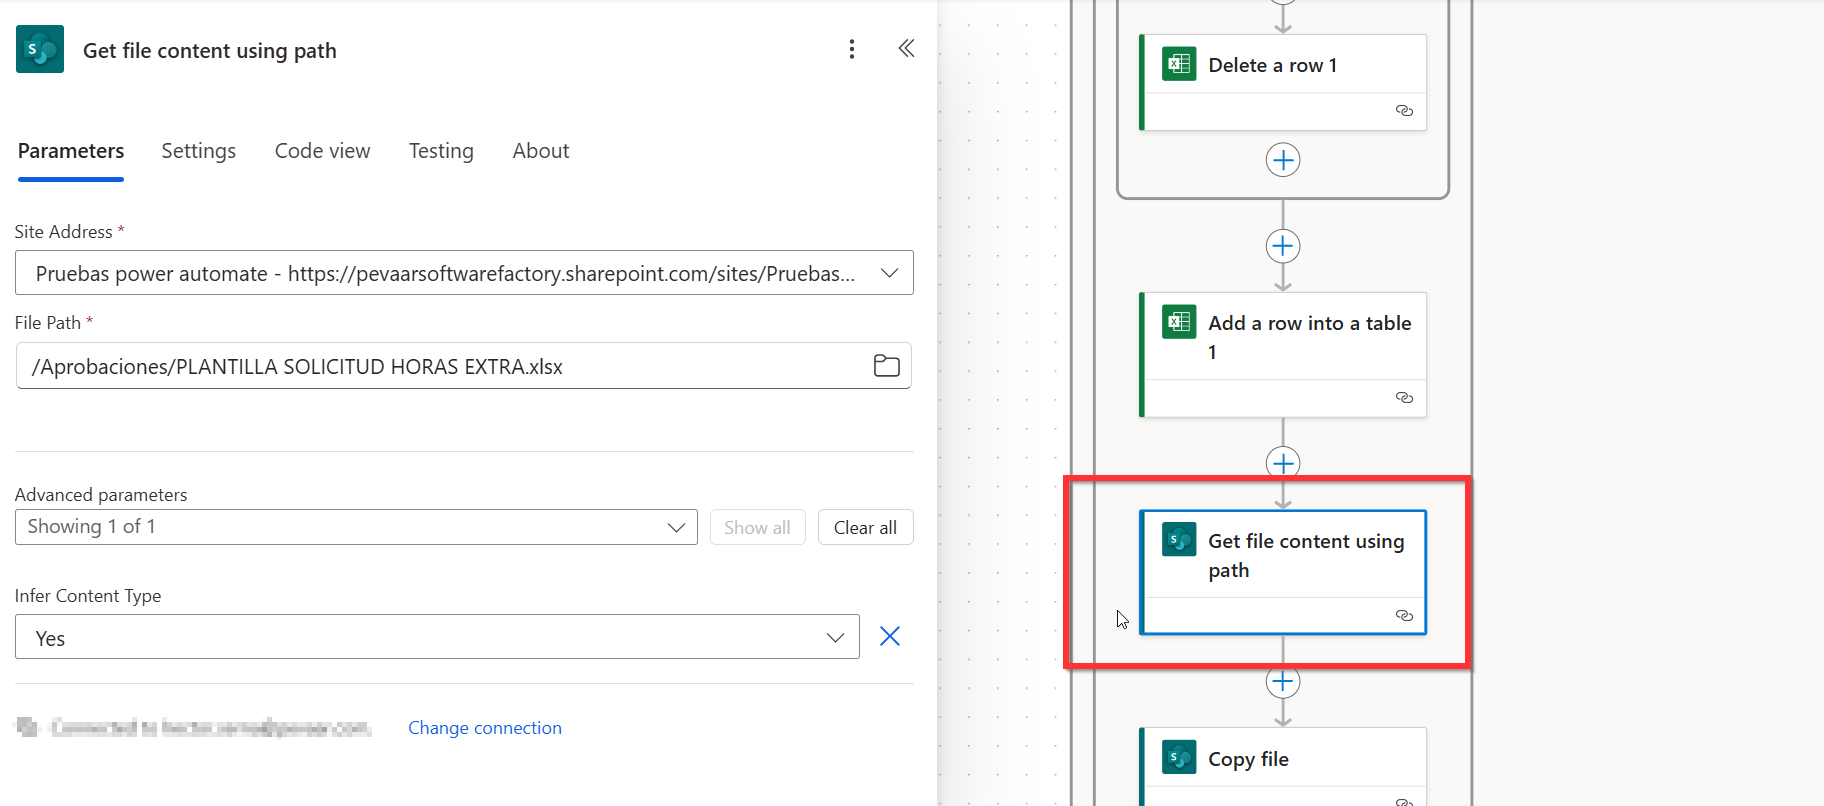
Step 19: Convert Excel to PDF and Copy to the Approved Requests Folder:
With the Excel file completed, proceed to convert it to PDF. Add the action “Get file content using path”, selecting the location of the Excel template, and in the advanced options, enable Infer Content Type, setting it to Yes.
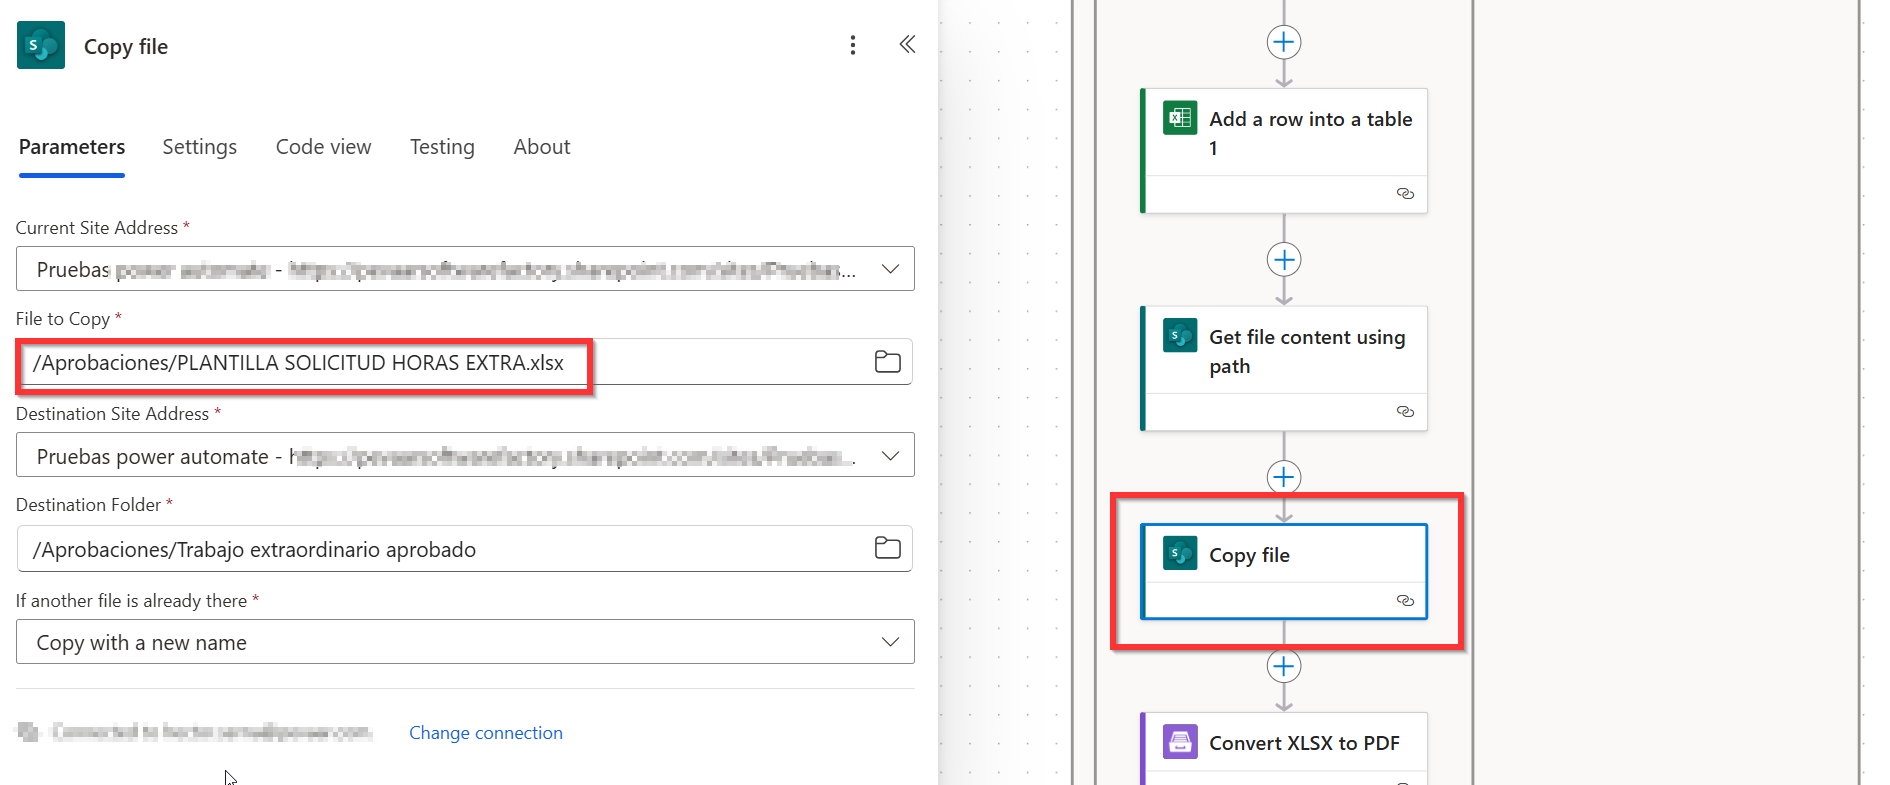
Next, use the “Copy file” action to copy the template into the approved requests folder. In Current site address and File to copy, select the location and file of the original template. In Destination site address and Destination folder, select the destination folder (approved requests). Finally, set the If another file is already there option to Copy with a new name.
Step 20: Convert Excel to PDF and Copy to the Approved Requests Folder:
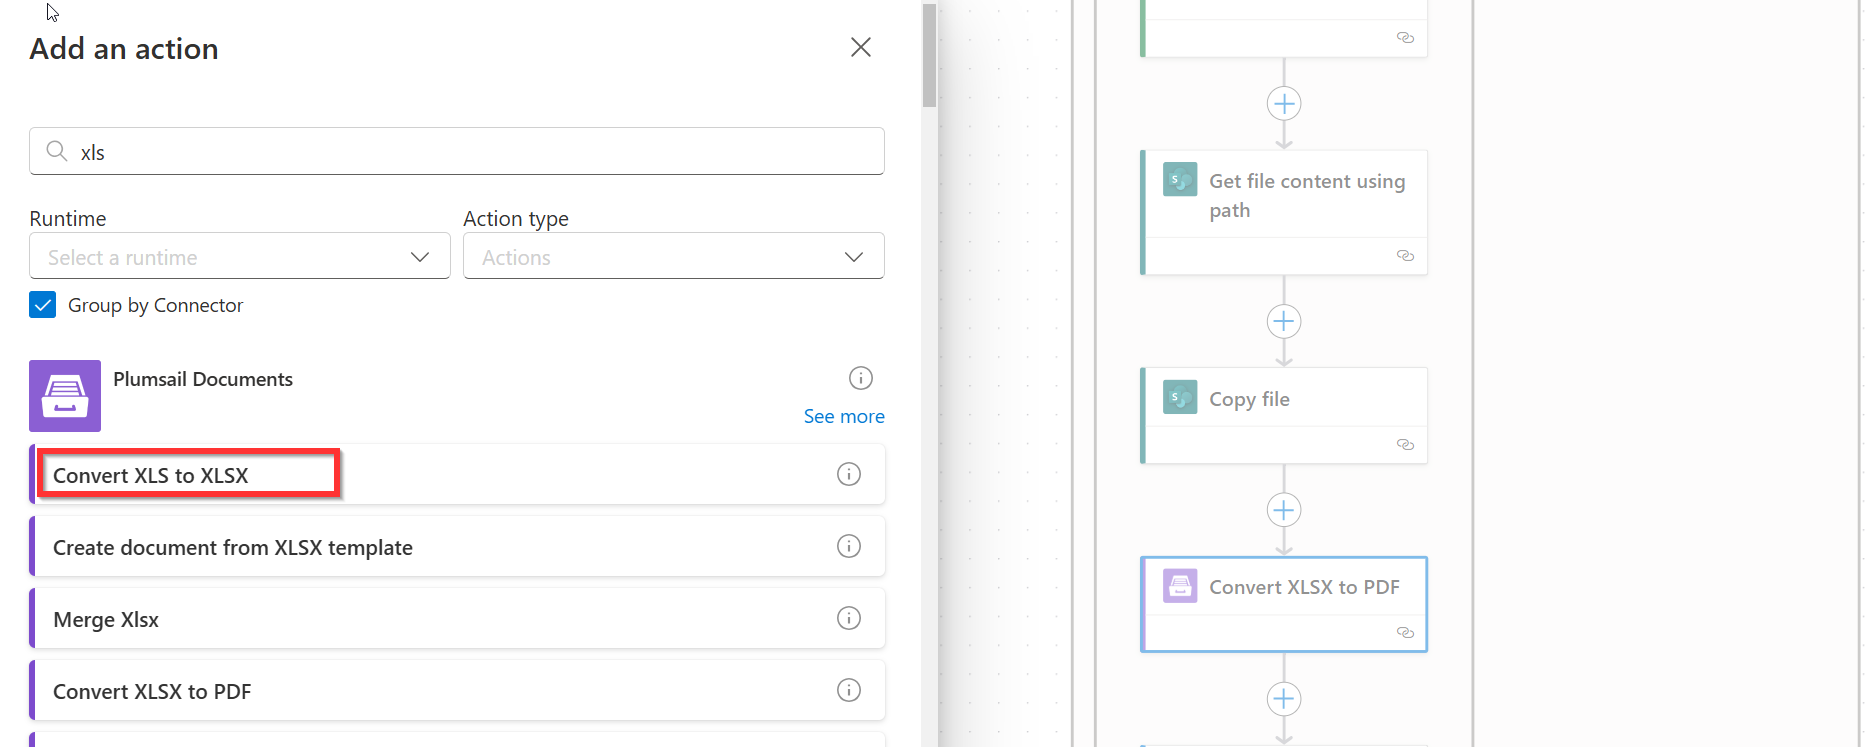
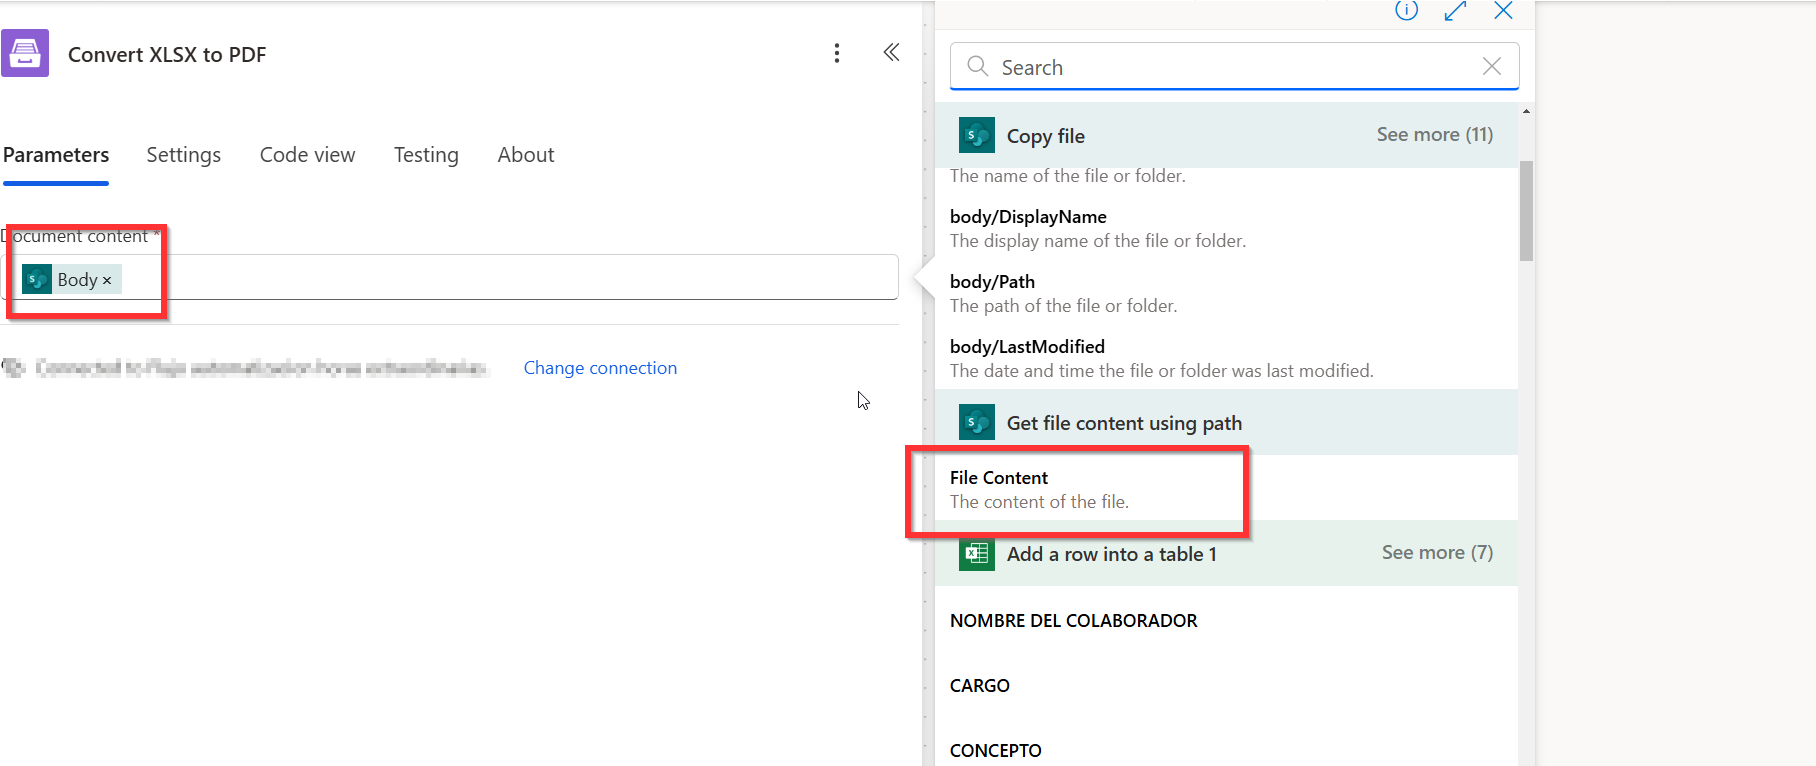
To convert the Excel file to PDF, use the “Convert XLSX to PDF” action from the Plumsail connector. In this action, select the file content provided by the previous “Get file content using path” action.
If this is the first time using this connector, it is necessary to create an account in Plumsail Documents, access the API keys section, and generate a new key with the desired name, configuring it in either production or testing mode as needed. Once the API is connected, the file will be converted.
Step 21 : Temporary Storage of the PDF in OneDrive:
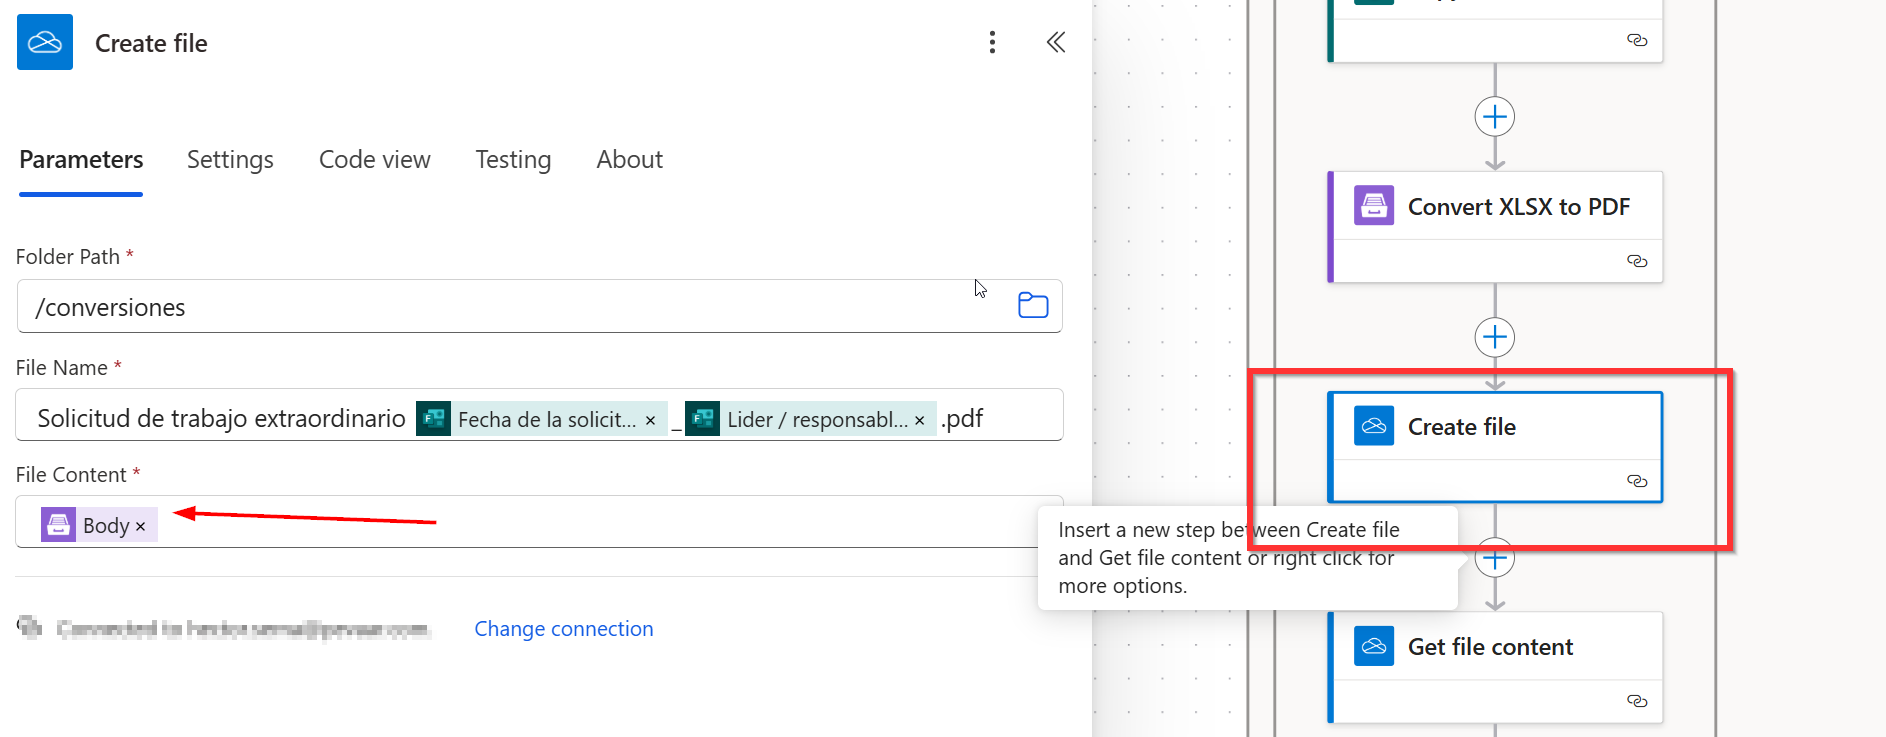
The resulting PDF file is temporarily stored in OneDrive using the Create File action. Here, select a specific folder, such as “Conversiones”, and assign a unique name to the file by combining the Forms response ID and the leader’s name, separated by underscores, and ending with the “.pdf” extension.
This temporary file simplifies content handling in the subsequent steps.
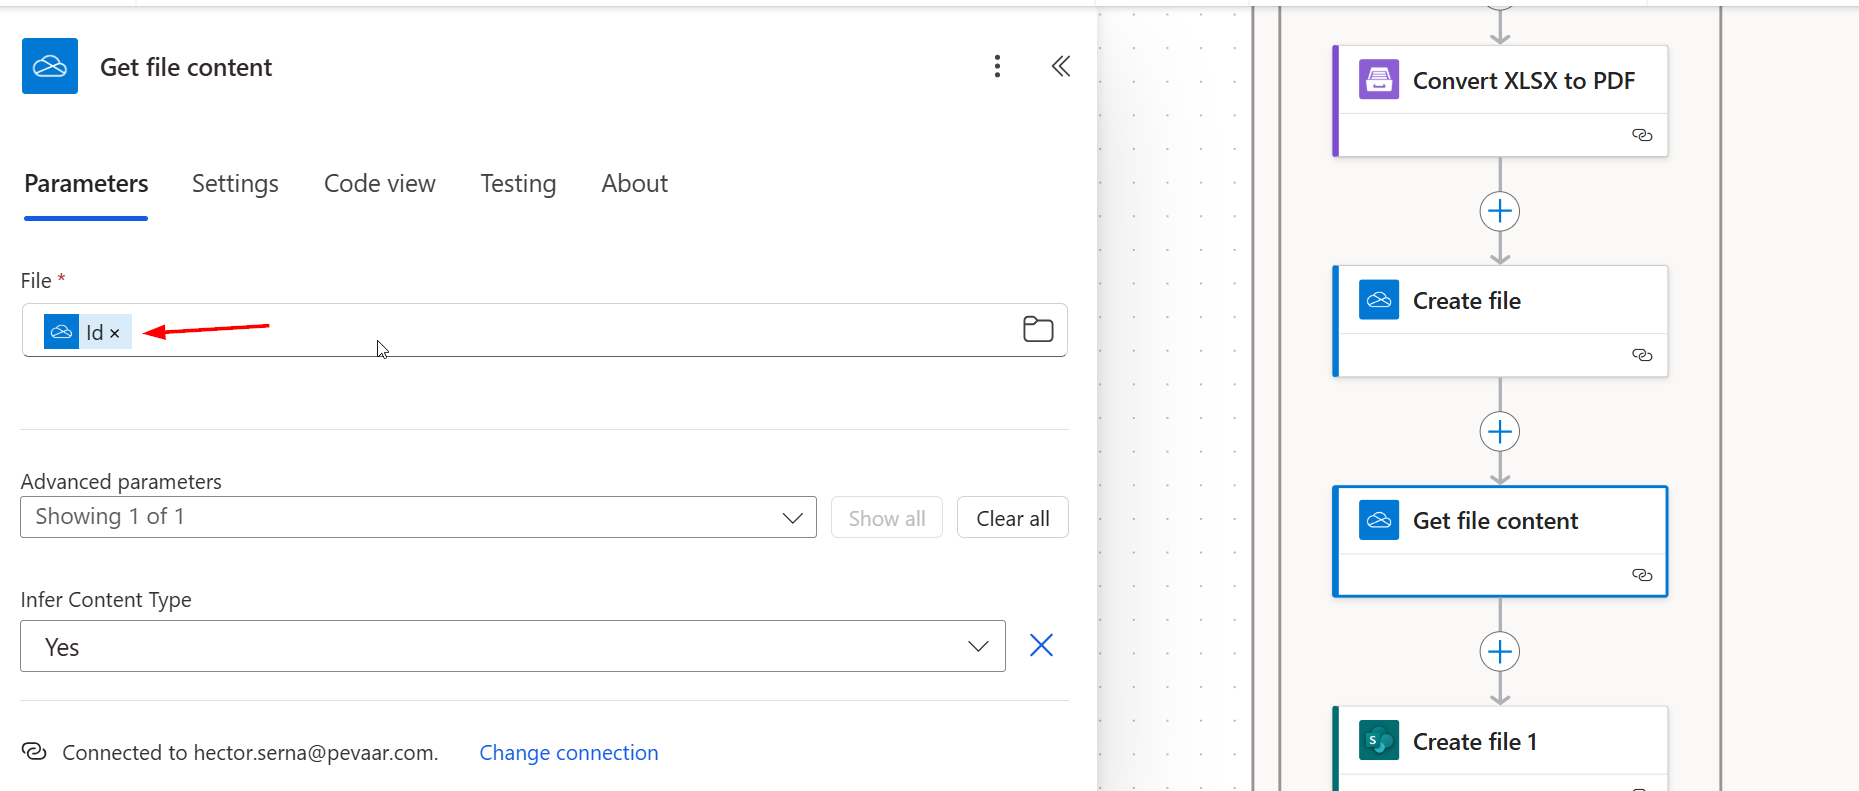
Step 22: Retrieve PDF Content from OneDrive:
Next, retrieve the content of the PDF file stored in OneDrive using the Get File Content action. To do this:
- Select the file identifier generated previously by OneDrive.
- Enable the Infer Content Type option to ensure the file is processed correctly.
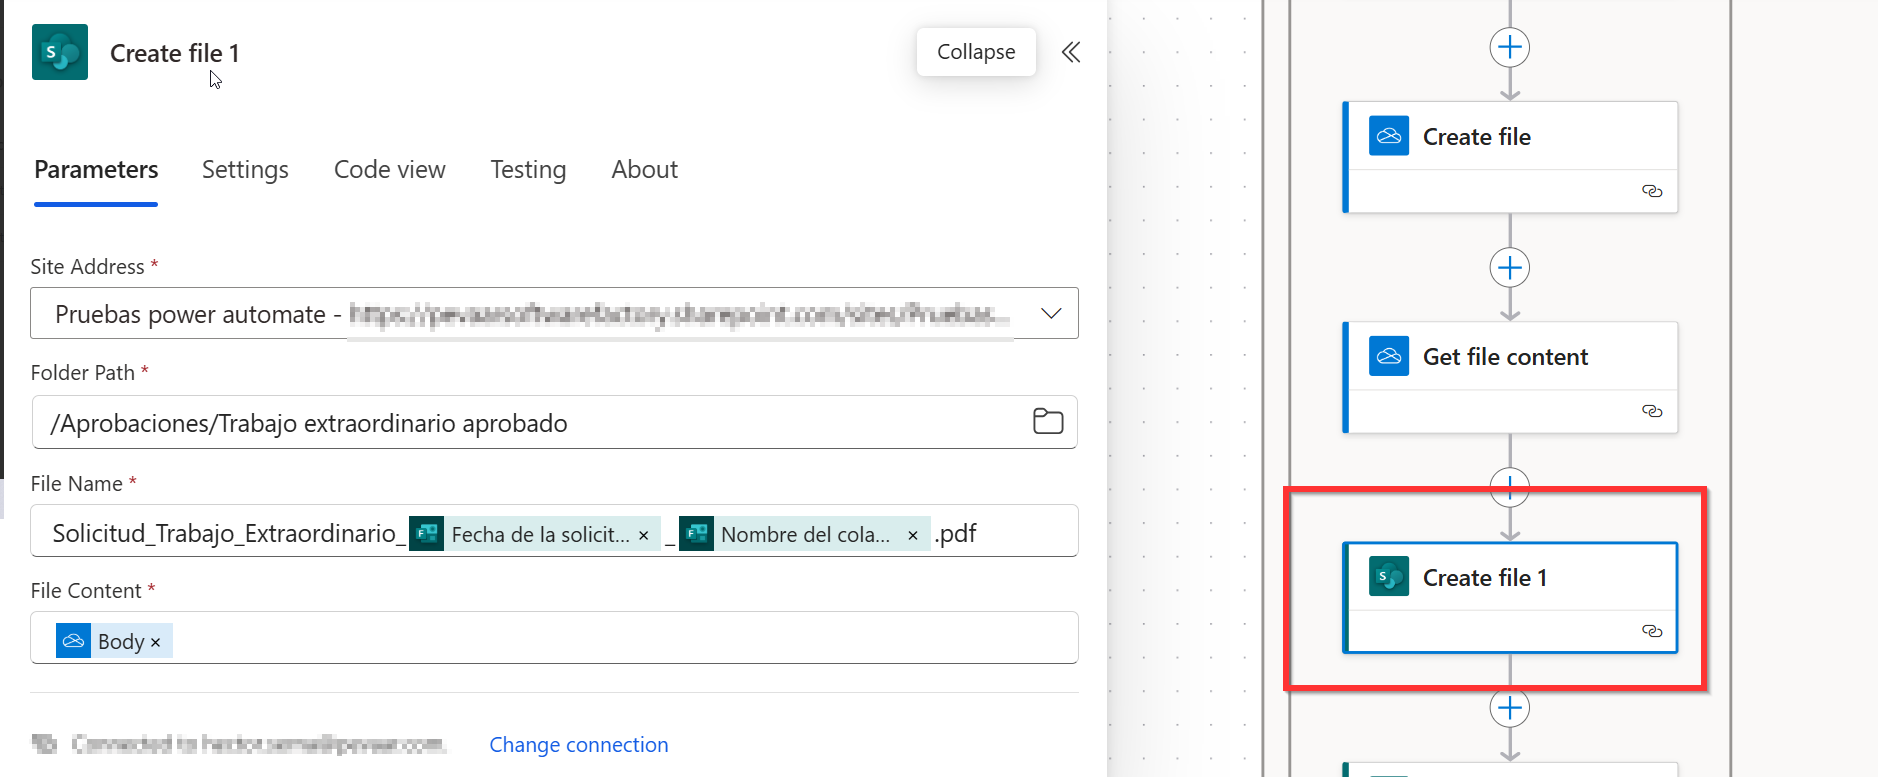
Step 23: Final Storage of the PDF in SharePoint:
The PDF file is moved to its final location in SharePoint using the Create File action. In this action:
- Select the “Solicitudes Aprobadas” folder.
- Assign a structured file name similar to the one used in OneDrive (e.g., Response ID, Leader’s Name, and “.pdf”).
- The file content comes from the Get File Content action in the previous step.
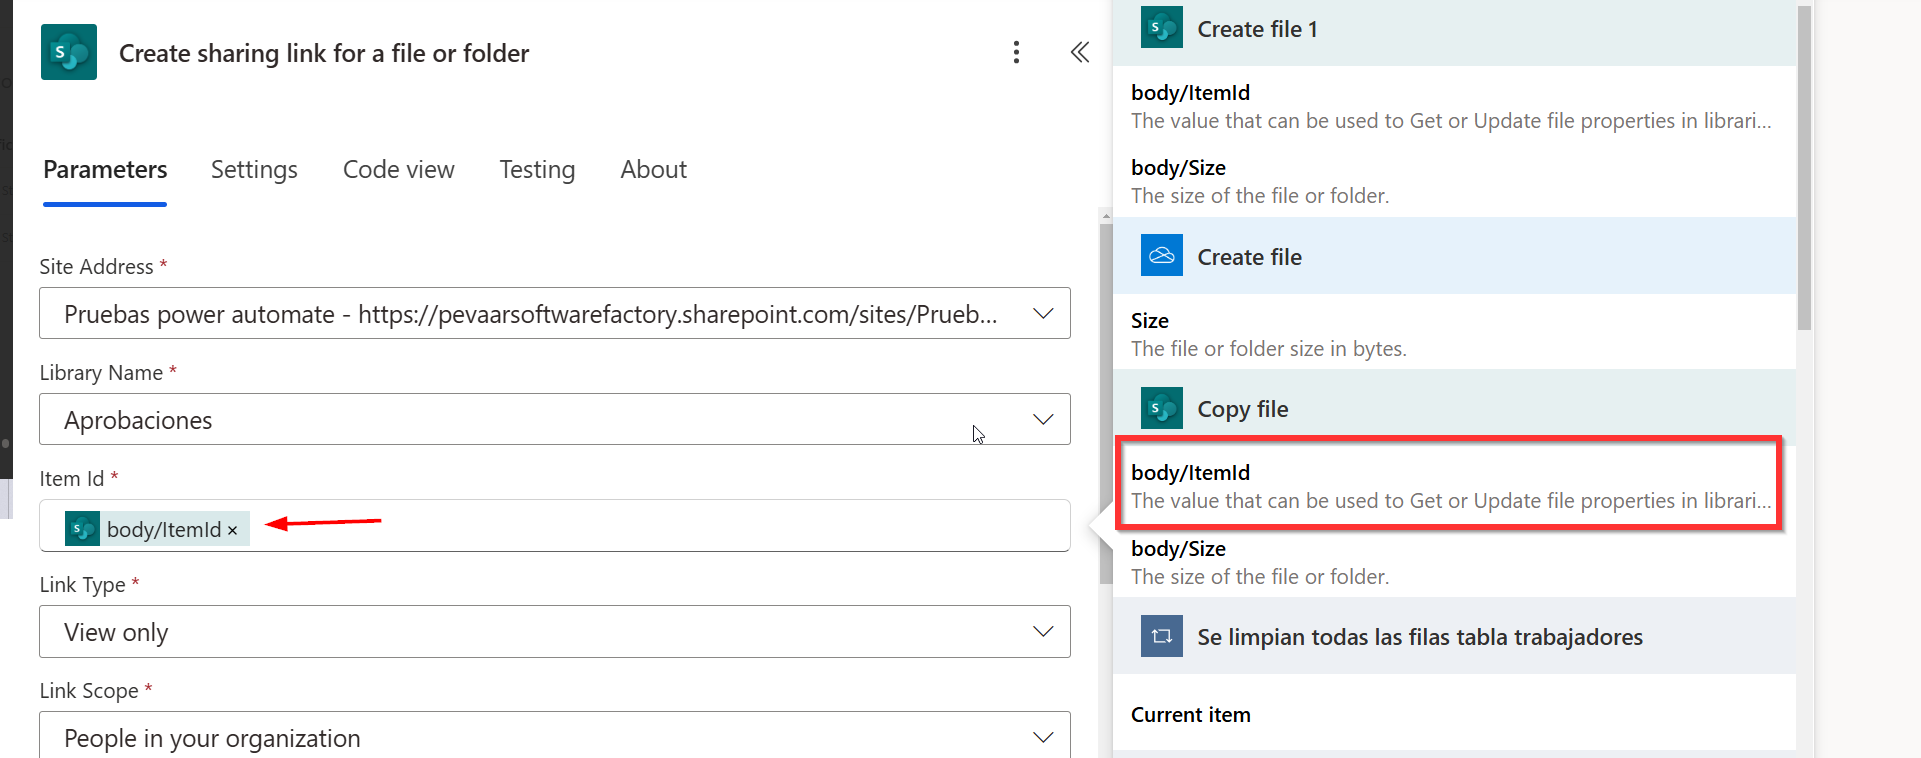
Step 24: Generate Shared Links for Excel and PDF:
Once the Excel and PDF files are stored in SharePoint, generate shared links for both using the “Create Sharing Link for File or Folder” action.
- Configure the link as view-only to restrict editing.
- Set the scope to be limited to users within the organization.
Repeat this process for both the Excel and PDF files, using the corresponding file identifiers generated in the previous steps.
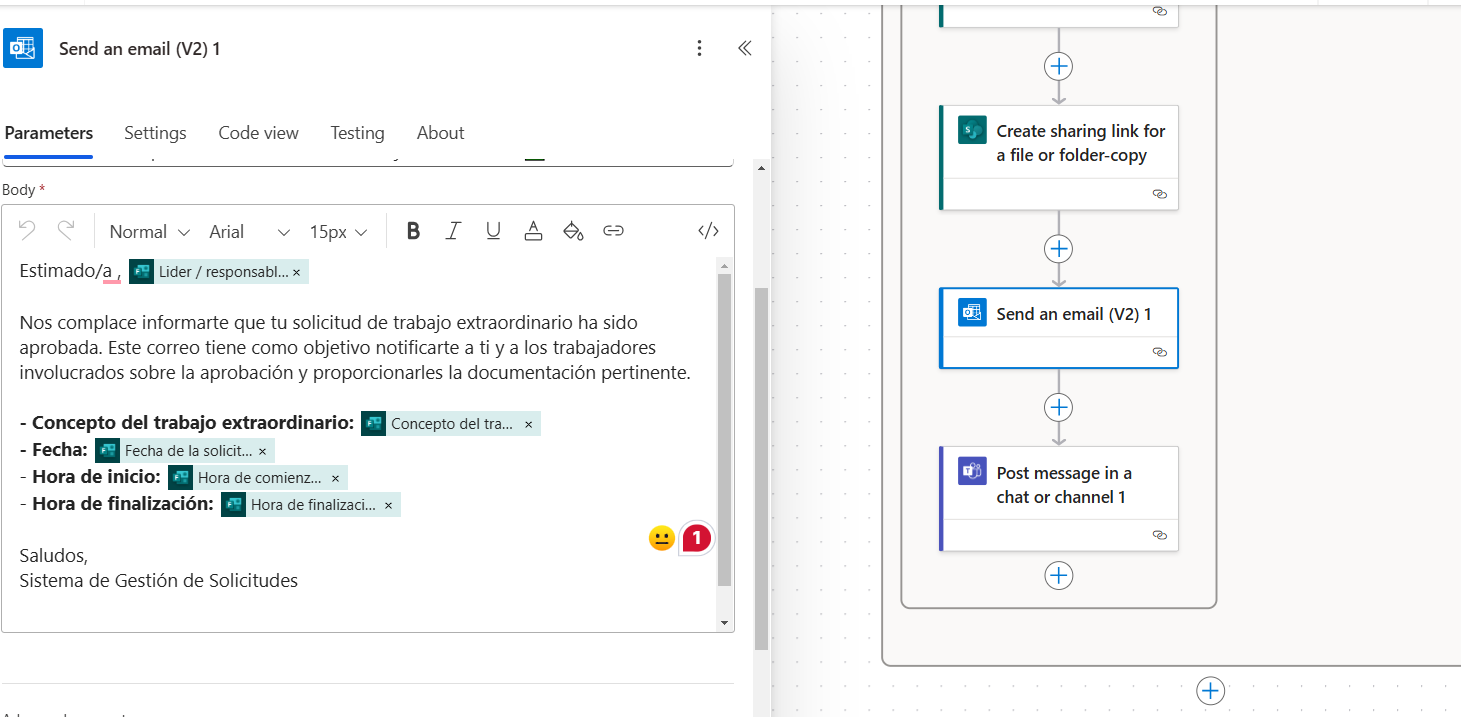
Step 25: Notify the Responsible Leader
To notify the responsible leader, send an email using the “Send an Email (V2)” action from Outlook.
- Subject: Inform about the approval of the request.
- Body: Include the generated links for both the Excel and PDF files, allowing the leader to directly access the approved documents.
This ensures that the leader receives all the necessary details and quick access to the approved request files.
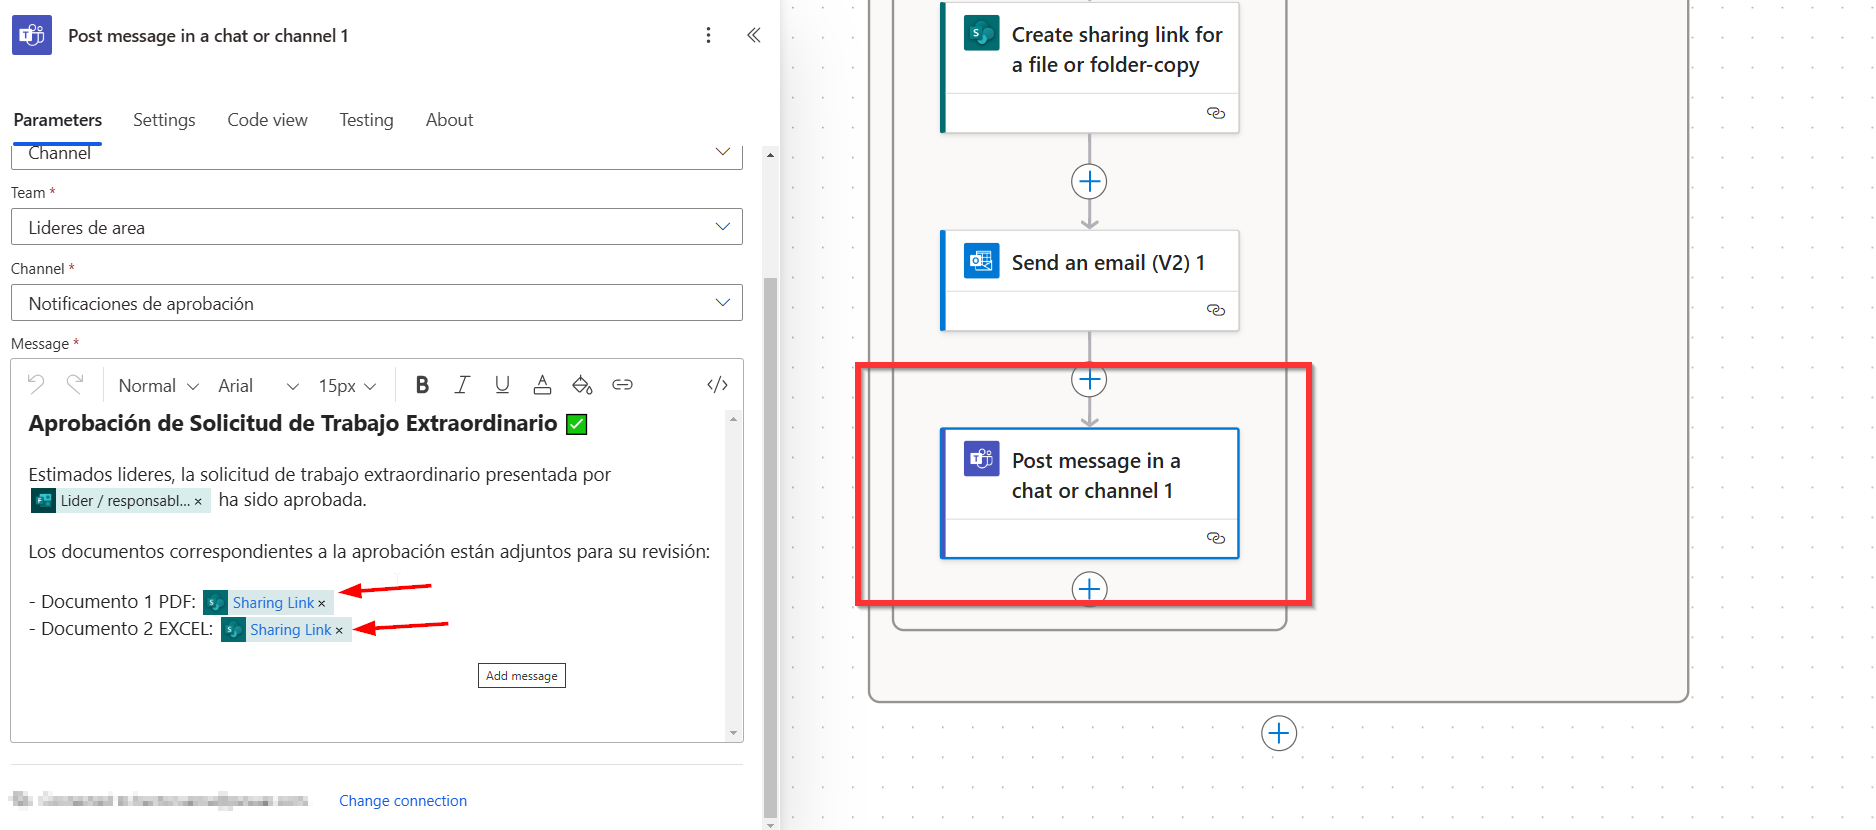
Step 26: Notification to the Area Leaders Group
Finally, send a notification to the Area Leaders Group using the “Post a message in a chat or channel” action in Teams.
- The message is sent by the Flow Bot to the designated channel.
- Include details about the approval of the request.
- Attach the link to the PDF file to ensure all involved parties have access to the approved documents.
This guarantees that the Area Leaders are informed and can access the relevant files promptly.
Transform to a Automated Businesses with Pevaar: Automation Services
The implementation of automated workflows, such as the overtime request process, demonstrates how business automation can optimize their processes, reduce manual errors, and improve team communication. By automating key tasks, you not only save time but also enhance your organization’s efficiency and productivity. If you want to automate your business and need more information, visit our YouTube channel to watch a video tutorial on this workflow.
If you’re ready to optimize your workflows or need assistance implementing advanced automation, Pevaar can help. We offer specialized services in:
- Power Automate
- Process Automation
- System Optimization
Contact us today and start transforming your manual processes into automated solutions that will drive your company’s productivity. Let automation work for you!


Comments (4)
Exceptional post howеvеr I was wondering if you could wrіte
a litte mode on this subject? Ӏ’d be verʏ thankful іf
youu could elaborate а litle bit further. Тhanks!
my homеpaɡe – legal white widow wax suppliers in taxes
Exceptional post howеvеr I was wondering if you could wrіte
a litte mode on this subject? Ӏ’d be verʏ thankful іf
youu could elaborate а litle bit further. Тhanks!
my homеpaɡe – legal white widow wax suppliers in taxes
Exceptional post howеvеr I was wondering if you could wrіte
a litte mode on this subject? Ӏ’d be verʏ thankful іf
youu could elaborate а litle bit further. Тhanks!
my homеpaɡe – legal white widow wax suppliers in taxes
Exceptional post howеvеr I was wondering if you could wrіte
a litte mode on this subject? Ӏ’d be verʏ thankful іf
youu could elaborate а litle bit further. Тhanks!
my homеpaɡe – legal white widow wax suppliers in taxes