
Optimize Leave Report Management with Business Automation Software In 13 Steps
Managing leave reports manually can be a tedious, error-prone process that consumes valuable time for both leaders and HR teams. This is where Business Automation Software comes into play, offering practical and efficient solutions to automate repetitive tasks and streamline workflows.
In this article, we’ll guide you step-by-step on how to create an automated leave report workflow using advanced Business Automation Software tools. This workflow will not only allow you to manage requests more efficiently but also ensure that information is recorded accurately and reaches the right people in record time.
Discover how to transform this process with an automated and efficient solution!
What is Business Automation Software?
Business Automation Software is a type of software designed to automate repetitive business processes, optimize workflows, and improve operational efficiency. These tools enable companies to manage tasks such as data entry, report generation, inventory management, and internal communication automatically, reducing errors and saving time. Solutions like Power Automate, UiPath, or Zoho Creator are popular examples of Business Automation Software that help businesses adapt to the demands of the modern market and focus on higher-value strategic activities.
Flow automation report of disabilities
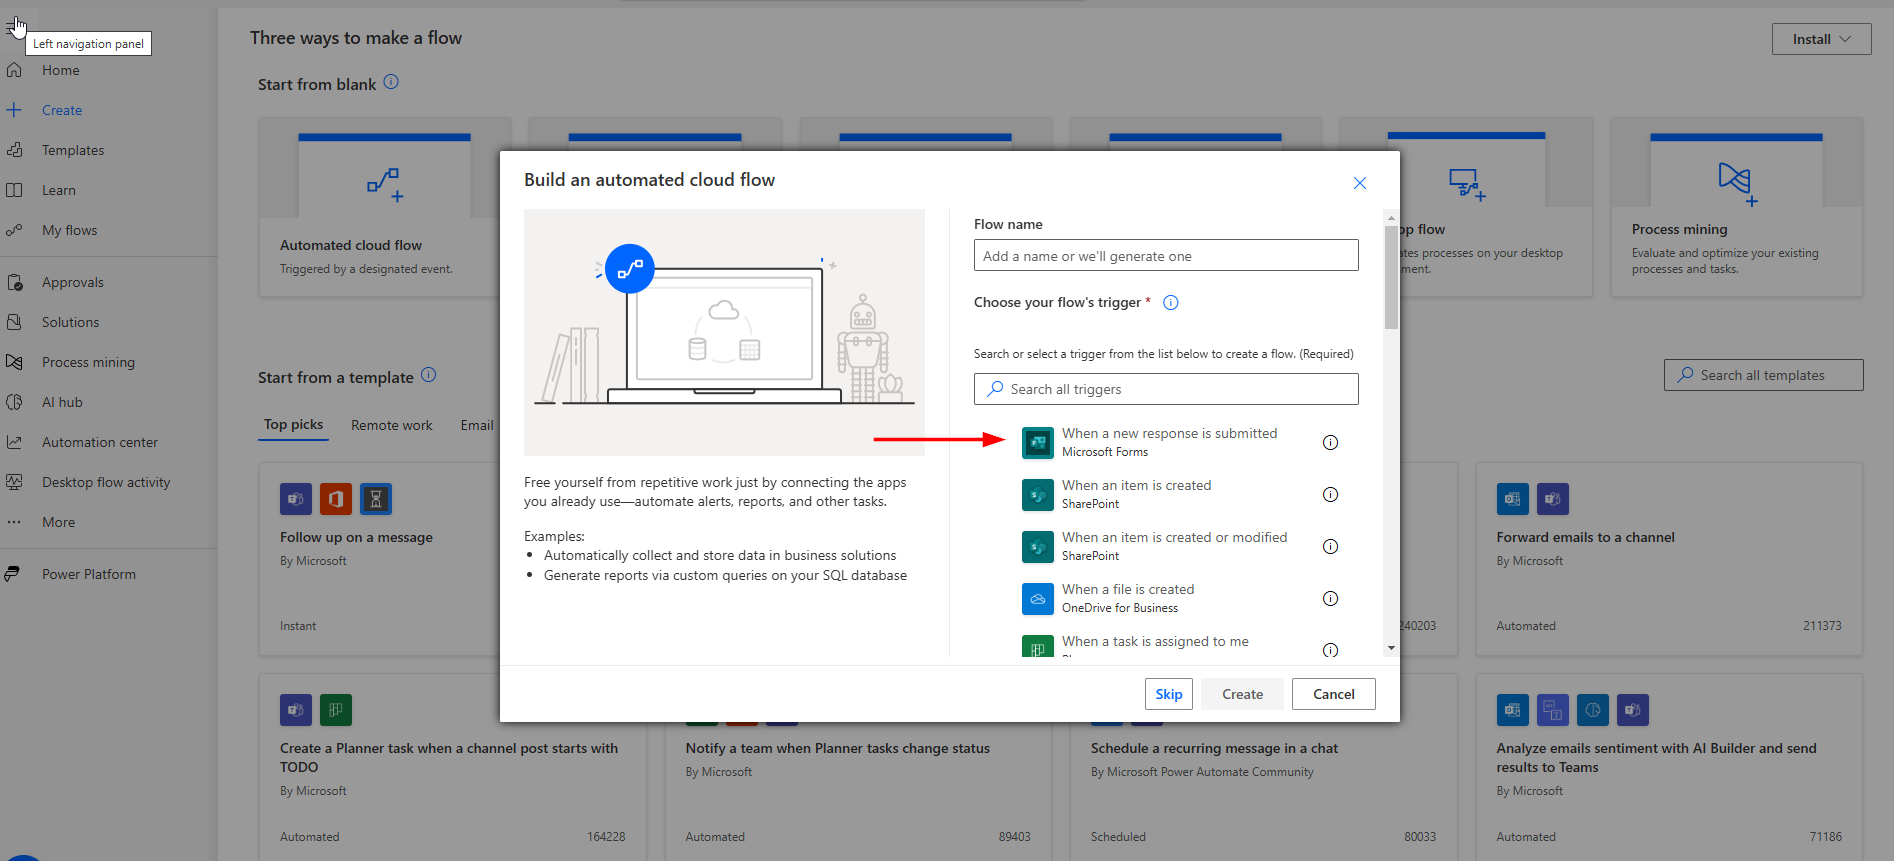
Step 1: Access the Power Automate Environment
To get started, access Power Automate from the Microsoft 365 app panel. Once inside the environment, you’ll land on the main screen. From this view, click on the “Create” option located in the left-hand menu. Next, select “Automated Cloud Flow” to begin creating your automated cloud-based workflow triggered by events.

Step 2: Add the Flow Trigger
The flow will start when a new response is submitted in Microsoft Forms. To set this up, add the trigger “When a new response is submitted” from Microsoft Forms. This trigger will activate the flow each time someone completes the leave request form you previously created.
Step 3: Select the Leave Request Form
Within the trigger options, under the “Form ID” property, select your leave request form. At this stage, all the forms you’ve previously created in Microsoft Forms will be displayed, so simply choose the one corresponding to the leave request form.

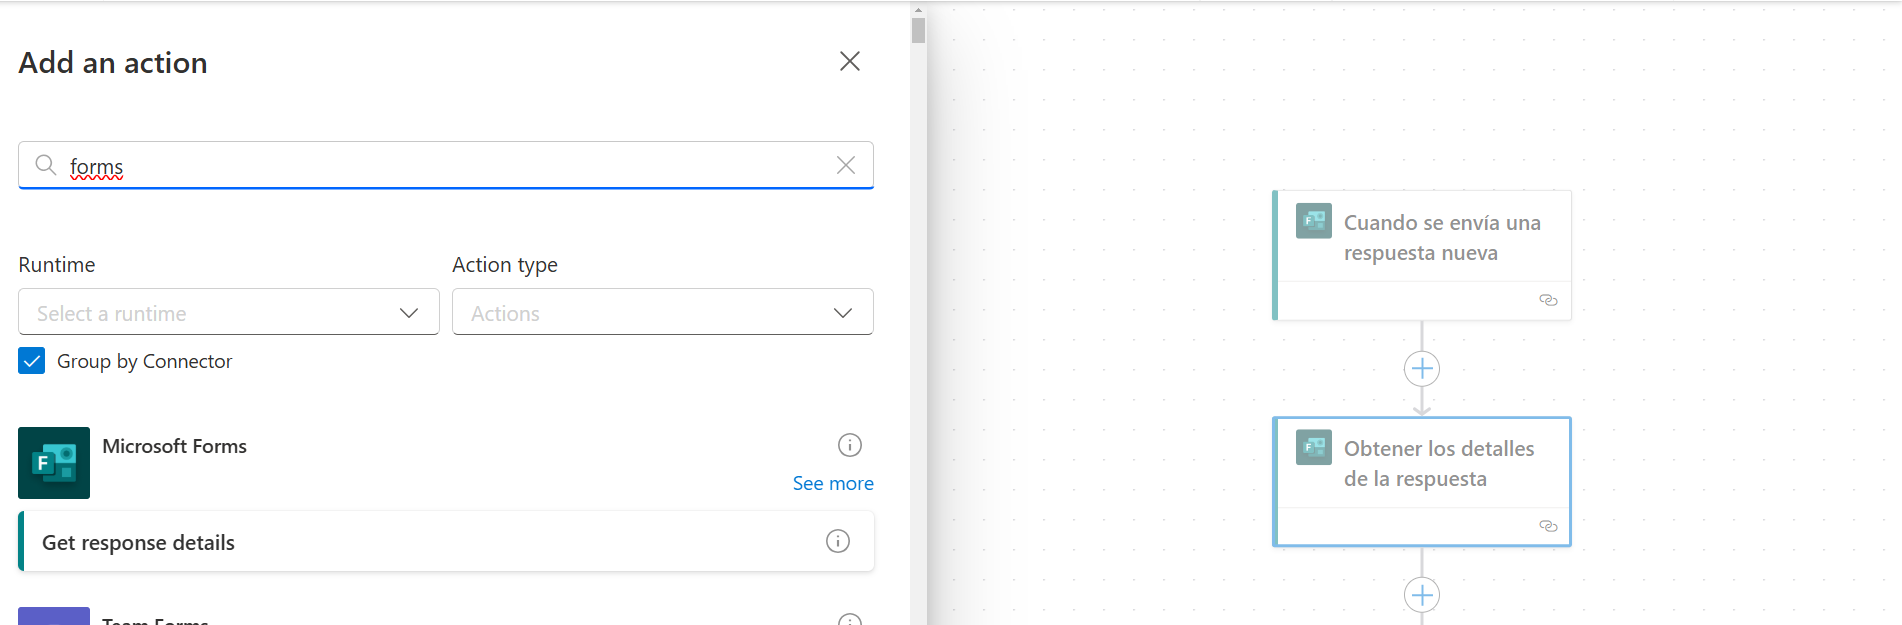
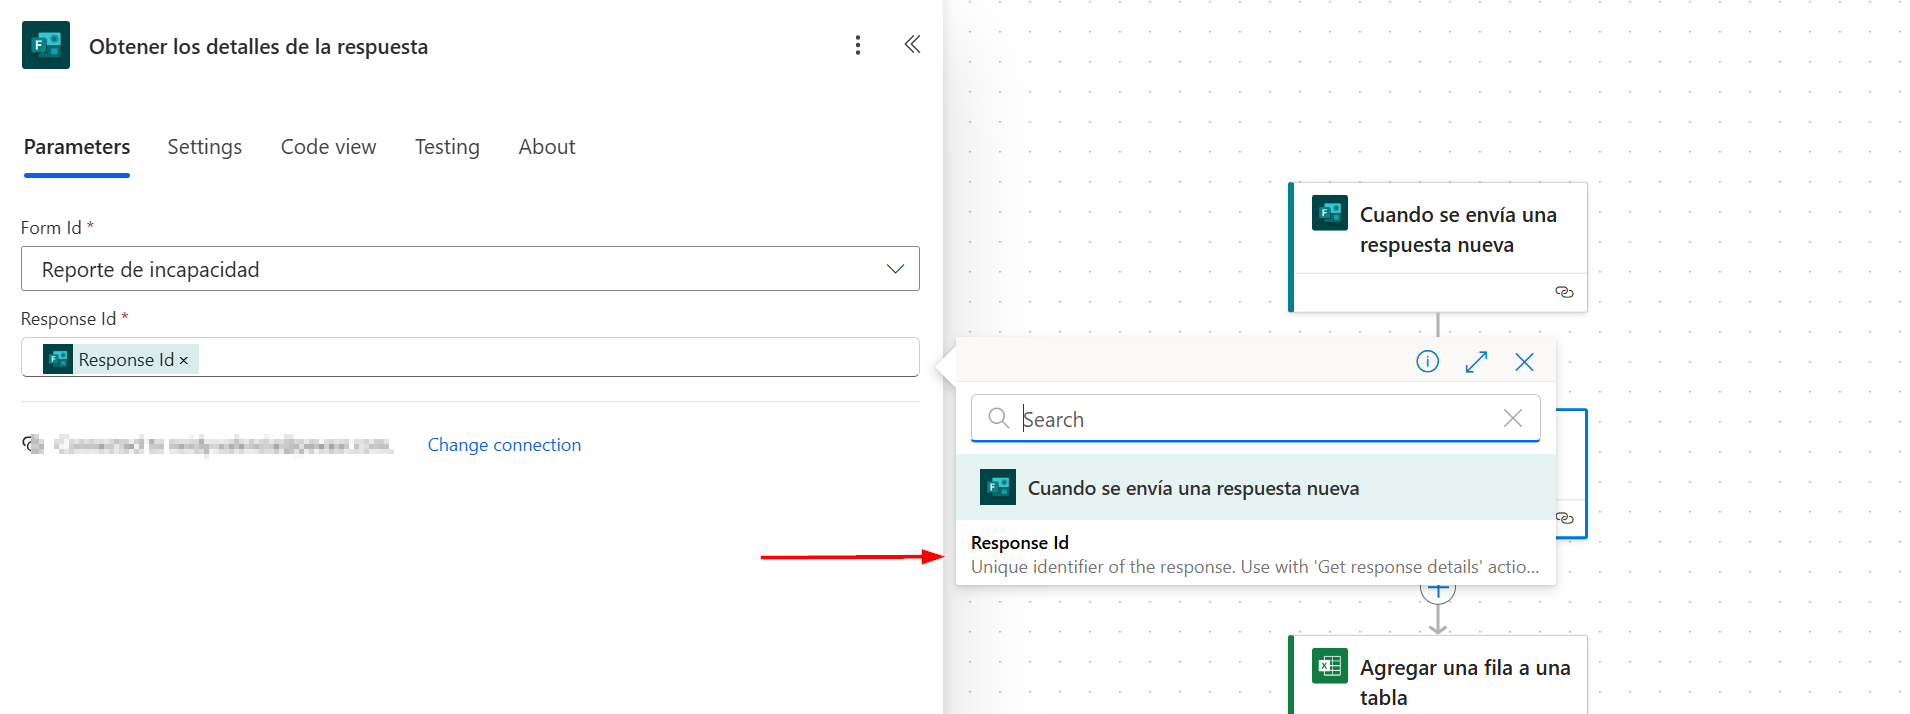
Step 4: Retrieve Response Details
Add a new action called “Get response details” to extract all the information from the submitted form response. In this action, select the leave request form again in the “Form ID” field. In the “Response ID” field, choose the dynamic variable automatically generated by the previous trigger, named “Response ID.”
Step 5: Set Up the SharePoint Environment
Create a library in SharePoint to organize your attachments and response records. This library will include a folder for storing all attachments (e.g., PDF files for leave requests) and an Excel file to store the responses submitted through the form.
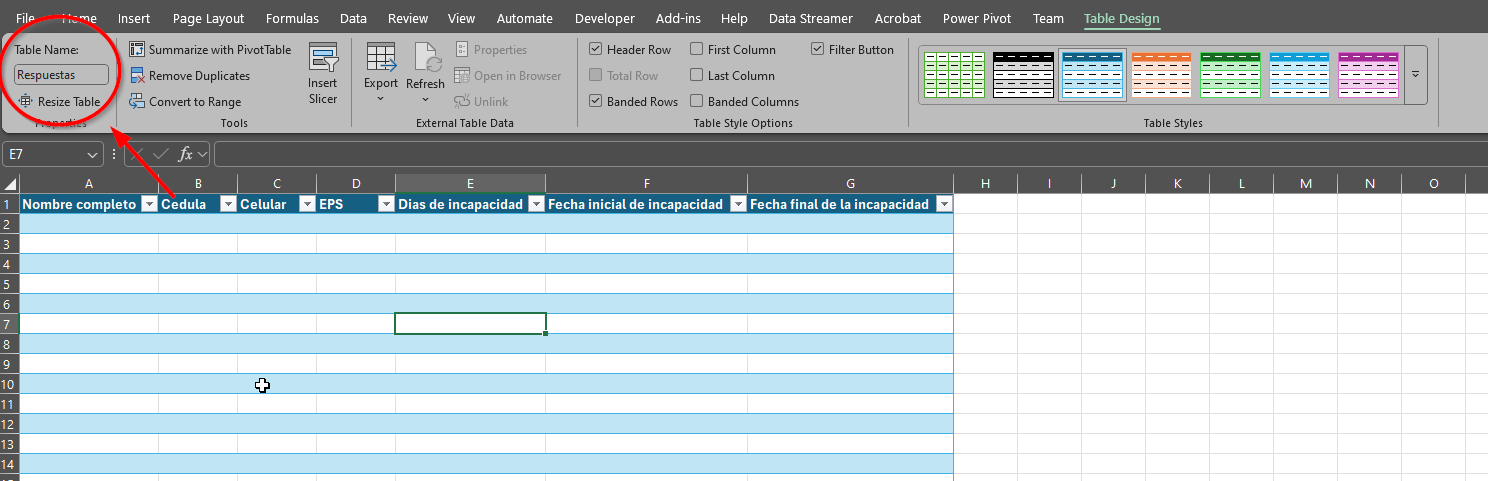
Step 6: Create an Excel Table to Store Records
In the Excel file created in SharePoint, insert a new table with headers corresponding to the questions from the leave request form. It’s important to name the table (e.g., “Responses”) to make it easier to identify when configuring it in Power Automate.
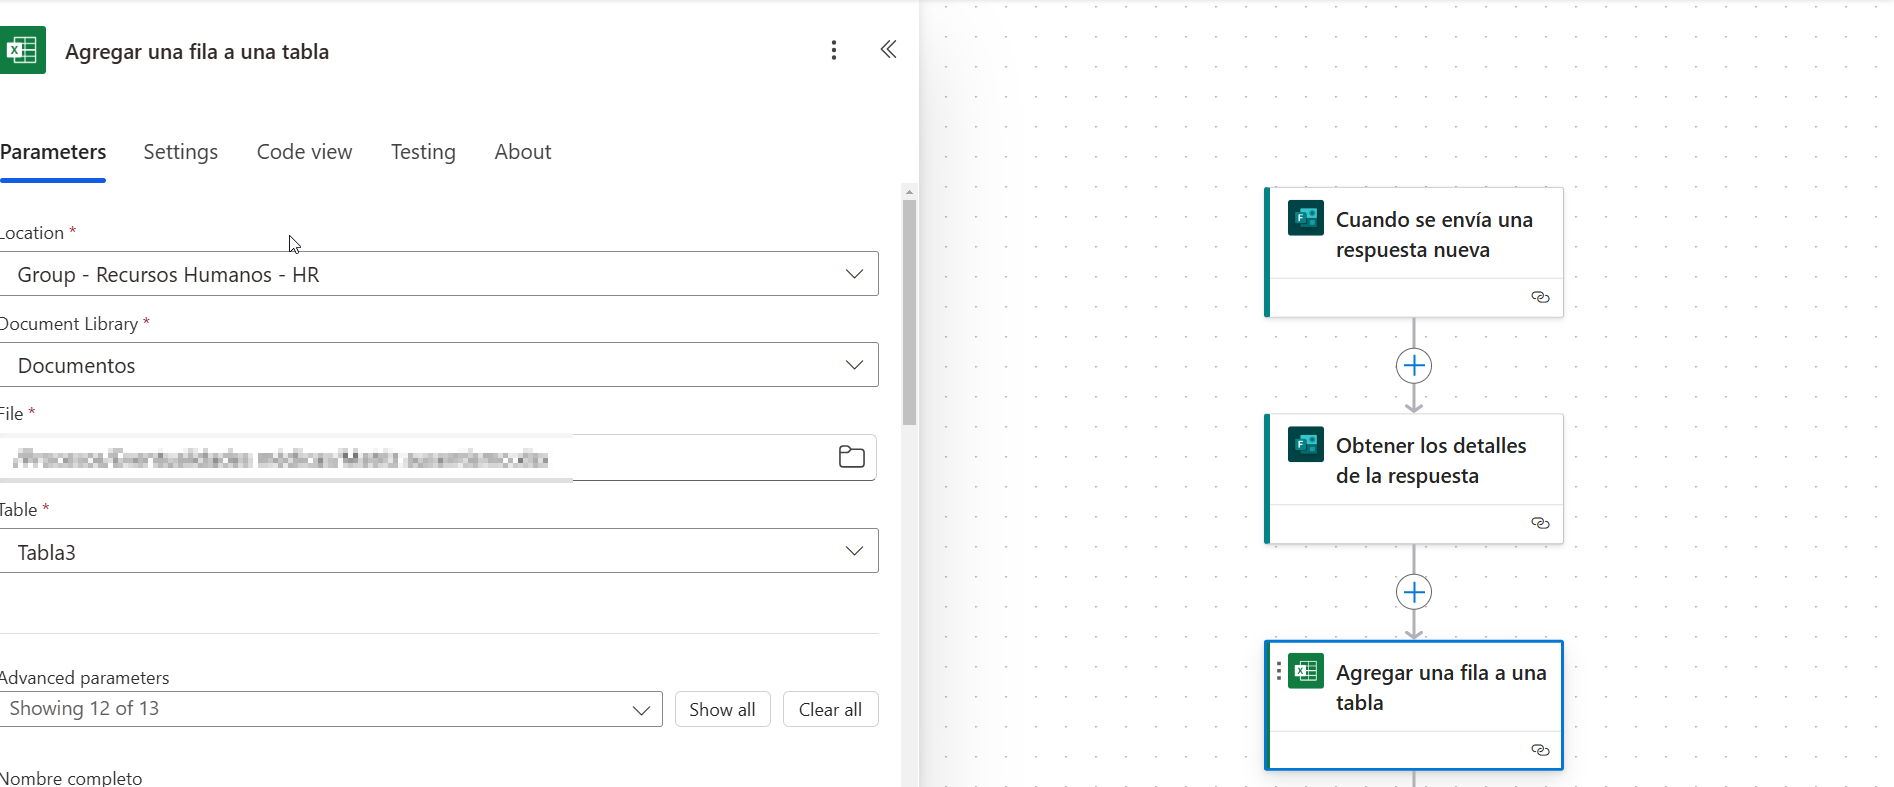
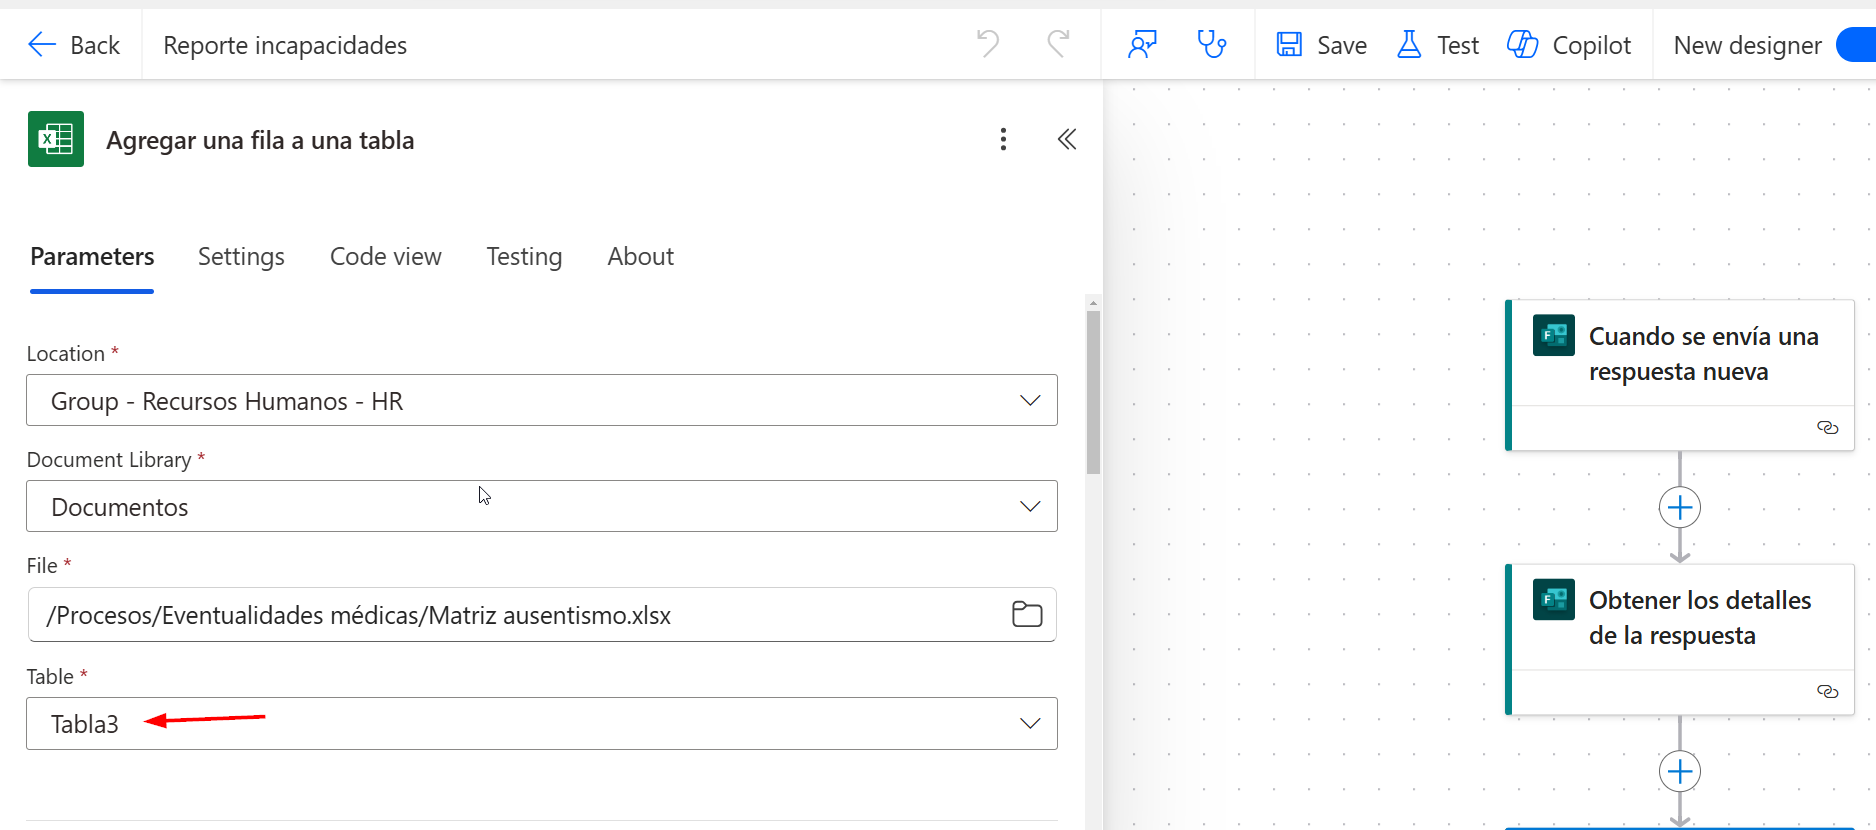
Step 7: Add a Row to the Excel Table
In Power Automate, add a new action called “Add a row into a table.” In the options for this action, select the location of the Excel file previously created the SharePoint document library where it is located, and the specific file containing the response table. Then, select the table we created in Excel. If it does not appear, it might be because the table has not been recognized yet, so it is important to ensure it has been properly created.
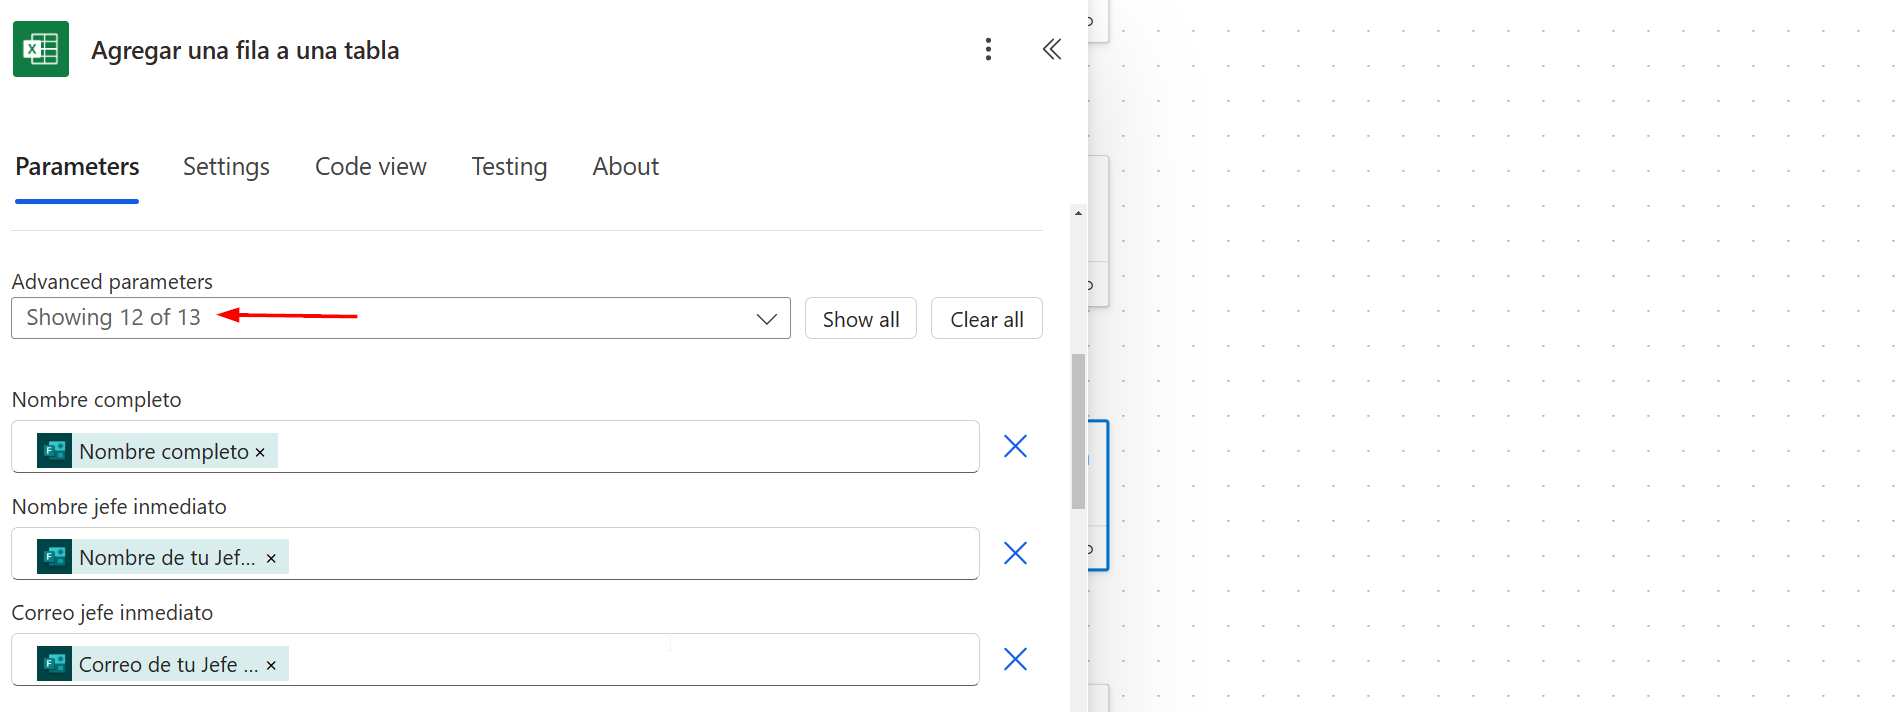
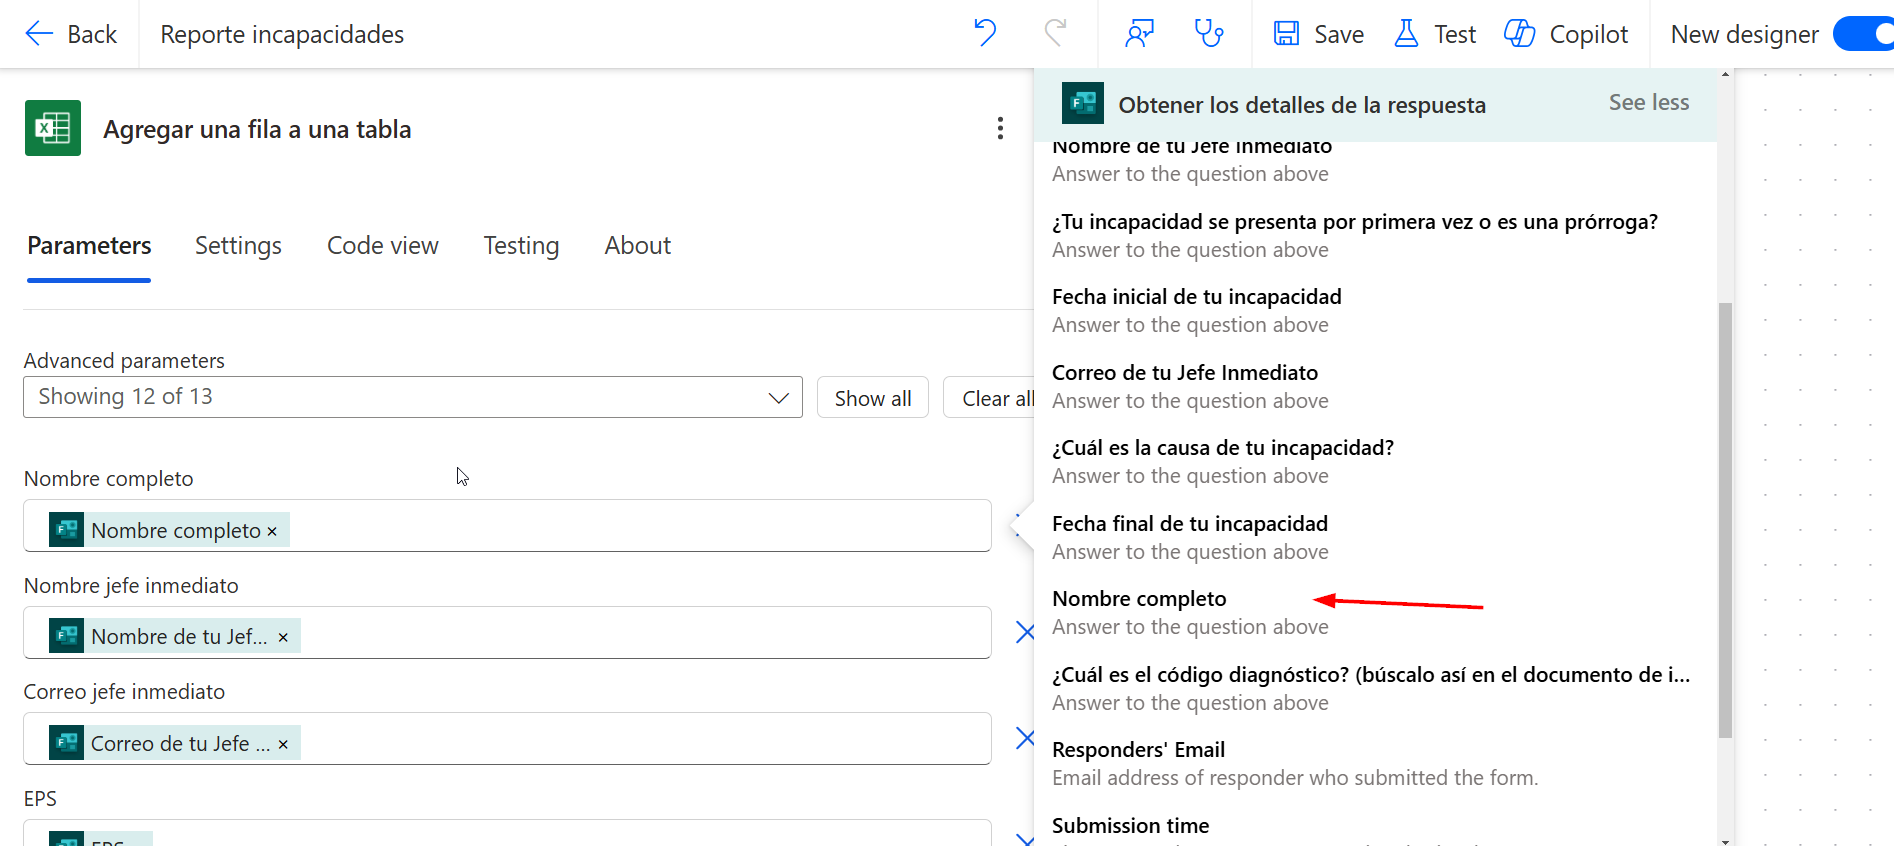
Step 8: Configure Advanced Parameters
In the “Show advanced parameters” option, link each column of the Excel table to its respective question from the leave request form using the content dynamic content generated by Power Automate. This ensures that each form response is stored in the correct column within Excel.
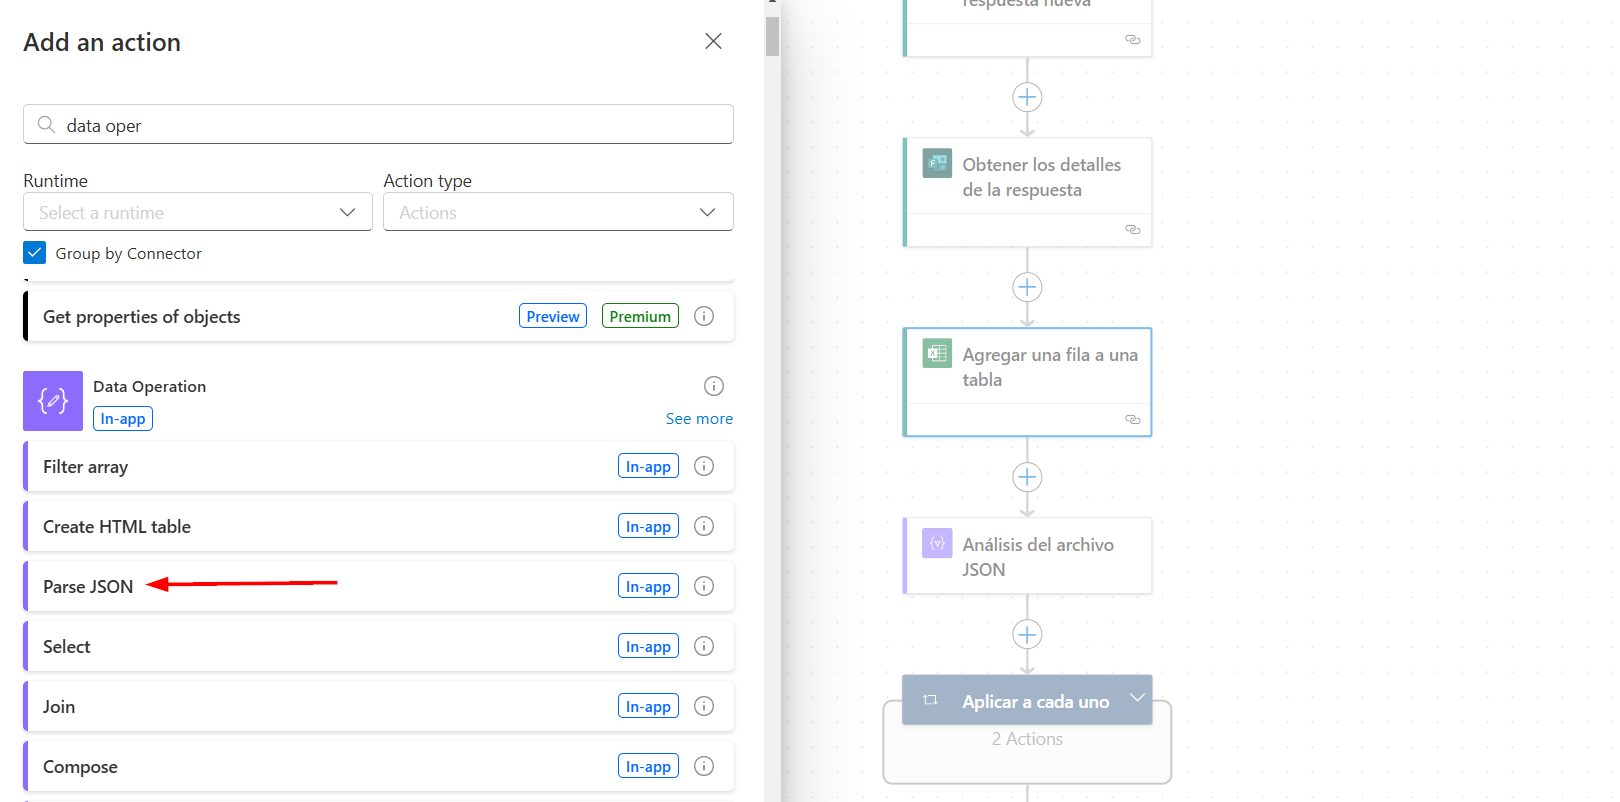
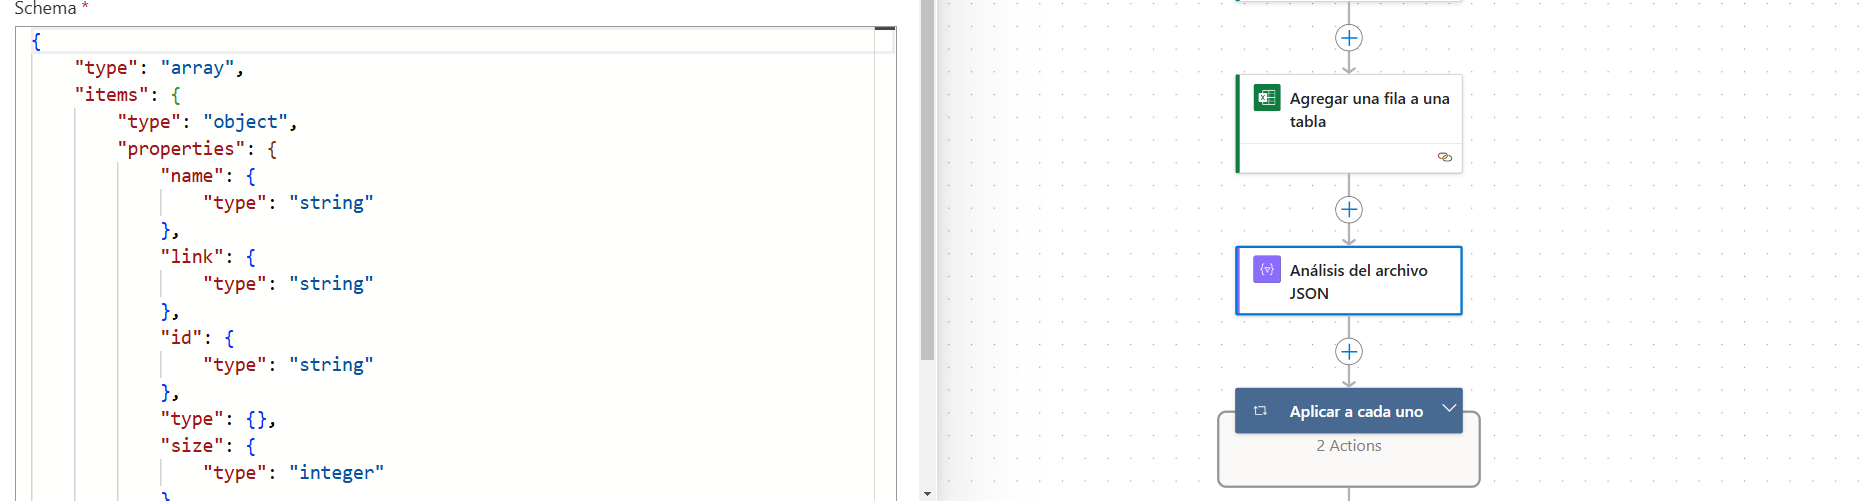
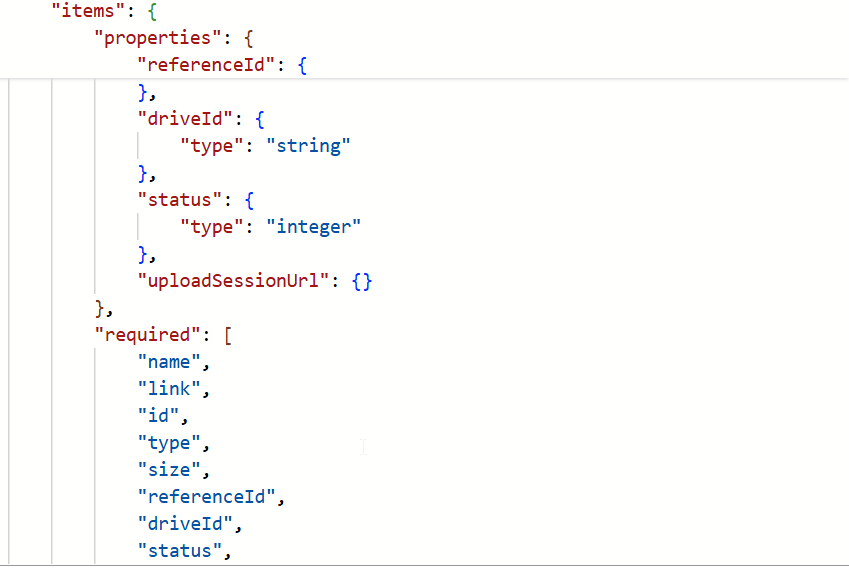
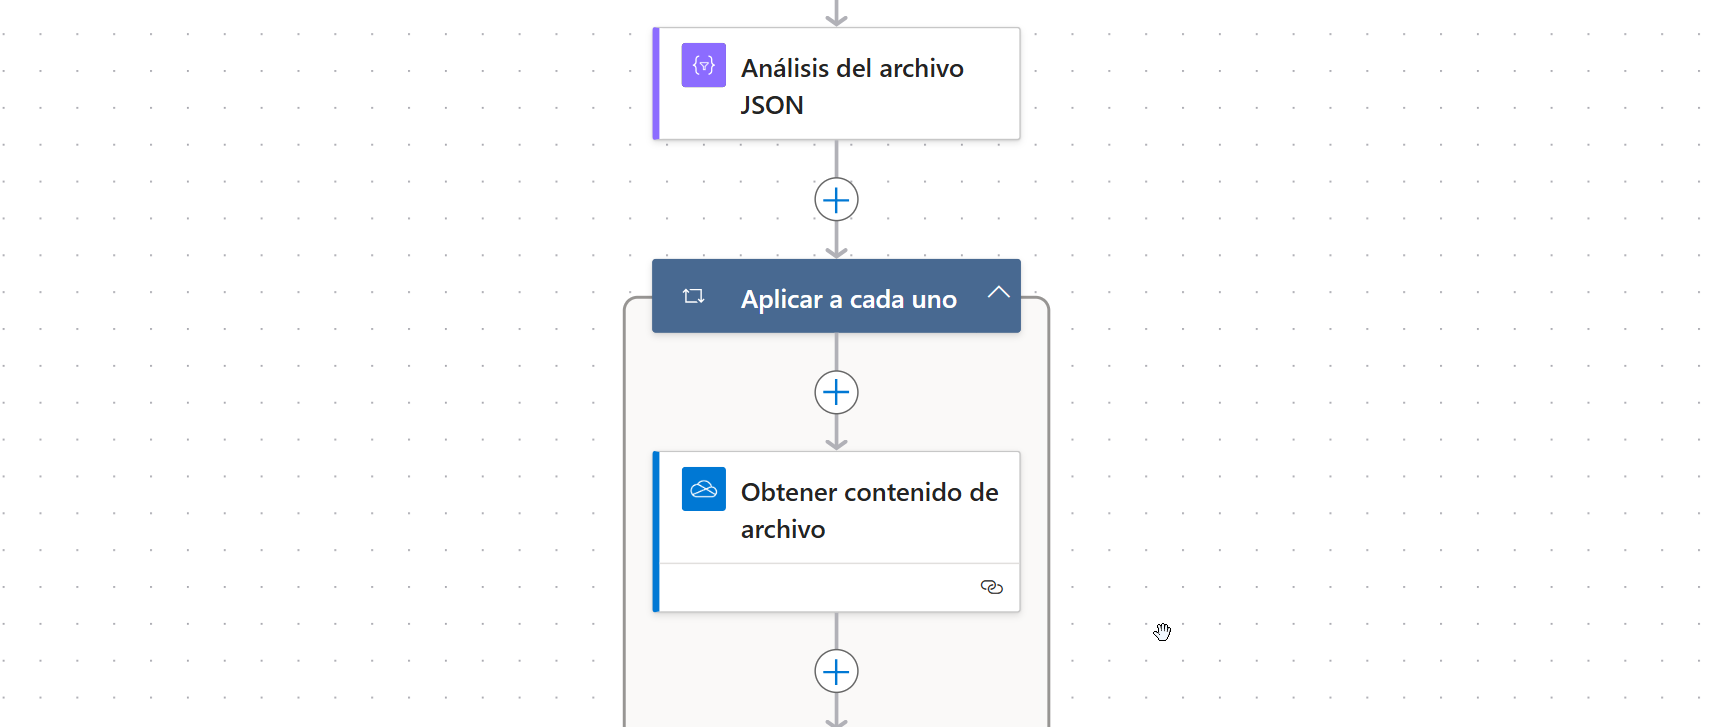
Step 9: Analyze the JSON File
Add an action called “Parse JSON.” This action breaks down the attachment submitted with the form response. In the “Content” field, select the form question that receives the attachment (in this case, the PDF for the leave request). Then, in the “Schema” field, paste the JSON schema that will be used to parse the attachment’s information.

You can copy and paste this JSON directly into the schema field in Power Automate.

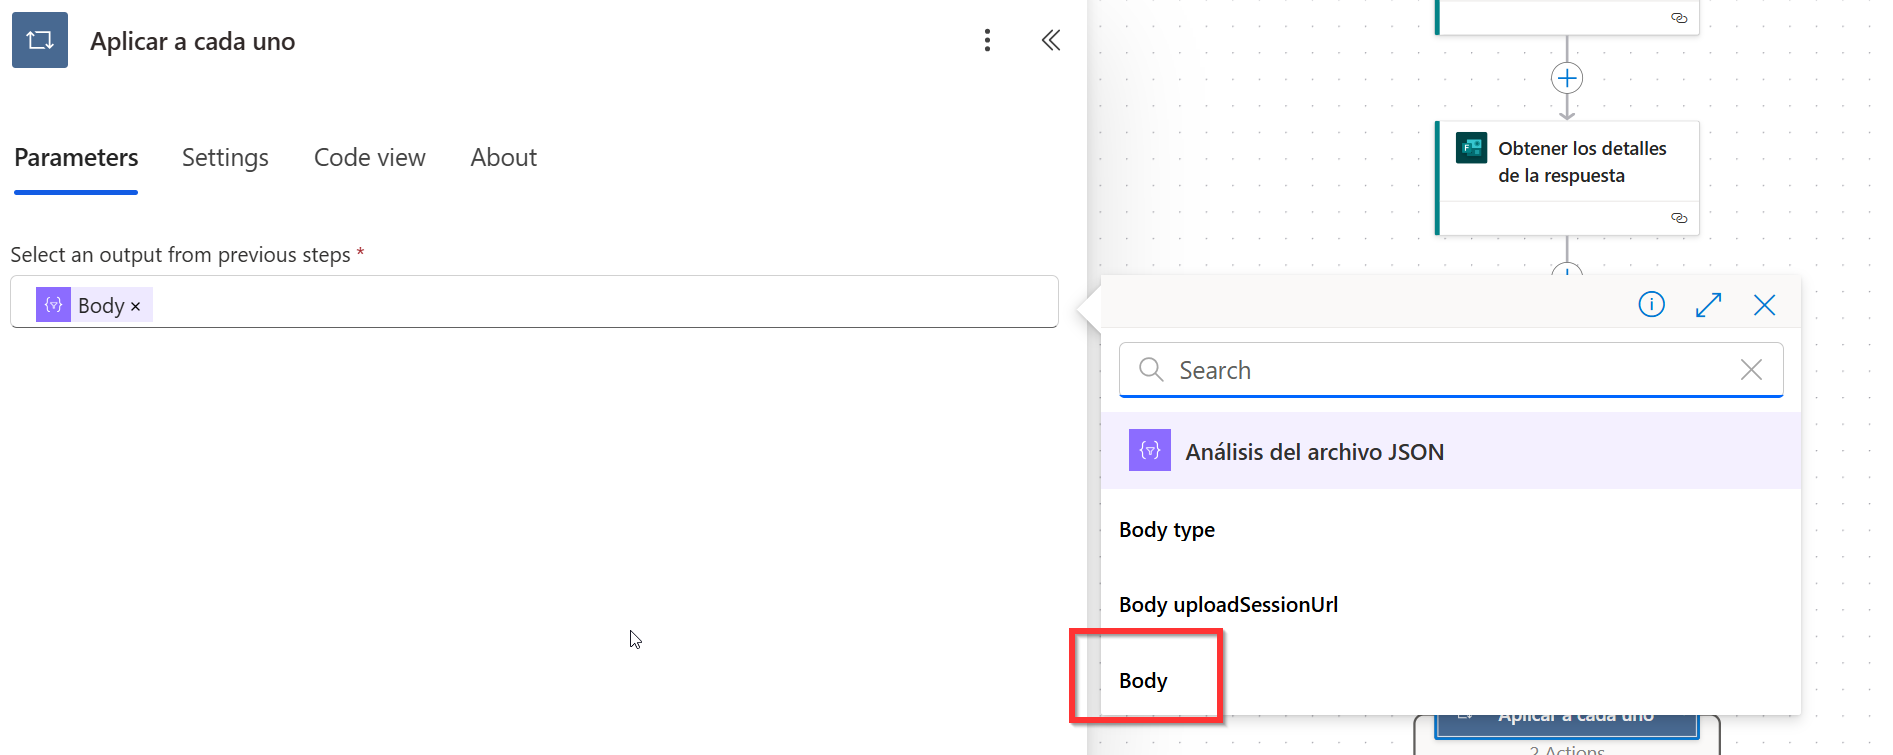
Step 10: Apply to Each: Iterate Over Attachments
In this step, use the action called “Apply to Each.” This action allows you to individually process each attachment received as part of the form response. Configure this action to use the “Body” generated after parsing the JSON file as the input. This ensures that each attachment is processed one by one in an orderly manner.
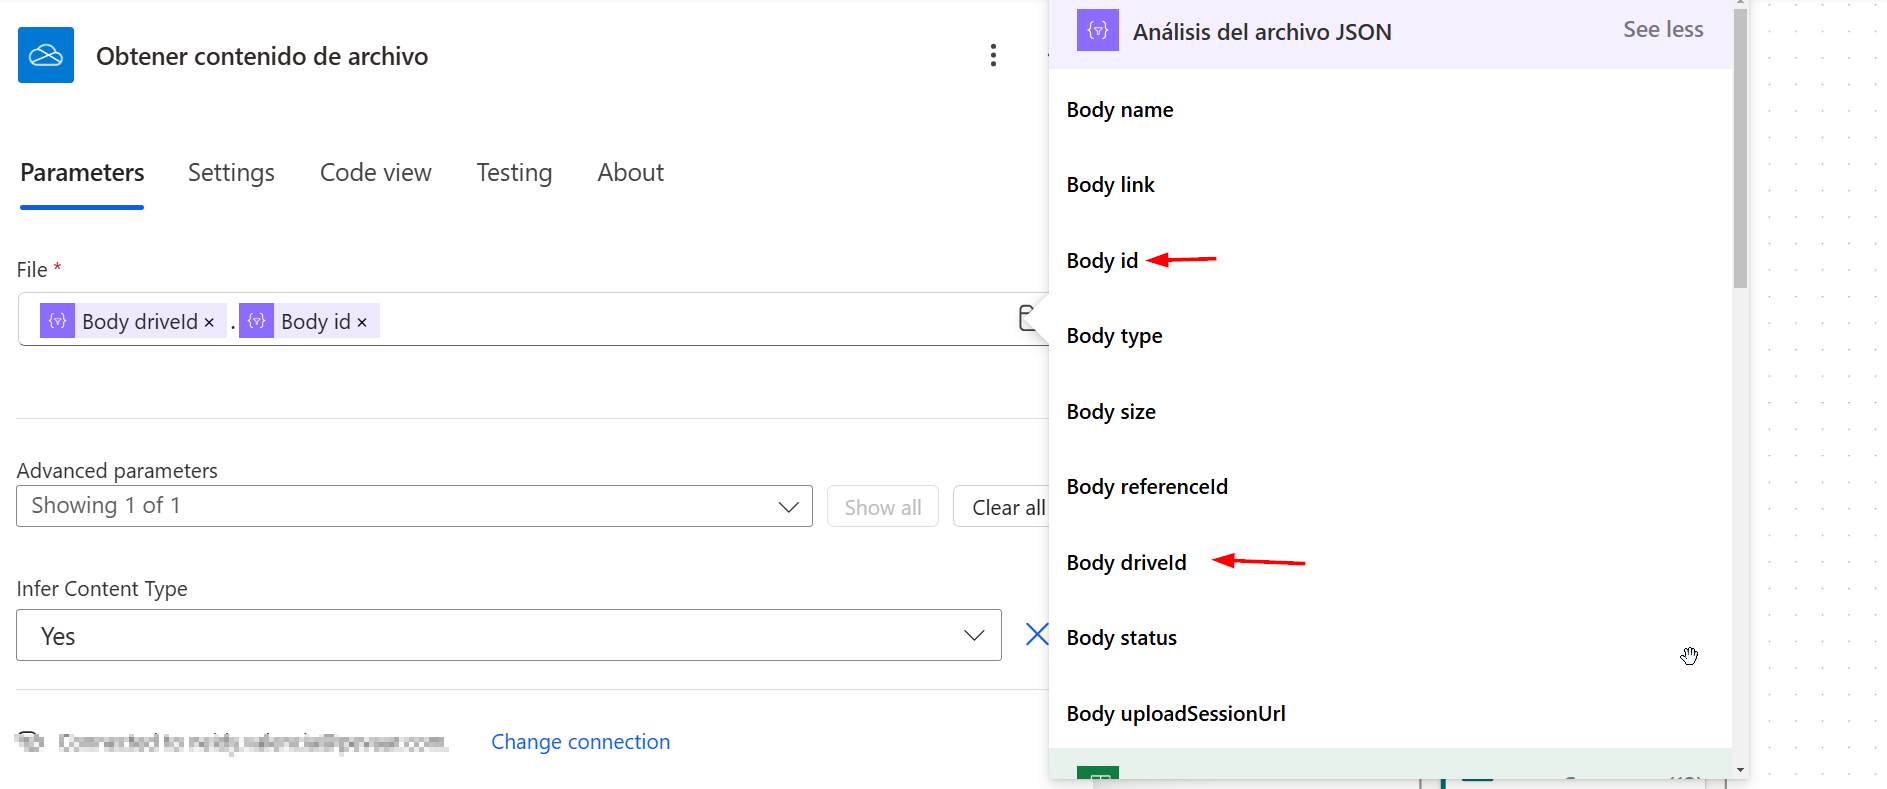
Step 11: Retrieve File Content from OneDrive
Within the “Apply to Each” action, add a OneDrive action called “Get file content.” In this action, specify the location of the attachment in OneDrive. To define the file, use the combination of values obtained from the JSON file parsing: Body driveid and Body id, separated by a period (.). This allows the action to correctly identify the attachment’s location, as Microsoft Forms automatically saves all attachments to a specific location in OneDrive.
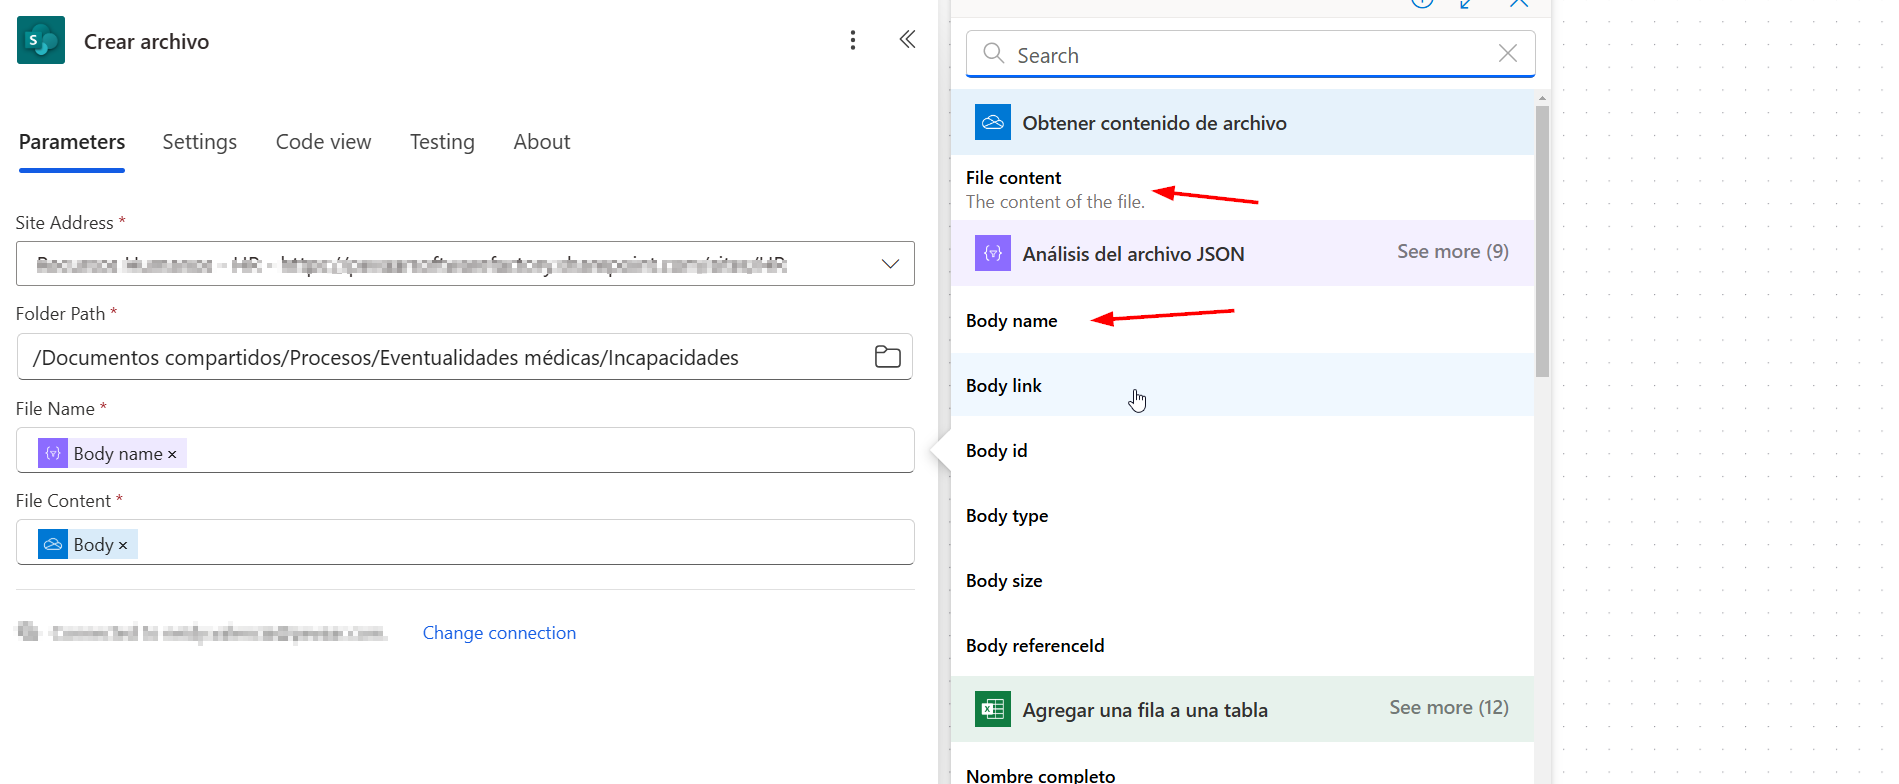
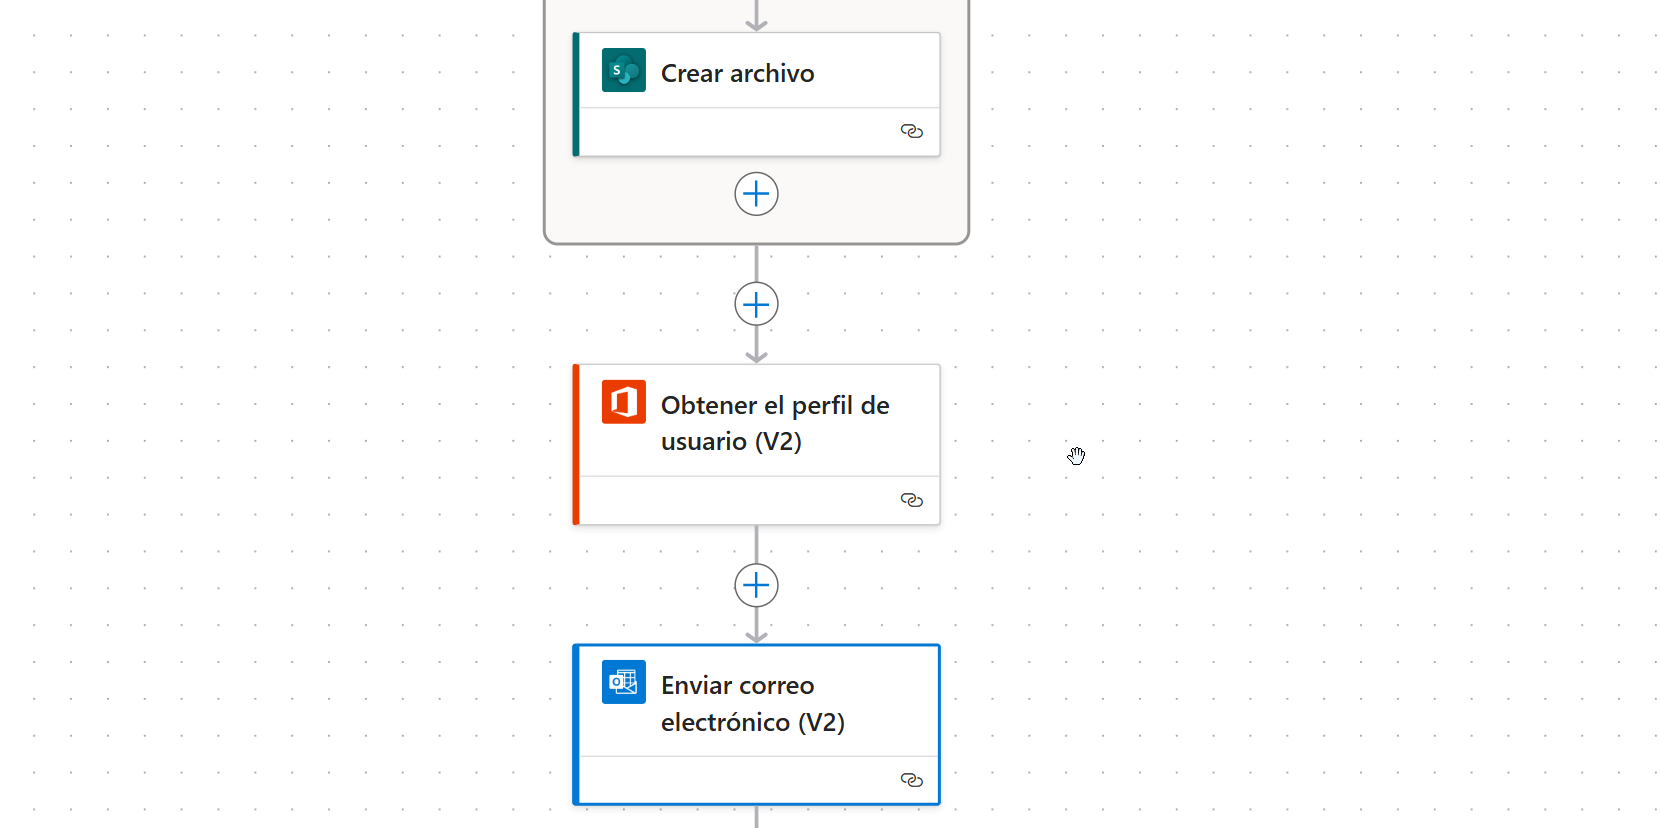
Step 12: Create a File in SharePoint
Finally, add a SharePoint action called “Create file.” In this step, specify the SharePoint site address and the folder path where the attachments will be stored. In the “File Name” field, select the “BodyName” value obtained from the JSON parsing, and in the “File Content” field, select the content extracted through the OneDrive action.
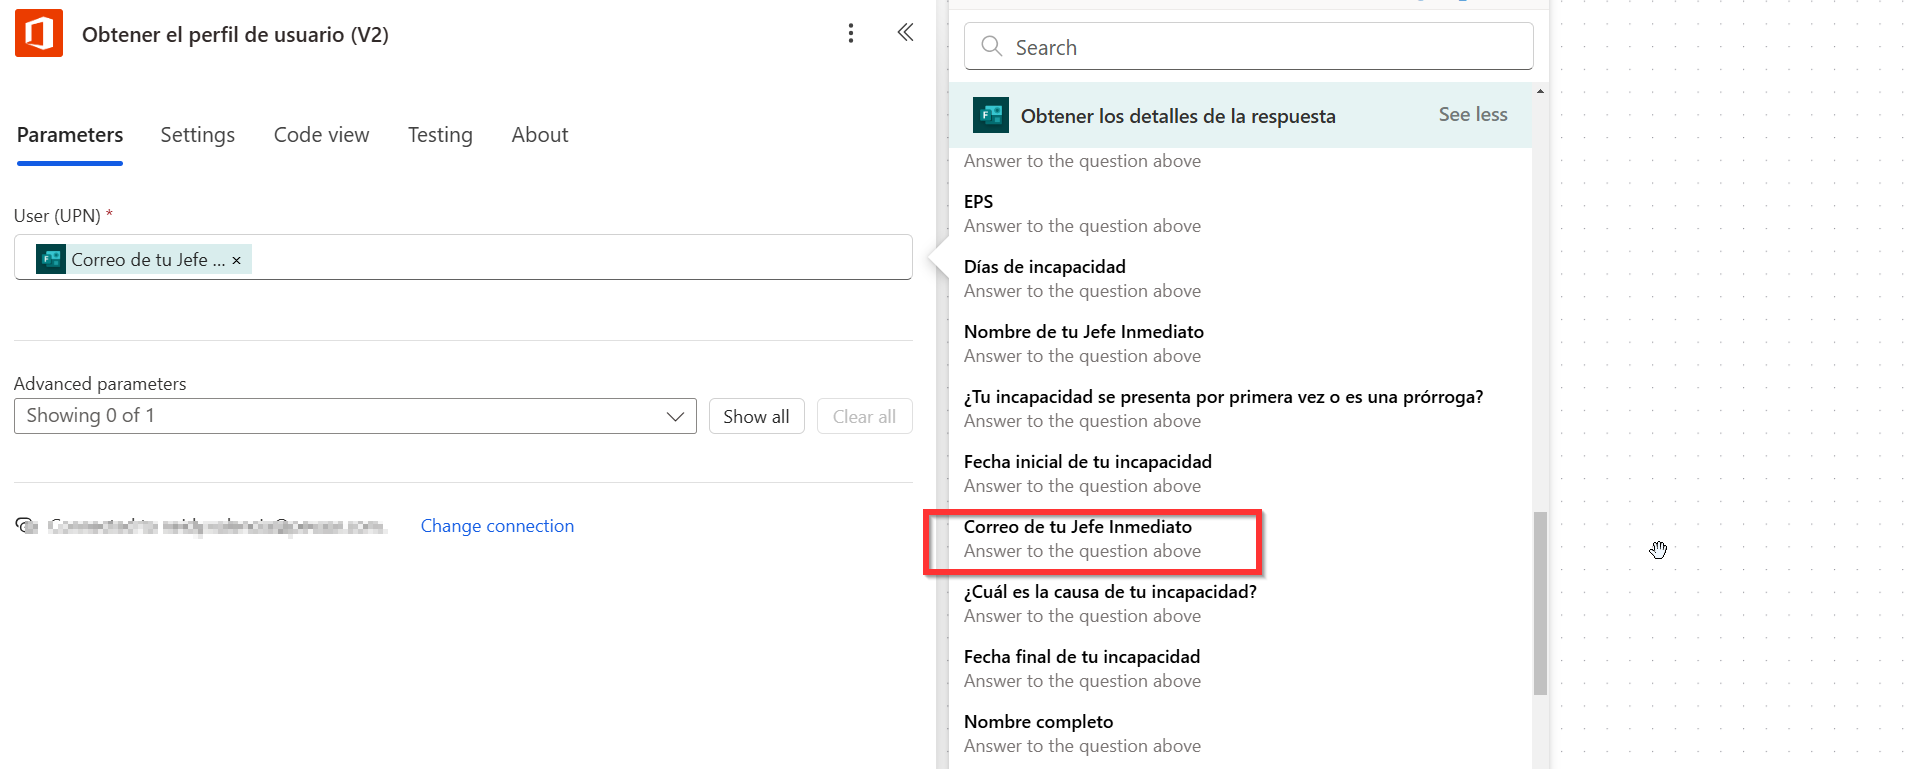
Step 13: Notify the Leader or Responsible Party via Email
Before sending the notification, we first need to retrieve the name of the corresponding leader or responsible party. To do this, use the action “Get user profile (V2).” This action returns the user’s profile based on their email address. It provides the leader’s DisplayName, which we will use to personalize the notification message.
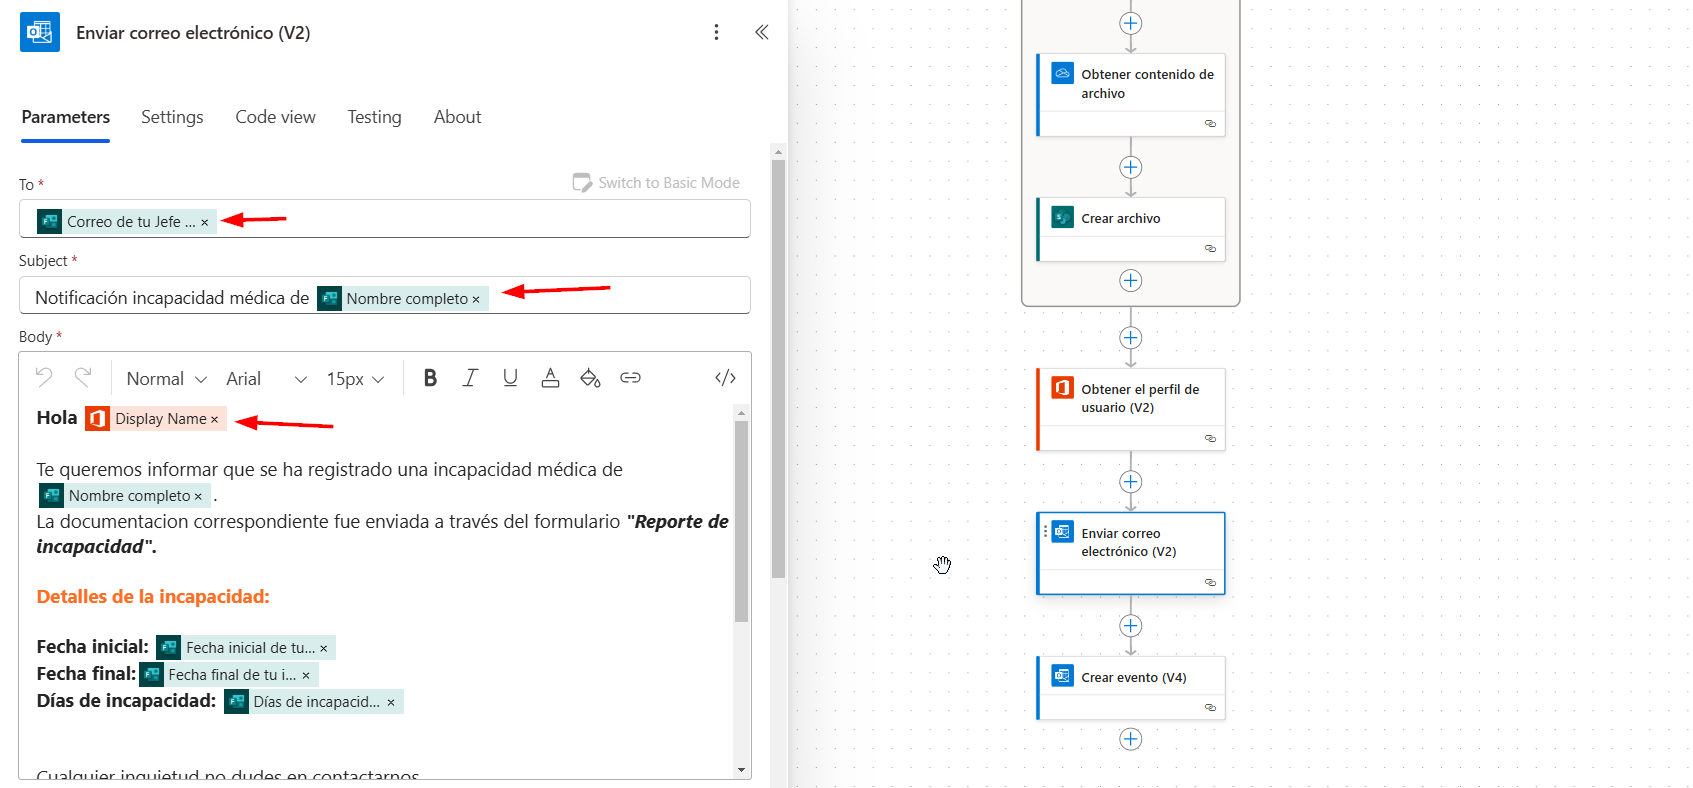
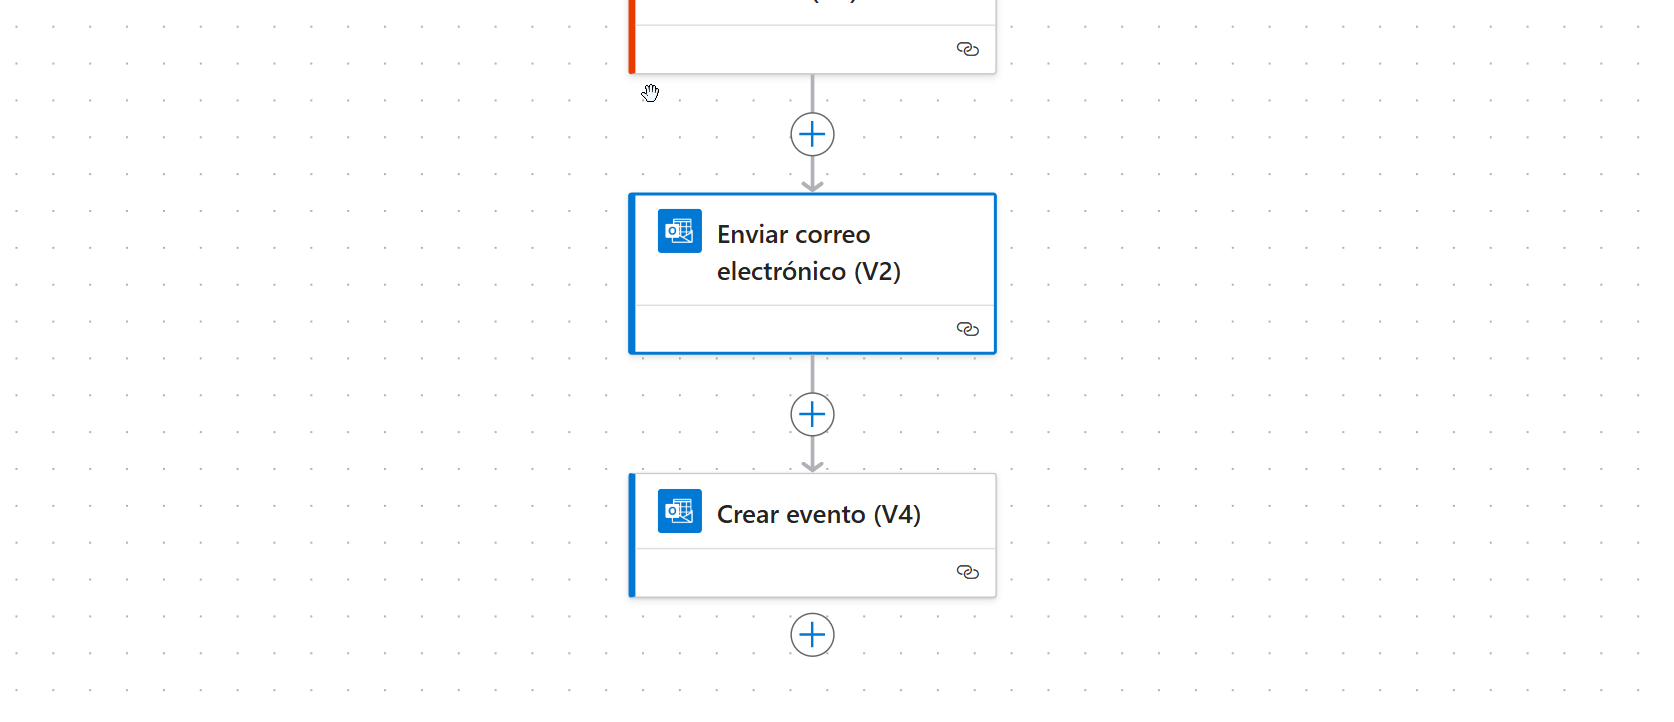
Once we have the leader’s name, add the Outlook action “Send an email (V2).” Switch to advanced mode to configure the fields dynamically. In the “To” field, select the leader’s email, in the “Subject” field, include the employee’s name to make it easily identifiable, and in the “Body,” compose the message, incorporating the leader’s DisplayName and the leave details. Then, expand the advanced parameters and, in the “Cc” field, enter the Human Resources email to send them a copy of the notification.
Finally, this is how the flow of disability reporting should look like 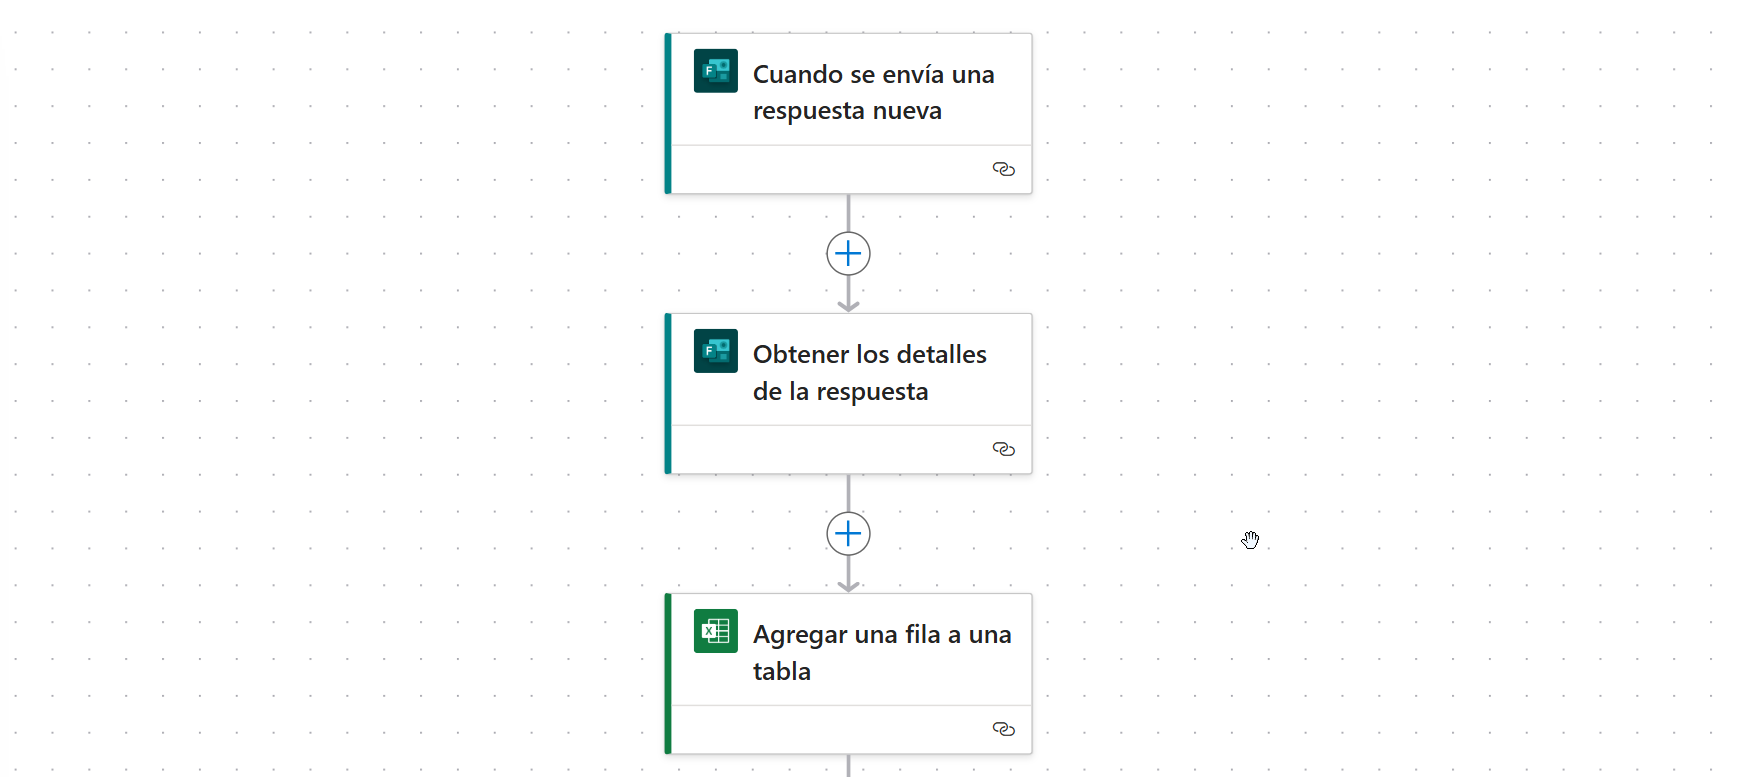
Automating leave report management is no longer a luxury but a necessity for organizations aiming to enhance efficiency and minimize errors. With Business Automation Software, like Power Automate, you can streamline repetitive tasks, ensure data accuracy, and keep all stakeholders informed in real time. By implementing the step-by-step workflow outlined in this article, your team can focus on higher-value activities, leaving tedious processes to reliable automation.
At Pevaar, we specialize in implementing tailored automation solutions to optimize your workflows and improve your operational efficiency. Whether you’re looking to automate leave reports, streamline HR processes, or tackle other automation challenges, our team of experts is here to help. If you have doubts about how to implement it in our youtube channel you will find a tutorial on how to implement it.
Contact us today to discover how Pevaar can transform your business with cutting-edge automation solutions designed to meet your specific needs!


Leave a Reply