
Power Automate Premium: Exit Approval Request Automation with Concurrent Approvals
In a business environment where digitalization and efficiency are key, process automation has become an indispensable tool to improve productivity and reduce operating costs. Power Automate Premium is an advanced Microsoft solution that enables you to automate complex workflows, integrate business applications, and streamline processes within an organization.
As businesses grow, the number of administrative and operational tasks increases exponentially. Many of these tasks are repetitive, manual, and prone to human error, leading to inefficiencies in time and resource management. Power Automate Premium addresses this problem by enabling the creation of automated workflows that run efficiently, without manual intervention, connecting apps and services inside and outside the Microsoft ecosystem.
What is Power Automate Premium?
Power Automate Premium is the advanced version of Power Automate, designed for businesses that require more robust and flexible automation. Unlike the standard version, Power Automate Premium provides access to advanced connectors, greater integration with enterprise systems, and additional features such as robotic process automation (RPA).
This service allows integration with platforms such as Salesforce, SQL Server, SAP, Azure, Oracle, ServiceNow, and other enterprise applications. In addition, it provides greater security and control over workflows, making it an ideal choice for businesses with large-scale automation needs.
To learn more about the features and pricing of Power Automate Premium, you can visit the official Microsoft Power Automate page.
Benefits of Power Automate Premium
- Access to Premium Connectors
The premium version allows you to connect workflows with advanced business platforms such as SAP, SQL Server, Dataverse, Salesforce, among others. This makes it easy to integrate multiple tools without the need for additional developments.
- Robotic Process Automation (RPA)
With Power Automate Premium, businesses can implement no-code or minimal-code RPA, allowing them to automate manual processes and interact with applications that don’t offer direct APIs.
- Increased Processing Capacity and Security
Flows in Power Automate Premium have higher execution priority, enabling faster and more efficient processes. In addition, it includes greater security and control over data access.
- Automation of Approval Processes
The tool allows you to create workflows with simultaneous or sequential approvals, which speeds up decision-making in the organization.
- Scalability and Flexibility
It’s ideal for businesses looking to scale their operations with automated workflows that can be tailored to different departments and needs.
- Integration with Artificial Intelligence
Power Automate Premium enables the use of AI in workflows, making it easy to classify documents, analyze data, and automate responses in complex processes.
Example of Use: Automating the Exit Approval Request with Concurrent Approvals
As a practical example of how Power Automate Premium can transform business processes, we’ll take automating a collaborator’s departure or move approval request with concurrent approvals.
This workflow allows the Human Resources area to automatically manage the validation and approval of the withdrawal or relocation of an employee within the company, connecting applications such as Microsoft Forms, OneDrive and Outlook.
Workflow automation approval request simultaneous departure of a collaborator
Objective
Describe how the automation flow was designed and how it works: request for approval, departure or transfer of an employee with simultaneous approvals
The Concurrent Collaborator Departure Approval Request Flow was created to automate the process of requesting approval or moving a collaborator with concurrent approvals, connecting Forms, OneDrive, and Outlook. In order to make the necessary connections within the flow, it is necessary that the person in charge of the process has previously created the administrative peace and save form, which must contain the same fields that are present in the word format, except for the signature of the collaborator and the approval of the responsible parties to be approved.
Initially, Power Automate (PA) must be accessed from Microsoft 365 applications, when you are in the PA environment, you must click on “Create” and then on “Automated cloud Flow” (image 1).
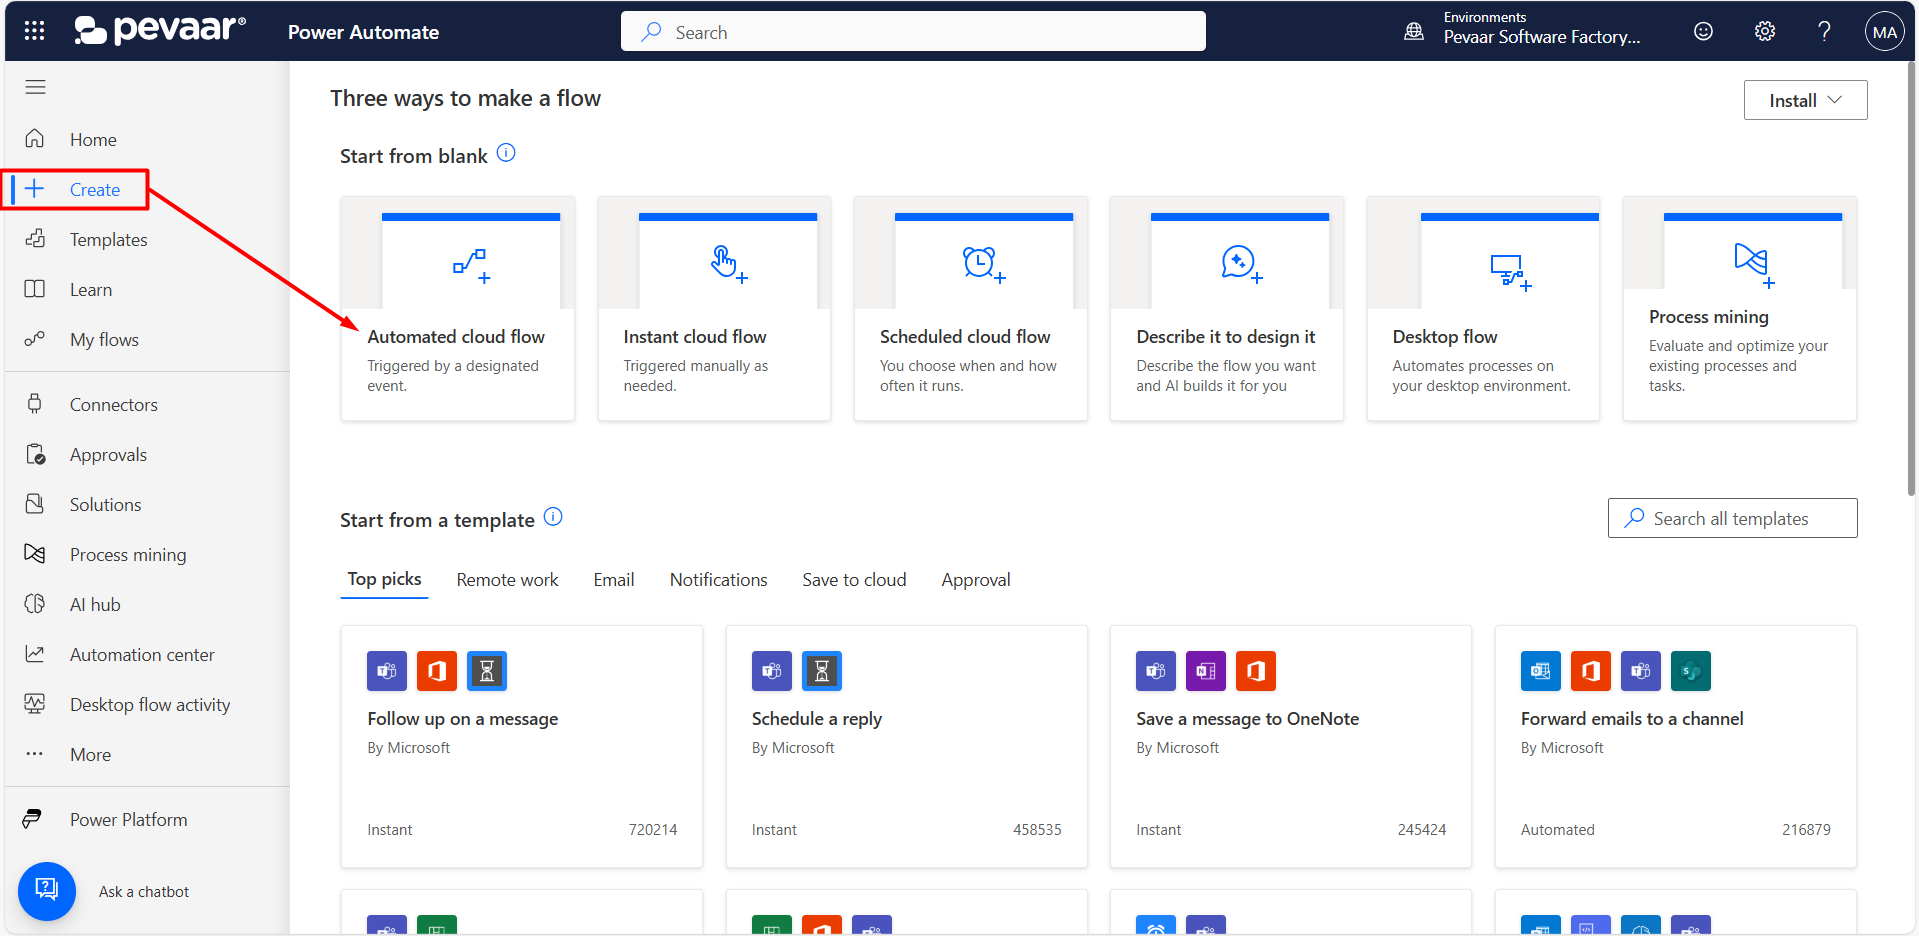 Image 1
Subsequently, a name must be added to the flow and the trigger of the flow must be selected, which in this case will be “When a new response is submitted” (image 2).
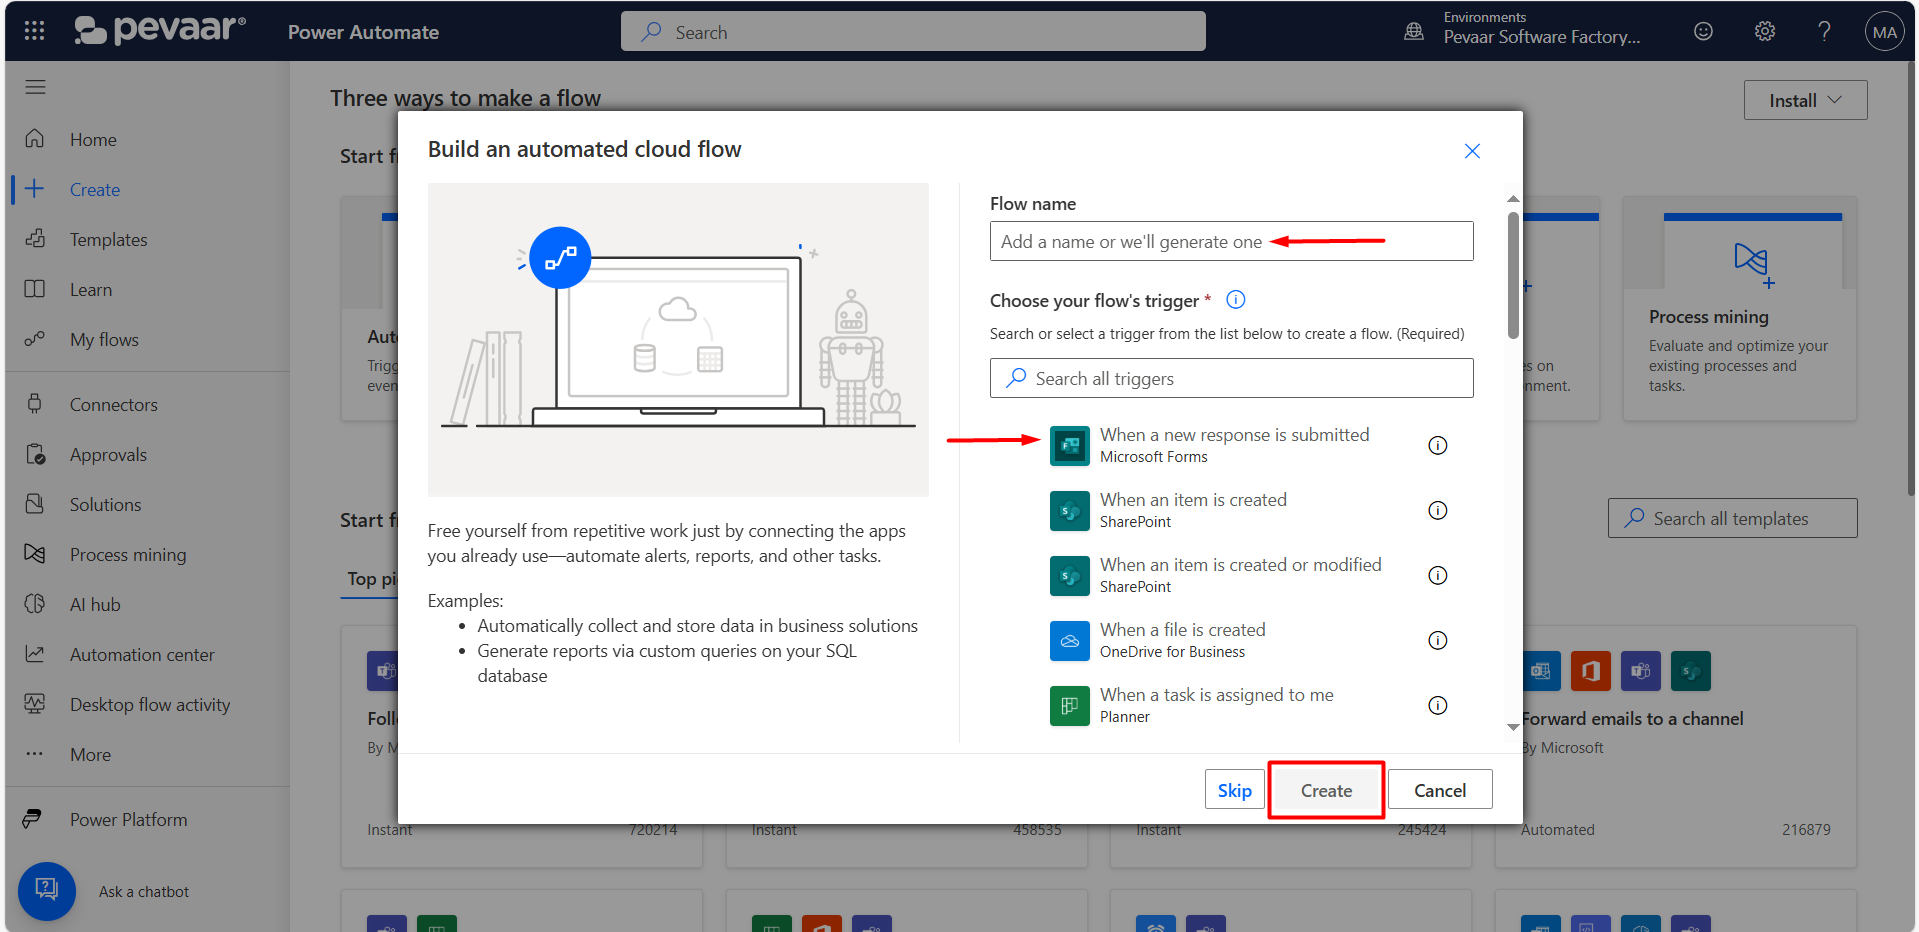 Image 2
The flow and its connections will be detailed below:
The flow starts with a trigger from Forms, in which the “Form Id” corresponding to the Administrative Peace and Salvo – Code RH-F-008-V02 was selected from the list of all forms that the user who designed the flow has created (image 3).
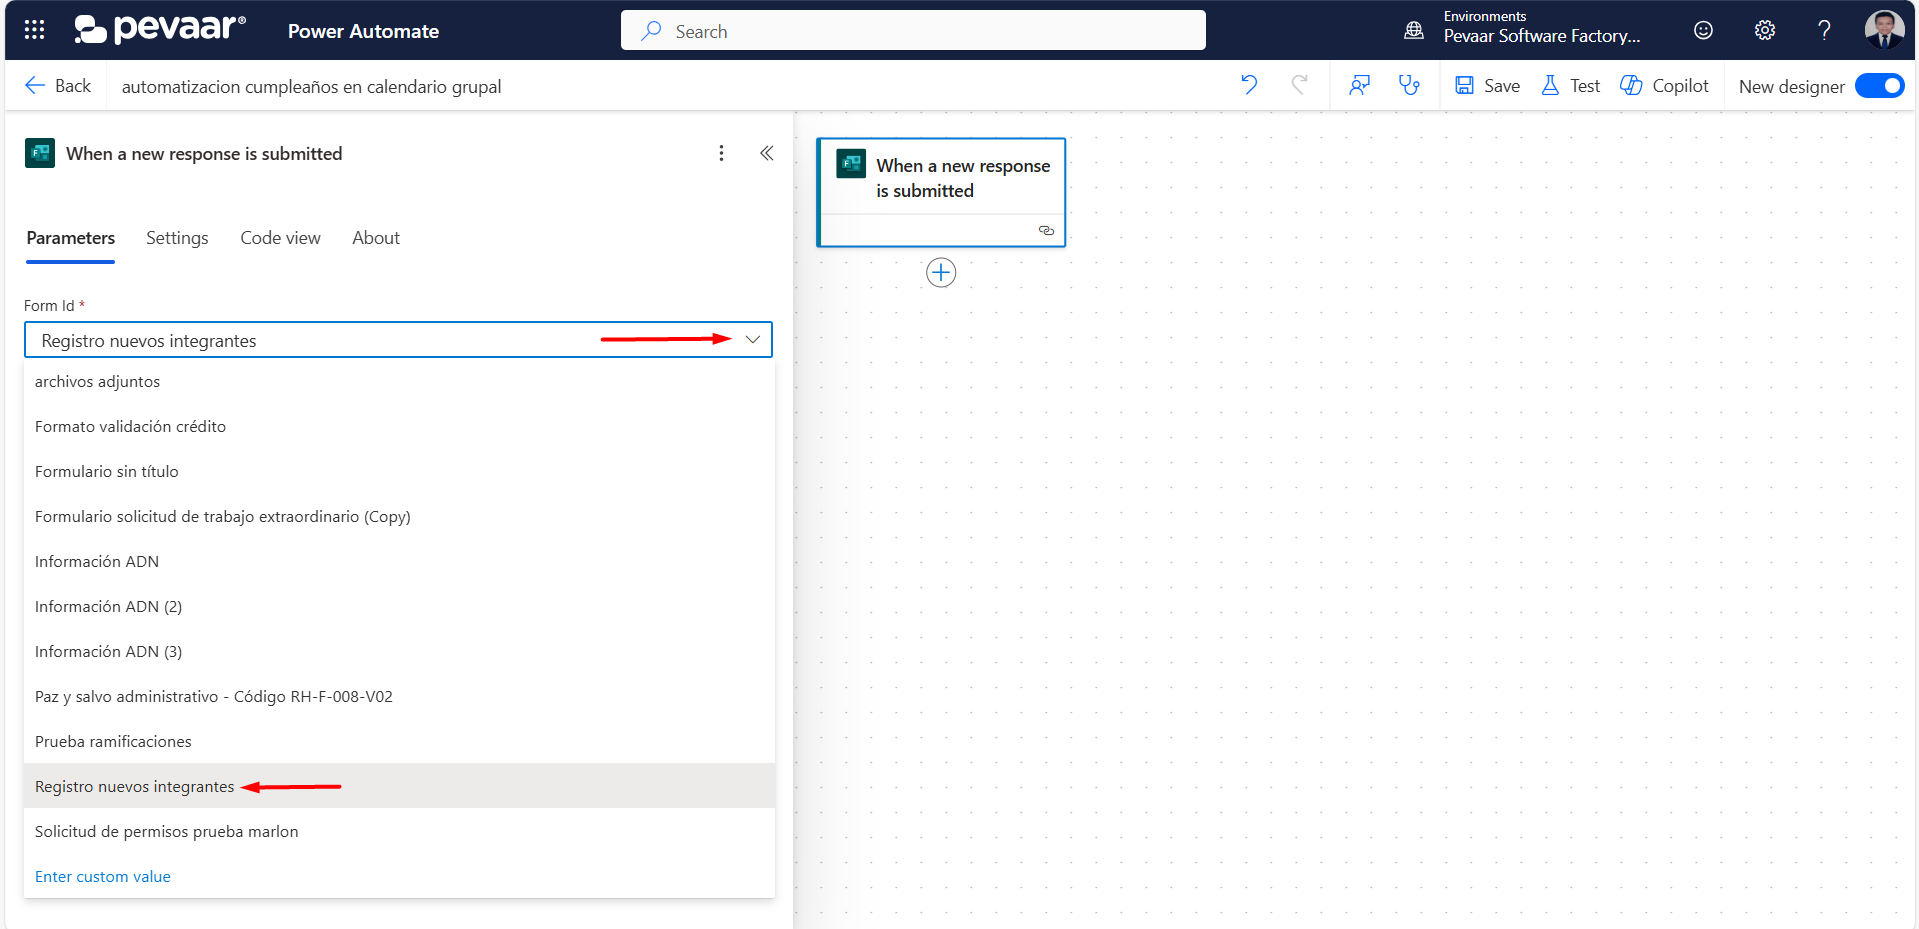 Image 3
To continue with the flow construction, a new action must be added by clicking on the + icon, this action must be performed every time a new action is to be added (image 4).
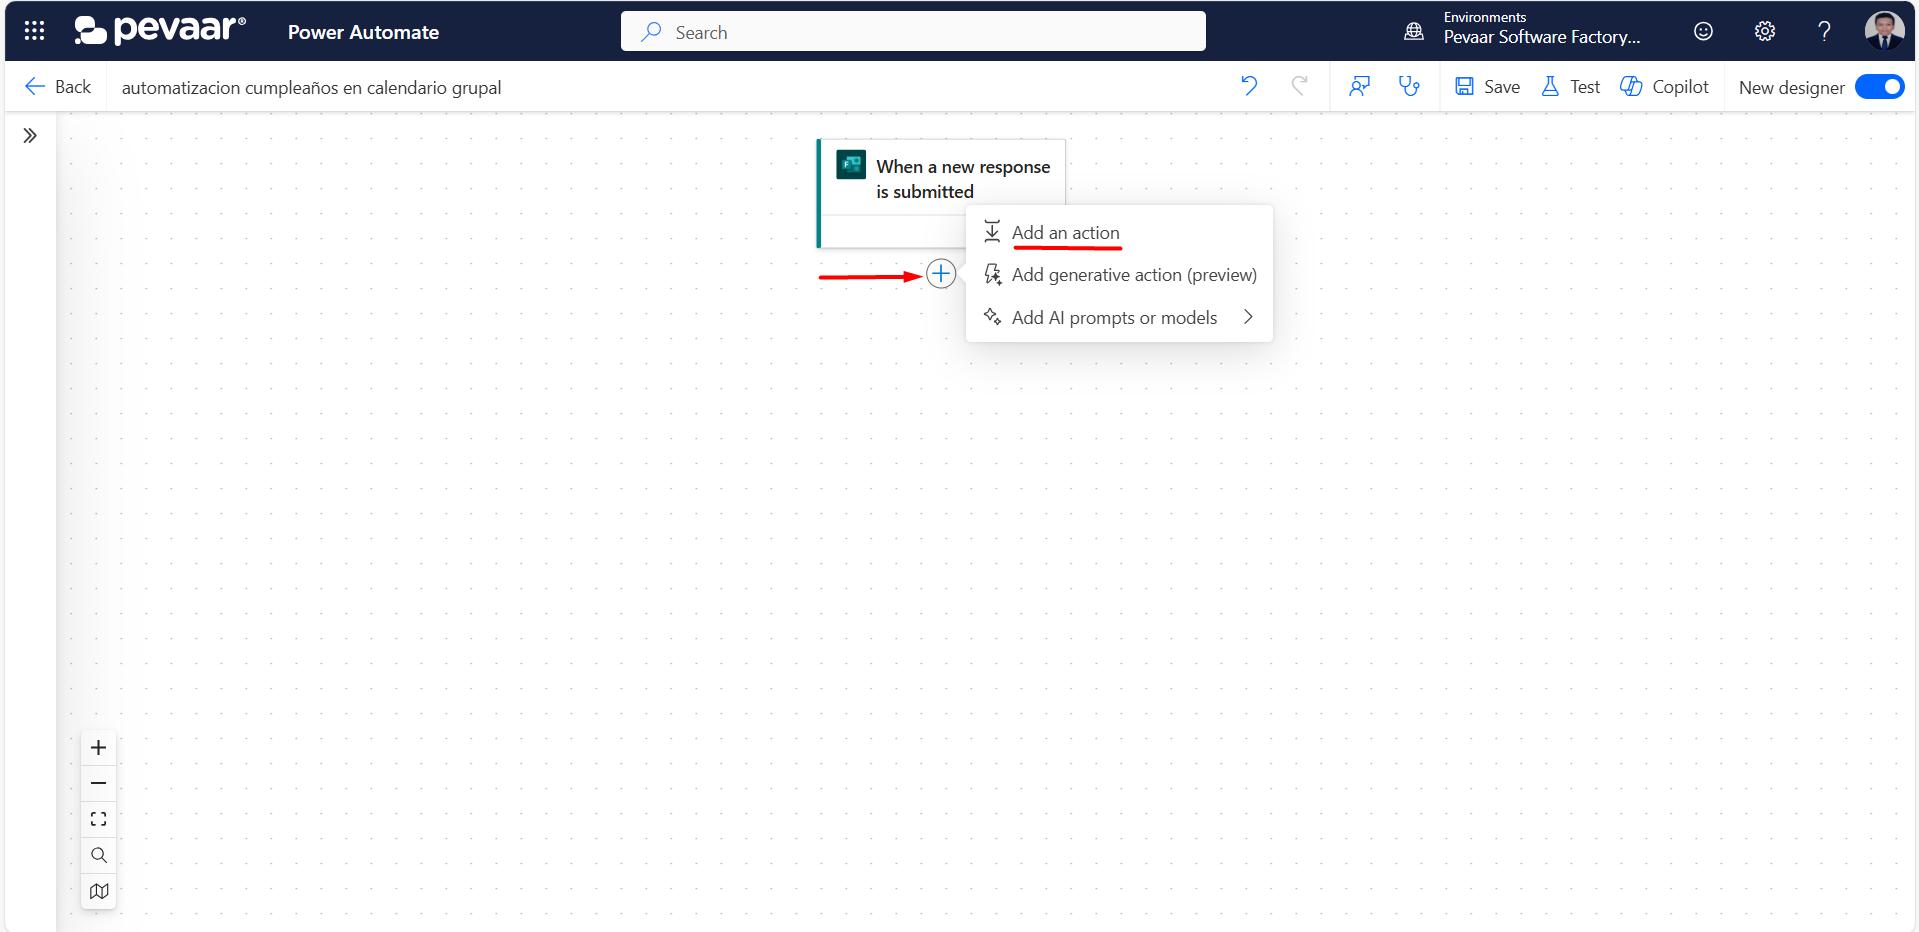 Image 4
In the search bar you must type the application to which the new action belongs, for this step it will be Forms, you must select the corresponding option (image 5).
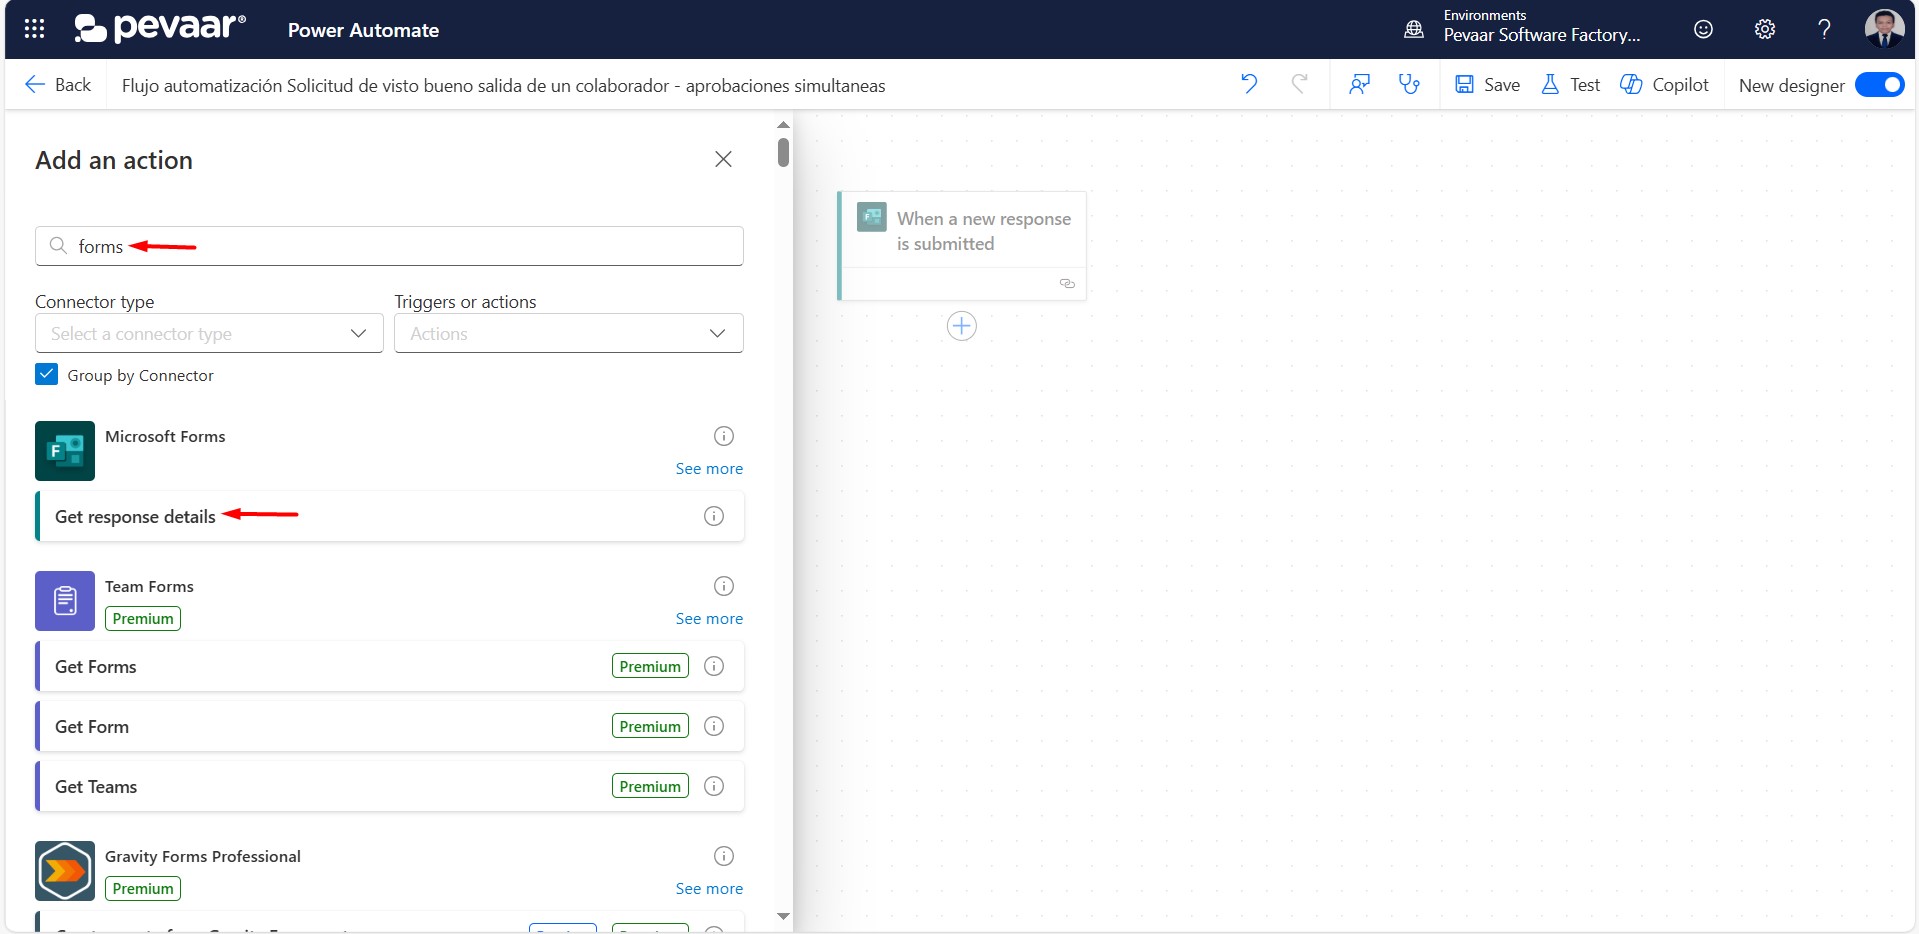 Image 5
The next action that is added to the flow is to Get response details, in this you must also select the “Form Id” corresponding to the Administrative Peace and Safe – Code RH-F-008-V02 (Image 6) in this step all the forms that the user has created will also appear; then “Response Id” of the dynamic content is selected (image 7). This allows the details of the answers to all the questions on the form to be obtained.
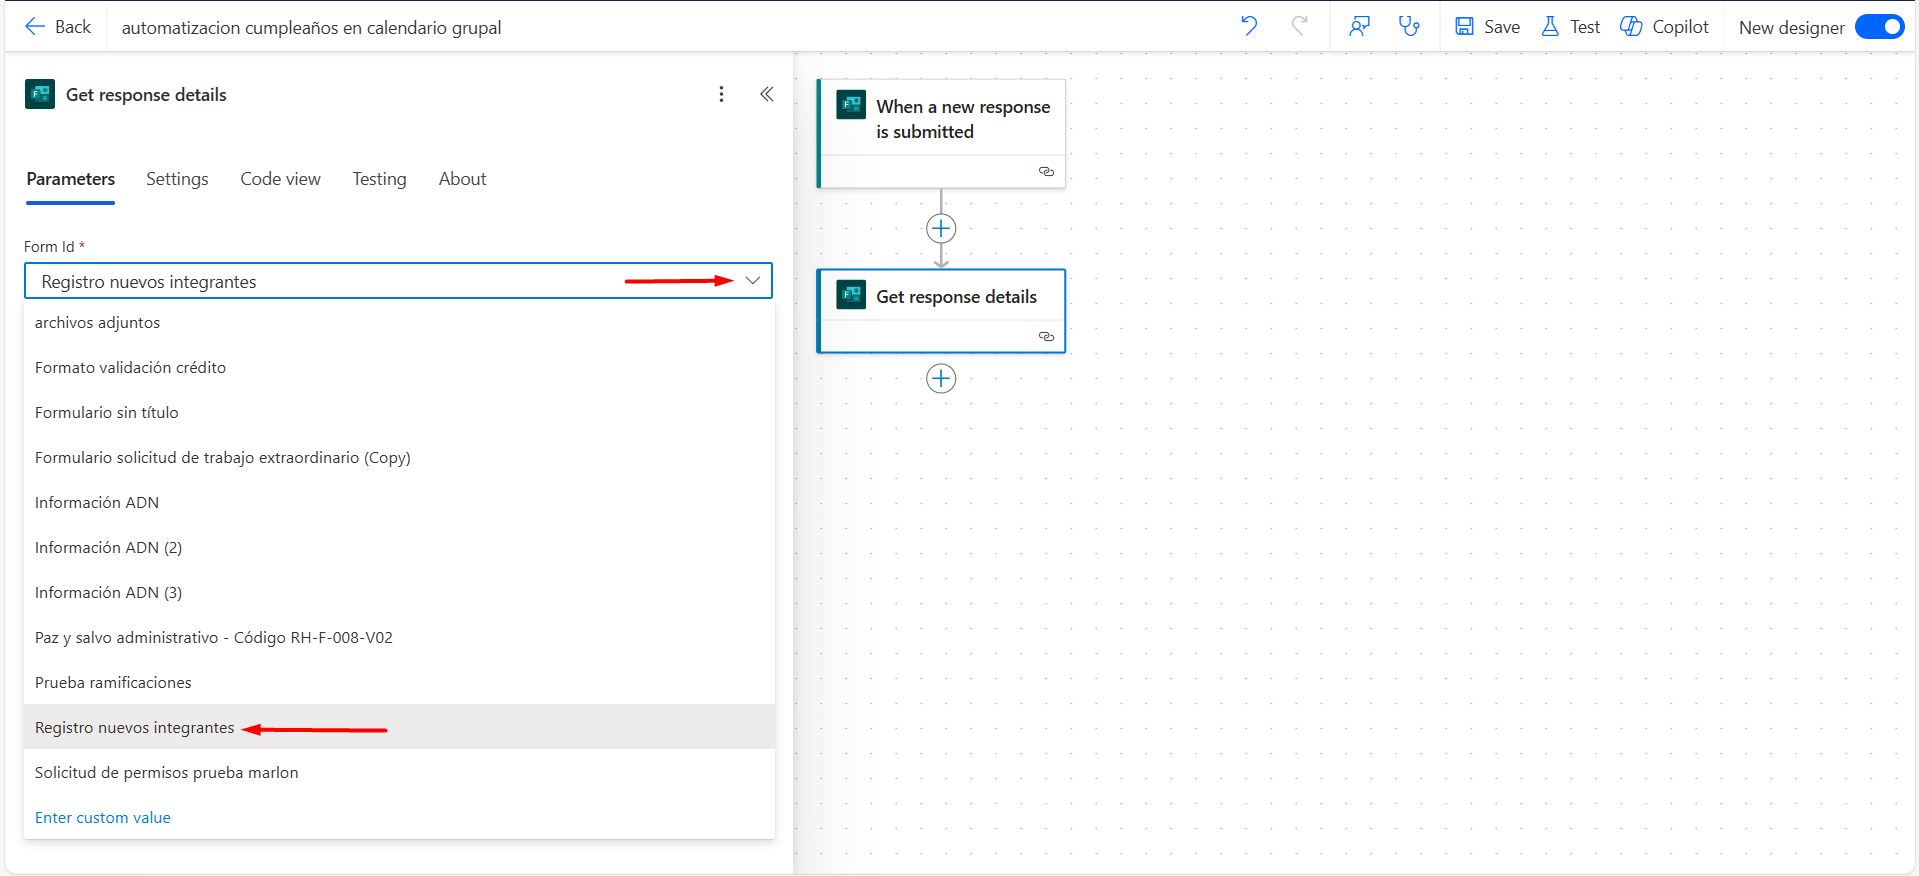 Image 6
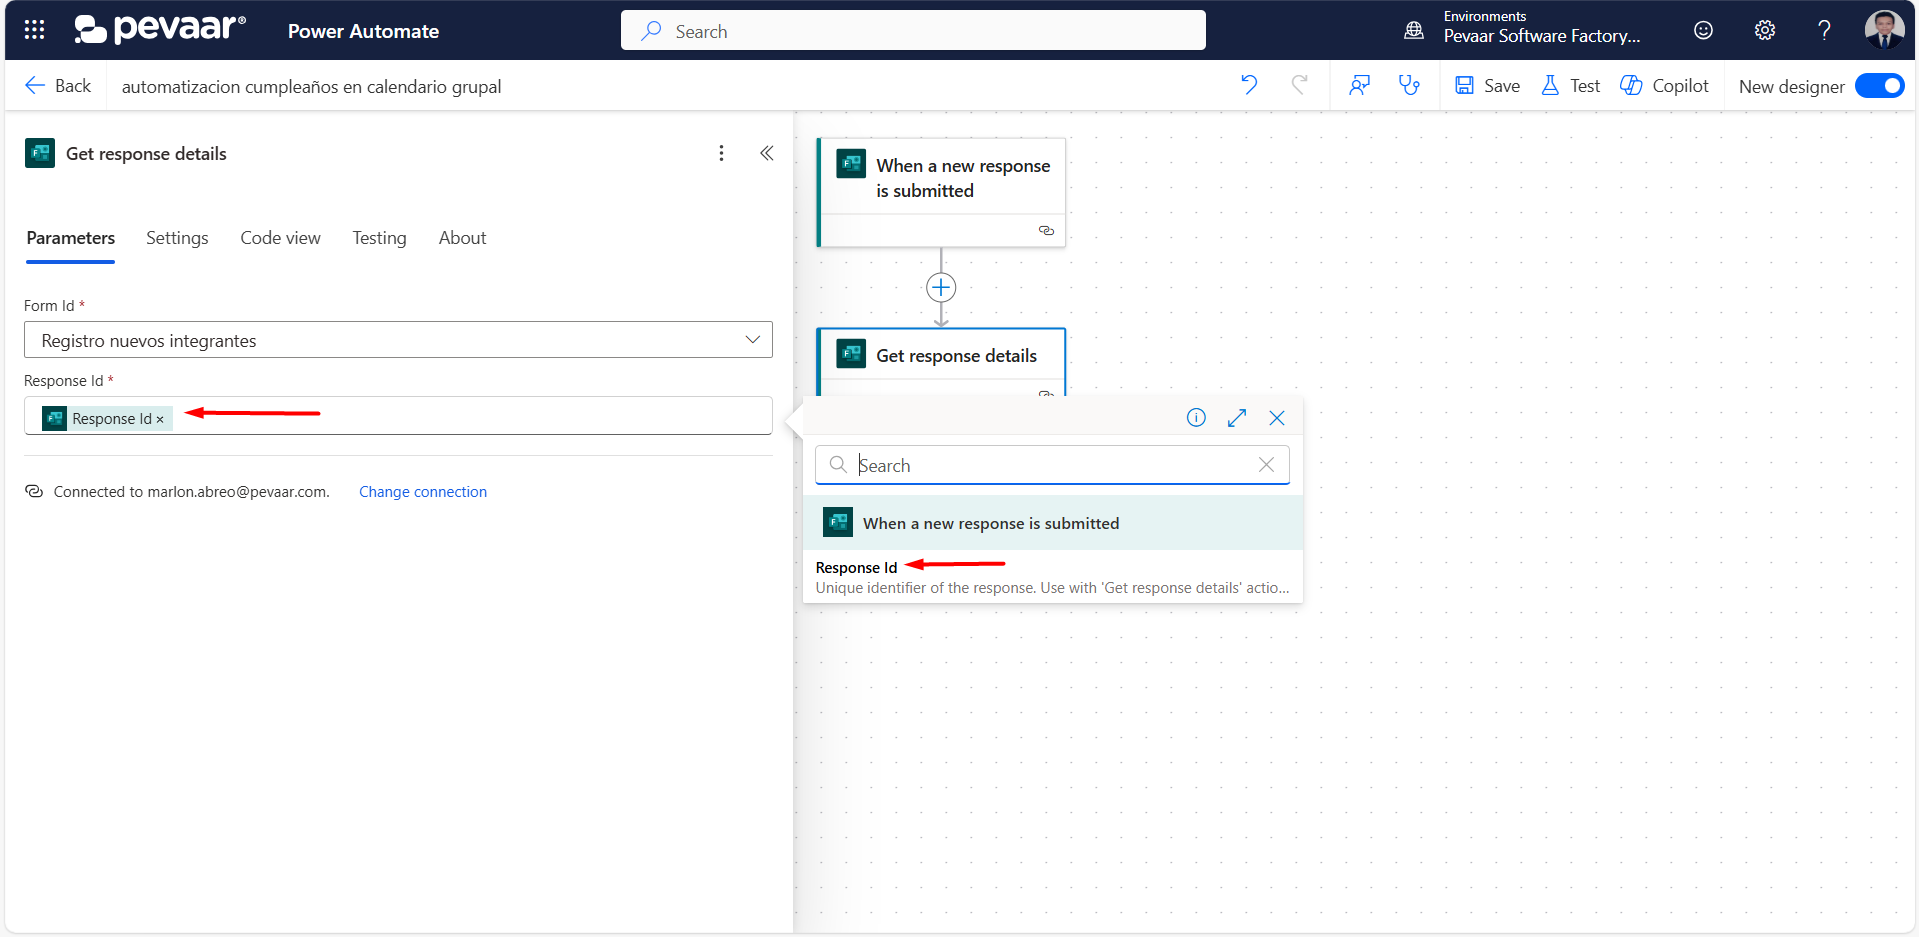 Image 7
The third action is “Convert time zone” through which the date of when the form was sent will be obtained, in order to use it and fill in the “Date” field of the word format.
In the search bar of the action you must type as keyword “convert time zone” and select the option “convert time zone” (image 8)
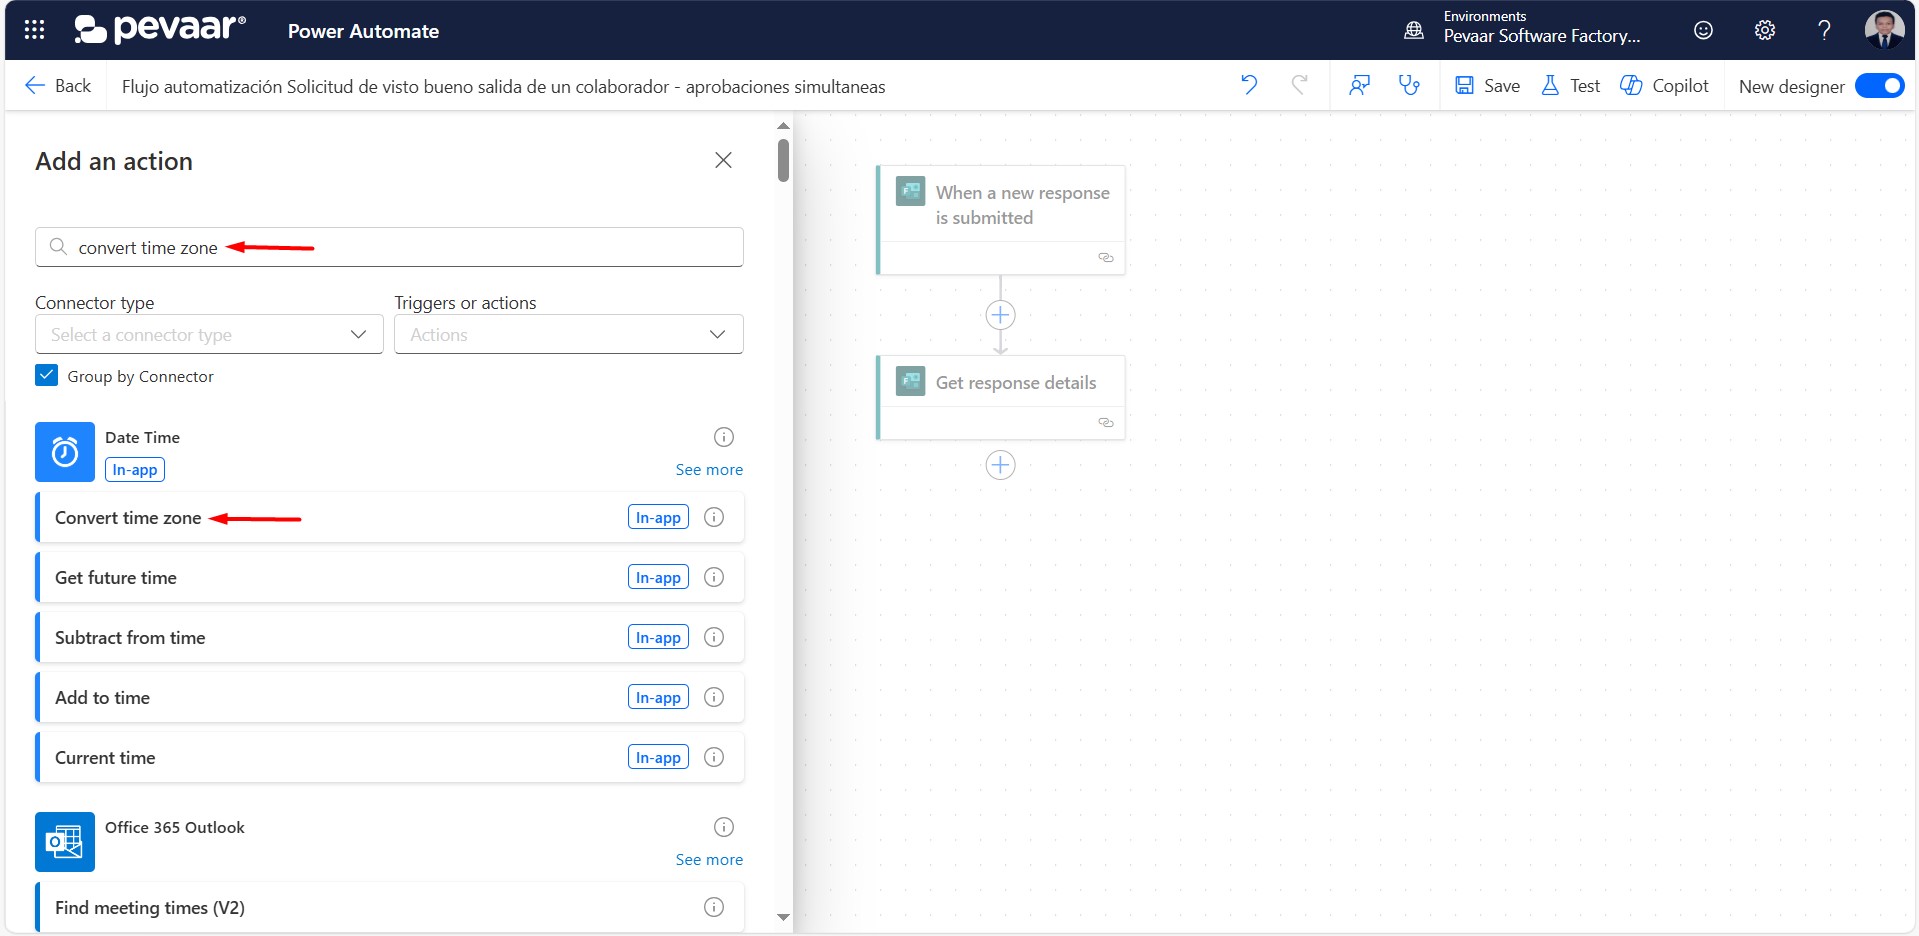 Image 8
Once the action is added we must fill in the fields “Base Time” which refers to the base time to make the conversion, “Source Time Zone” which is the source time zone, “Destination Time Zone” is the destination time zone to which we want to convert the base time, “Time Unit” is the format that is desired for the date. (image 9)
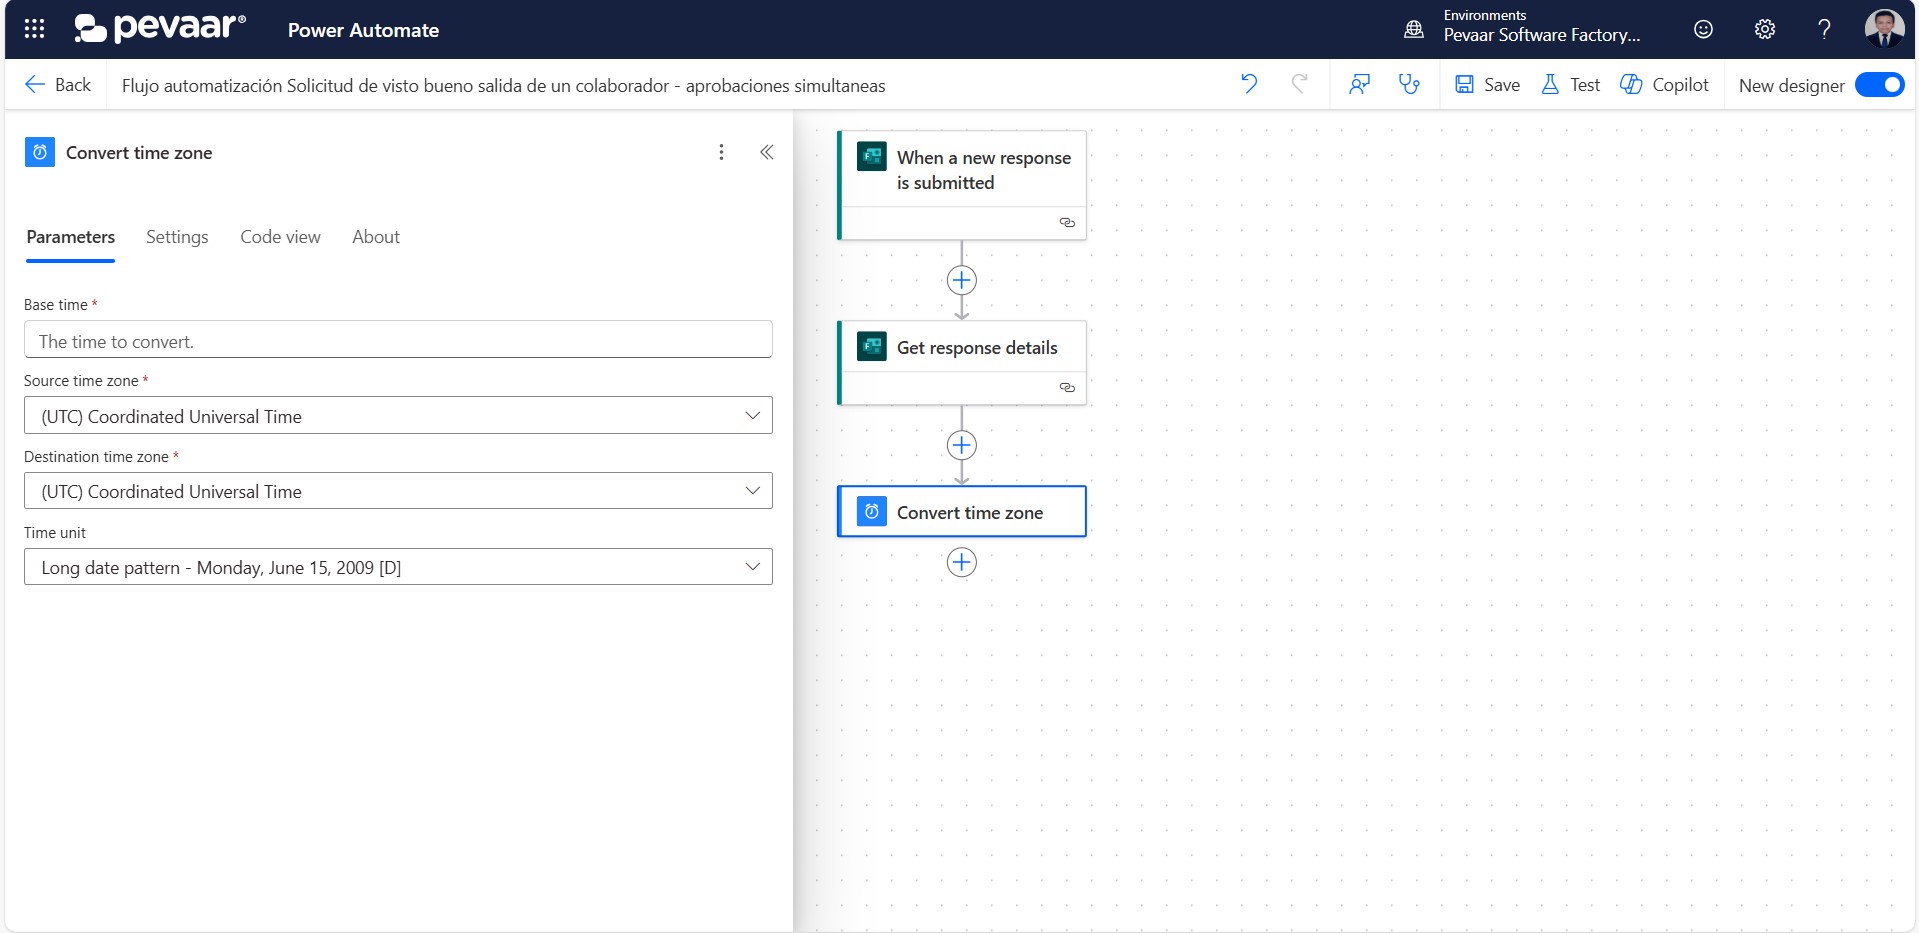 Image 9
In Base Time we will select the date of submission of the form dynamically, to find the date of submission we must click on “see more” next to “Get response details” (image 10)
 Image 10
In the Source Time Zone we will leave the option that appears by default “(UTC) Coordinated Universal Time”, the Destination Time Zone we will select our time zone, in this case UTC –05:00 (image 11)
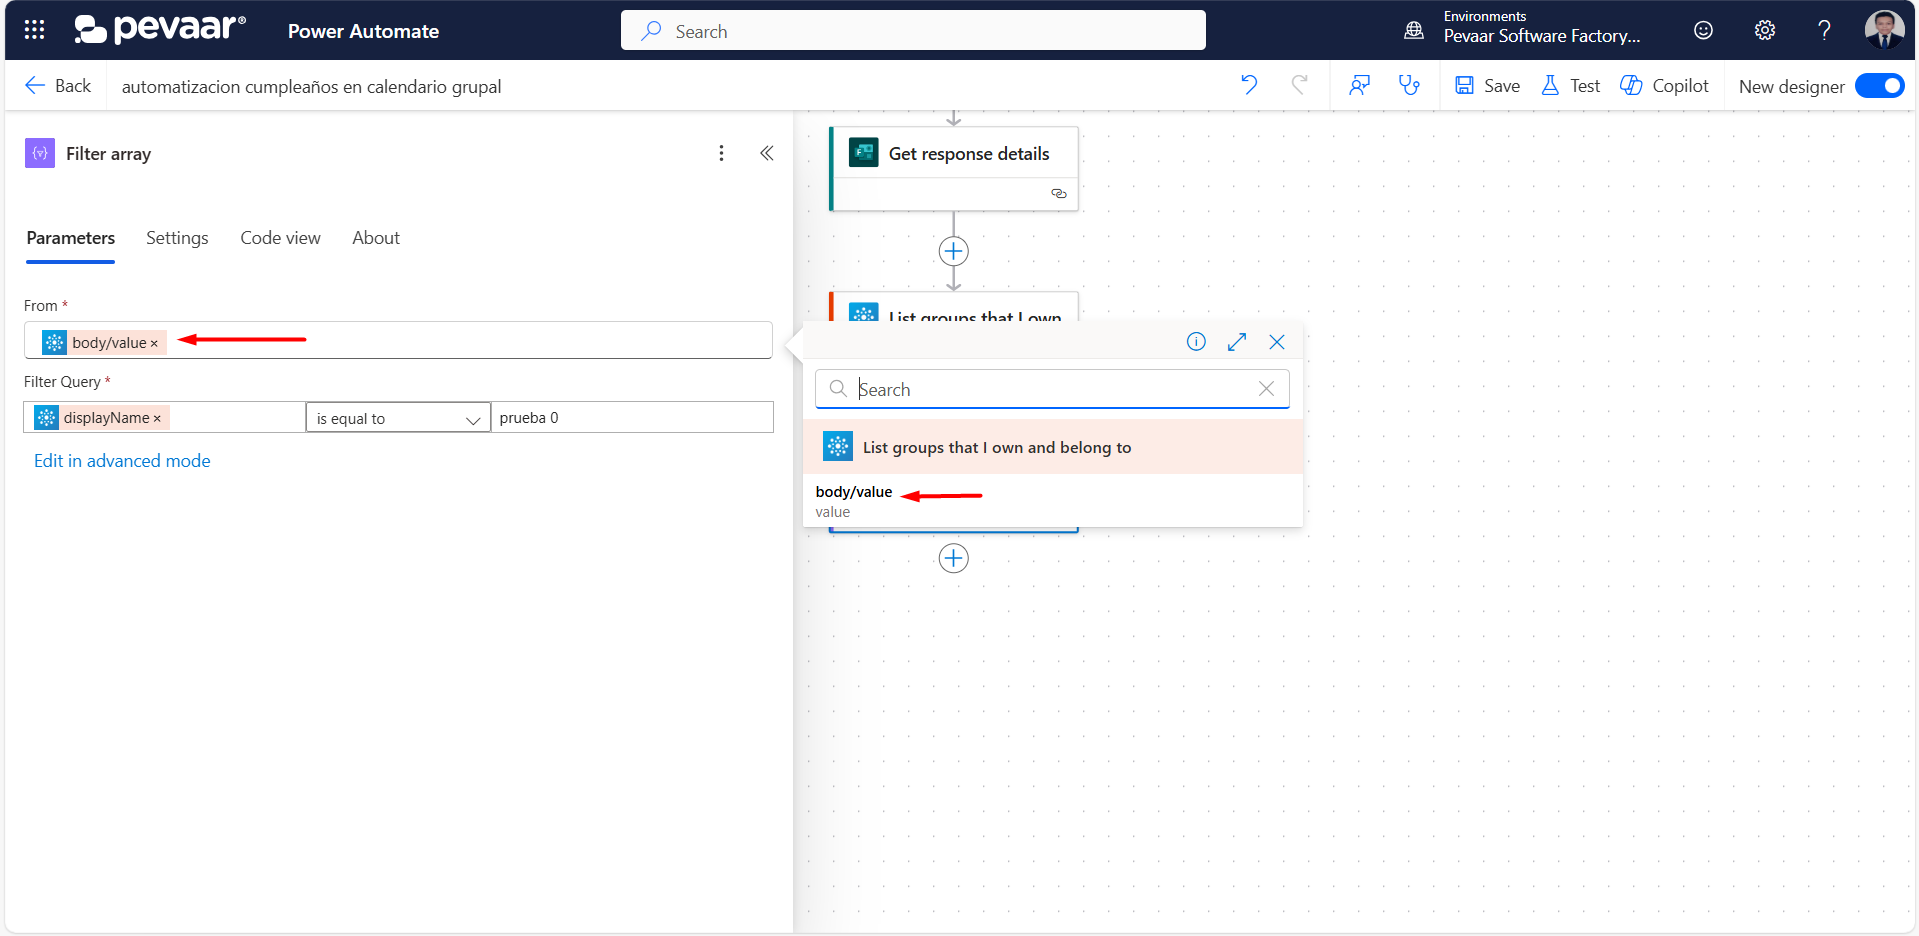 Image 11
In Time Unit we select the date format that interests us the most, in this case we select “Long date pattern [D]” (image 12)
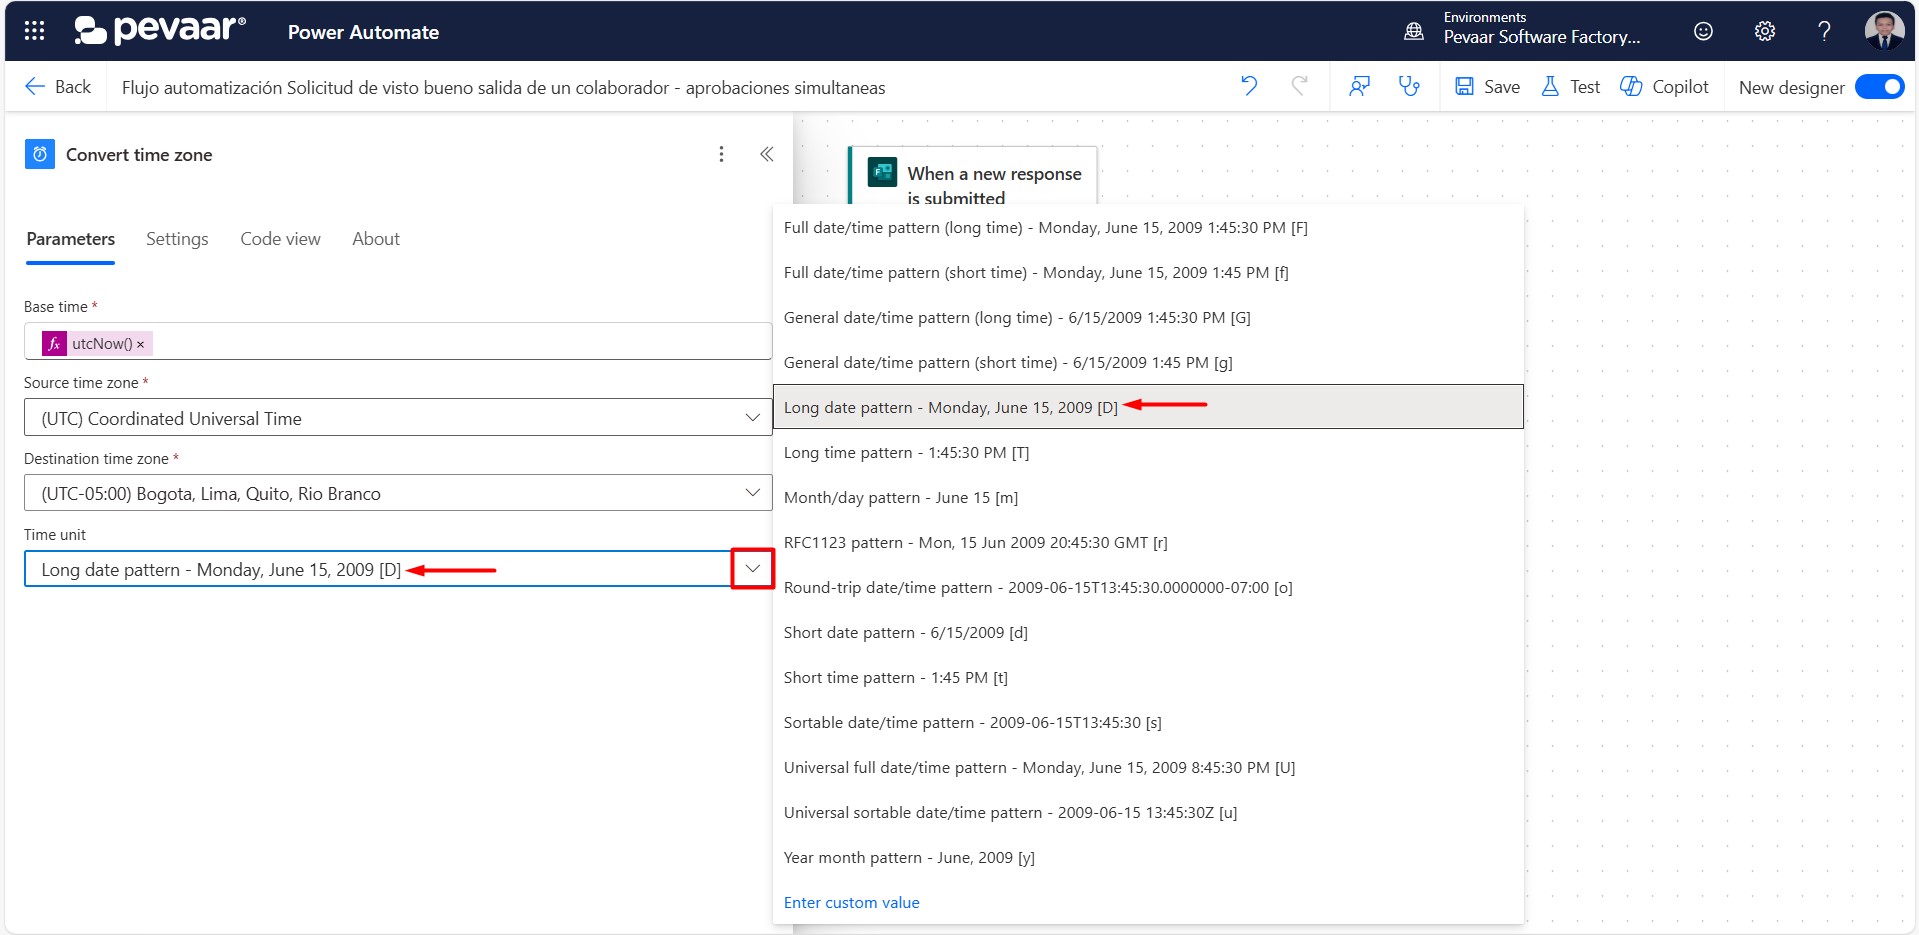 Image 12
The fourth action is a “Condition/Condition” it is checked that the reason for issuance of the paz y salvo is withdrawal, if the previous statement is true the field reason: withdrawal will be filled in the format, if the statement is false, the field reason: transfer will be filled in the form.
In the stock search bar, type “condition” as the keyword and select the option “condition” (image 13)
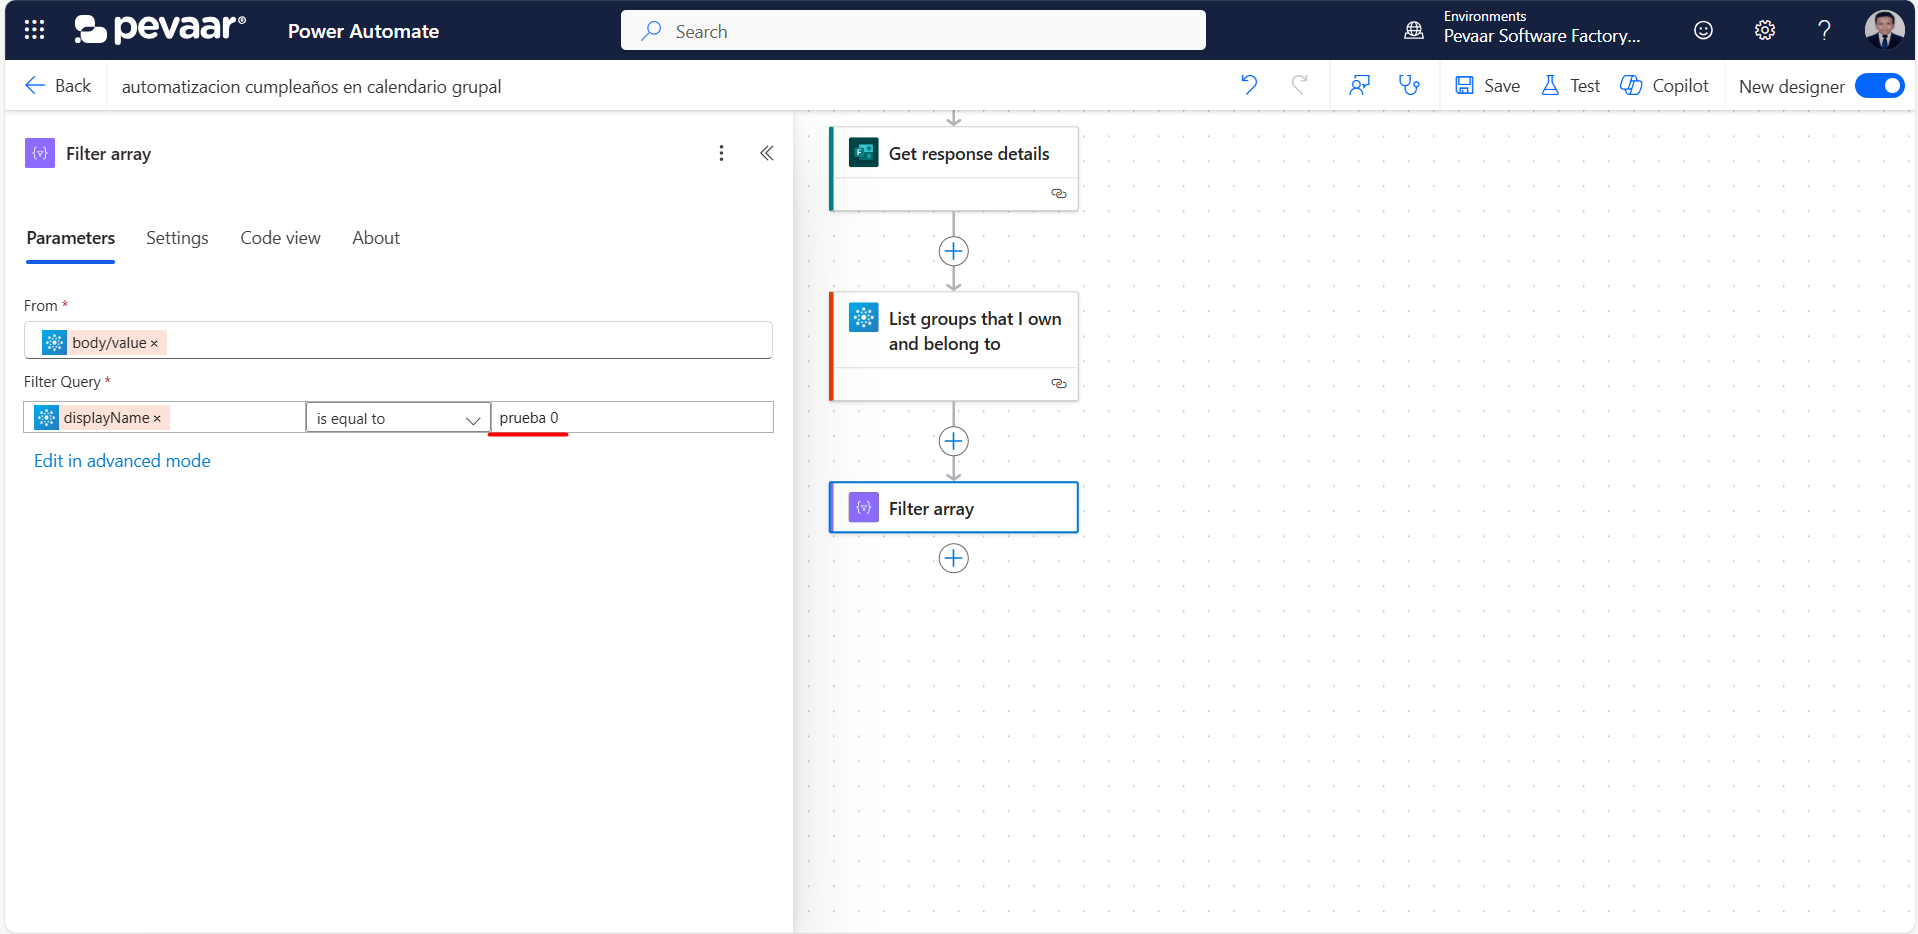 Image 13
In the first parameter of the condition expression, the reason for issuing the paz y salvo must be dynamically selected from the form (image 14)
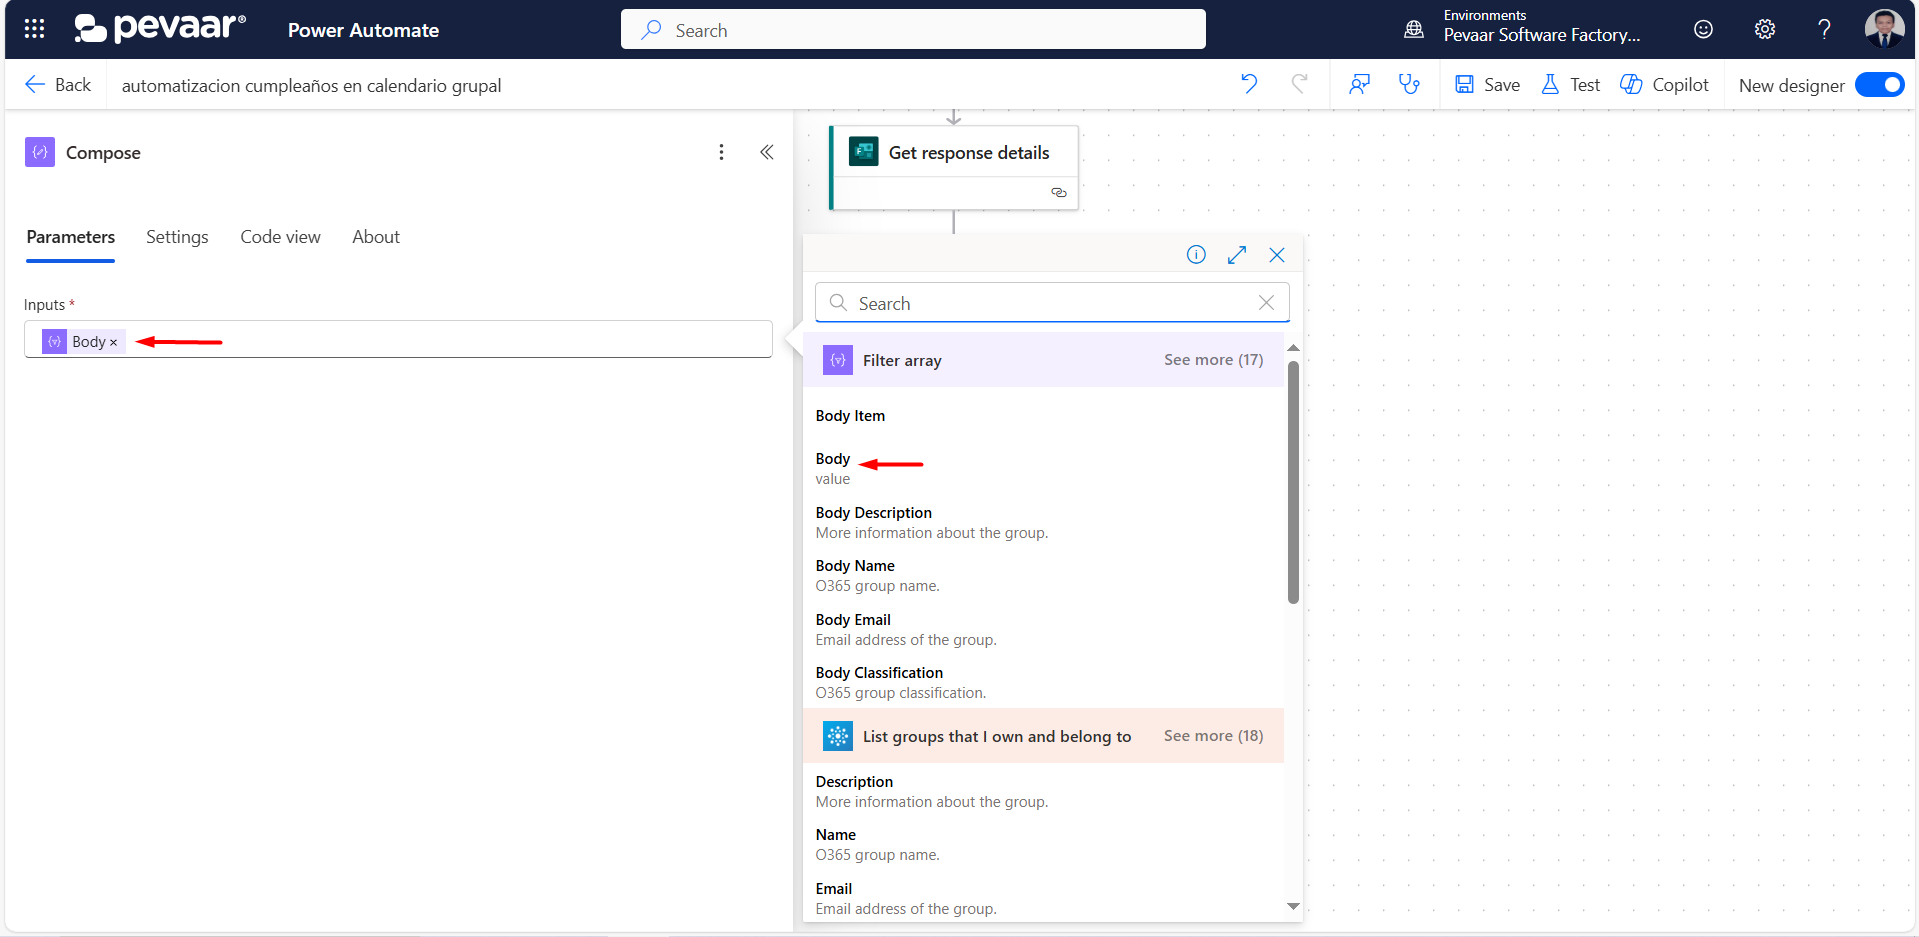 Image 14
In the second parameter, which compares the expression, the default “is equal to” is left, the third parameter we will place “Withdrawal”, as it is in the form (image 15)
 Image 15
Before continuing, you must have a format to which you want to add content dynamically, once the format has been created as we wish, the following steps must be done in Word desktop version (image 16)
 Image 16
The first thing we must do is add the developer functions, for this and without closing the format we have designed, we go to File or File, which is the first tab (image 17)
 Image 17
Once inside File/Archivo click on Options (image 18)
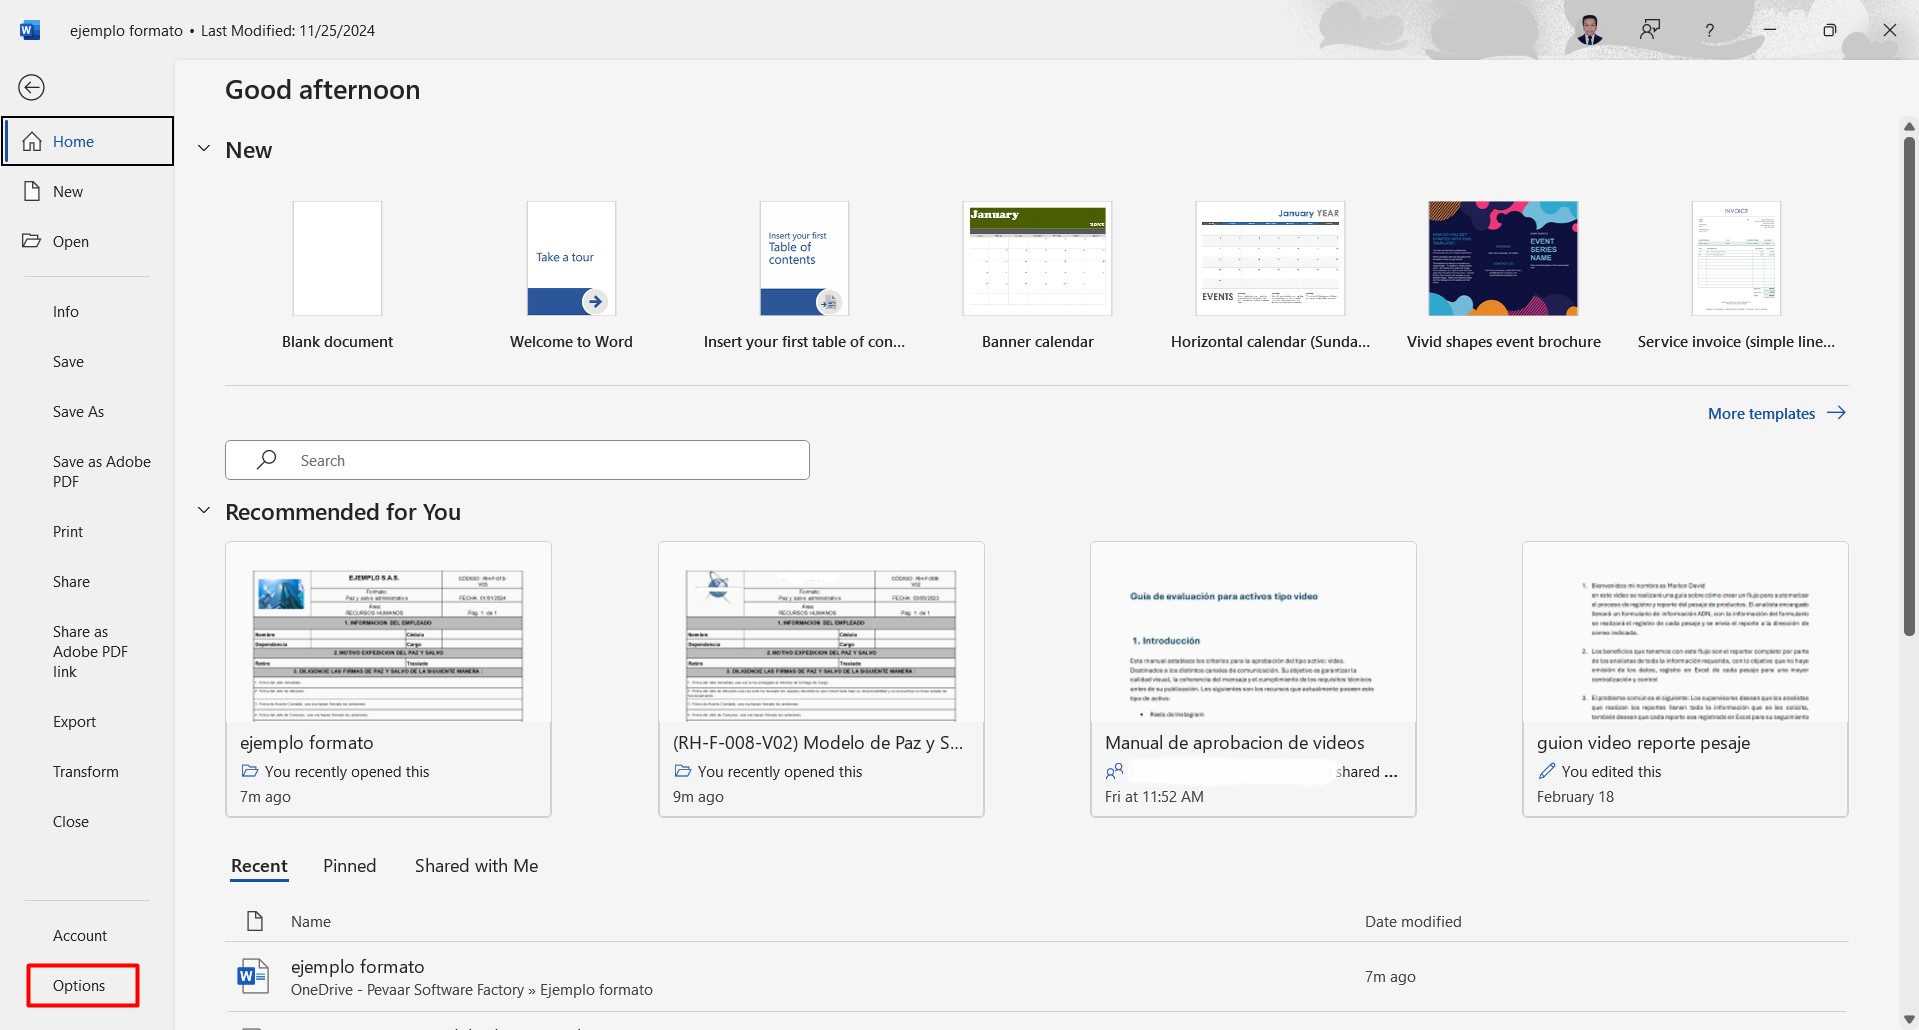 Image 18
In the window that appears, we go to the Customize Ribbon section, look for the Developer option and select it, finally click on OK (image 19)
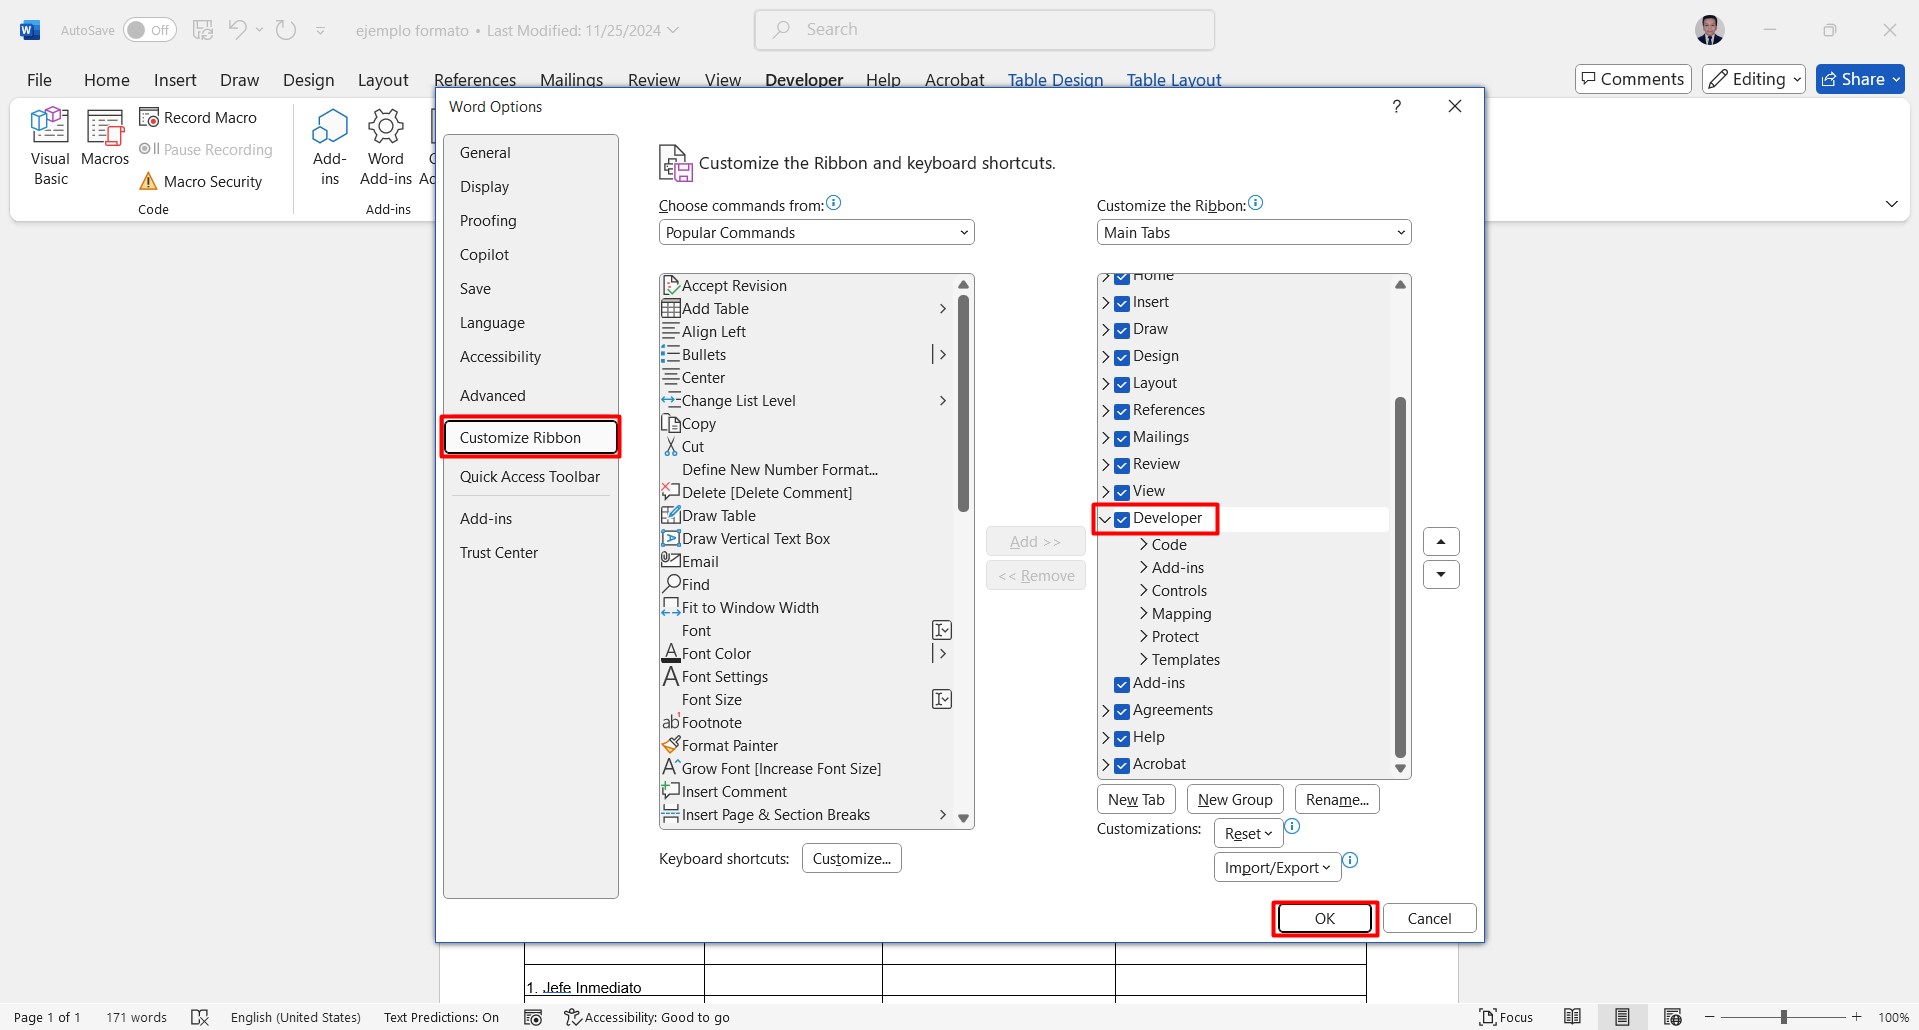 Image 19
Once the above is done we can add the dynamic text with the developer commands, we must click on the field where we are going to add the text, then we click on plain text content control (image 20)
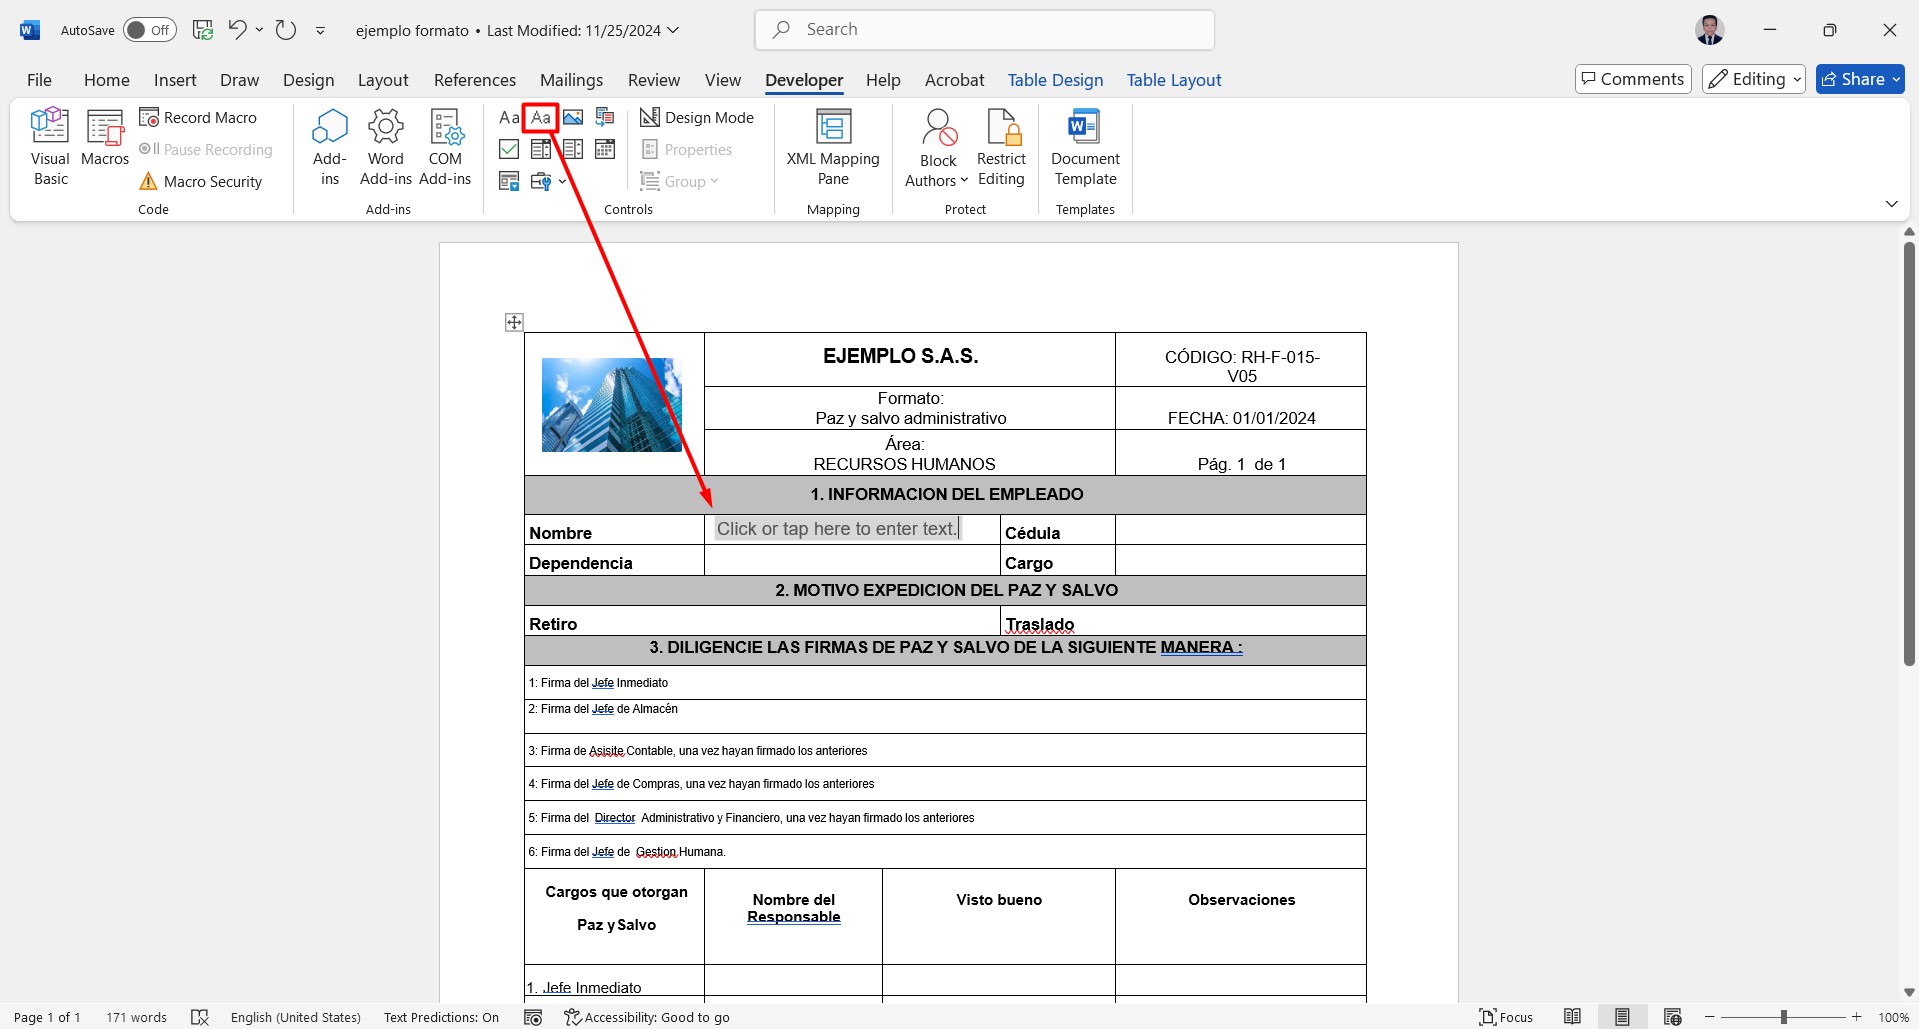 Image 20
To remove the text that comes out by default we can paste a blank space, the following page is recommended: Invisible space — Small ( ) Medium (ᅠ) Large (ᅠ) ❤️ , then we must give a title to the text, for this we do the following, without leaving the text, we click on Properties or Properties, finally we add a descriptive title of the field and click on OK, The tag will be added automatically once we do not leave the properties (image 21)
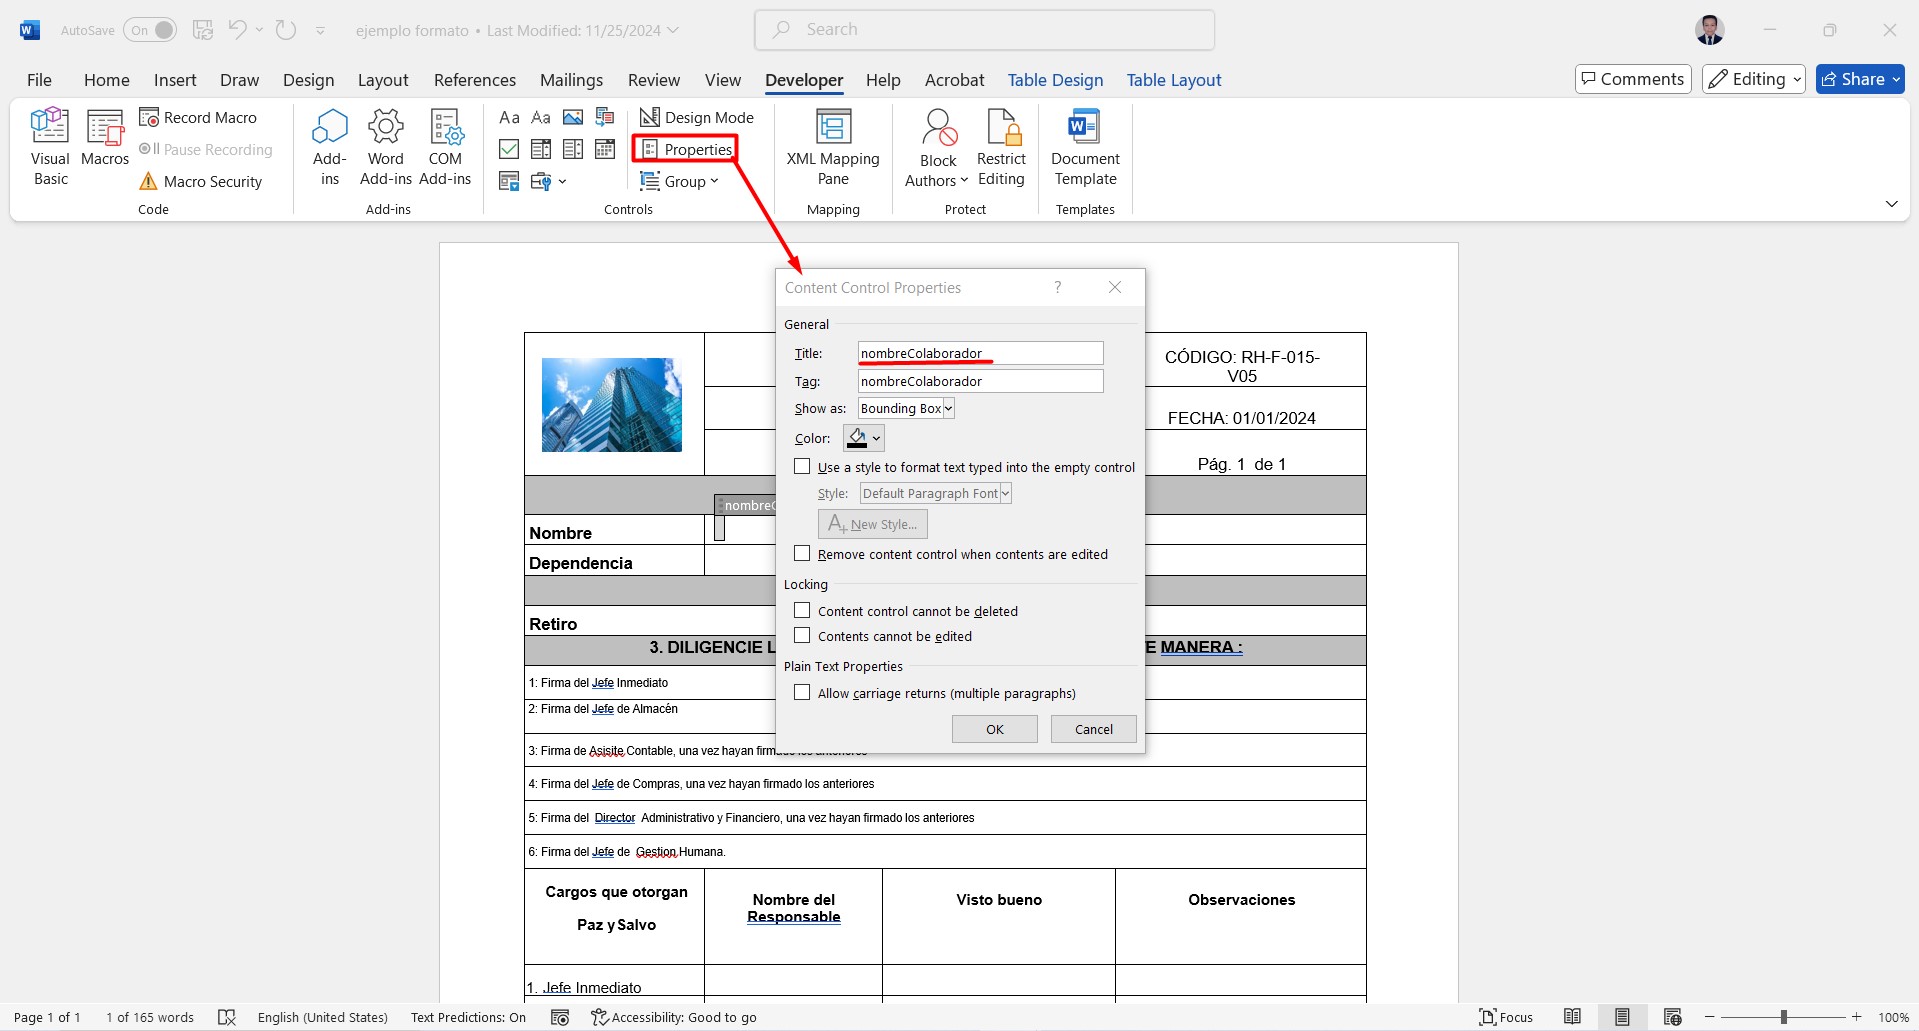 Image 21
In this case, we will repeat the process in point 4.5.2 in the fields that are underlined with red (Figure 22)
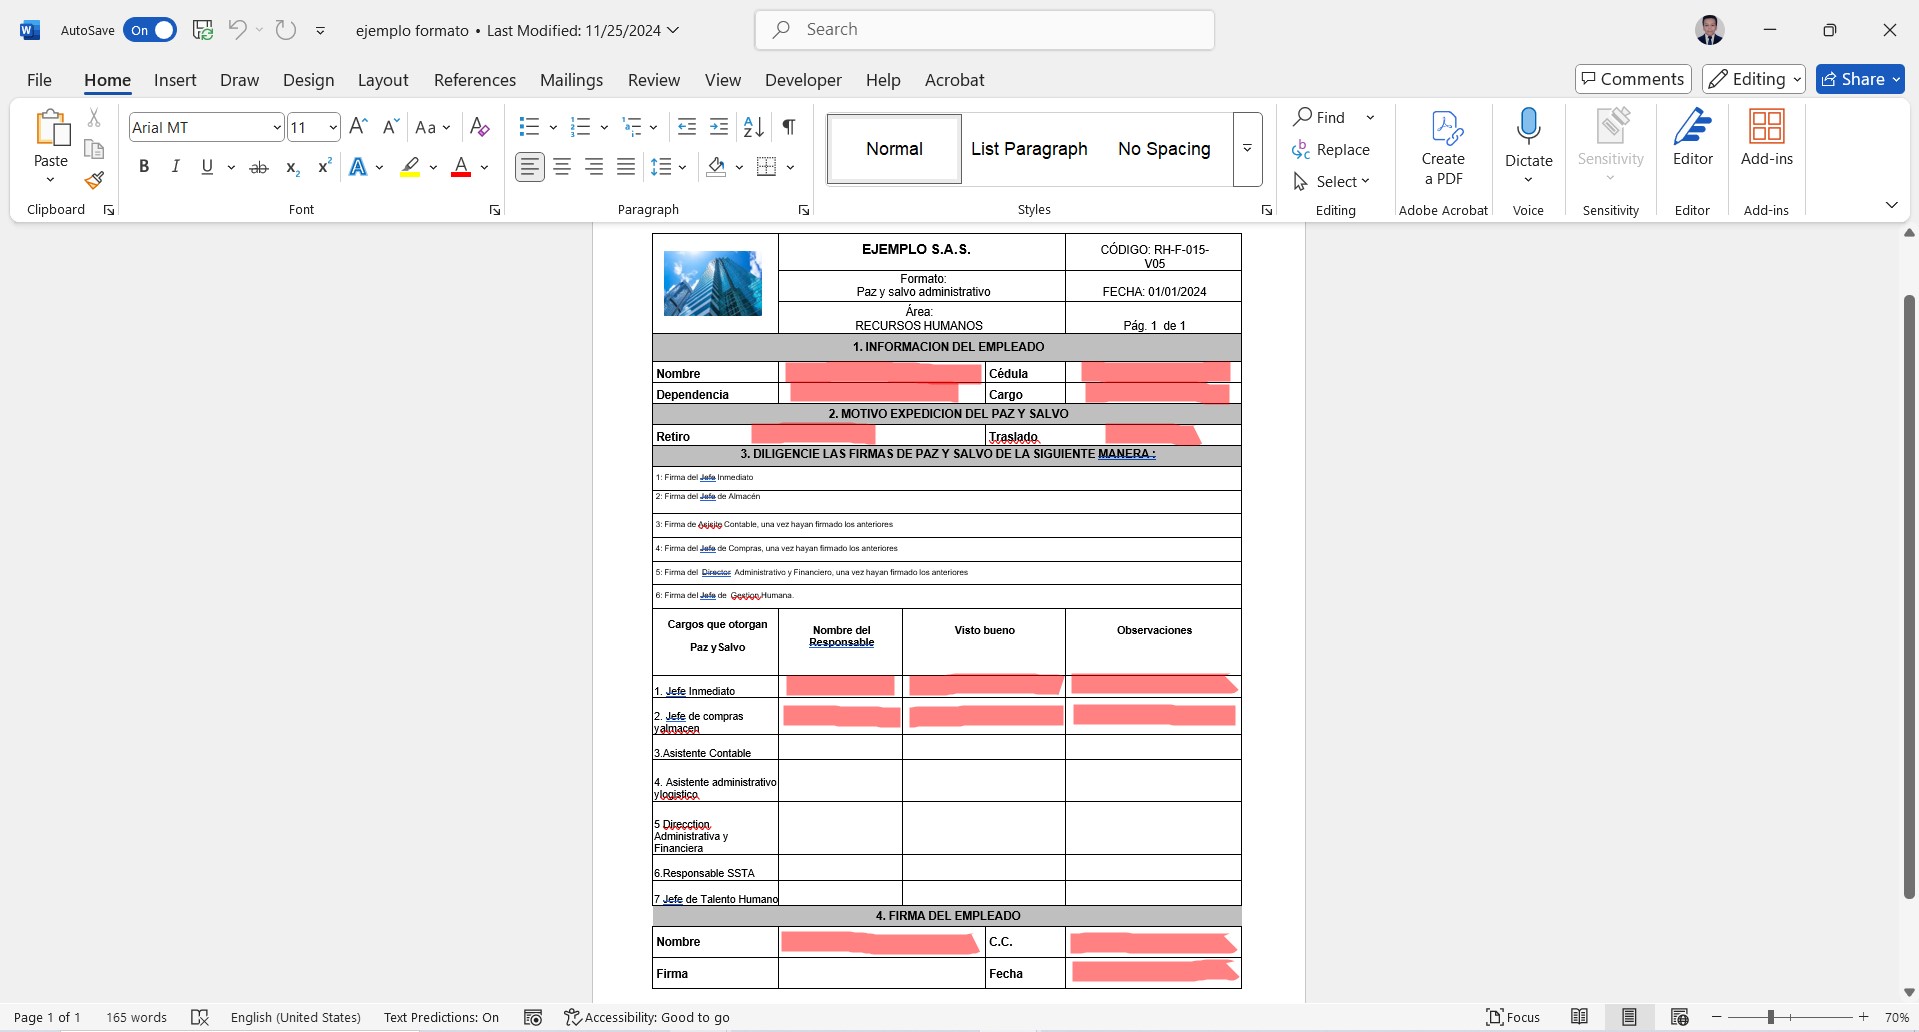 Image 22
At the end of the format, what we will do is create a table that will serve as a summary, which will show the name and comments of the approvers, and as in the previous steps we add the dynamic text with its respective name (image 23)
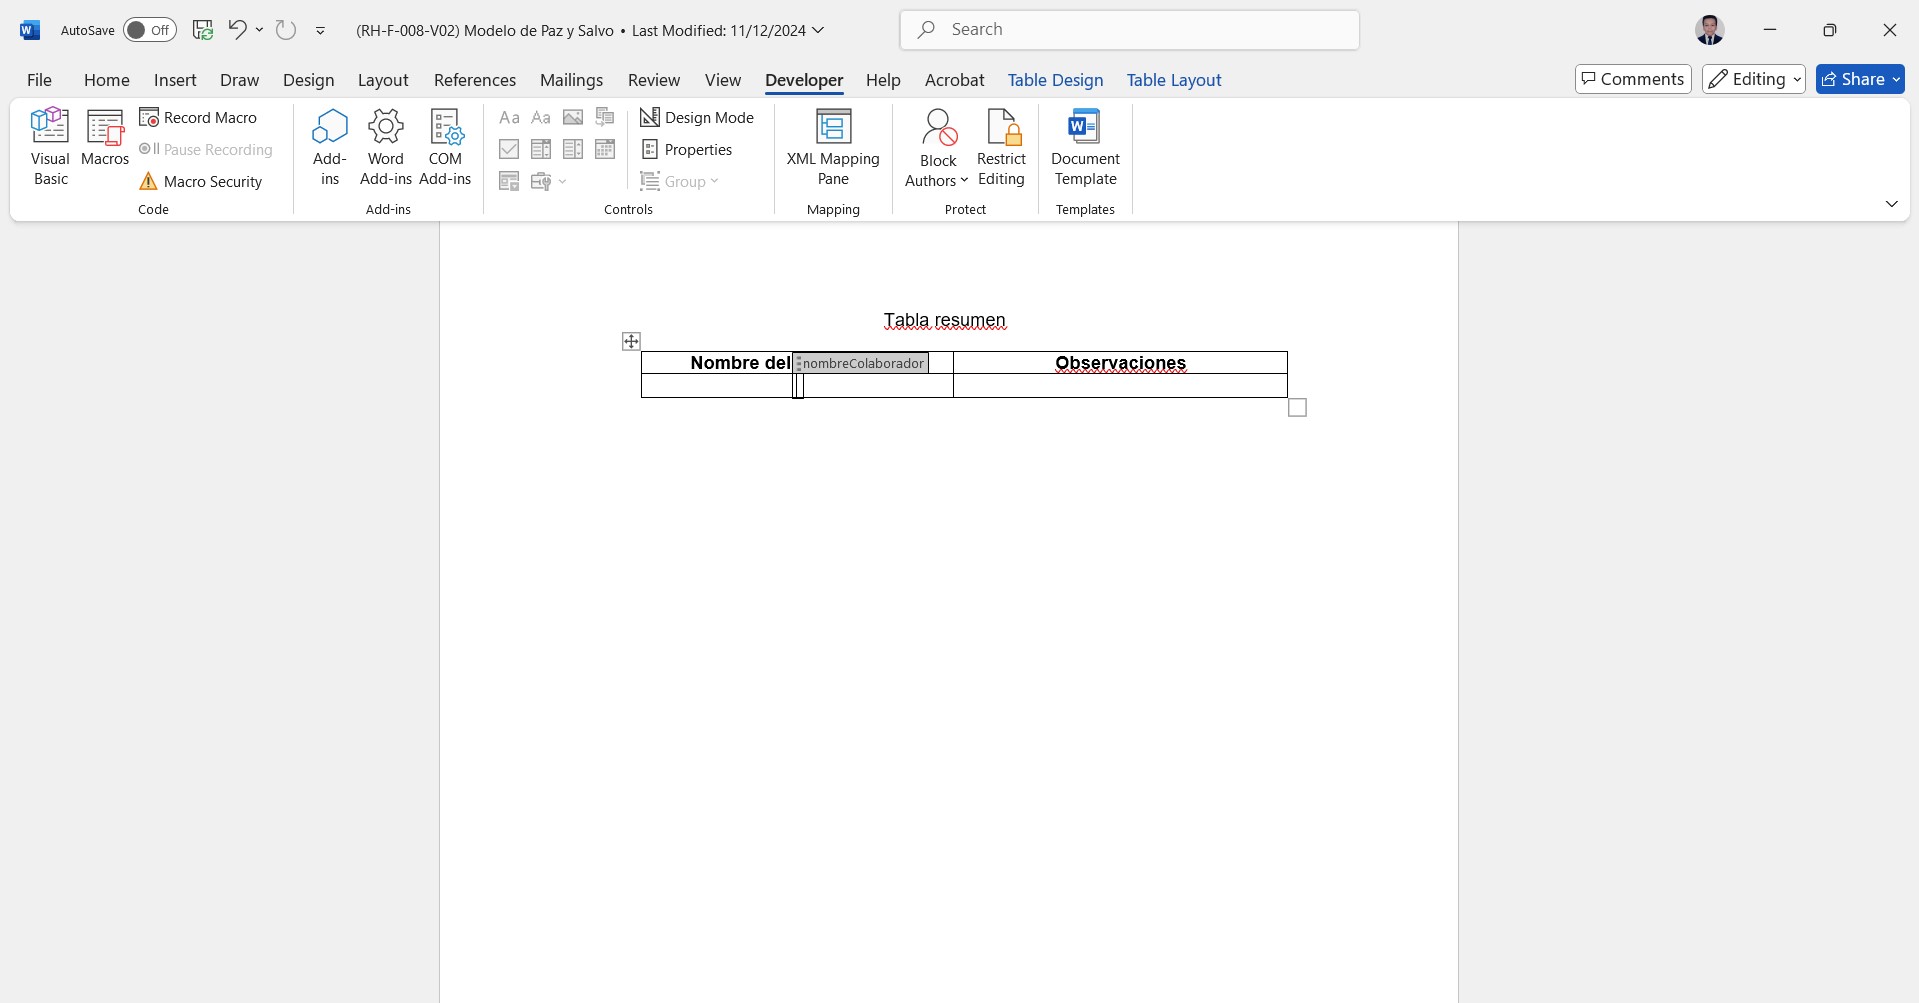
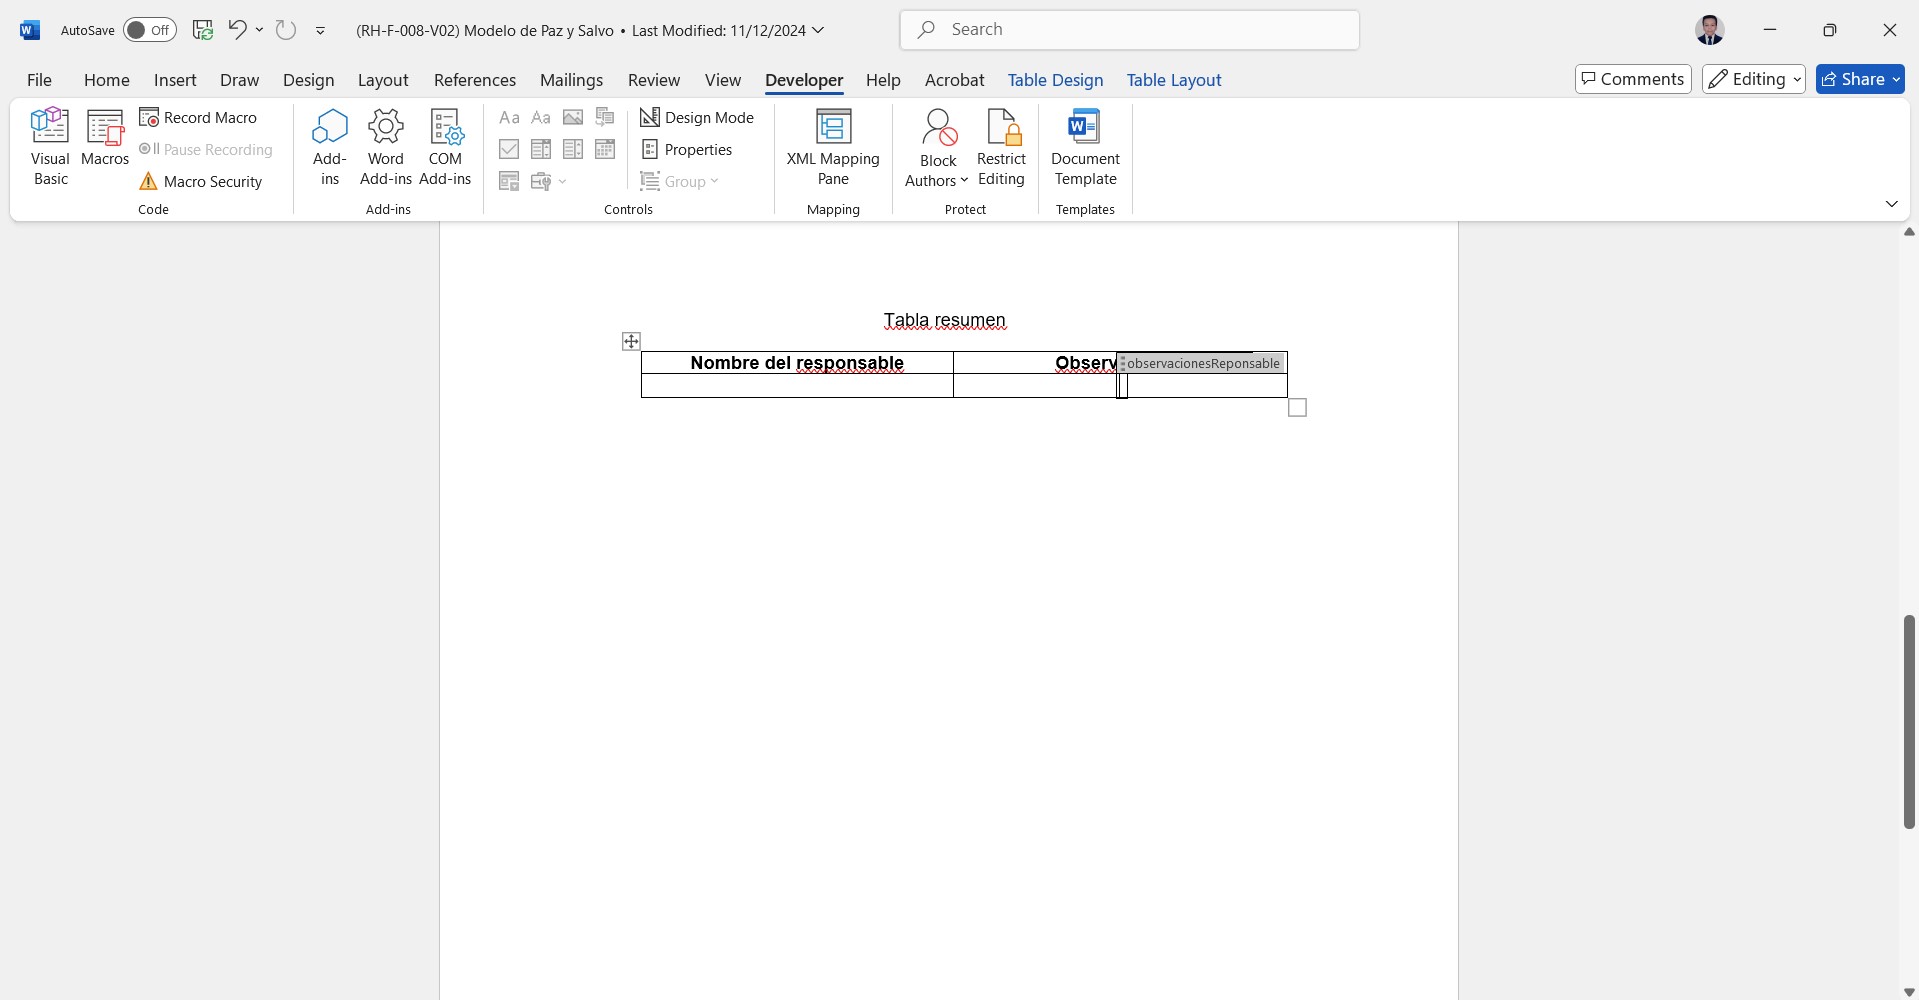 Image 23
Once the above is done, we must select the row below, and click on the marked option, with this option we can add content that is repeated, which will be obtained later in the form of a table (image 24)
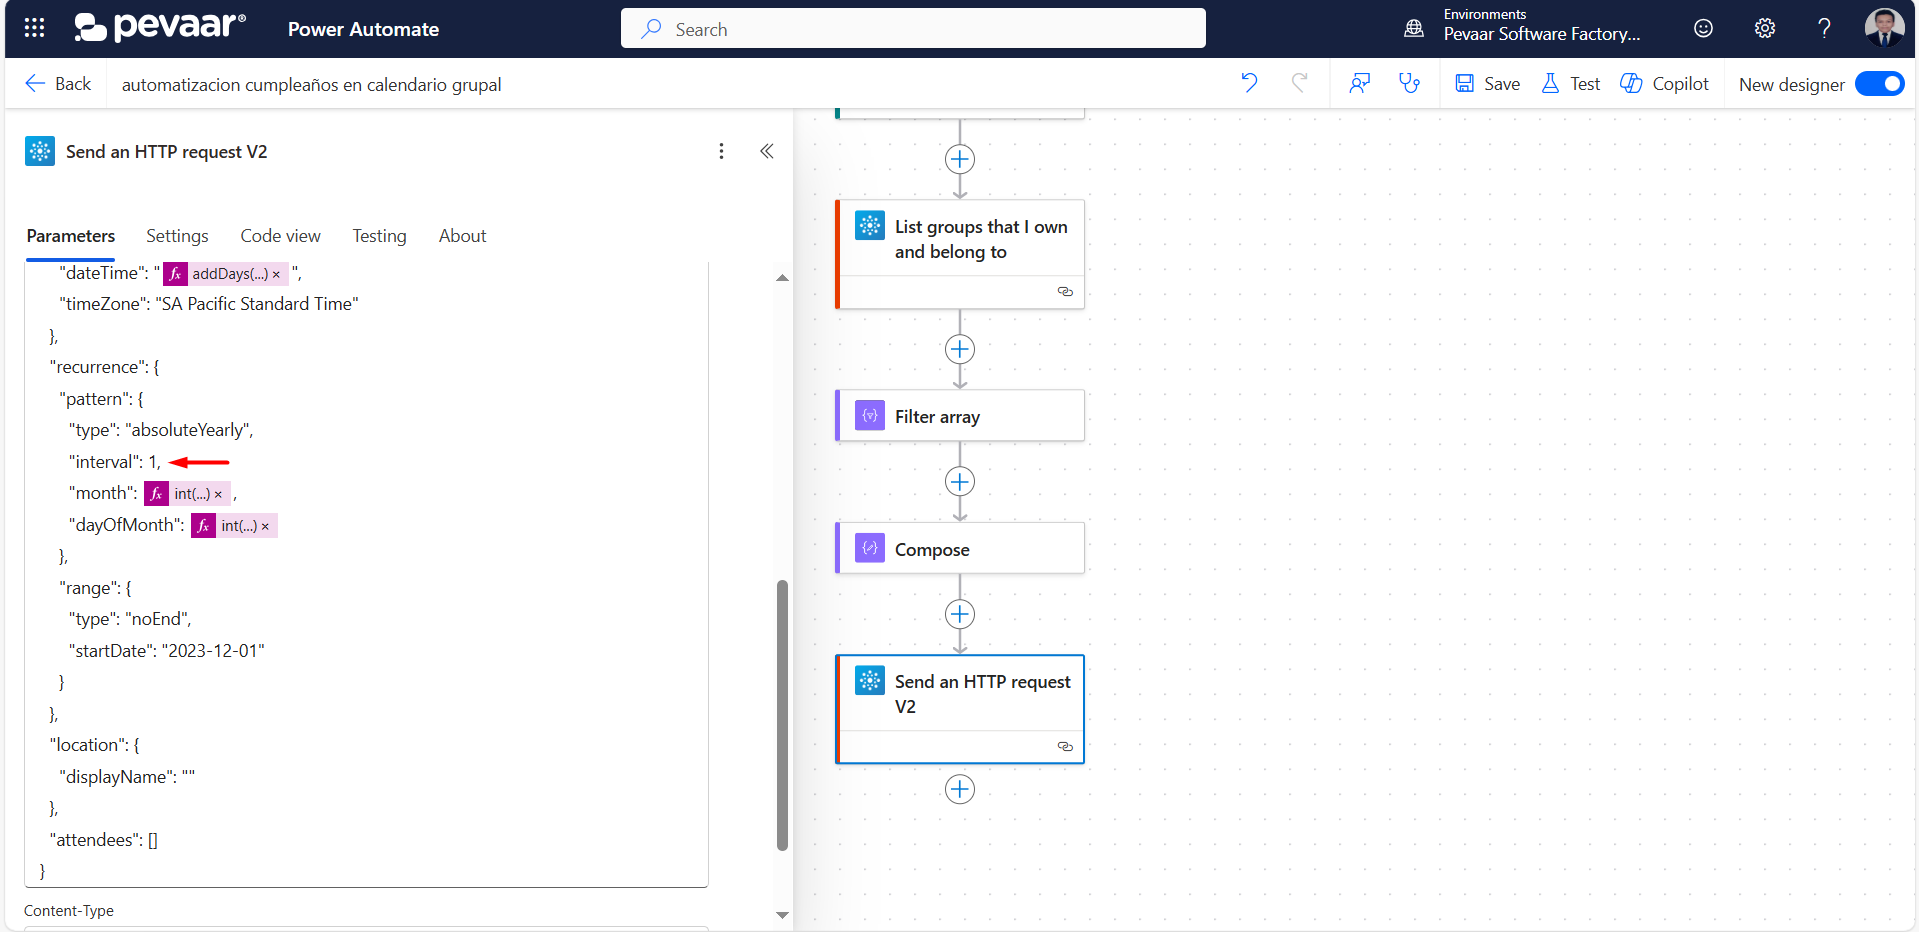 Image 24
Then we must select the box that appears on the table by click on the indicated dots, then we click on properties and give it a title, in this case “table”, finally we click on OK, once we have finished, we will save the format in a folder in OneDrive, it is also possible to save the file in a SharePoint site (image 25)
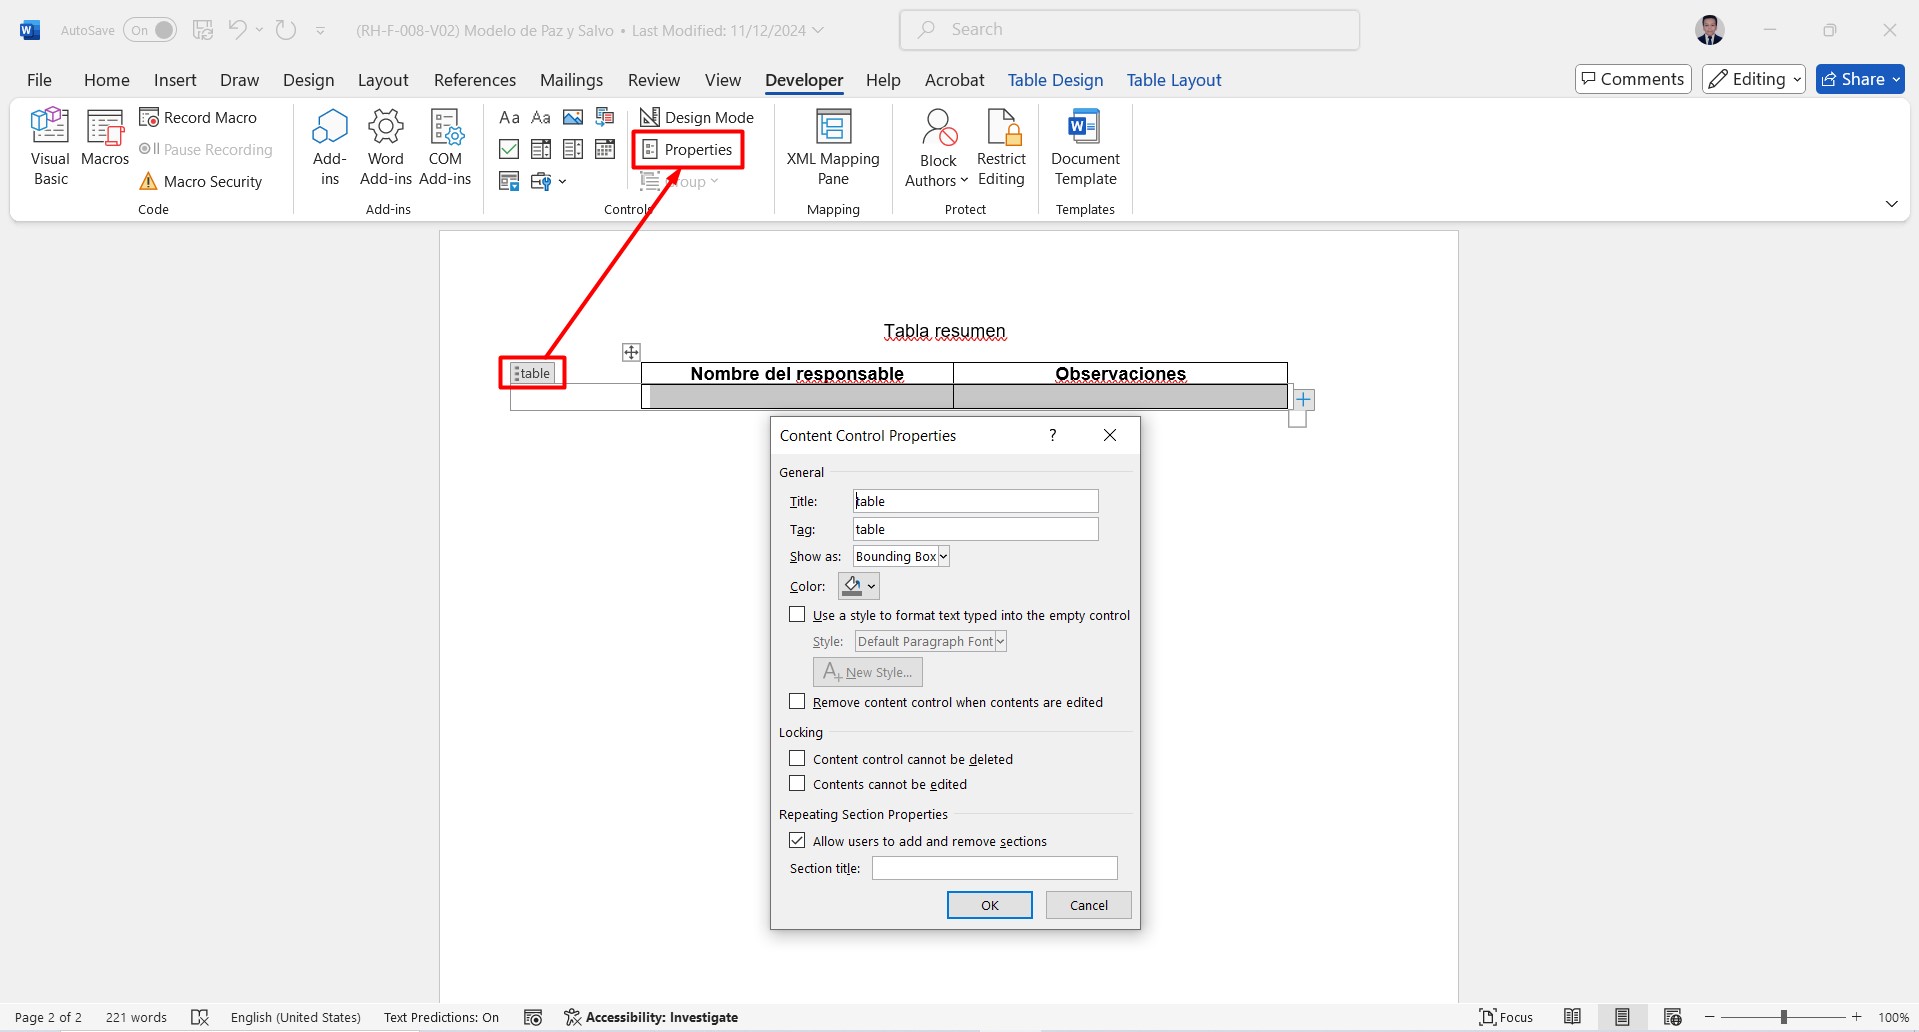 Image 25
We go back to our flow in Power Automate, on the “True” side of the condition we add the action “Populate to Microsoft Word template” with this action we create the dynamic word based on the format we have created.
In the search bar of the action you must type as keyword “populate a word template” and select the option “Populate a Microsoft Word template” (image 26)
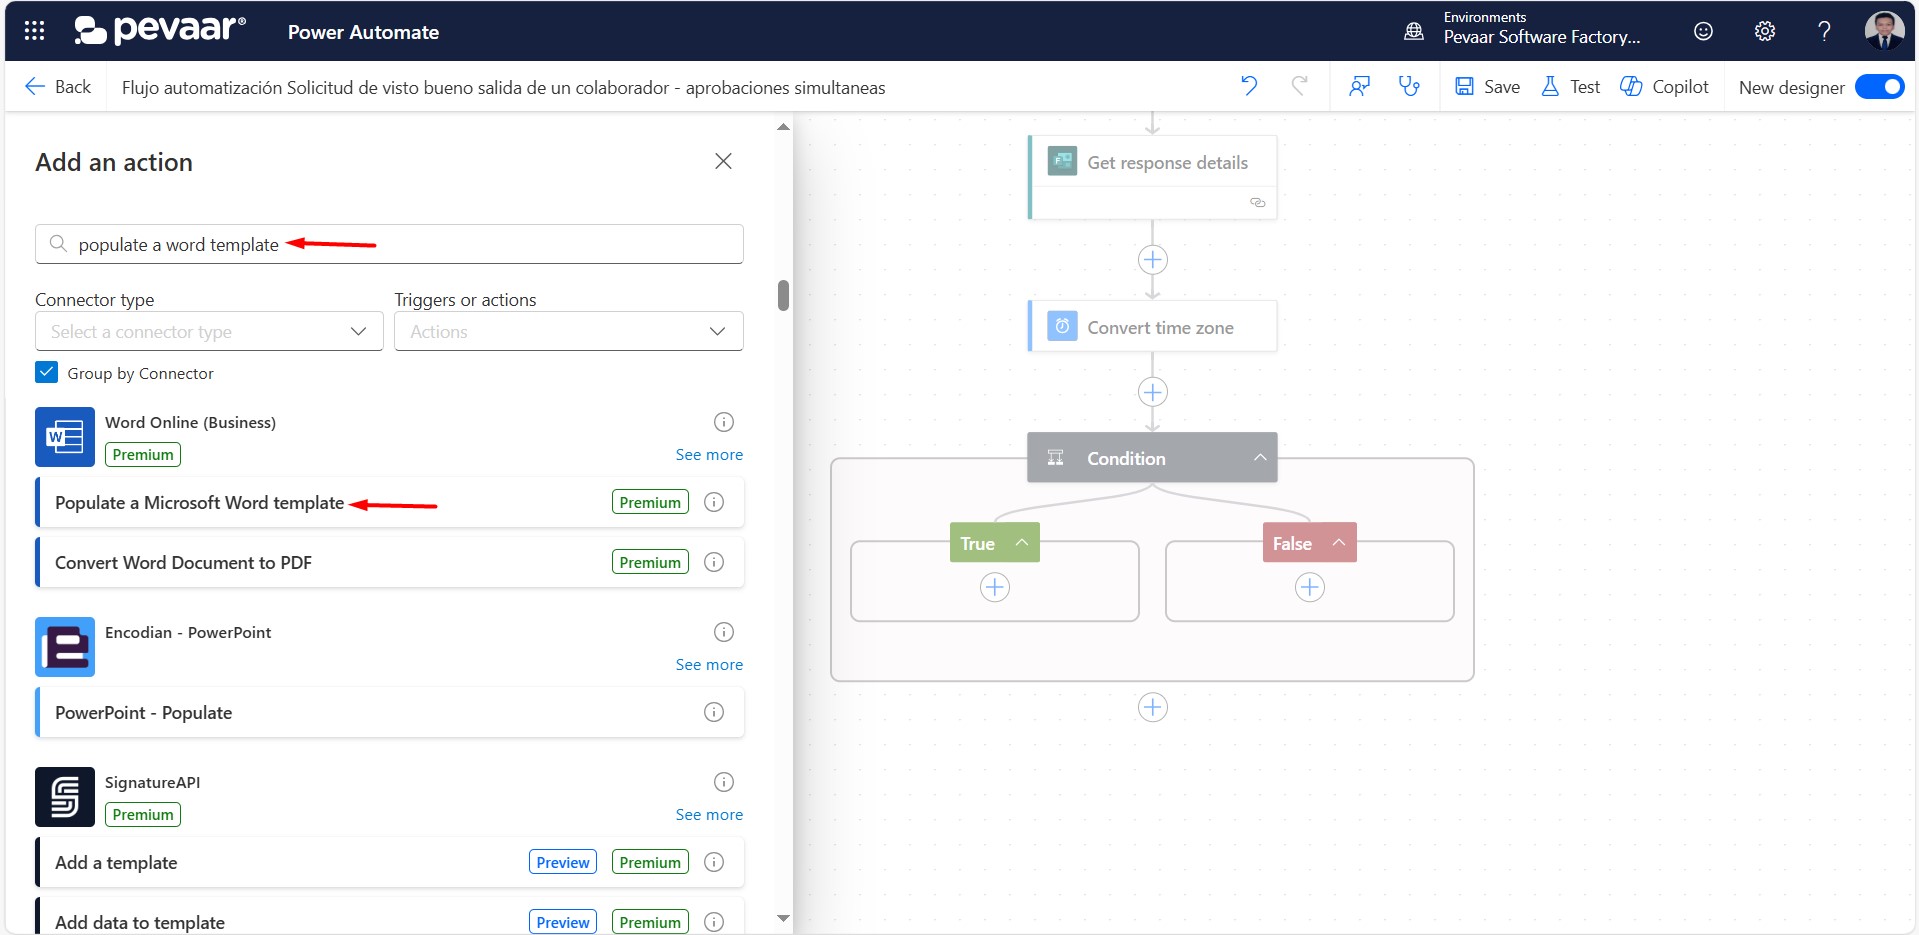 Image 26
Once the action has been added, we must select the file that we have saved in OneDrive, in Location we must select “OneDrive for Business”, in Document Library we select “Documents”, in File we will search for the file that we create and save (image 27)
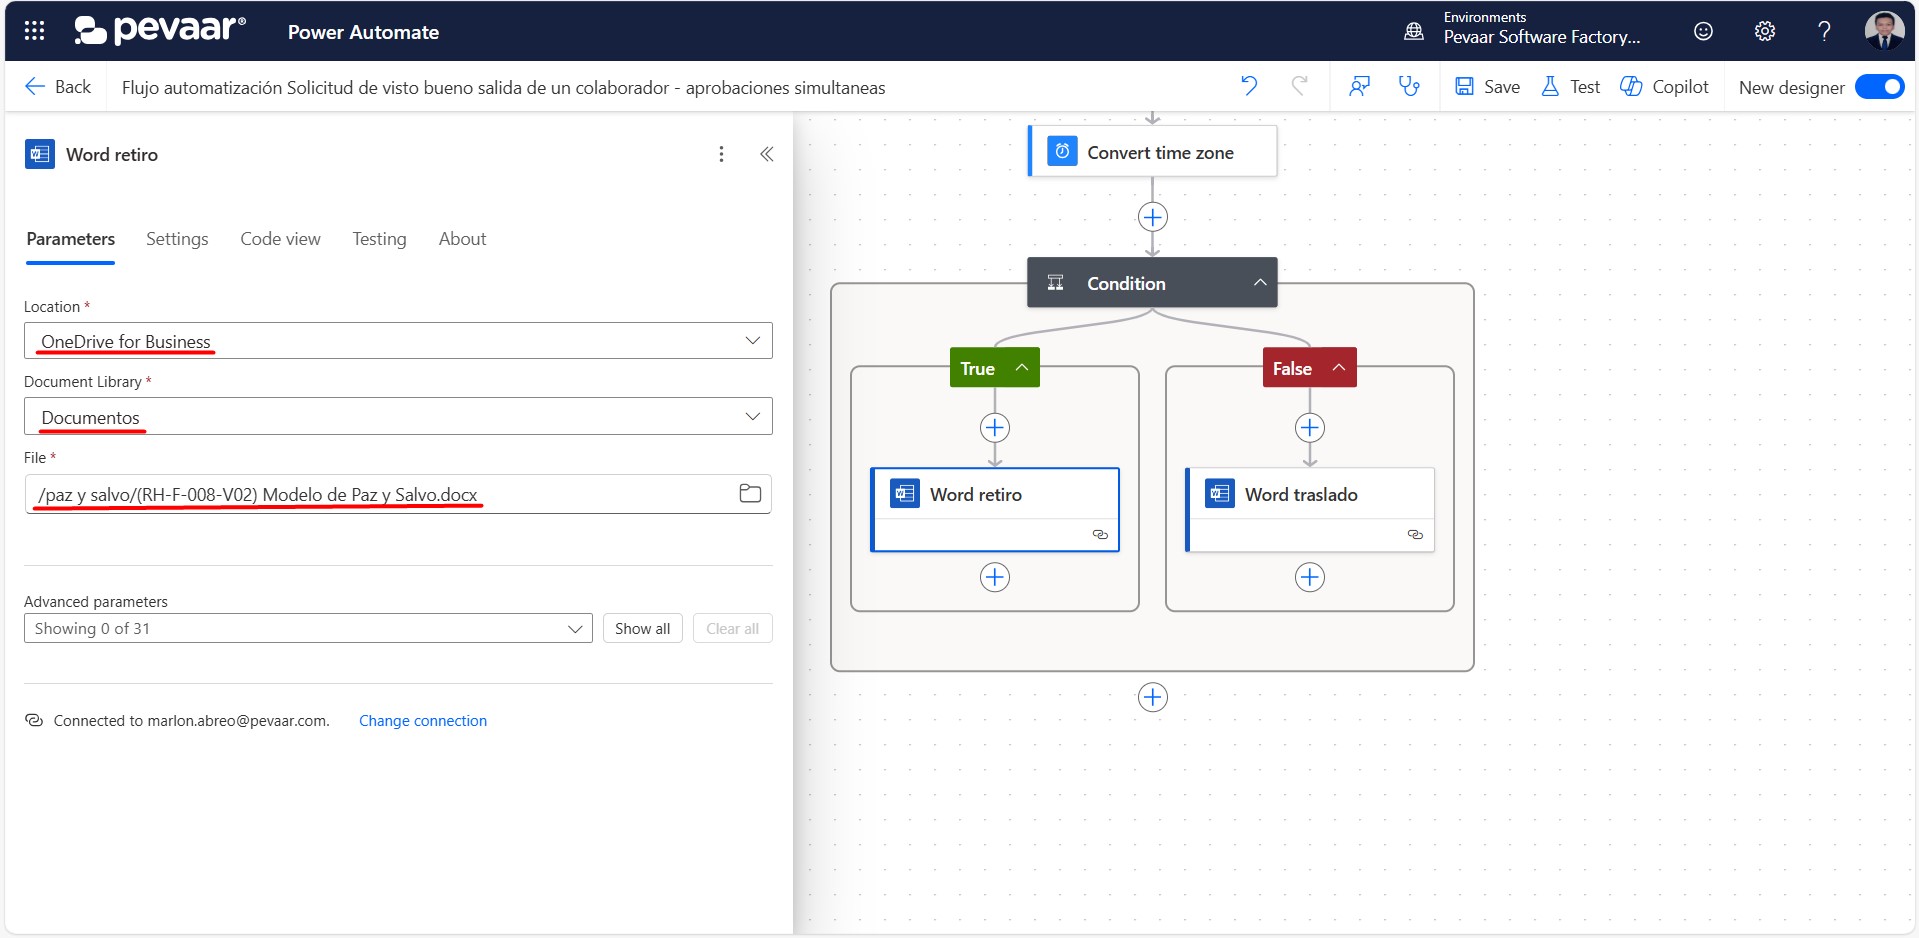 Image 27
The next step is to select from the advanced parameters the fields related to the collaborator, the withdrawal field and the date (image 28)
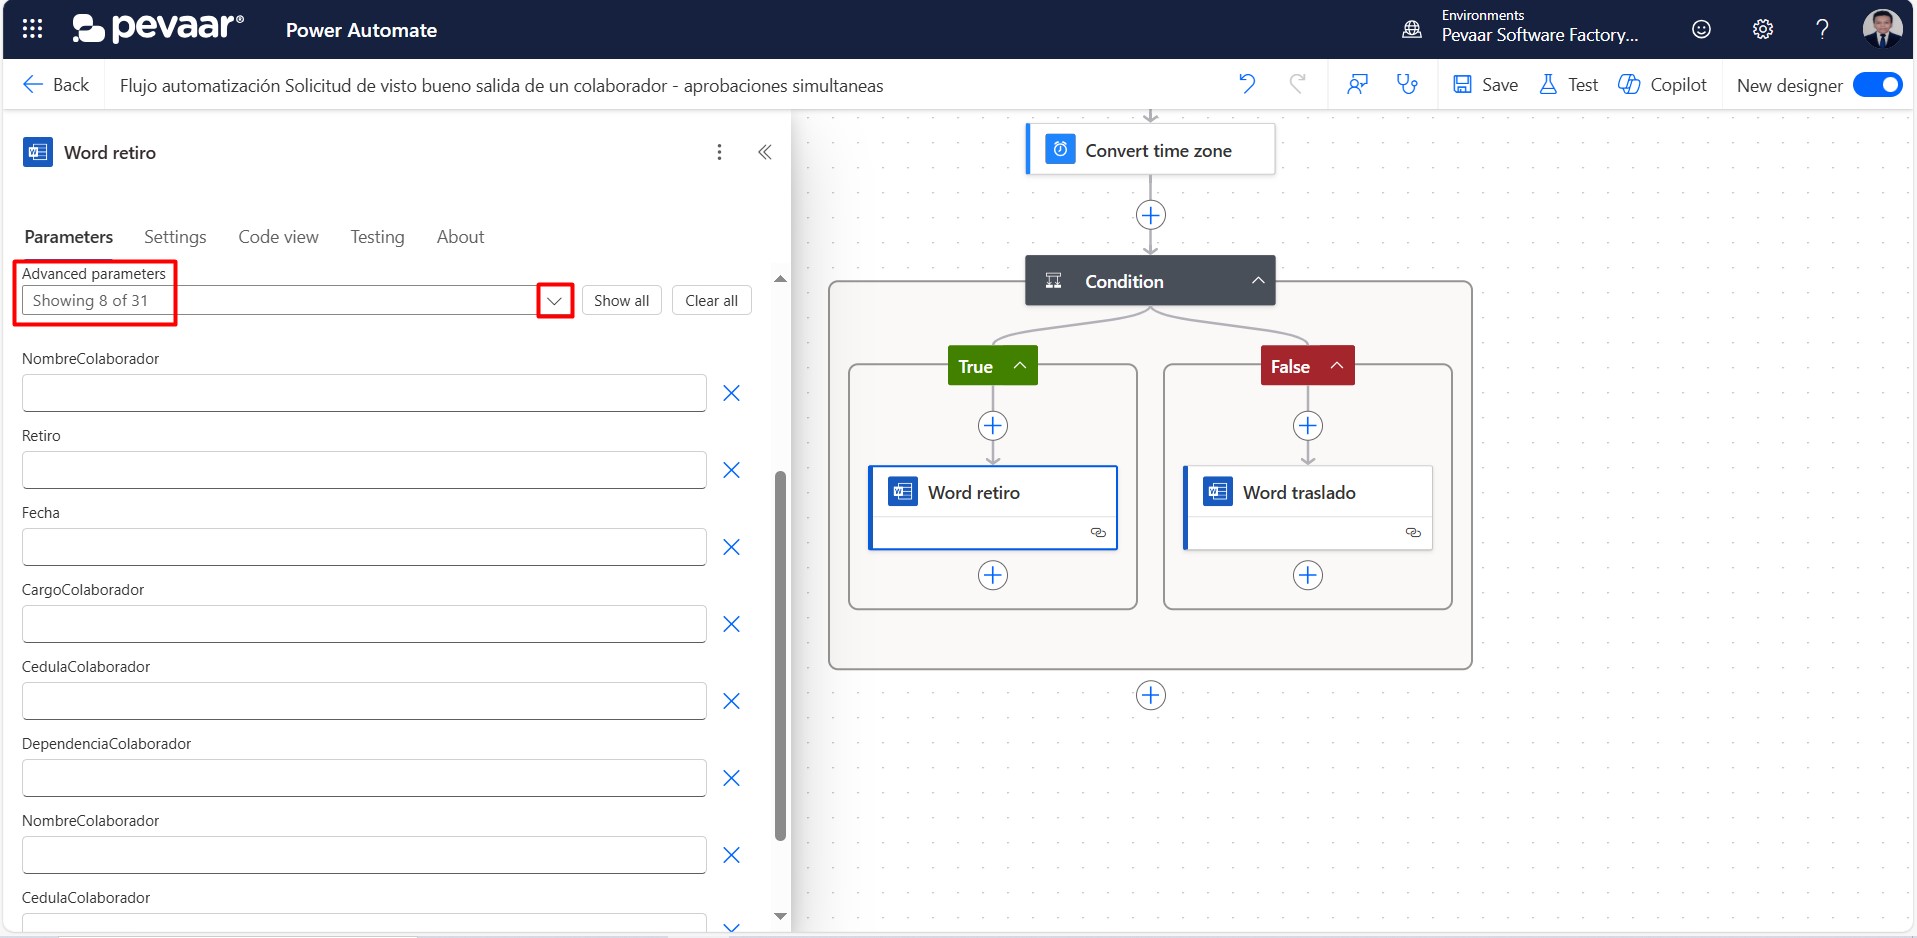 Image 28
We will fill in the fields related to the collaborator with the corresponding information from the form (image 29)
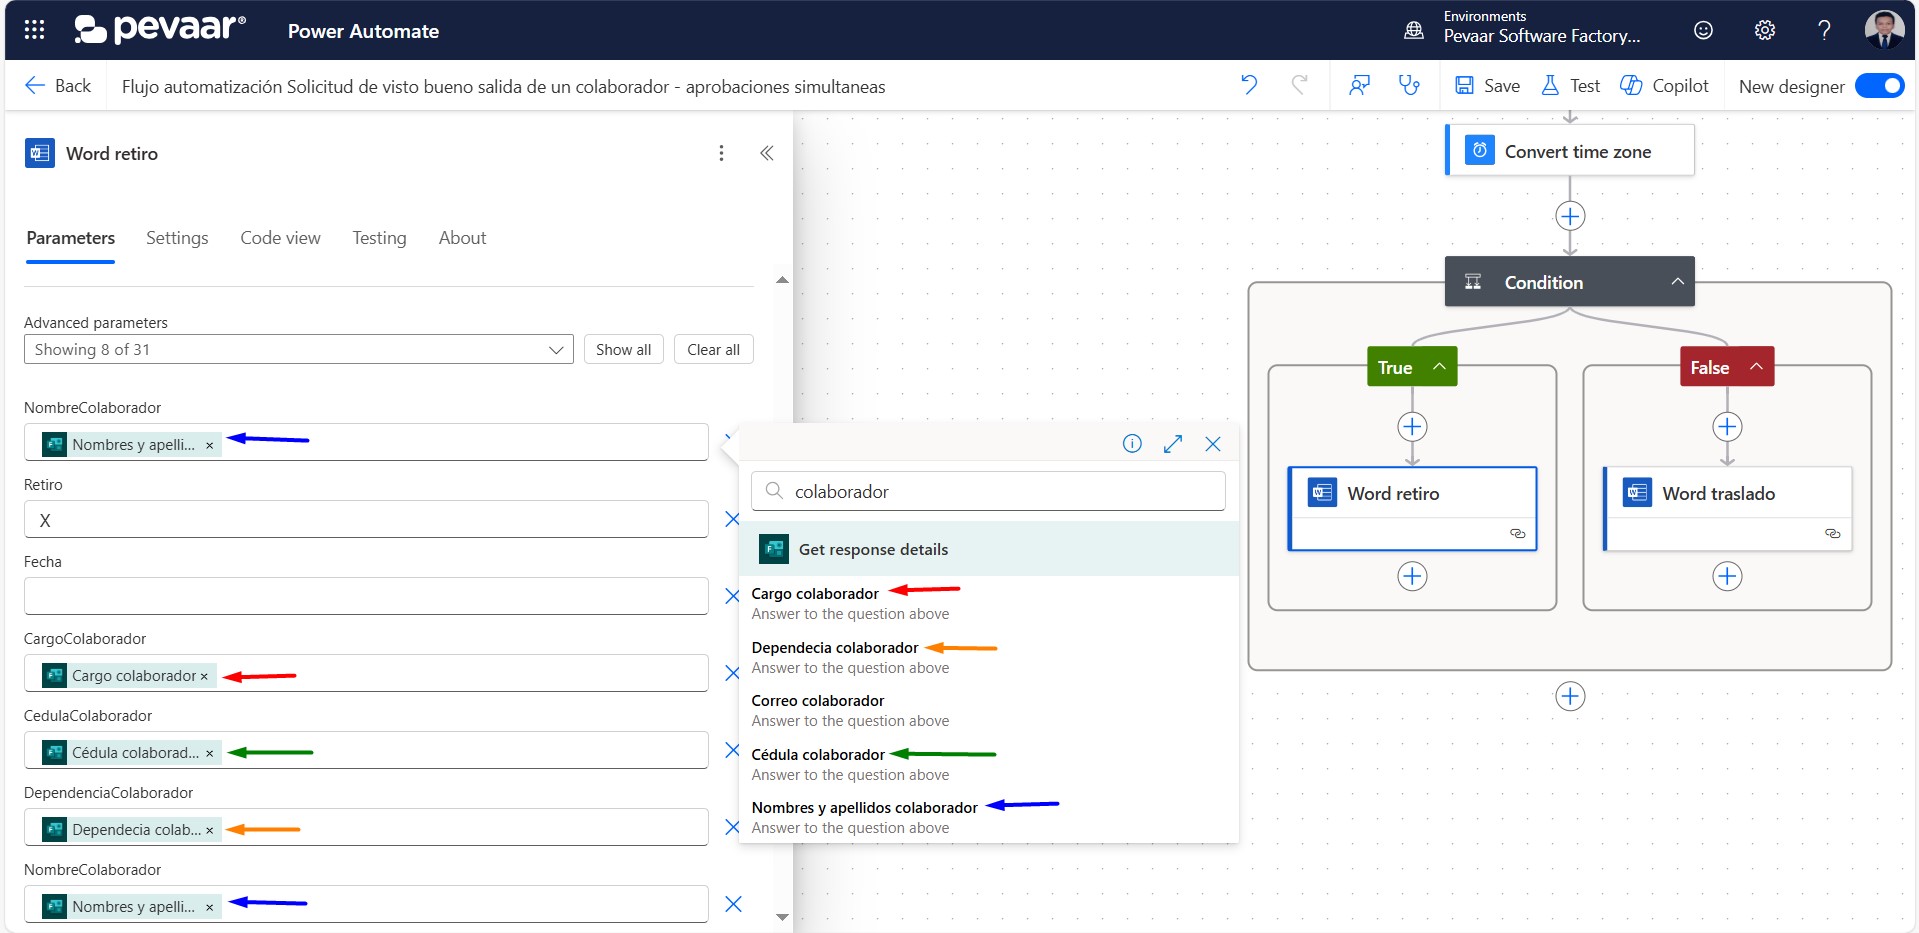 Image 29
We will put an “X” in the Retirement field, and we will dynamically select the Date field from the result of the action to convert a time zone (image 30)
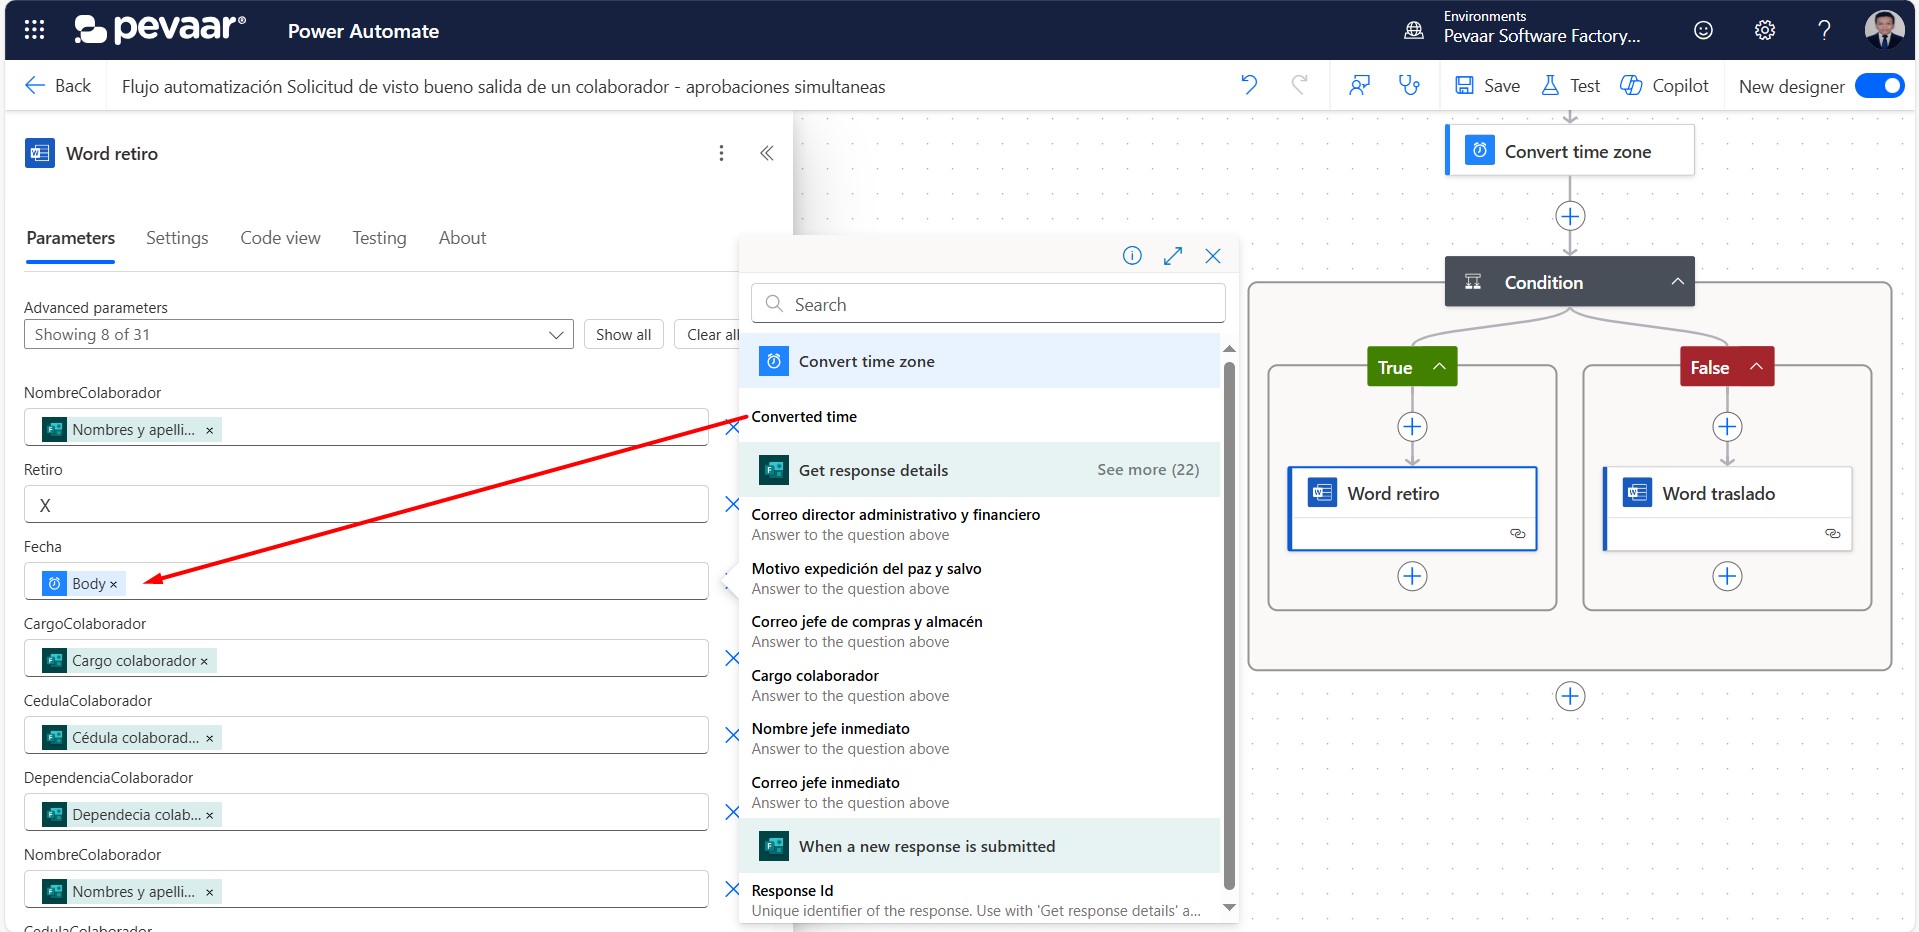 Image 30
On the “False” side of the condition, steps 4.6, 4.6.1, 4.6.2 and 4.6.3 must be repeated, in this case we must select the transfer field instead of the withdrawal field
The next action to add is “Start and wait for an approval” with which the departure or withdrawal of the collaborator will be authorized
In the search bar of the action, you must type “approval” as a keyword and select the option “Start and wait for an approval” (image 31)
 Image 31
In the approval type, select Custom Responses – Wait for all responses (image 32)
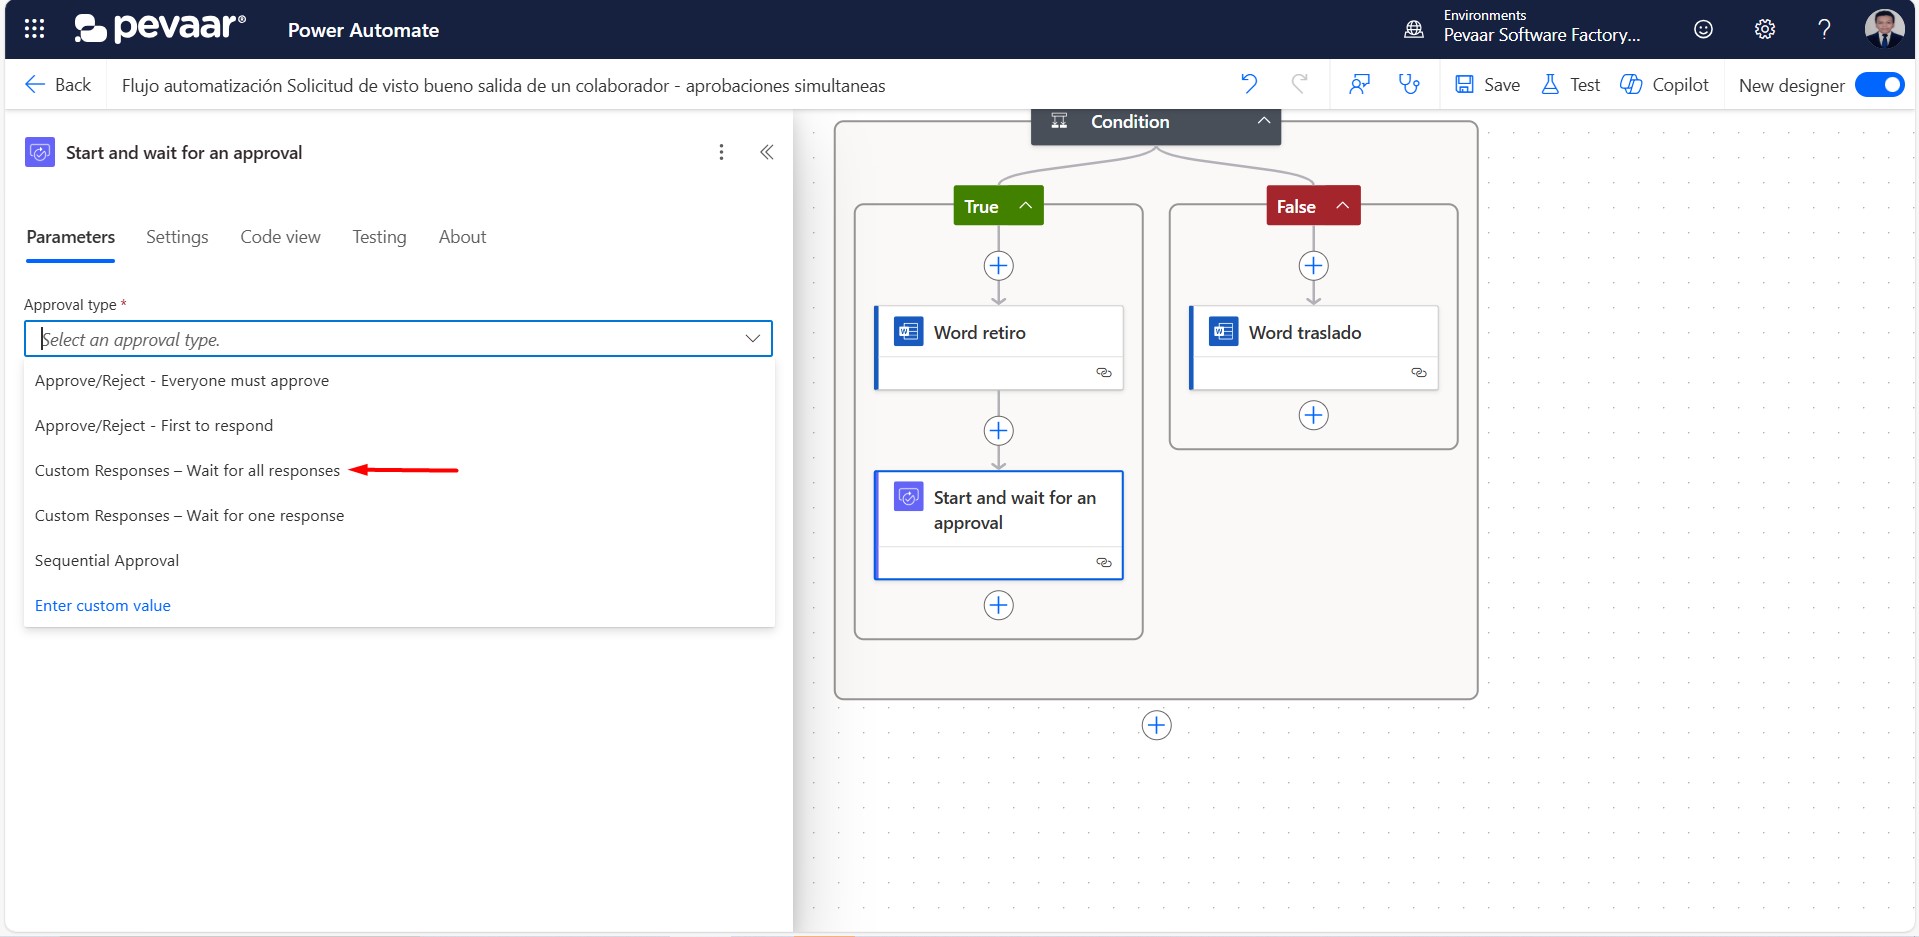 Image 32
In response options, in this case we will only put a “peace and salvo”, in the title we will put something alluding to the approval next to the name of the collaborator who requests it, the name is added dynamically from the form, in Assigned To or Assigned To we will place the emails of the approvers dynamically from the form (image 33).
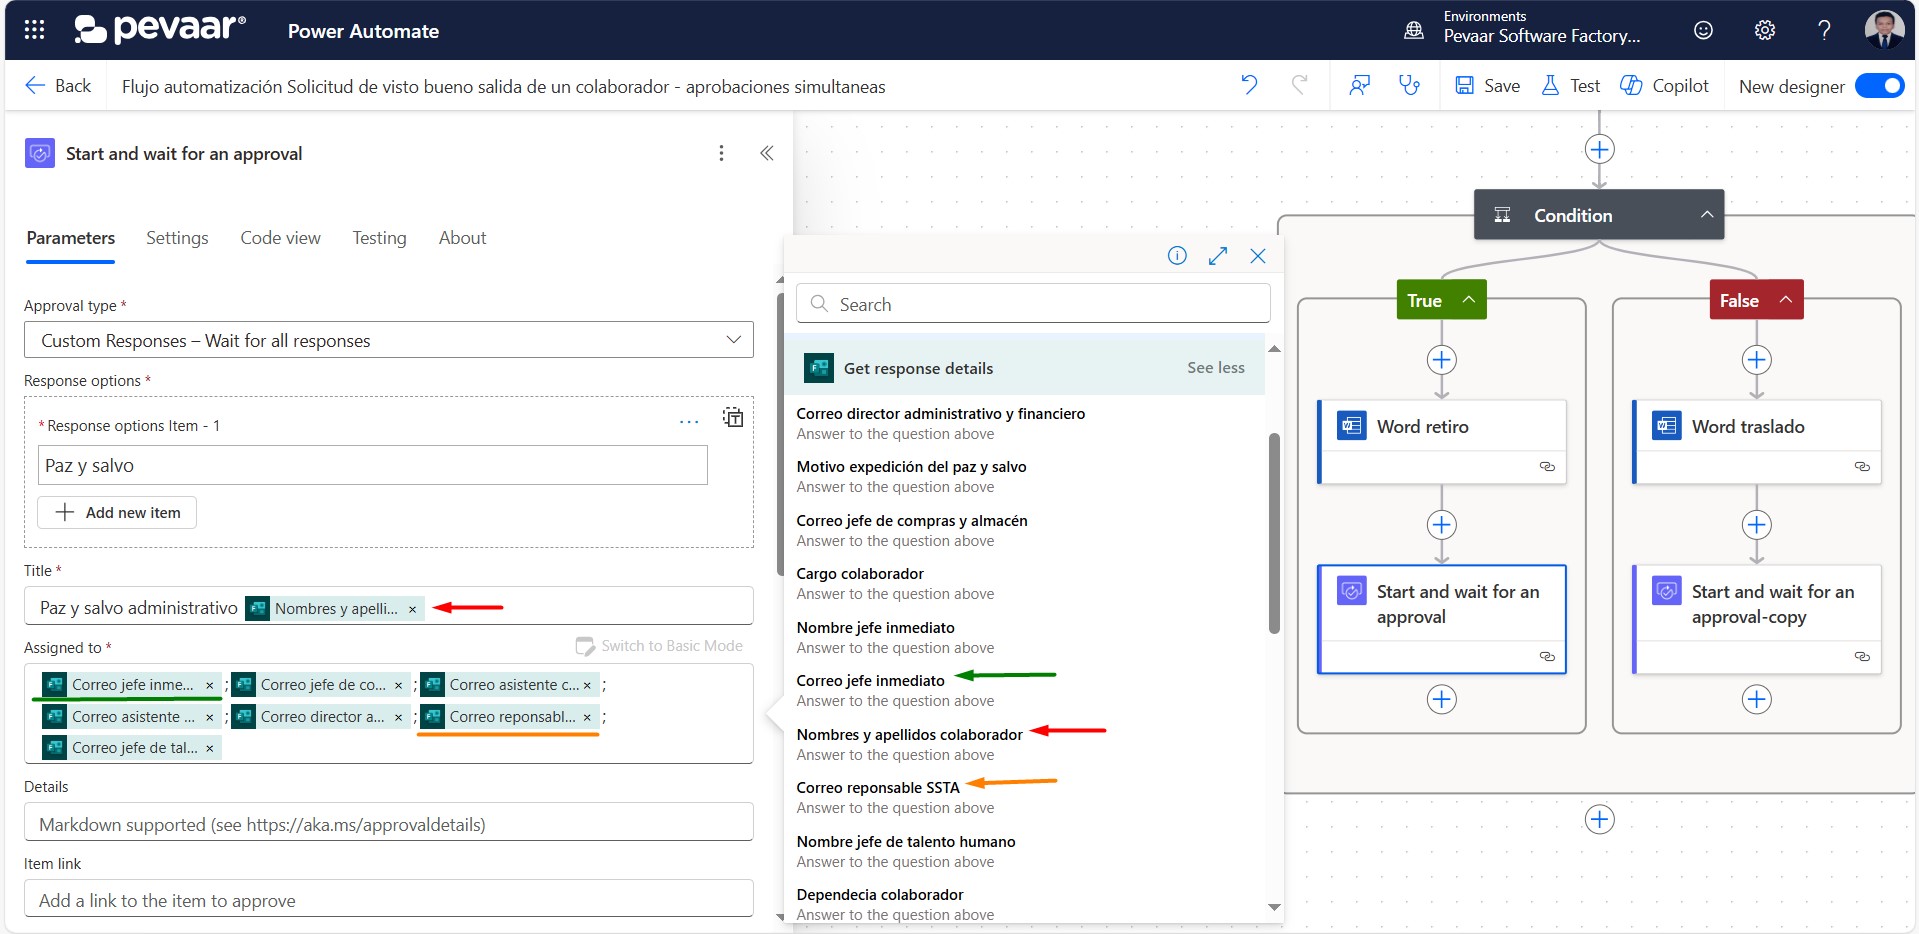 Image 33
The details of the approval will include information related to the collaborator and the reason why the peace and save is issued (image 34)
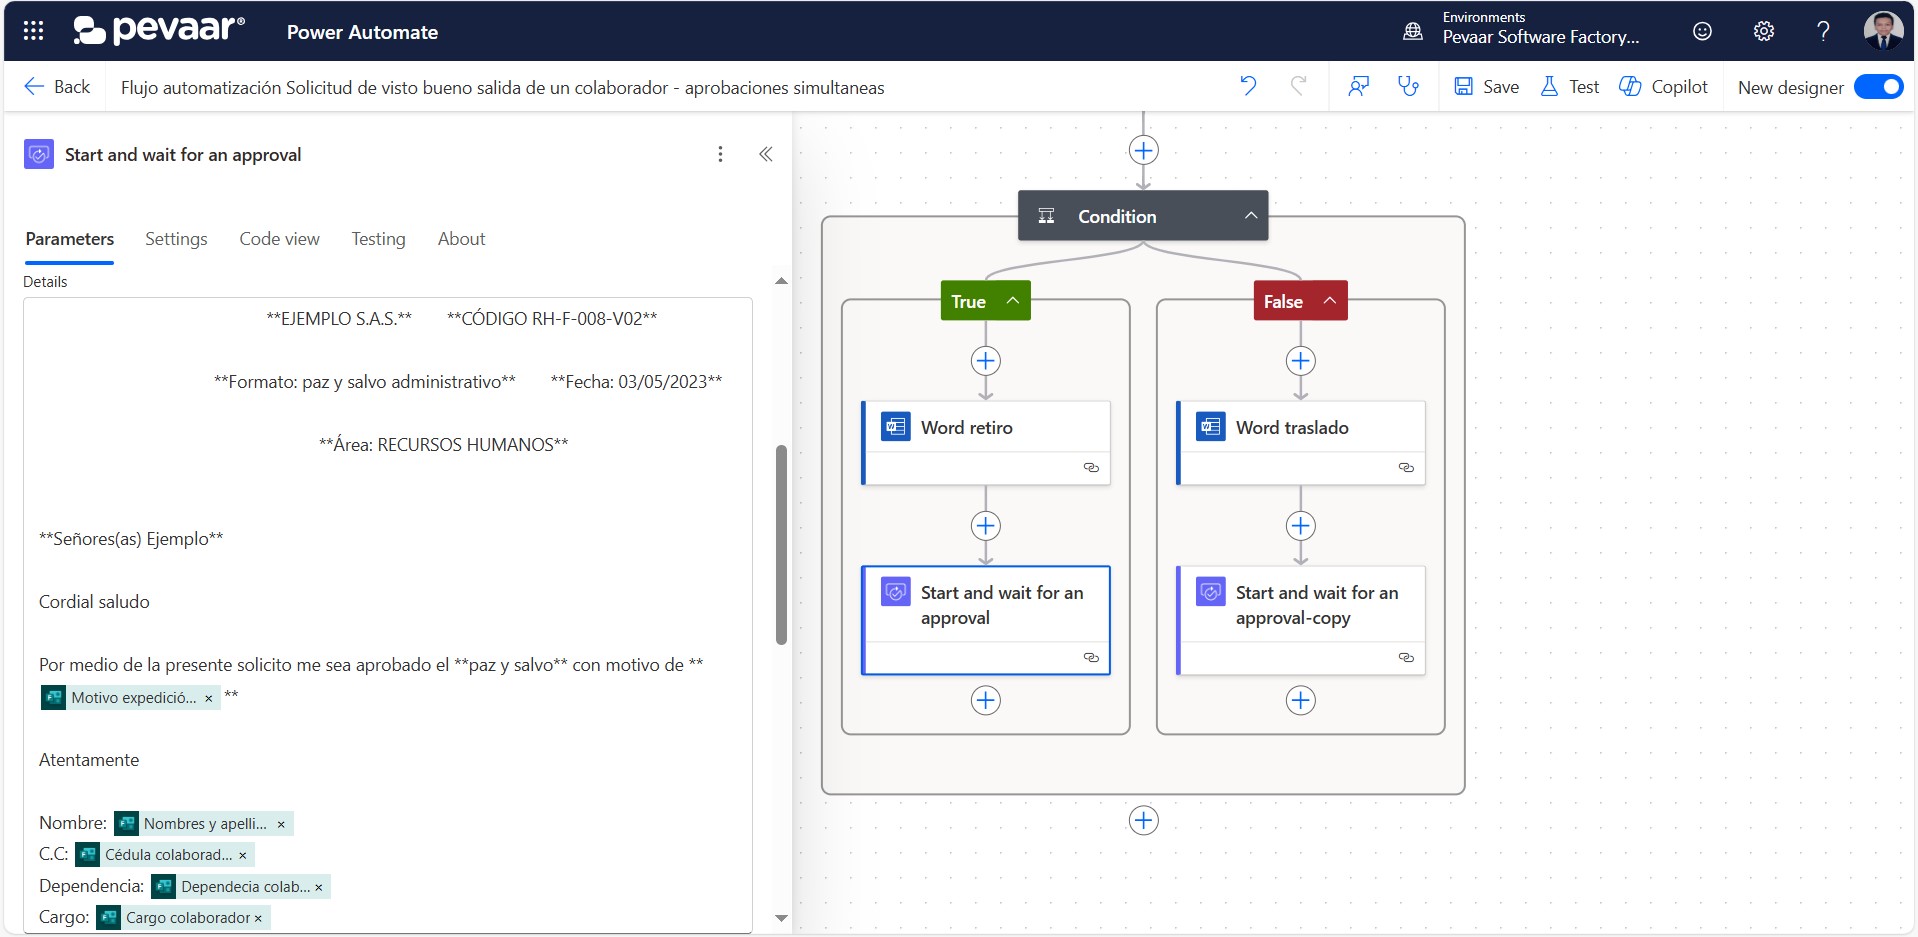 Image 34
In the advanced parameters of the approval we click on show all or see all, to fill in the applicant and attachment fields (image 35)
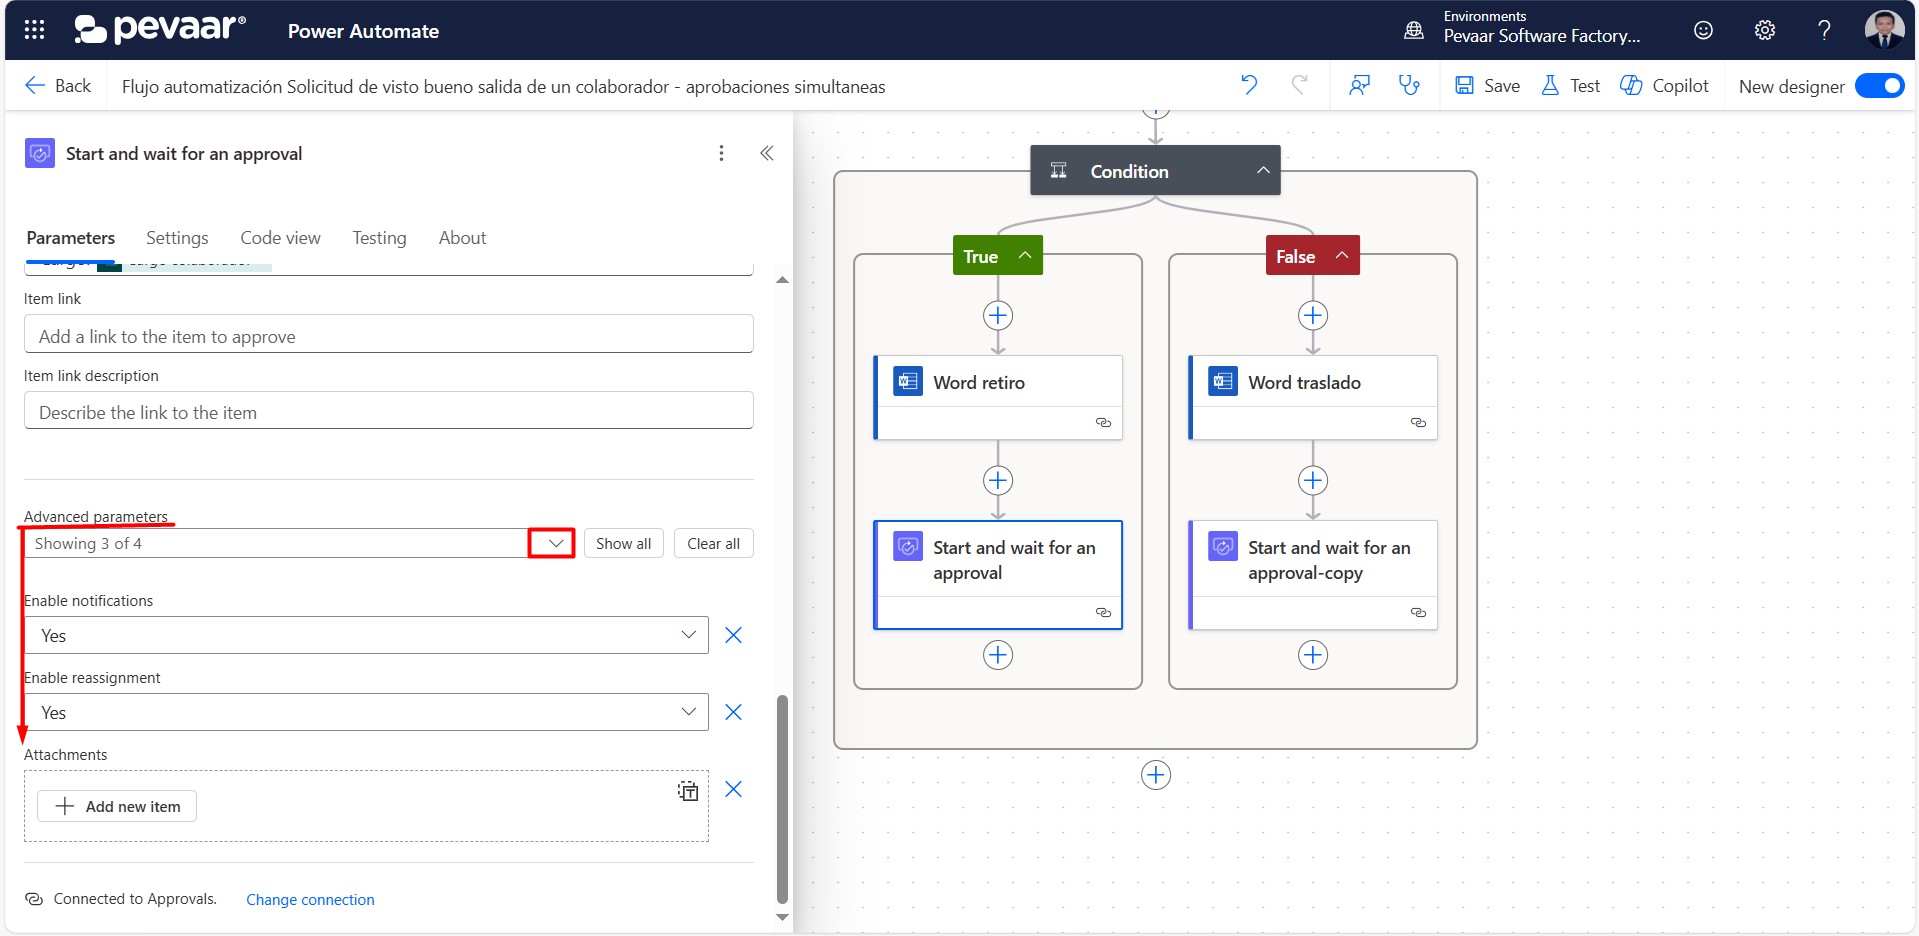 Image 35
In “Requestor” we click on Switch to Advanced mode and then dynamically add the email that sent the form
In the attachments field we add a new item, we will give it a descriptive name and end with the extension .docx, in the content of the attachment we will select the output of the previous action “Populate a Microsoft Word template” (image 37)
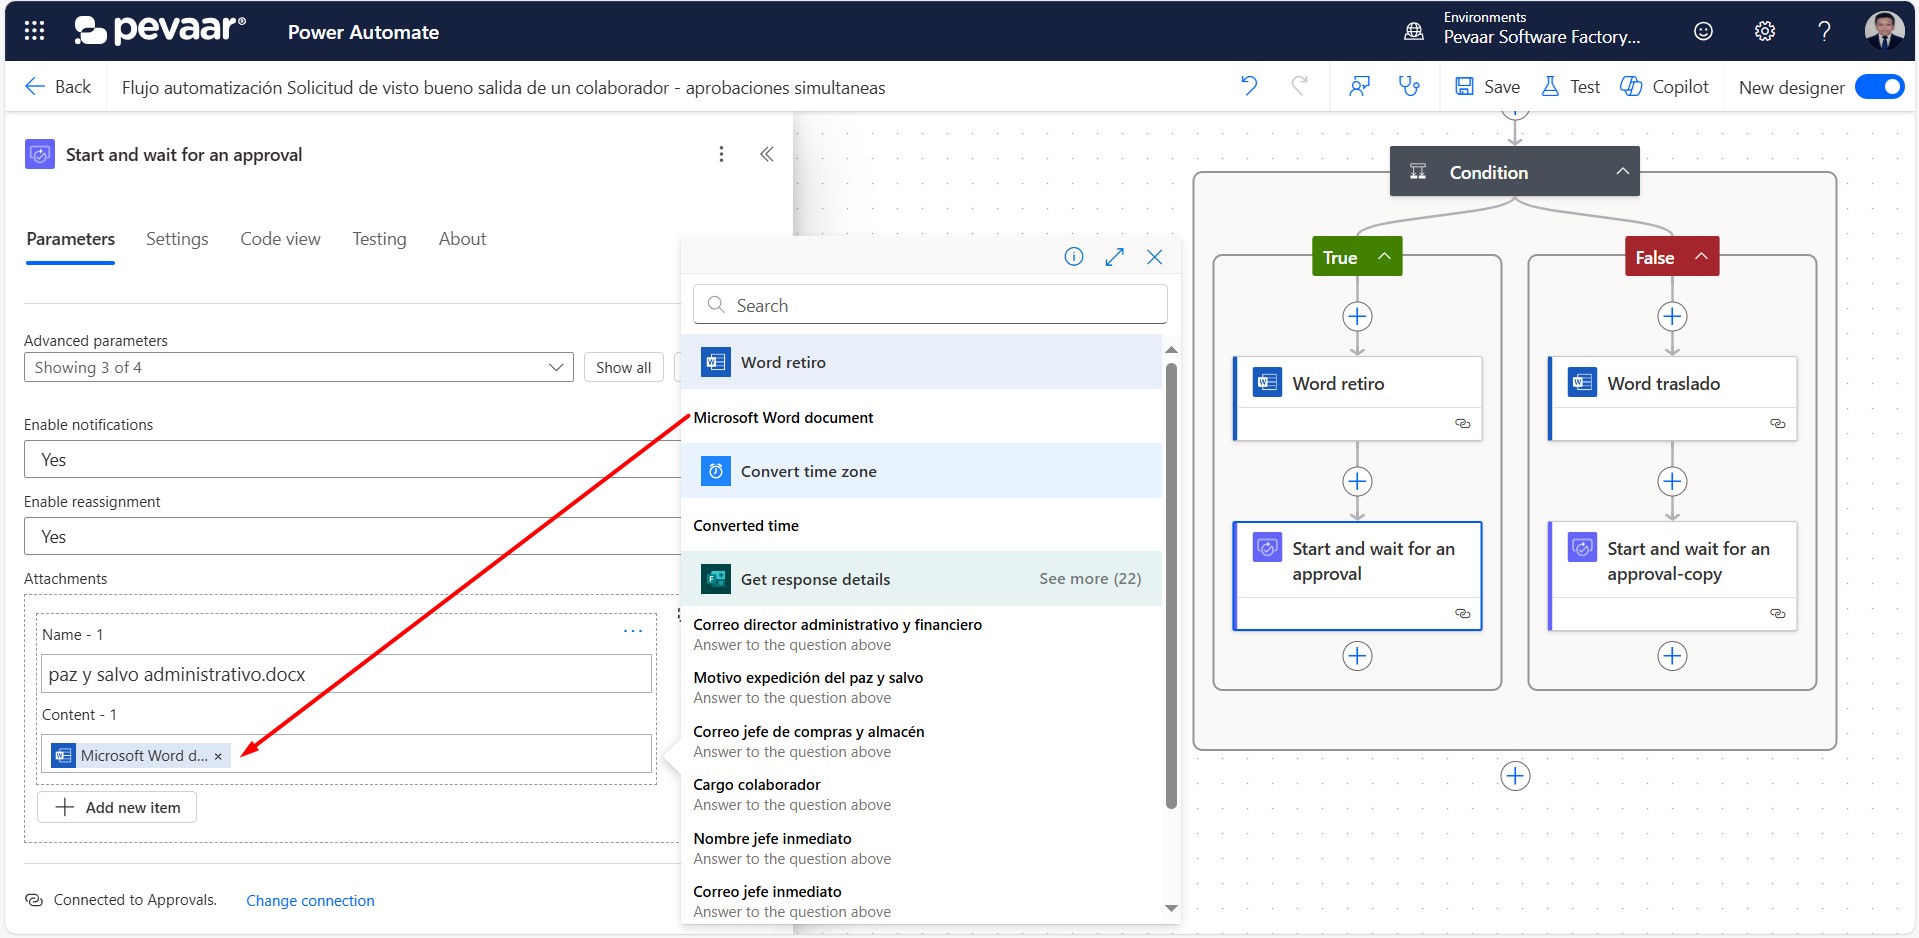 Image 37
On the “False” side of the condition, step 4.7 should be repeated after adding the “populate to word template” action
The next action is “Select/Select” which will allow us to obtain the information of the names and comments within an Array, the output of this action will be passed to the table field in the populate action to word template, and how we add the option to enter text that is repeated, in the final document the table with the selected data will be shown
In the search bar of the action you must type “select” as keyword and select the option “Select” (image 38)
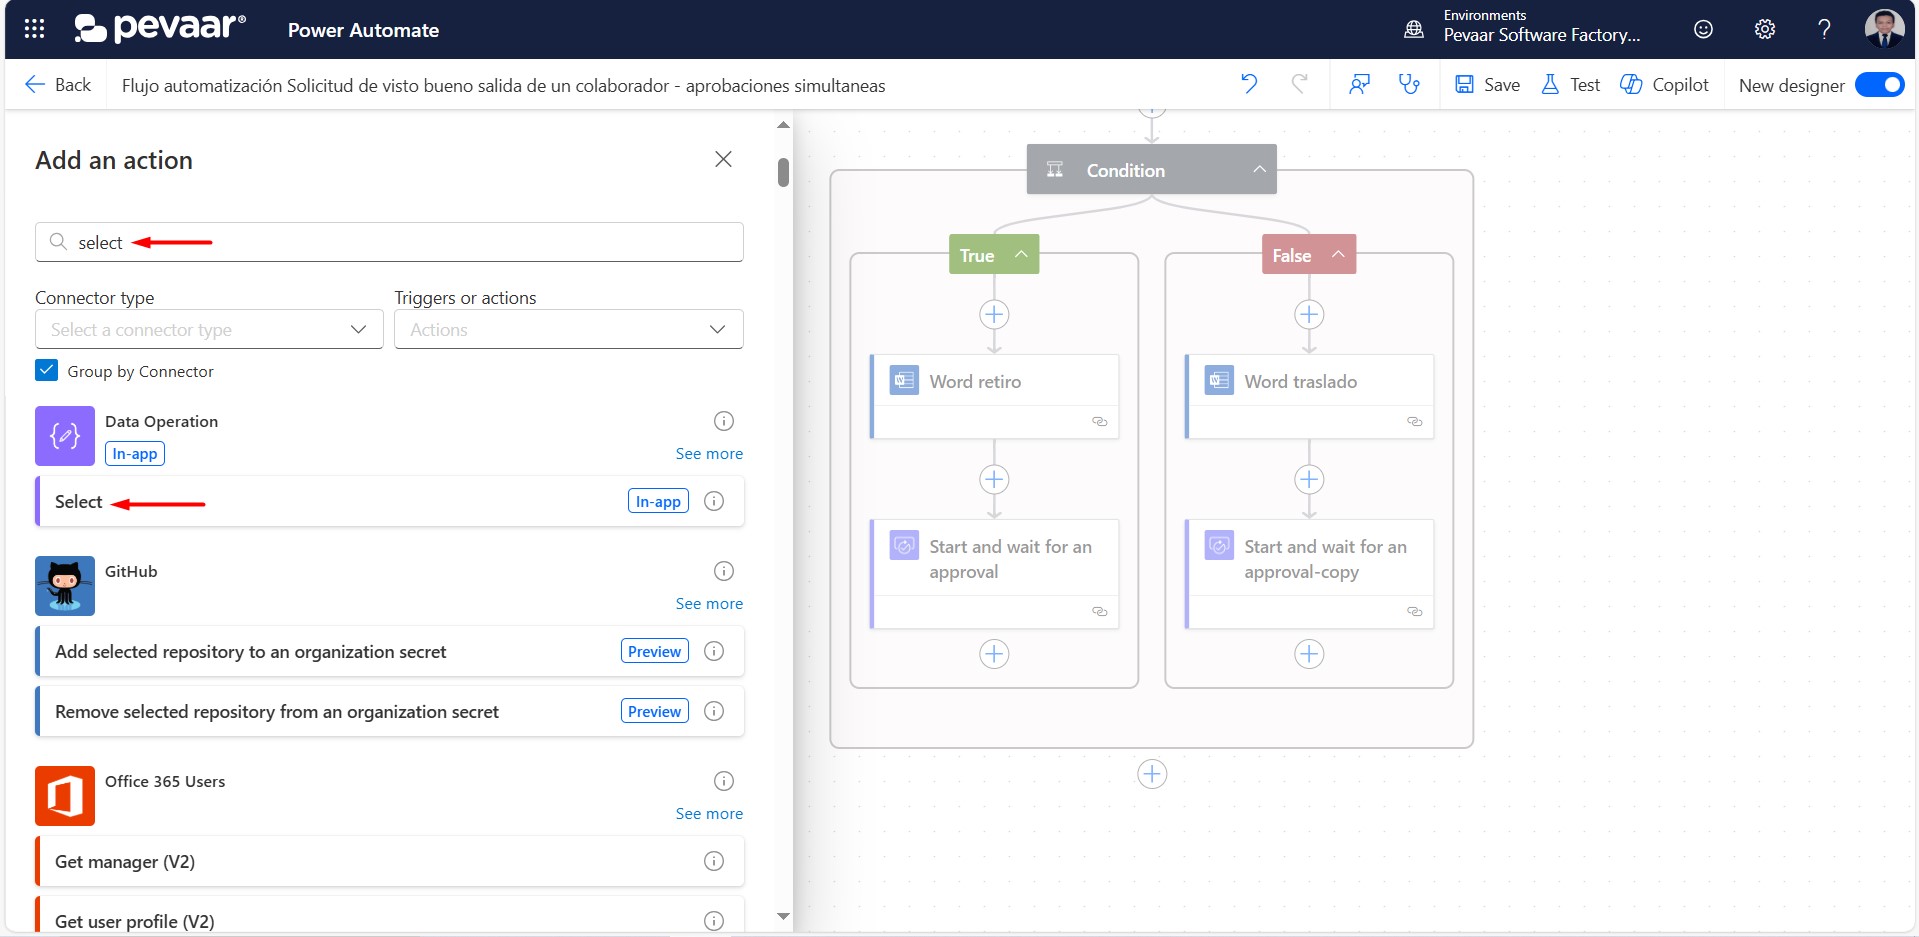 Image 38
In the “From” field of the select action we will dynamically place all the answers from the previous approval (image 39)
 Image 39
In the “Enter key” field we will write the same title that we put for the dynamic text of the name of the person responsible, example: nameResponsible -> nameResponsible, and in the field “Enter value” we will dynamically put the name of the approver (image 40)
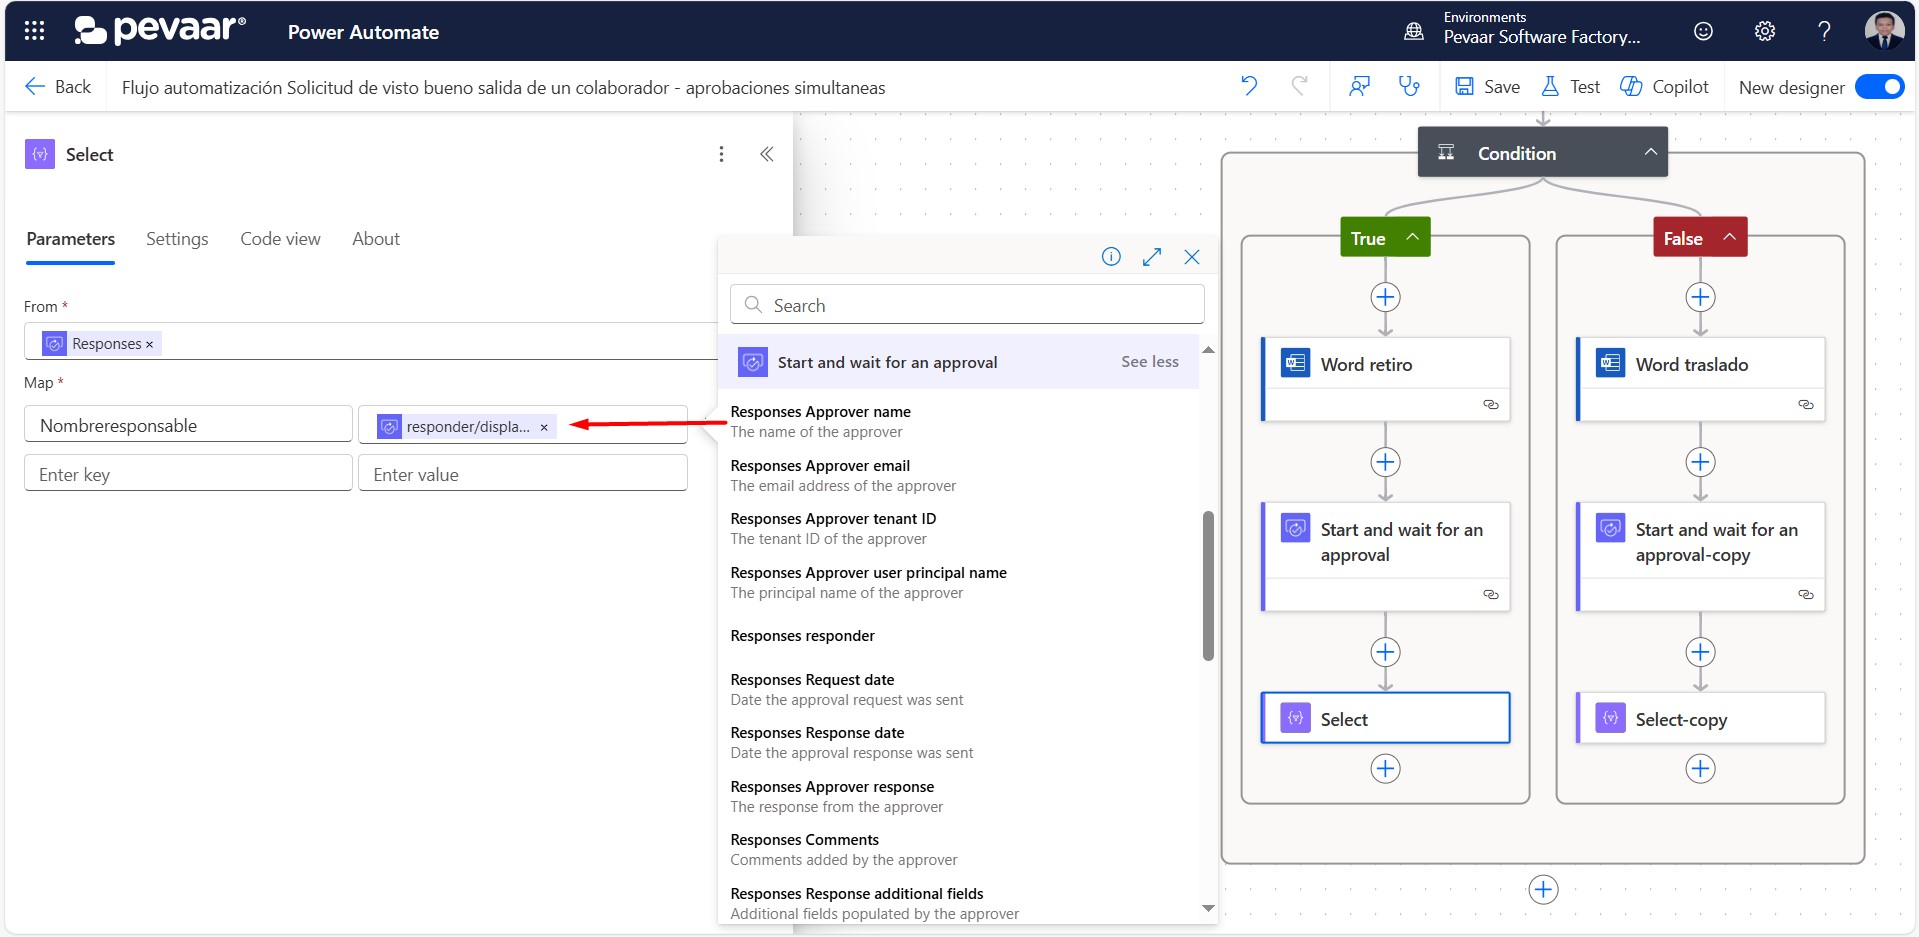 Image 40
In the next “Enter key” we will write the same title that we put for the dynamic text of the observations of the person responsible, example: observationsResponsible -> observationsResponsible, and in the field “Enter value” giving in the Fx option we will add the following expression: coalesce(item()?[‘ comments’], ‘No observations’)
After entering the action we click on add, this function serves us to obtain the comments of the approvers, if there were no comments it will be put as default text “No observations” (image 41)
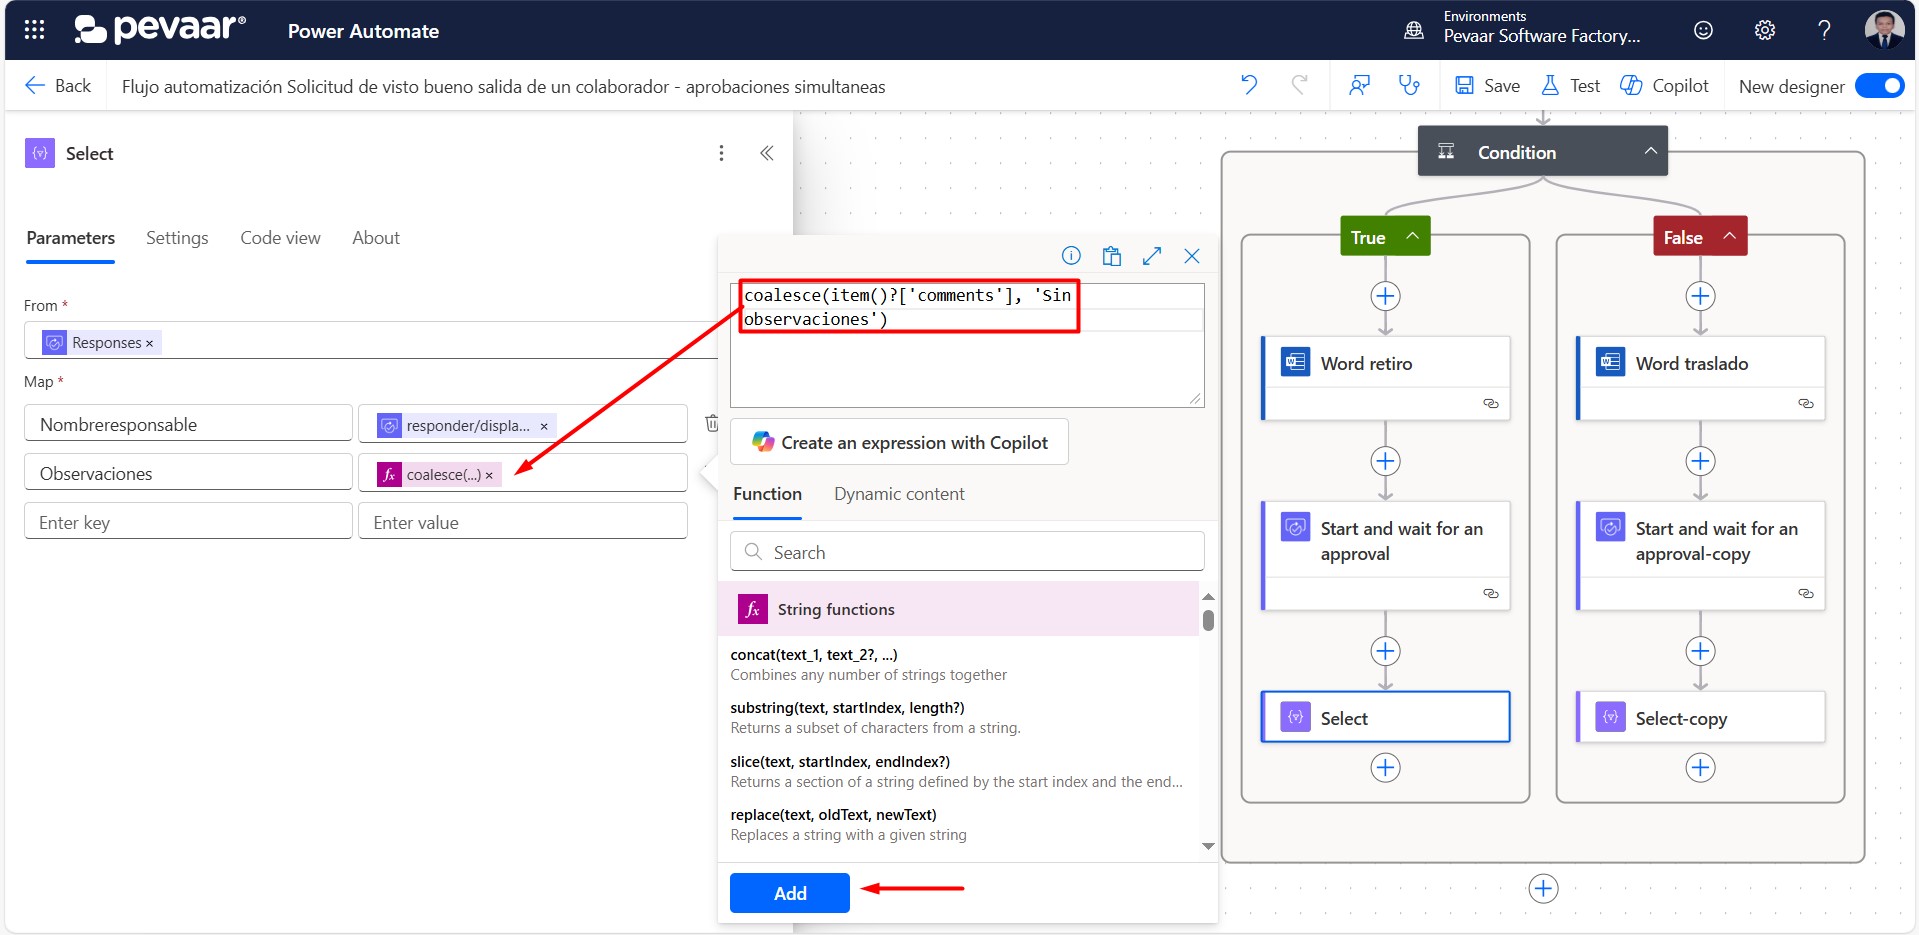 Image 41
On the “False” side of the condition, step 4.8 should be repeated, after having added the previous action “start and wait for an approval”
After the select action we put the action “populate a microsoft word template” again to fill in the fields of the approvers, we can copy and paste (image 42) the previous action (point 4.6) that already contains the file path and the collaborator’s data
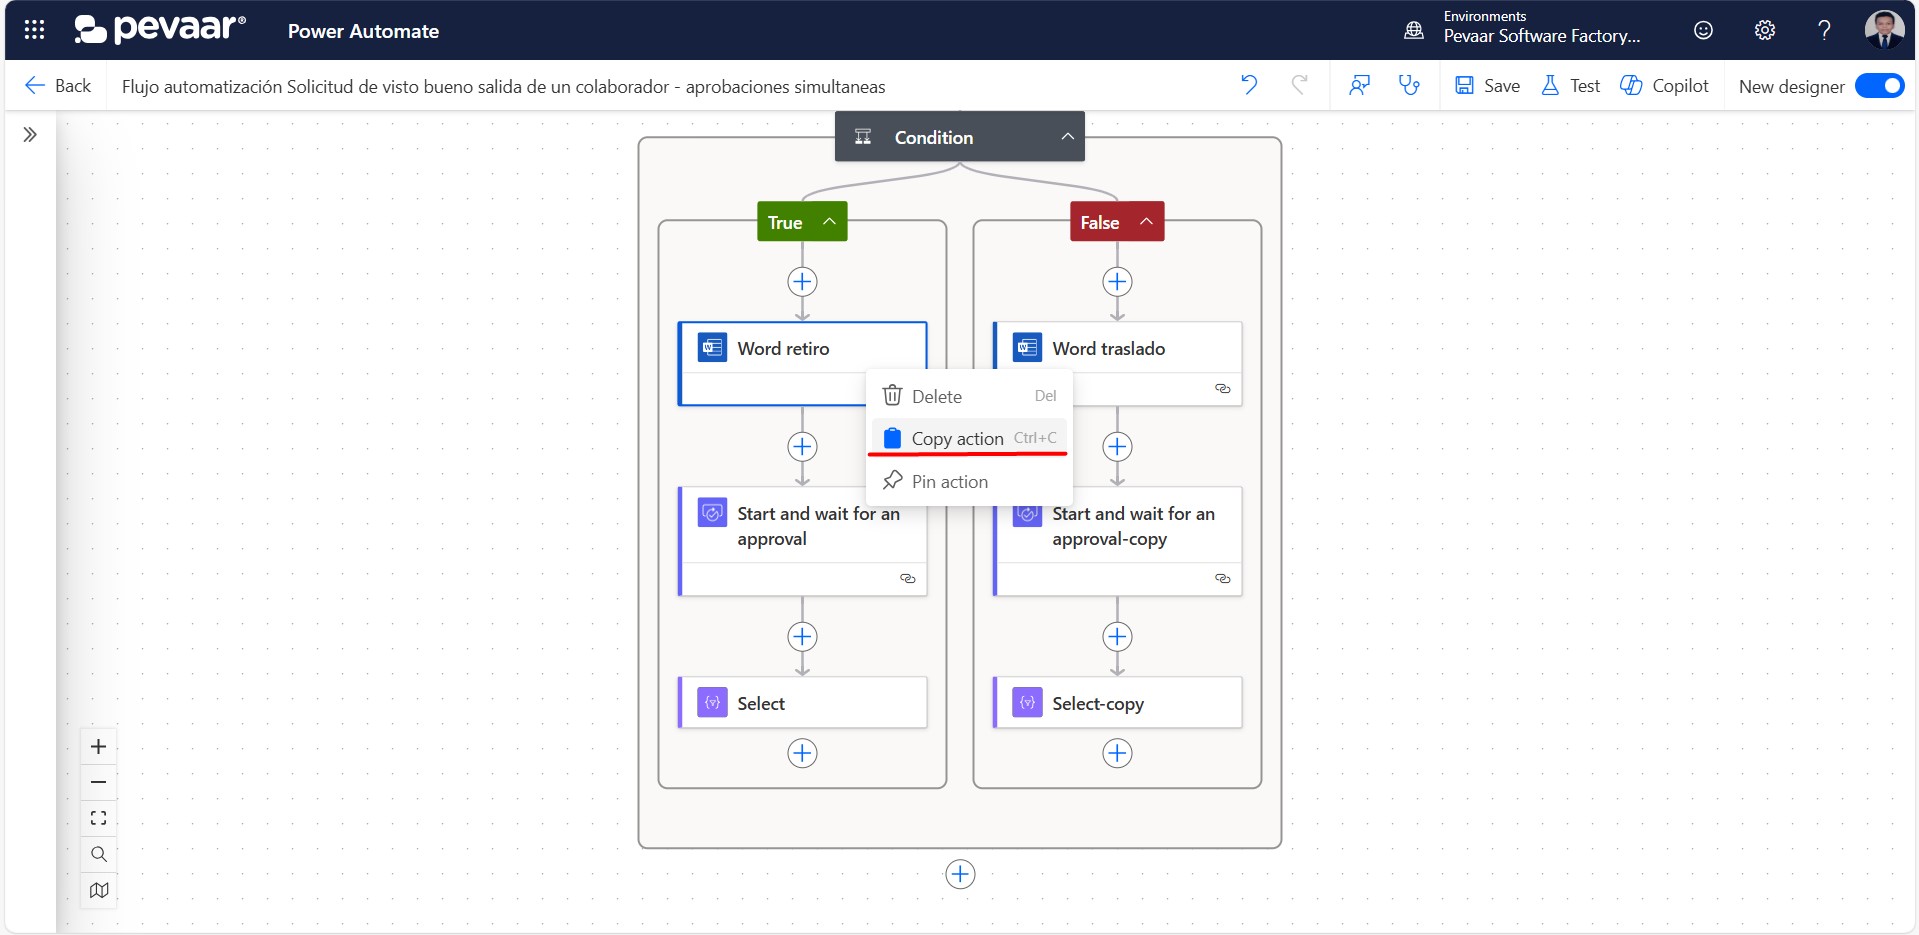
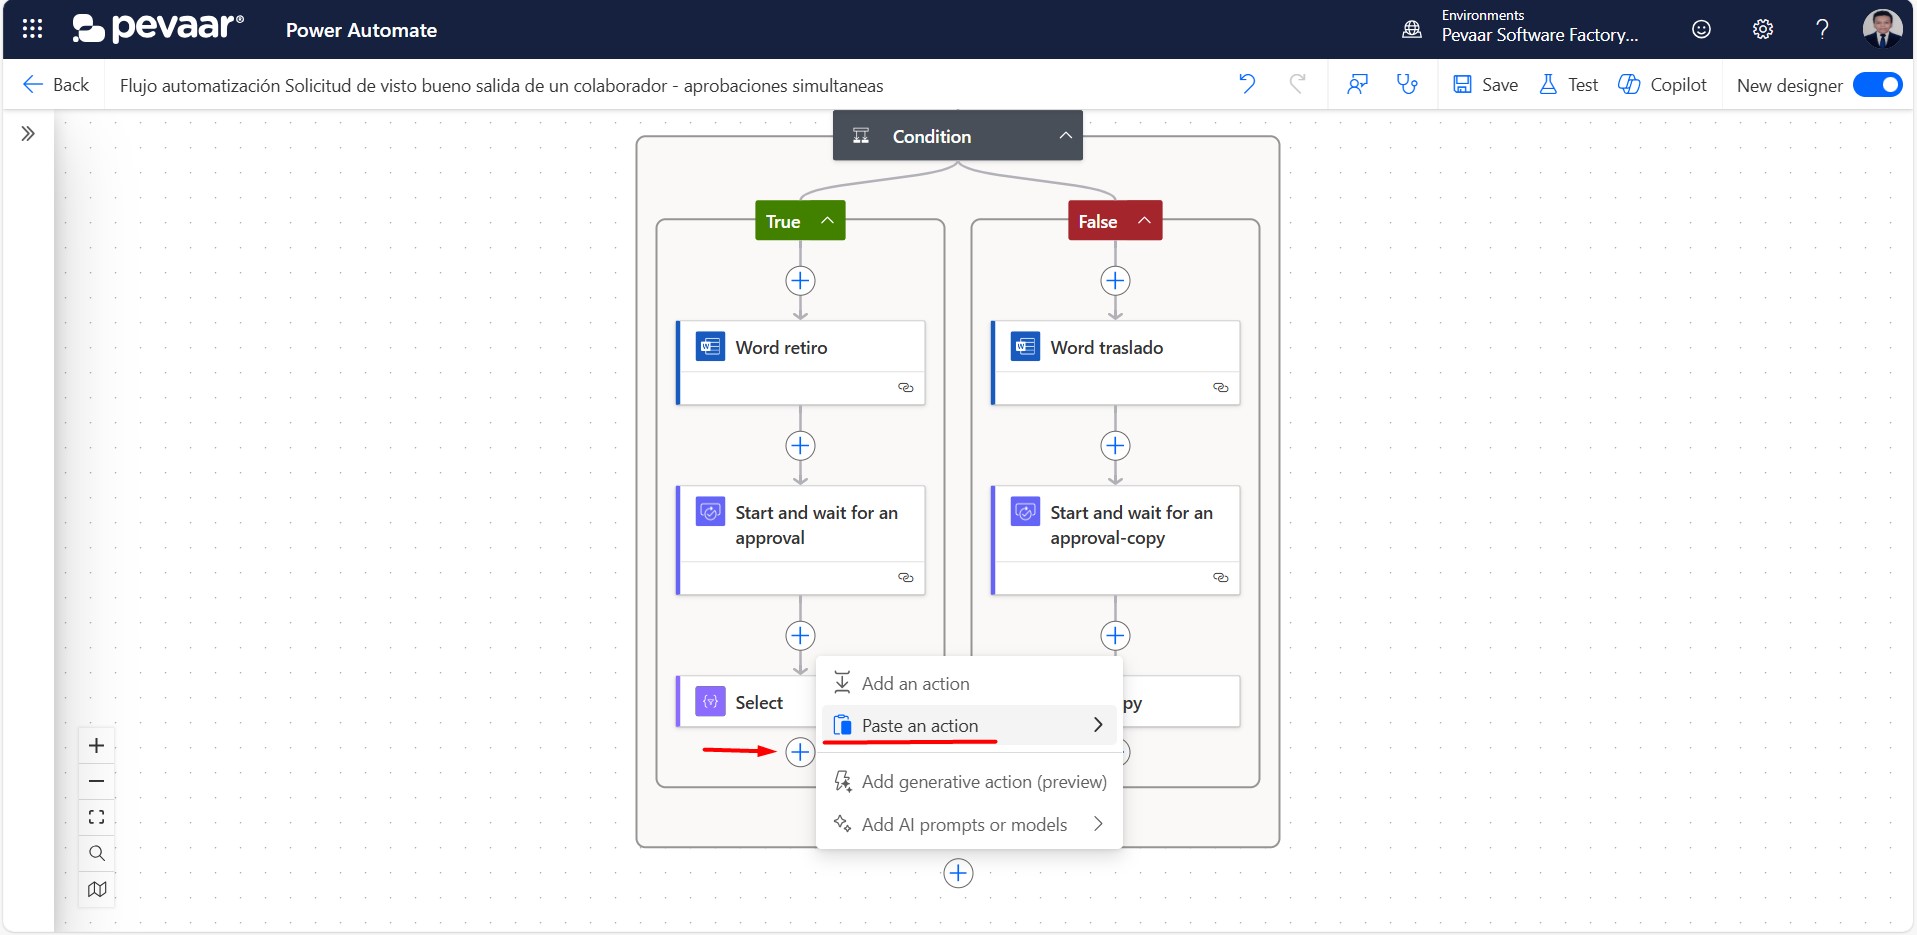 Image 42
Once the action has been added or copied, we must select all the available options from the advanced parameters except for the “Transfer” field (image 43)
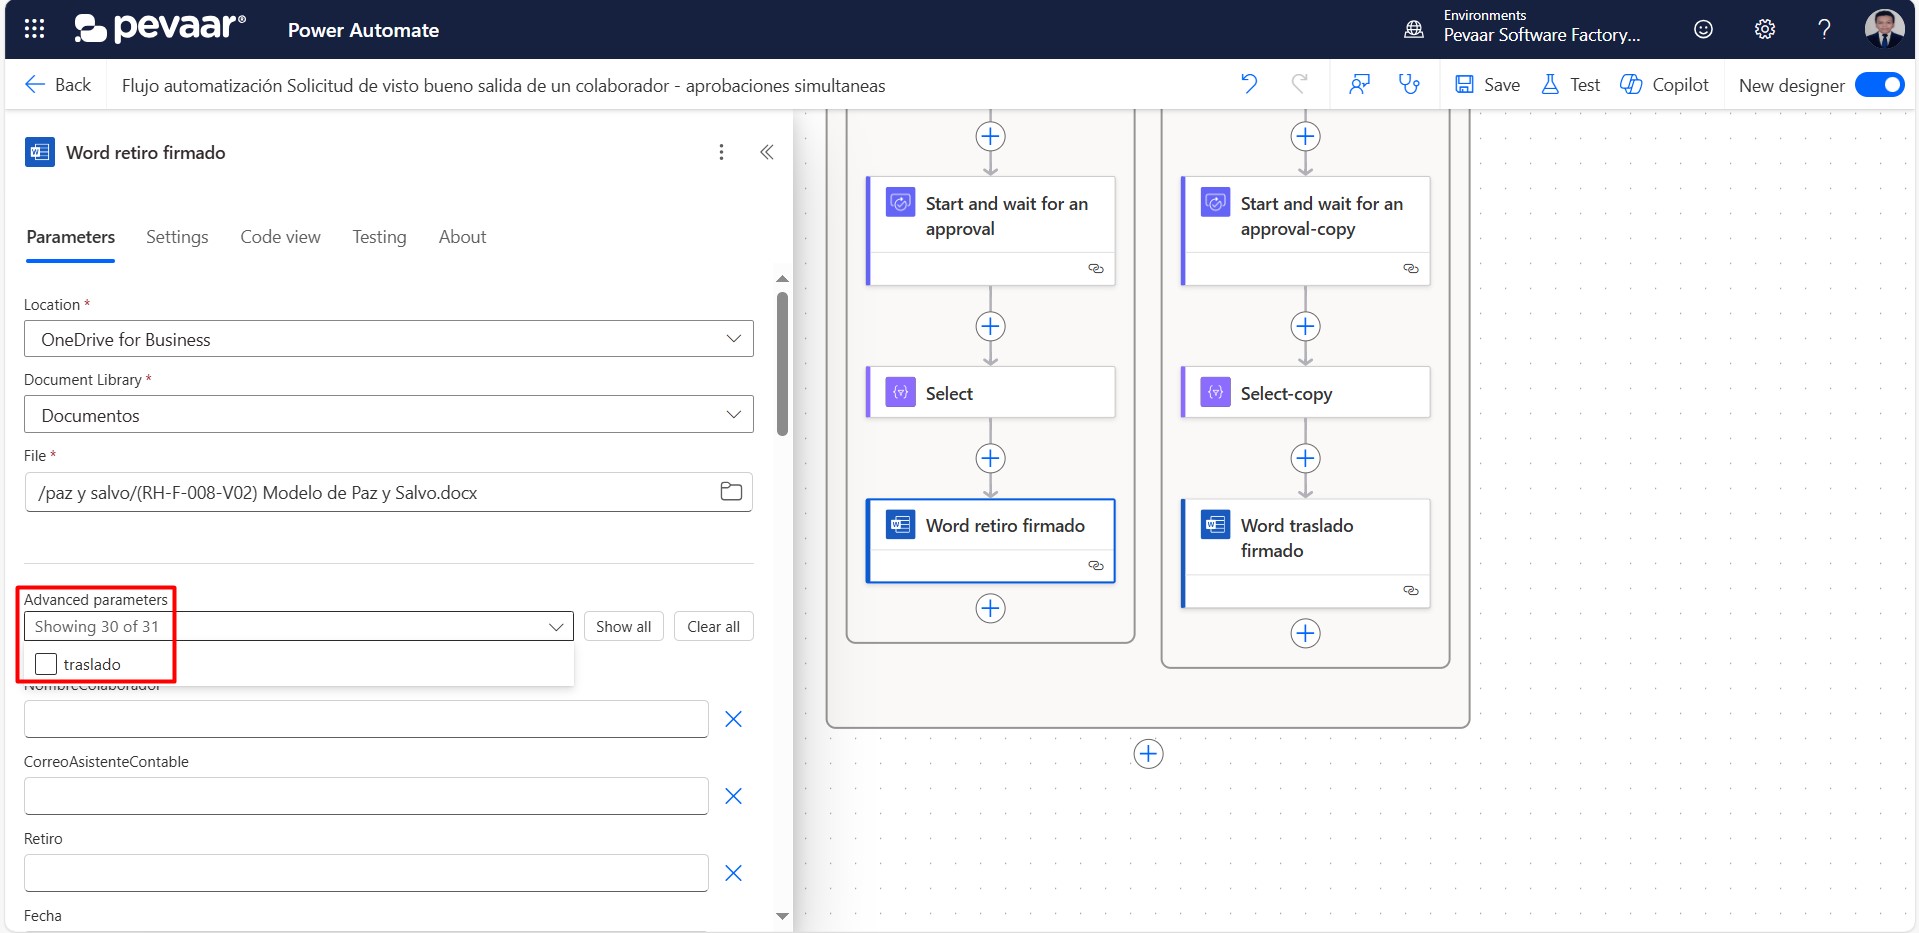 Image 43
The names and emails of all those responsible for approving will be added dynamically from the form, and the “seen” fields of each person responsible will be set: approval was given (image 44)
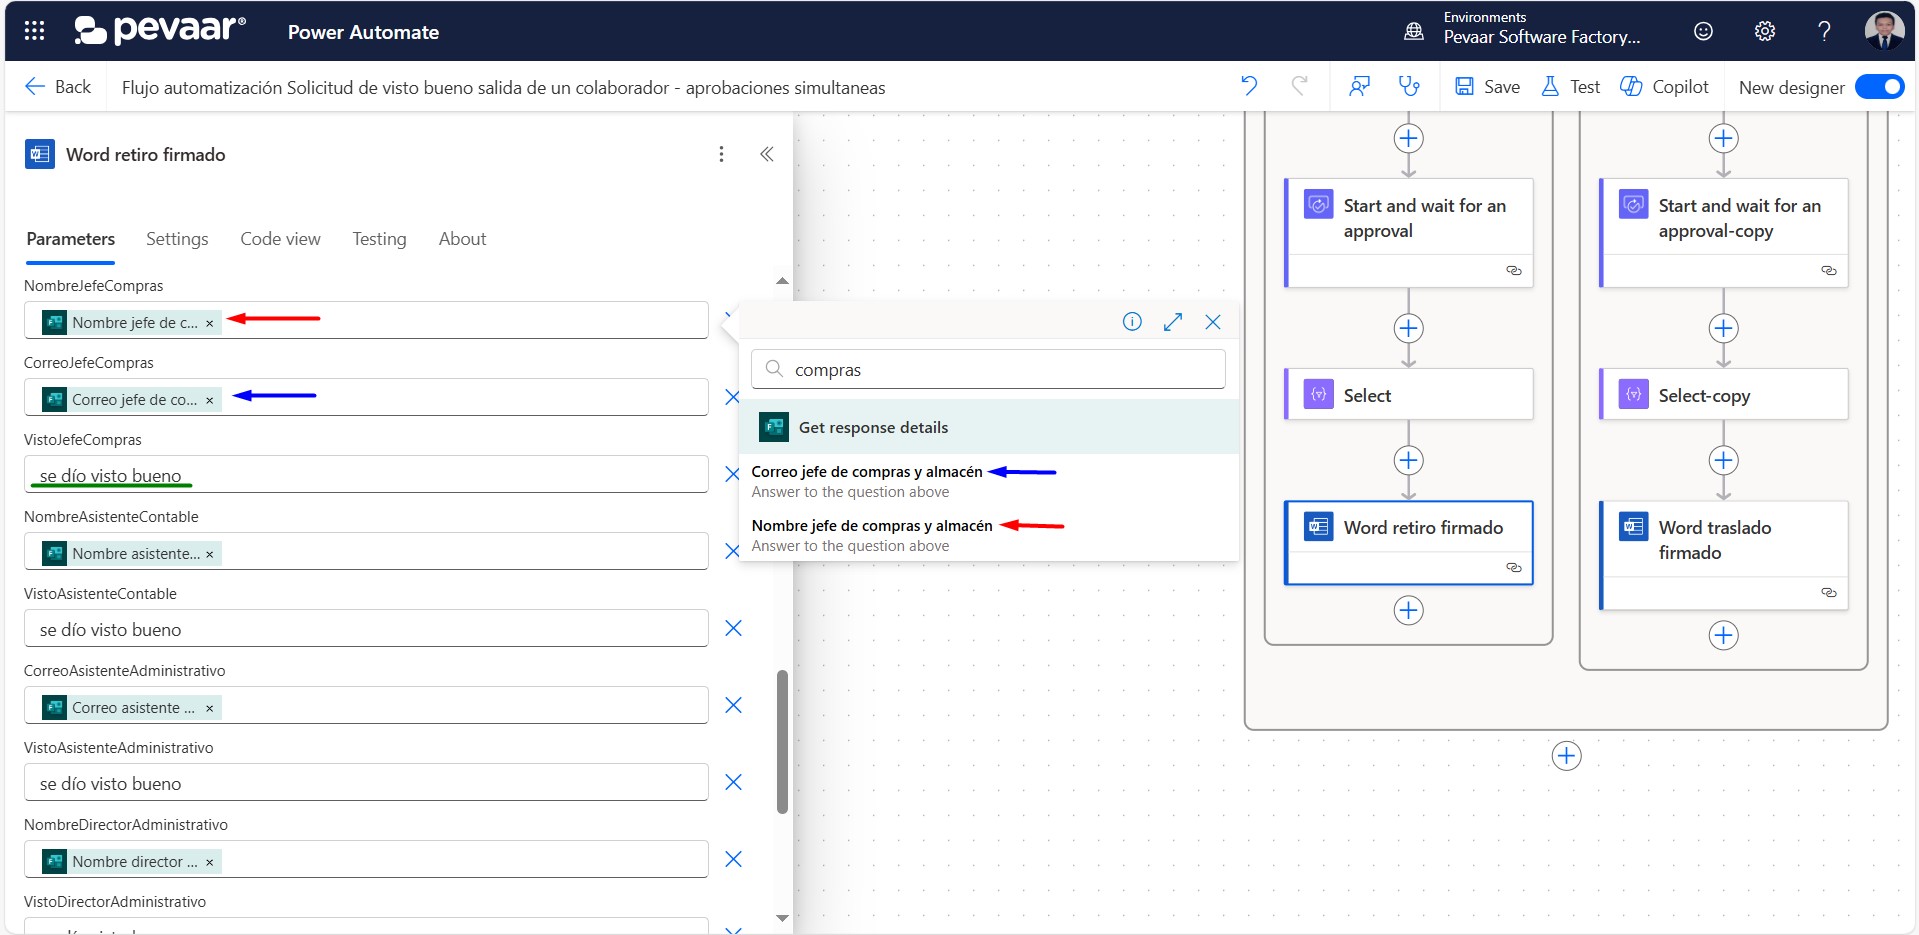 Image 44
In the table field we click on the option to add a complete array, then we dynamically add the output of the Select action (image 45)
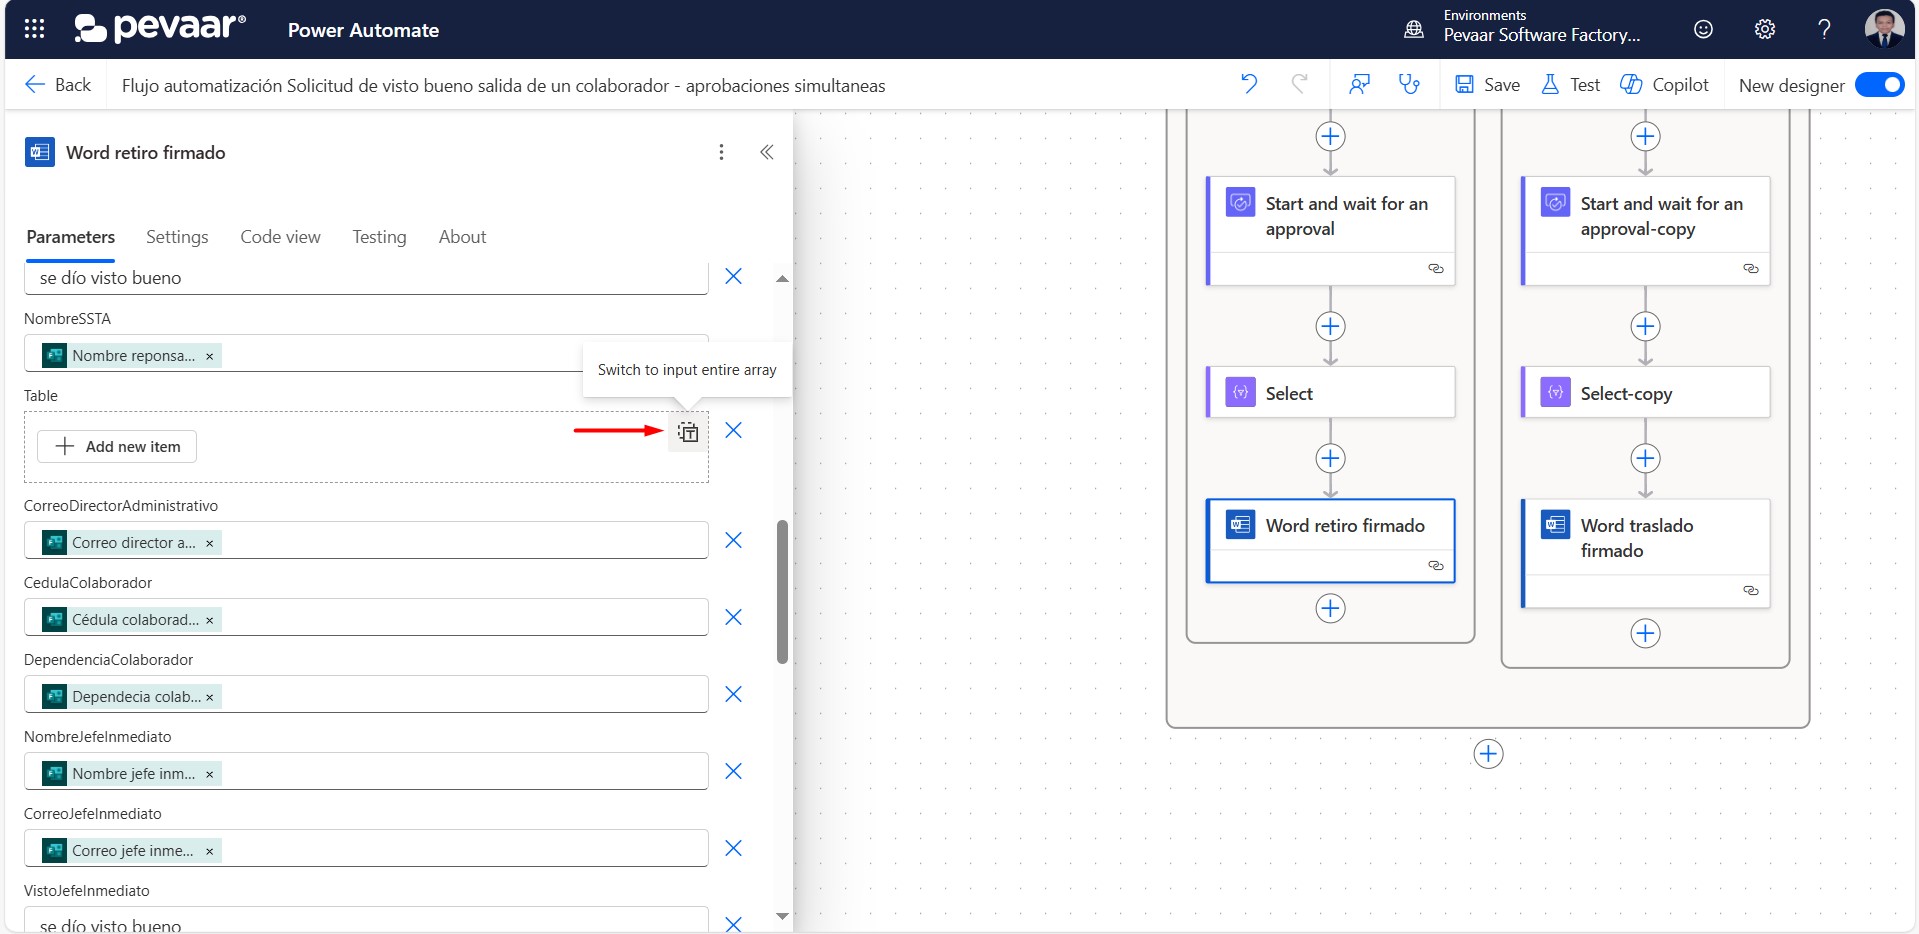 Image 45
On the “False” side of the condition, steps 4.9 should be repeated, after having added the previous “Select” action
So far the file that we have modified is not saved as if we had created it manually, what we must do is create a file with that content, for this we will use the “Create file” action of OneDrive for Business
In the search bar of the action you must type “create file” as a keyword and select the option “Create file” (image 46)
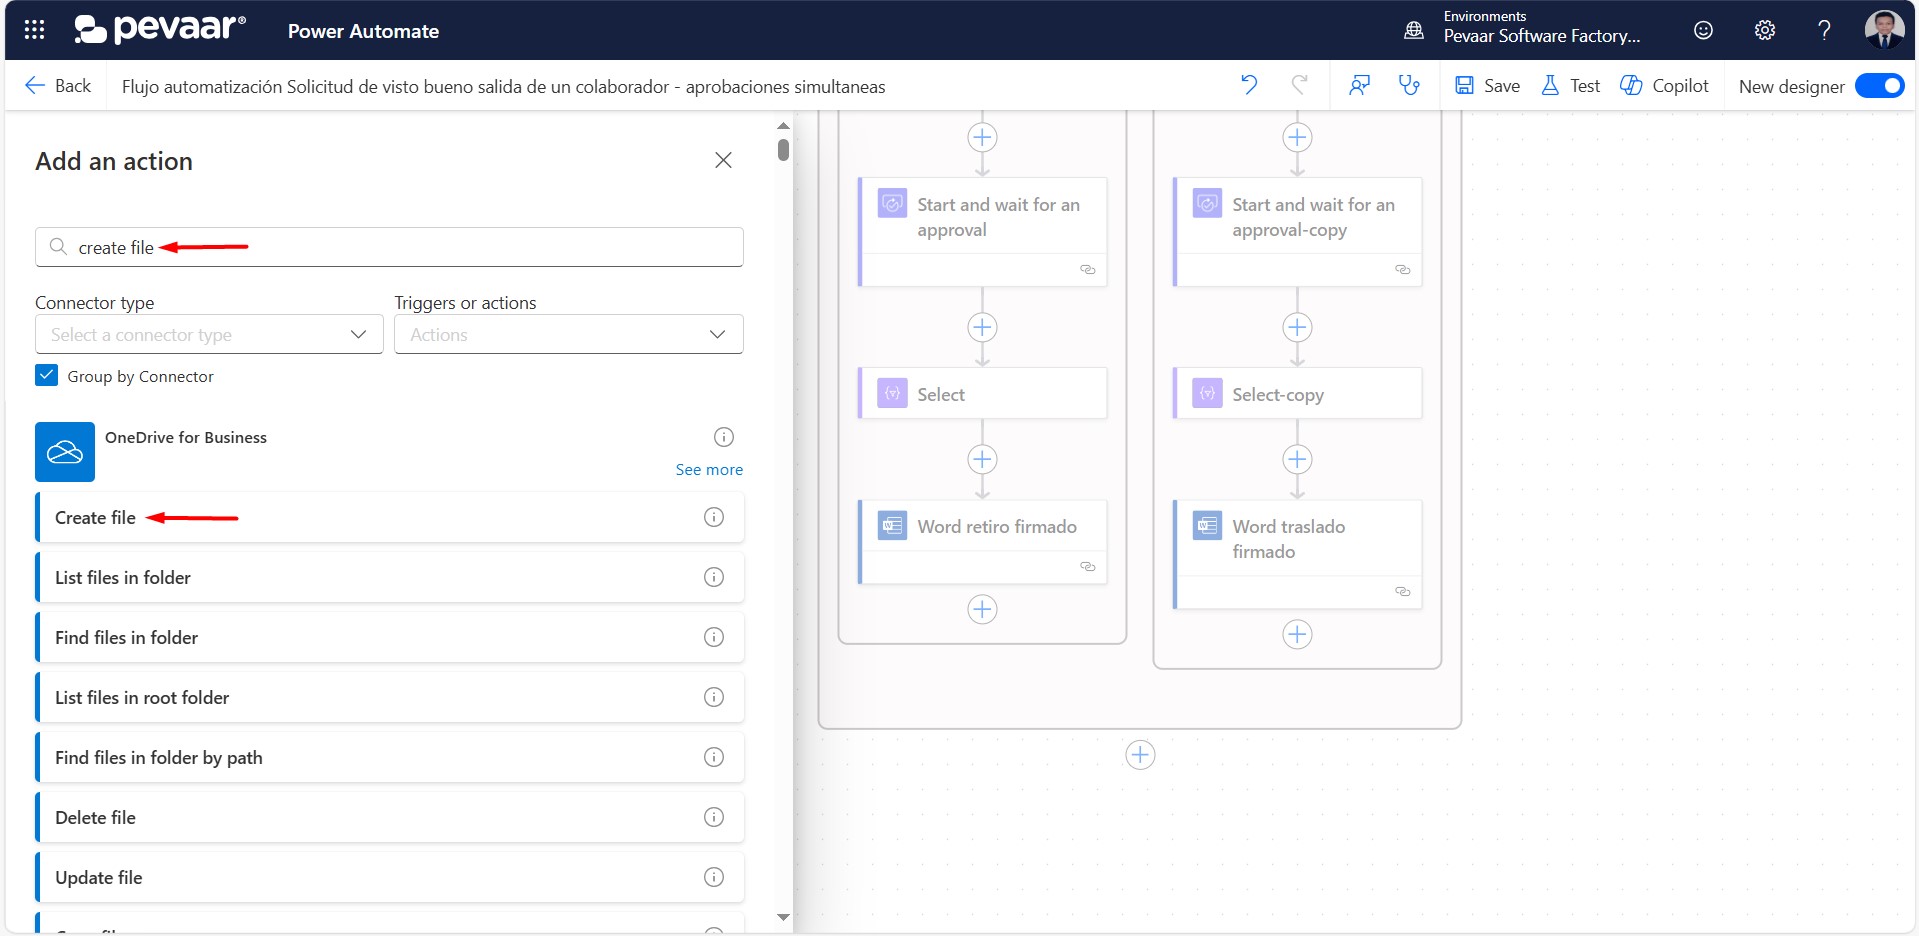 Image 46
In the “Folder Path” we will look for where we want to save the file, in “File name” or file name, in this case we will put a descriptive name with information about the collaborator and the date and with extension .docx, in “File content” or file content we will select the output of the action populate a word template above (image 47)
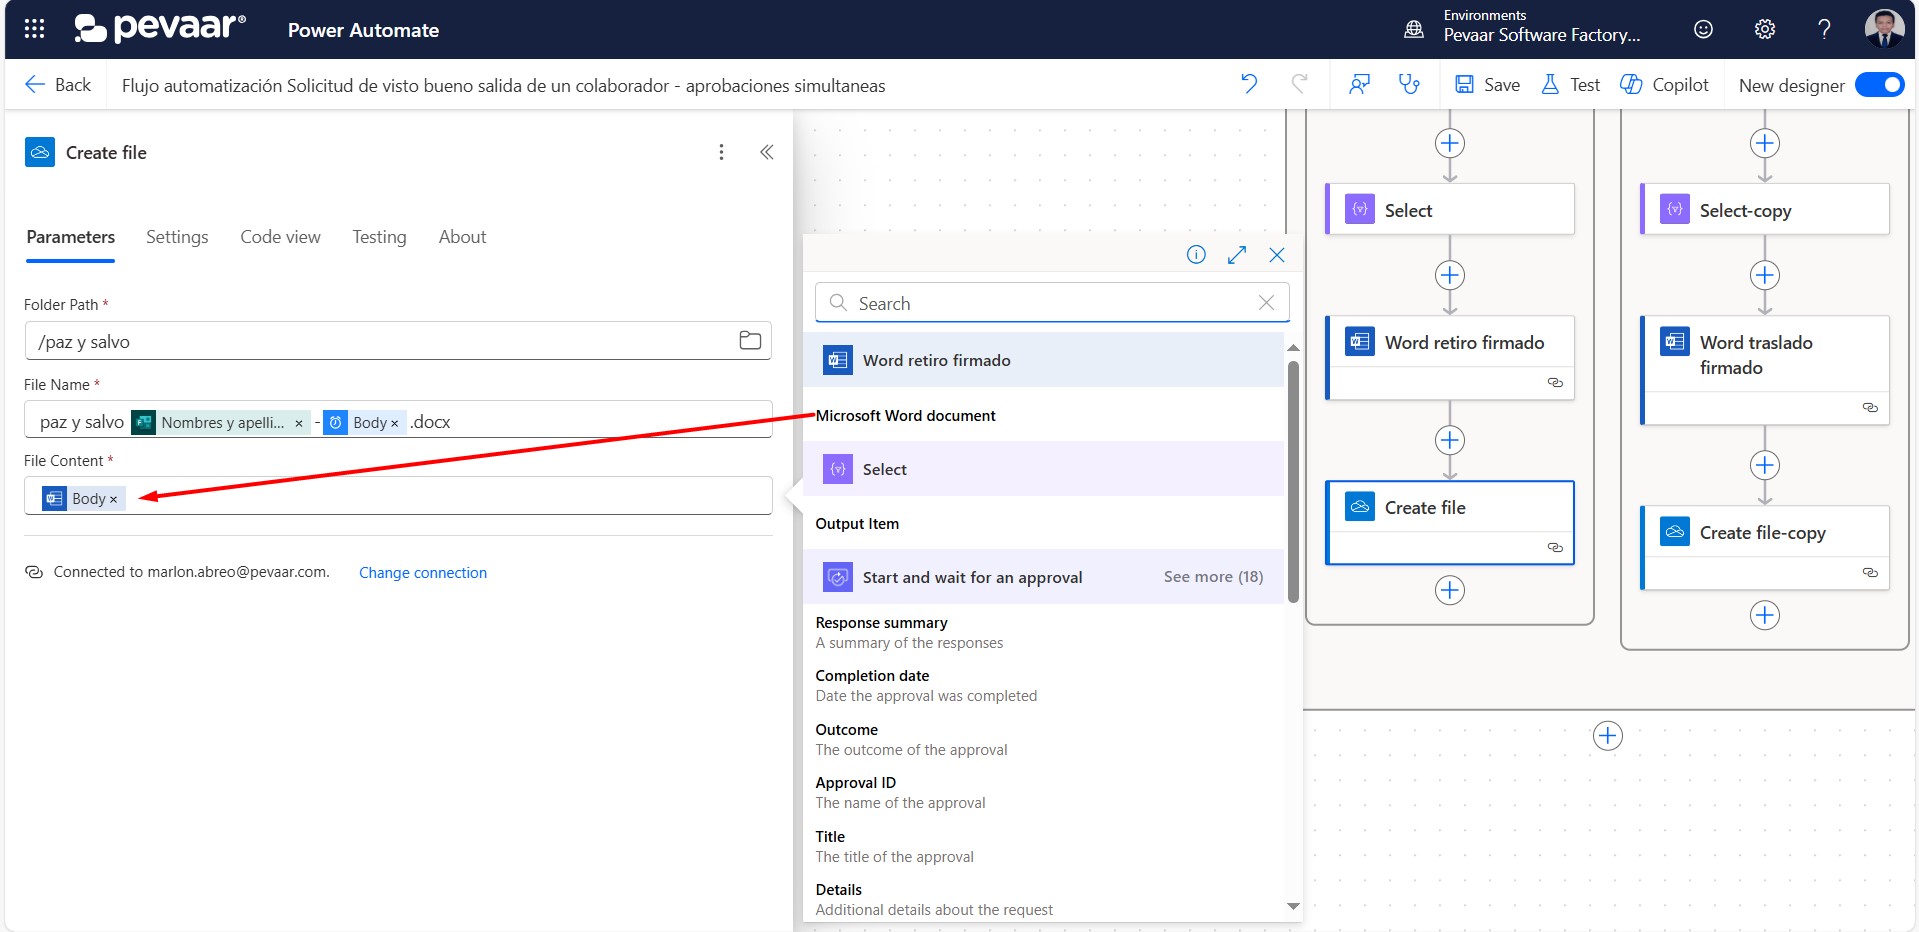 Image 47
On the “False” side of the condition, steps 4.10 should be repeated, after having added the previous action “populate a word template”
The next thing is to convert the created word file to PDF, for this we will use the “Convert file” action of OneDrive for Business
In the search bar of the action you must type “convert file” as keyword and select the option “Convert file” (image 48)
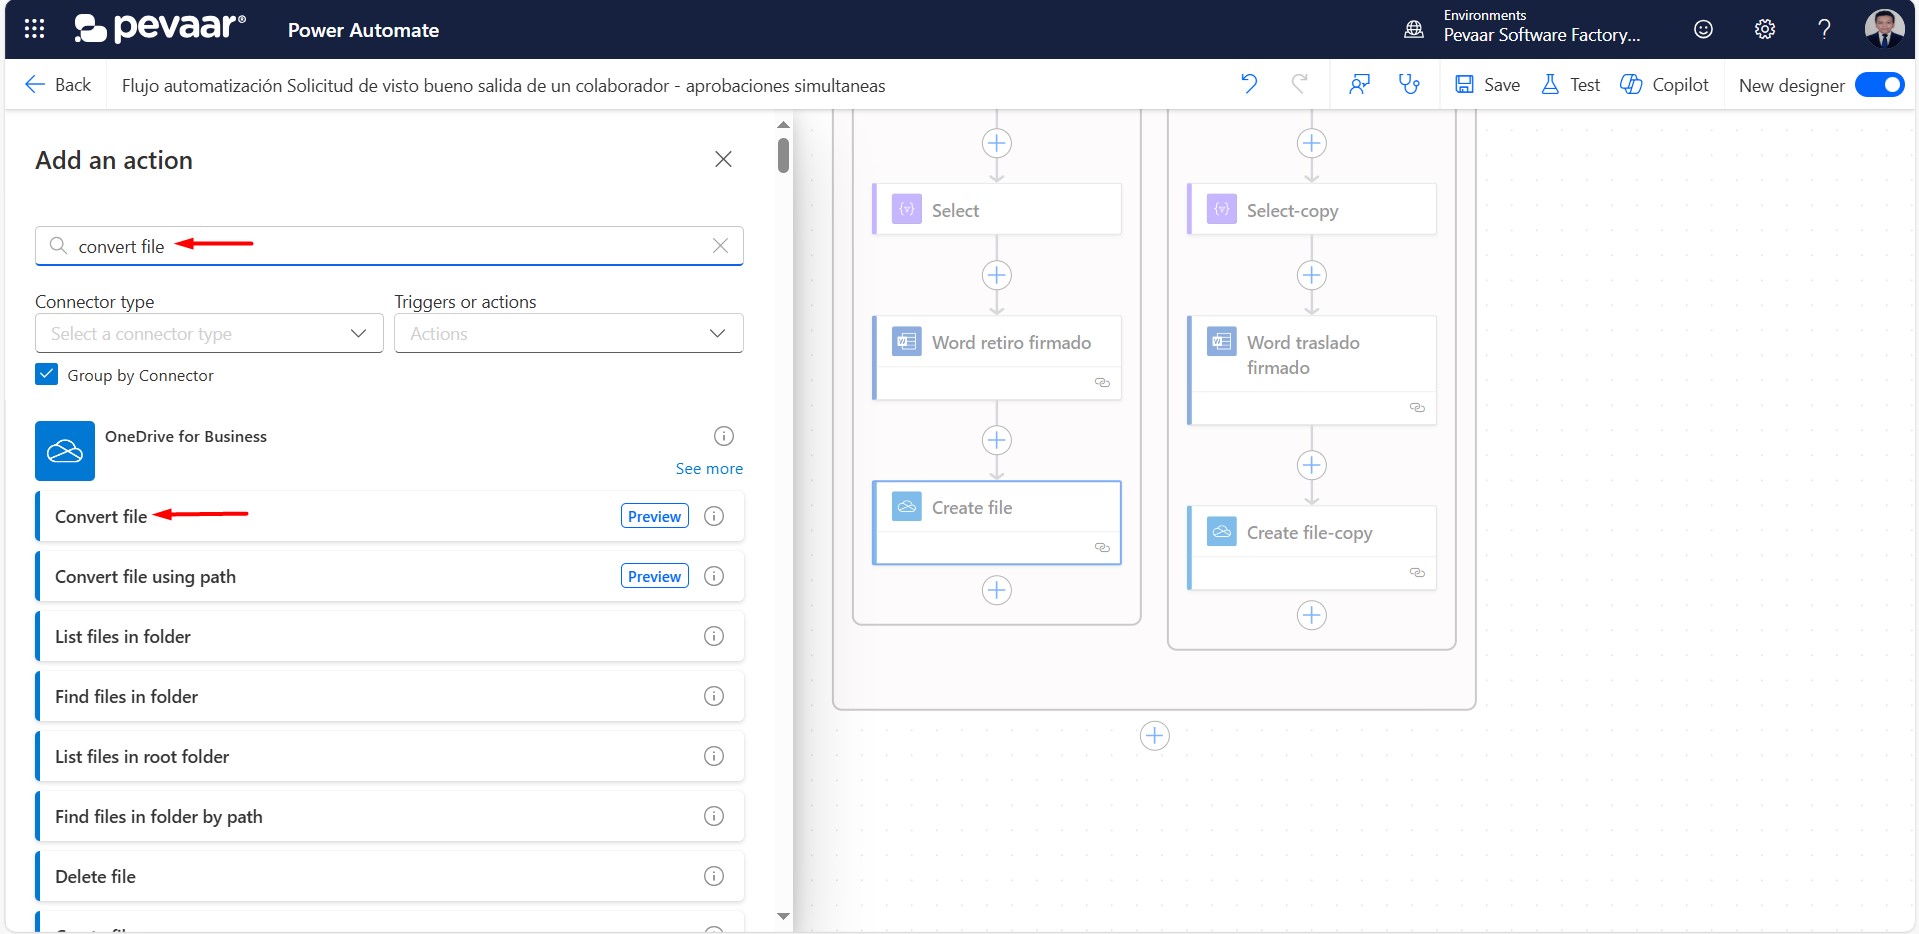 Image 48
In “File” we will select the id of the file that we have created with the previous action, in the “Target type” we will leave PDF (image 49)
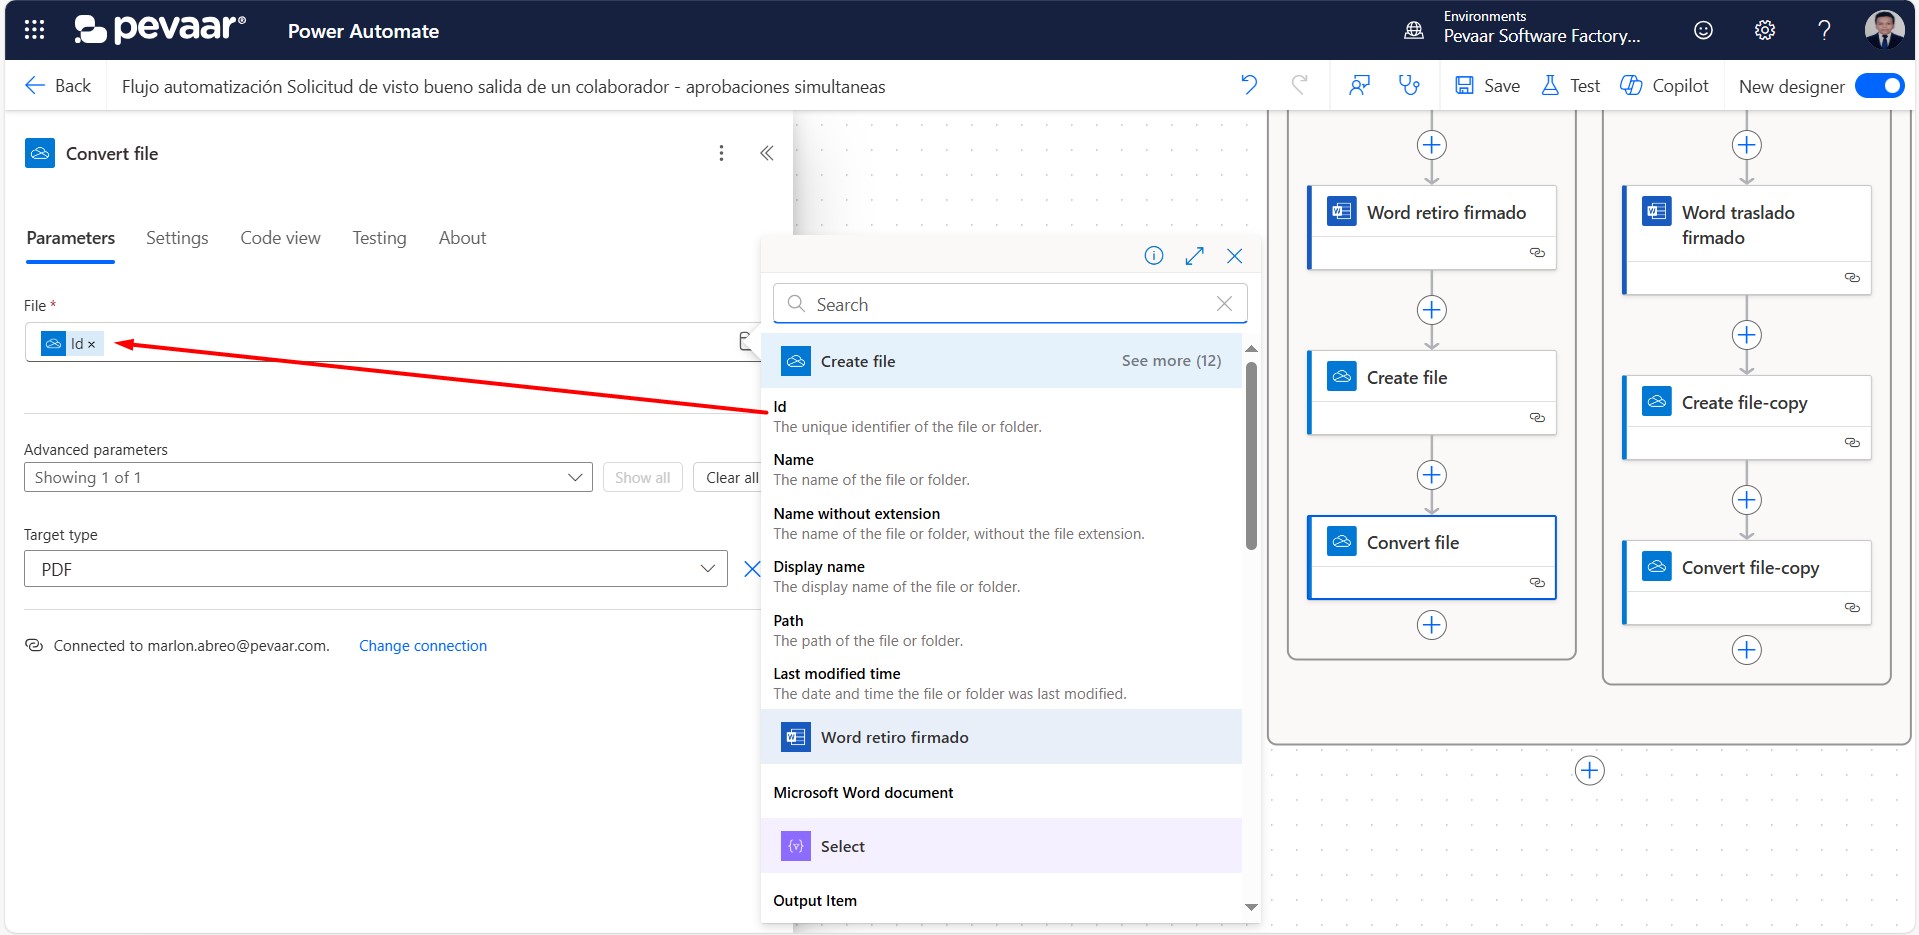 Image 49
On the “False” side of the condition, steps 4.11 should be repeated, after having added the previous “Create file” action
If you also want to save the file in PDF format, what you have to do is create a file with that content, for this you will use the “Create file” action in OneDrive for Business.
In the search bar of the action you must type as keyword “create file” and select the option “Create file” (image 50)
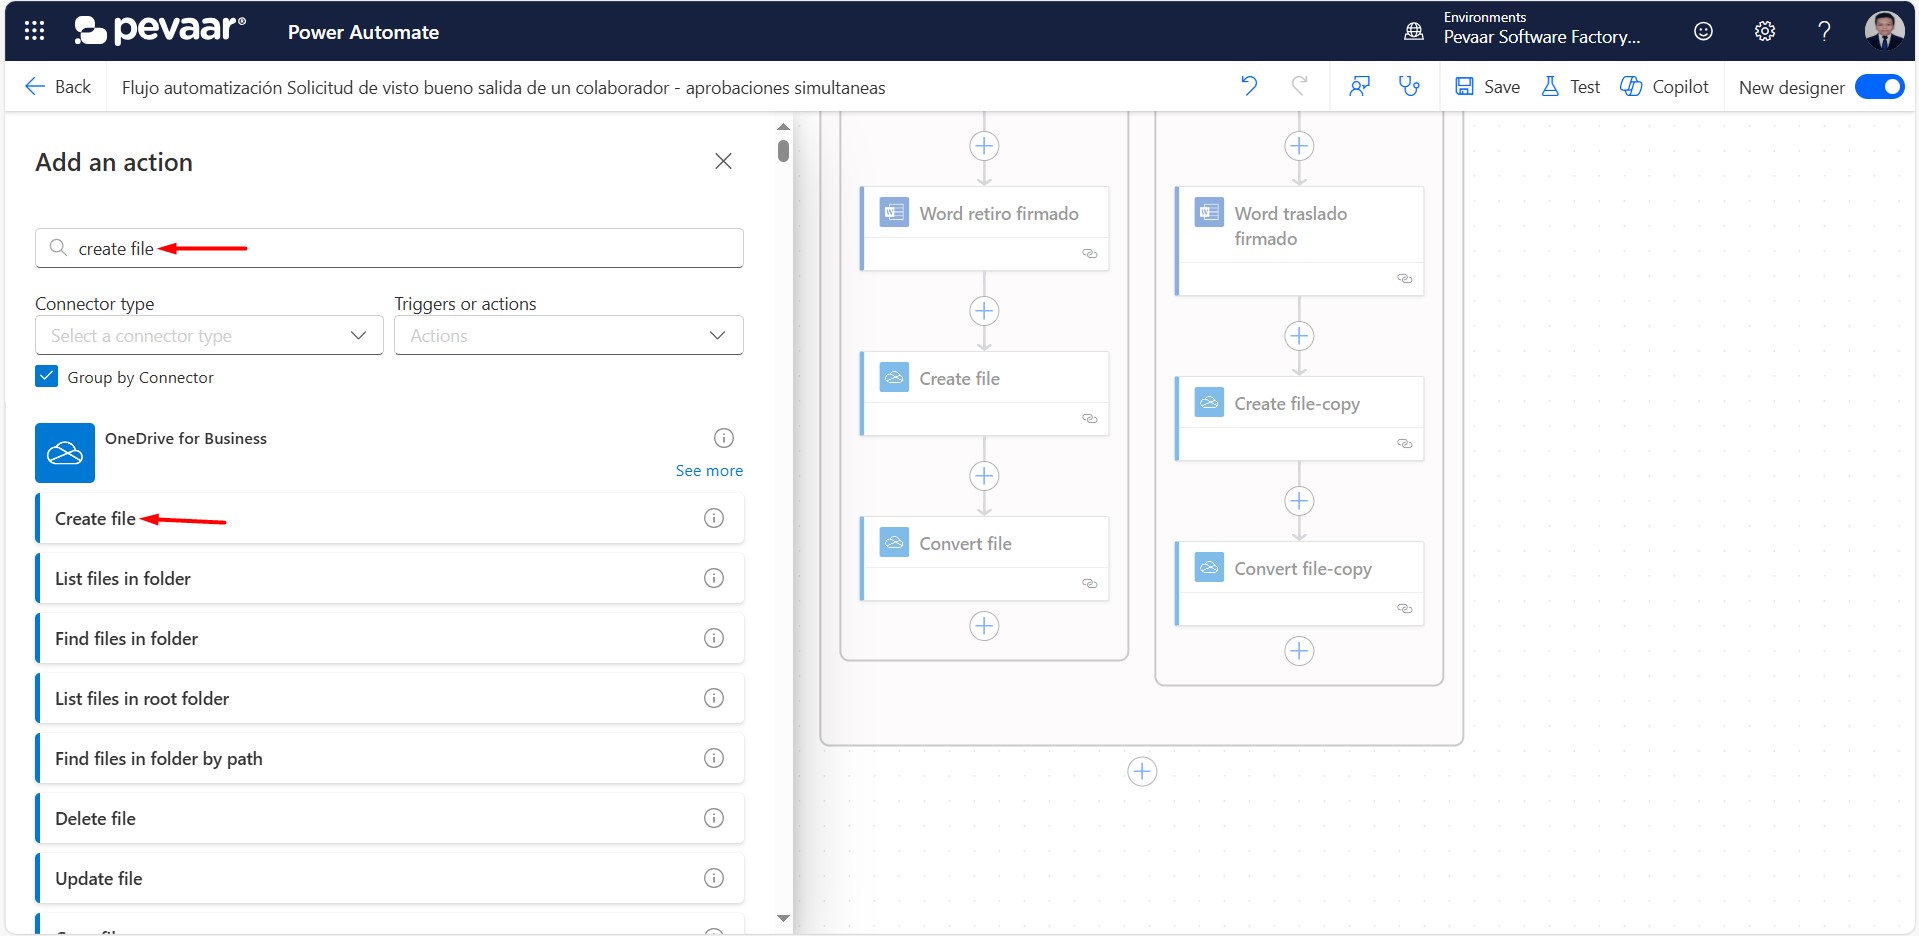 Image 50
In the “Folder Path” we will look for where we want to save the file, in “File name” or file name, in this case we will put a descriptive name with information about the collaborator and the date and with extension .pdf, in “File content” or file content we can the output of the previous convert file action (image 51)
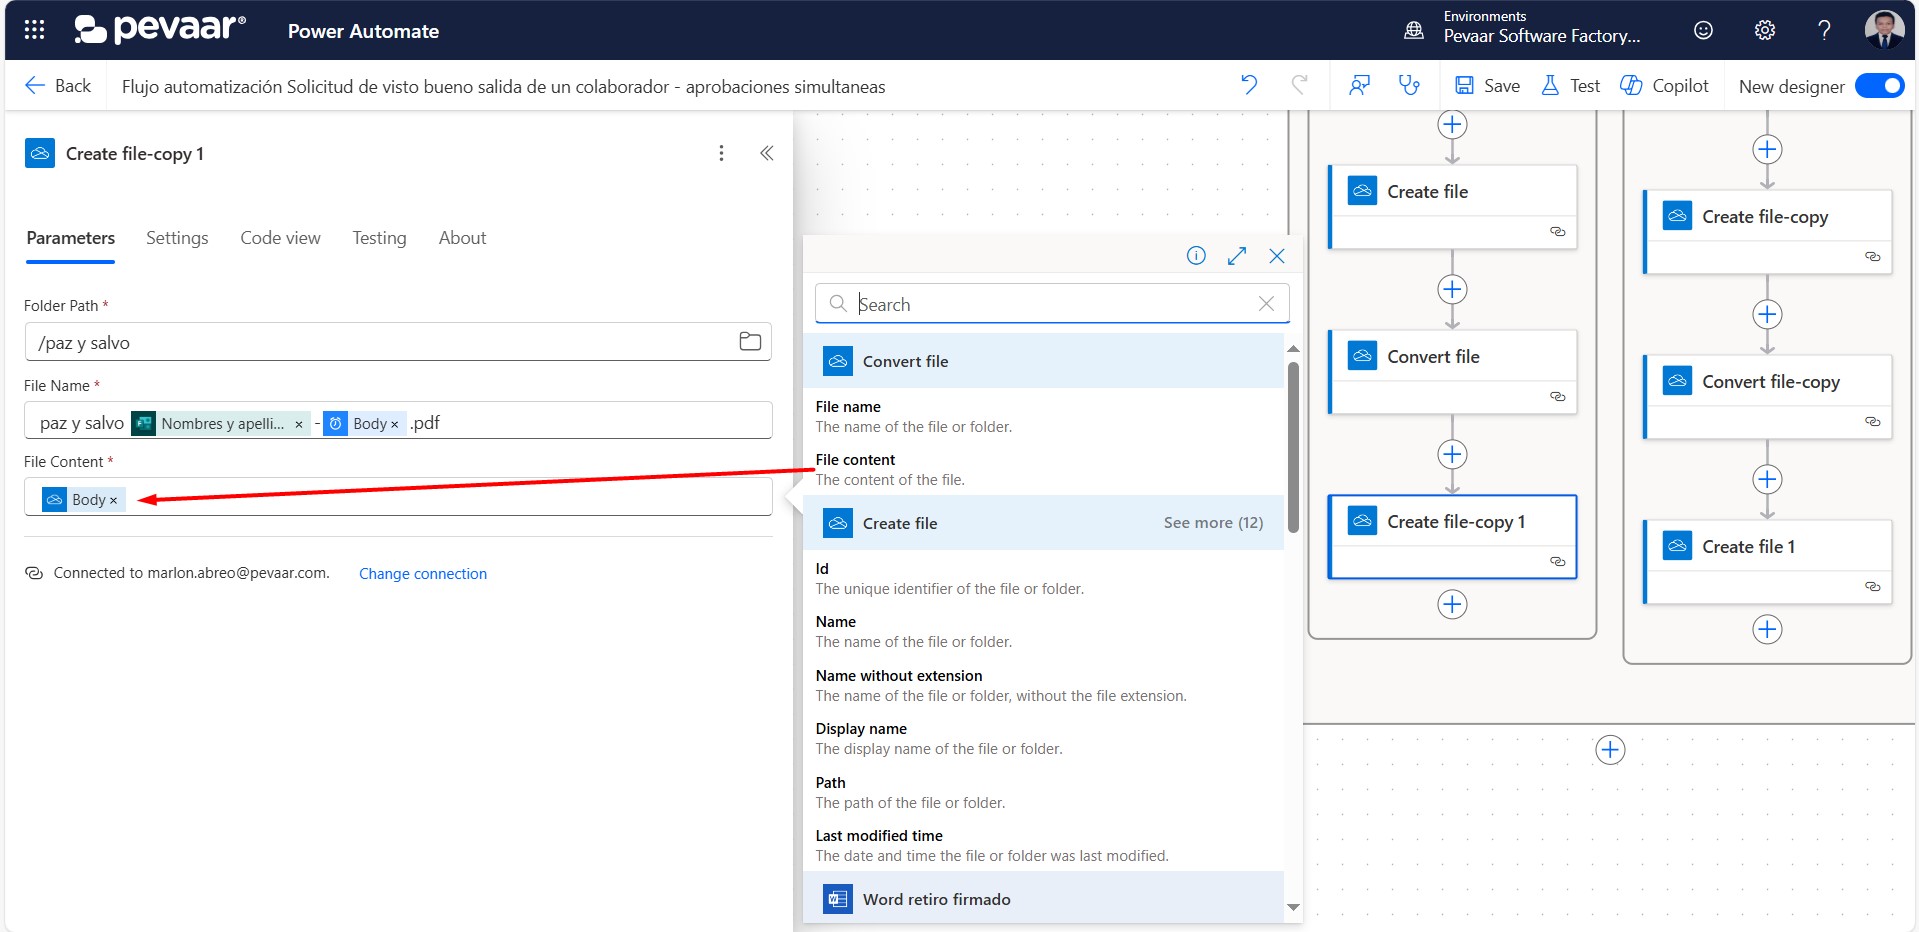 Image 51
On the “False” side of the condition, steps 4.12 should be repeated, after having added the previous “Convert file” action
The last action is to send an email to the collaborator notifying the approval of their peace and safety, for this we will use the “Send an email” action of the Office 365 Outlook connector group
In the search bar of the action you must type “send email” as a keyword and select the option “Send email” (image 52)
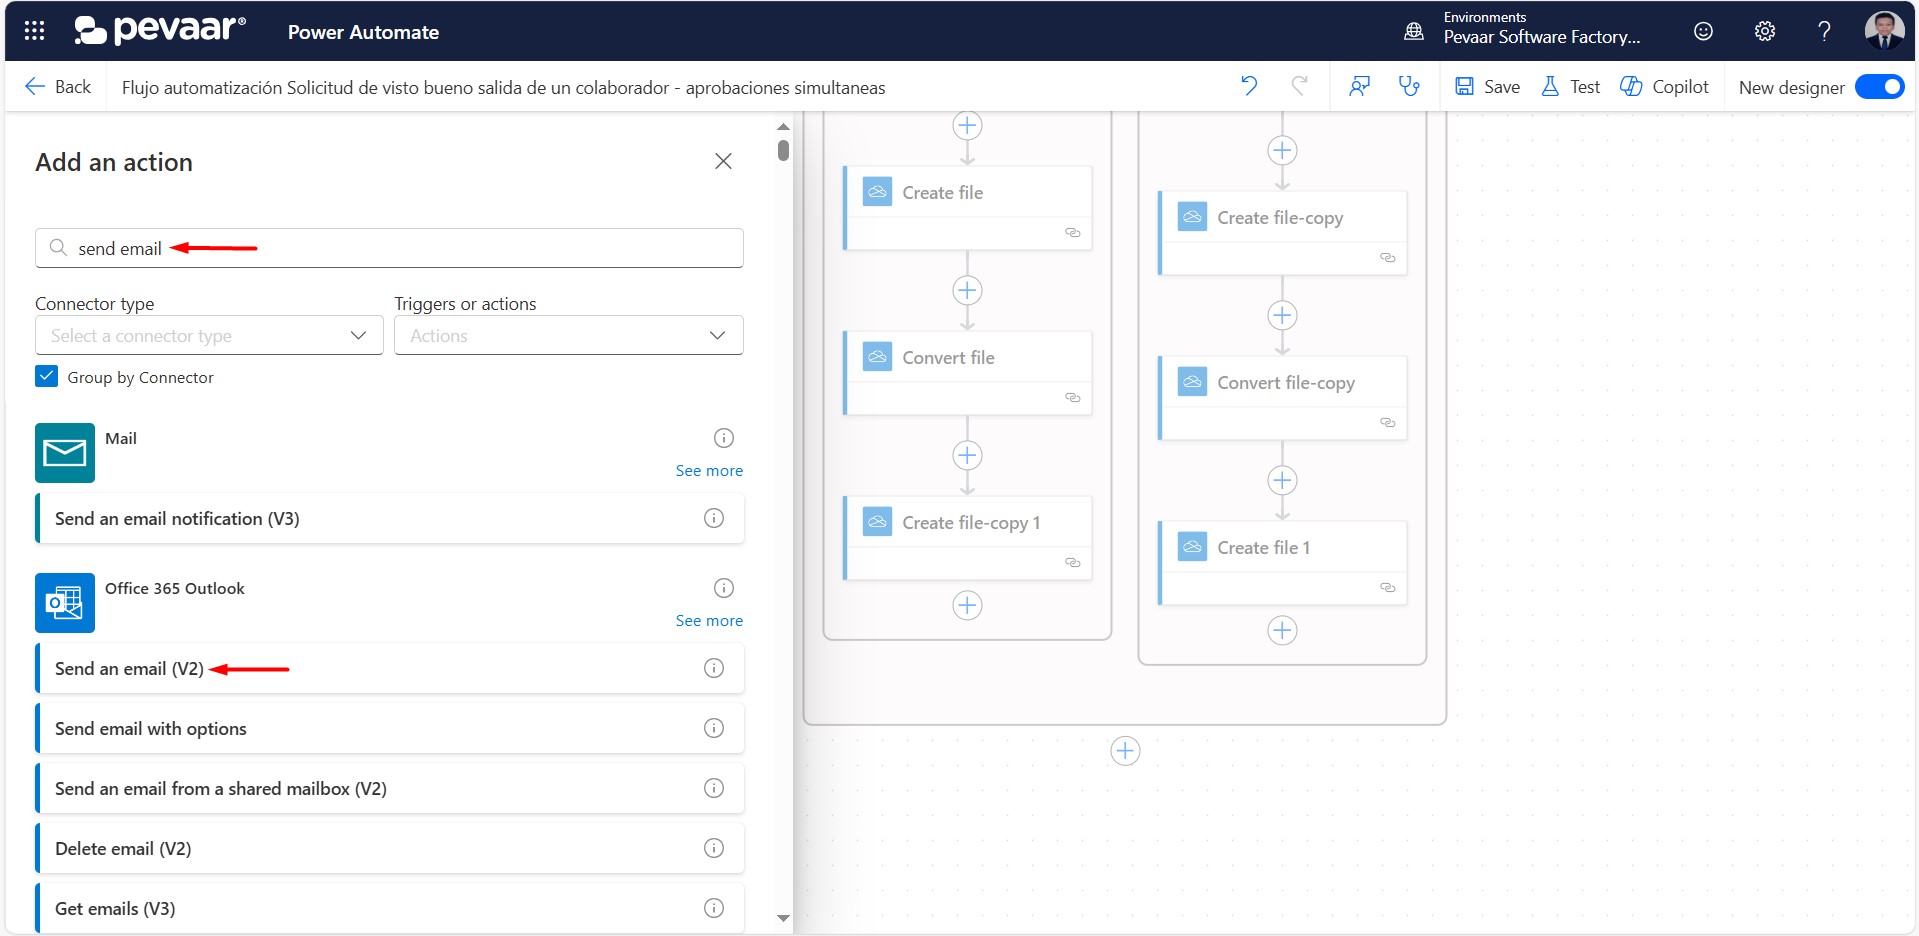 Image 52
The person who will be sent the email is the same person who sent the form, for this we dynamically select the email from Forms, and we will add the dynamic parameter Attachments or Attachments (image 53)
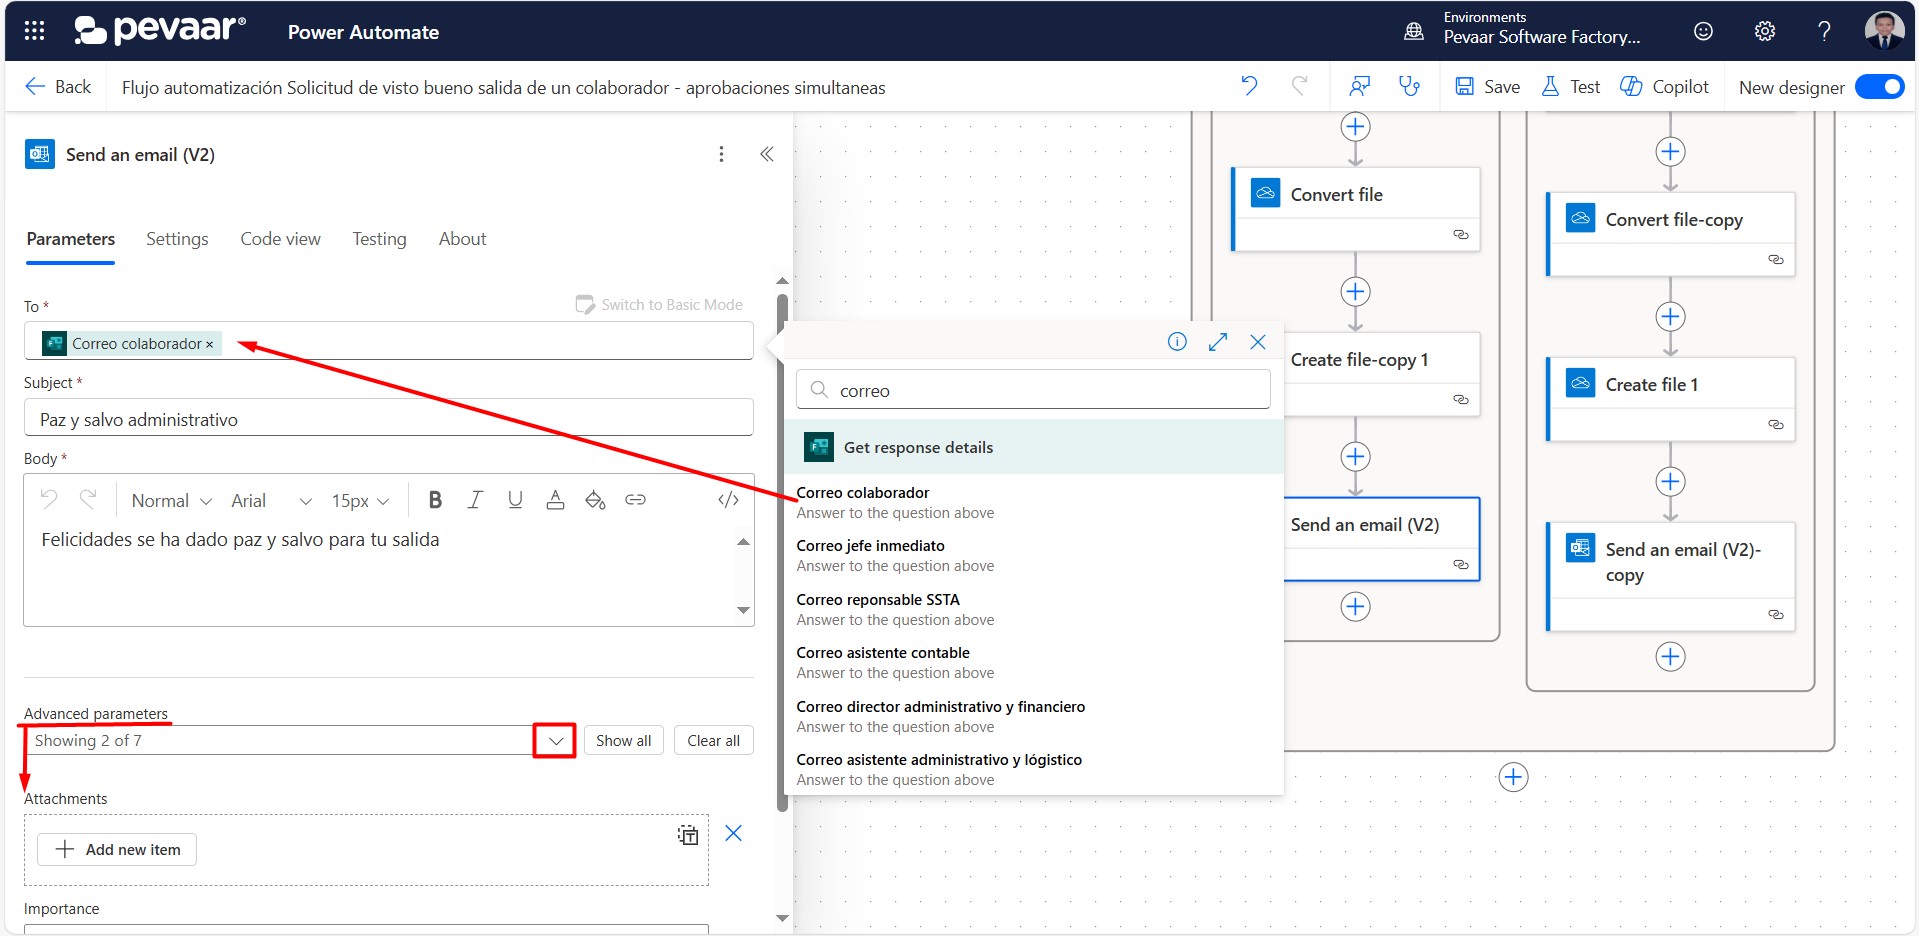 Image 53
We will add a new item in the attached parameter, then in the name of the attachment we will dynamically put the name of the file converted to PDF previously, in the same way with the content (image 54)
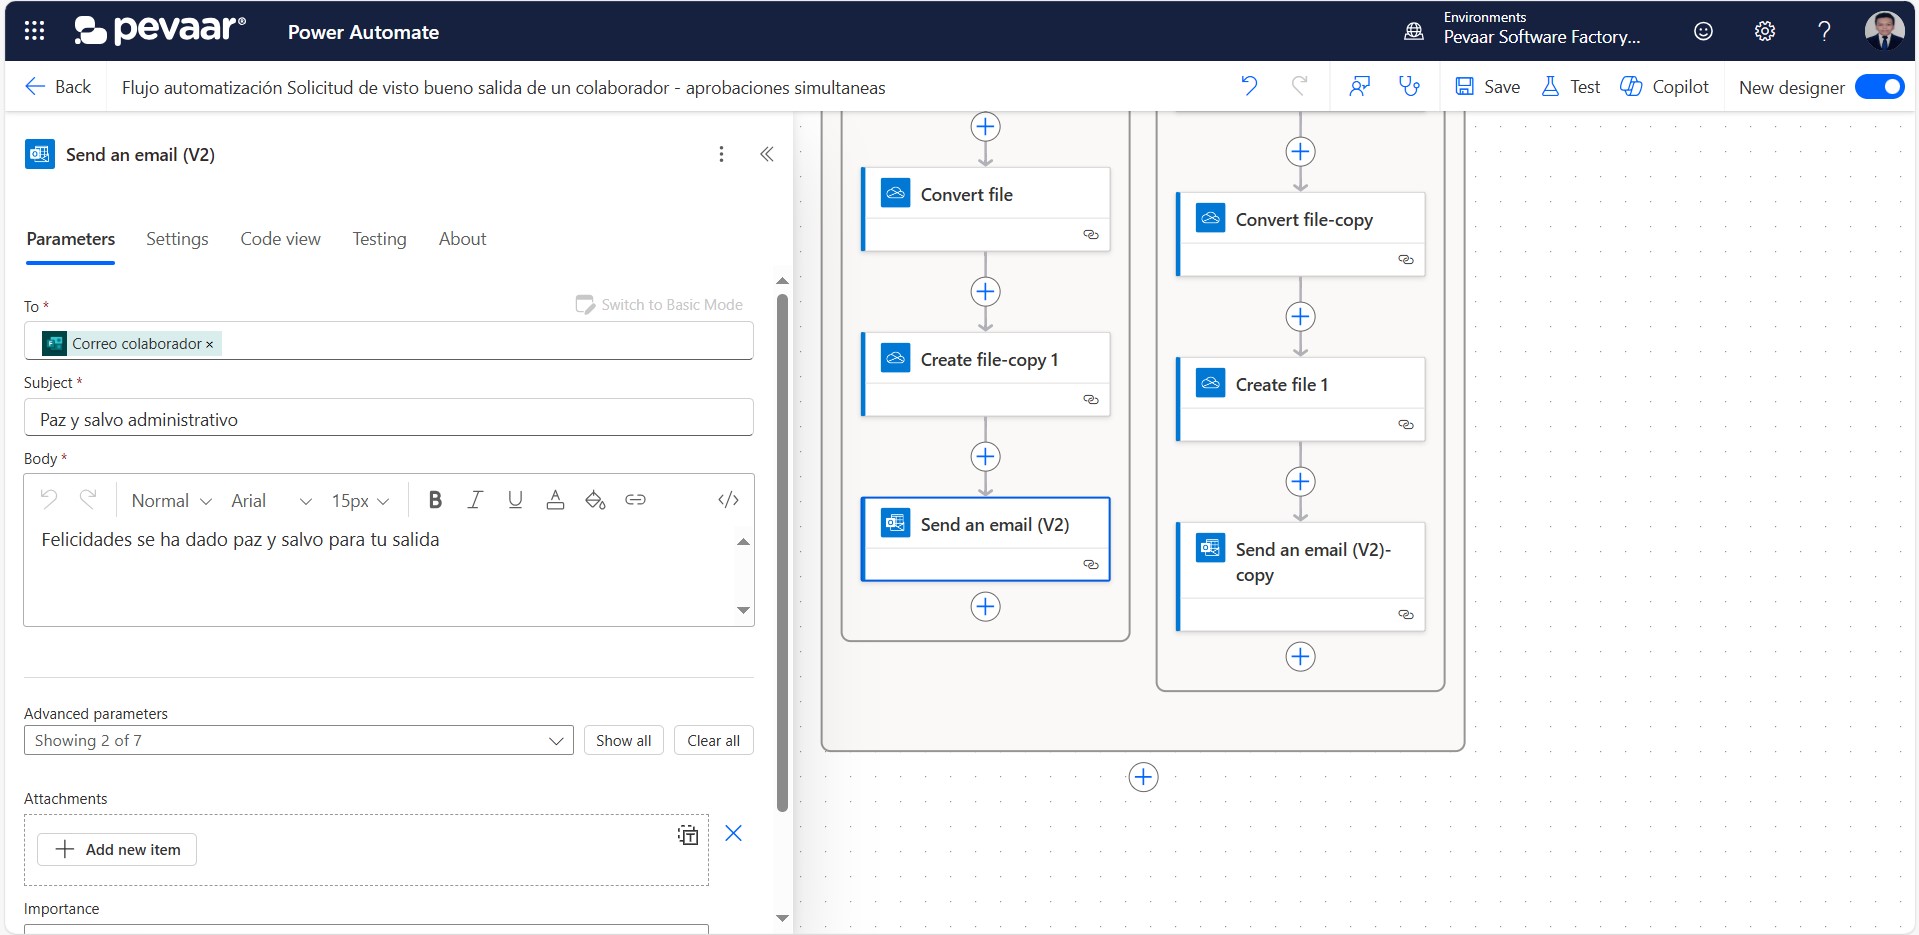
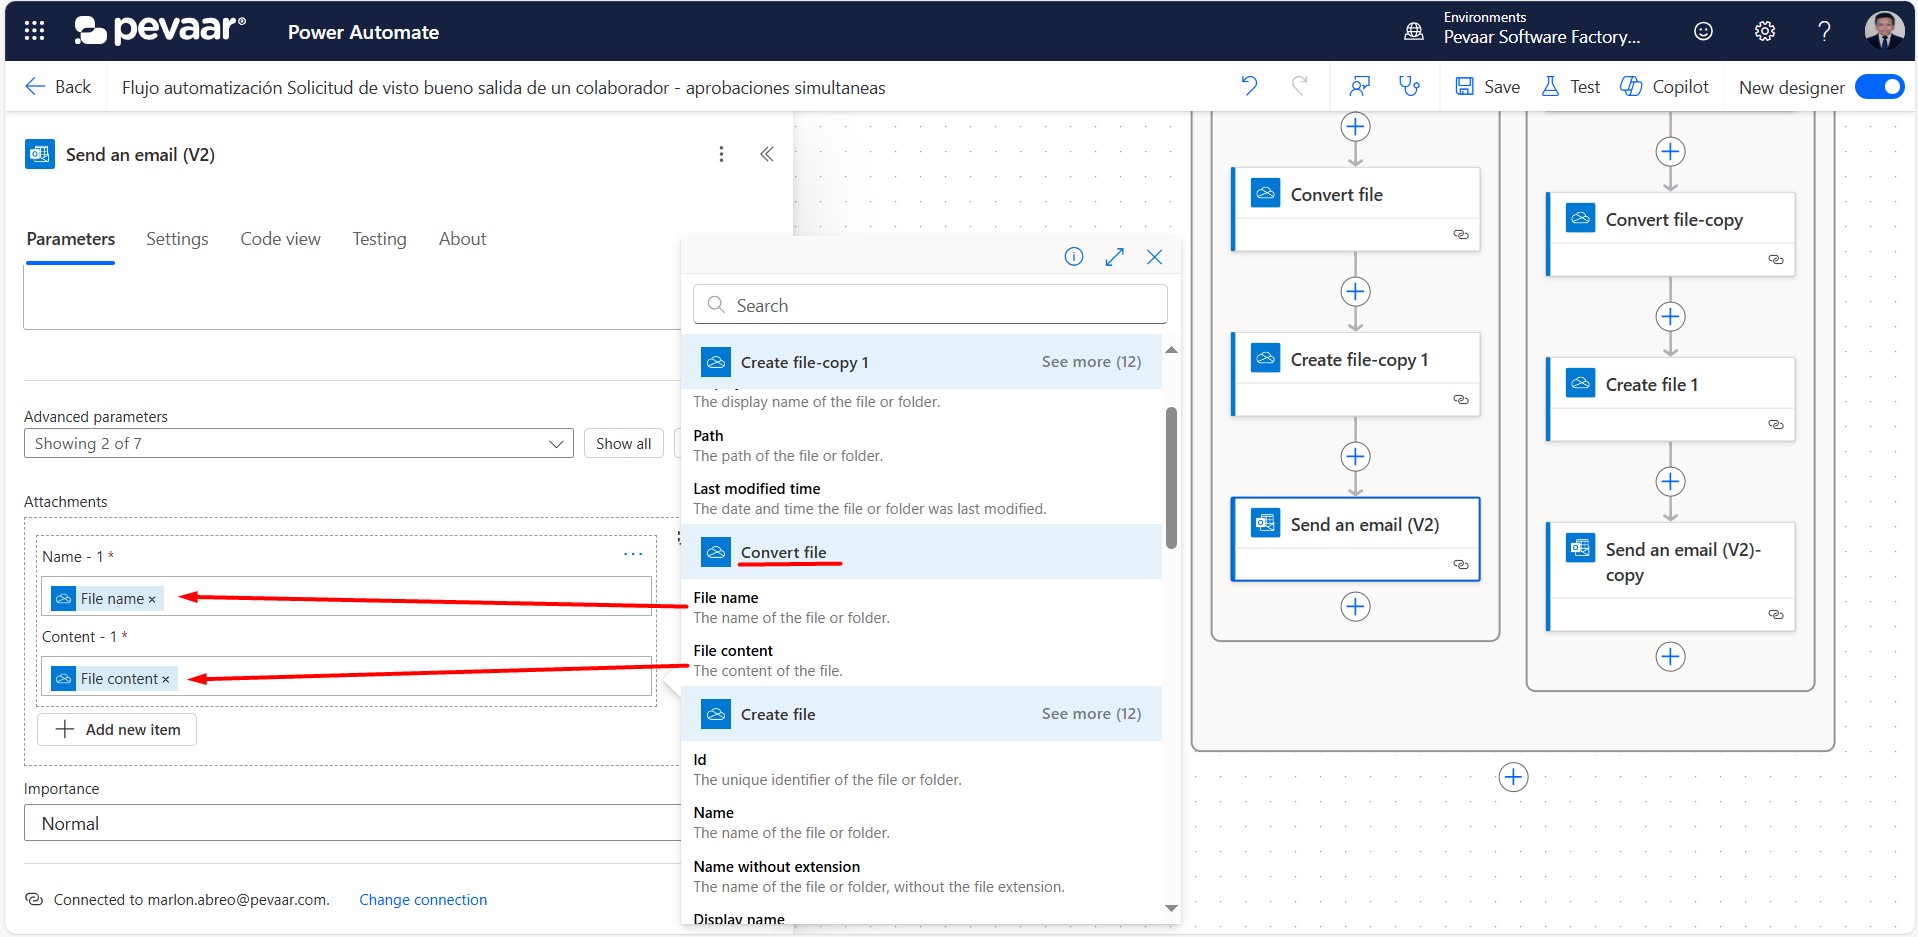 Image 54
On the “False” side of the condition, steps 4.13 should be repeated, after having added the previous “Convert file” action
This is the end of the flow
Drive Business Efficiency with Power Automate Premium
Using Power Automate Premium in a business not only streamlines administrative and operational processes, but also allows teams to focus on strategic tasks instead of wasting time on repetitive manual processes. In this case, we saw how automating the request for approval of the departure or transfer of an employee with simultaneous approvals improves efficiency in Human Resources and guarantees a more rigorous control of internal processes.
If your company is looking for advanced automation solutions, at Pevaar we offer specialized services in Power Automate Premium, enterprise software integration and workflow optimization. In addition, we have an expert team in process automation, custom software development and IT staffing services.
Want to implement Power Automate Premium in your business? Contact us today and find out how we can help you optimize your processes and improve operational efficiency.
This article now features a more comprehensive introduction to Power Automate Premium, ensuring better search engine optimization and providing more value to the reader.


Leave a Reply