
Approval Process for External Users: How to Automate It
In many organizations, requesting permissions is still a manual, slow, and error-prone task — especially when external users are involved. To solve this, we designed an automated workflow with Power Automate that connects email, Excel, and calendar tools, simplifying the approval process and making it hassle-free.
In this article, we’ll show you how this solution works, which tools it uses, and how it can help your HR team optimize the management of employee permissions. If you’re looking to streamline your approval process and reduce administrative workload, this guide is for you.
Optimize the Approval Process: See How Our Automated Workflow Works
Learn how you can set up this workflow to automatically manage permission requests from external users. Keep reading to get started!
First, go to Power Automate, click on “Create”, and then select “Automated cloud flow” (see Image 1).
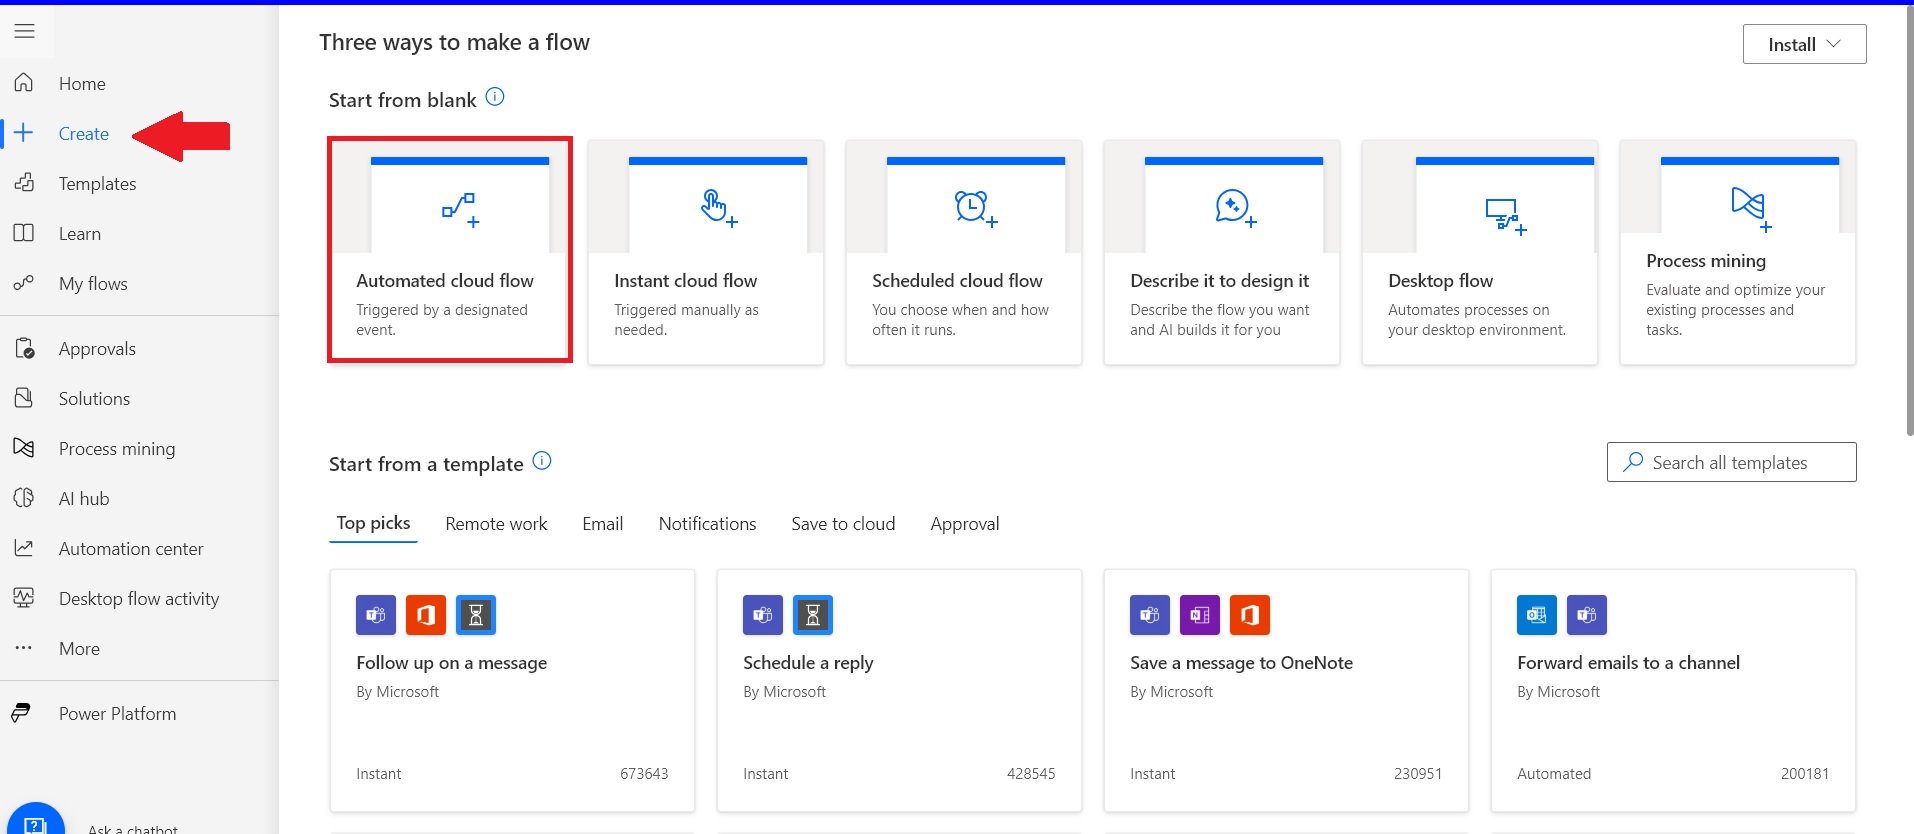
Image 1
You need to give the flow a name and select the flow trigger, which in this case will be “When a new response is submitted” (see Image 2).
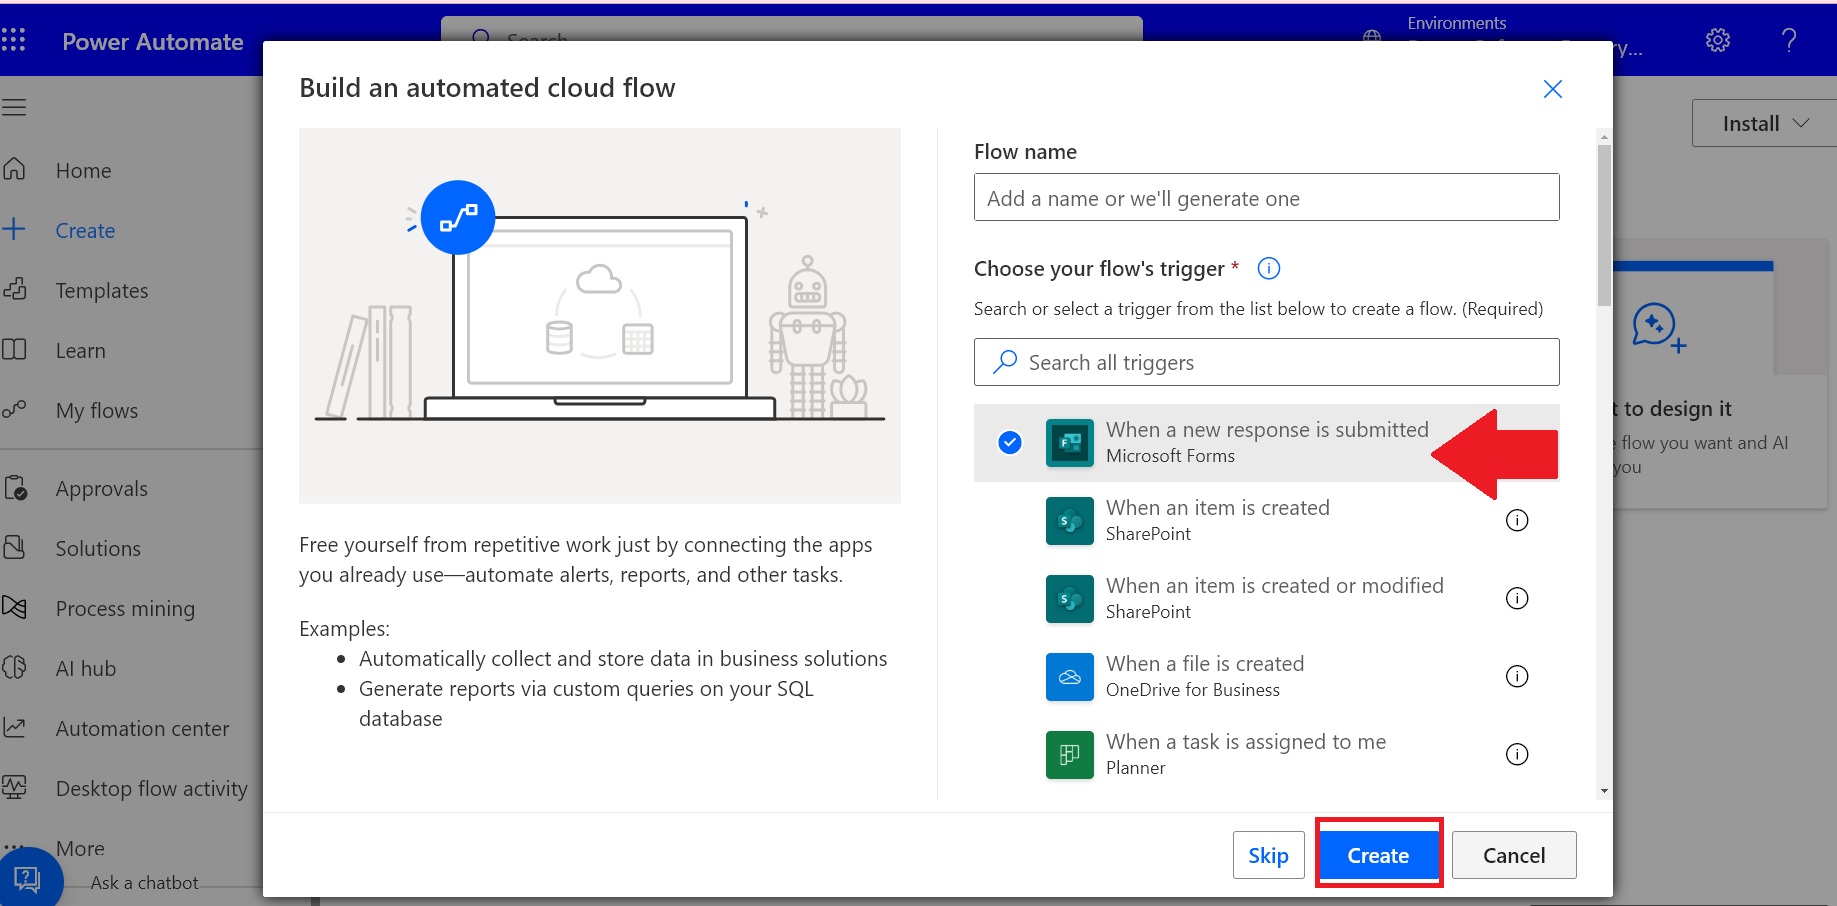
Image 2
Next, the flow and its connections will be detailed:
1.1. The flow begins with a trigger from Forms. You need to select the corresponding “Form Id” from the automatically loaded options, which corresponds to the Permission Request form from the list of all the forms created by the user who designed the flow (see Image 3).
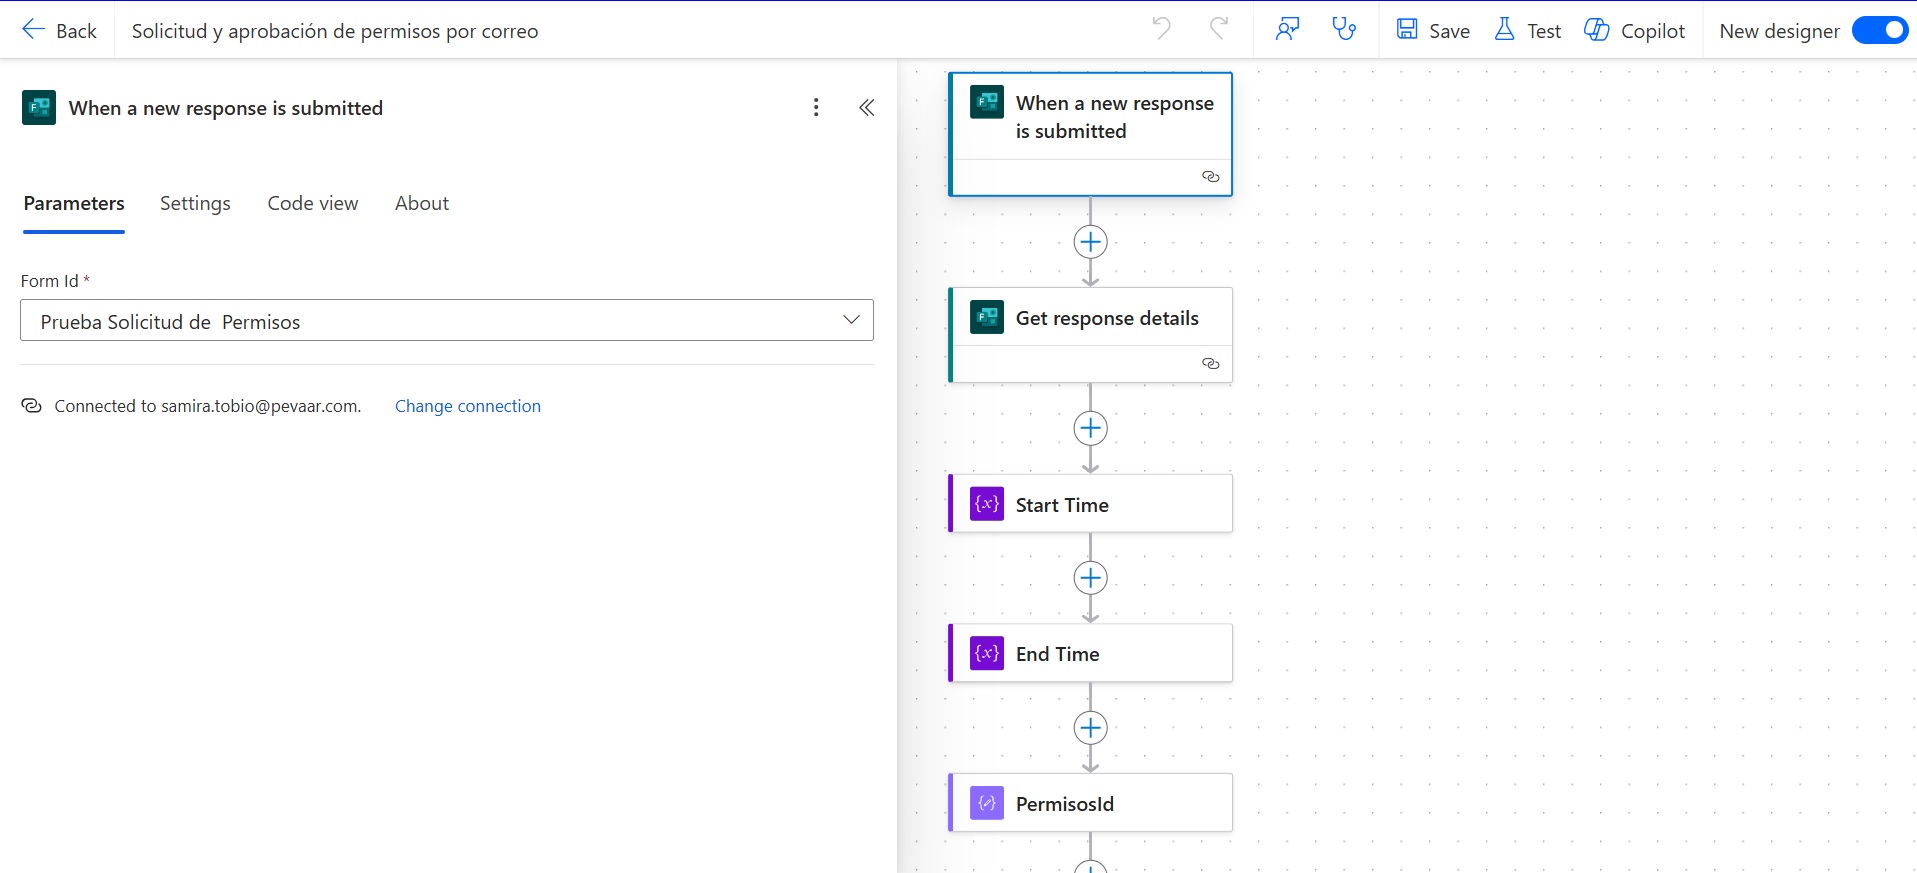
Image 3
1.1.1. To continue building the flow, you need to add a new action by clicking the + icon. This action must be repeated each time a new action is added (see Image 4).
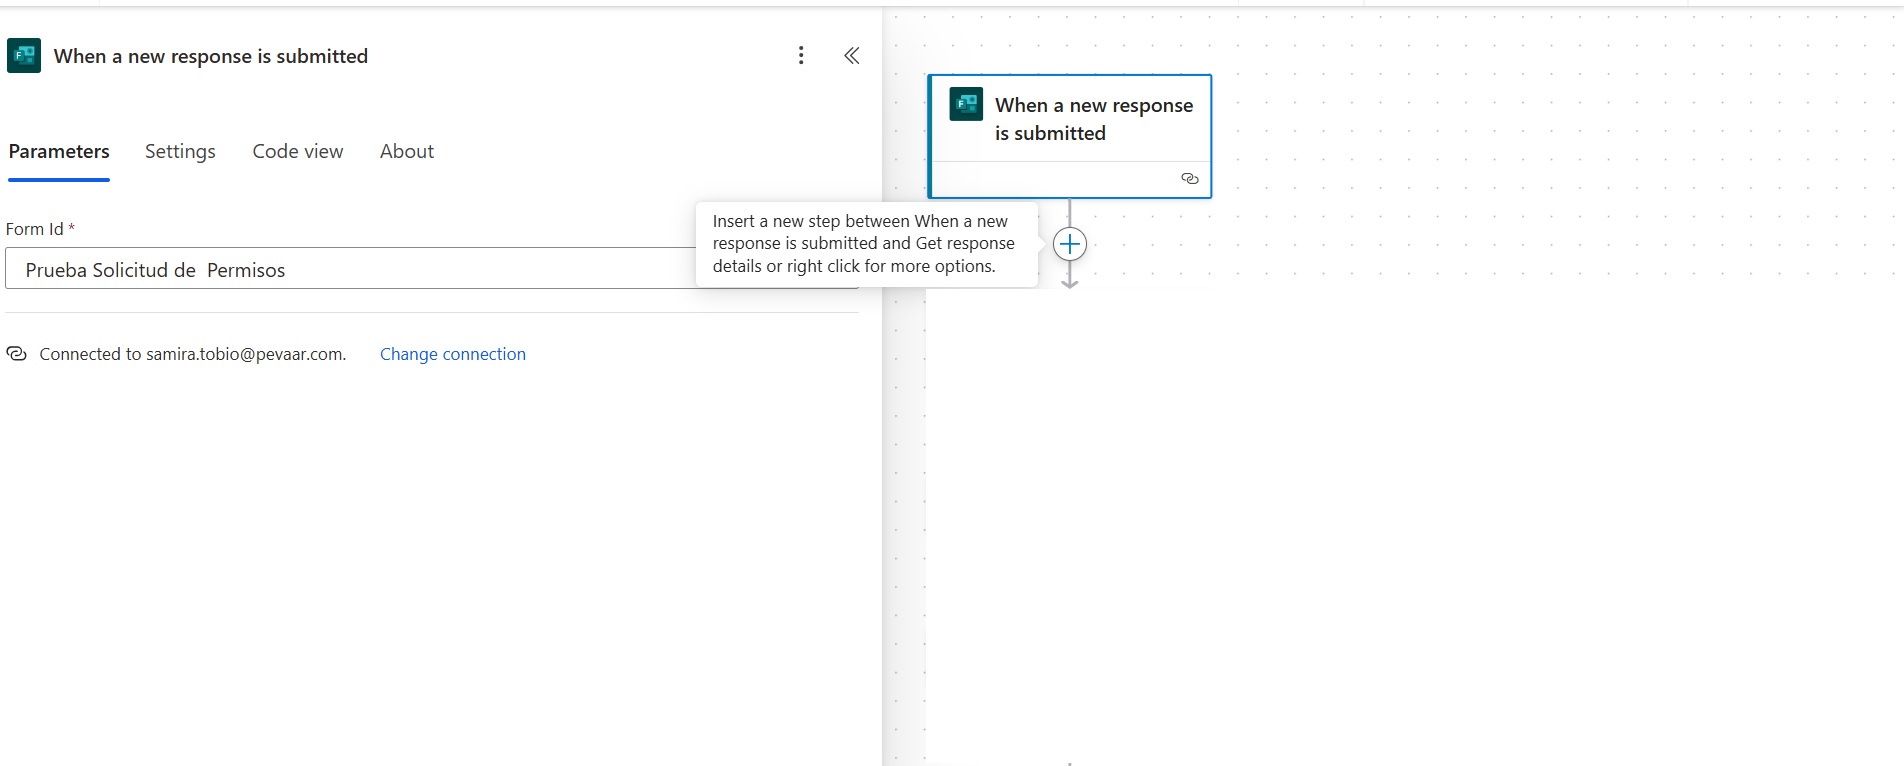
Image 4
1.1.2. In the search bar, type the application that the new action belongs to. For this step, it will be Forms. Select the corresponding option (see Image 5).
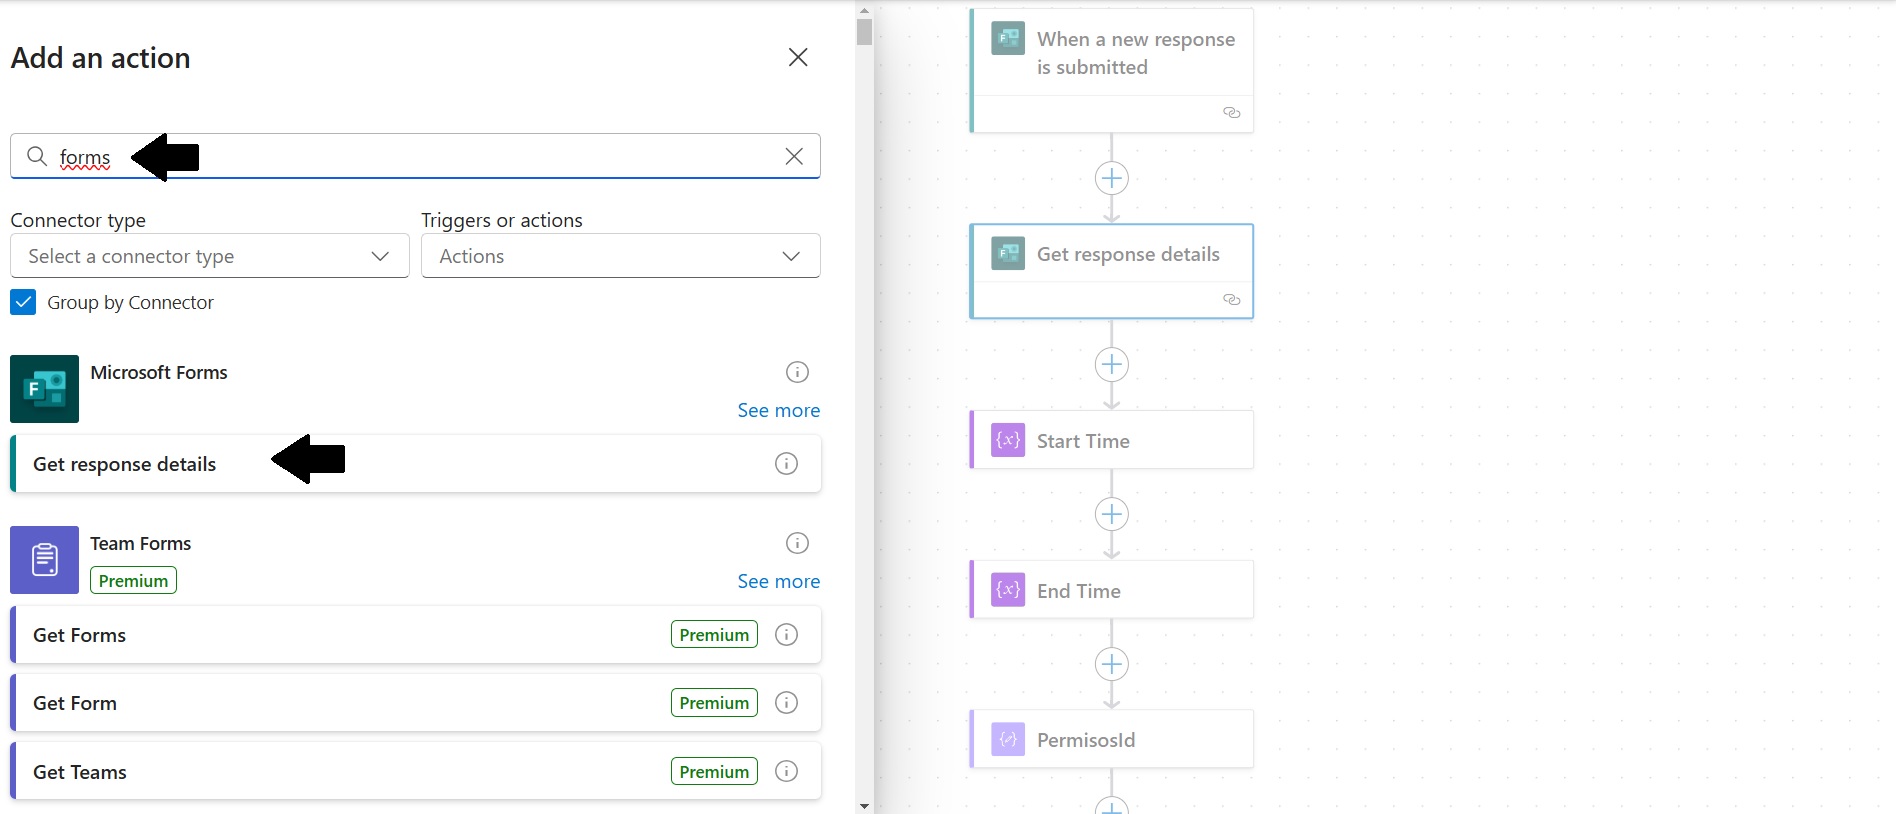
Image 5
1.2. The next action added to the flow is Get response details. In this step, the corresponding “Form Id” for the Permission Request form is selected (all the forms created by the user will appear here as well). Then, select the “Response Id” from the dynamic content. This allows you to retrieve the details of the responses to all the questions in the form (see Image 6).
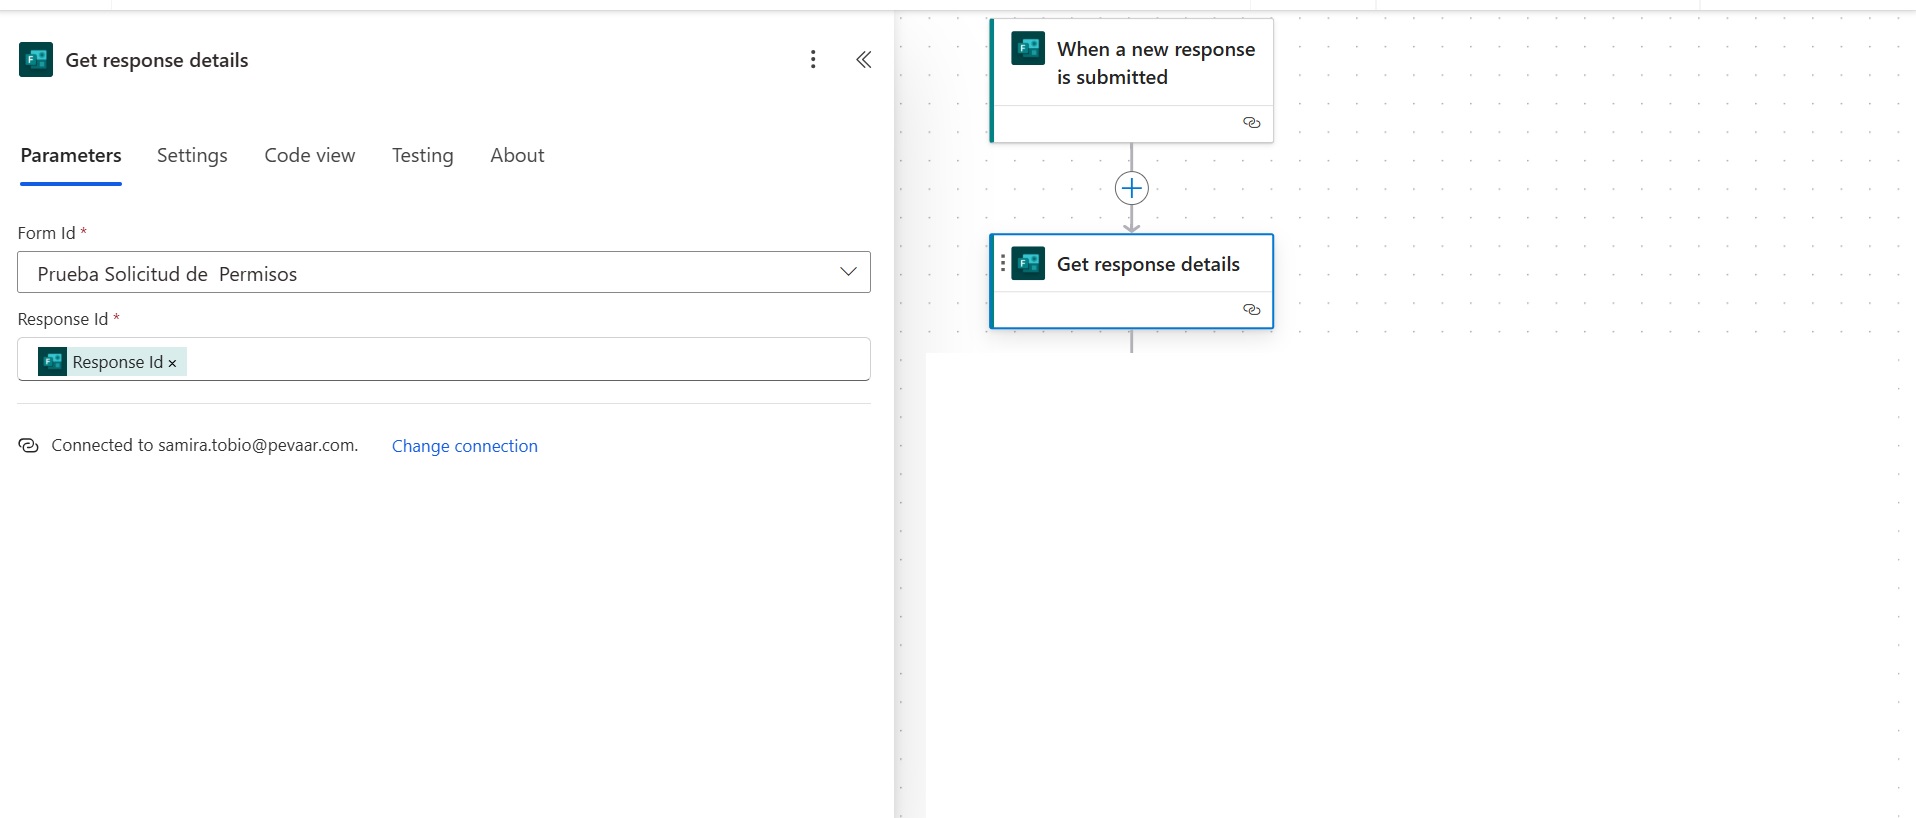
Image 6
1.3. The third (see Image 7) and fourth (see Image 8) actions will be Initialize a variable. These will be used to store the start time and end time of the permission. These variables are of type String as they allow for text processing.
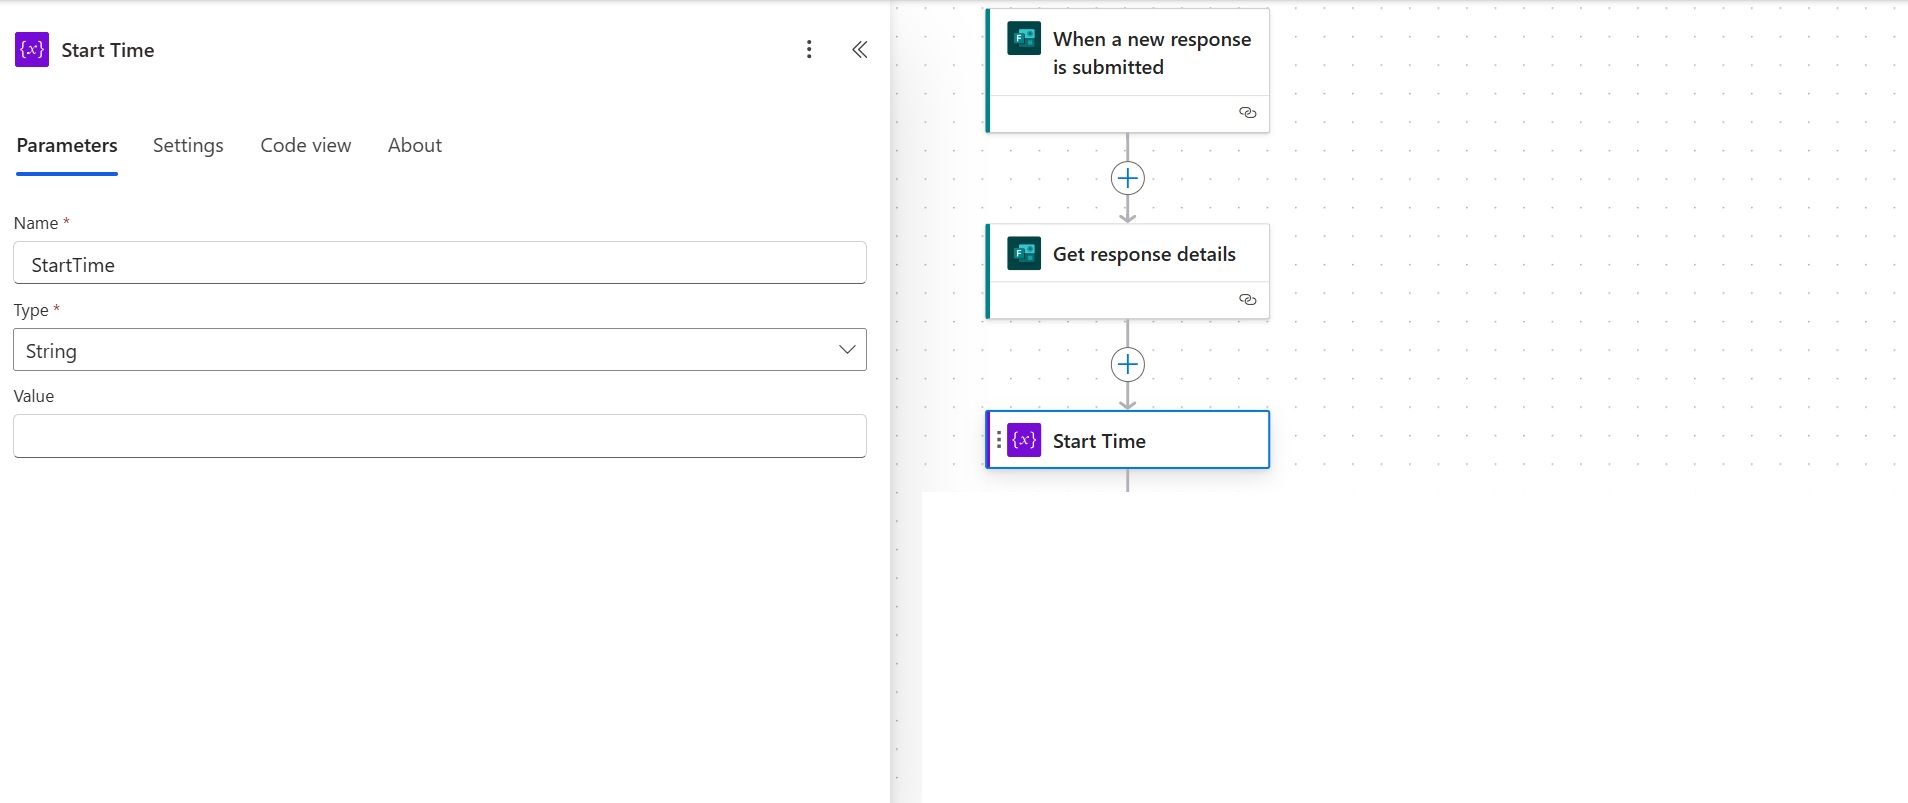
Image 7
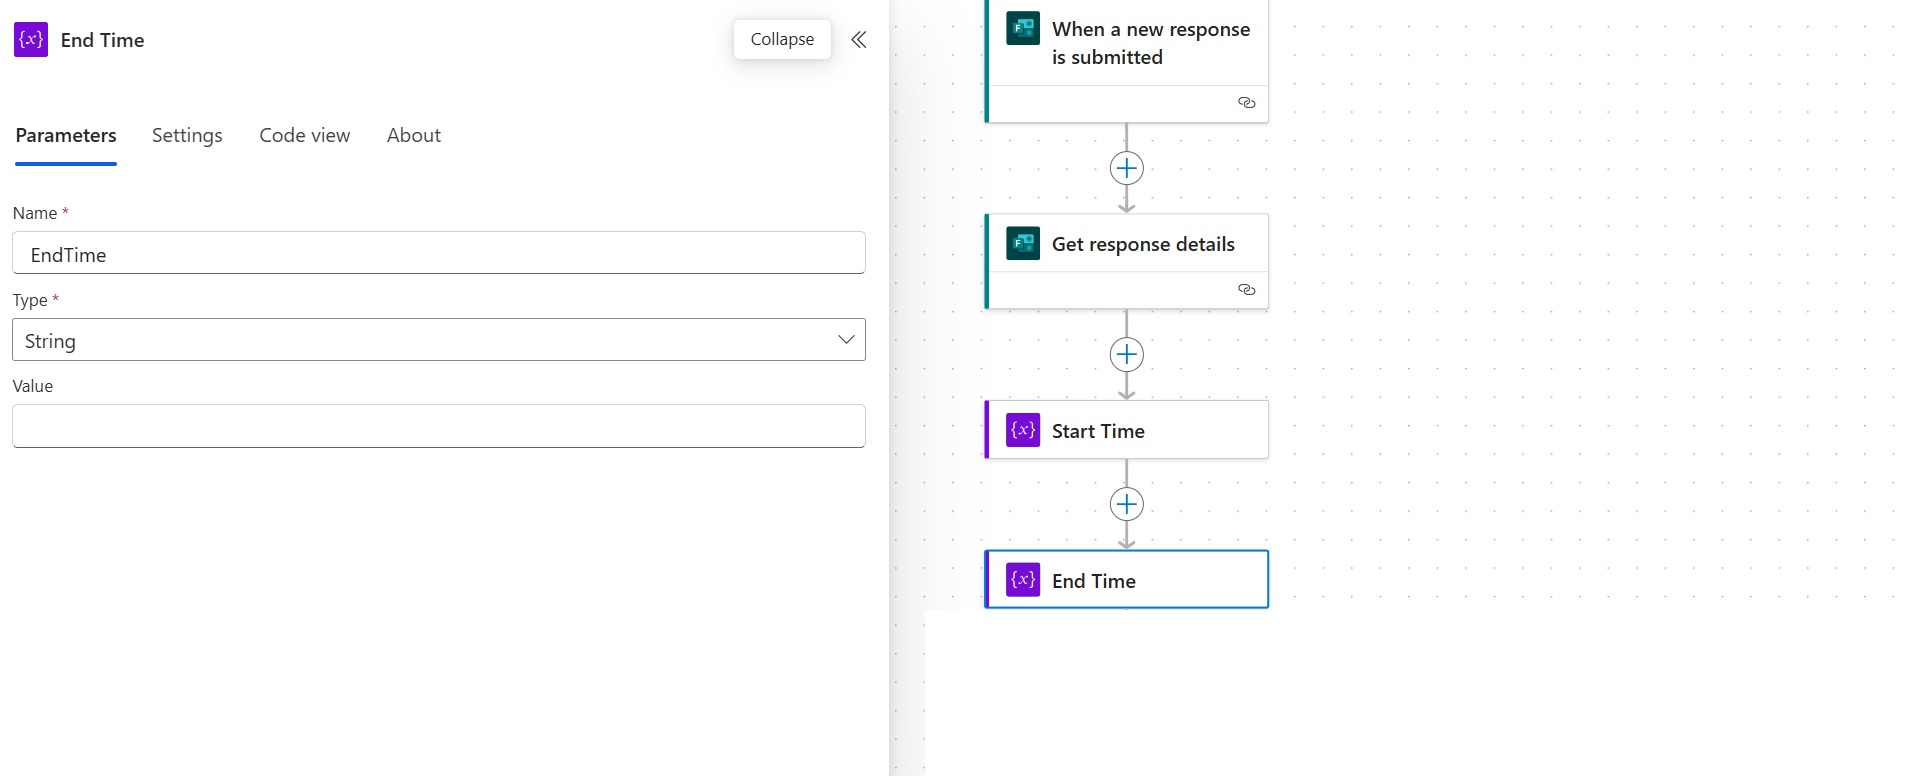
Image 8
1.4. The flow continues with another Compose action, which we call “PermissionId”. This generates a unique ID for each request, and this information will be added to an Excel table. It helps to filter the data and prevent errors when executing subsequent actions.
In the action search bar, type the keyword “Compose” and select the corresponding option. To complete the inputs, click on fx and add the expression “guid()” (see Image 9).
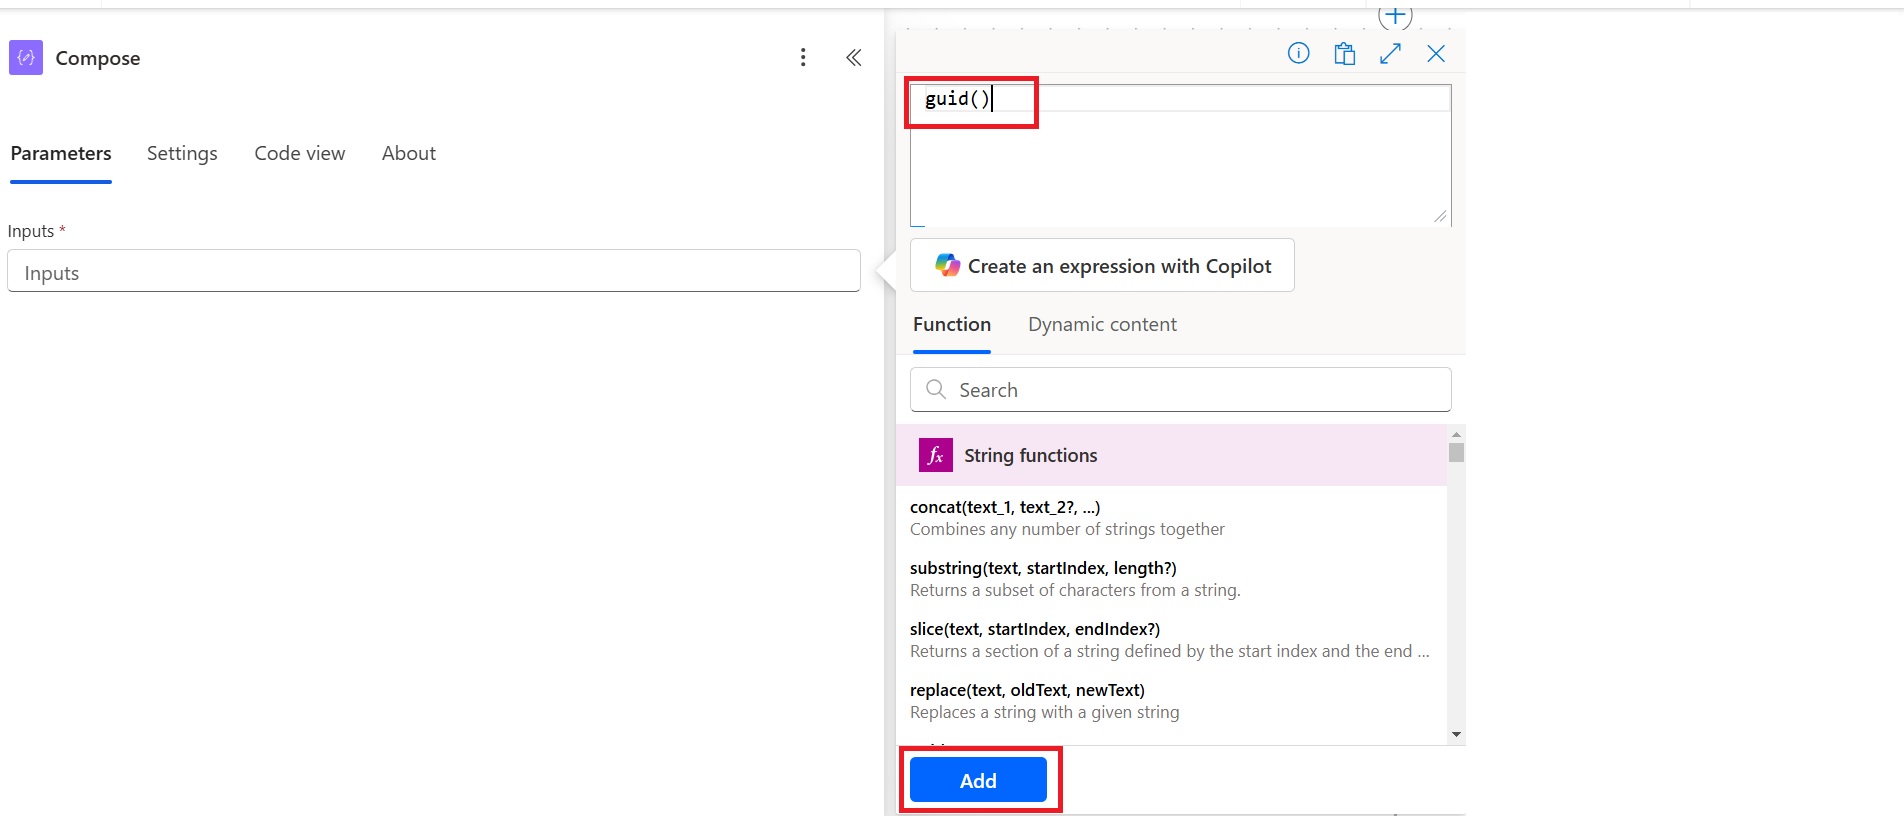
Image 9
1.5. The flow then connects to Microsoft Excel with the “Add a row into a table” action.
1.5.1. You need to create an Excel document in table format to add the information to it. This table should include the fields that will be extracted from the form, such as Name, Immediate Supervisor’s Name, Immediate Supervisor’s Email, Type of Permission, Permission Start Date, Permission End Date, Start Time, End Time, and Observations (see Image 10).
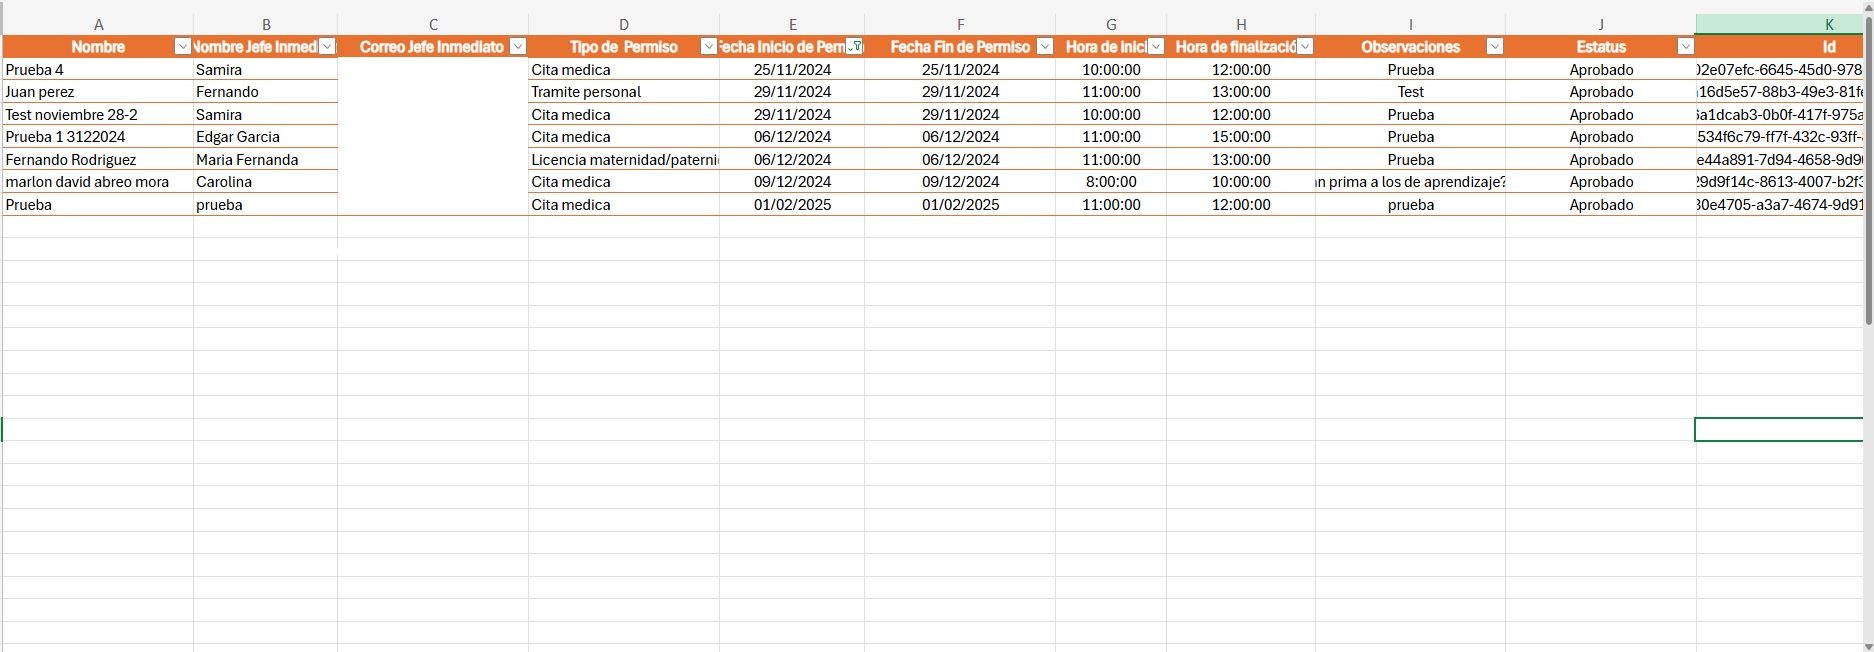
Image 10
After selecting the “Add a row into a table” action, you need to configure the following: select the location of the previously created Excel file, the document library where it’s stored, the file, and the table.
You also need to fill in the parameters with the dynamic content provided by Power Automate, which are the data extracted from the form. The only option that won’t have dynamic content will be Status, which will initially be set to “Pending” and will automatically update with the approval result once the flow completes. Additionally, the Id field will be filled with the dynamic content generated by the “PermissionId” action (see Image 11).
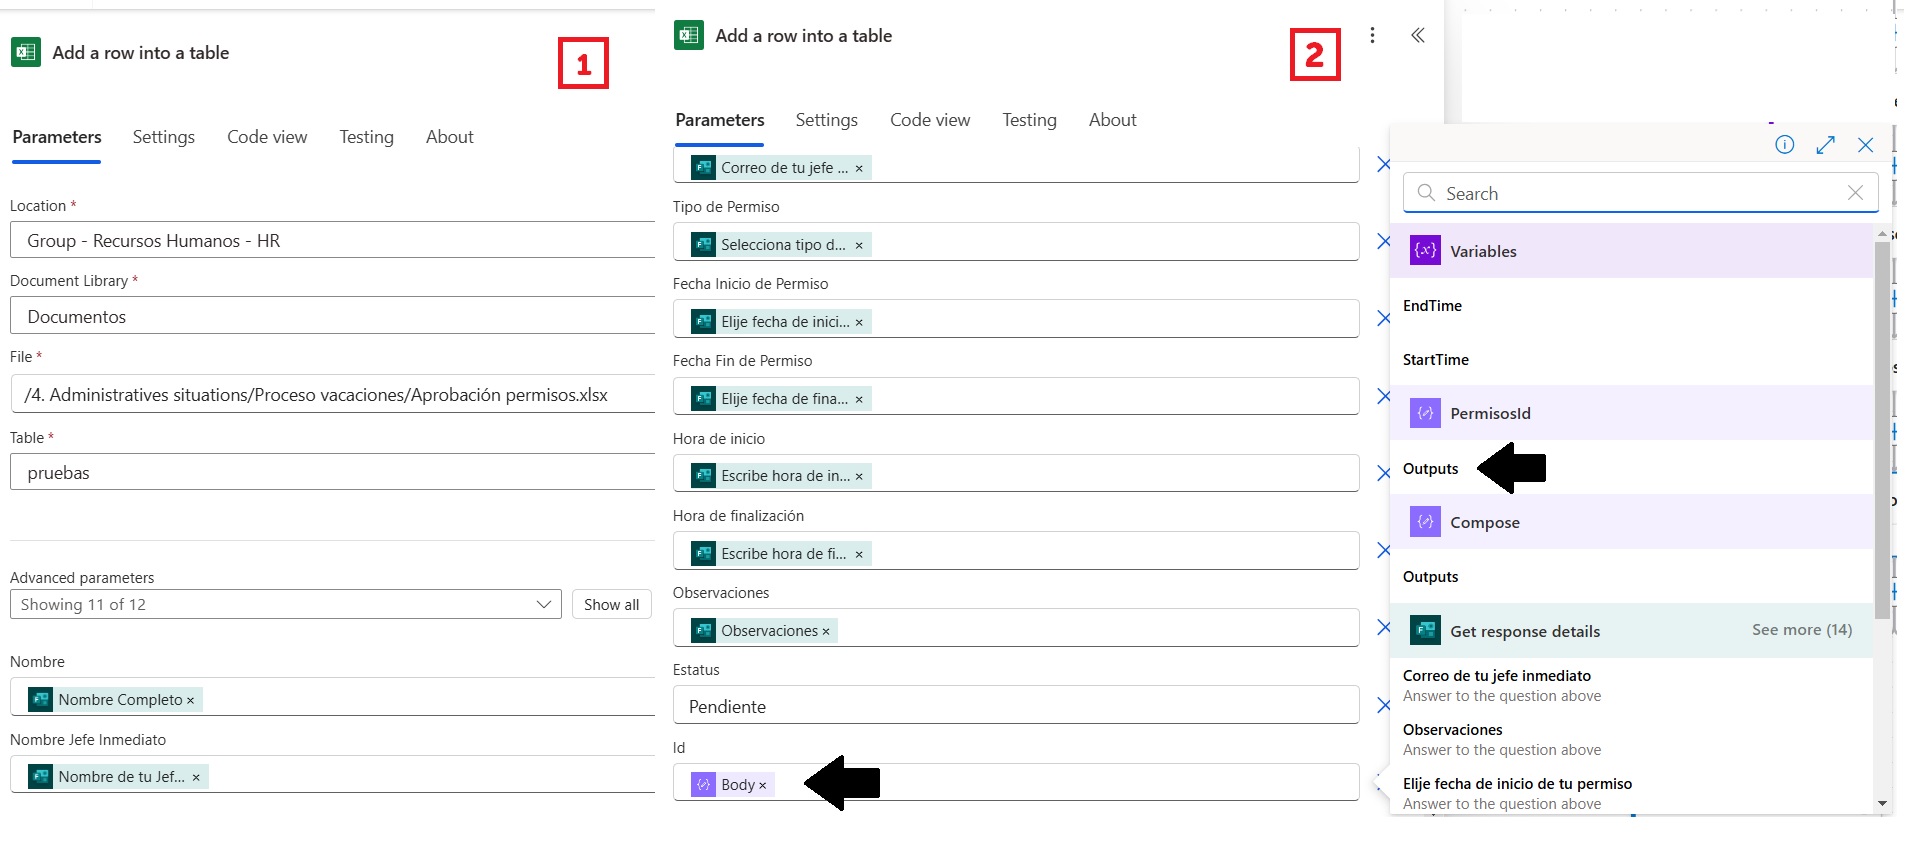
Image 11
1.6. The next step connects the flow with the email options. To do this, type “Send email with options” in the search bar.
To configure this action, you need to select Advanced options (see Image 12):
- To: Select the dynamic content corresponding to the Immediate Supervisor’s email.
- Header Text: Here, you should enter the type of request and the name of the person making the request.
- Body: This is where the body of the request appears with the corresponding details. To style the text, you should copy the following HTML code:
<p style=”font-family: Arial, sans-serif; font-size: 16px; color: #000;”>
<strong>Hola [Nombre del jefe inmediato] ,</strong>
</p>
<p style=”font-family: Arial, sans-serif; font-size: 14px; color: #333;”>
Por medio del presente solicito me sea aprobado el siguiente permiso: [Tipo de permiso]
</p>
<table style=”border-collapse: collapse; width: 100%; font-family: Arial, sans-serif; font-size: 14px; color: #333;”>
<tr>
<td style=”border: 1px solid #ddd; padding: 8px; background-color: #f9f9f9;”><strong>Fecha inicio del permiso:</strong></td>
<td style=”border: 1px solid #ddd; padding: 8px;”>[Fecha de inicio del permiso]</td>
</tr>
<tr>
<td style=”border: 1px solid #ddd; padding: 8px; background-color: #f9f9f9;”><strong>Fecha fin del permiso:</strong></td>
<td style=”border: 1px solid #ddd; padding: 8px;”>[Fecha de finalización del permiso]</td>
</tr>
<tr>
<td style=”border: 1px solid #ddd; padding: 8px; background-color: #f9f9f9;”><strong>Hora inicio:</strong></td>
<td style=”border: 1px solid #ddd; padding: 8px;”>[Hora de inicio del permiso]</td>
</tr>
<tr>
<td style=”border: 1px solid #ddd; padding: 8px; background-color: #f9f9f9;”><strong>Hora fin: </strong></td>
<td style=”border: 1px solid #ddd; padding: 8px;”>[Hora de finalización del permiso]</td>
</tr>
<tr>
<td style=”border: 1px solid #ddd; padding: 8px; background-color: #f9f9f9;”><strong>Modo de recuperación: </strong></td>
<td style=”border: 1px solid #ddd; padding: 8px;”>[Observaciones]</td>
</tr>
</table>
<p style=”font-family: Arial, sans-serif; font-size: 14px; color: #333;”>
Atentamente, <br>
<strong>[Nombre Completo del colaborador]</strong>
</p>
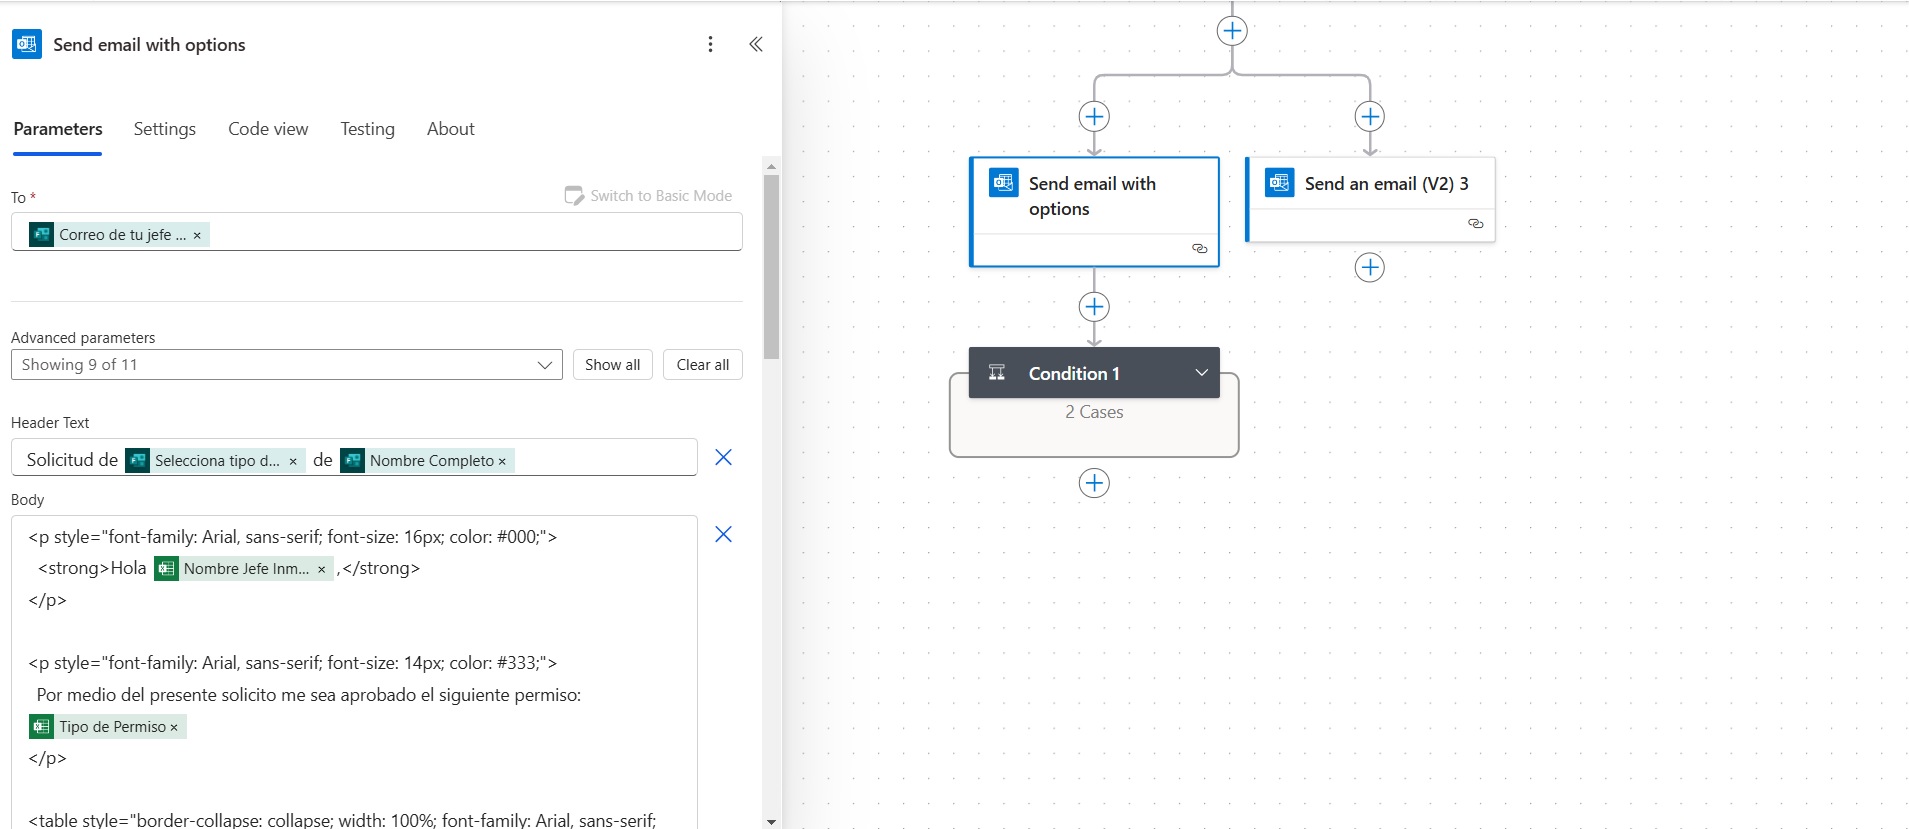
Image 12
To configure the remaining fields, you need to select the options shown in Image 13.
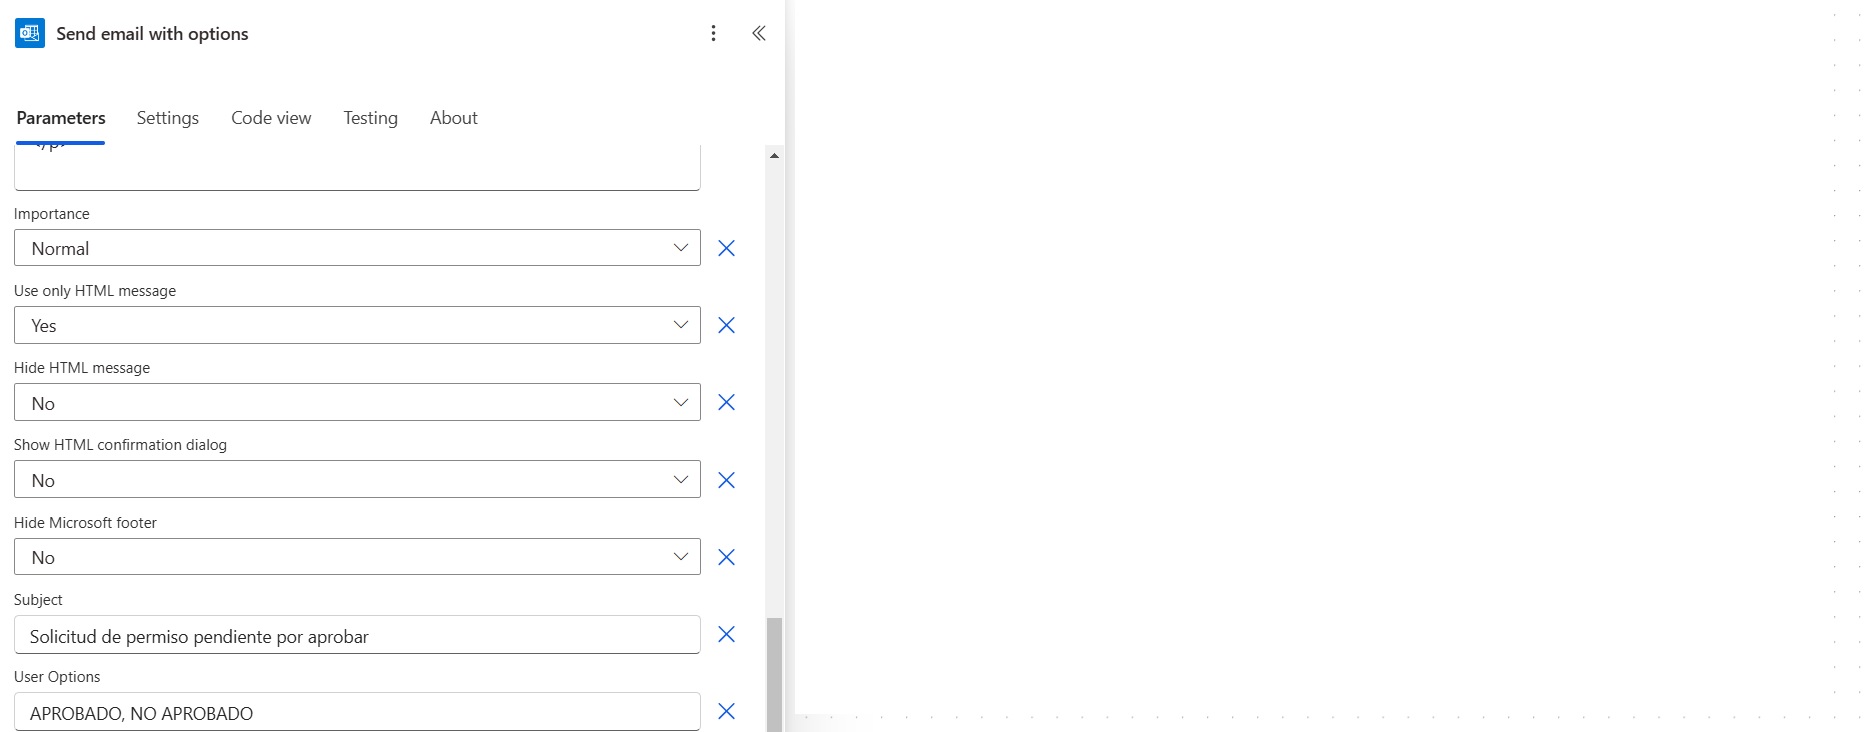
Image 13
1.7. At the same time, a new action is added, “Send an email”, which will function as a notification for HR. In this action, you need to write a short message indicating that the person has requested permission and that it is pending approval from the leader (see Image 14).
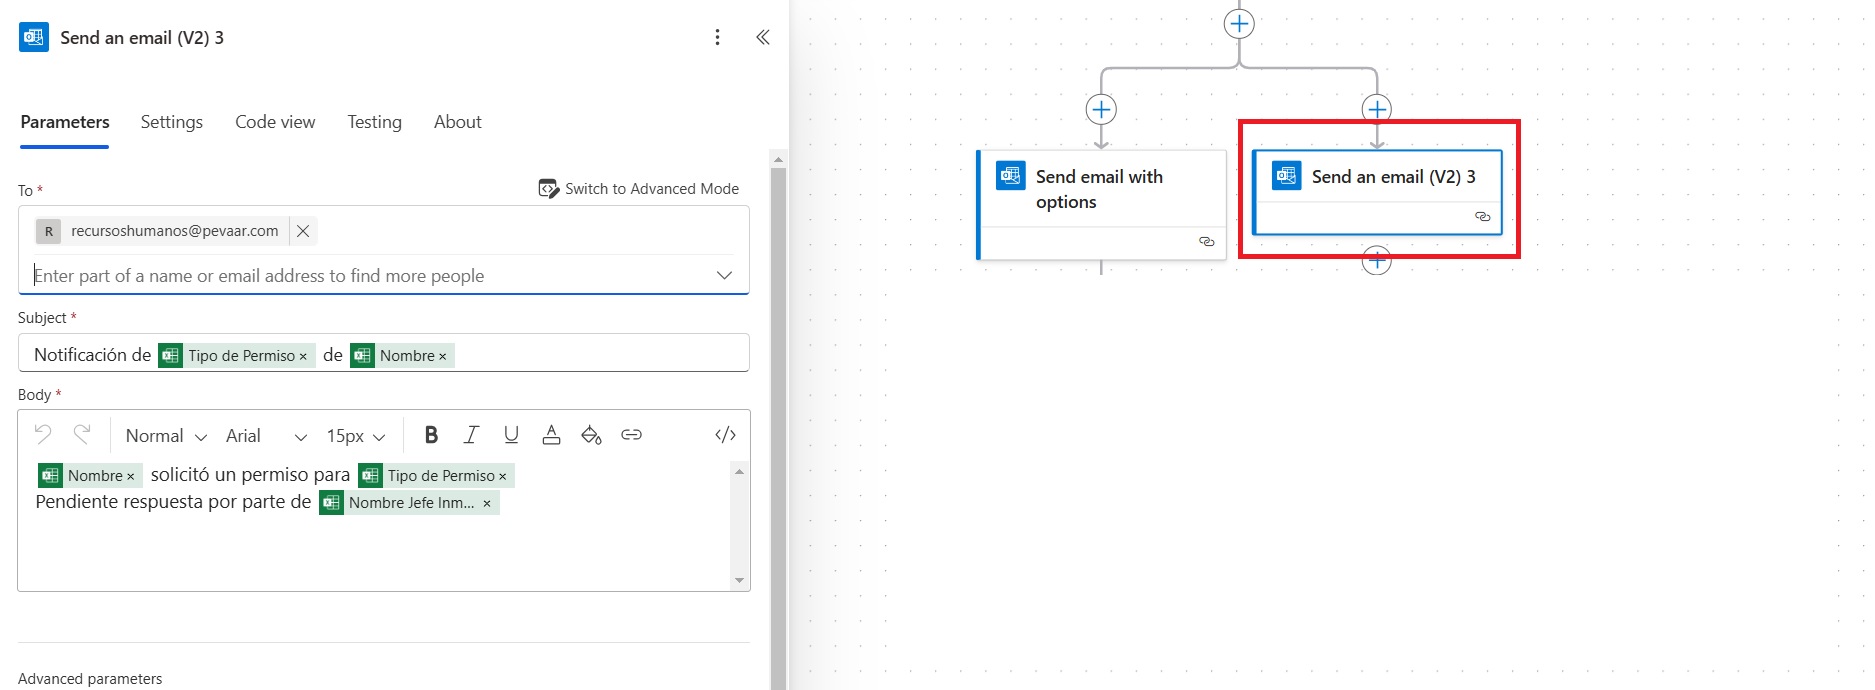
Image 14
1.8. The flow continues with a Condition that is derived from the Send email with options action. The logical operator will be AND. In the first value, you need to select from the dynamic content generated by the previous action “body/SelectedOption” (see Image 15), which is the option chosen by the leader. Then, select the comparison operator “is equal to”, and the corresponding value will be APPROVED, which should be typed exactly as it was added in the response options (see Image 16).
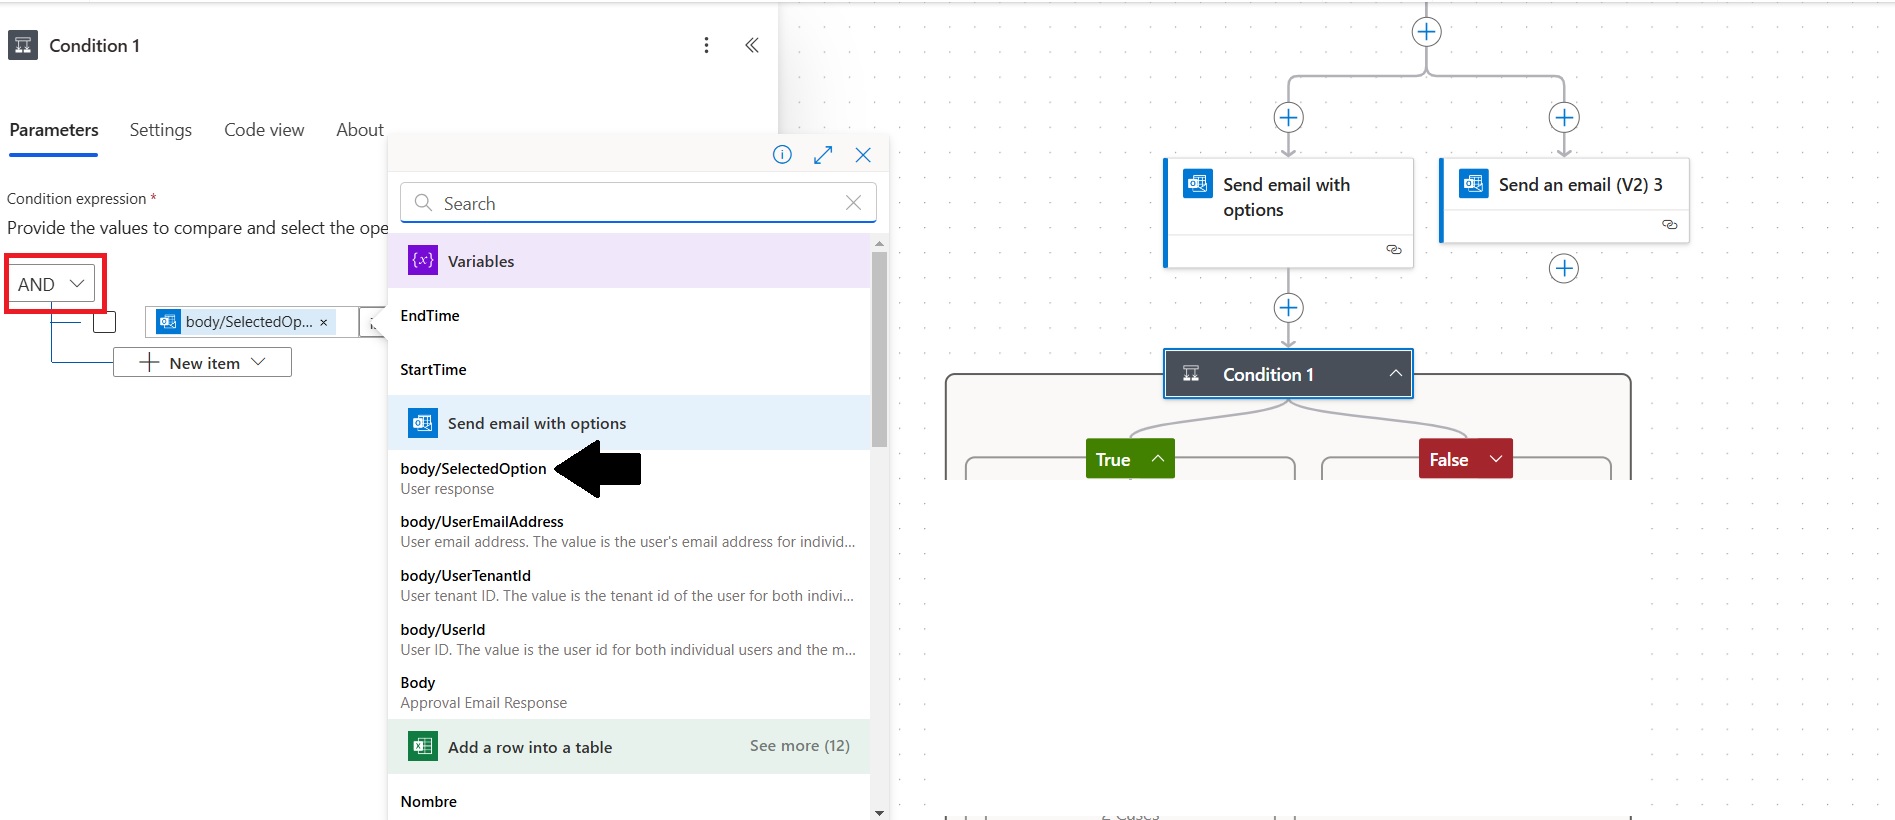
Image 15
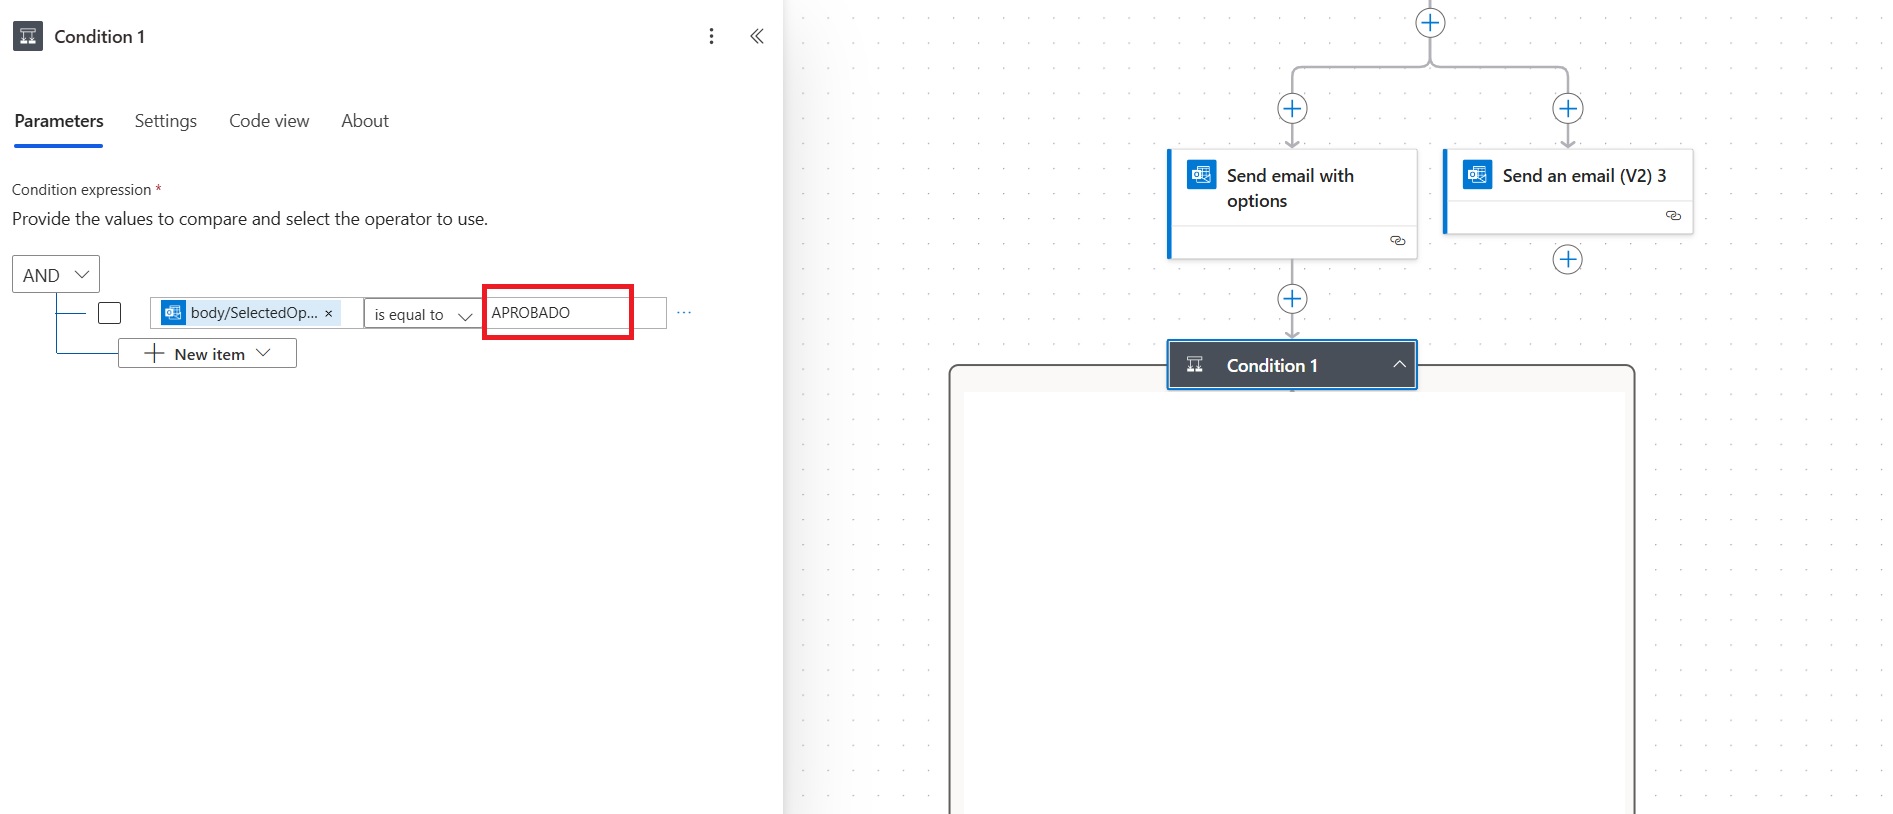
Image 16
1.8.1. If the selected option is NOT APPROVED, the condition will be evaluated as false, and the following actions will be executed:
1.8.1.1. Update a row – In this action, the Status of the permission will be updated (see Image 17).
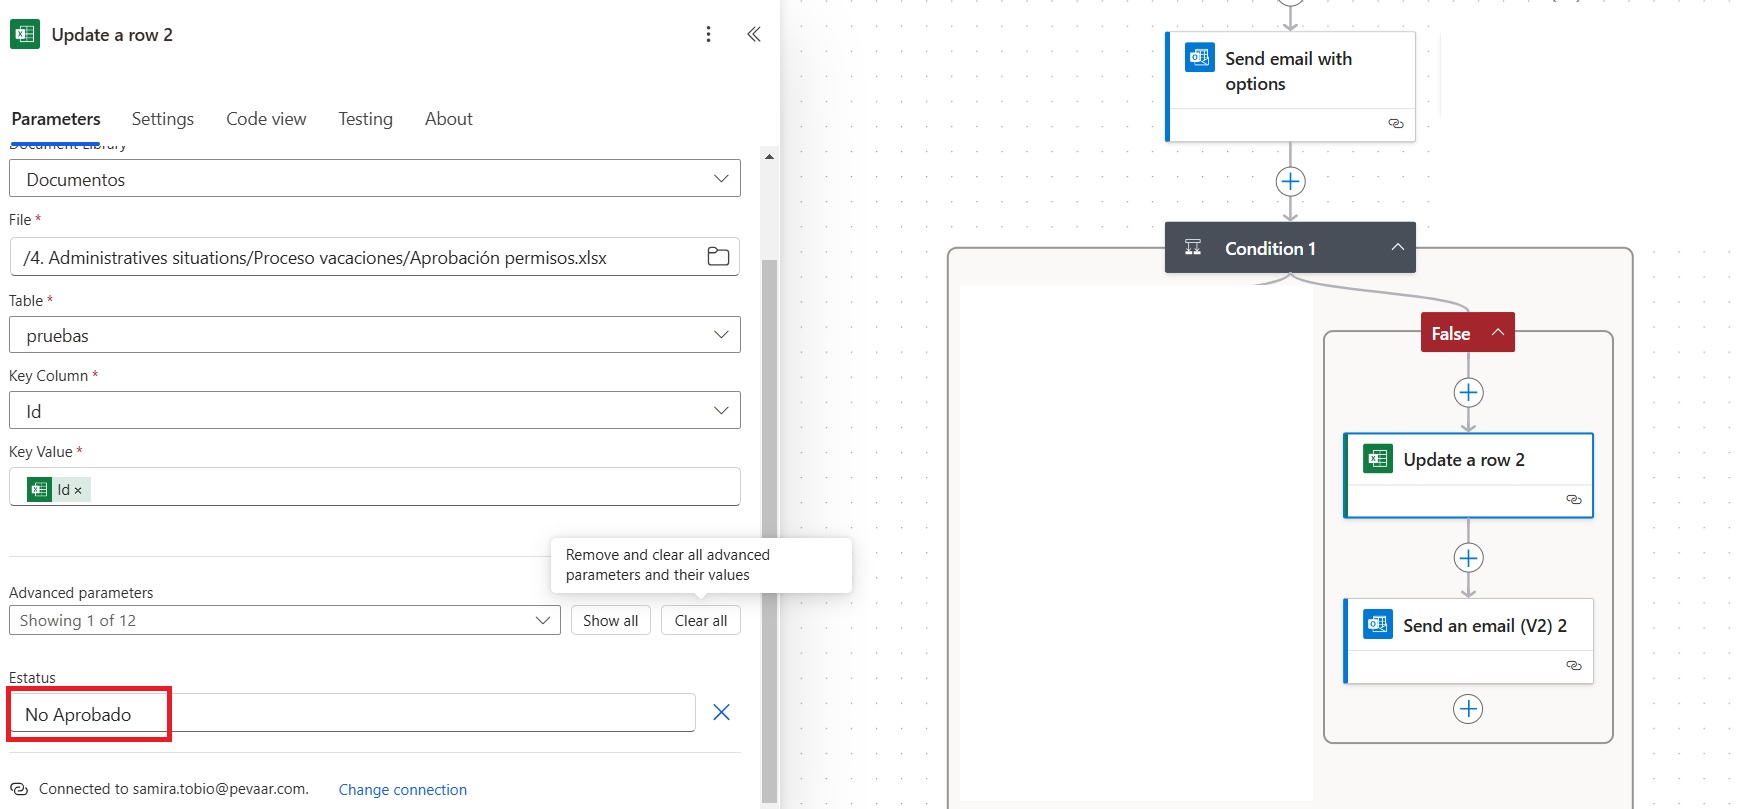
Image 17
1.8.1.2. Send an email – An email is sent to the person who requested the permission, indicating that the permission was not approved. The information is completed with dynamic content, and in the BCC field, the HR email address is added so they can also receive the notification (see Image 18).
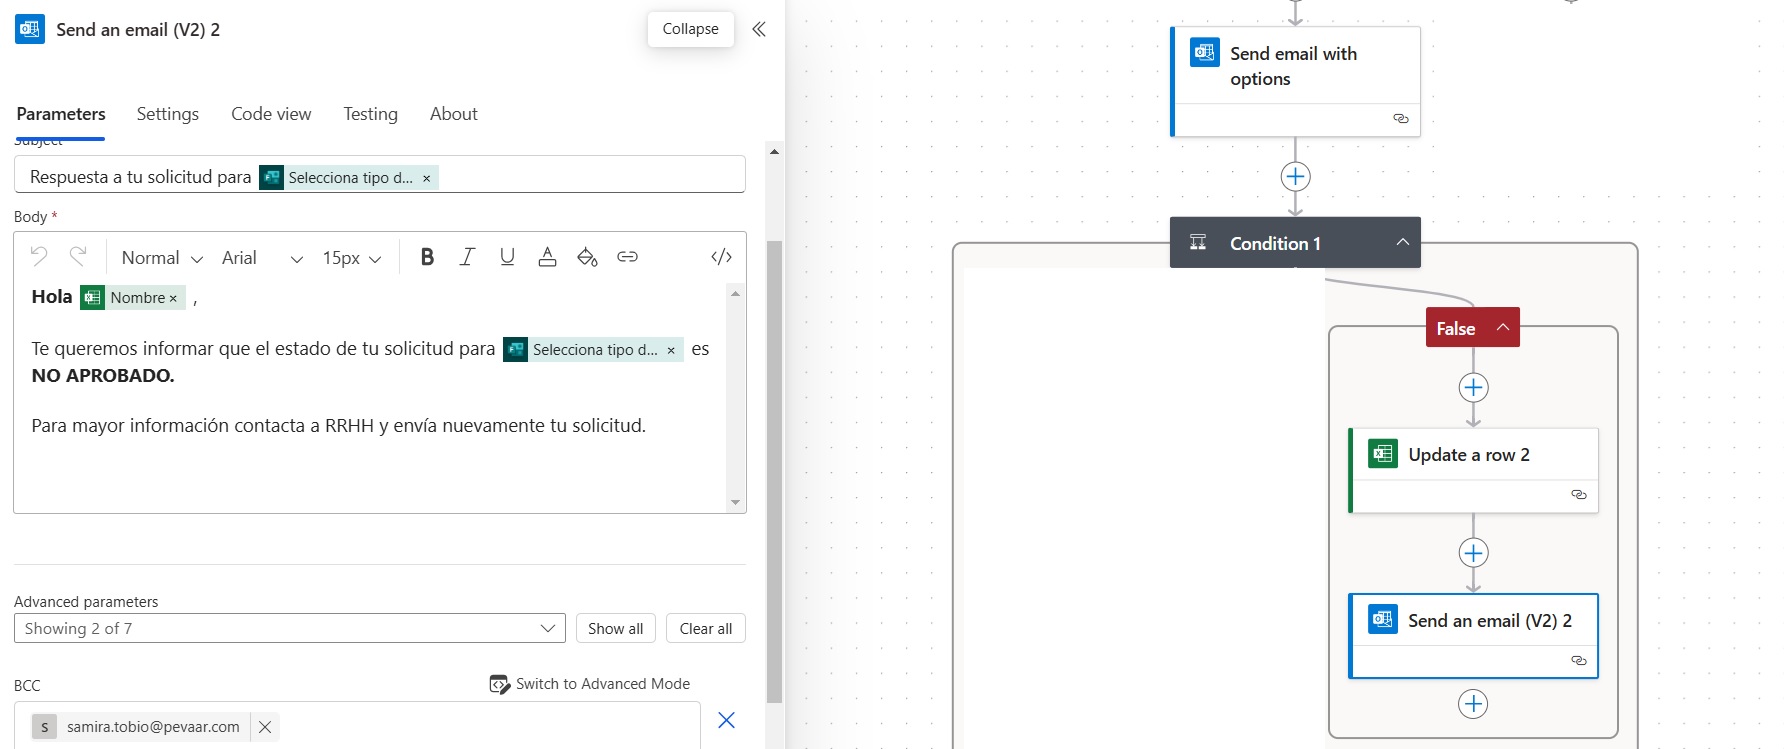
Image 18
1.8.2. If the selected option is APPROVED, the condition will be evaluated as true and the following actions will be executed:
1.8.2.1. Send email with options – This action is the same as the first one, but the “To” field will correspond to the HR email address for a double approval process. The other options within the action are configured the same way (see Image 12 and Image 13).
1.9. The flow continues with a Condition that is configured the same as the previous one. The logical operator will be AND. In the first value, select from the dynamic content generated by the previous action “body/SelectedOption”, which is the option chosen by the leader. Then, select the comparison operator “is equal to” and the corresponding value will be APPROVED, which must be typed exactly as it was added in the response options (see Image 15 and Image 16).
1.9.1. If the selected option is NOT APPROVED, the condition will be evaluated as false and the following actions will be executed:
1.9.1.1. Update a row – The Status of the permission will be updated (see Image 17).
1.9.1.2. Send an email – An email is sent to the person who requested the permission, indicating that the permission was not approved. The information is completed with dynamic content, and in the BCC field, the HR email address is added so they can also receive the notification (see Image 18).
1.9.2. If the selected option is APPROVED, the condition will be evaluated as true and the following actions will be executed:
1.9.2.1. Delay – This option is added to pause the flow for a specific period of time, which in this case will be 90 seconds. This ensures that the information in the table is up-to-date and prevents errors. The time can be modified according to the needs (see Image 19).
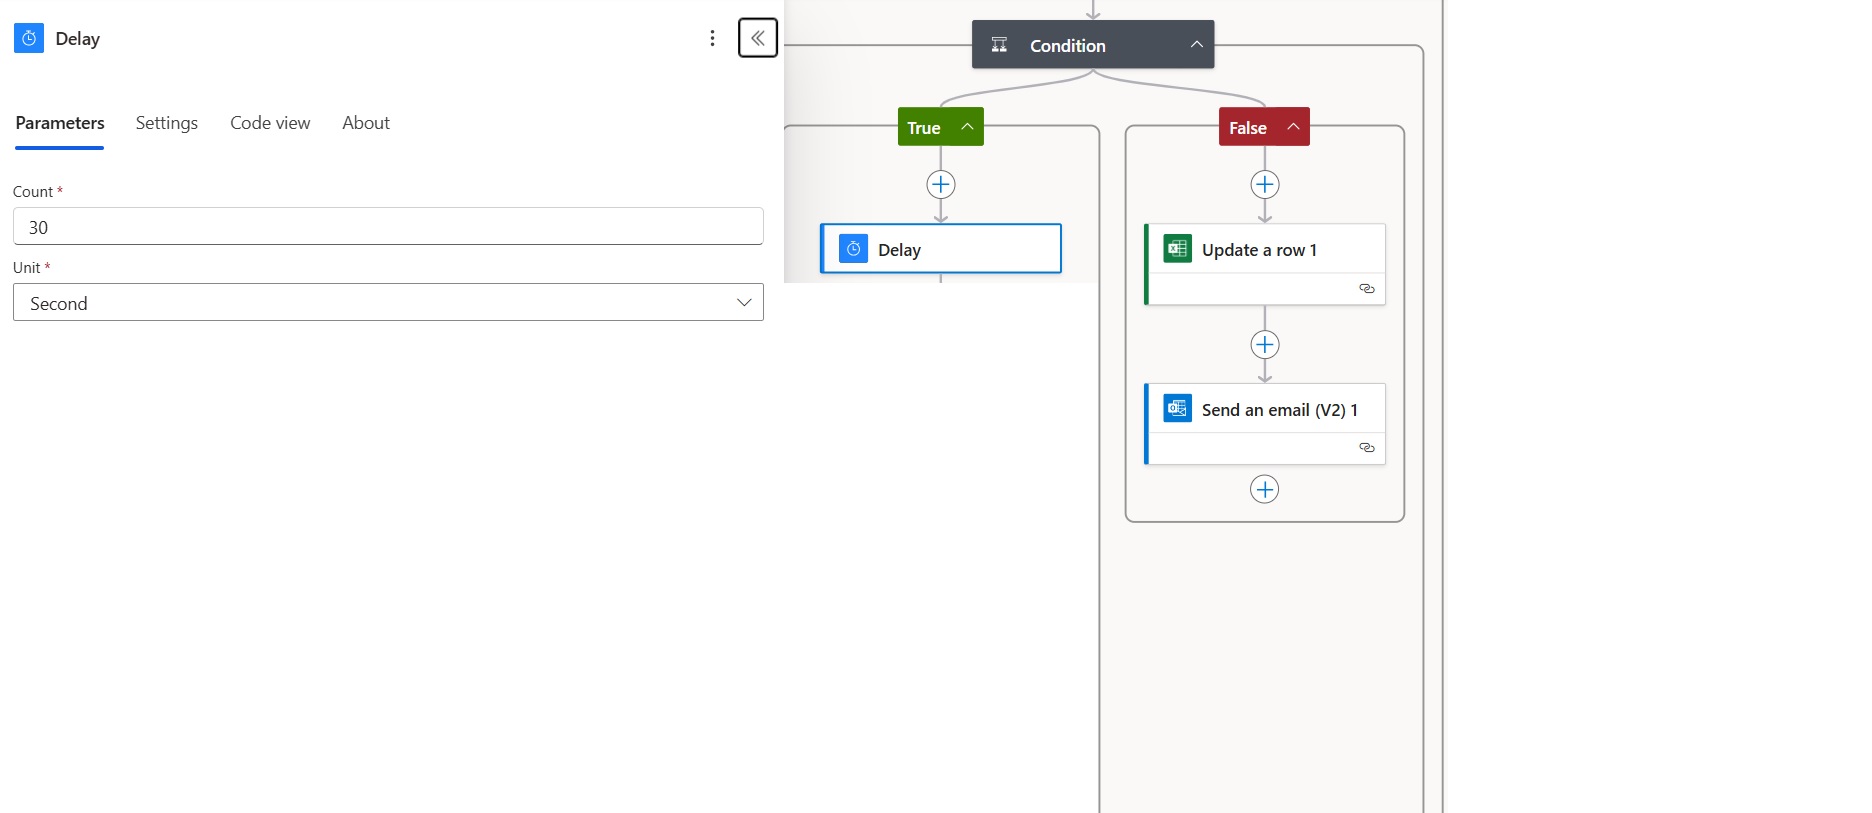
Image 19
1.9.2.2. Append StartTime and Append EndTime are actions that allow adding the start and end times of the permission, and they are linked to the variables initialized at the beginning of the flow. These two actions are of type Append to string variable (see Image 20).
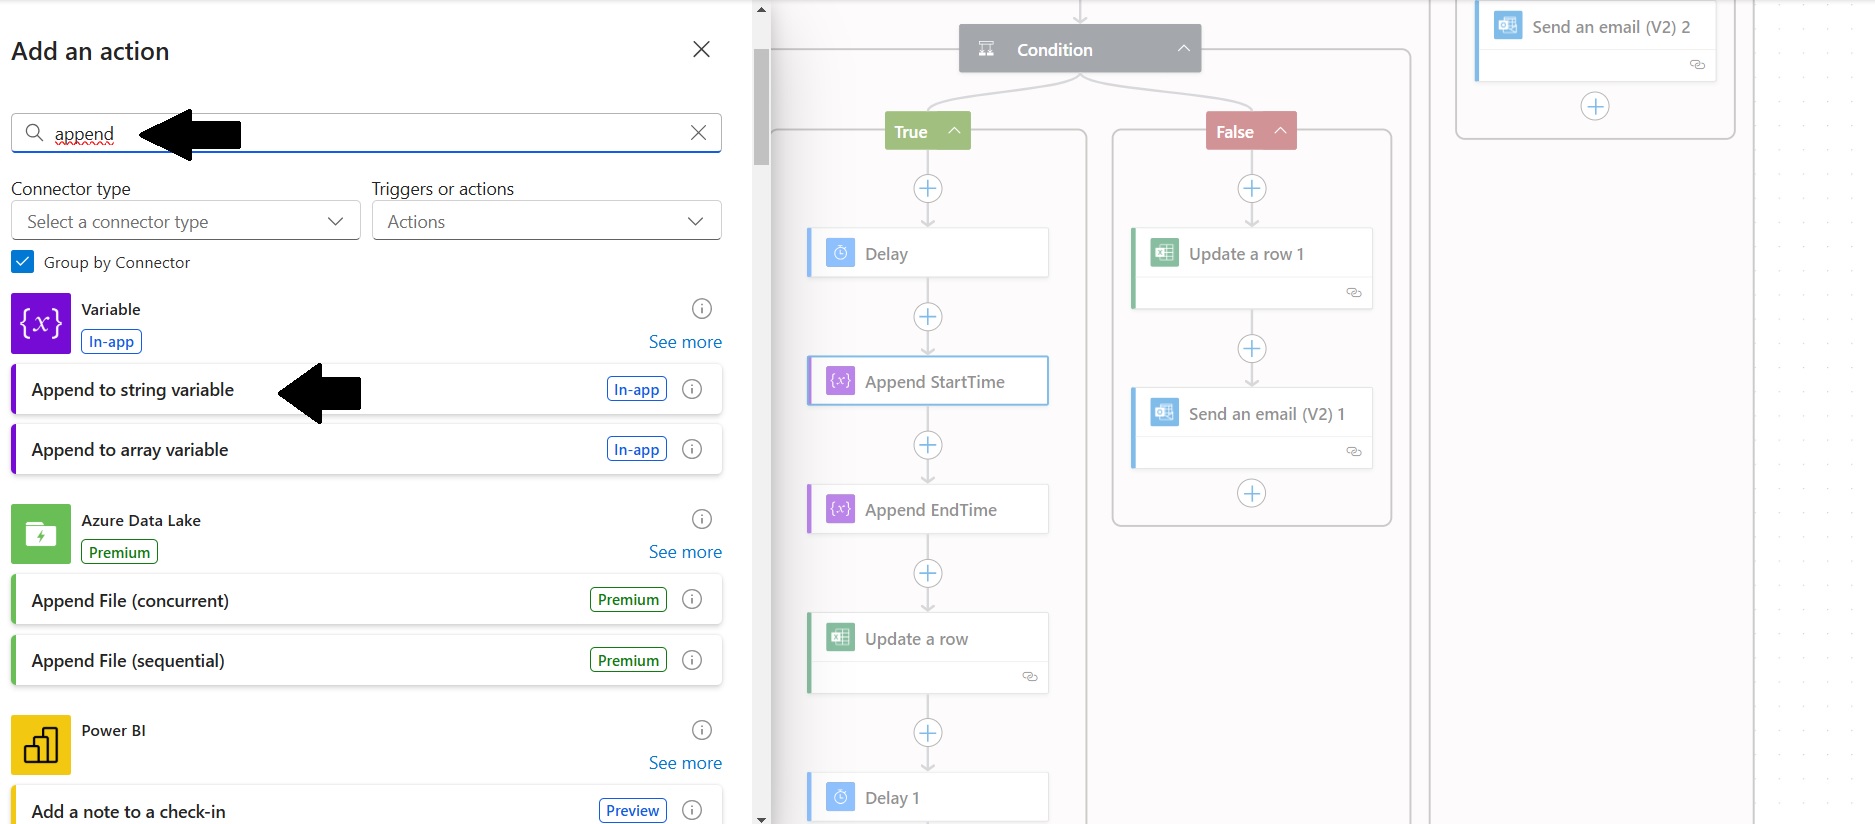
Image 20
Next, you need to select StartTime or EndTime as appropriate. In the Value field, select from the dynamic content the Start Time for Append StartTime (see Image 21) and End Time for Append EndTime (see Image 22).
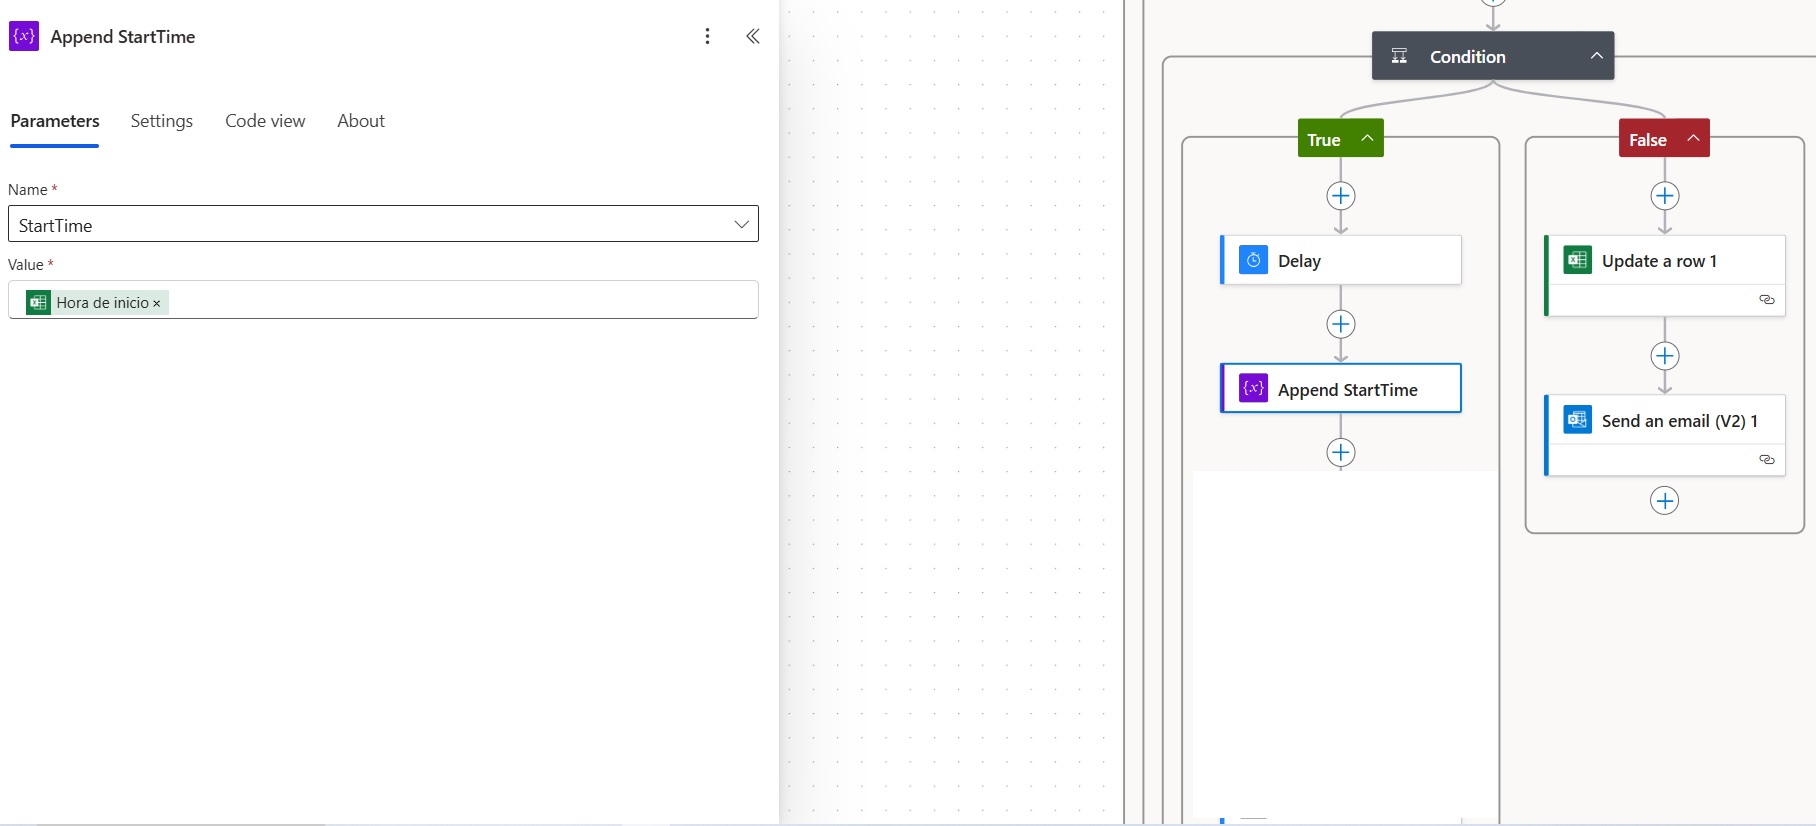
Image 21
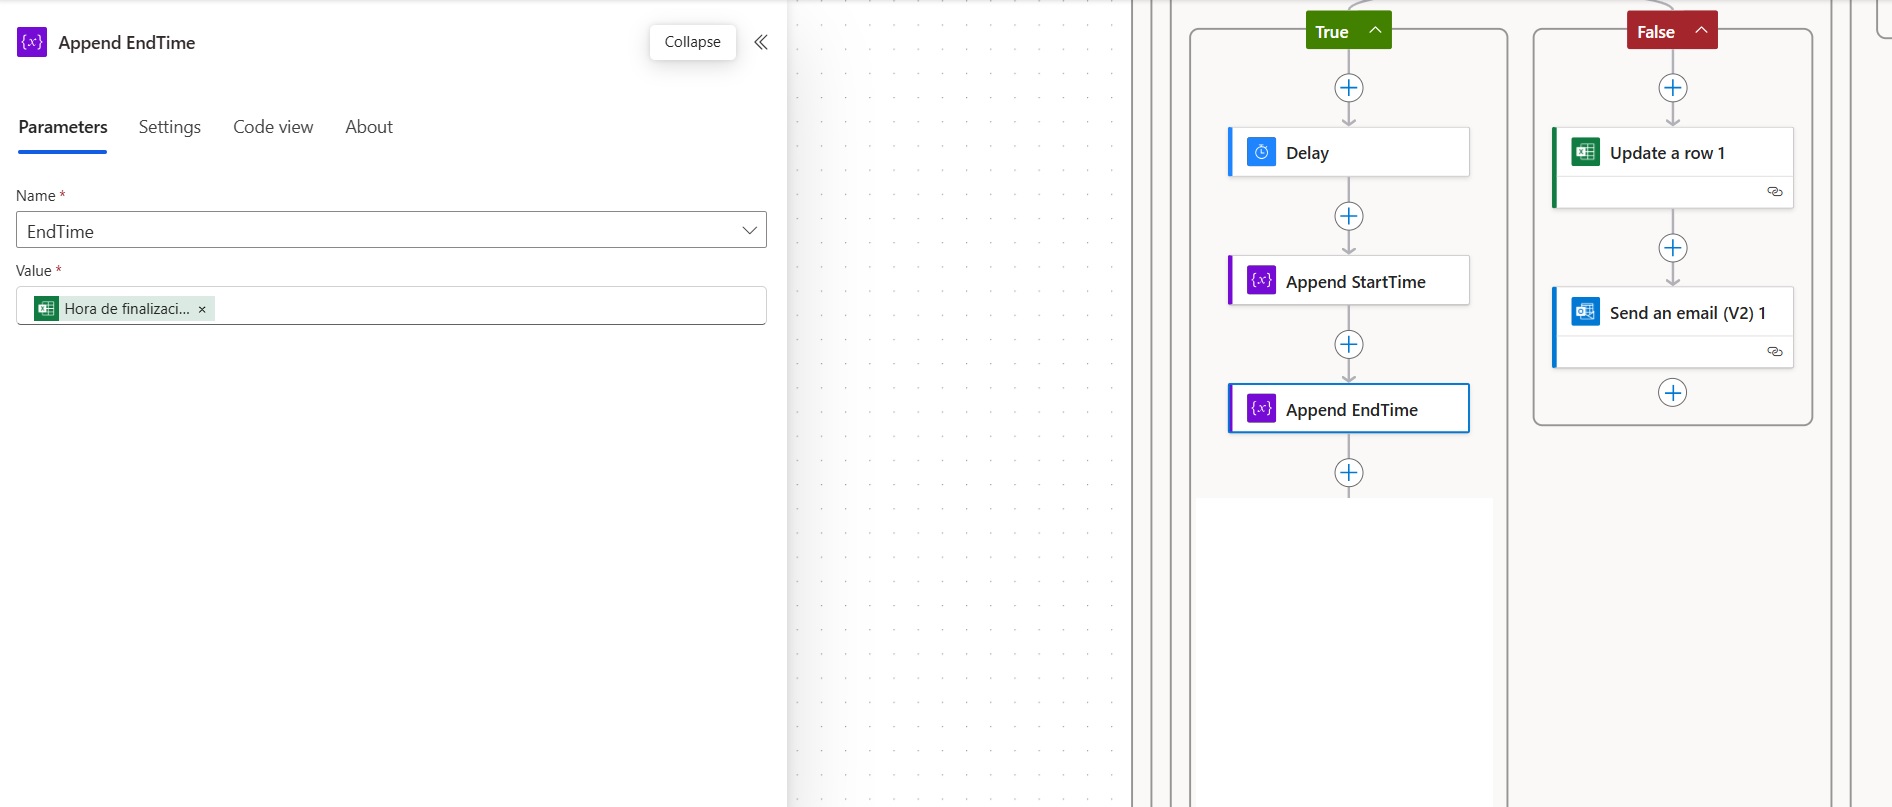
Image 22
1.9.2.3 Update a row in the Excel table – In this step, the Status is updated with the approval result, which was previously set to “Pending.” You need to connect to the Excel document selected in the previous step where the row was added (see Image 23).
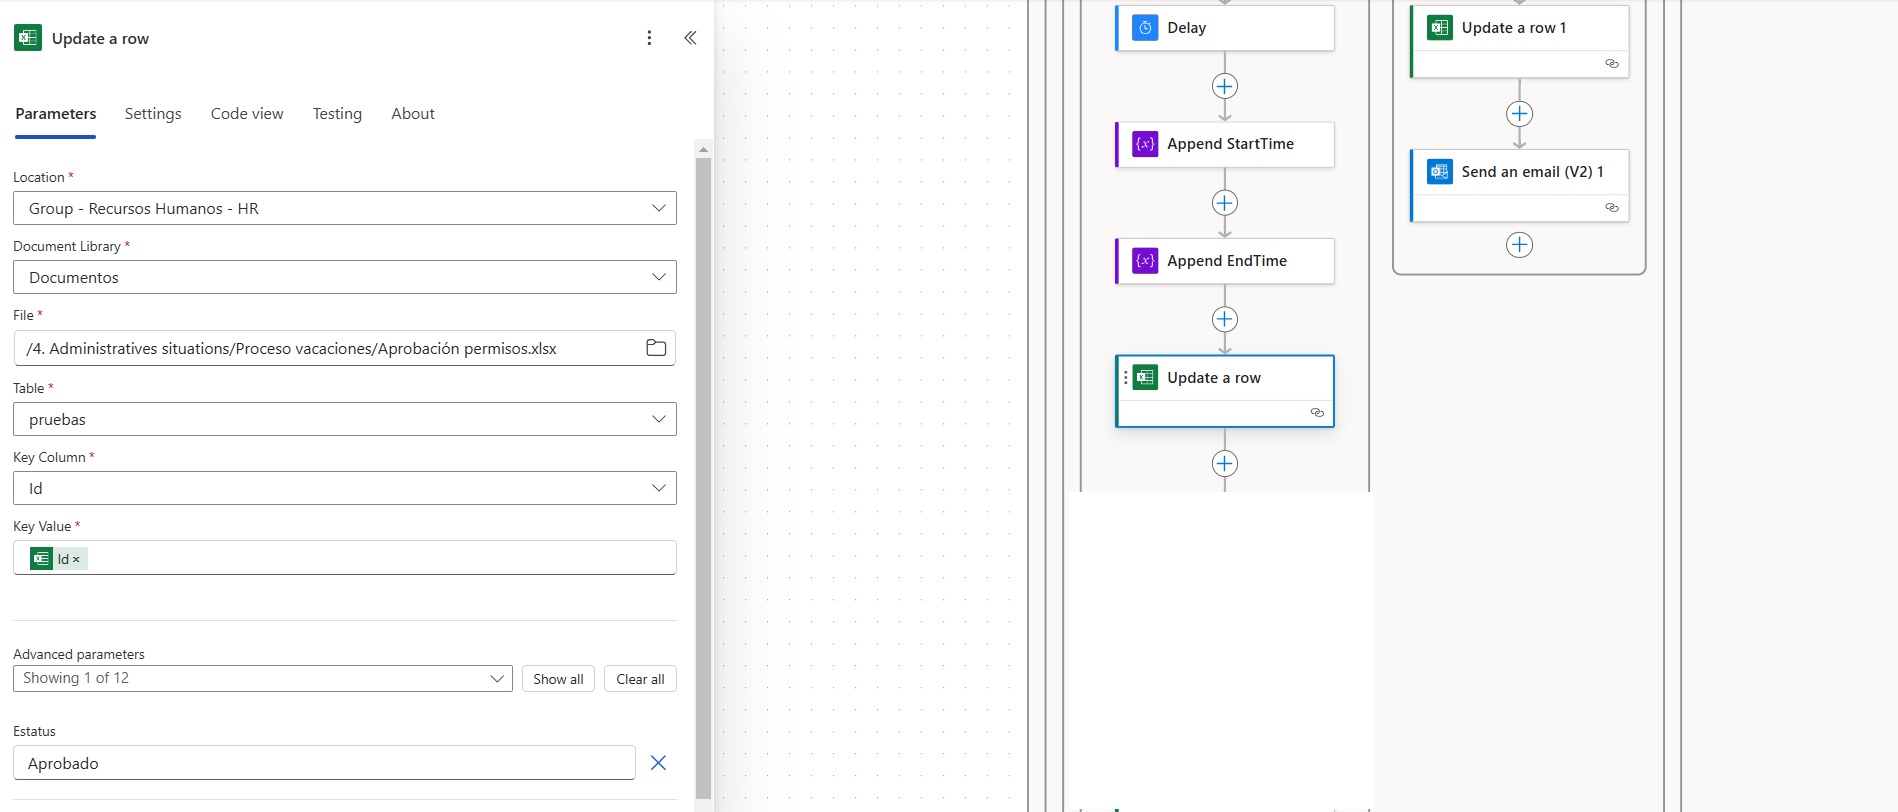
Image 23
1.9.2.4. The flow continues with a delay, which serves the same function as the previous one, meaning it pauses the flow actions for a specific period of time to allow the table to update and prevent errors in the flow. As mentioned earlier, the time can be adjusted, and in this step, it is set to one minute (see Image 19).
1.9.2.5. Send email – In this step, the email that should be sent to the employee in case the request is approved is customized (see Image 24).
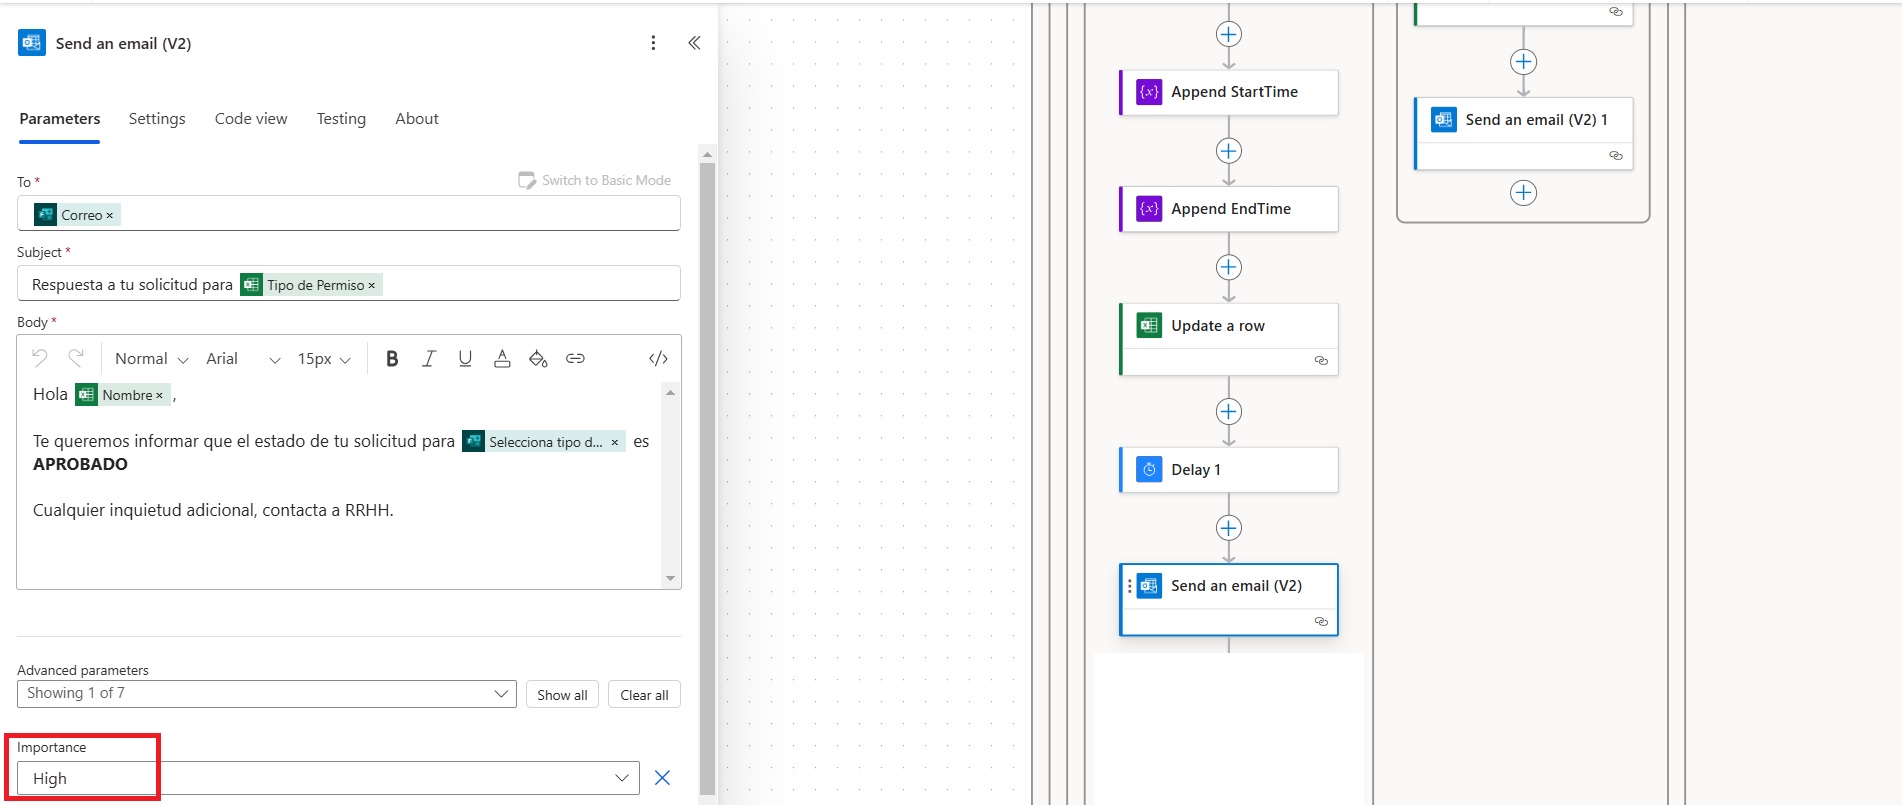
Image 24
1.9.2.6. Next, the action “List rows present in a table” is added. This action is used to retrieve all the information from the table. In the advanced parameters, you need to select Filter Query, where the expression “Id eq ‘Outputs’” is added. This expression is used to filter the unique Id generated in a previous step (see Image 25).
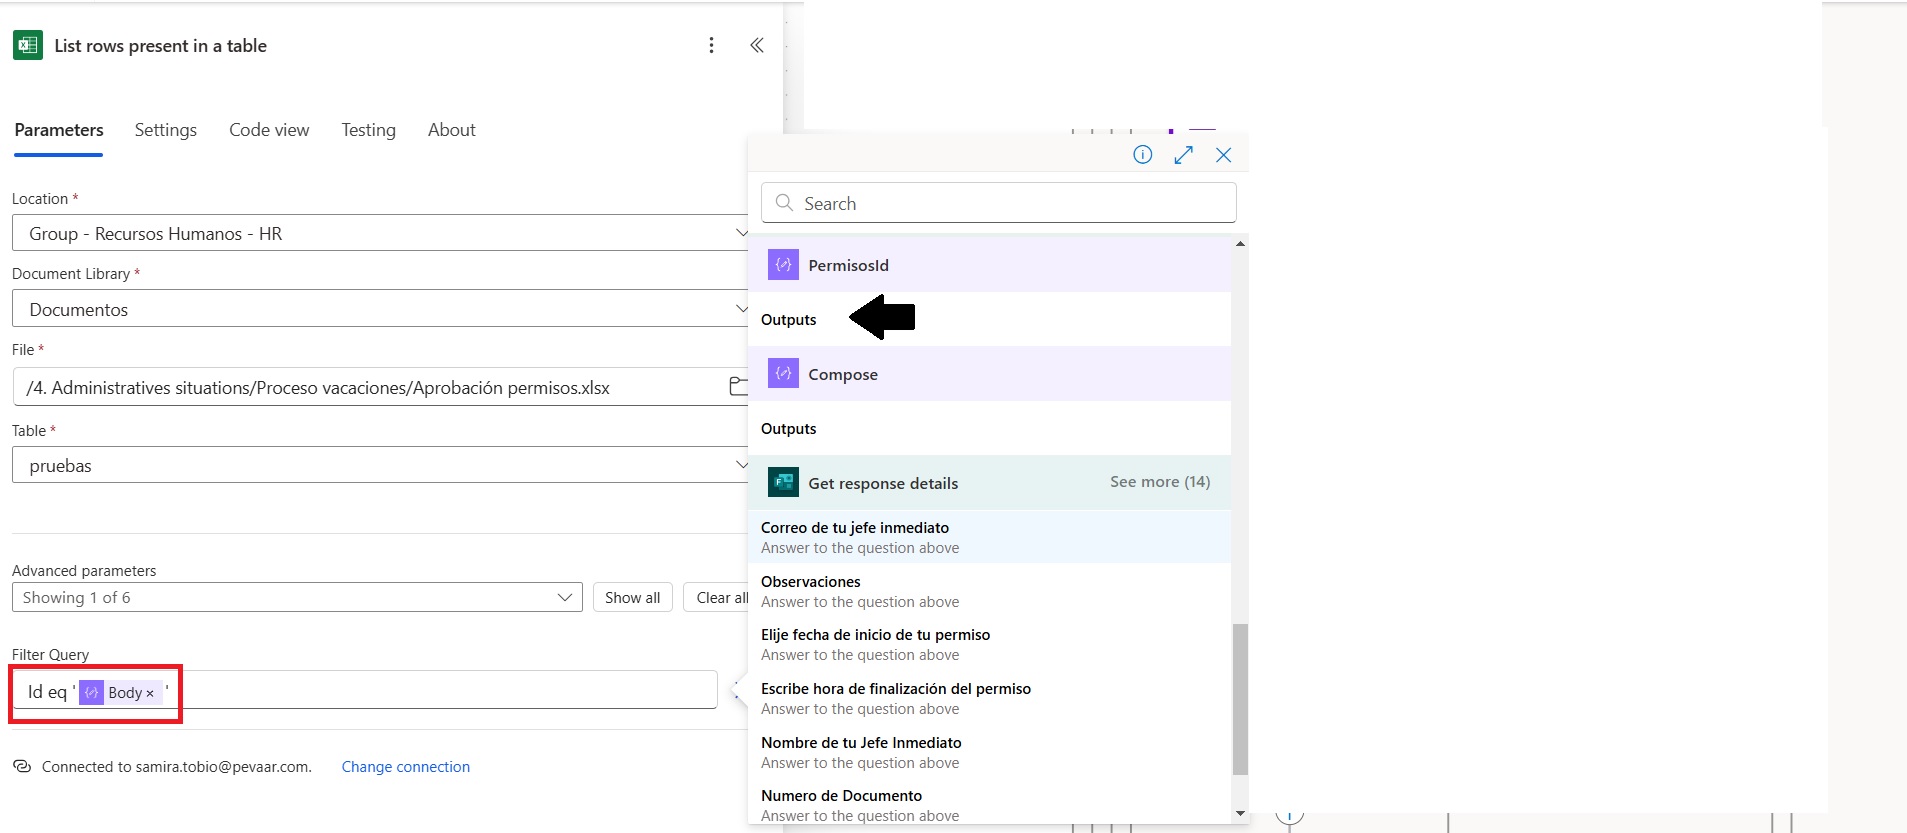
Image 25
1.9.2.7. Next, an “Apply to each” action is added. This action works with the list of items from the previous action, meaning it allows searching through the Excel document for the information added from the form. In this case, it will be related to the date and time (see Image 26).
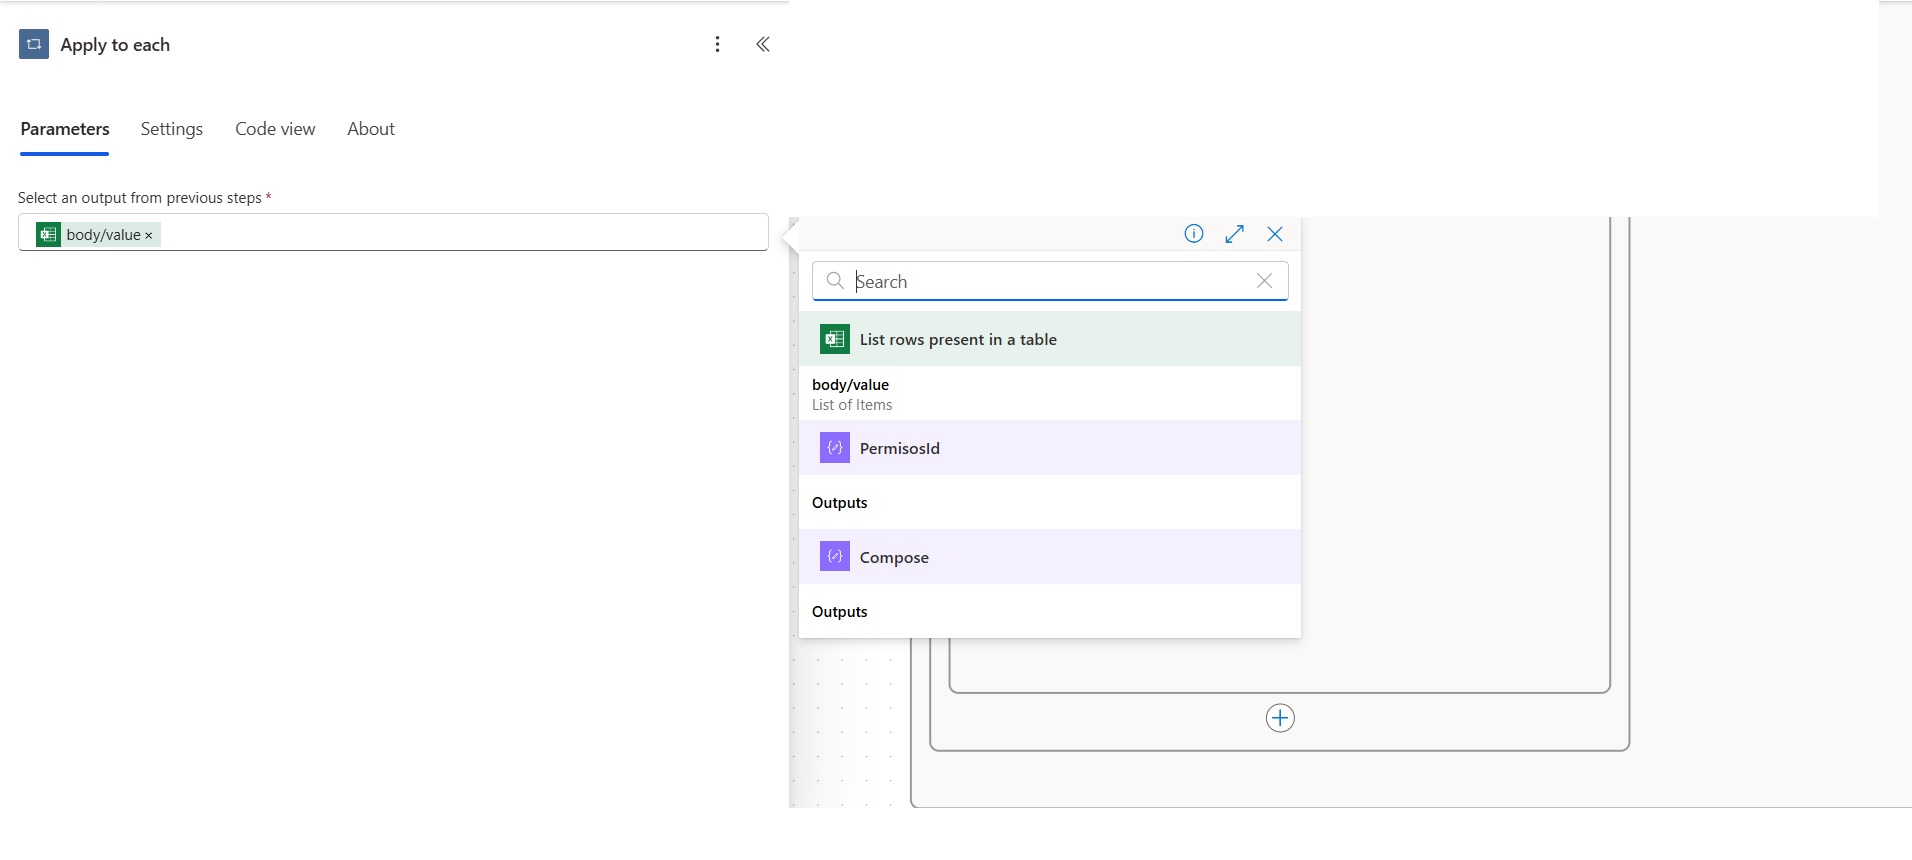
Image 26
1.9.2.8. The last actions are 4 Compose actions and a calendar event, which allow formatting the start and end date and time of the permission so that it can be added to the absence calendar (see Image 27).
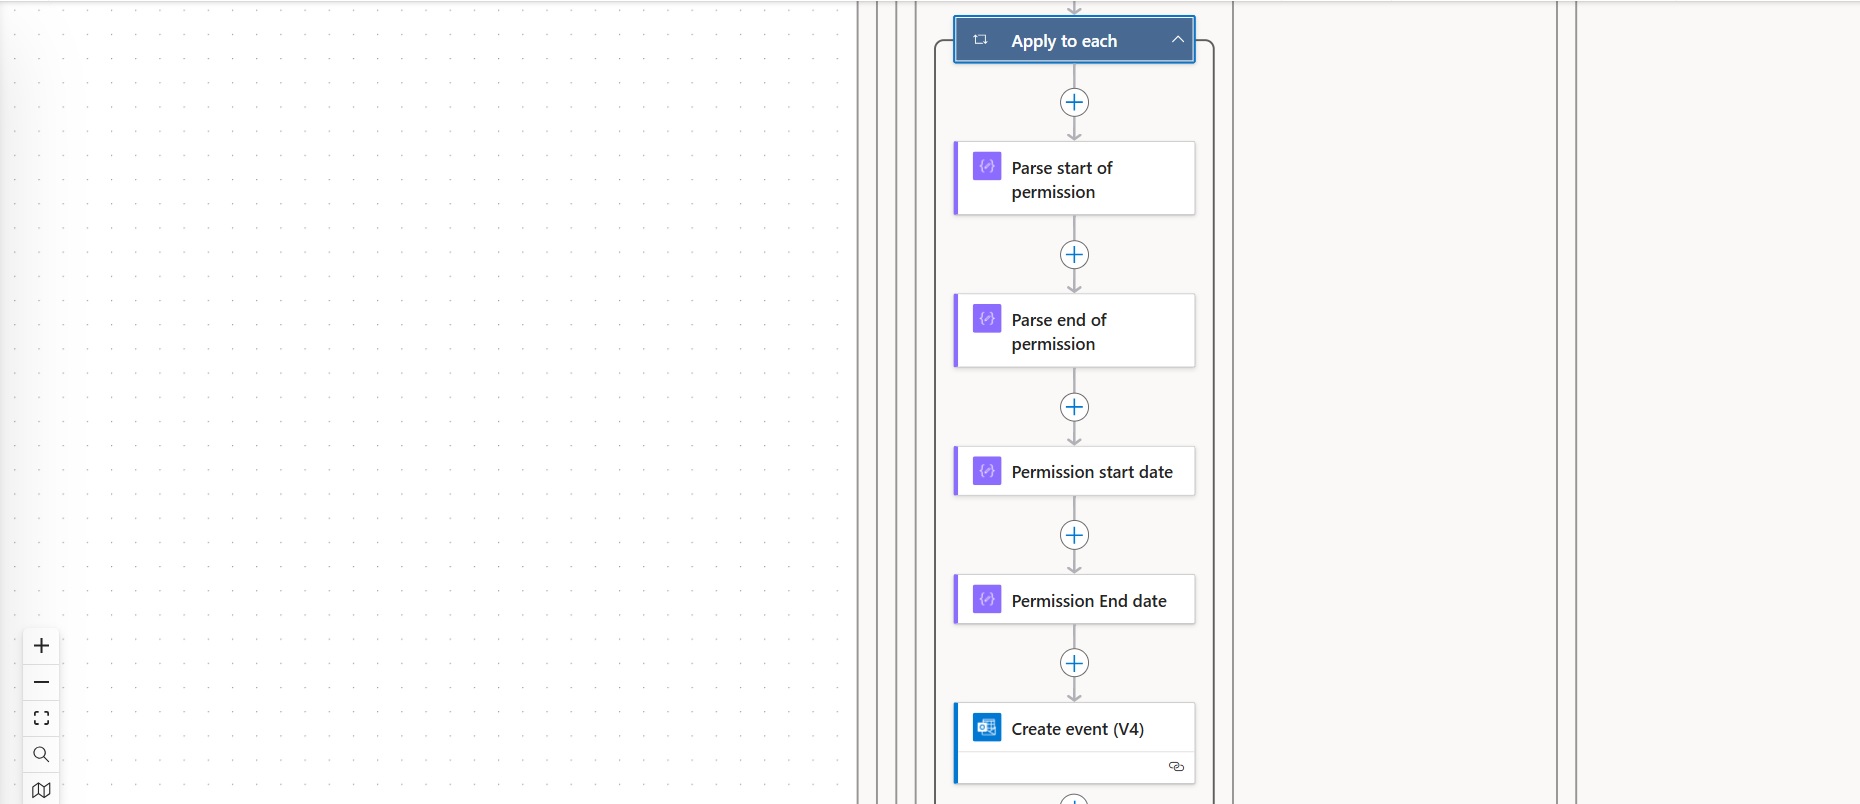
Image 27
1.9.2.9. The first action within the Apply to each is a Compose action, which we will call Parse start of permission (see Image 28). This action is responsible for formatting the start time of the permission. The following expression is used:
formatDateTime(variables(‘StarTime’),’HH:mm:ss’).
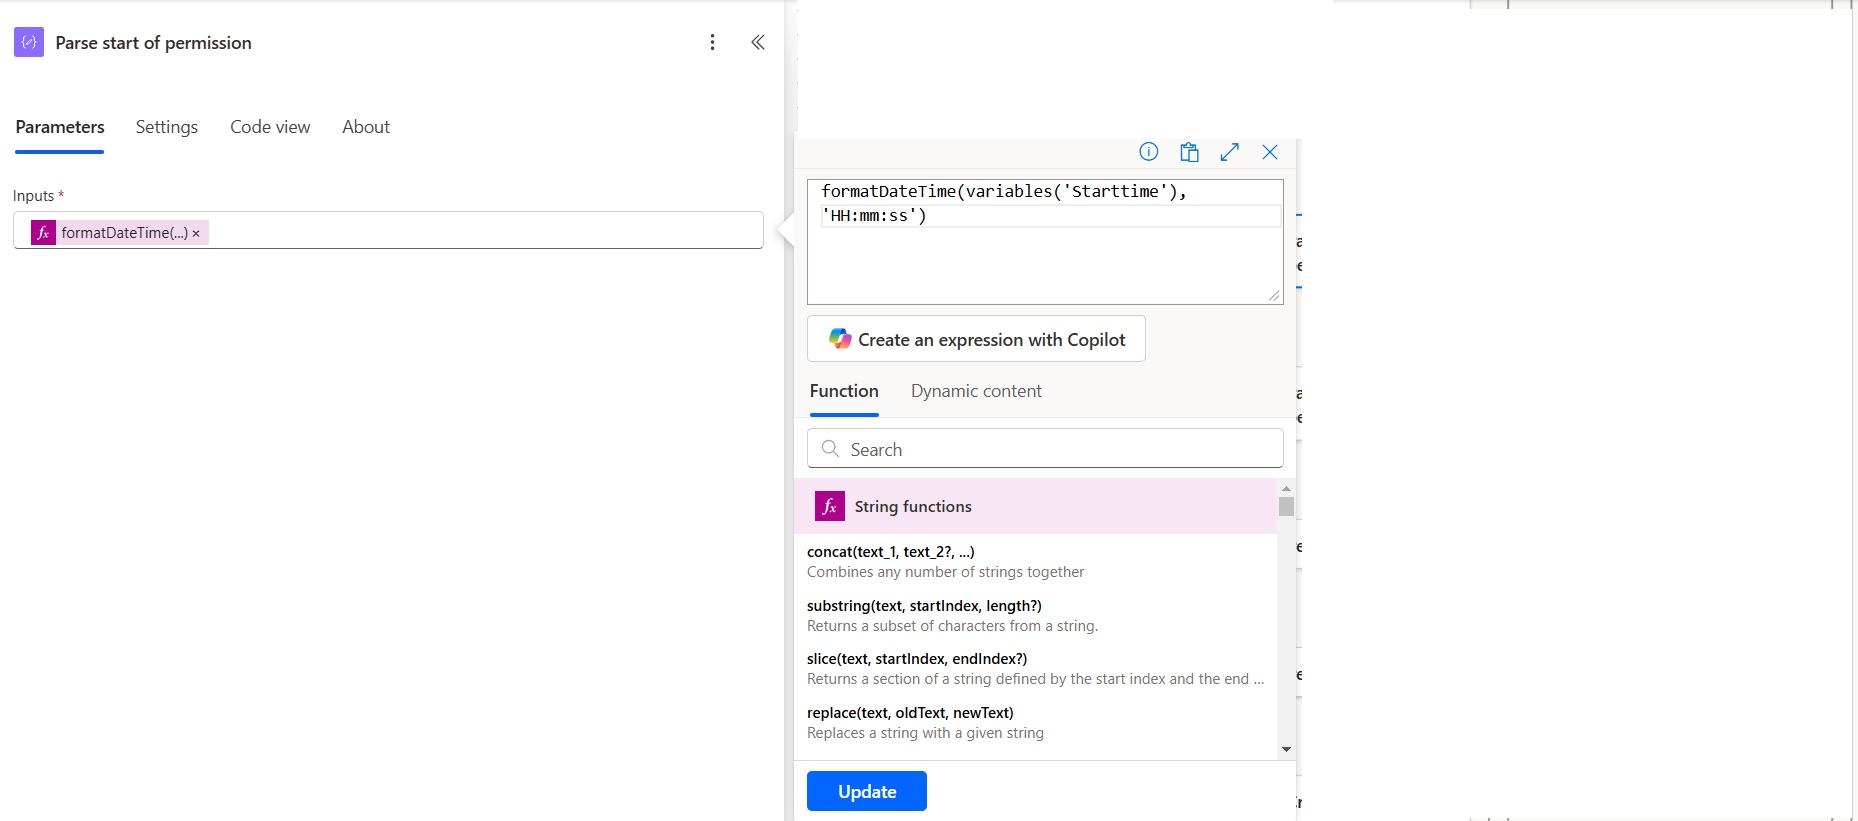
Image 28
1.9.2.10. The second action will be called Parse end of permission (see Image 29). This action formats the time at which the permission ends. The following expression is used:
formatDateTime(variables(‘Endtime’),’HH:mm:ss’).
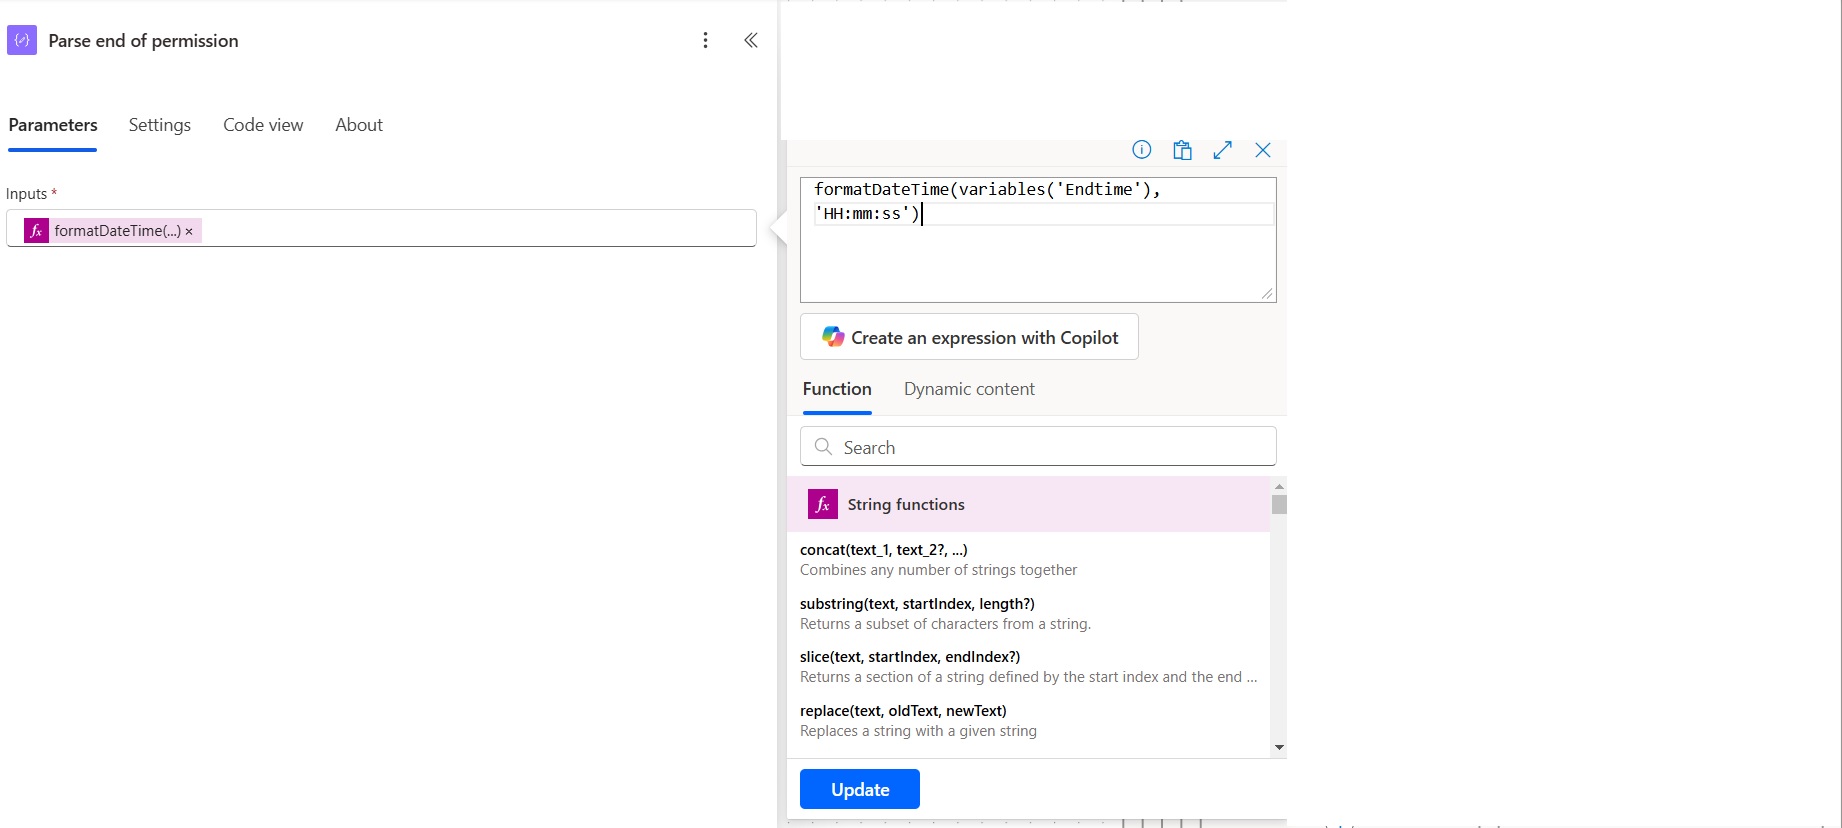
Image 29
1.9.2.11. The third action is a Compose action, and we name it Permission Start Date (see Image 30). This action formats the start date of the permission so that it can be added to the calendar. The expression also takes the output from the Parse Start of Permission action to concatenate both the start date and time of the permission.
The following expression is added: concat(addDays(‘1899-12-30’, int(items(‘Apply_to_each’)?[‘Fecha Inicio de Permiso’]), ‘yyyy-MM-dd’),’T’,outputs(‘Parse_Start_of_permission’))
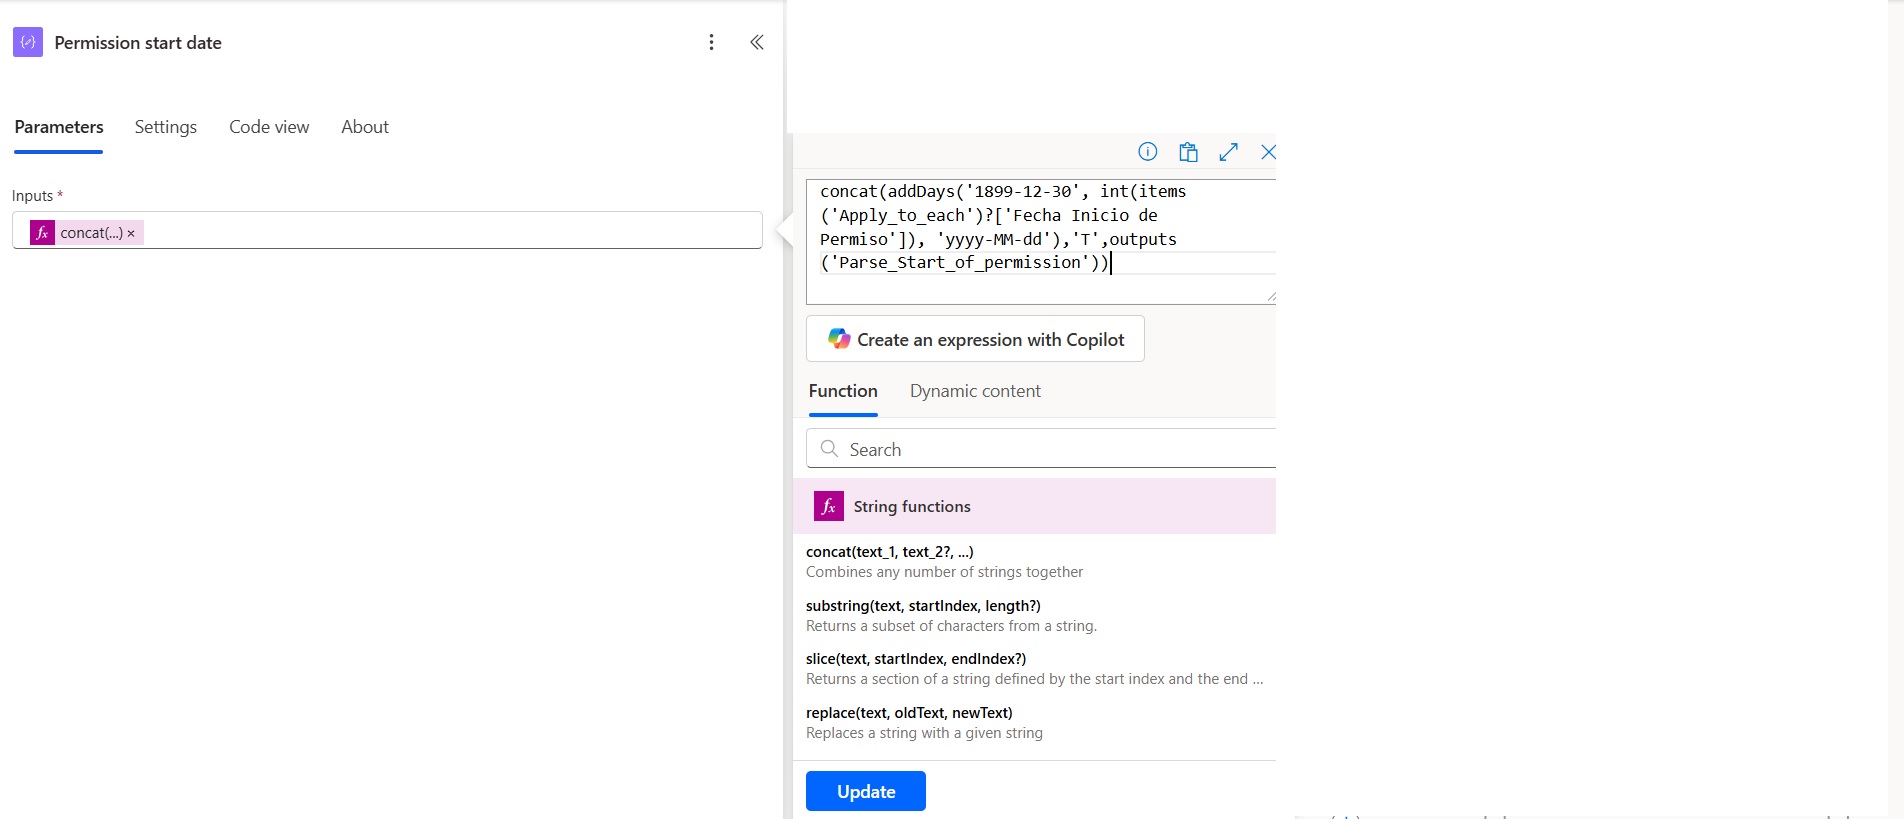
Image 30
1.9.2.12. The fourth action is named Permission End Date (see Image 31). It formats the end date of the permission. In this action, the output from the Parse End of Permission action is added, where both the end date and time of the permission are concatenated.
The following expression is added: concat(addDays(‘1899-12-30’, int(items(‘Apply_to_each’)?[‘Fecha Fin de Permiso’]), ‘yyyy-MM-dd’),’T’,outputs(‘Parse_End_of_permission’))
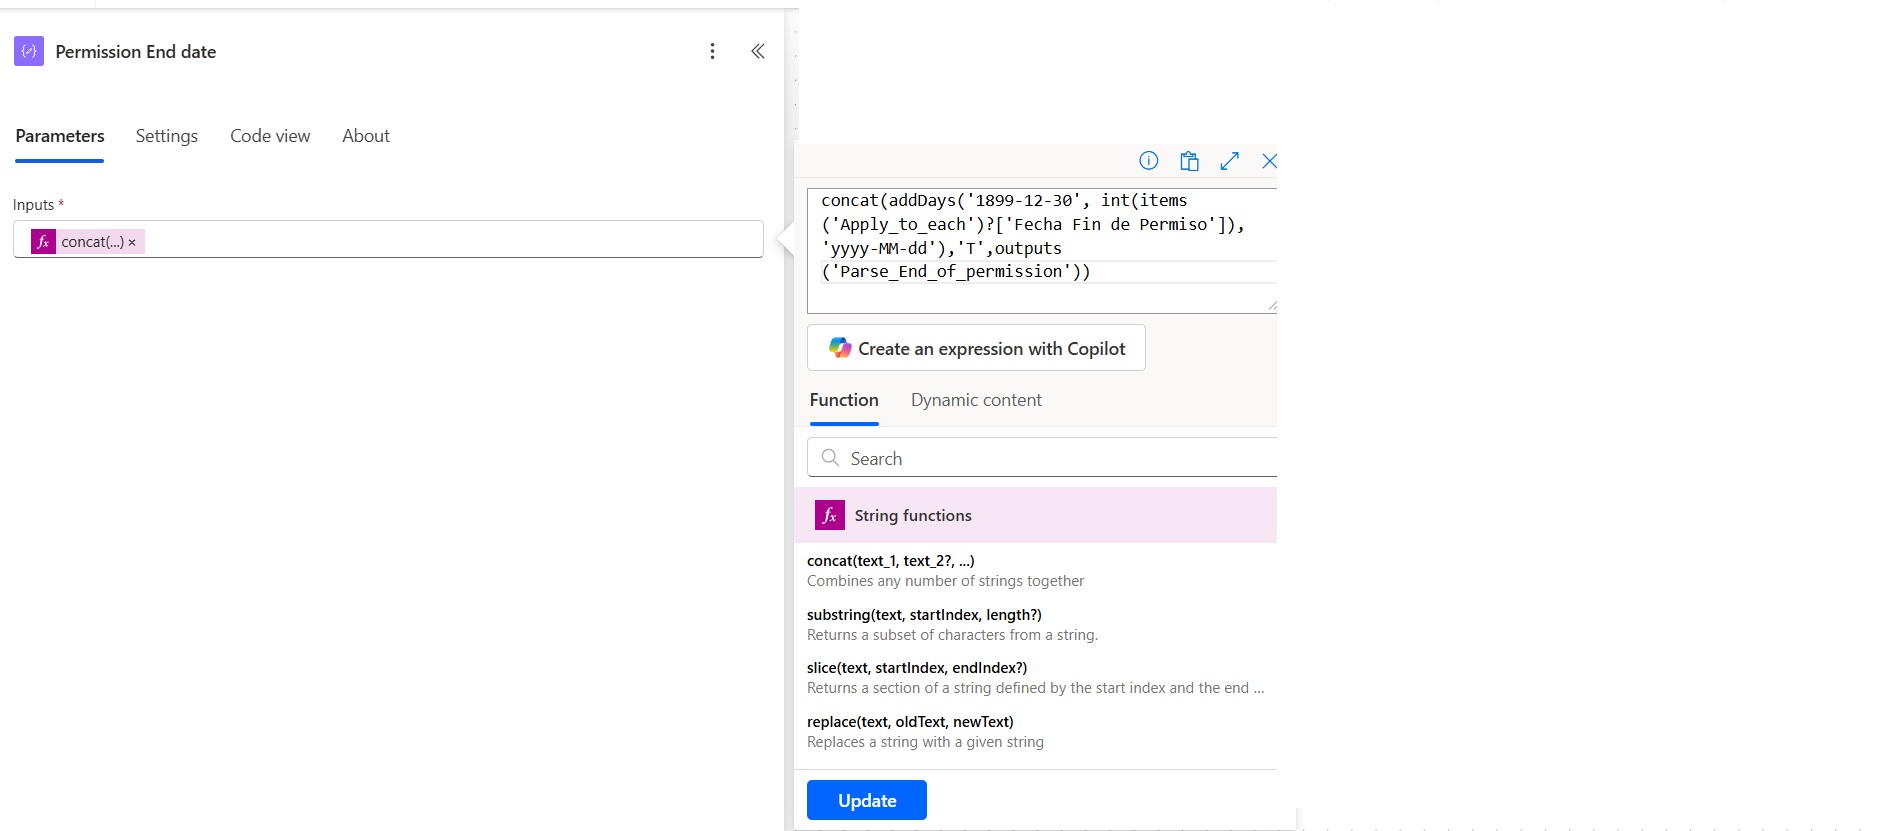
Image 31
1.9.2.13. Finally, the condition ends by adding an event to the calendar. To do this, you need to select the calendar Id where the event should be added. In the Subject field, the type of permission and the name of the employee should be added by selecting the dynamic options extracted from the Excel table (see Image 32).
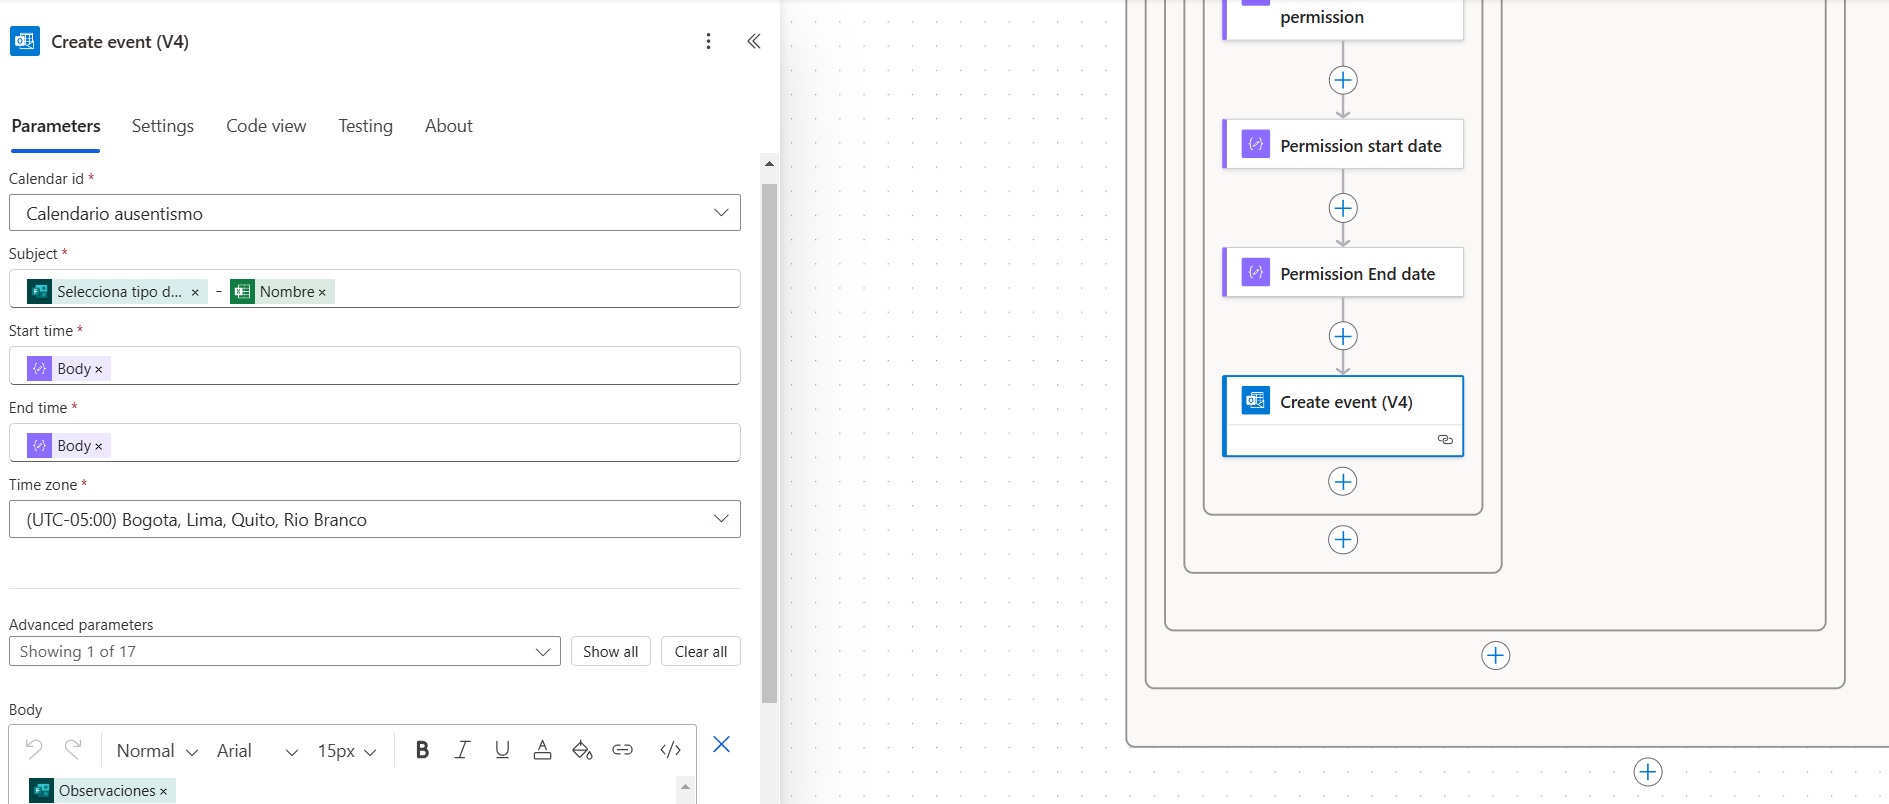
Image 32
In Start time and End time, the outputs from the previous actions will be added. You should also select the corresponding Time Zone, which in this case is Bogotá. In the Body of the event message, we will add the dynamic options for the observations related to the hour recovery mode when the permission is for a personal matter. This information will be reflected in the calendar event (see Image 33).
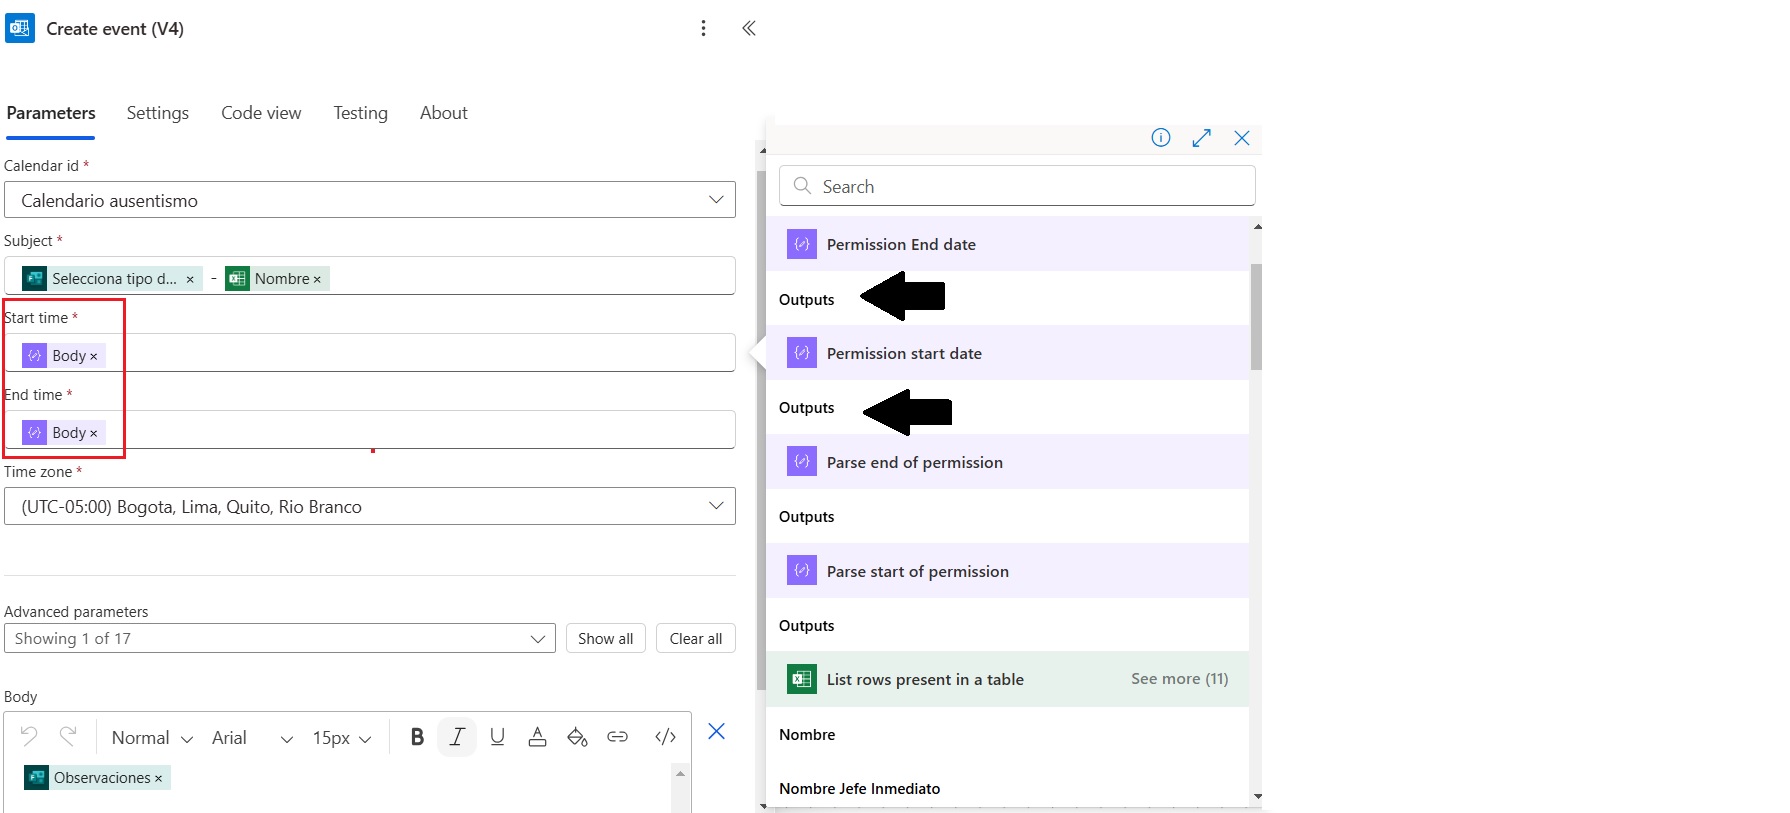
Image 33
With this solution, you have a reliable tool to manage the approval process for permission requests in an organized and seamless manner. It allows for greater control and traceability throughout the process, enabling Human Resources to focus on higher-value tasks.
Take Your Processes to the Next Level with Pevaar
Now is the time to take the next step and make the most of this automation. Optimize permission management and other key processes with the help of our experts. ¡Contact us and discover how we can support your business!


Leave a Reply