
Email Automation: Send Emails to Microsoft Teams teams Automatically with Power Automate
Can you imagine sending emails to all members of your Microsoft Teams group without manually copying each address one by one? With Power Automate, it’s possible by an email automation solution. In this blog, we’ll show you how to build an automated flow that pulls member emails from a group (defined in the Microsoft 365 Admin Center) and sends personalized messages efficiently.
This email automation setup is ideal for those looking to streamline internal communication, save time, and reduce human error in repetitive tasks. If you’re in charge of process automation in your organization, this flow could become a key tool in your digital toolkit.
Important Note: Creating a group in Microsoft 365 can only be done using an admin account, as this type of account has the necessary permissions to manage and configure groups within the admin portal.
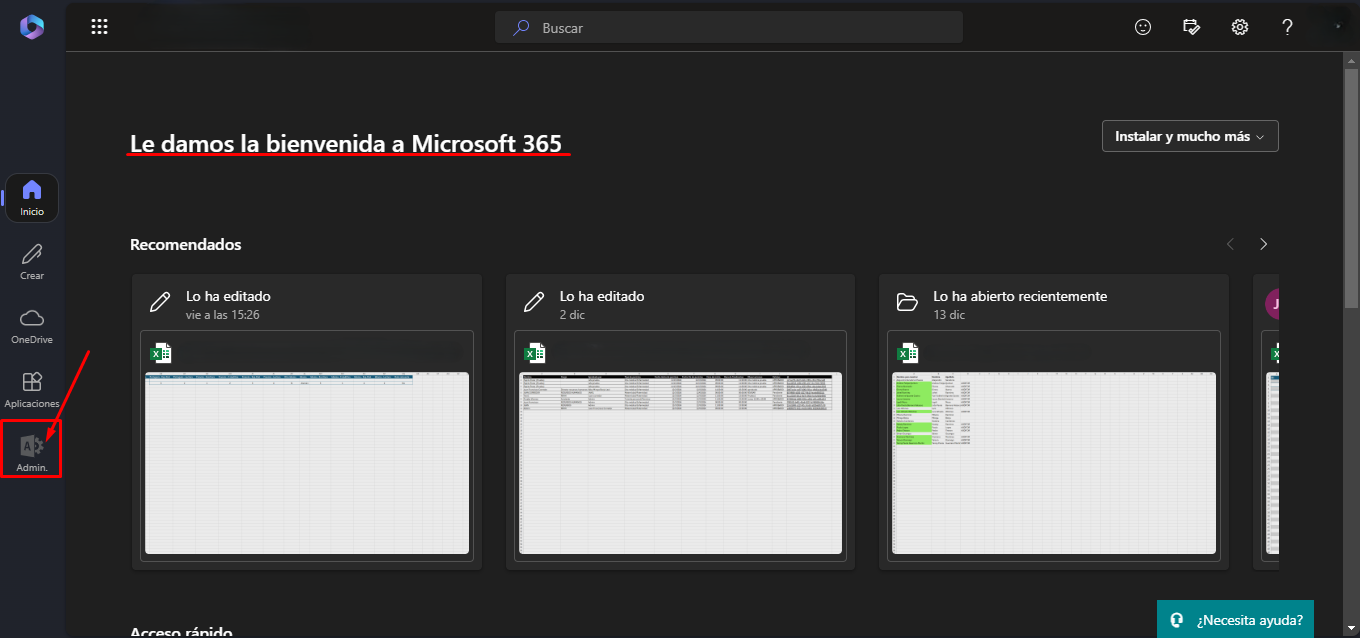
- To get started, sign in to Microsoft 365 using an account with Global Administrator permissions. Go to https://www.office.com and log in with your admin credentials. Once inside, access the “Admin” tab located at the bottom left of the screen. (img.1)
img.1
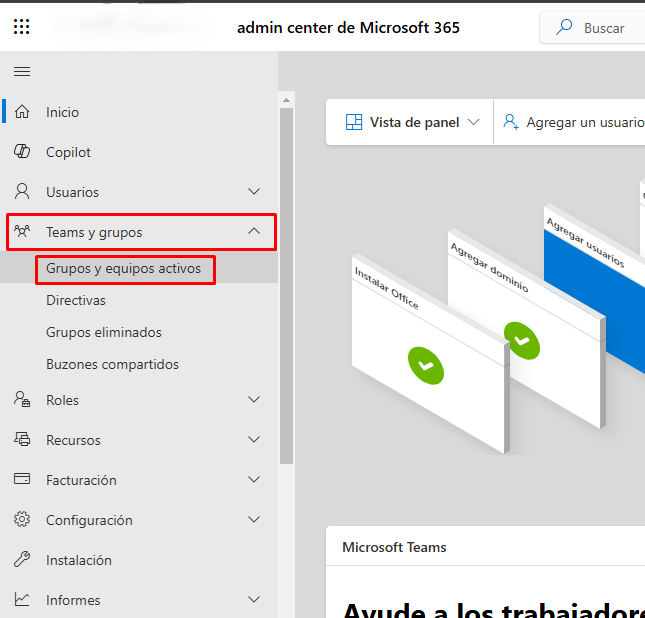
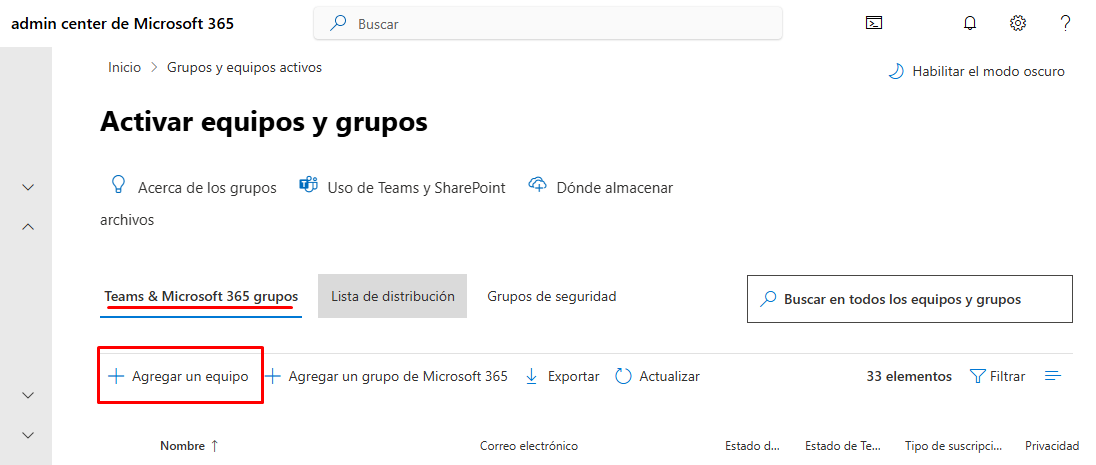
1.1. Once you’ve accessed the Microsoft 365 Admin Center, you’ll be in the administration interface. From there, navigate to the “Teams & groups“ tab in the left-hand menu. Within this section, select the “Active teams & groups“ option (img.2). This will take you to a view where you can manage the active groups and teams within your organization, and from here you can proceed to create or manage the group required for automation in Power Automate. (img.3)
Img.2
Img.3
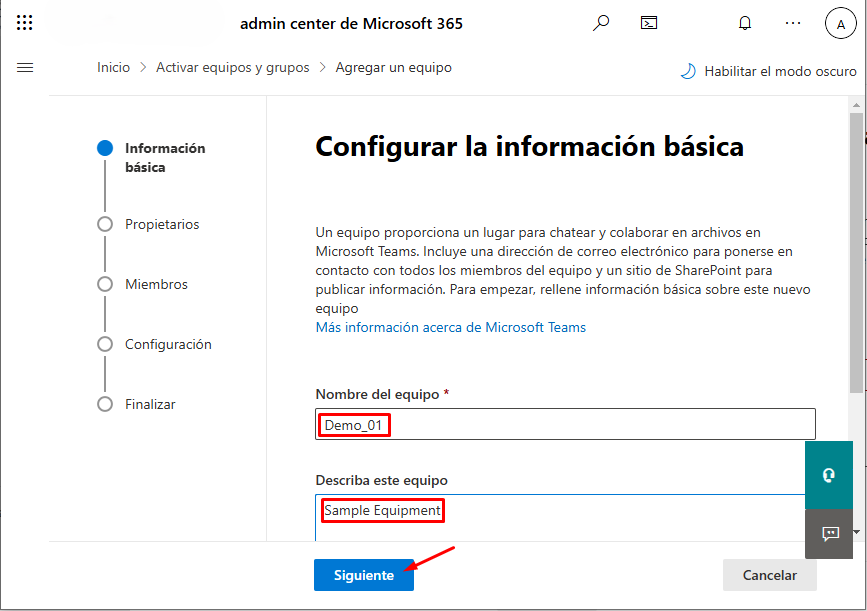
1.2. Once you’ve selected the “Active teams & groups” option, you’ll be taken to the team creation interface. The process is divided into several steps:
- Basic Information: In this first step, you’ll need to assign a name to the team. For this example, we’ll name it: Demo_01. You should also provide a description, which in this case will be: Sample equipment.
This helps explain the purpose of the team. These fields are essential for identifying the team within the organization. (img.4)
Img.4
- Owners: In this step, you need to add the owners of the team. You can add up to 100 owners. Owners are responsible for managing the team, adding or removing members, and configuring team settings. For this example, we’ll add ADMINISTRATOR as the group owner. (img.5)

Img.5
-
Members: Next, you’ll add the members of the team. Here, you can include the people who will be part of this team. You can add them by name or email address. In this example, we’ll also add ADMINISTRATOR, but this time as a member. (img.6)

Img.6
- Settings: In this step, you’ll assign an email address to the team. In this case, it will be: Demo01. This email address will be used by team members to communicate within the group. By default, the system will assign your organization’s domain—for example, if the company is “Contoso,” the email address will look like demo01@contoso.com.
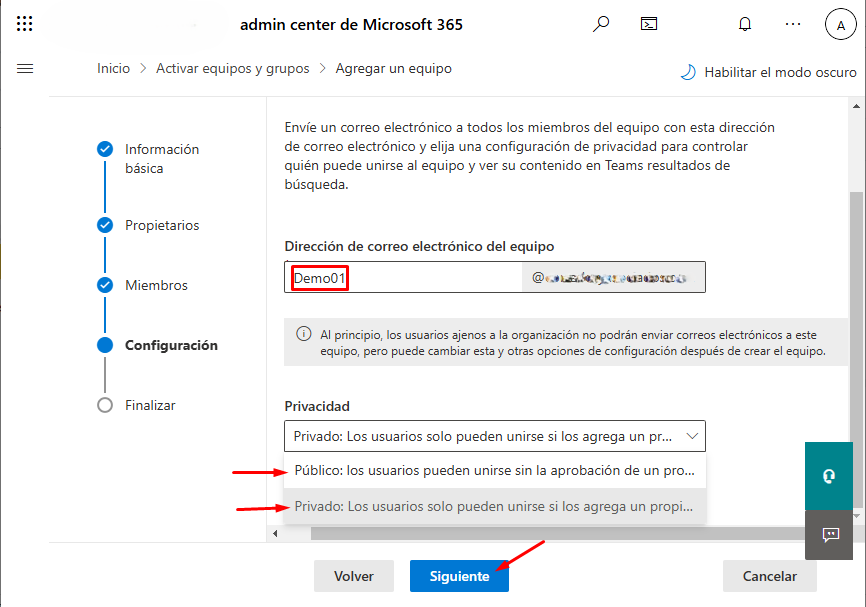
Img.7
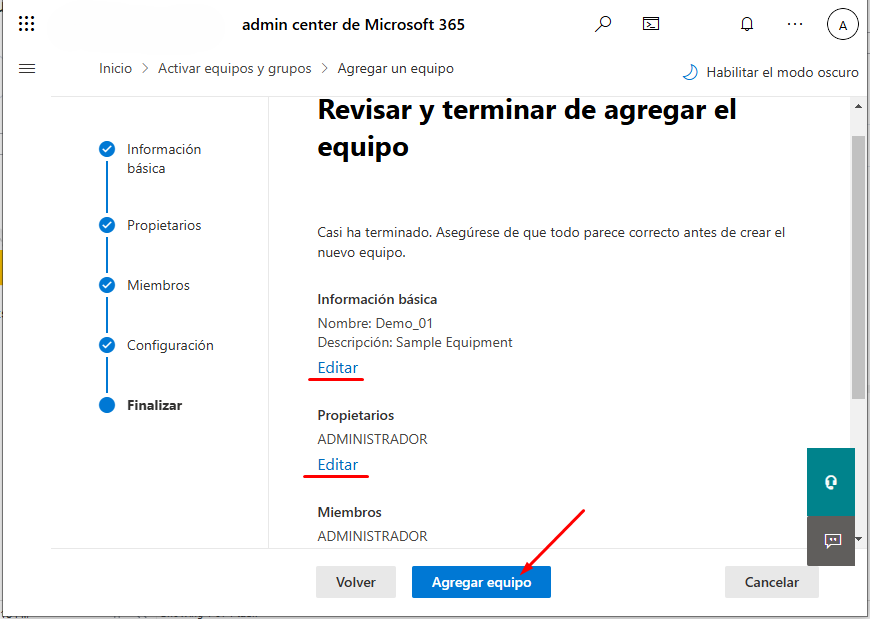
- Finalize: Finally, in this step, you can review all the information you’ve entered. If necessary, you can edit any field before proceeding. If everything is in order, simply click “Add team” to complete the group creation process. (img.8)
Img.8
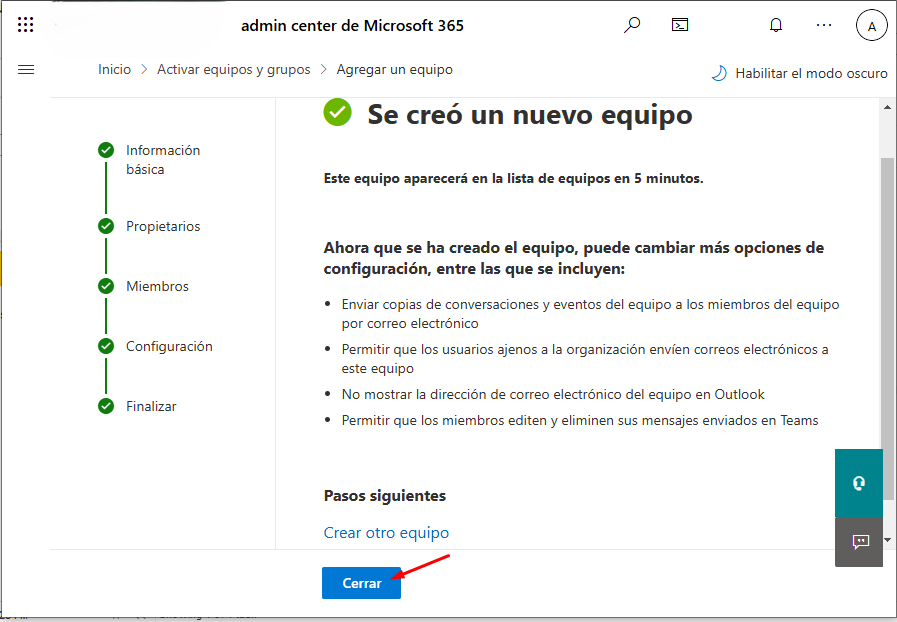
Once you’ve clicked “Add team,” the system will begin processing the team creation. After a few moments, a confirmation message will appear, indicating that the team has been successfully created. (img.9)
Img.9
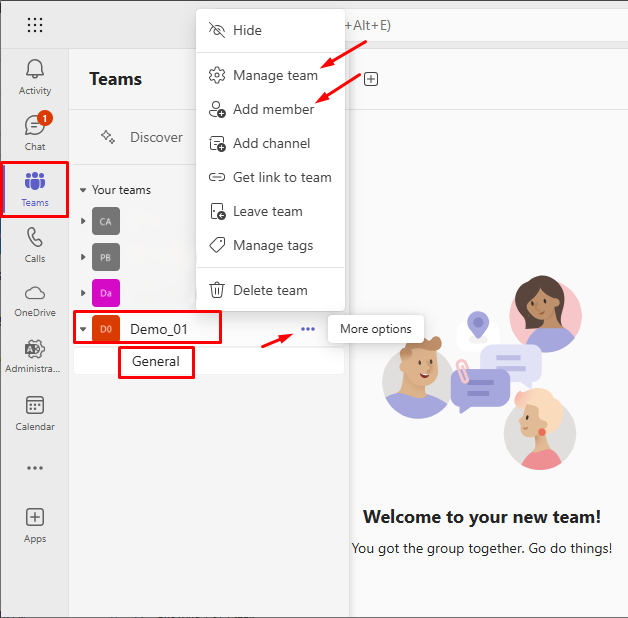
In the admin interface, you’ll be able to see the new team in the “Active teams & groups” list. From there, the team will be ready to use, and you can begin adding members, assigning permissions, and utilizing it in Power Automate automation. It’s important to note that the group will display the Teams logo, indicating that the created group is connected to Teams. (img.10)

Img.10
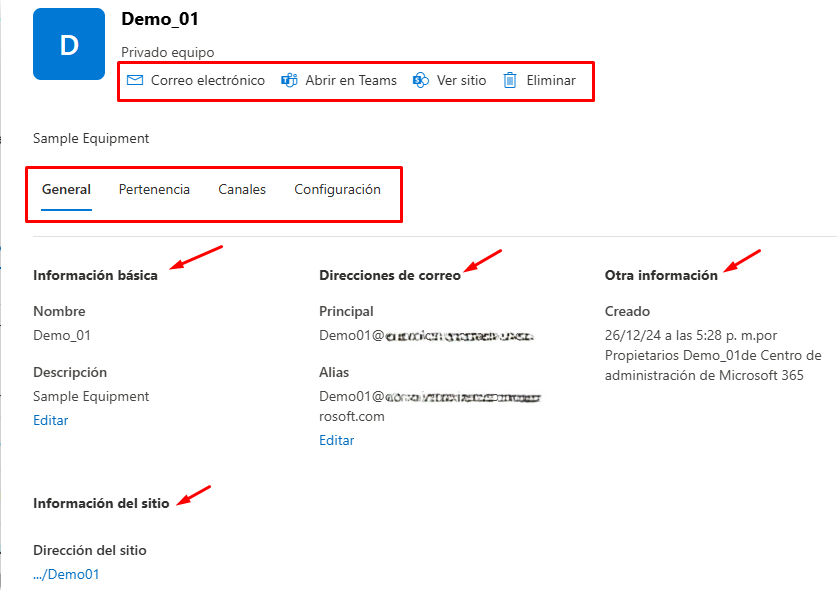
Once the team has been successfully created, you can click on the group name in the “Active teams & groups” list to access all the detailed information of the team, as shown in the image (img.11). When you do this, a view will open with several sections, including:
- Basic Information: Here, you’ll be able to see the team name and description you provided during the creation process.
- Email Address: You’ll see the email address assigned to the team, which will be used for communication within the group. Remember, this address includes your organization’s domain.
- Site Information: This section provides details such as the SharePoint site associated with the team, where files and documents shared within the team are stored.
- Other Settings: You can also review other settings related to the team, such as privacy, owners, and current members, among others.
Img.11
Now, you can head to Teams, where you’ll see the new team appear in the left sidebar under the “Teams” section. The name of the team you created will be displayed there, and you can click on it to access the channel, add members, share files, and perform other team management tasks. (img.12)
Img.12
2. Now that you have the team created and visible in Microsoft Teams, the next step is to go to Power Automate to begin creating the automated flow.
To do this, open the Power Automate app in your browser or from the desktop app. If you’re not logged in, sign in with your Microsoft 365 credentials.
In Power Automate, go to the “Create“ option in the left-hand menu. This will take you to a screen where you can choose the type of flow you want to create.
For this task, select “Scheduled cloud flow.” This type of flow is ideal for scheduling tasks to run at defined intervals or specific times. (img.13)
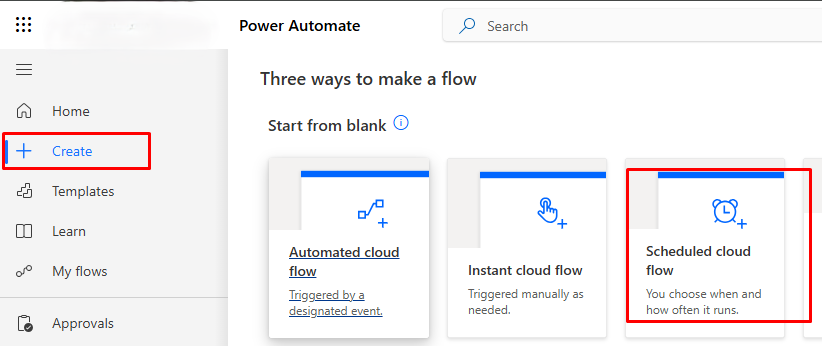
Img.13
2.1 Next, assign a name to the flow. Then, set the frequency at which you want the flow to run and click Create. (img.14)
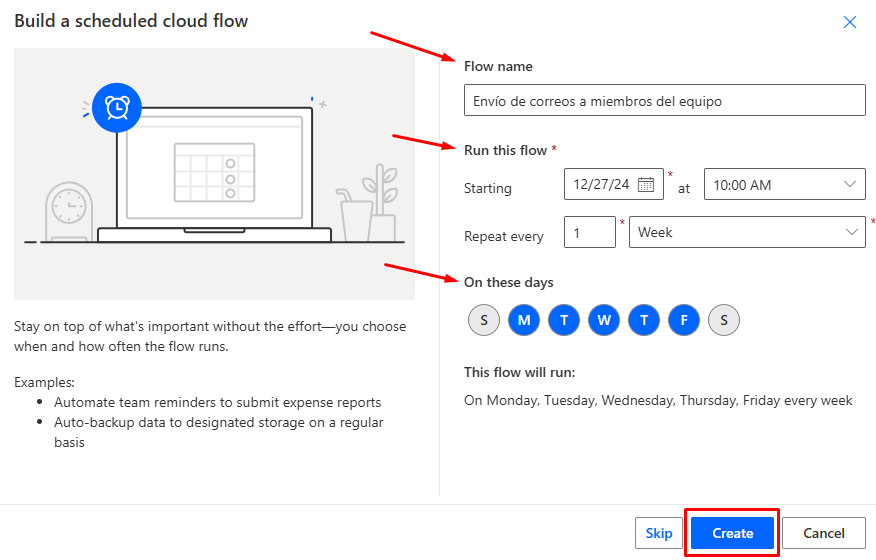
Img.14
2.2. In the flow creation environment, the next step is to add an action to retrieve the members of the Microsoft 365 group. To do this, click “New step” to add a new action.
In the search bar, type “List group members” and select the corresponding option that appears under the Office 365 Groups action group. This action will allow the flow to automatically retrieve the list of members from the Microsoft Teams group you previously created. (img.15)
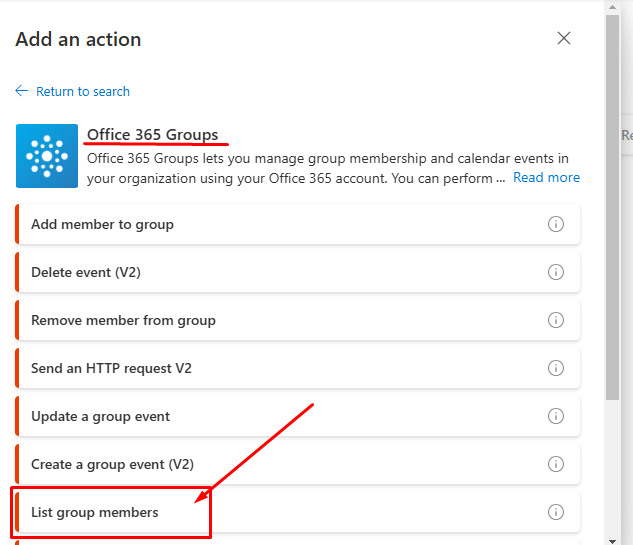
Img.15
When selecting this action, you’ll need to configure the Group ID that corresponds to the team you created. In this case, the name we have set for the group is Demo_01. This will ensure that the flow retrieves the correct members from the Teams group and uses them for the next step in the process. (img.16)
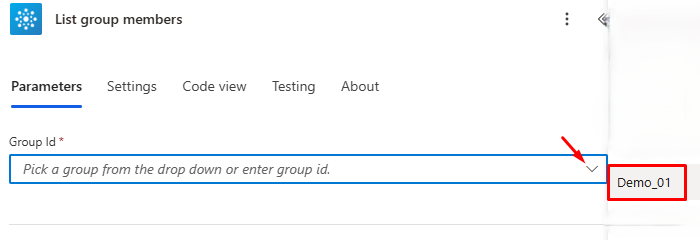
Img.16
After adding the “List group members” action to retrieve the members from the Microsoft 365 group, the next step is to process each member individually. To do this, we need to use the “Apply to each” action.
Click “New step” and search for “Apply to each.” Select the action. In the “Select a value” field, choose “Body/Value” from the “List group members” action’s dynamic content. This ensures that the “Apply to each” action receives the full list of members and can process them one by one. (img.17)
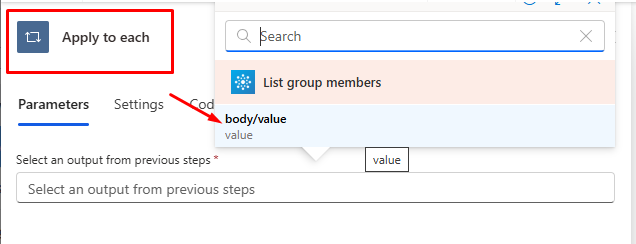
Img.17
Within the “Apply to each” block, click “Add an action” and search for “Send an email (V2)” from Outlook. Select this action to configure the email sending to each member of the group. (img.18)
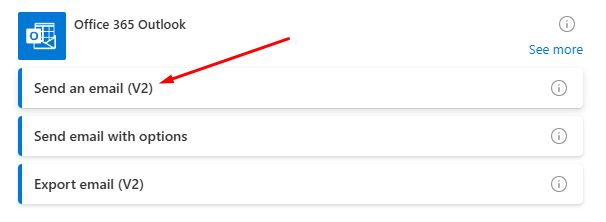
Img.18
In this action, you need to configure the following parameters:
- To: In this field, select the advanced mode (img.19) to choose “Mail” from the “List group members” action using dynamic content. This will automatically assign the email address of each member to send them the message. (img.20)
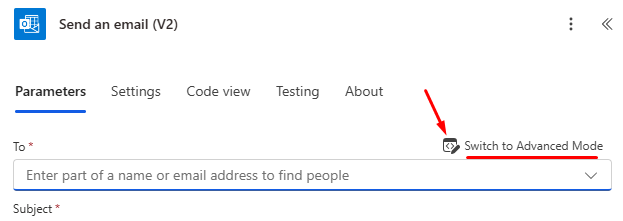
Img.19
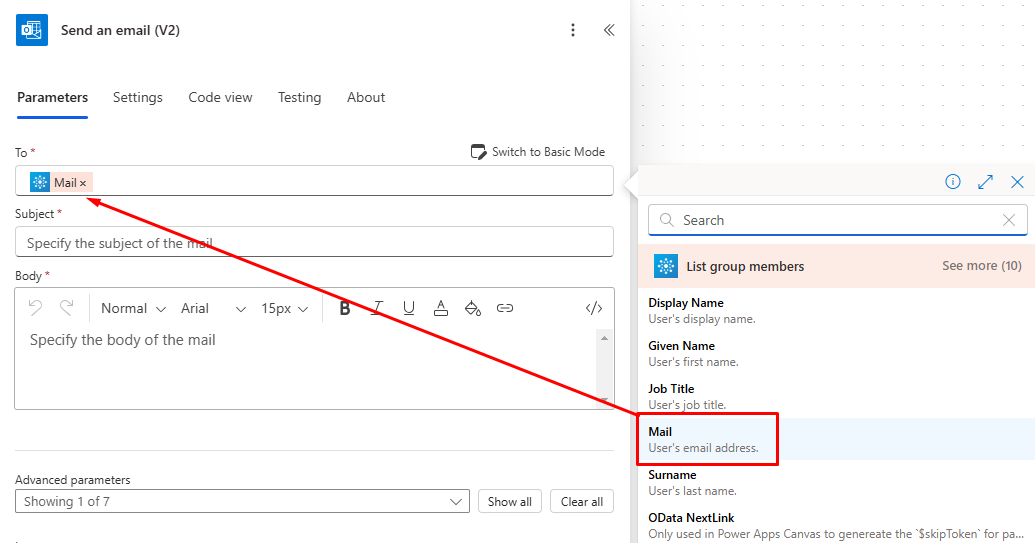
Img.20
- Subject: Here, you can assign the email subject. You can enter static text (as is the case here) or use dynamic content depending on your needs. (img.21)
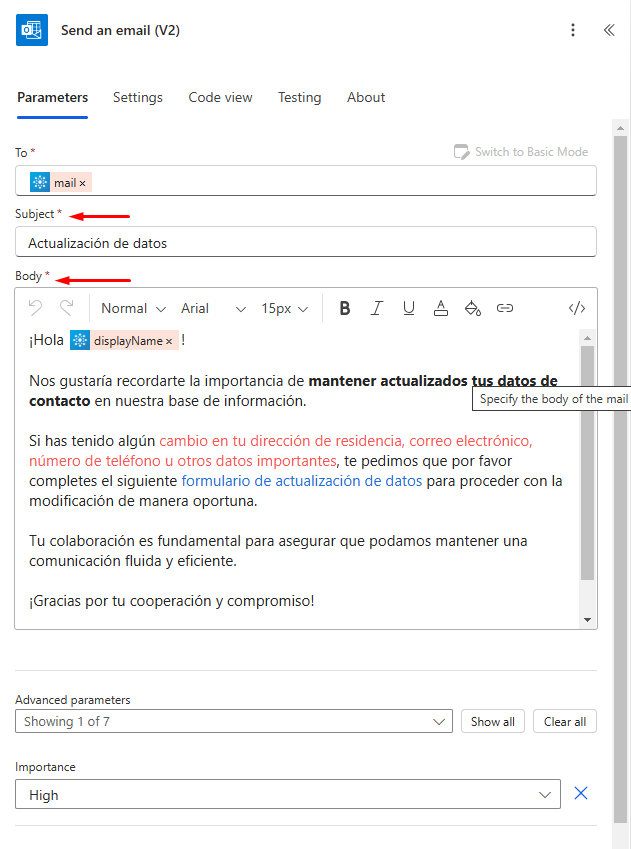
Img.21
- Body: In this field, define the content of the message that will be sent to each team member. You can use static text and dynamic content in the message to personalize it based on what you want to communicate to the group members, such as a welcome, a notification, etc. In this case, we use the dynamic content “Display Name” from the “List group members” action to take each user’s name and send them a personalized greeting. (img.22)

Img.22
Done! Now you have a scheduled flow to send automatic messages to the email addresses of the members of your group. Here’s an overview of the flow.
Improve Your Internal Communication with Power Automate and Teams Through Email Automation
Implementing automated flows to send emails to Microsoft Teams members not only saves time but also improves coordination and consistency in internal communication. By centralizing repetitive processes such as email automation, your team can focus on higher-value tasks, reducing human errors and speeding up operational response.
Additionally, by leveraging the integration between tools like Microsoft 365, Teams, and Power Automate, your organization enters a more efficient, modern ecosystem aligned with best business productivity practices.
Do you want to implement this flow in your organization or adapt the automation to your specific needs?
👉 Contact us at Pevaar. Our team of experts is ready to help you optimize your processes and take your company’s productivity to the next level.


Leave a Reply