
Income Tracking App: the module that makes complicated things simple
Keeping track of invoices and payments doesn’t have to feel like solving a mystery novel. The Income Tracking App makes sure every peso (or dollar!) is exactly where it should be. With just a few clicks, you can simplify revenue management, get a crystal-clear view of your cash flow, and finally take the wheel of your financial control.
And yes, even the “payments received” screen is designed to be as easy and intuitive as snapping your fingers. Simple, fast, and made for real life.
Let’s take it apart step by step, but with style:
The Boss Title
To kick things off, we add a label with the title “Income” in its Text property. No room for confusion here: you’ll always know you’re in the section where money comes in (and doesn’t slip away).
The Mighty Search Bar
We insert a text box with a search icon. It’s like having your own financial detective for invoices: type in a client, invoice number, or project, and the Income Tracking App instantly brings you the result.
Reset Button
Made a mistake in your search? One click on the clear button, and everything goes back to zero. It’s like shaking an Etch A Sketch to start fresh.
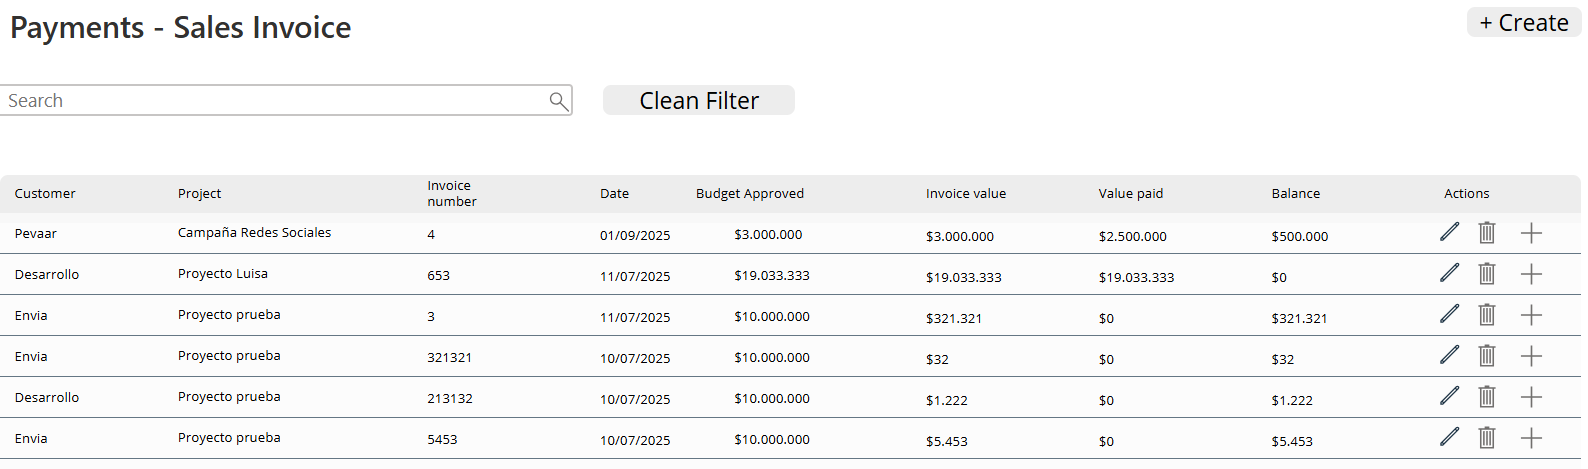
The Organized Gallery
Here’s where it gets fun: the gallery arranges your income like a catalog—easy to read, no mess. To achieve this, we insert a vertical gallery with the Items property:
Sort(
Search( InvoicePayments;
TextInput_Search_Income.Text;
Client; Project; InvoiceNumber; Date; InvoiceValue; Budgeted value, PurchaseOrderNumber, ICA withholding; Withholding
);
'Created On';
SortOrder.Descending
)
The result? A list where the most recent income always appears at the top. No need to dig through files, everything flows here as it should.
Data Source
Behind every great module in the Income Tracking App, there’s an even greater table. Everything starts with InvoicePayments, the base where every registered income is stored.
Here you’ll find essential fields like: Client, Project, Invoice Number, Date, Invoice Value, Budgeted Value, Purchase Order Number, ICA Withholding, and Withholding.
It’s like your accounting book—only digital, clean, organized, and ready to respond in seconds.
Search Functions
The radar that finds it all:
Search(InvoicePayments, TextInput_Search_Income.Text, …)
This lets you search across multiple fields at once (client, project, invoice number, etc.). Just type a value and in less than a second you’ll get matches. The Income Tracking App never fails.
Sorting Function
Order matters, and here you guarantee it with:
Sort( … , 'Created On', SortOrder.Descending)
The benefit? You’ll always see the most recent incomes at the top of the list.
Inside the Gallery
Here’s where the Income module gets interactive:
Info Labels
Each income record shows clear data thanks to labels connected to the table. Insert labels for the most relevant columns: Client, Project, Invoice Number, Date, and Value.
Each label connects directly to the actual table field using properties like:
ThisItem.Client
ThisItem.InvoiceNumber
ThisItem.InvoiceValue
That way, you never have to guess where the money came from.
Icons with Attitude
- Delete: With the OnSelect property:
Set(varIncomeDeletionRecord, ThisItem);;
UpdateContext({ popDelete: true })
- Edit: With the OnSelect property:
Set(IncomeItemRecord, ThisItem);;
Navigate(EditIncome)
With these, you can jump straight into a record, update it, or delete it without hassle.
Create Button
Got a new income to add? Just hit the Create button with this property:
Navigate(CreateIncome, ScreenTransition.None)
It’s like opening a new tab—except it’s for your finances.
This section transforms the gallery into an interactive board: visualize, edit, delete, or create new records—all in one click. Exactly what makes project management with the Income Tracking App more agile and modern.
Img.1
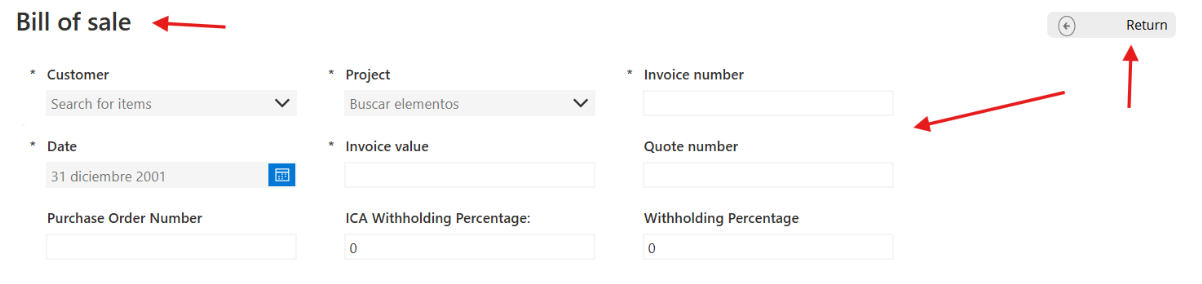
“Create Income” Screen
Back Button
Always with a quick exit:
OnSelect = Back()
Save Button
The classic that never fails:
OnSelect = SubmitForm(Form_CreateIncome_1)
Title Label
So there’s no doubt:
Text = "Create Income"
The Magic Form
Here’s where the action happens:
Notify("Income created successfully"; NotificationType.Success);;
NewForm(Form_CreateIncome_1);;
Navigate(Incomes; ScreenTransition.Fade)
The result? Each income is registered in style, notification included.
 Img.2
Img.2
“+” Button to Add Payments
Because there will always be more income to record, we add a button labeled “+”.
This button has the OnSelect property:
Collect(TemporaryInvoicePayments;
   {
      Payment_Date: Today();
      Payment_Value: 0;
      Advance: "";
      TotalPayment: 0
   }
)
What does this formula do?
Collect
It’s the function that allows you to create or add records inside a local collection in the income tracking app.
Here, the collection is called TemporaryInvoicePayments.
The Initial Record
When you press the button, a new record is added with these default values:
- Payment_Date → automatically filled with today’s date thanks to Today().
- Payment_Value → starts at 0, waiting for the user to enter the actual value.
- Advance → starts empty (“”), designed to record advances if applicable.
- TotalPayment → starts at 0, and later is calculated based on the data entered.
To guide the user, we also insert a label with the text:
Text = "Add payment"
 Img.3
Img.3
Because nothing beats a clear reminder of what the button does.
Payment Gallery
This is where each payment becomes a visible and editable record.
We insert a blank vertical gallery, and in its Items property we set:
TemporaryInvoicePayments
Inside the gallery, we add 4 controls that make the magic happen:
- DatePicker → with the DefaultDate property:
ThisItem.Payment_Date
This way, the correct date always appears.
- TextInput → with the Default property:
ThisItem.Payment_Value
So the user can adjust the actual payment value.
- Dropdown → with the options:
[""; "Yes"; "No"]
Perfect to indicate whether there is an advance or not.
- Delete icon (trash bin) → with the OnSelect property:
Remove(TemporaryInvoicePayments; ThisItem)
This way, you can delete a record with a single click.

Img.4
With this set of controls, the income module of the Income Tracking App becomes interactive, flexible, and even fun to use. Every payment is entered cleanly, organized, and easy to manage—just the way it should be in a Income Tracking App.
Crunching totals like a pro
Now comes the time to do the math, and here your Income Tracking App turns into that sharp accountant who never makes mistakes (and never takes a vacation). Thanks to a couple of smart labels, everything stays under control:
Label “Paid Value”
Text = “$” & Text(Sum(TemporaryInvoicePayments; Value(Paid_Value));”#,##0.00″)
This label automatically shows the total amount paid, formatted in pesos and perfectly neat, so you don’t need to grab the calculator.
Label “Balance”
Text = "$" & Text(Value(DataCardValue24.Text) - Sum(TemporaryPaymentsInvoice; Value(Payment_Value)); "#,##0.00")
Here’s the outstanding balance: what’s left to be paid is calculated instantly by subtracting the payments from the total invoice value. In seconds, you’ll know whether it’s time to celebrate—or if you still need to wait for that payment to hit your account.

Img.5
The Grand Finale: Save and Celebrate with Your Income Tracking App
After all the hard work of registering invoices, payments, and balances, it’s time to hit the Save Button. And this is where your Income Tracking App shines like a true rockstar of organization:
If(
    CountRows(TemporaryInvoicePayments) = 0;
    Notify("You must add at least one payment"; NotificationType.Error);

    With(
        {
            newInvoicePayments: Patch(
                InvoicePayments;
                Defaults(Payment Invoice);
                {
                    InvoiceNumberProject: DataCardValue38.Text;
                    InvoiceDate: DateValue5.SelectedDate;
                    ClientAppRelation: DataCardValue43_2.Selected;
                    ProjectAppRelation: DataCardValue46.Selected;
                    PaidAmount: Sum(TemporaryInvoicePayments; Payment_Value);
                    ReteICA: Value(DataCardValue30.Text);
                    Retention: Value(DataCardValue31.Text);
                    ApprovedClientBudget: Value(DataCardValue28.Text);
                    QuoteNumber: DataCardValue33.Text;
                    PurchaseOrderNumber: DataCardValue35.Text;
                    InvoiceValue: Value(DataCardValue24.Text)
                }
            )
        };

        If(
            !IsBlank(newInvoicePayments);

            ForAll(
                TemporaryPaymentsInvoice;
                Patch(
                    ProjectInvoicePayments;
                    Defaults(ProjectInvoicePayments);
                    {
                        PaymentDate: Payment_Date;
                        PaymentValue: Payment_Value;
                        Advance: Advance;
                        InvoicePaymentRelation: newInvoicePayments
                    }
                )
            );;

            Clear(TemporaryInvoicePayments);

            Notify("Invoice and payments saved successfully"; NotificationType.Success)
        )
    )
);;
ResetForm(Form5);;
Navigate(Payments1_1; ScreenTransition.Fade)
What does this formula do?
Initial Validation
The app first checks that you’ve added at least one payment:
If(
    CountRows(TemporaryInvoicePayments) = 0;
    Notify("You must add at least one payment"; NotificationType.Error);
)
If the TemporaryInvoicePayments collection is empty—bam!—you get an alert reminding you that you need at least one payment before moving forward.
Invoice Creation
With the Patch function, the app saves the invoice into the InvoicePayments table:
newInvoicePayments: Patch(
    InvoicePayments;
    Defaults(PaymentsInvoice);
    {
        InvoiceNumberProject: DataCardValue38.Text;
        InvoiceDate: DateValue5.SelectedDate;
        ClientAppRelation: DataCardValue43_2.Selected;
        ProjectAppRelation: DataCardValue46.Selected;
        PaidAmount: Sum(TemporaryInvoicePayments; Payment_Value);
        ReteICA: Value(DataCardValue30.Text);
        Retention: Value(DataCardValue31.Text);
        ApprovedClientBudget: Value(DataCardValue28.Text);
        QuoteNumber: DataCardValue33.Text;
        PurchaseOrderNumber: DataCardValue35.Text;
        InvoiceValue: Value(DataCardValue24.Text)
    }
)
Here, everything is stored: client, project, values, withholdings… it’s like carrying an automatic accountant in your pocket.
Linked Payments
Then, one by one, all temporary payments are inserted into the project payments table using ForAll, linking them directly to the newly created invoice:
ForAll(
    TemporaryPaymentsInvoice;
    Patch(
        ProjectInvoicePayments;
        Defaults(ProjectInvoicePayments);
        {
            PaymentDate: Payment_Date;
            PaymentValue: Payment_Value;
            Advance: Advance;
            InvoicePaymentRelation: newInvoicePayments
        }
    )
)
That way, each payment is tied in without you having to do it manually.
Clean-Up and Confirmation
Once everything’s saved, the Income Tracking App clears the temporary collection and pops a success message:
Clear(TemporaryInvoicePayments);
Notify("Invoice and payments saved successfully"; NotificationType.Success)
You get a neat notification confirming everything went smoothly.
Final Actions
To wrap it all up, the Income Tracking App resets the form and takes you back to the payments screen in style:
ResetForm(Form5);;
Navigate(Payments1_1; ScreenTransition.Fade)
That fade transition? It’s like a classy round of applause from your Income Tracking Appfor a job well done.
And with this final step, your Income Tracking App becomes your all-in-one partner: recording invoices, linking payments, validating info, and confirming everything is in perfect order.
But this isn’t the end. We invite you to visit our website to keep discovering how to optimize your Power Apps Project Profitability App with the best tech at your fingertips.
Also, don’t miss the previous blog posts in this module, where we explained how to build the Project Administrative Management module step by step, with formulas that make your experience smoother and more efficient.
Check them out, learn, and take your management game to the next level!
Don’t just read about it — make it happen! Schedule a call and discover how to customize your own Income Tracking App.


Leave a Reply