
Transform your company’s employee credit application: discover how to automate it
It all started on an ordinary Monday. Andrea, the HR manager, was opening her email while taking her first sip of coffee. She had 37 unread messages, including including credit applications submitted by employees over the weekend. Each one came in different formats—some missing signatures, others incomplete, and one without any attachments.
As she tried to sort through the mess, one of the employees approached her desk:
— “Have you reviewed my credit application yet? It’s urgent.”
Andrea could barely manage a smile. The truth was, she hadn’t even finished verifying the data from last Friday.
This scenario is more common than it seems. Managing credit applications manually not only consumes valuable time but also opens the door to human errors, delays, and employee frustration.
But it doesn’t have to be that way.
 Img 1
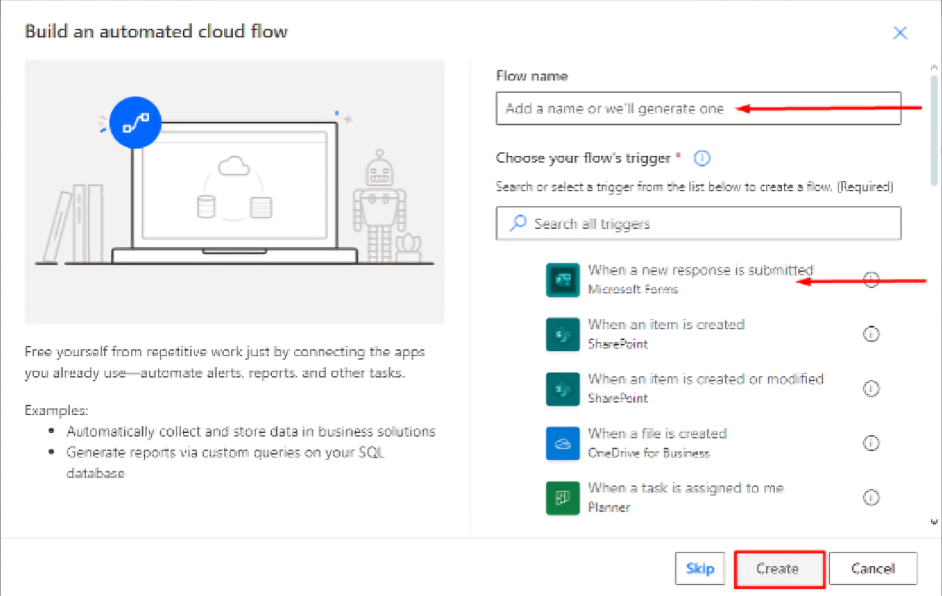
Next, you need to give the flow a name and select the trigger, which in this case will be “When a new response is submitted” (Img 2).
Img 2
Next, the flow and its connections will be detailed:
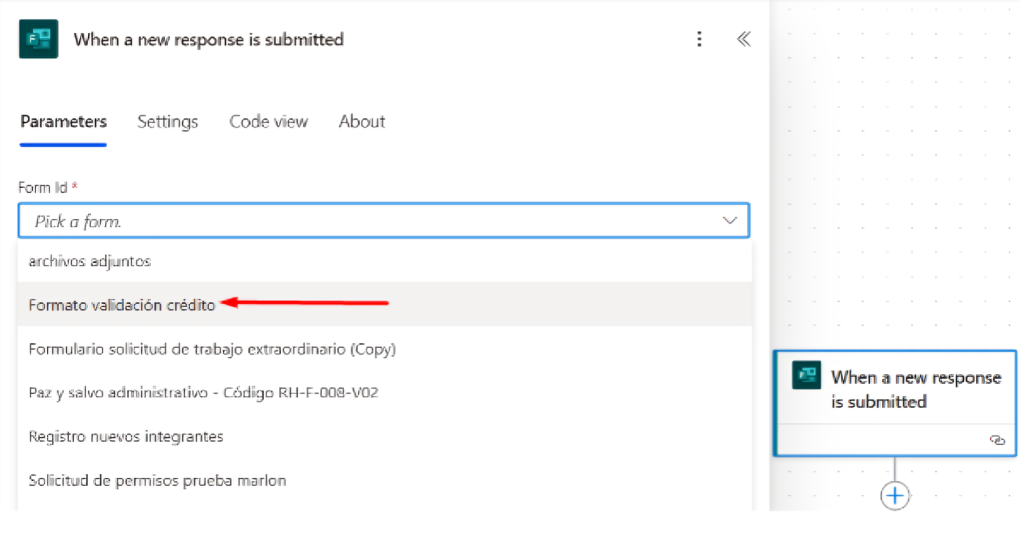
1.1. The flow starts with a trigger from Forms. From the automatically loaded options, the “Form Id” corresponding to the “Credit Validation Form” was selected from the list of all forms created by the user who designed the flow (Img 3).
Img 3
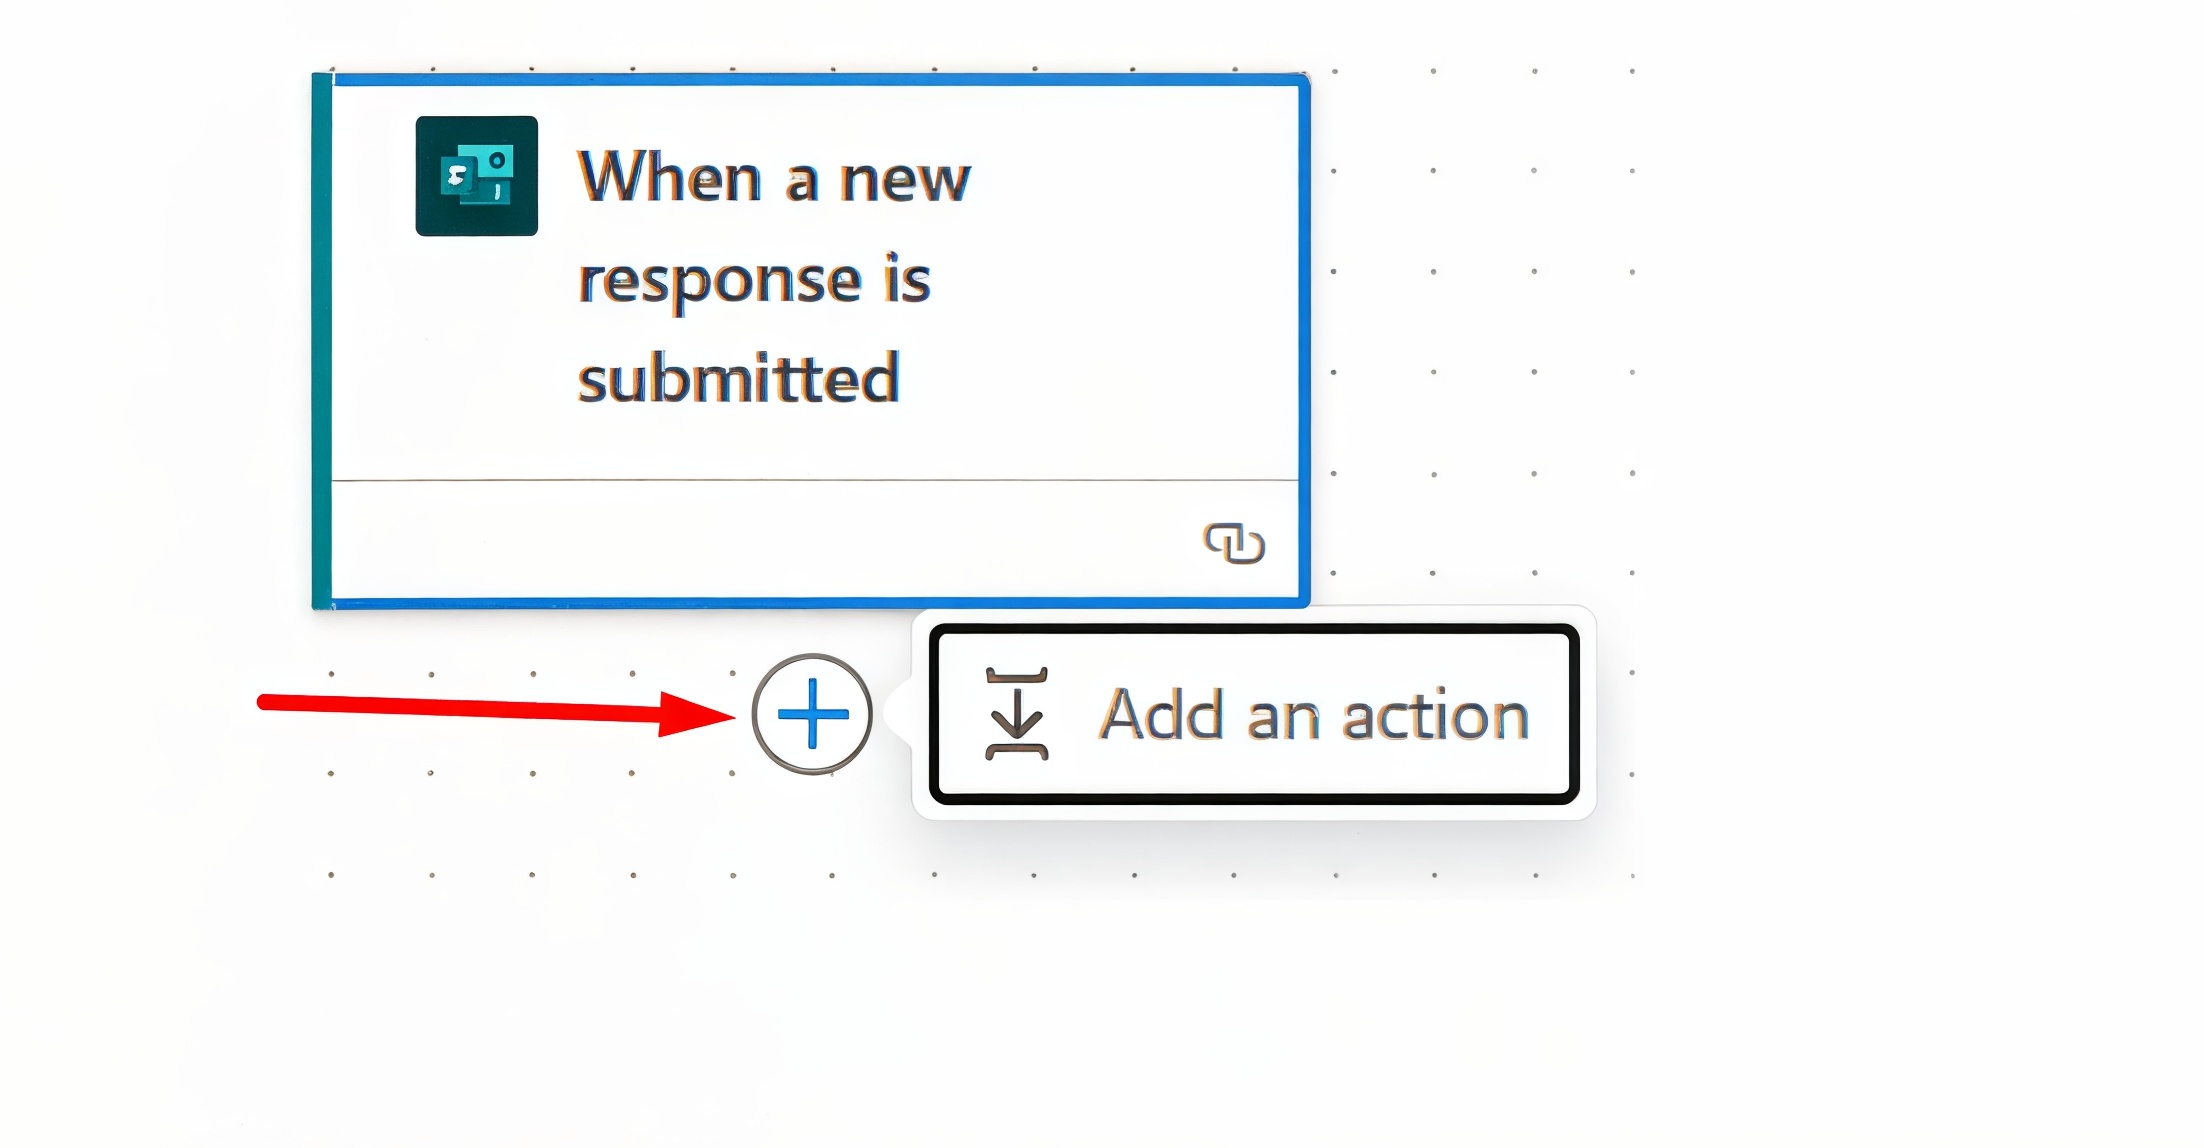
To continue building the flow, you need to add a new action by clicking the + icon. This step must be repeated each time you want to add a new action (Img 4).
Img 4
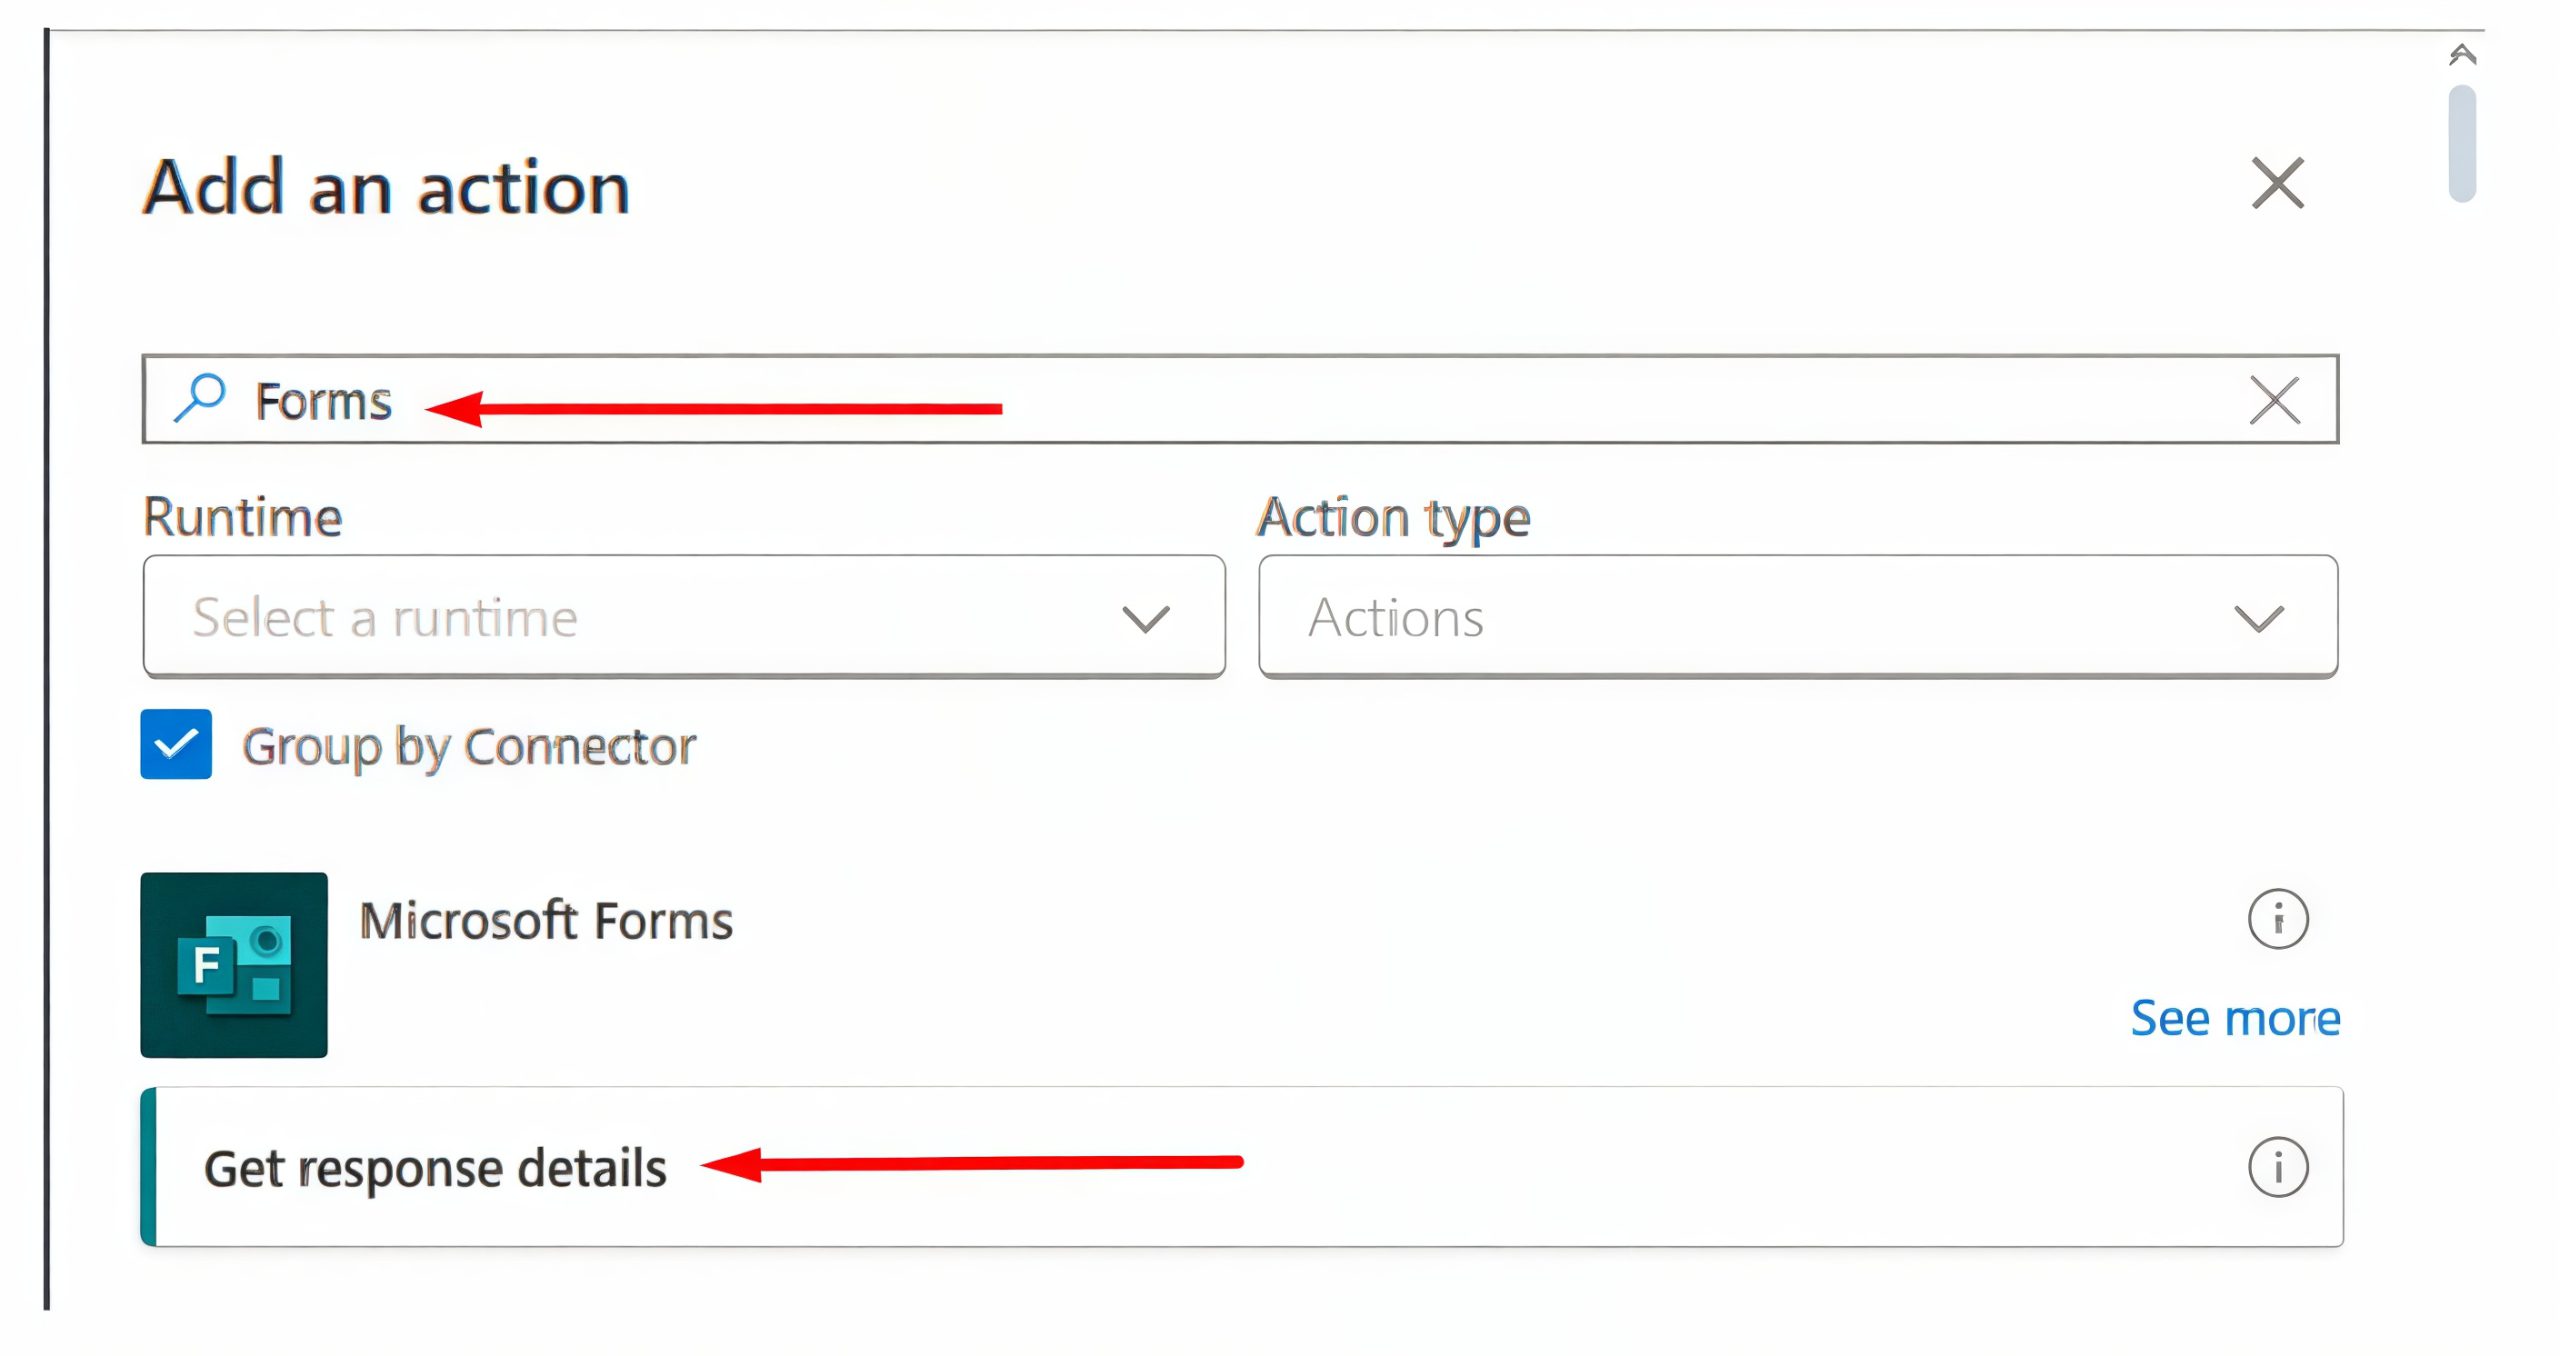
In the search bar, you need to type the application that the new action belongs to. For this step, it will be Forms. Then, select the corresponding option (Img 5).
Img 5
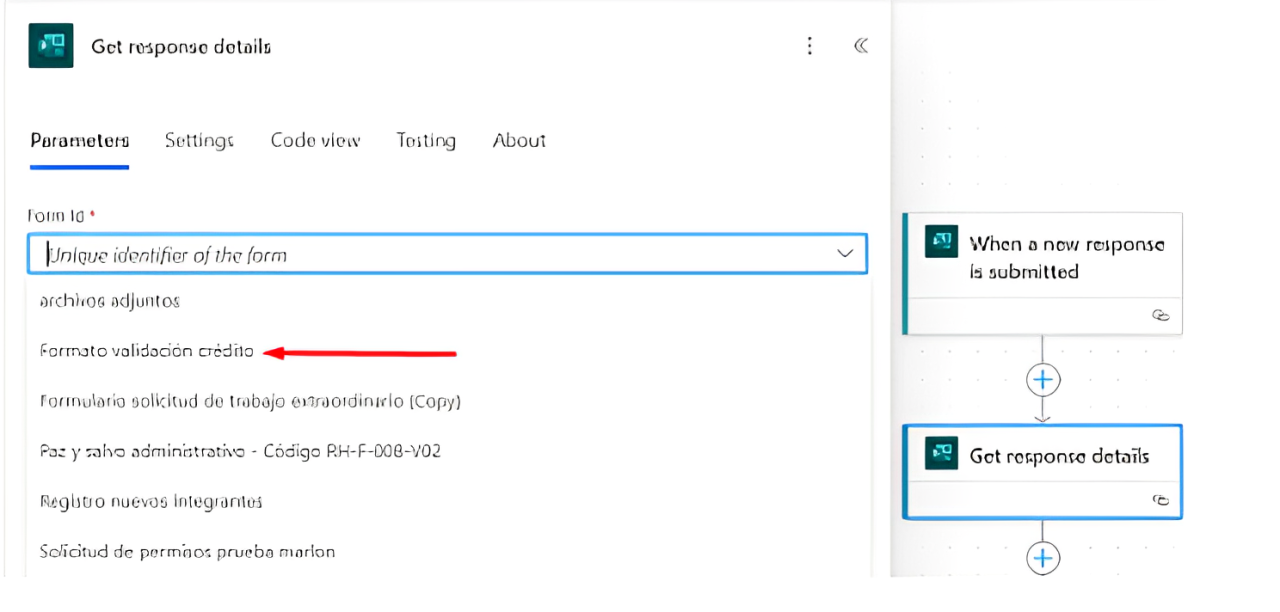
1.2. The next action added to the flow is Get response details. Here, you also need to select the Form Id corresponding to the Credit Validation Form (Img 6). At this step, all the forms created by the user will appear; then, select Response Id from the dynamic content (Img 7). This allows the flow to retrieve the details of the responses to all the questions in the form.
Img 6
Img 7
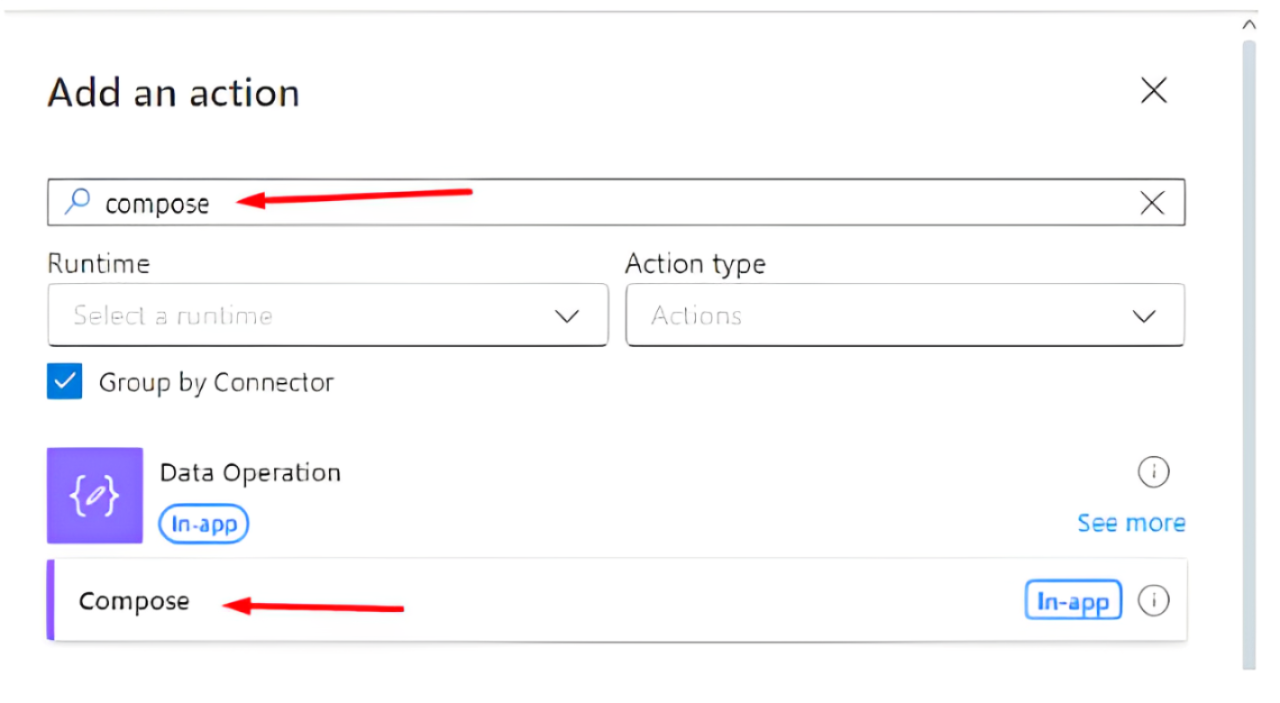
1.3. The third action is Compose, where a unique ID will be generated and stored to be used when creating rows in our Excel table.
In the action search bar, type the keyword “compose” and select the Compose option (Img 8).
Img 8
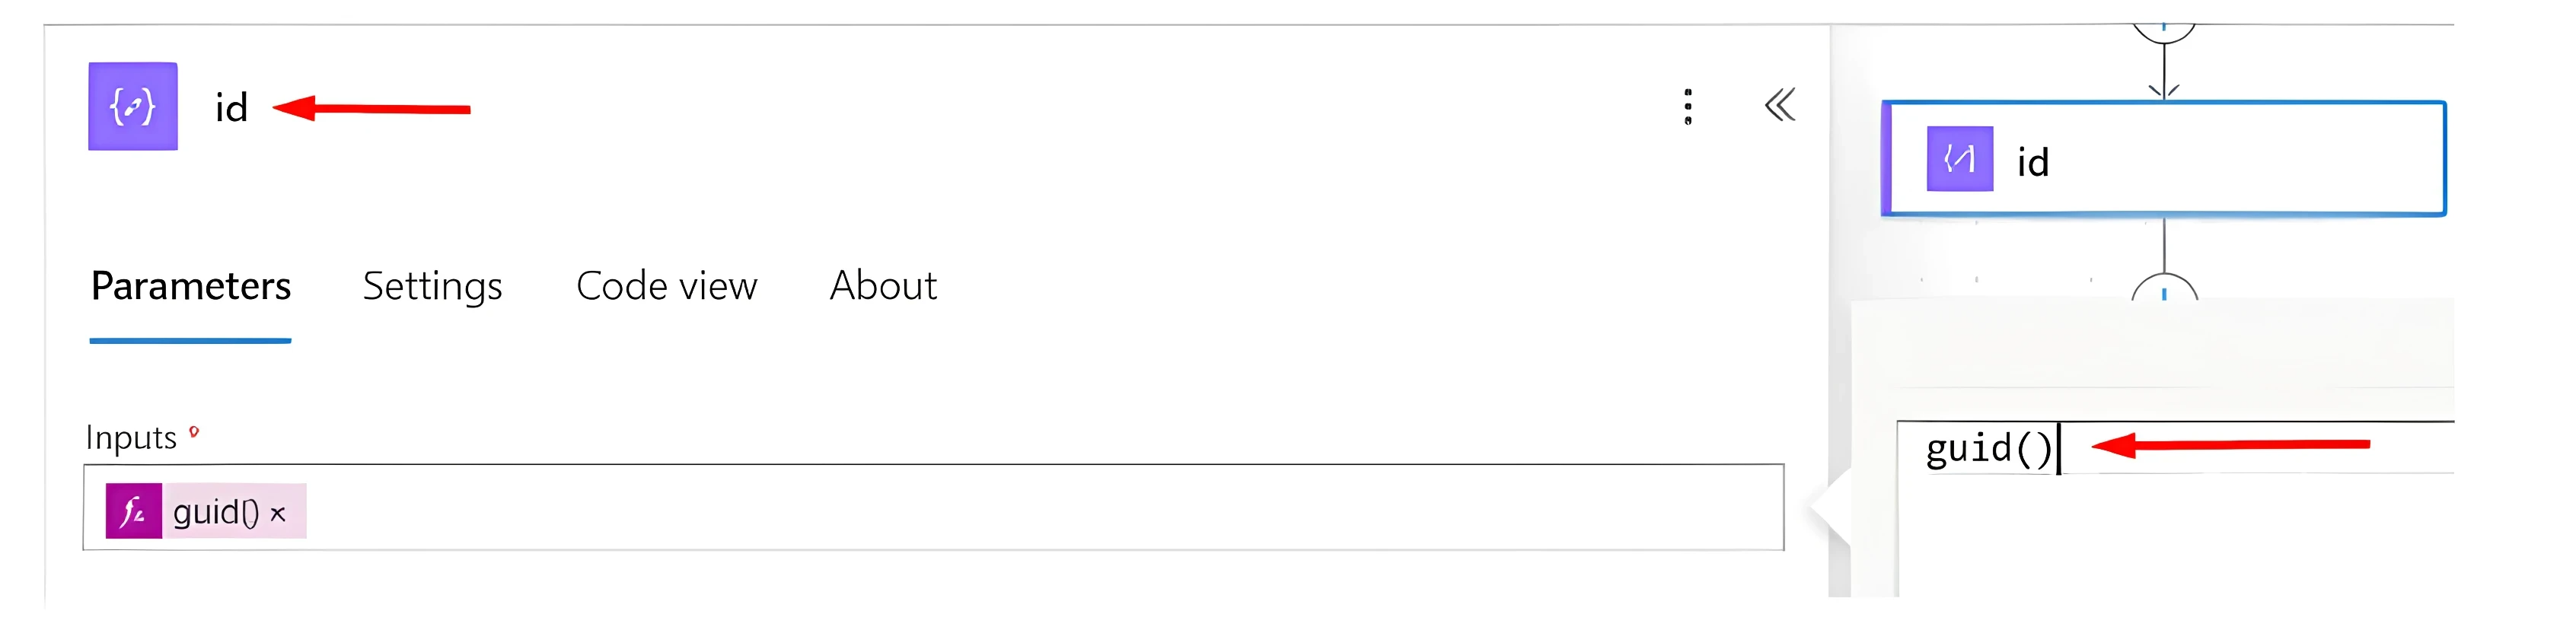
The action name is changed to “id”. To create the unique ID, click on the Fx option and type: guid() (Img 9).
Img 9
1.4. Before continuing with the flow, we need to create an Excel document that includes a formatted table. It must primarily contain the id field and the fields from the form.
Once the Excel file is created, we will save it in a SharePoint site. The fourth action to add is Add a row into a table, which will add a row to the Excel table created earlier (Img 10).
Img 10
In Location, select the SharePoint site where the Excel file is saved. In Document Library, choose the library where the file is stored. In File, browse and select the file. In Table, select the table created in the Excel file (Img 11).
From the available advanced parameters, add all the fields except for the DateTime Format field (if it appears). Fill the fields dynamically with the information from the form, and fill the id field with the output from the Compose action named “id” that we created earlier (Img 12).
Img 11
Img 12
1.5. The fifth action is Compose, where we will place the HTML code of the two formats.
In the action search bar, type the keyword “Compose” and select the Compose option (Img 13).
Img 13
Once the action is added, rename the action, paste the HTML code, and fill the fields dynamically with information from the form (Img 14).
Img 14
For creating the formats, the following site is recommended, you can design the formats from scratch or upload an existing Word or PDF file. It is advisable to work with tables.
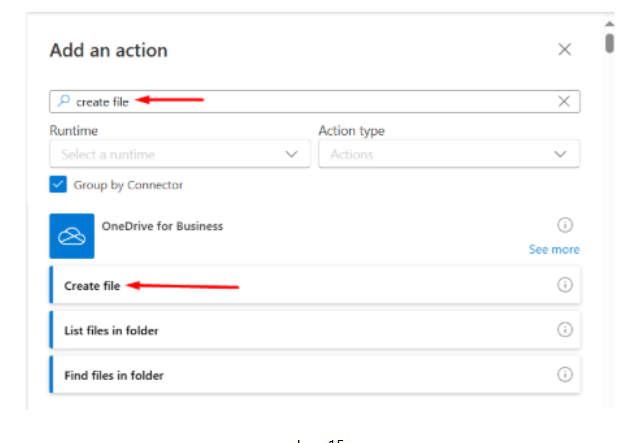
1.6. The next step is to create a file with the HTML code. For this, we will use the “Create file” action from OneDrive for Business.
In the action search bar, type the keyword “create file” and select the Create file option (Img 15).
Img 15
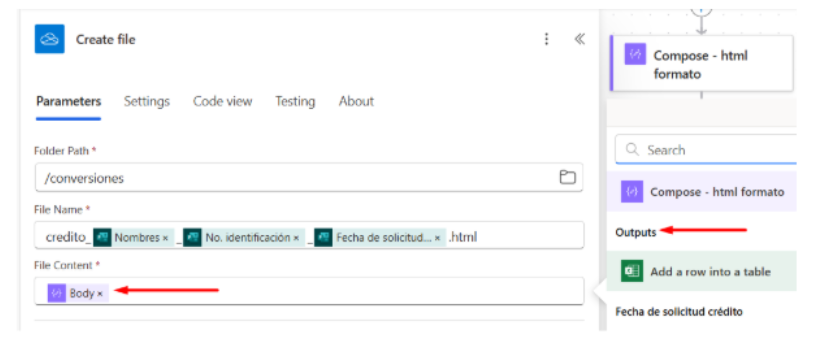
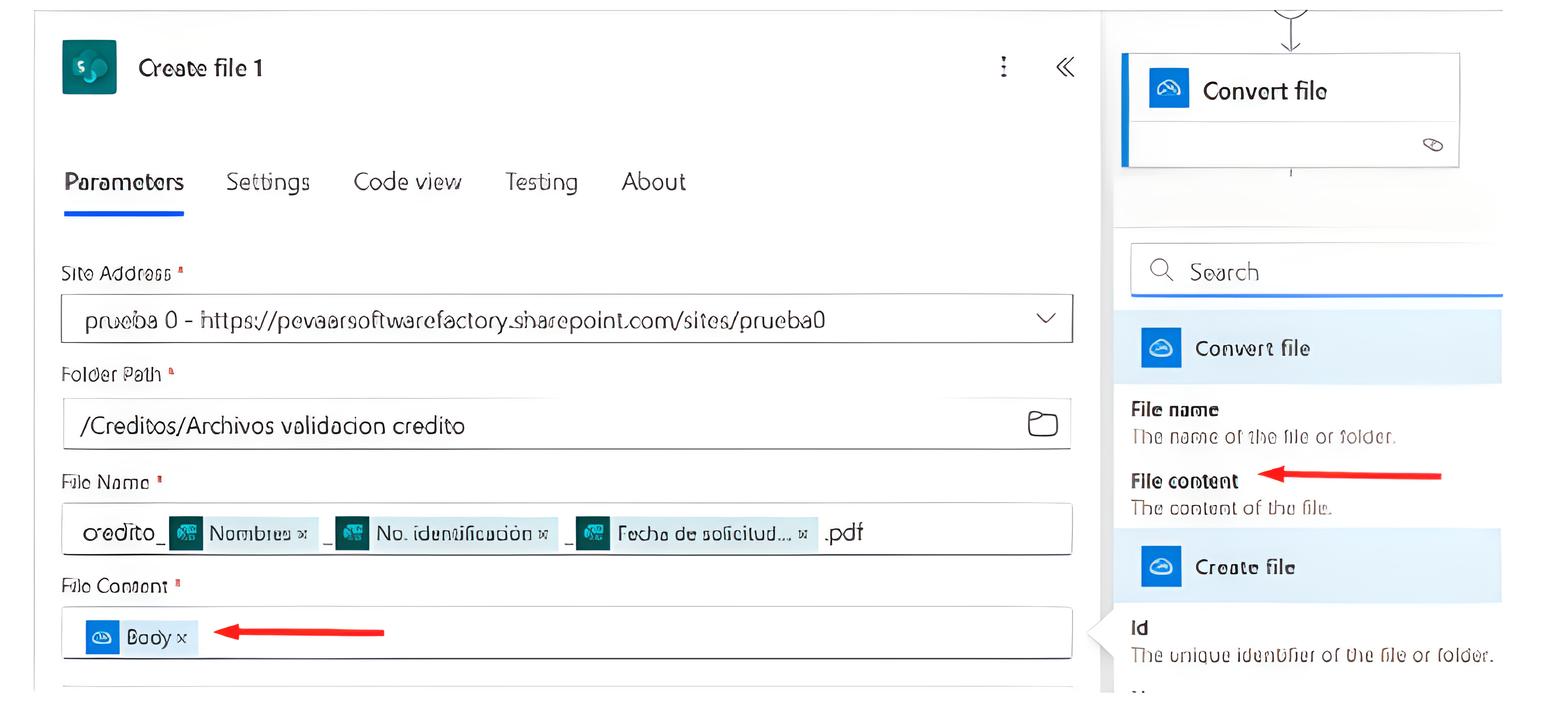
In Folder Path, select the folder where you want to save the file. In File name, enter a descriptive name including the employee’s name, their ID number, the application date, and the .html extension. In File content, select the output from the previous Compose action (Img 16).
Img 16
1.7. Now, the HTML file needs to be converted to PDF. For this, we will use the Convert file action from OneDrive for Business.
In the action search bar, type the keyword “convert file” and select the Convert file option (Img 17).
Img 17
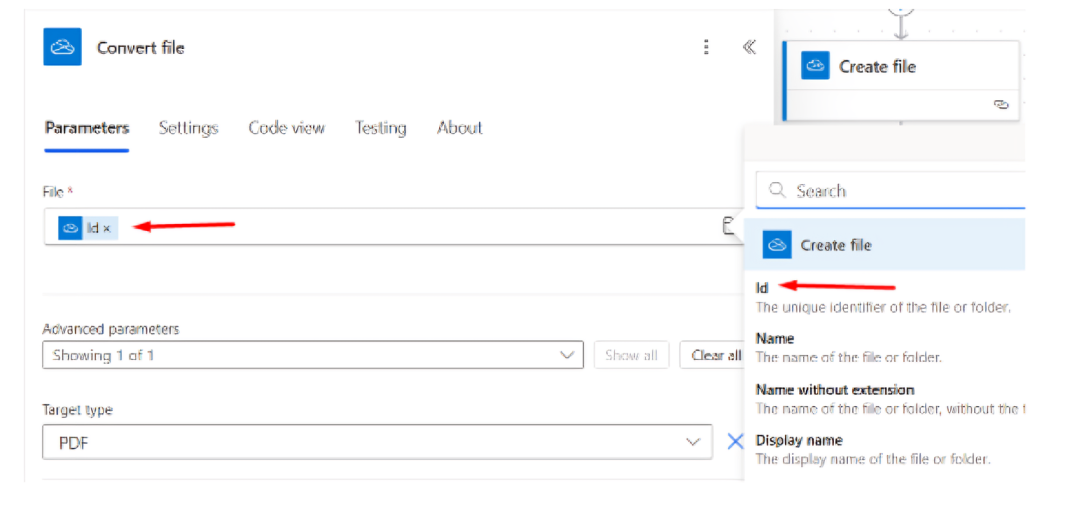
In File, select the ID of the file created using the previous Create file action. In Target type, leave it as PDF (Img 18).
Img 18
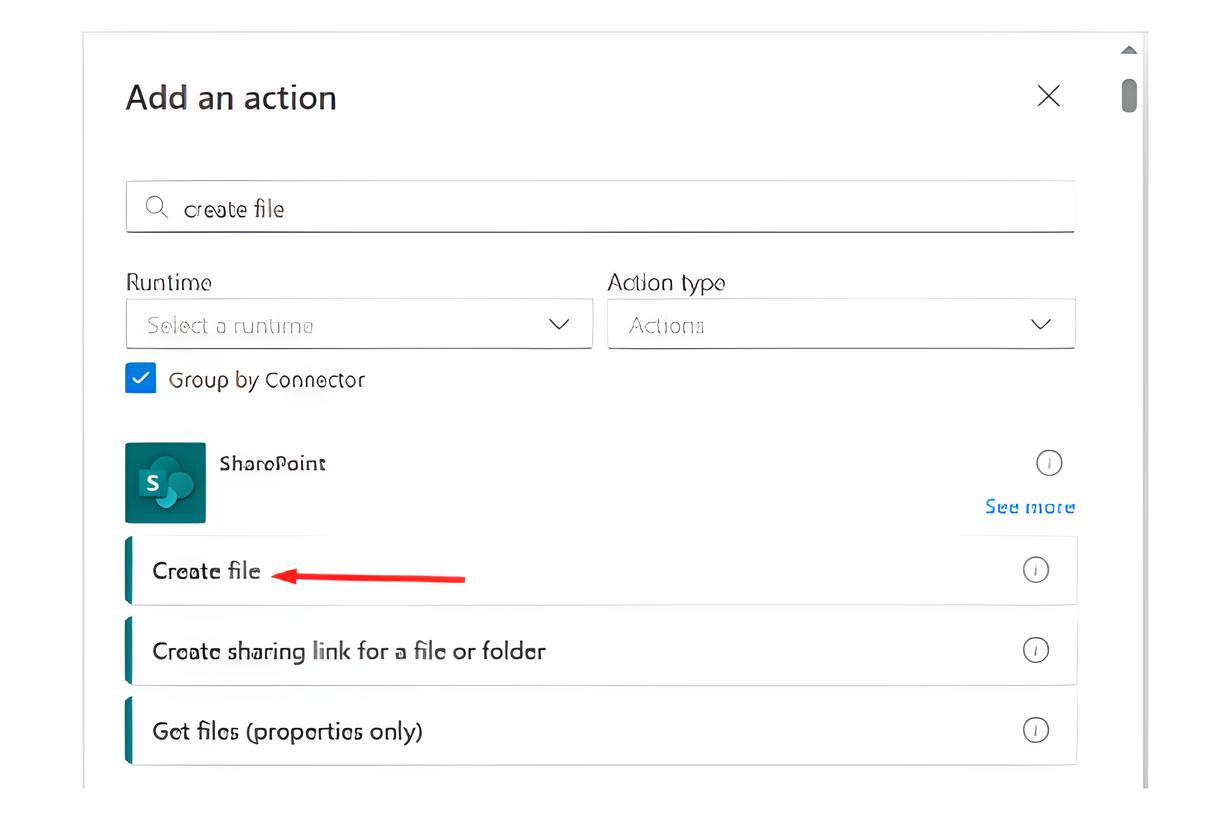
1.8. The final file needs to be saved in a SharePoint site. To do this, we will use the Create file action from SharePoint.
In the action search bar, type the keyword “create file” and select the Create file option (Img 19).
Img 19
Select the SharePoint site where you want to save the PDF. In Folder Path, choose the folder where the file should be stored. In File name, enter a descriptive name including the employee’s name, their ID number, the application date, and the .pdf extension. In File content, select the output from the previous Convert file action (Img 20).
Img 20
1.9. The final action is to send an email to the employee, notifying them that they must download, print, and sign the attached file. To do this, we will use the Send an email action from the Office 365 Outlook connector group.
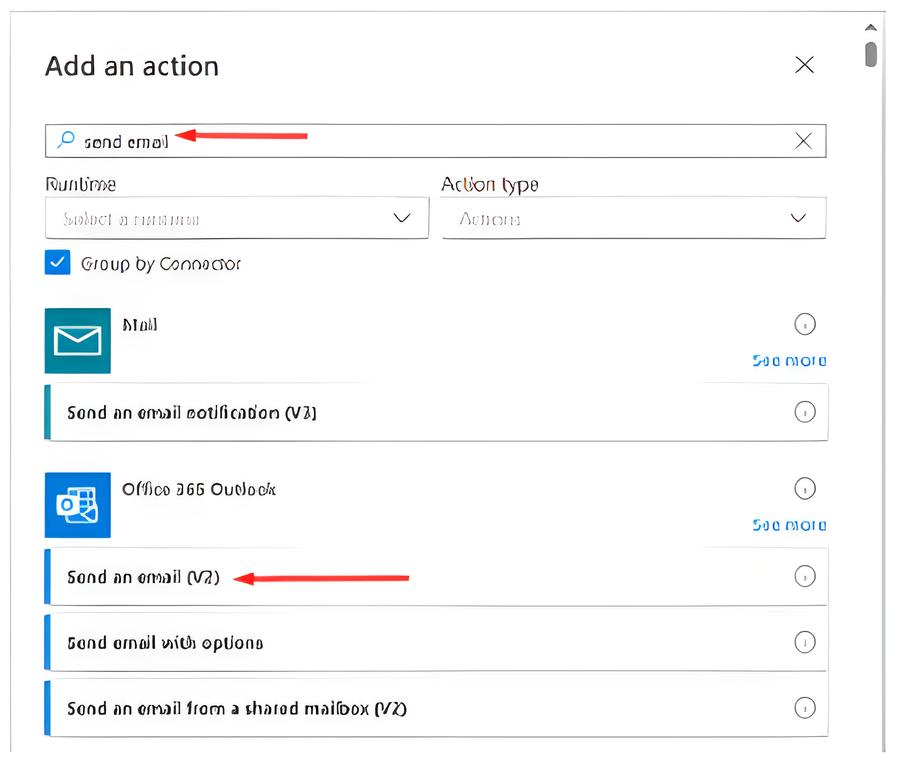
In the action search bar, type the keyword “send email” and select the Send email option (Img 21)
Img 21
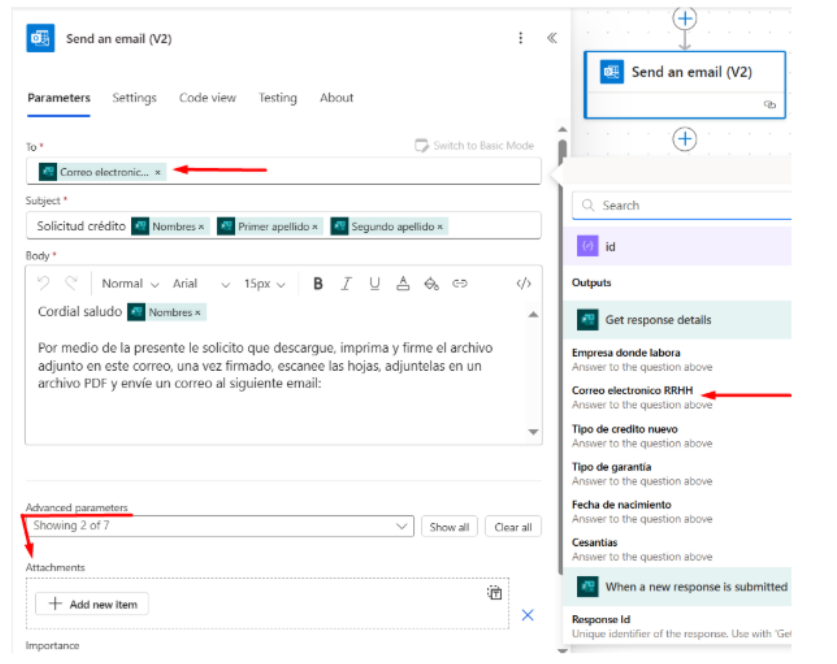
The email will be sent to the Human Resources contact. Switch to advanced mode, then select the employee’s email address dynamically from Forms. Then, add a subject and body to the email, and include the dynamic parameter Attachments (Img 22)
Img 22
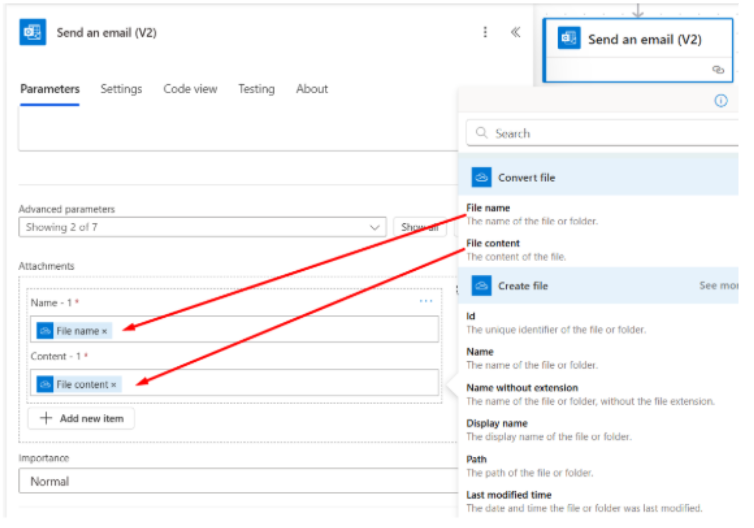
We will add a new item in the Attachments parameter. Then, for the attachment name, Insert dynamically the name of the file previously converted to PDF, and do the same for the attachment content (Img 23)
Img 23
Automating the employee credit application process not only reduced time and errors but also freed up the HR team to focus on more strategic tasks.
Using tools like Power Automate showed us that you don’t need to invest in complex solutions to achieve meaningful change. Sometimes, what you need is already within reach — you just need to know how to connect the dots.
Img 1
Next, you need to give the flow a name and select the trigger, which in this case will be “When a new response is submitted” (Img 2).
Img 2
Next, the flow and its connections will be detailed:
1.1. The flow starts with a trigger from Forms. From the automatically loaded options, the “Form Id” corresponding to the “Credit Validation Form” was selected from the list of all forms created by the user who designed the flow (Img 3).
Img 3
To continue building the flow, you need to add a new action by clicking the + icon. This step must be repeated each time you want to add a new action (Img 4).
Img 4
In the search bar, you need to type the application that the new action belongs to. For this step, it will be Forms. Then, select the corresponding option (Img 5).
Img 5
1.2. The next action added to the flow is Get response details. Here, you also need to select the Form Id corresponding to the Credit Validation Form (Img 6). At this step, all the forms created by the user will appear; then, select Response Id from the dynamic content (Img 7). This allows the flow to retrieve the details of the responses to all the questions in the form.
Img 6
Img 7
1.3. The third action is Compose, where a unique ID will be generated and stored to be used when creating rows in our Excel table.
In the action search bar, type the keyword “compose” and select the Compose option (Img 8).
Img 8
The action name is changed to “id”. To create the unique ID, click on the Fx option and type: guid() (Img 9).
Img 9
1.4. Before continuing with the flow, we need to create an Excel document that includes a formatted table. It must primarily contain the id field and the fields from the form.
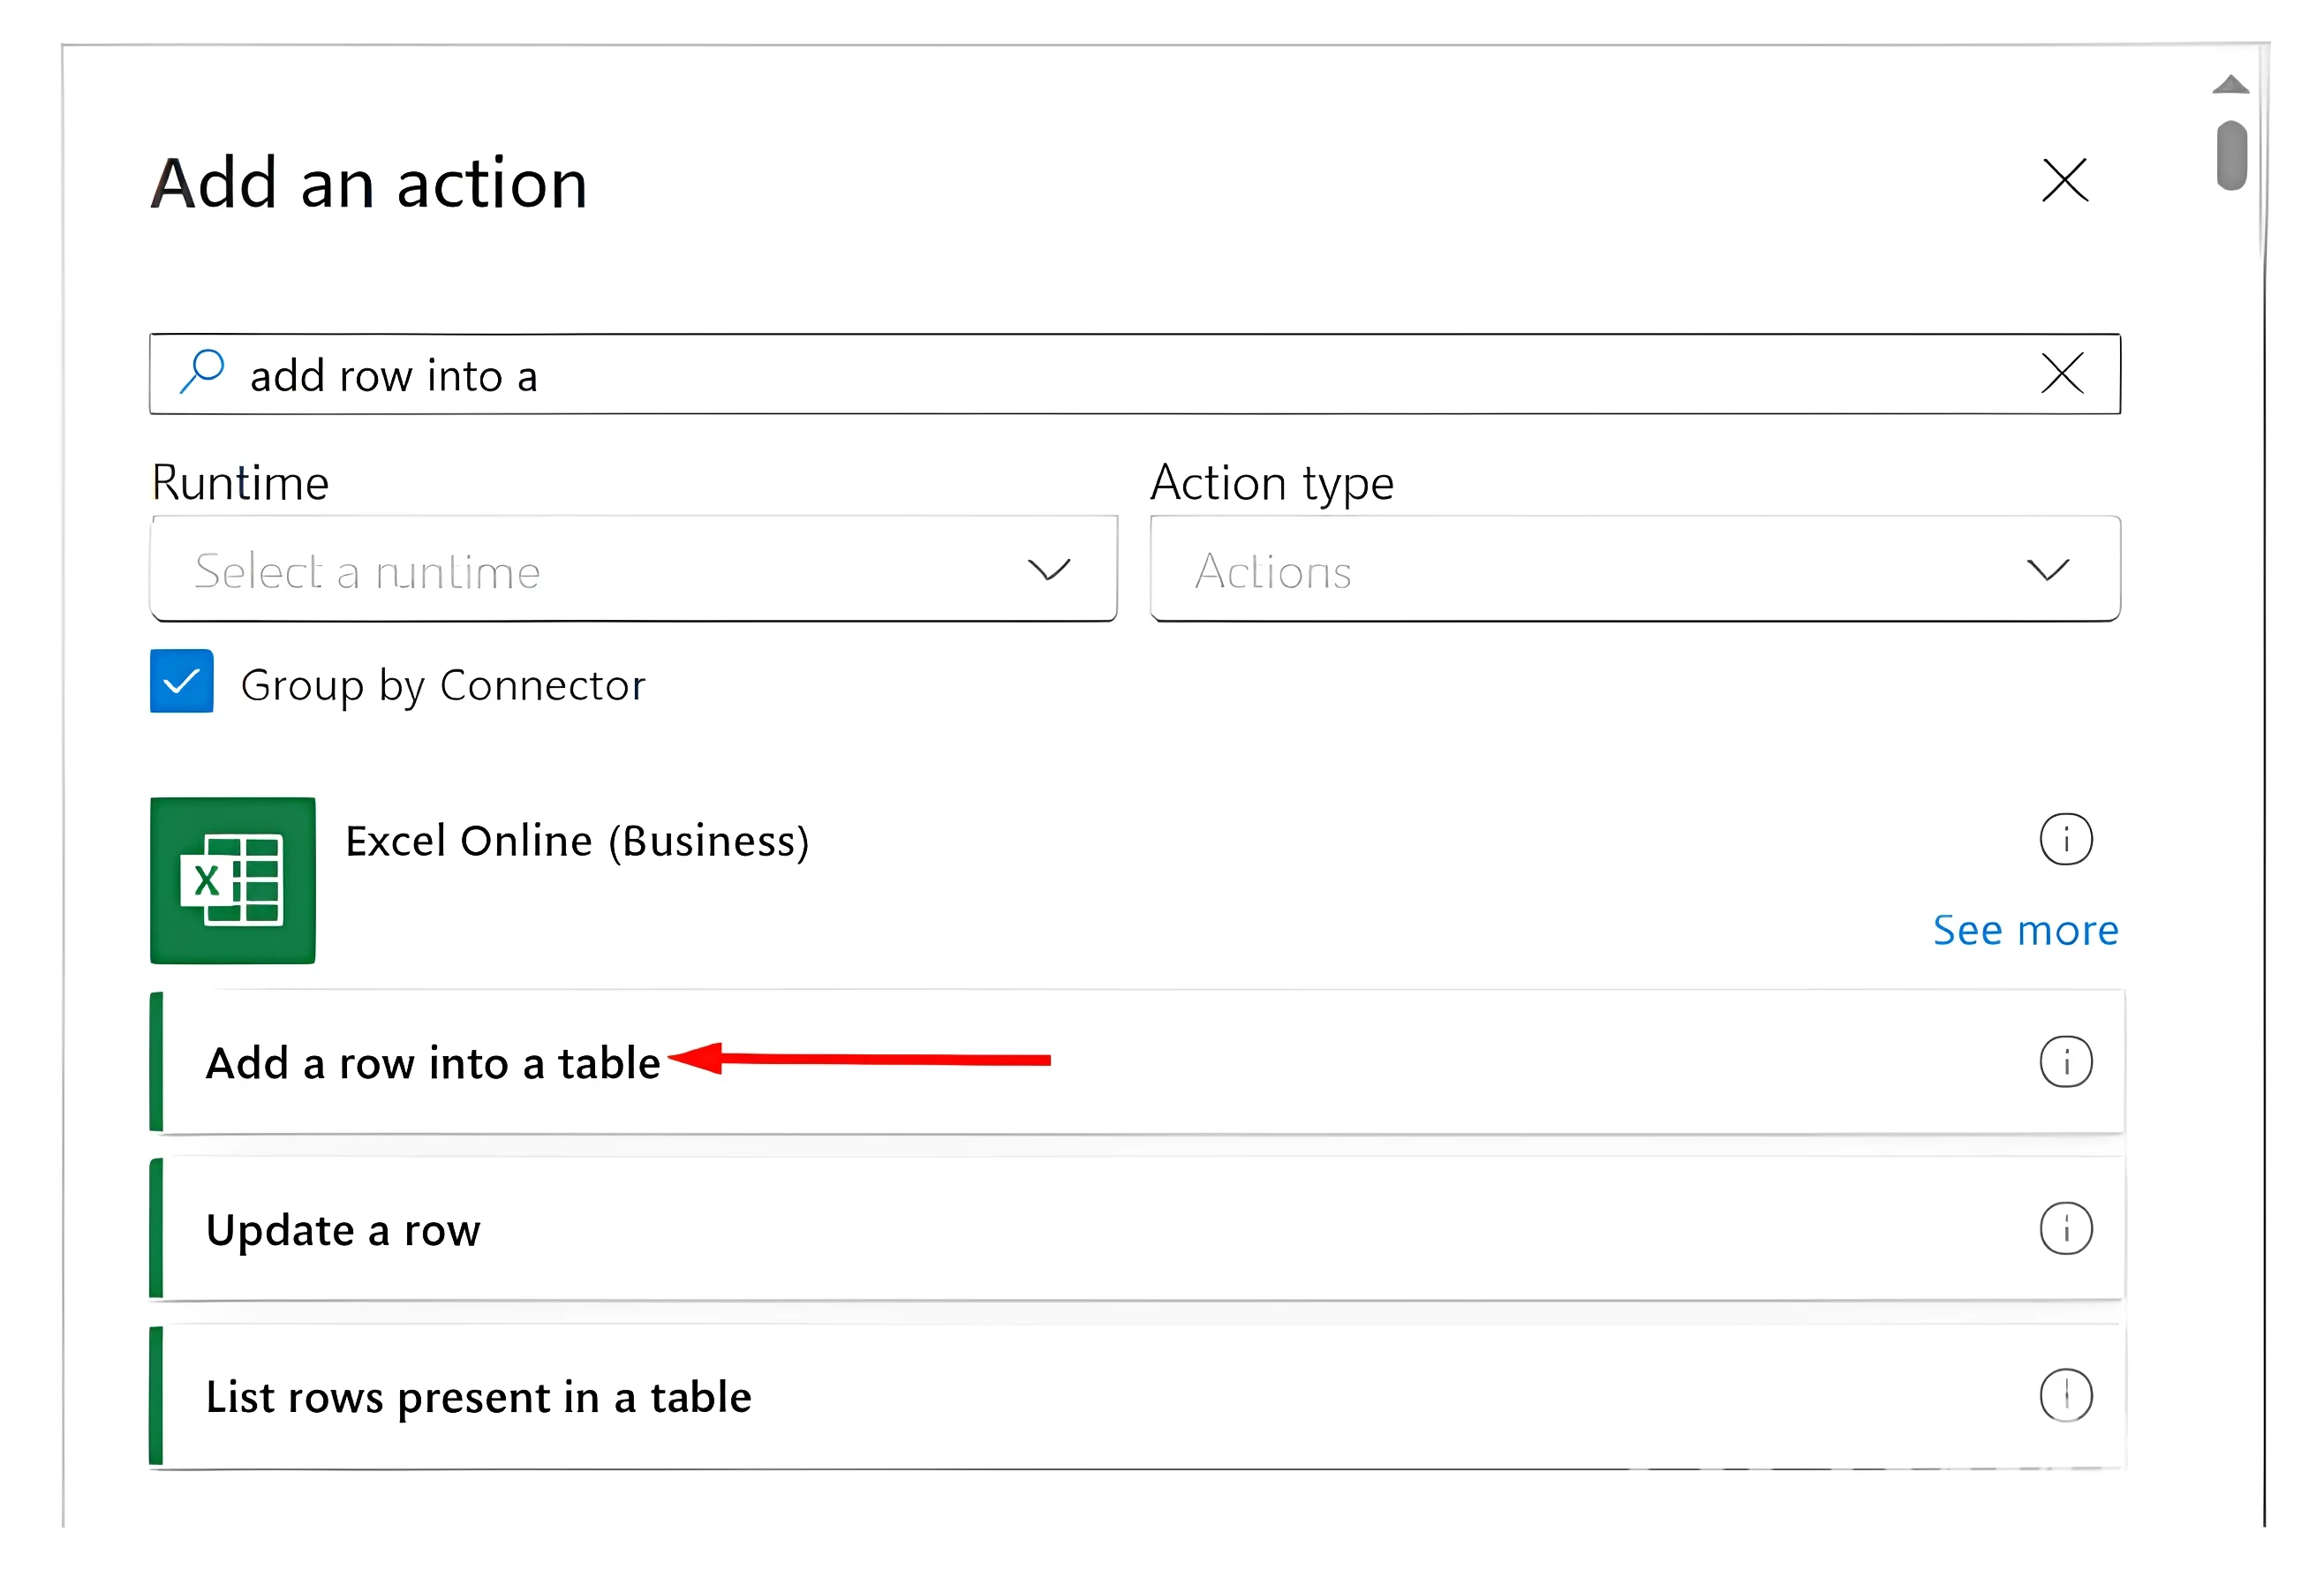
Once the Excel file is created, we will save it in a SharePoint site. The fourth action to add is Add a row into a table, which will add a row to the Excel table created earlier (Img 10).
Img 10
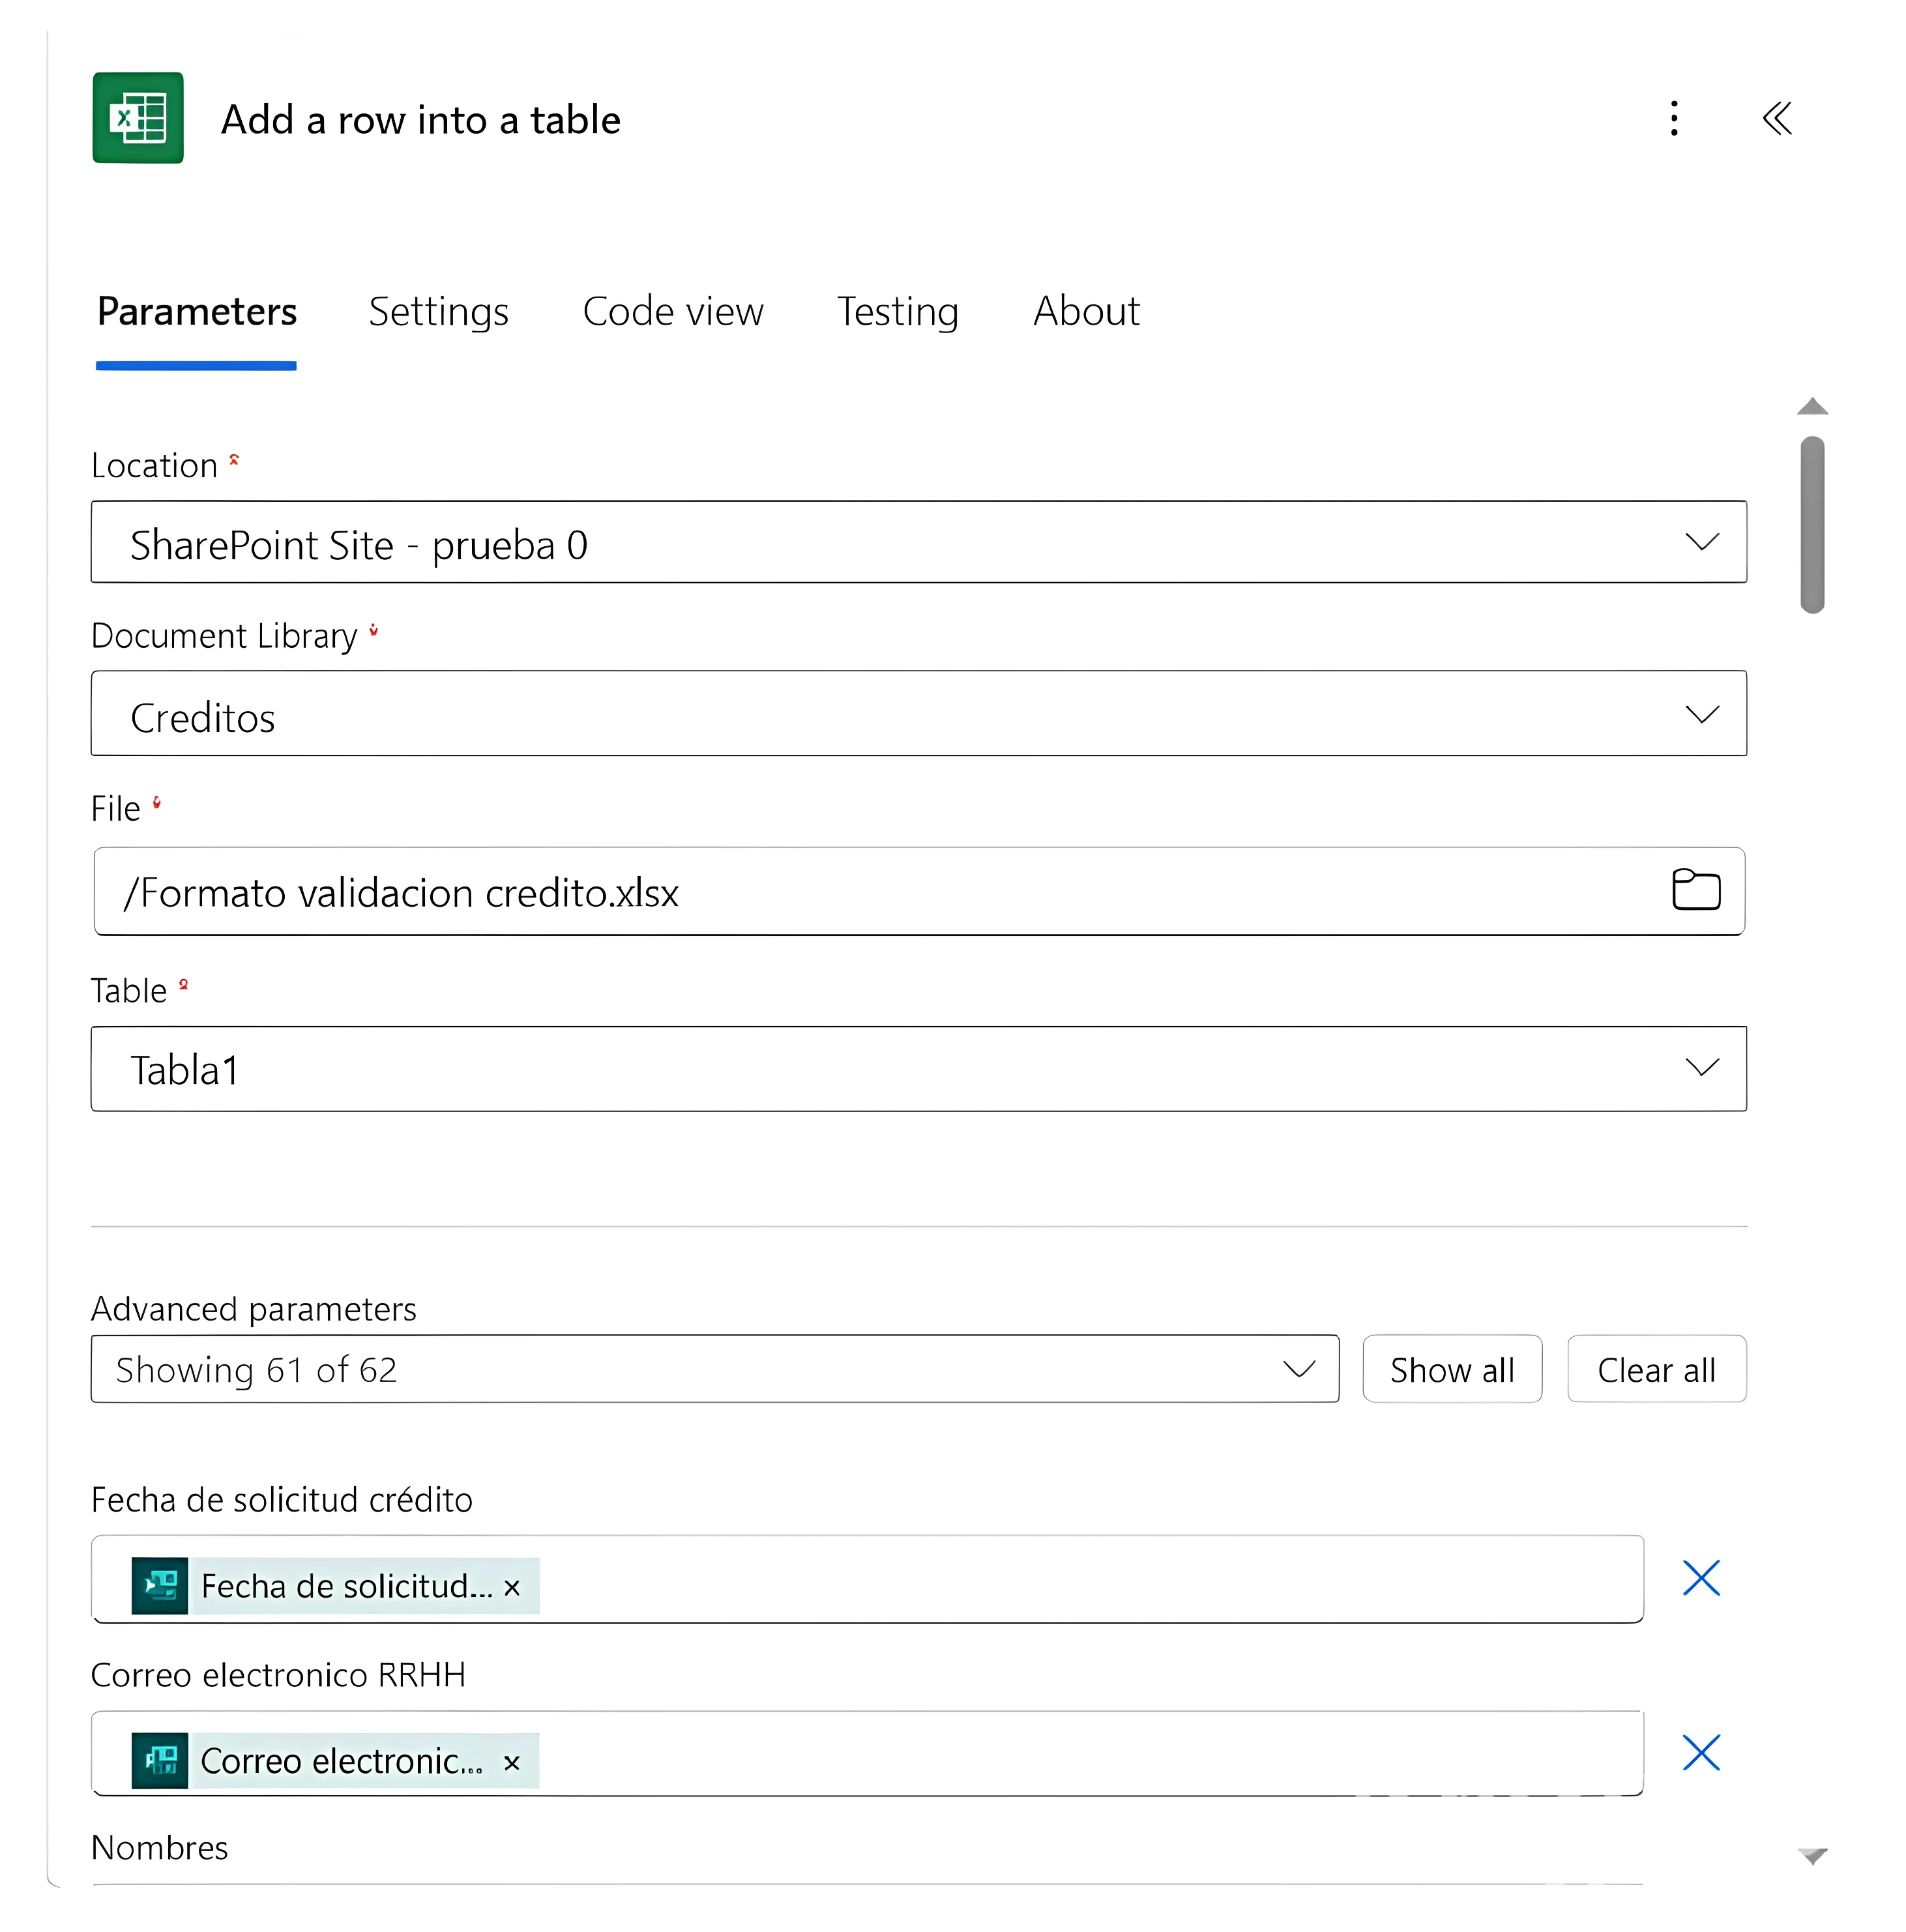
In Location, select the SharePoint site where the Excel file is saved. In Document Library, choose the library where the file is stored. In File, browse and select the file. In Table, select the table created in the Excel file (Img 11).
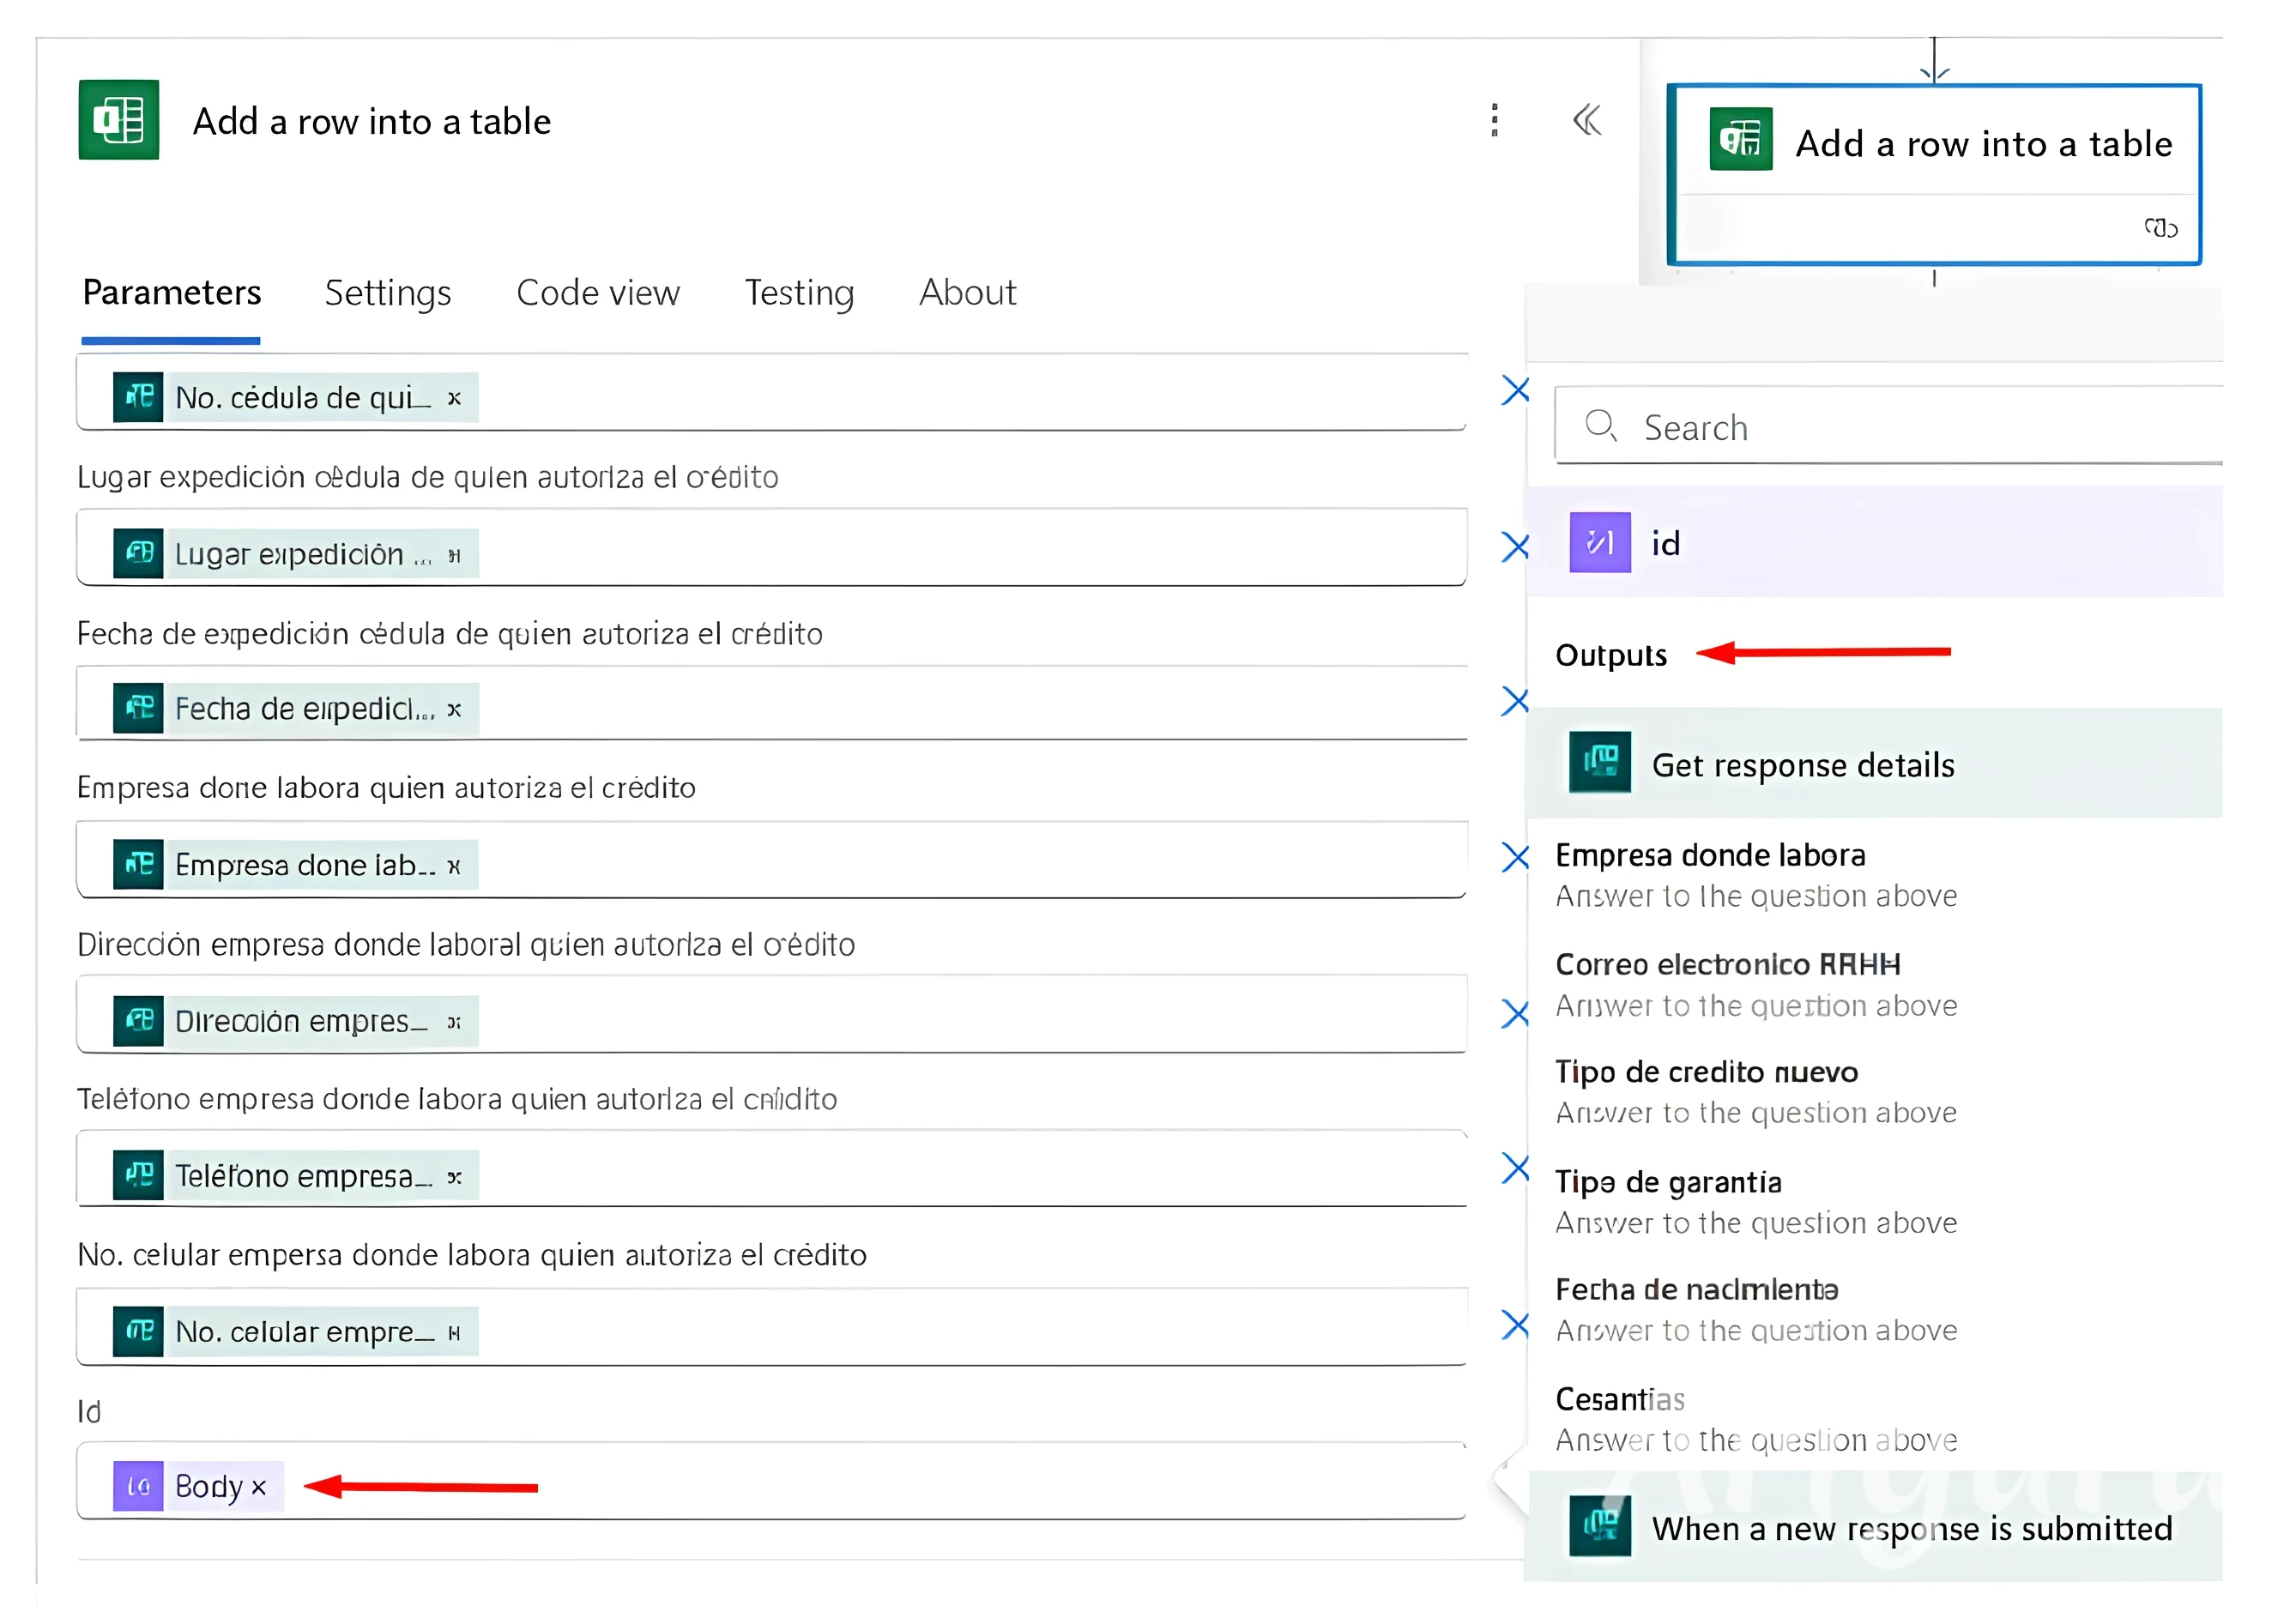
From the available advanced parameters, add all the fields except for the DateTime Format field (if it appears). Fill the fields dynamically with the information from the form, and fill the id field with the output from the Compose action named “id” that we created earlier (Img 12).
Img 11
Img 12
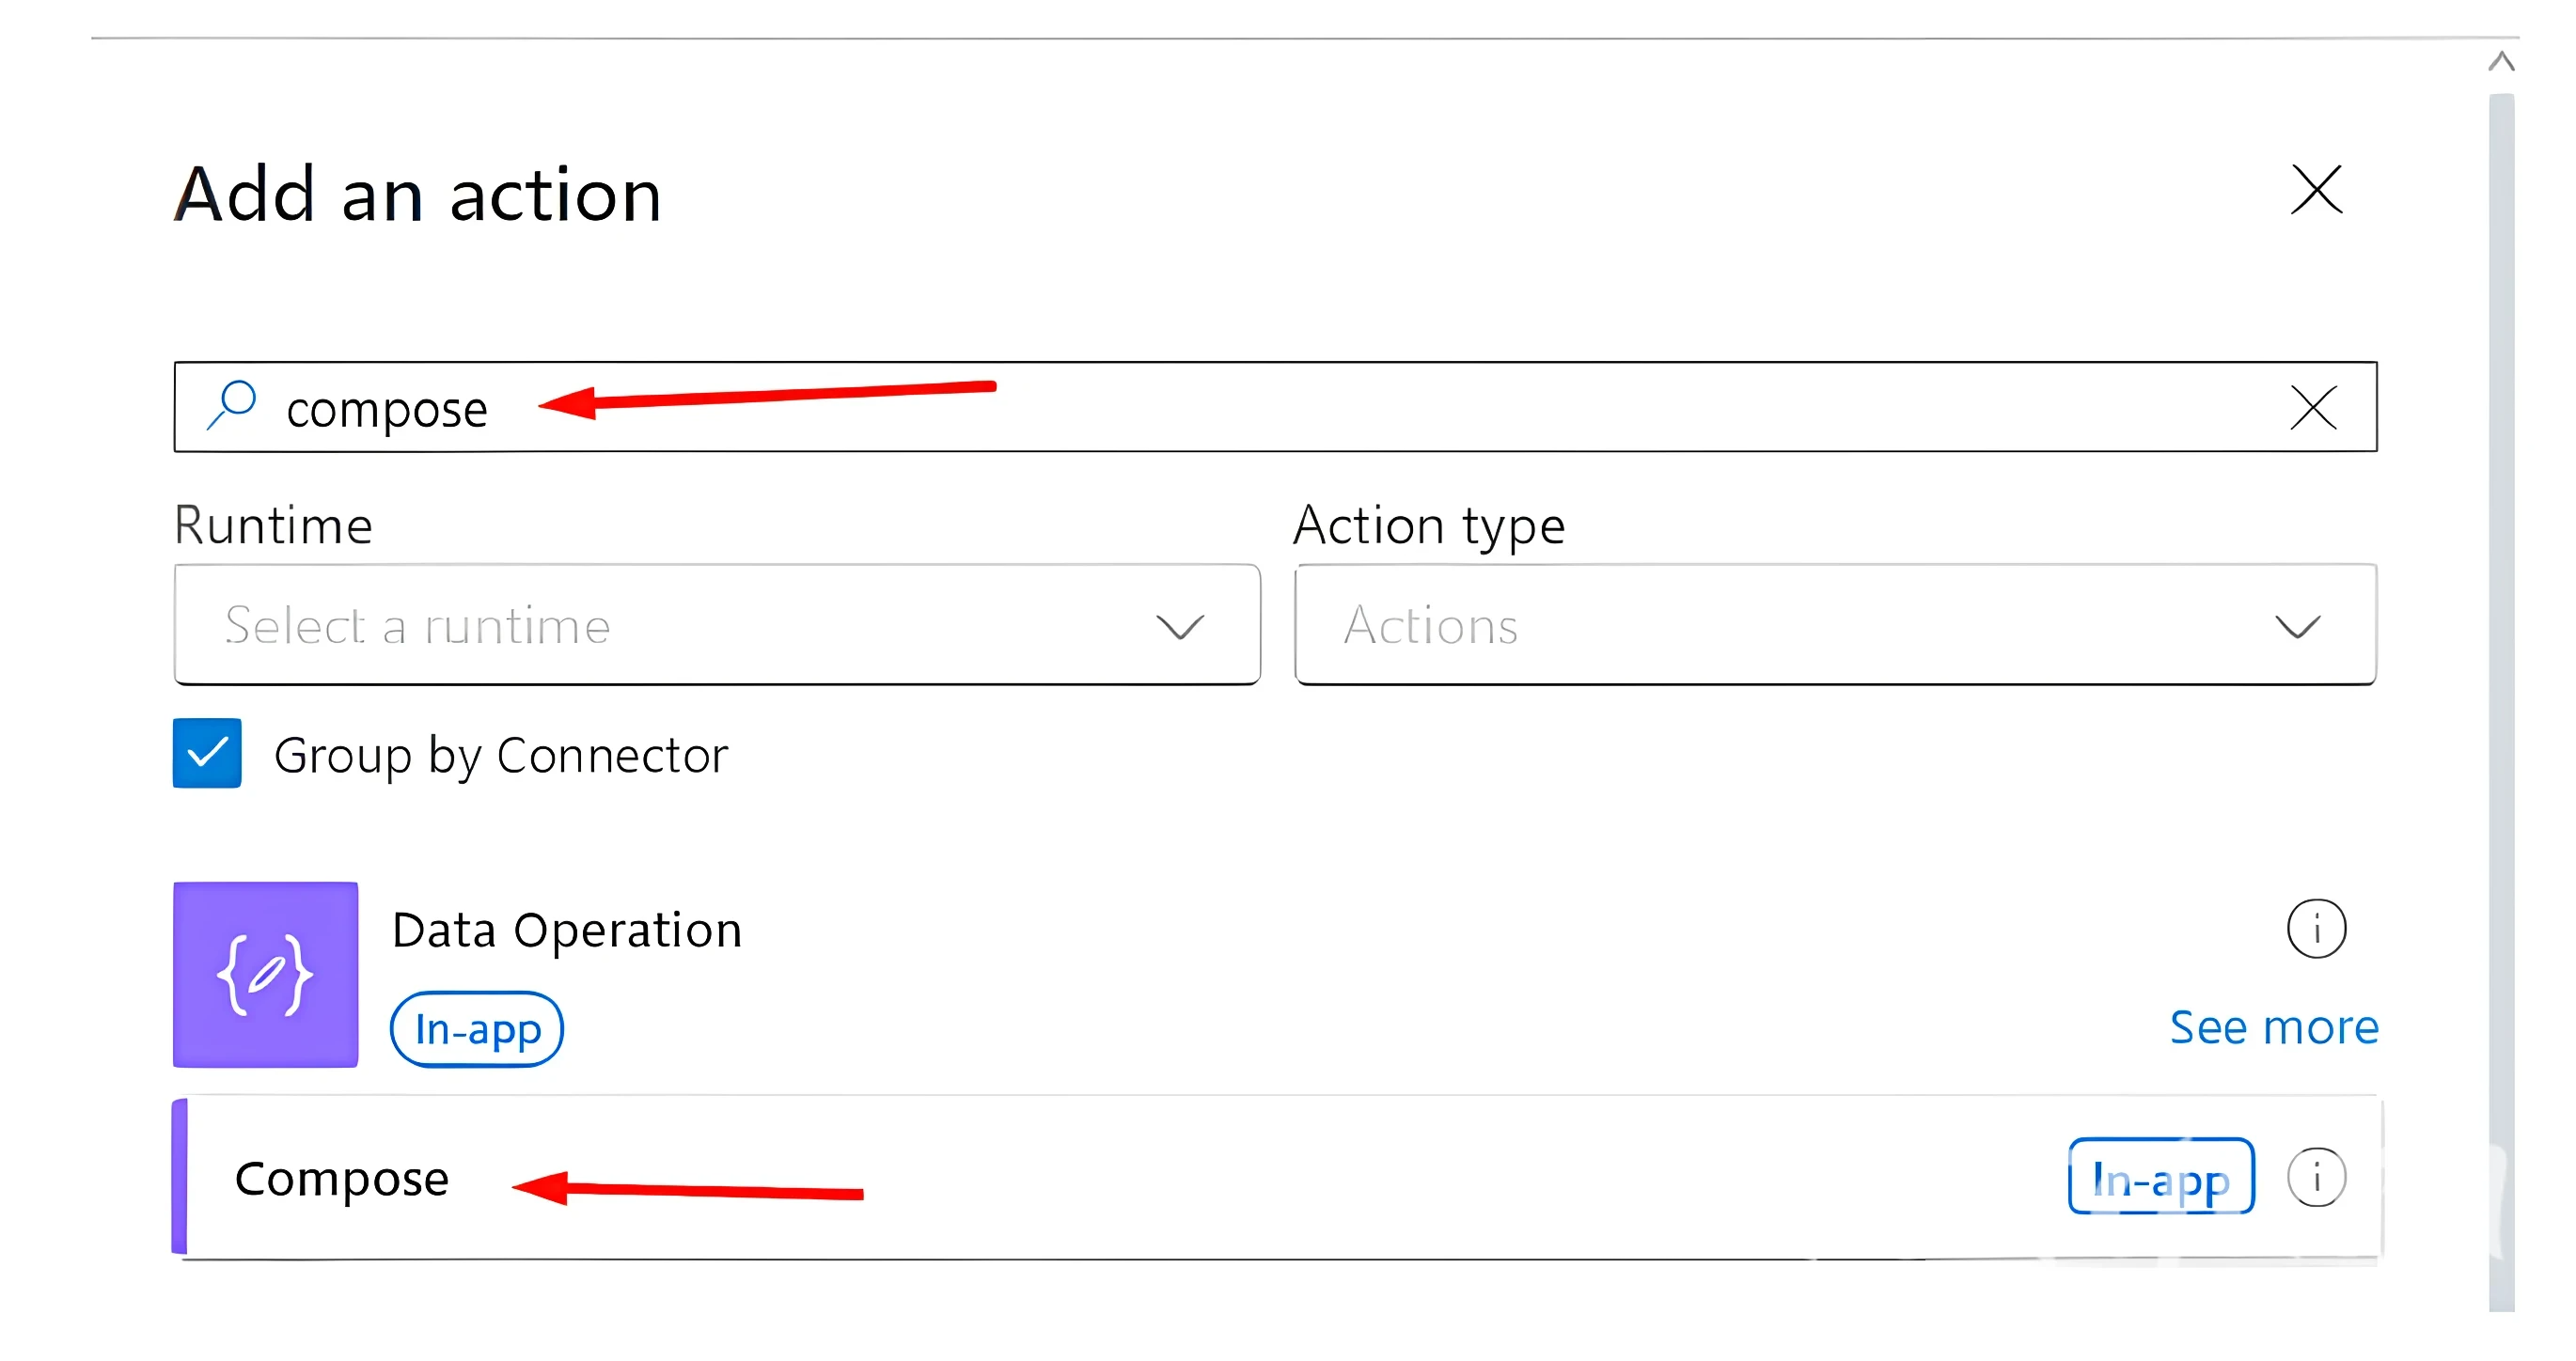
1.5. The fifth action is Compose, where we will place the HTML code of the two formats.
In the action search bar, type the keyword “Compose” and select the Compose option (Img 13).
Img 13
Once the action is added, rename the action, paste the HTML code, and fill the fields dynamically with information from the form (Img 14).
Img 14
For creating the formats, the following site is recommended, you can design the formats from scratch or upload an existing Word or PDF file. It is advisable to work with tables.
1.6. The next step is to create a file with the HTML code. For this, we will use the “Create file” action from OneDrive for Business.
In the action search bar, type the keyword “create file” and select the Create file option (Img 15).
Img 15
In Folder Path, select the folder where you want to save the file. In File name, enter a descriptive name including the employee’s name, their ID number, the application date, and the .html extension. In File content, select the output from the previous Compose action (Img 16).
Img 16
1.7. Now, the HTML file needs to be converted to PDF. For this, we will use the Convert file action from OneDrive for Business.
In the action search bar, type the keyword “convert file” and select the Convert file option (Img 17).
Img 17
In File, select the ID of the file created using the previous Create file action. In Target type, leave it as PDF (Img 18).
Img 18
1.8. The final file needs to be saved in a SharePoint site. To do this, we will use the Create file action from SharePoint.
In the action search bar, type the keyword “create file” and select the Create file option (Img 19).
Img 19
Select the SharePoint site where you want to save the PDF. In Folder Path, choose the folder where the file should be stored. In File name, enter a descriptive name including the employee’s name, their ID number, the application date, and the .pdf extension. In File content, select the output from the previous Convert file action (Img 20).
Img 20
1.9. The final action is to send an email to the employee, notifying them that they must download, print, and sign the attached file. To do this, we will use the Send an email action from the Office 365 Outlook connector group.
In the action search bar, type the keyword “send email” and select the Send email option (Img 21)
Img 21
The email will be sent to the Human Resources contact. Switch to advanced mode, then select the employee’s email address dynamically from Forms. Then, add a subject and body to the email, and include the dynamic parameter Attachments (Img 22)
Img 22
We will add a new item in the Attachments parameter. Then, for the attachment name, Insert dynamically the name of the file previously converted to PDF, and do the same for the attachment content (Img 23)
Img 23
Automating the employee credit application process not only reduced time and errors but also freed up the HR team to focus on more strategic tasks.
Using tools like Power Automate showed us that you don’t need to invest in complex solutions to achieve meaningful change. Sometimes, what you need is already within reach — you just need to know how to connect the dots.
From frustration to efficiency: how we transformed the employee credit application.
Inspired by situations like Andrea’s, we decided to redesign the process from the ground up. The solution wasn’t hiring more staff or implementing costly external systems, but rather leveraging the power of the tools we already had at hand. That’s how the automated employee credit application flow was born—developed using Power Automate, a platform that connects forms, emails, and cloud files to make the process fast, standardized, and free from manual intervention at every step. In this blog, we’ll walk you through how we designed and implemented an automated employee credit application flow using Power Automate—a tool that transforms cumbersome processes into simple, secure, and efficient operations. Now that you know the problem we faced and how we solved it, it’s time to show you the step-by-step guide. Keep reading and discover how we did it! First, you need to access Power Automate (PA) from the Microsoft 365 apps. Once you are in the PA environment, click on “Create” and then select “Automated cloud flow” (Img 1).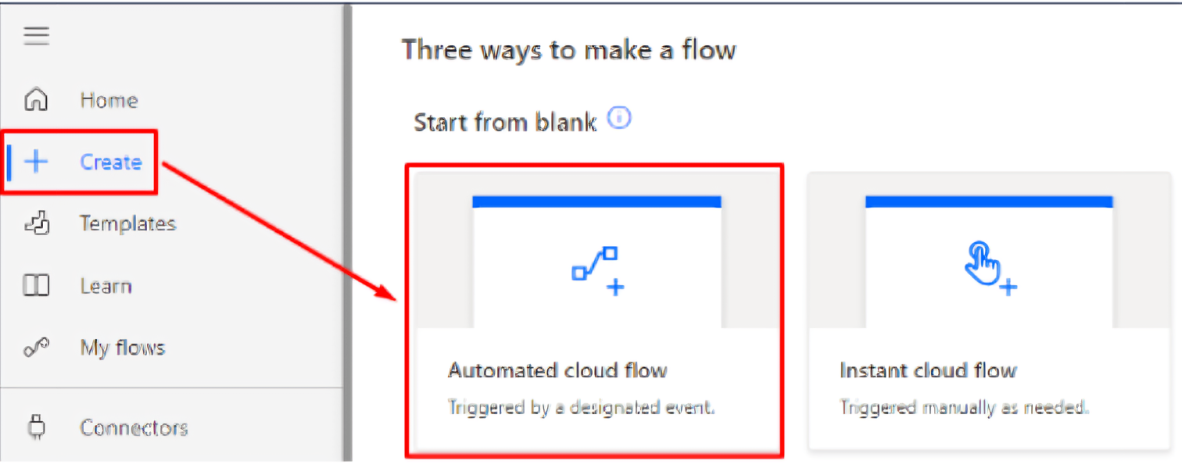 Img 1
Next, you need to give the flow a name and select the trigger, which in this case will be “When a new response is submitted” (Img 2).
Img 1
Next, you need to give the flow a name and select the trigger, which in this case will be “When a new response is submitted” (Img 2).
 Img 2
Next, the flow and its connections will be detailed:
1.1. The flow starts with a trigger from Forms. From the automatically loaded options, the “Form Id” corresponding to the “Credit Validation Form” was selected from the list of all forms created by the user who designed the flow (Img 3).
Img 2
Next, the flow and its connections will be detailed:
1.1. The flow starts with a trigger from Forms. From the automatically loaded options, the “Form Id” corresponding to the “Credit Validation Form” was selected from the list of all forms created by the user who designed the flow (Img 3).
 Img 3
To continue building the flow, you need to add a new action by clicking the + icon. This step must be repeated each time you want to add a new action (Img 4).
Img 3
To continue building the flow, you need to add a new action by clicking the + icon. This step must be repeated each time you want to add a new action (Img 4).
 Img 4
In the search bar, you need to type the application that the new action belongs to. For this step, it will be Forms. Then, select the corresponding option (Img 5).
Img 4
In the search bar, you need to type the application that the new action belongs to. For this step, it will be Forms. Then, select the corresponding option (Img 5).
 Img 5
1.2. The next action added to the flow is Get response details. Here, you also need to select the Form Id corresponding to the Credit Validation Form (Img 6). At this step, all the forms created by the user will appear; then, select Response Id from the dynamic content (Img 7). This allows the flow to retrieve the details of the responses to all the questions in the form.
Img 5
1.2. The next action added to the flow is Get response details. Here, you also need to select the Form Id corresponding to the Credit Validation Form (Img 6). At this step, all the forms created by the user will appear; then, select Response Id from the dynamic content (Img 7). This allows the flow to retrieve the details of the responses to all the questions in the form.
 Img 6
Img 6
 Img 7
1.3. The third action is Compose, where a unique ID will be generated and stored to be used when creating rows in our Excel table.
In the action search bar, type the keyword “compose” and select the Compose option (Img 8).
Img 7
1.3. The third action is Compose, where a unique ID will be generated and stored to be used when creating rows in our Excel table.
In the action search bar, type the keyword “compose” and select the Compose option (Img 8).
 Img 8
The action name is changed to “id”. To create the unique ID, click on the Fx option and type: guid() (Img 9).
Img 8
The action name is changed to “id”. To create the unique ID, click on the Fx option and type: guid() (Img 9).
 Img 9
1.4. Before continuing with the flow, we need to create an Excel document that includes a formatted table. It must primarily contain the id field and the fields from the form.
Once the Excel file is created, we will save it in a SharePoint site. The fourth action to add is Add a row into a table, which will add a row to the Excel table created earlier (Img 10).
Img 9
1.4. Before continuing with the flow, we need to create an Excel document that includes a formatted table. It must primarily contain the id field and the fields from the form.
Once the Excel file is created, we will save it in a SharePoint site. The fourth action to add is Add a row into a table, which will add a row to the Excel table created earlier (Img 10).
 Img 10
In Location, select the SharePoint site where the Excel file is saved. In Document Library, choose the library where the file is stored. In File, browse and select the file. In Table, select the table created in the Excel file (Img 11).
From the available advanced parameters, add all the fields except for the DateTime Format field (if it appears). Fill the fields dynamically with the information from the form, and fill the id field with the output from the Compose action named “id” that we created earlier (Img 12).
Img 10
In Location, select the SharePoint site where the Excel file is saved. In Document Library, choose the library where the file is stored. In File, browse and select the file. In Table, select the table created in the Excel file (Img 11).
From the available advanced parameters, add all the fields except for the DateTime Format field (if it appears). Fill the fields dynamically with the information from the form, and fill the id field with the output from the Compose action named “id” that we created earlier (Img 12).
 Img 11
 Img 12
1.5. The fifth action is Compose, where we will place the HTML code of the two formats.
In the action search bar, type the keyword “Compose” and select the Compose option (Img 13).
Img 12
1.5. The fifth action is Compose, where we will place the HTML code of the two formats.
In the action search bar, type the keyword “Compose” and select the Compose option (Img 13).
 Img 13
Once the action is added, rename the action, paste the HTML code, and fill the fields dynamically with information from the form (Img 14).
Img 13
Once the action is added, rename the action, paste the HTML code, and fill the fields dynamically with information from the form (Img 14).
 Img 15
In Folder Path, select the folder where you want to save the file. In File name, enter a descriptive name including the employee’s name, their ID number, the application date, and the .html extension. In File content, select the output from the previous Compose action (Img 16).
Img 15
In Folder Path, select the folder where you want to save the file. In File name, enter a descriptive name including the employee’s name, their ID number, the application date, and the .html extension. In File content, select the output from the previous Compose action (Img 16).
 Img 16
1.7. Now, the HTML file needs to be converted to PDF. For this, we will use the Convert file action from OneDrive for Business.
In the action search bar, type the keyword “convert file” and select the Convert file option (Img 17).
Img 16
1.7. Now, the HTML file needs to be converted to PDF. For this, we will use the Convert file action from OneDrive for Business.
In the action search bar, type the keyword “convert file” and select the Convert file option (Img 17).
 Img 17
In File, select the ID of the file created using the previous Create file action. In Target type, leave it as PDF (Img 18).
Img 17
In File, select the ID of the file created using the previous Create file action. In Target type, leave it as PDF (Img 18).
 Img 18
1.8. The final file needs to be saved in a SharePoint site. To do this, we will use the Create file action from SharePoint.
In the action search bar, type the keyword “create file” and select the Create file option (Img 19).
Img 18
1.8. The final file needs to be saved in a SharePoint site. To do this, we will use the Create file action from SharePoint.
In the action search bar, type the keyword “create file” and select the Create file option (Img 19).
 Img 19
Select the SharePoint site where you want to save the PDF. In Folder Path, choose the folder where the file should be stored. In File name, enter a descriptive name including the employee’s name, their ID number, the application date, and the .pdf extension. In File content, select the output from the previous Convert file action (Img 20).
Img 19
Select the SharePoint site where you want to save the PDF. In Folder Path, choose the folder where the file should be stored. In File name, enter a descriptive name including the employee’s name, their ID number, the application date, and the .pdf extension. In File content, select the output from the previous Convert file action (Img 20).
 Img 20
1.9. The final action is to send an email to the employee, notifying them that they must download, print, and sign the attached file. To do this, we will use the Send an email action from the Office 365 Outlook connector group.
In the action search bar, type the keyword “send email” and select the Send email option (Img 21)
Img 20
1.9. The final action is to send an email to the employee, notifying them that they must download, print, and sign the attached file. To do this, we will use the Send an email action from the Office 365 Outlook connector group.
In the action search bar, type the keyword “send email” and select the Send email option (Img 21)
 Img 21
The email will be sent to the Human Resources contact. Switch to advanced mode, then select the employee’s email address dynamically from Forms. Then, add a subject and body to the email, and include the dynamic parameter Attachments (Img 22)
Img 21
The email will be sent to the Human Resources contact. Switch to advanced mode, then select the employee’s email address dynamically from Forms. Then, add a subject and body to the email, and include the dynamic parameter Attachments (Img 22)
 Img 22
We will add a new item in the Attachments parameter. Then, for the attachment name, Insert dynamically the name of the file previously converted to PDF, and do the same for the attachment content (Img 23)
Img 22
We will add a new item in the Attachments parameter. Then, for the attachment name, Insert dynamically the name of the file previously converted to PDF, and do the same for the attachment content (Img 23)
 Img 23
Automating the employee credit application process not only reduced time and errors but also freed up the HR team to focus on more strategic tasks.
Using tools like Power Automate showed us that you don’t need to invest in complex solutions to achieve meaningful change. Sometimes, what you need is already within reach — you just need to know how to connect the dots.
Img 23
Automating the employee credit application process not only reduced time and errors but also freed up the HR team to focus on more strategic tasks.
Using tools like Power Automate showed us that you don’t need to invest in complex solutions to achieve meaningful change. Sometimes, what you need is already within reach — you just need to know how to connect the dots.


Leave a Reply