Building Automation Systems for Overtime Management: A Free Step-by-Step Guide in 5 Steps
In today’s fast-paced workplace, building automation systems is no longer a luxury—it’s a necessity for businesses aiming to stay competitive. Managing overtime reports manually is a common pain point for organizations, as it is often time-consuming, prone to human error, and inefficient. However, with the right automation strategies, you can streamline this process, reduce workload, and ensure accuracy in managing critical data.
This guide delves into building automation systems specifically tailored for overtime management. By leveraging Power Automate, you’ll discover how to create workflows that seamlessly handle overtime submissions, approvals, and data organization. Whether it’s collecting information through Microsoft Forms, integrating data into Excel, or sending automated email notifications, building automation systems can simplify every step of the process.
The benefits of implementing building automation systems extend beyond efficiency; they also free up valuable time, reduce the risk of errors, and enable teams to focus on more strategic tasks. This detailed guide is designed to walk you through each step, providing practical insights and tools to revolutionize how you manage overtime data.
Whether you’re new to building automation systems or looking to upgrade your existing workflows, this guide will help you save time, enhance accuracy, and create a streamlined process that works effortlessly. Let’s dive in and start building an efficient, accurate, and reliable automation system for overtime management!
Building Automation Systems: Overtime Report Workflow
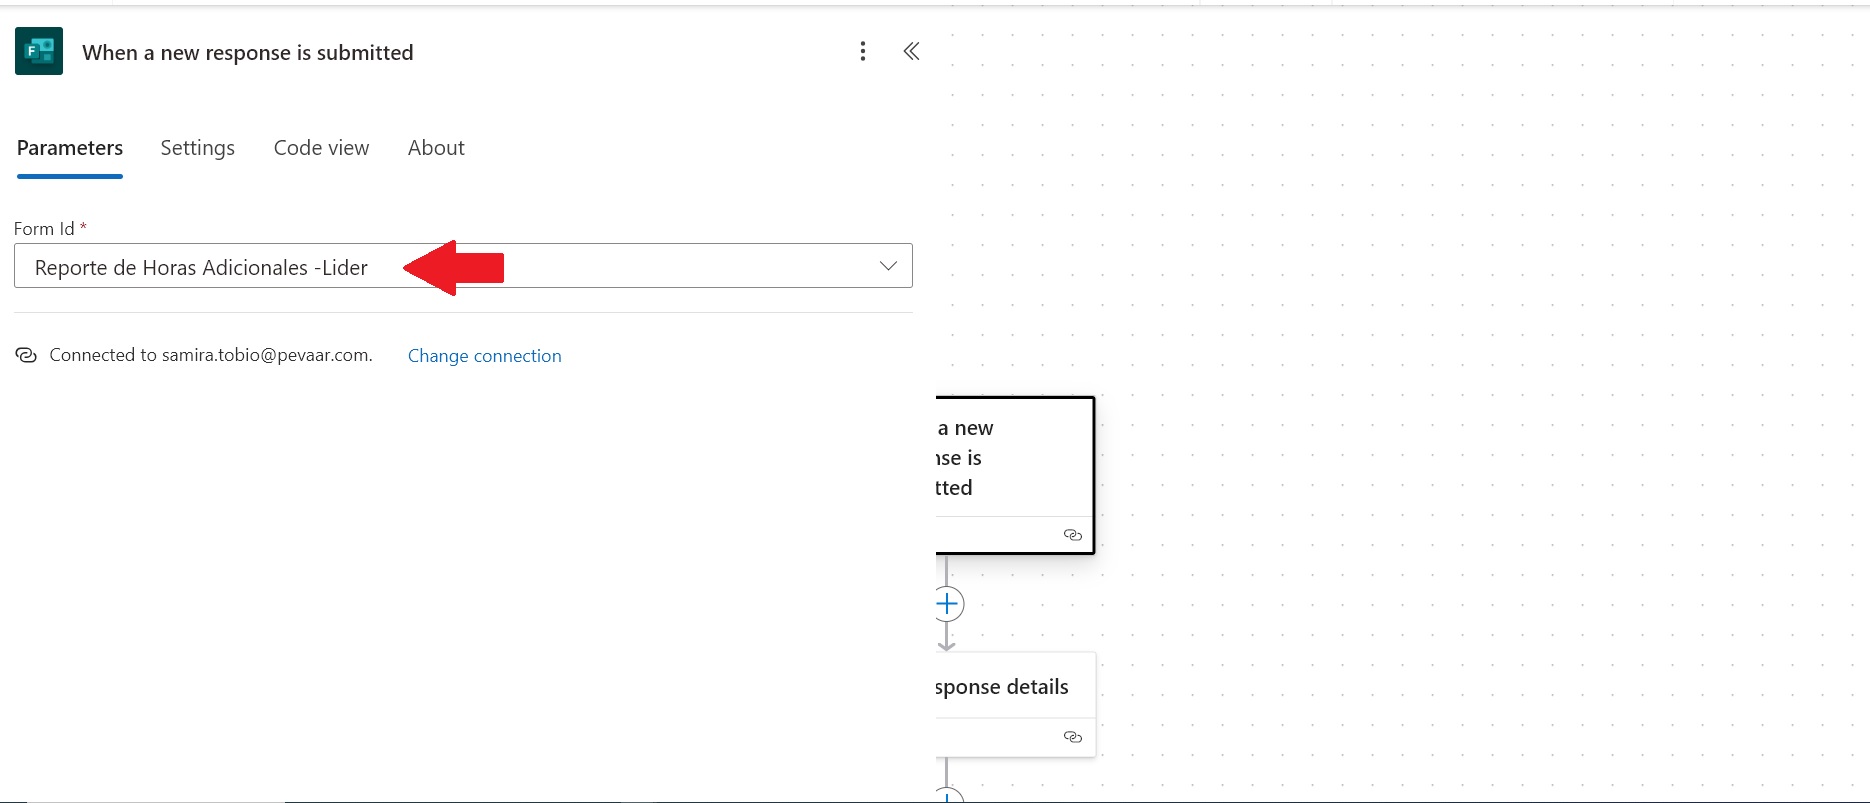
Start by accessing Power Automate (PA) through the Microsoft 365 applications. Once in the PA environment, click on “Create”, and for the first flow, select the “Automated Cloud Flow” option (Image 1) and choose the trigger “When a new response is submitted” (Image 2). Next, select the ID of the Overtime Report Form (Image 3).
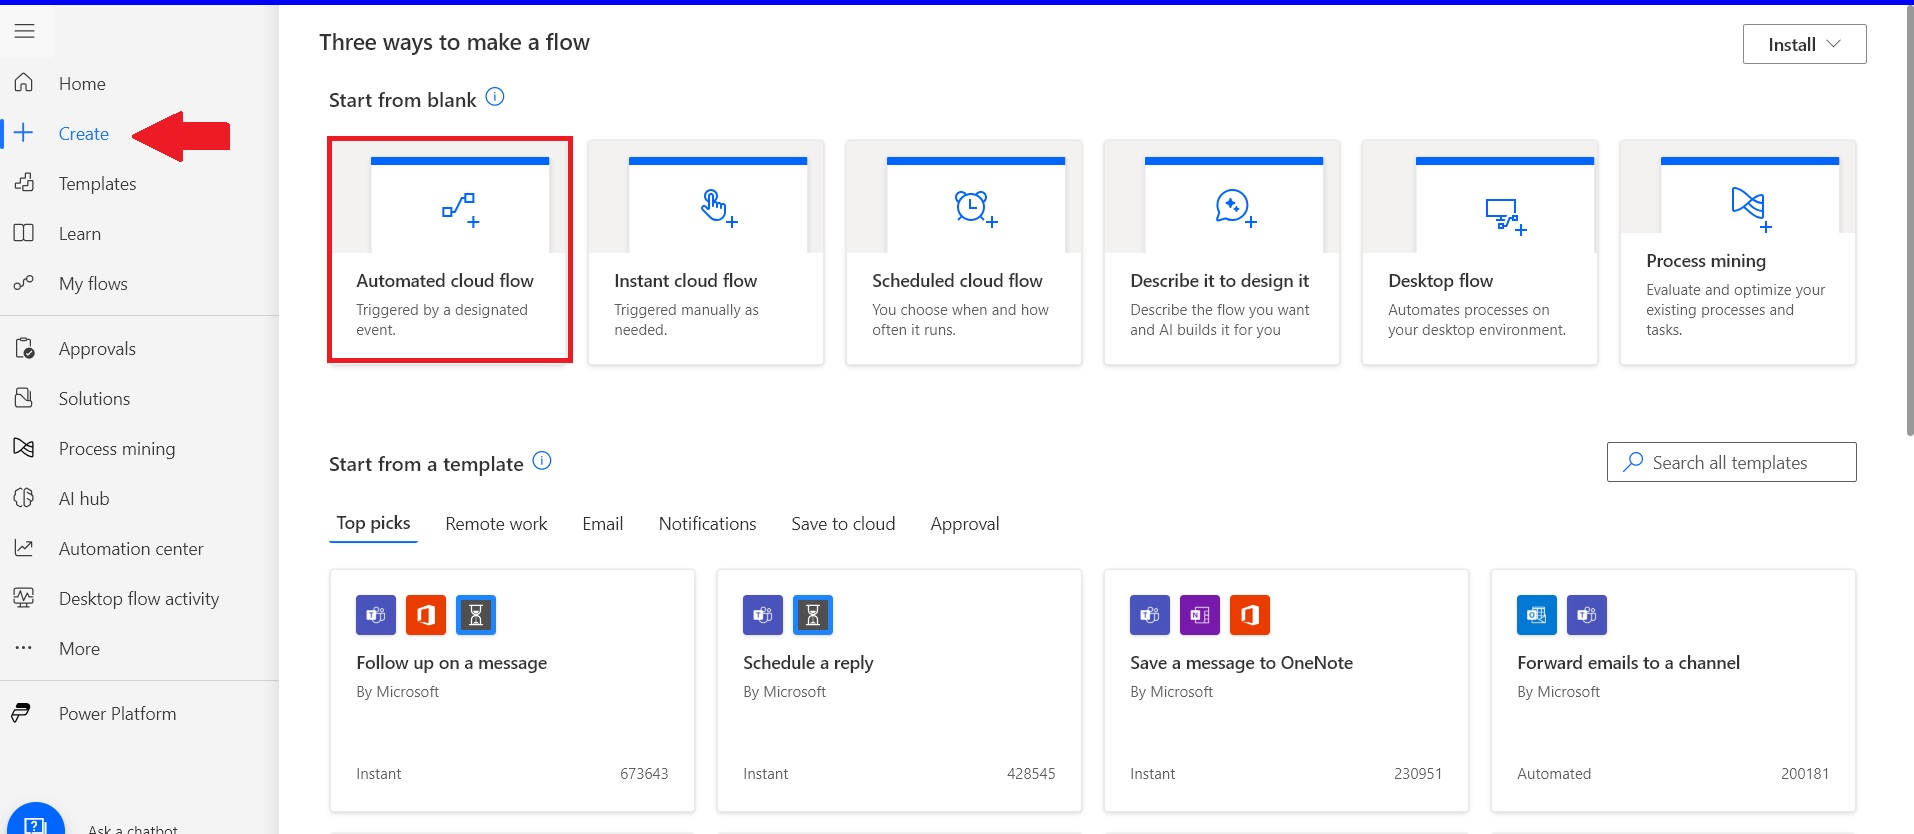
Image 1
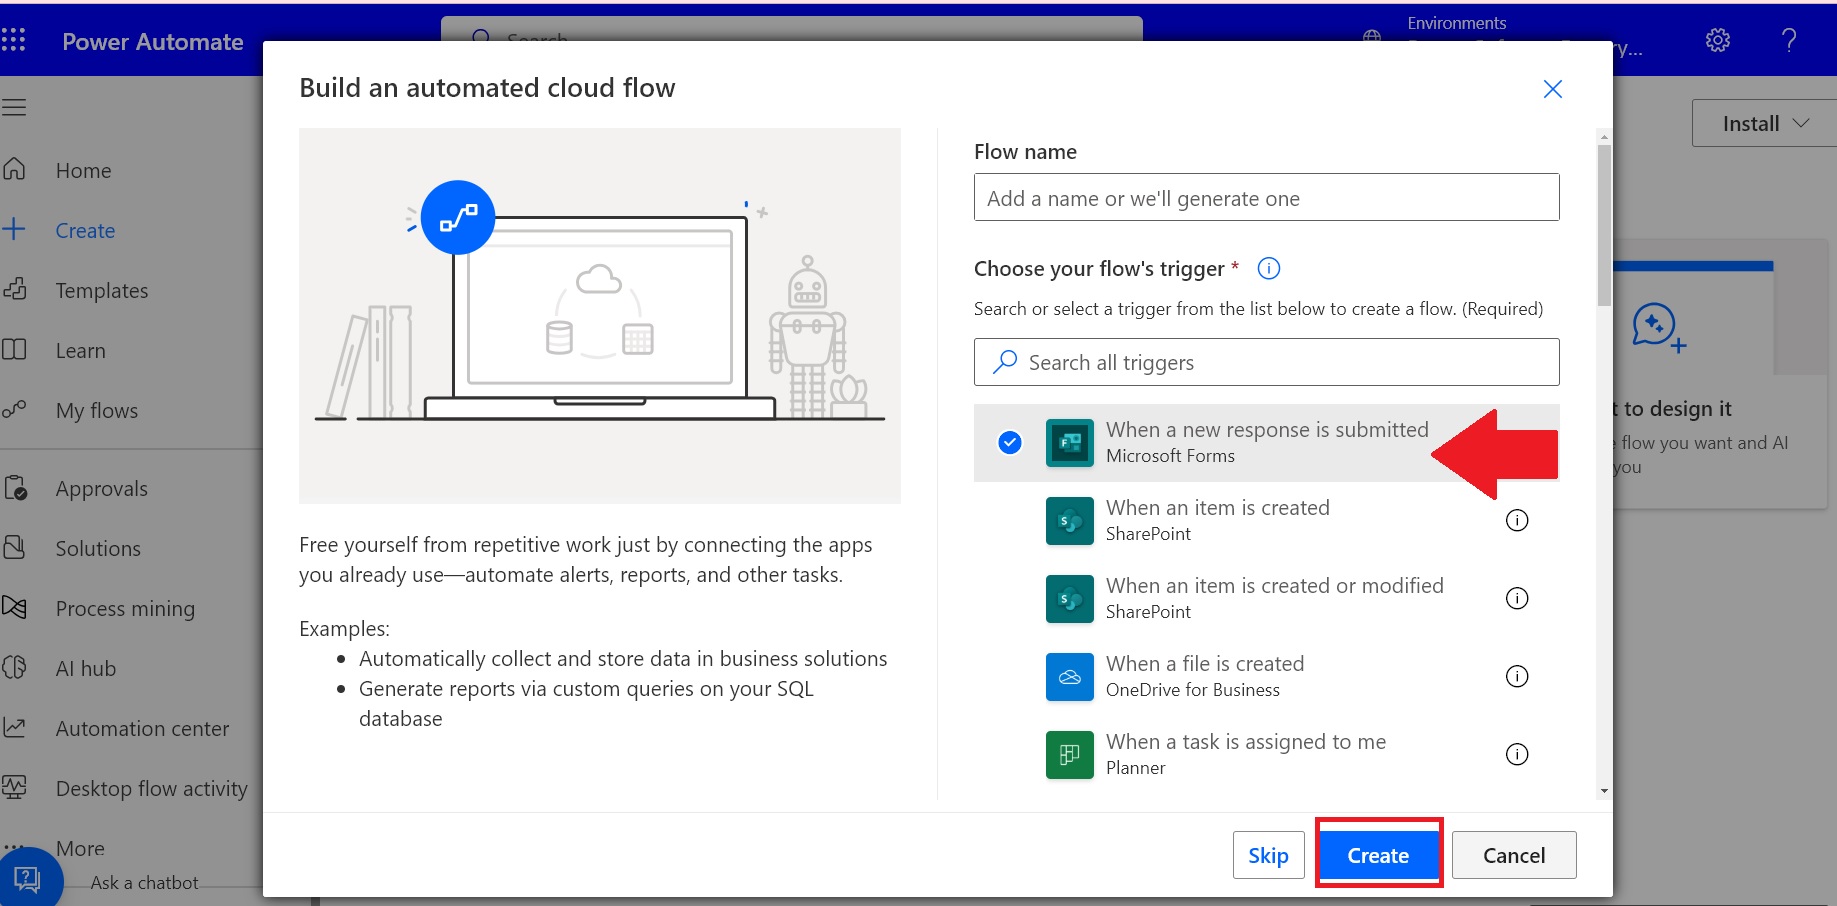
Image 2
To add the second action to the workflow, click the “+”, type “Forms” in the search bar, and select the action “Get Response Details.” This allows the flow to extract the response details and utilize the recorded information (Image 4).
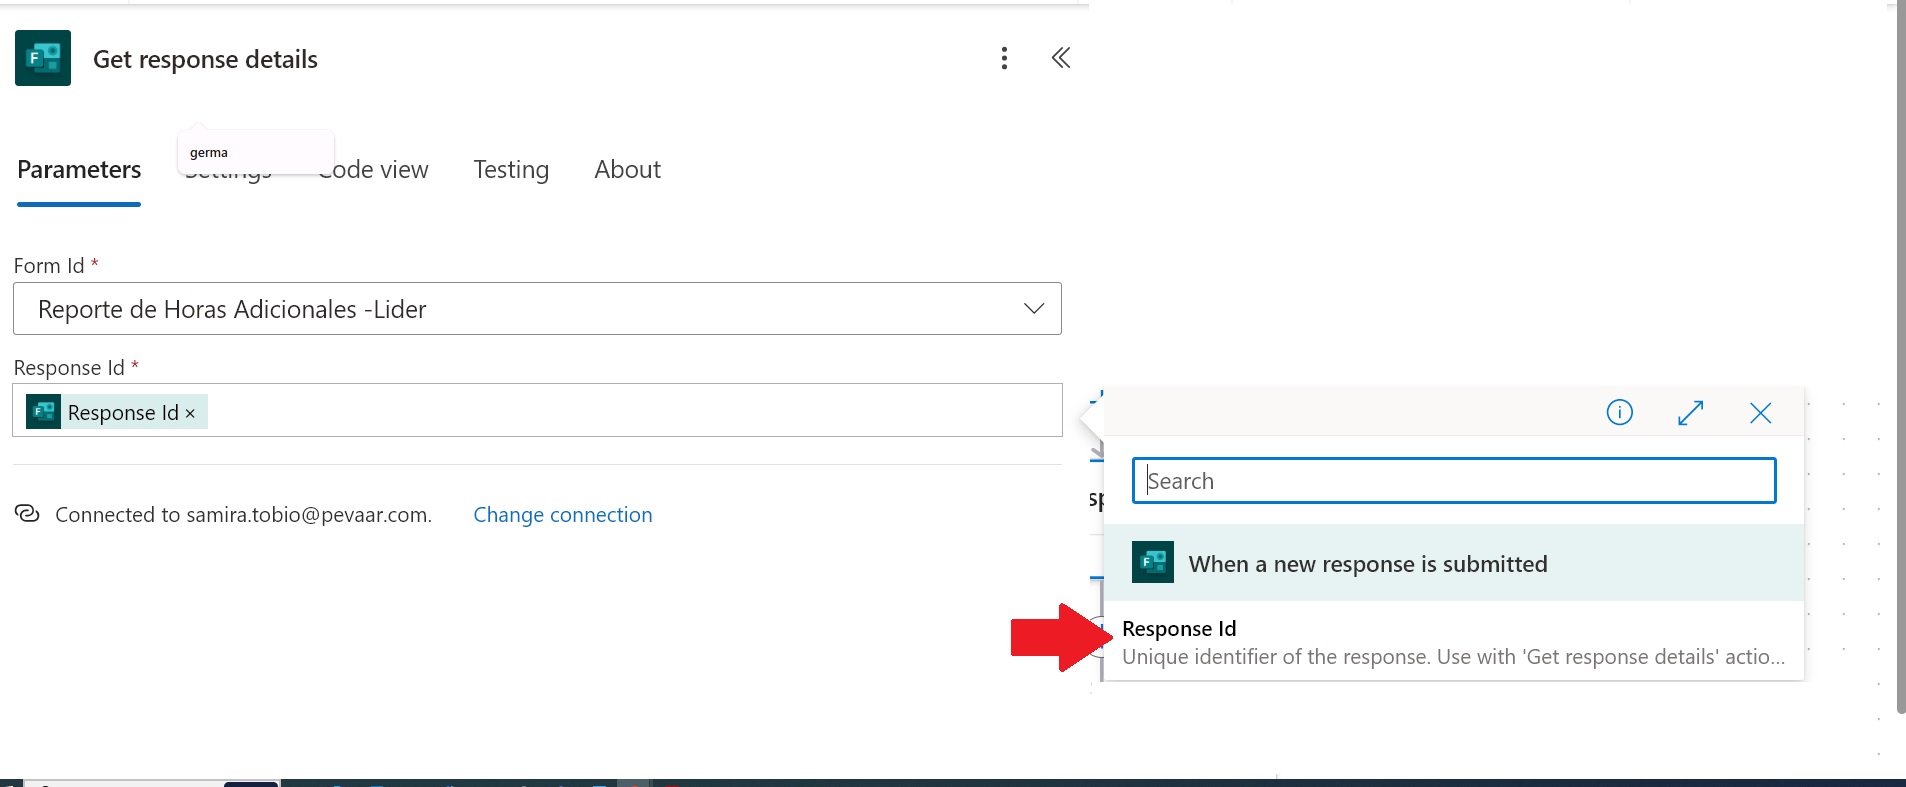
Image 4
Finally, for the first flow, add the action “Add a row into a table.” To do this, type Excel in the search bar and select this action from the list of options. When configuring this action, make sure to select the location, library, file, and the corresponding table (Image 5).
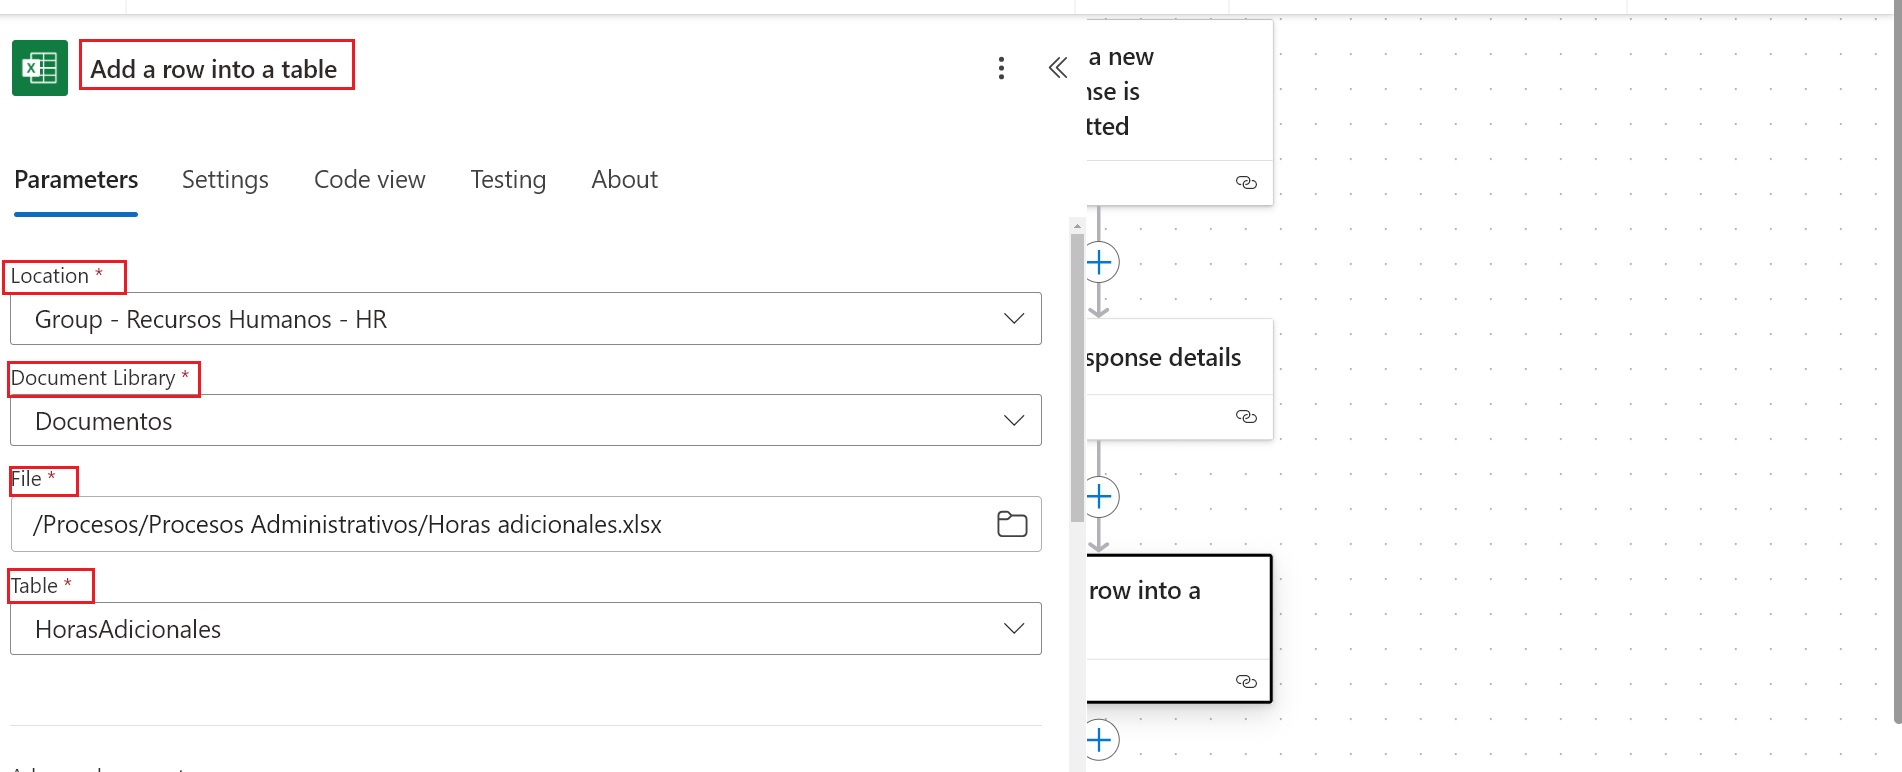
Image 5
Similarly, the fields from which the information will be extracted into the table must be filled out: date, authorizing leader, employee, dates, number of overtime days, total hours, settlement method, agreed value, and total value (Image 6).
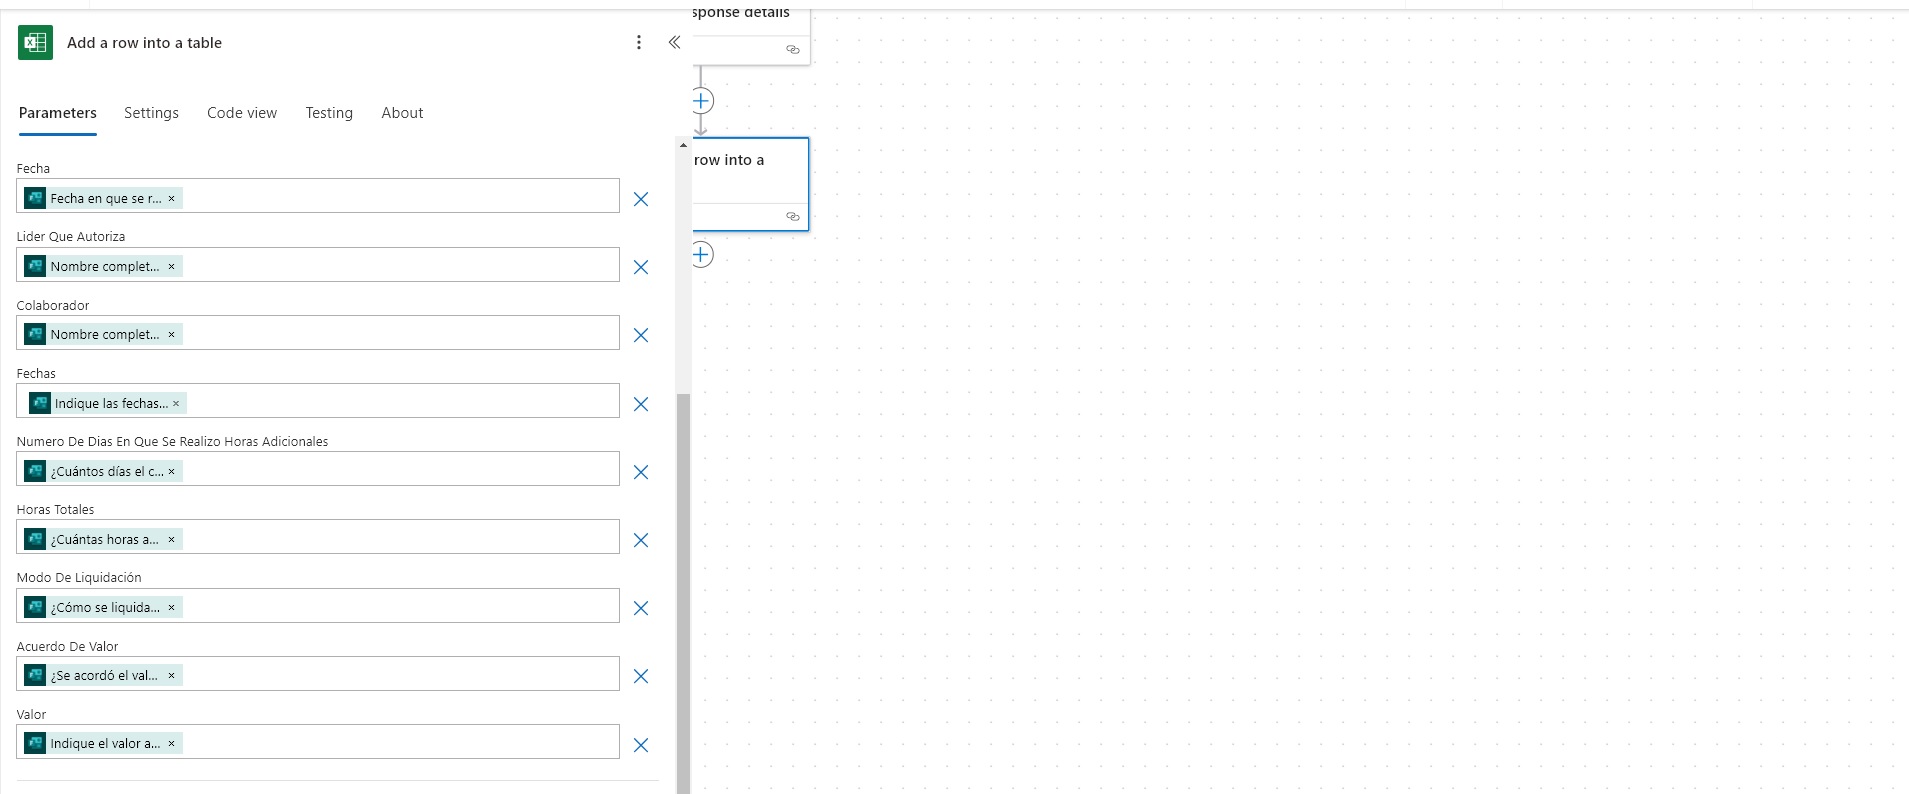
Image 6
Second Flow – Scheduled Cloud Flow
For the second flow, click on “Create” and then select “Scheduled Cloud Flow.” This option is chosen because the workflow is intended to execute actions on a specific day each month (Image 7).
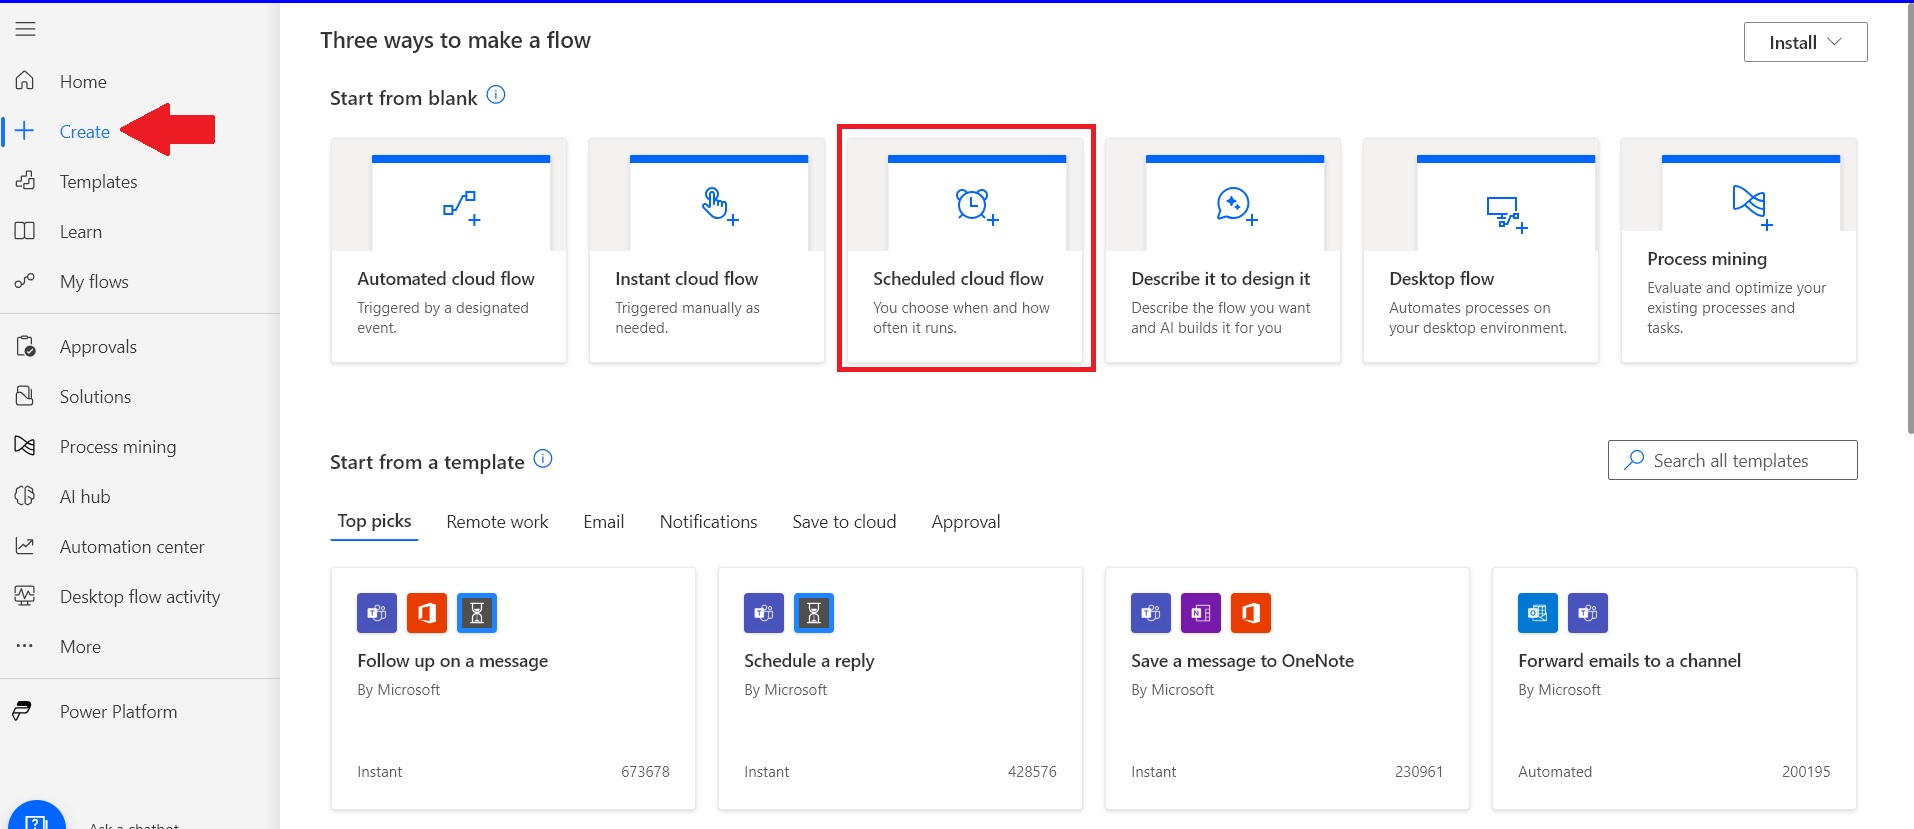
Image 7
Regarding the recurrence configuration, complete the Interval field with the number 1 and set the Frequency to daily. For the time zone, select the one corresponding to your city, which in this case is Bogotá. This configuration corresponds to the UTC standard time format, which is universal, but for this flow, it should not affect subsequent steps.
In the Start Time field, configure the date and time when the flow will start using the following format: YYYY-mm-ddT00:00:00.000Z.
Finally, specify the time when the flow will run daily by selecting the hour in the “At These Hours” field and entering the minutes in the “At These Minutes” field. This will complete the recurrence configuration (Image 8).
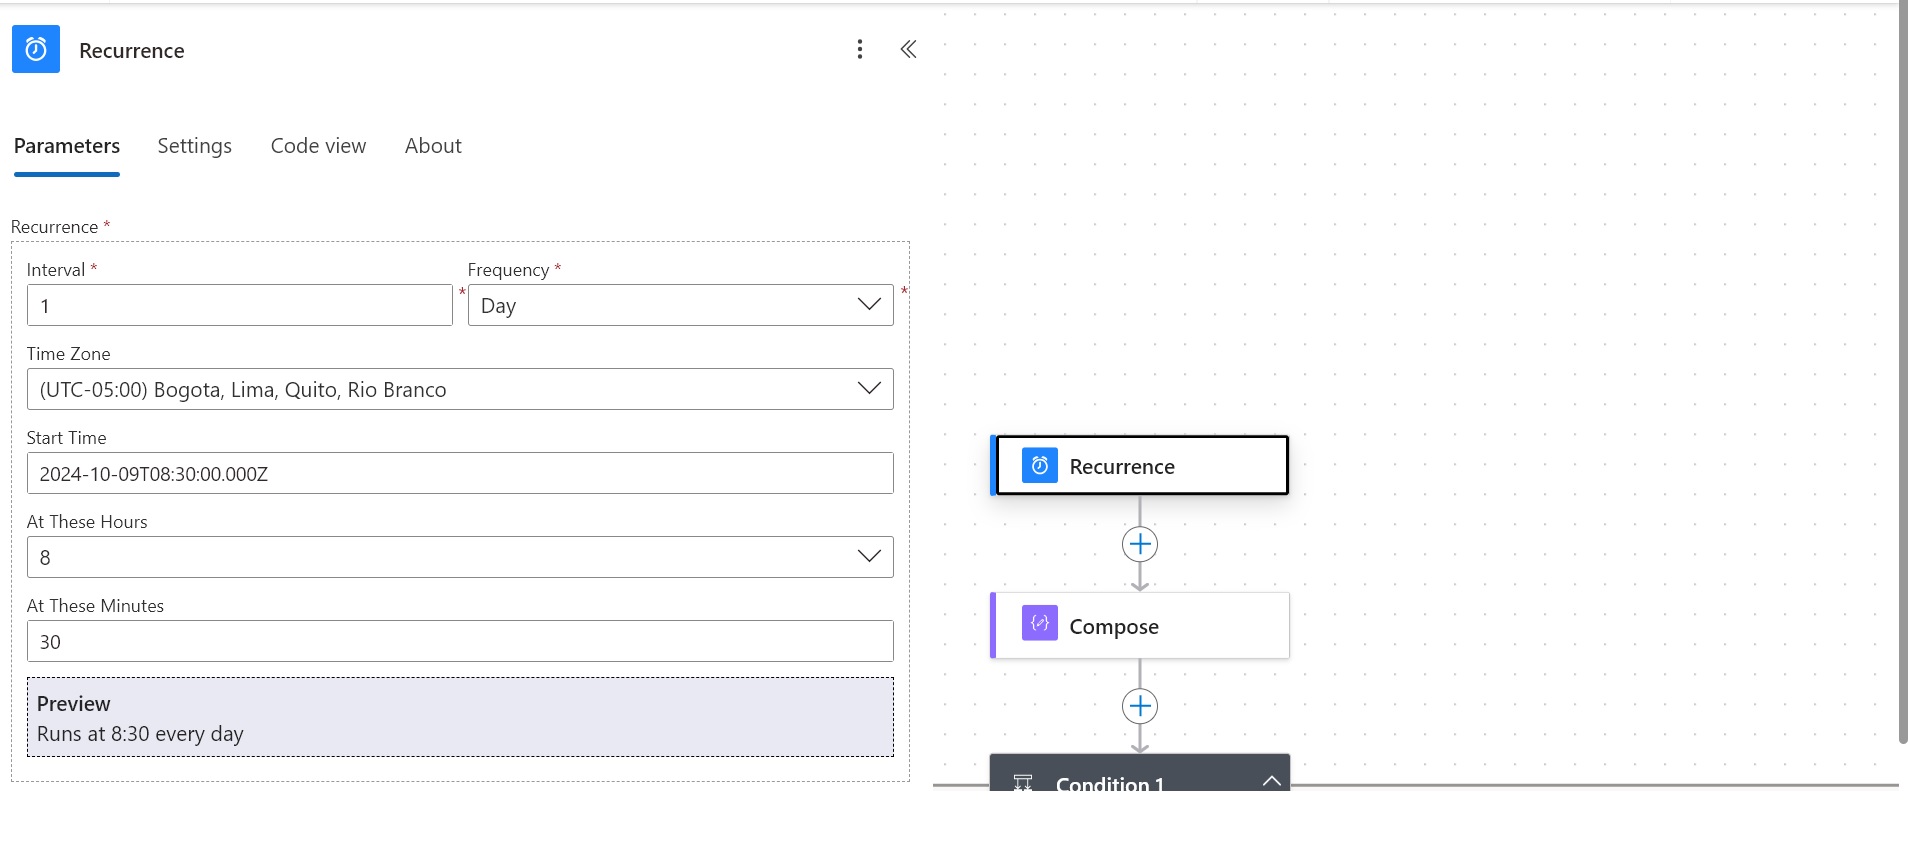
Image 8
The next action will be a Compose (Image 9) that outputs the current day based on the local time zone, as UTC is standard but not local.
The expression for this Compose action is:
plaintext
Copy code
dayOfMonth(addHours(utcNow(), -5))
To add this expression:
- Click on fx to open the expression editor.
- Enter the expression and then click Add to confirm (Image 10).
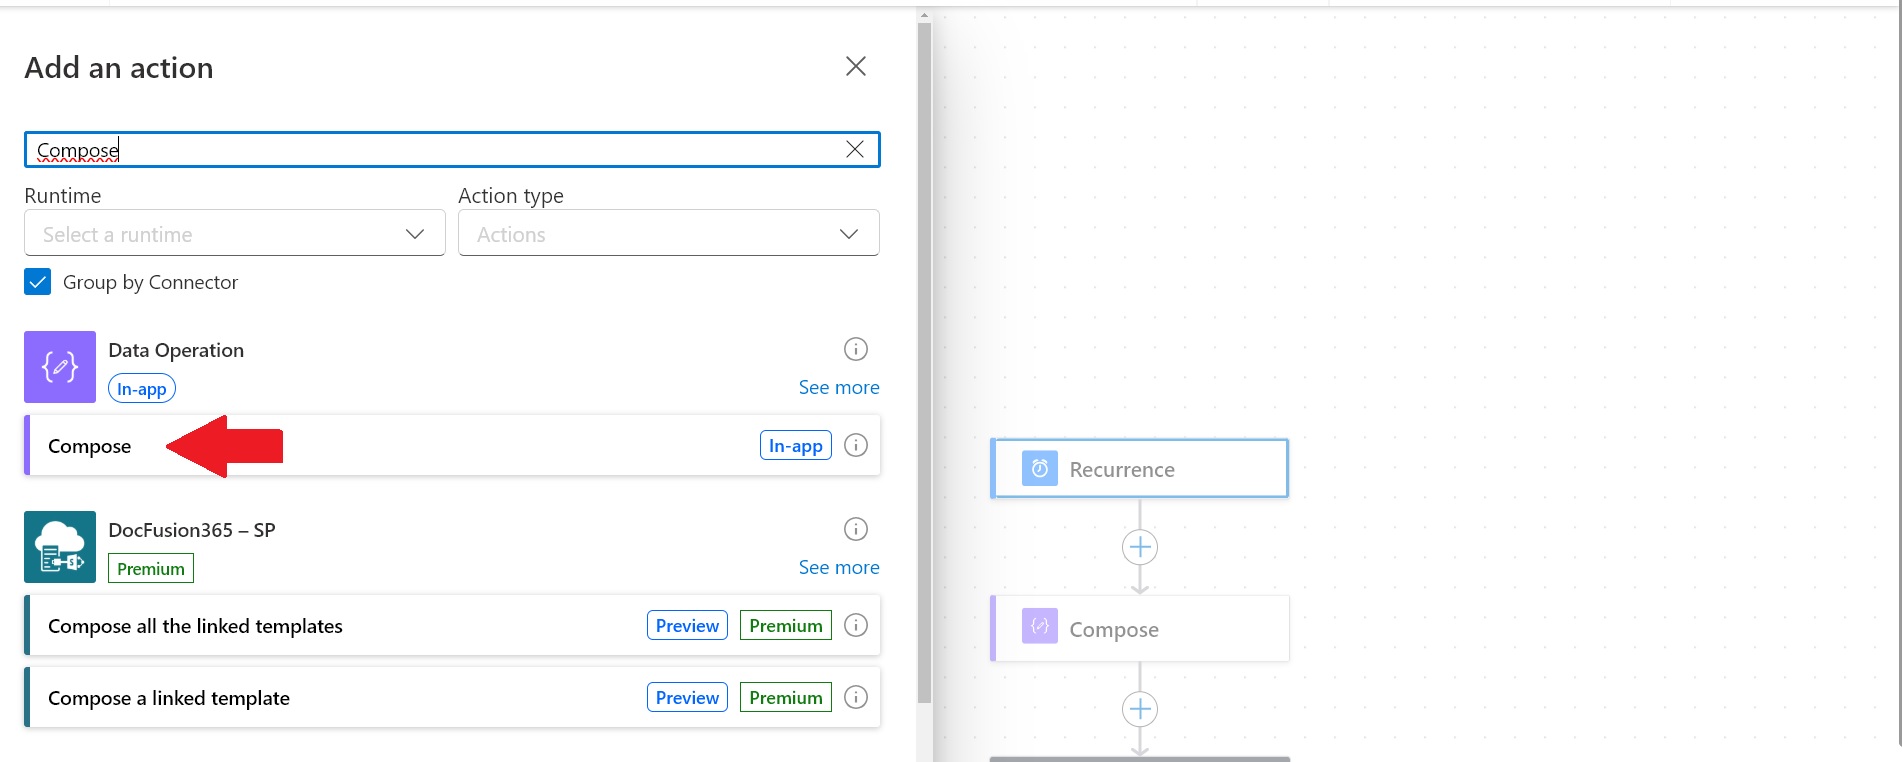
Image 9
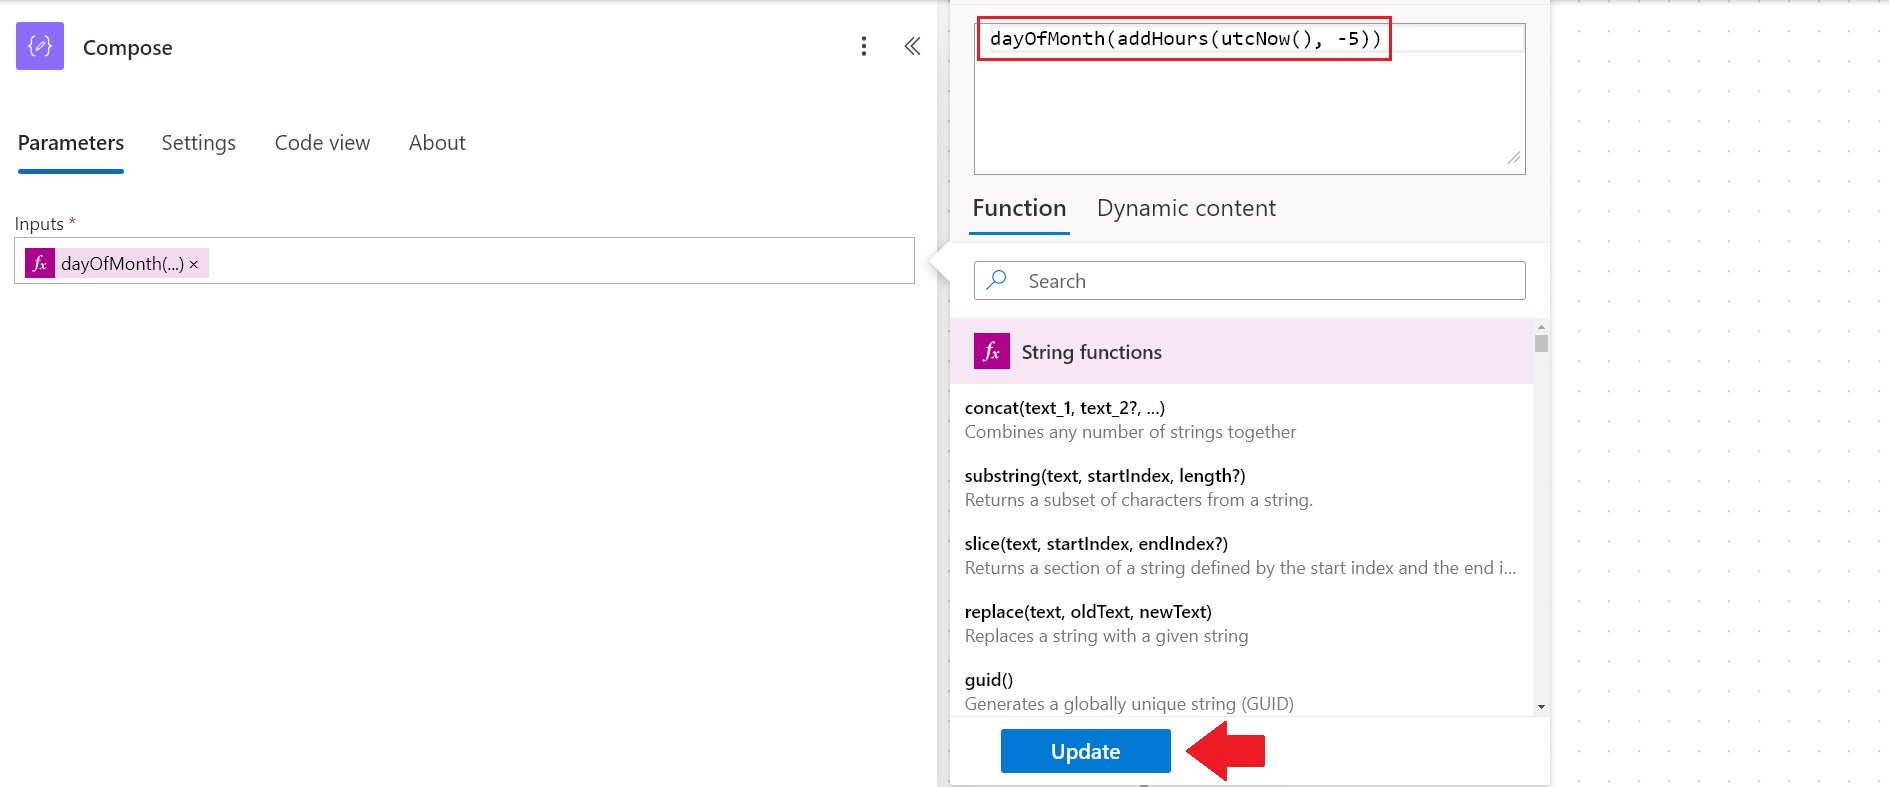
Image 10
Next, add an AND condition.
- In the first value, select the outputs from the previous action (the Compose) (Image 11). To do this, click on the lightning icon to access the dynamic content automatically generated by Power Automate.
- Set the condition to equals.
- In the second value, enter the day on which the flow should run, which in this case is 21 (the 21st of each month). This will trigger the subsequent actions (Image 12).
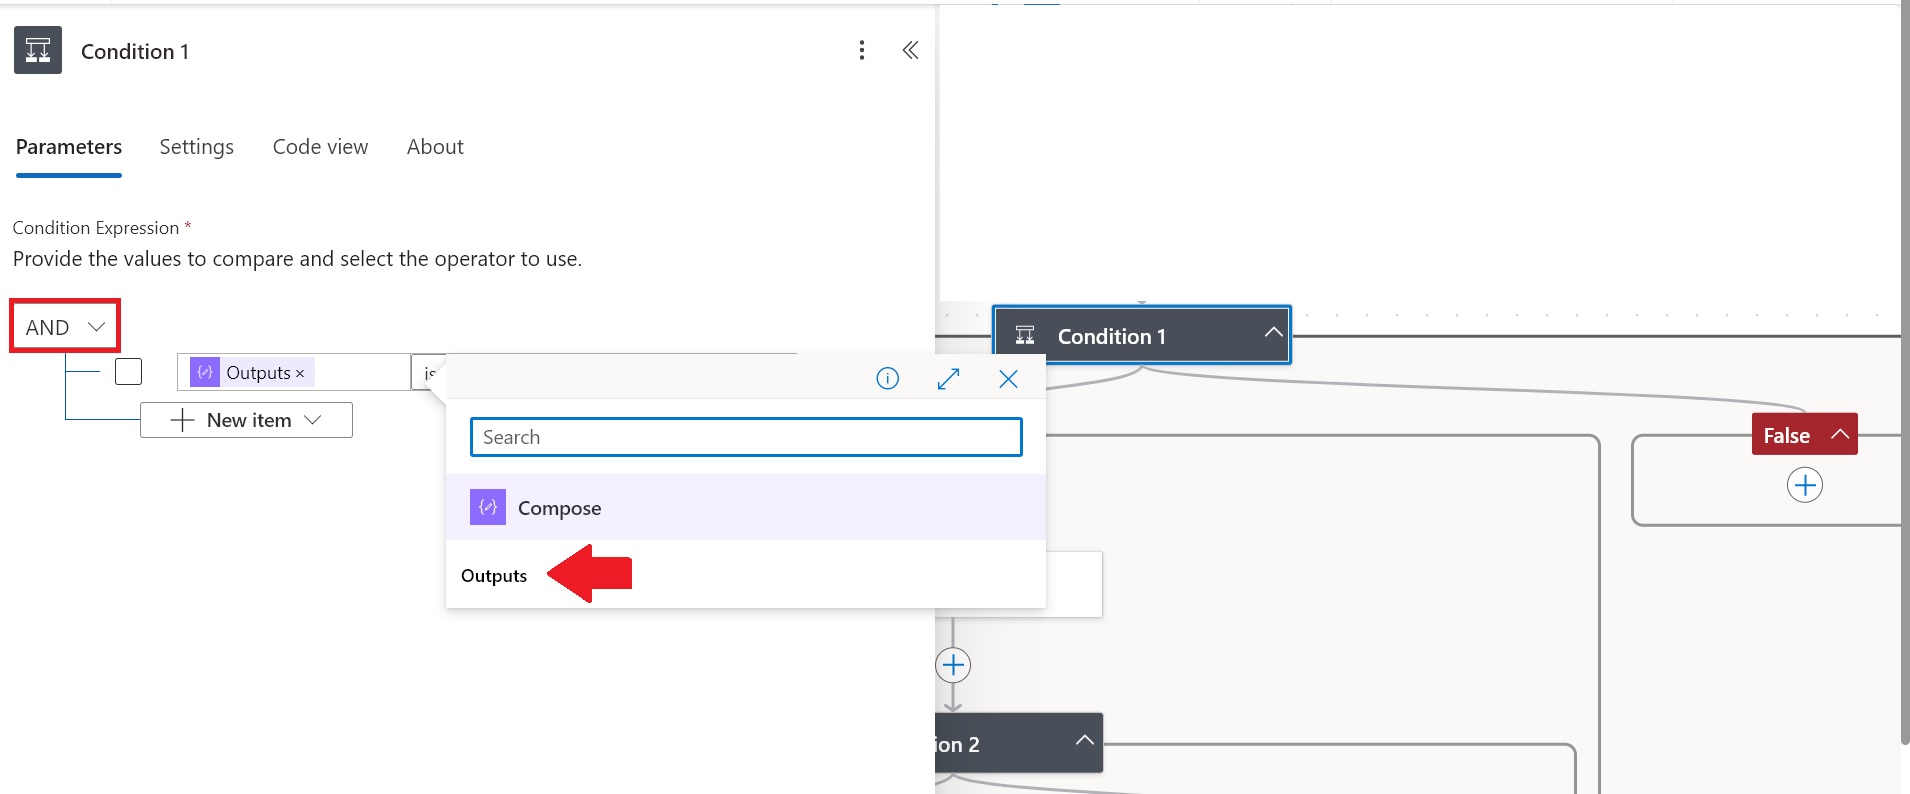
Image 11
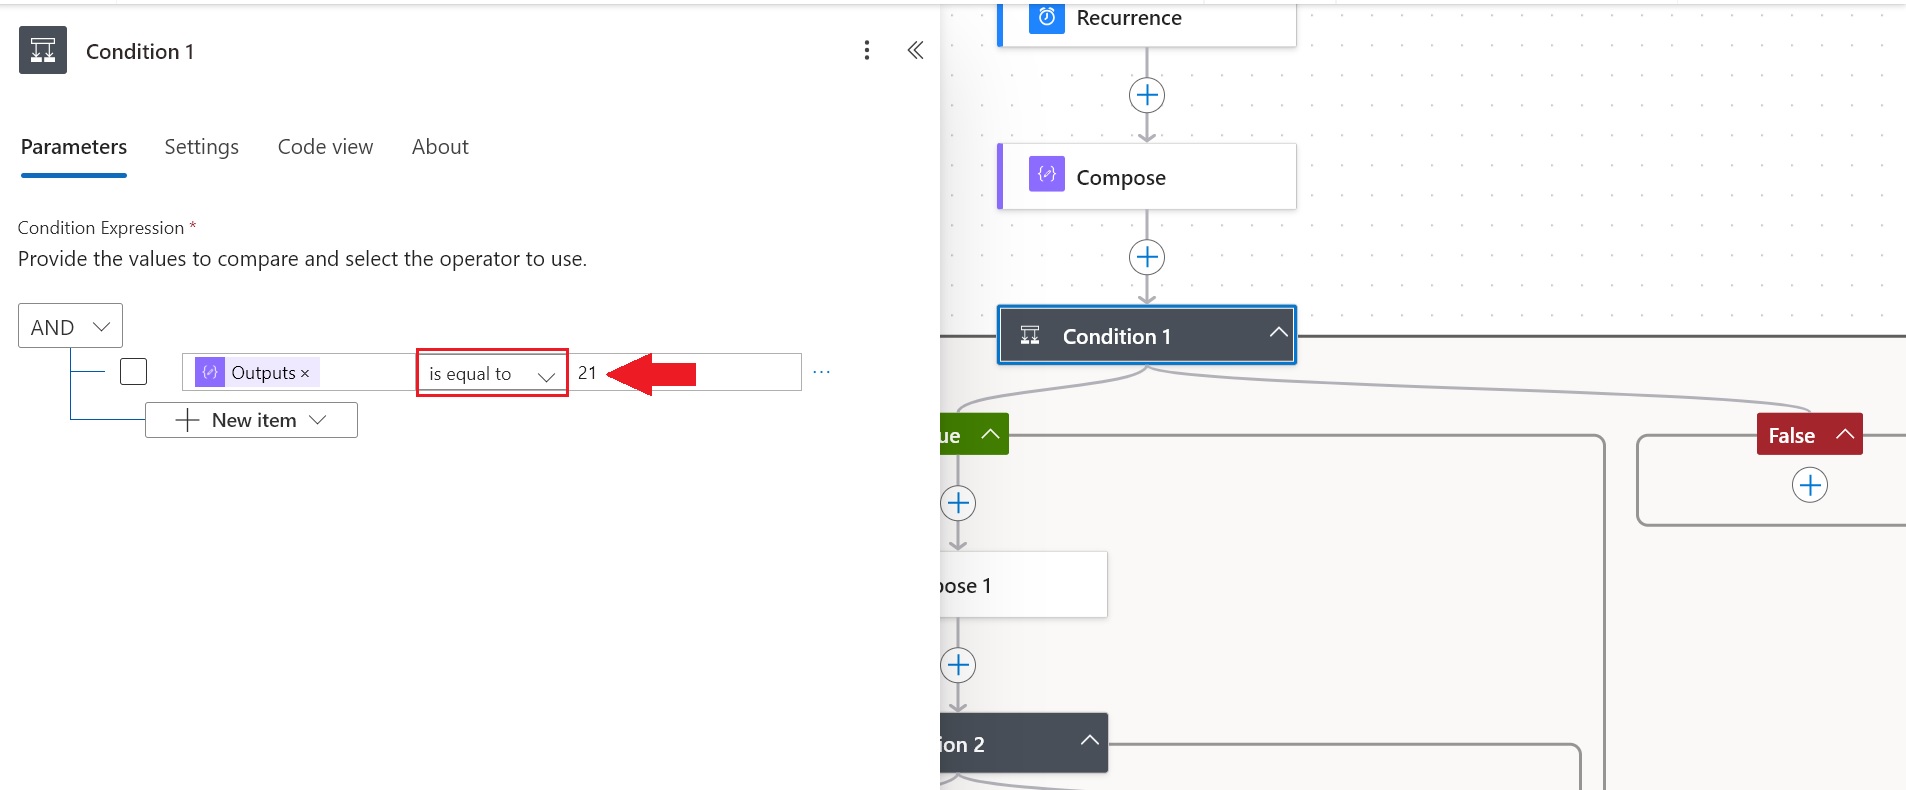
Image 12
If the condition is false, no action is added to the flow (Image 13).
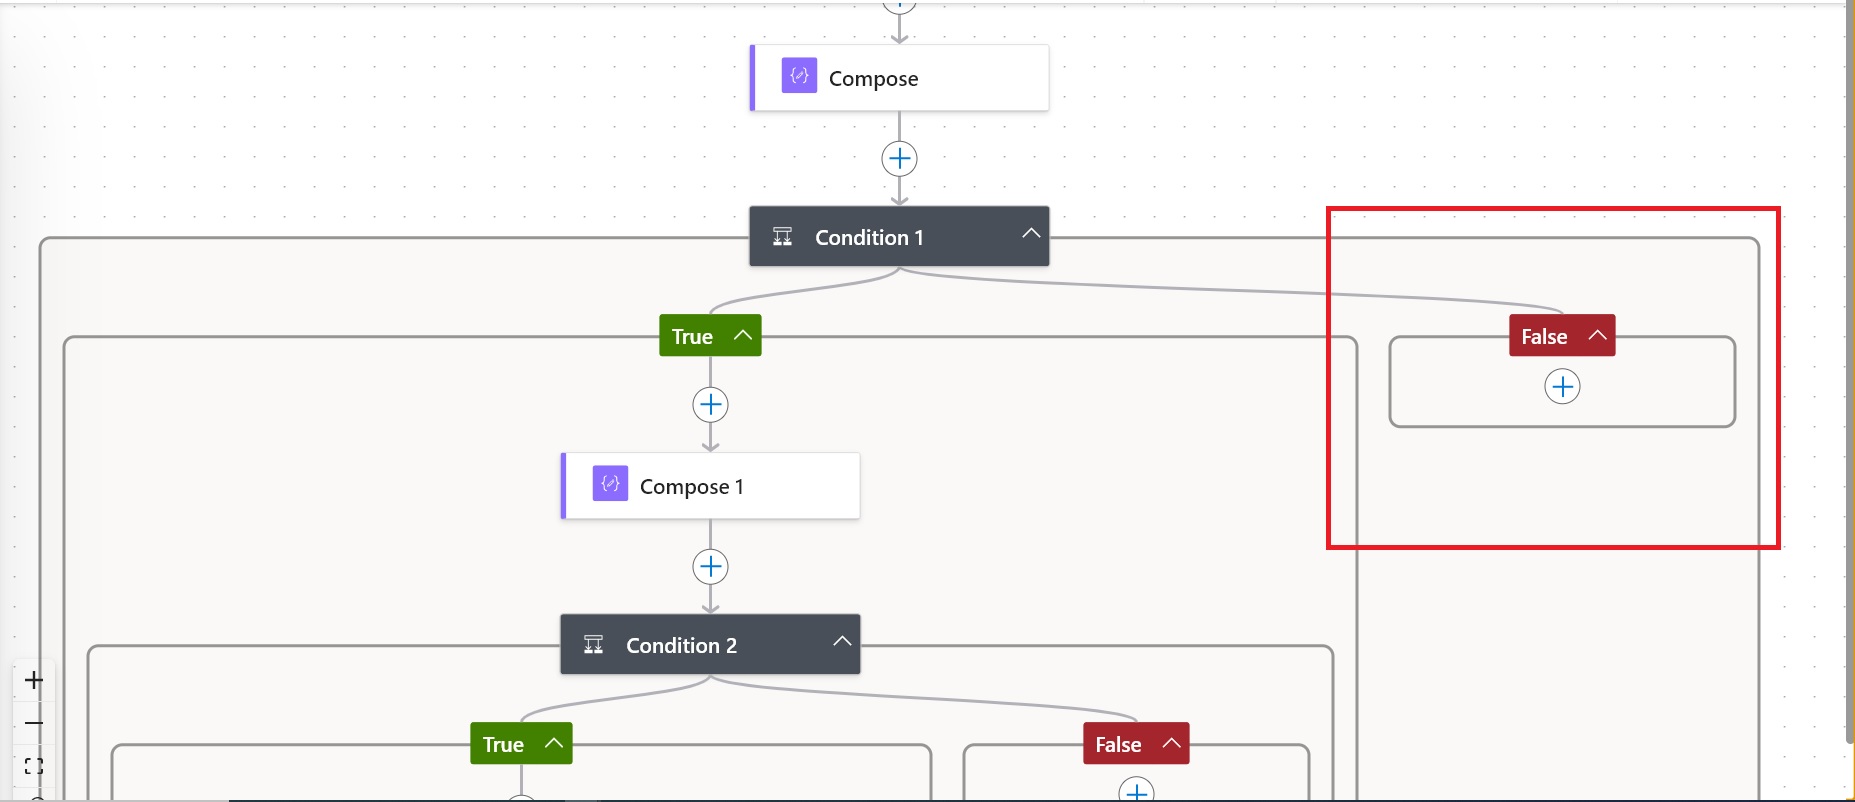
Image 13
If the condition is true, a Compose action should be added (Image 9) to output the current time based on the local time zone, which in this case is Colombia.
The corresponding expression is:
plaintext
Copy code
formatDateTime(addHours(utcNow(), -5), ‘HH:mm’)
(Image 14)
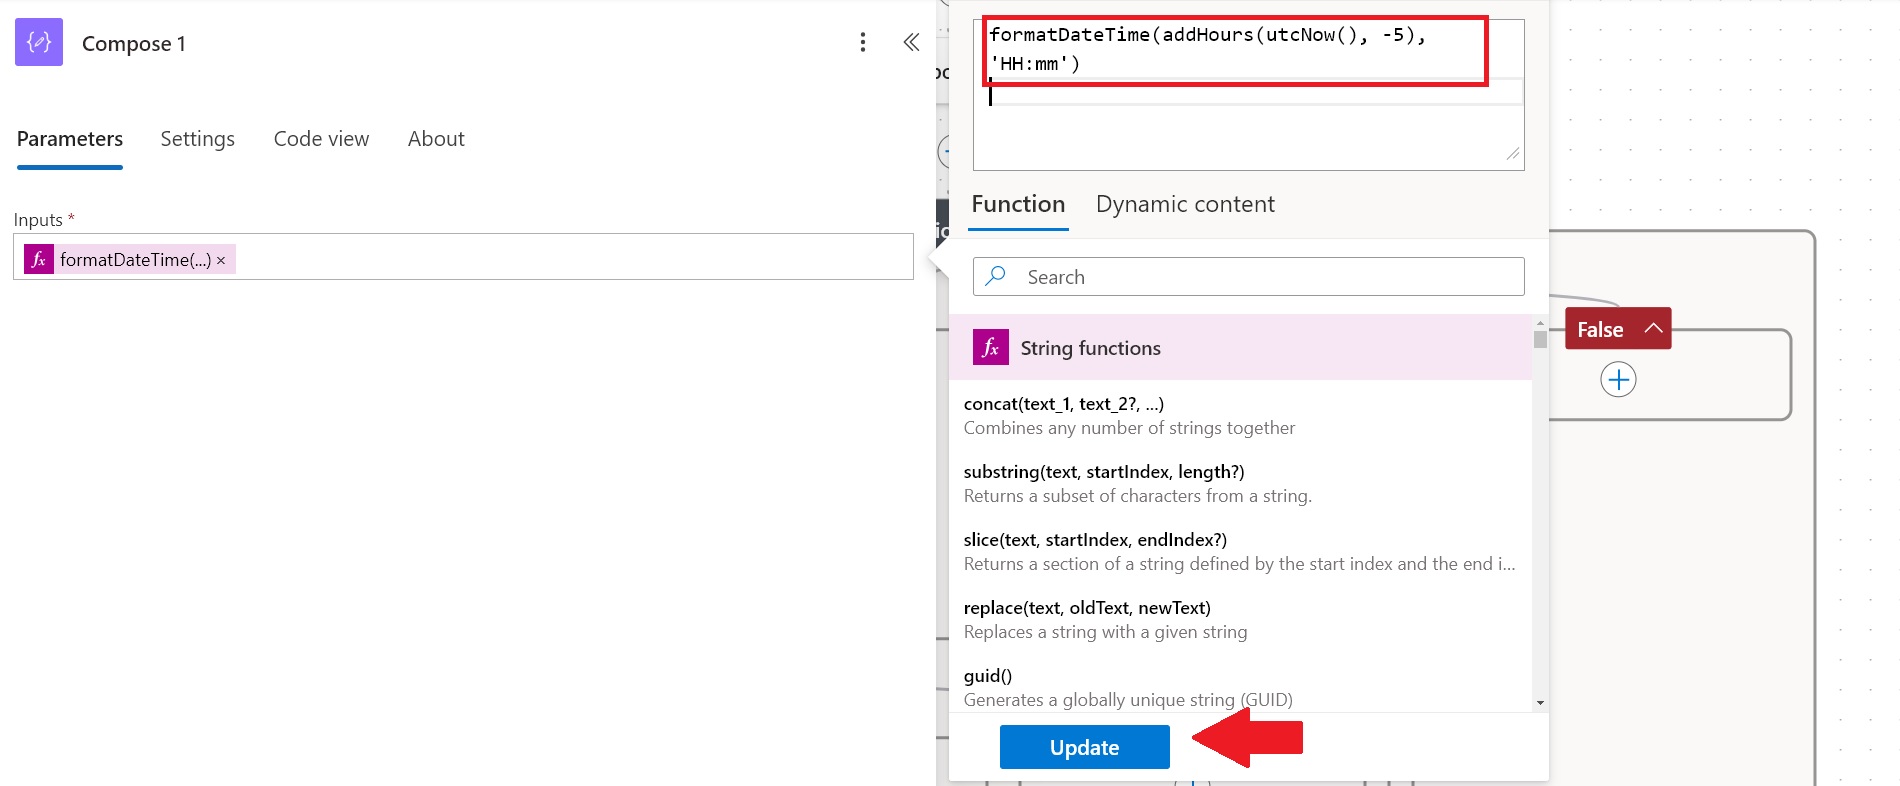
Image 14
The flow continues with an AND condition:
- In the first value, select the outputs from the Compose action using the dynamic content.
- The operator should be “is equal to.”
- In the second value, enter the time in 24-hour format, which in this case is 08:30.
This action compares the current time with the predefined time to determine if the flow should run (Image 15).
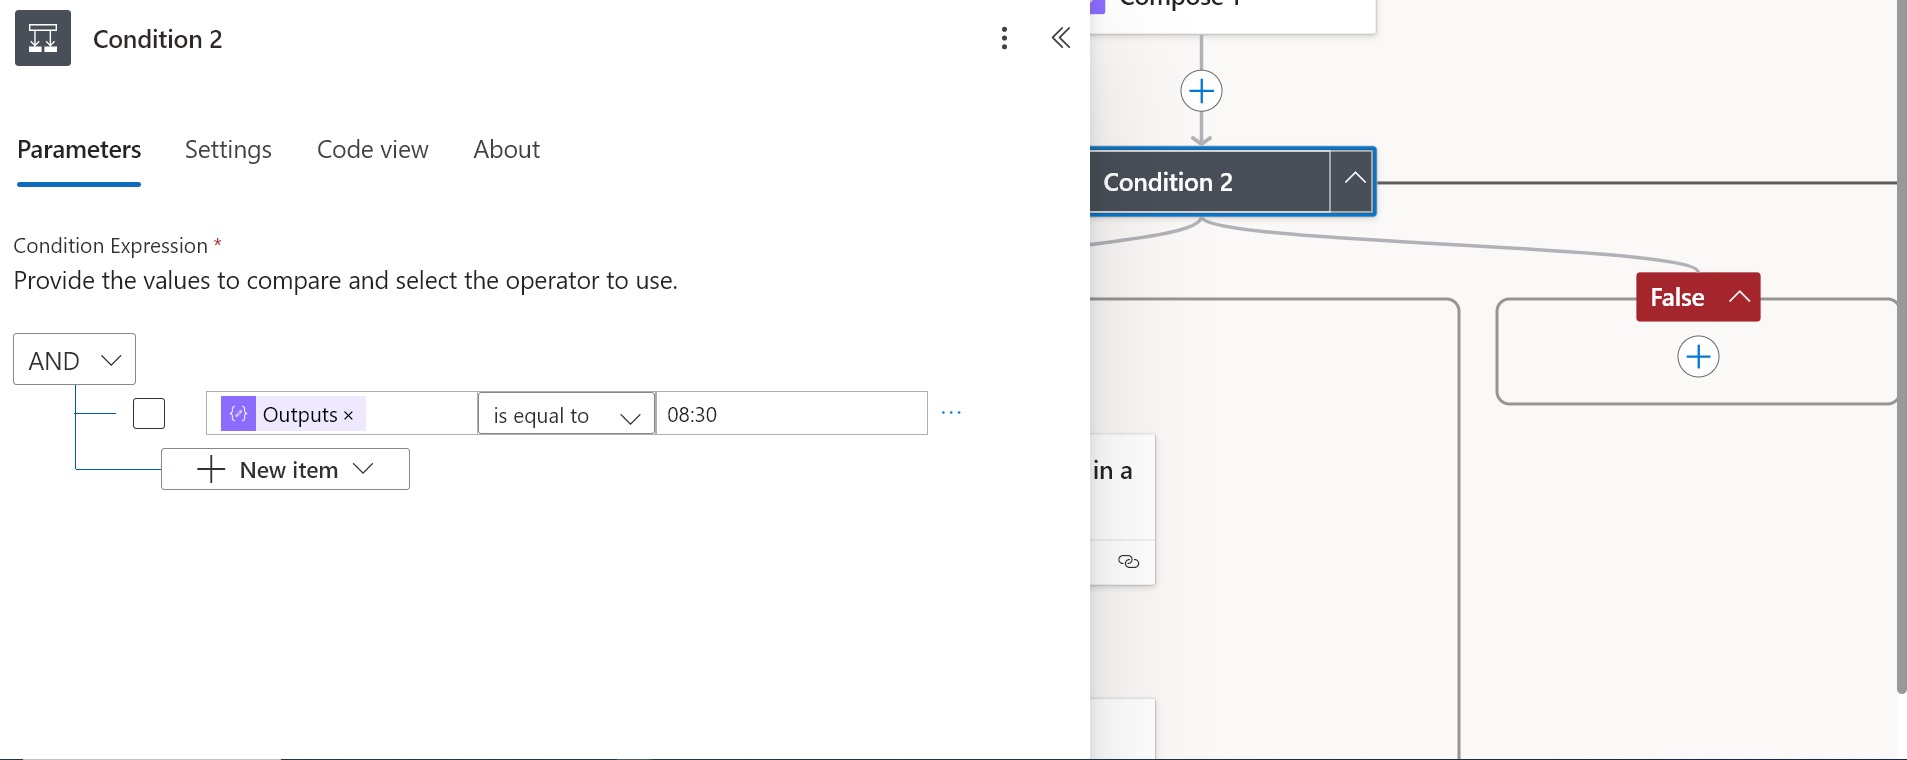
Image 15
If the condition is false, no action is added to the flow (Image 13).
If the condition is true, the first action to add is “List rows present in a table.”
- Select the Excel file where the additional hours data sent by the leaders is stored.
- Configure the following:
- Location
- Library
- File
- Table
(Image 16).
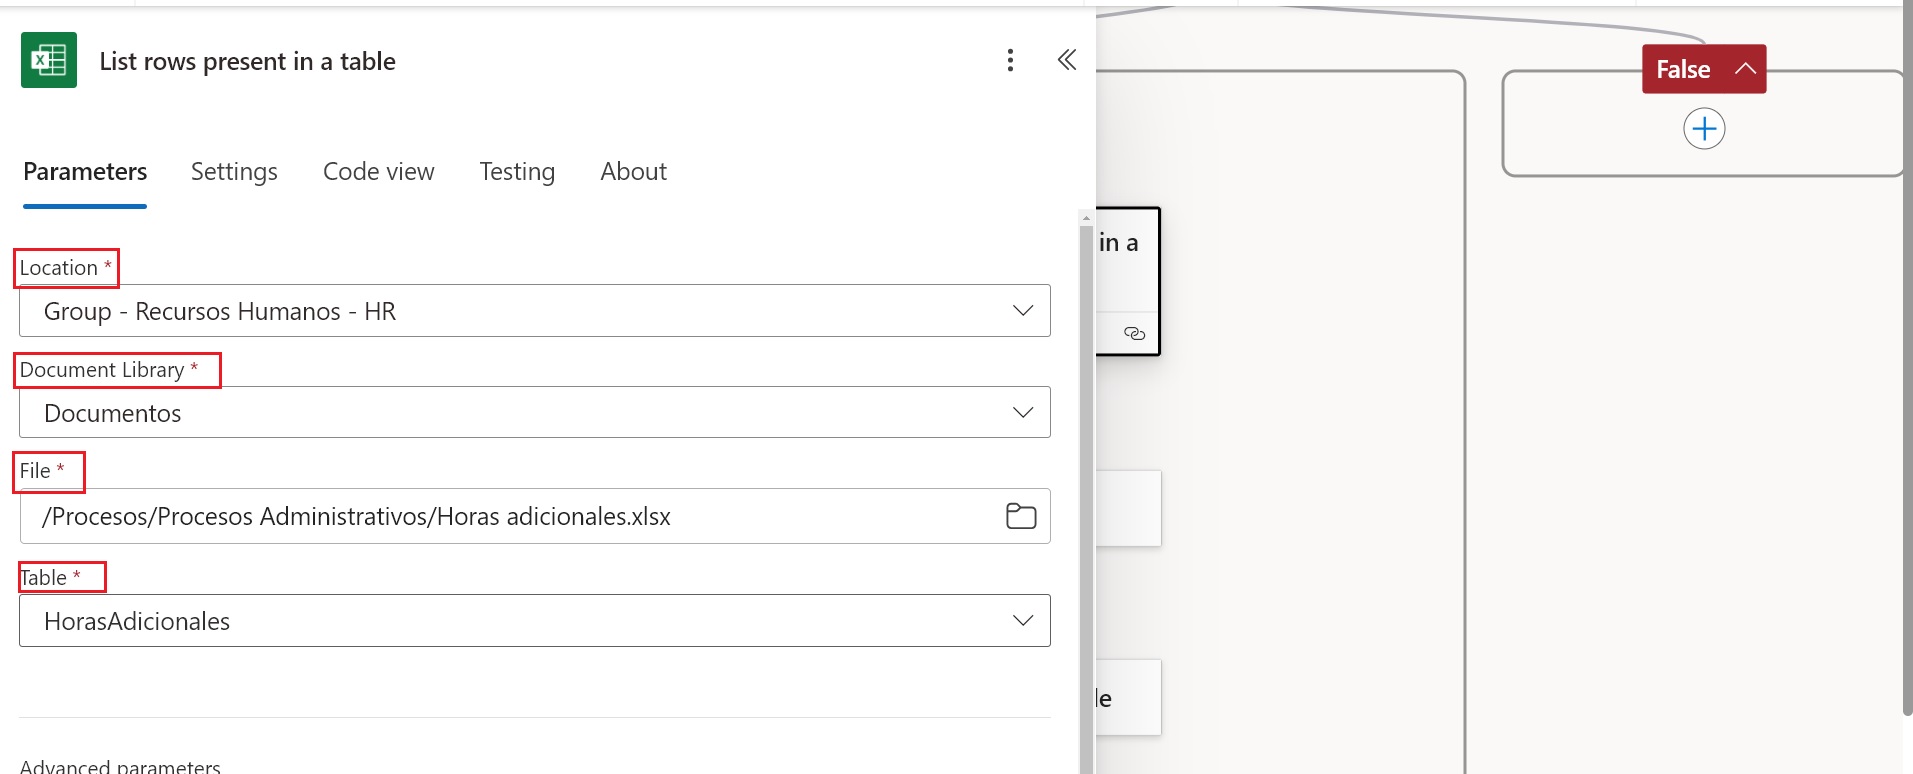
Image 16
The next action is Filter array, which is used to work only with data that meets specific criteria.
- In the From field, select “body/value” from the dynamic content generated by the previous Excel action (Image 17).
- In the Filter Query, add an expression using fx (Image 18).
This expression is designed to find records created between the 21st of the previous month and the 20th of the current month.
Here’s an example of the expression logic that can be used in Filter Query:
plaintext
Copy code
@and(greaterOrEquals(items(‘Apply_to_each’)?[‘DateField’], startOfMonth(addDays(utcNow(), -21))), lessOrEquals(items(‘Apply_to_each’)?[‘DateField’], addDays(utcNow(), -10)))
Modify the field names (e.g., ‘DateField’) to match the date column in your table.
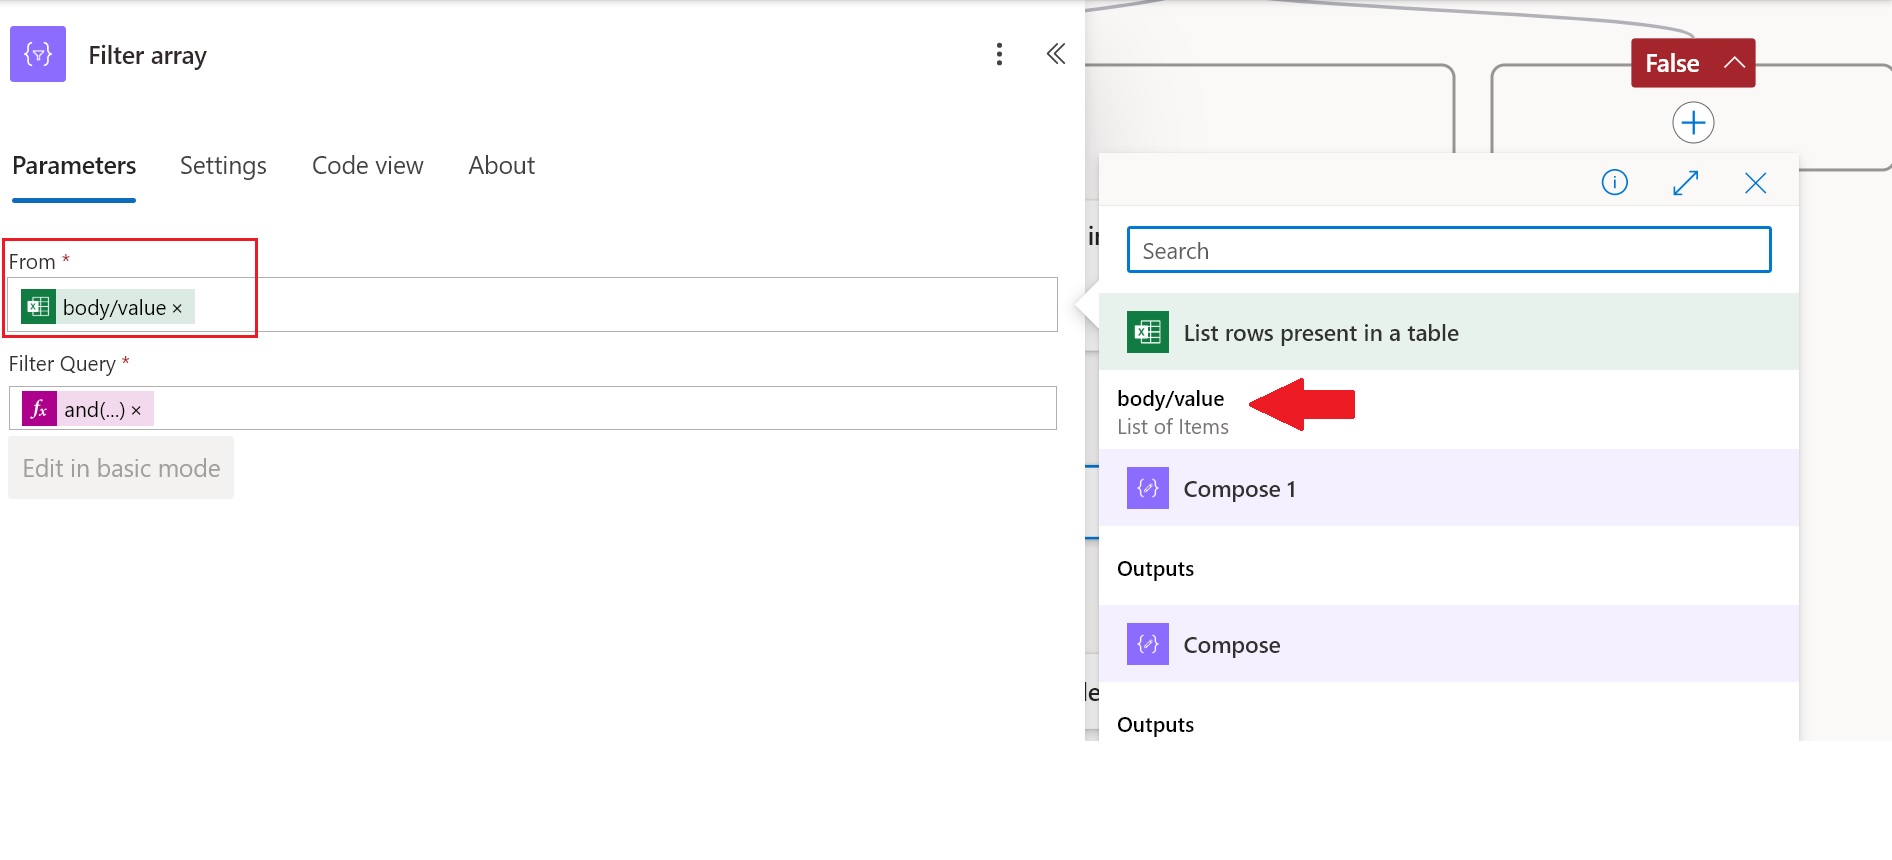
Image 17
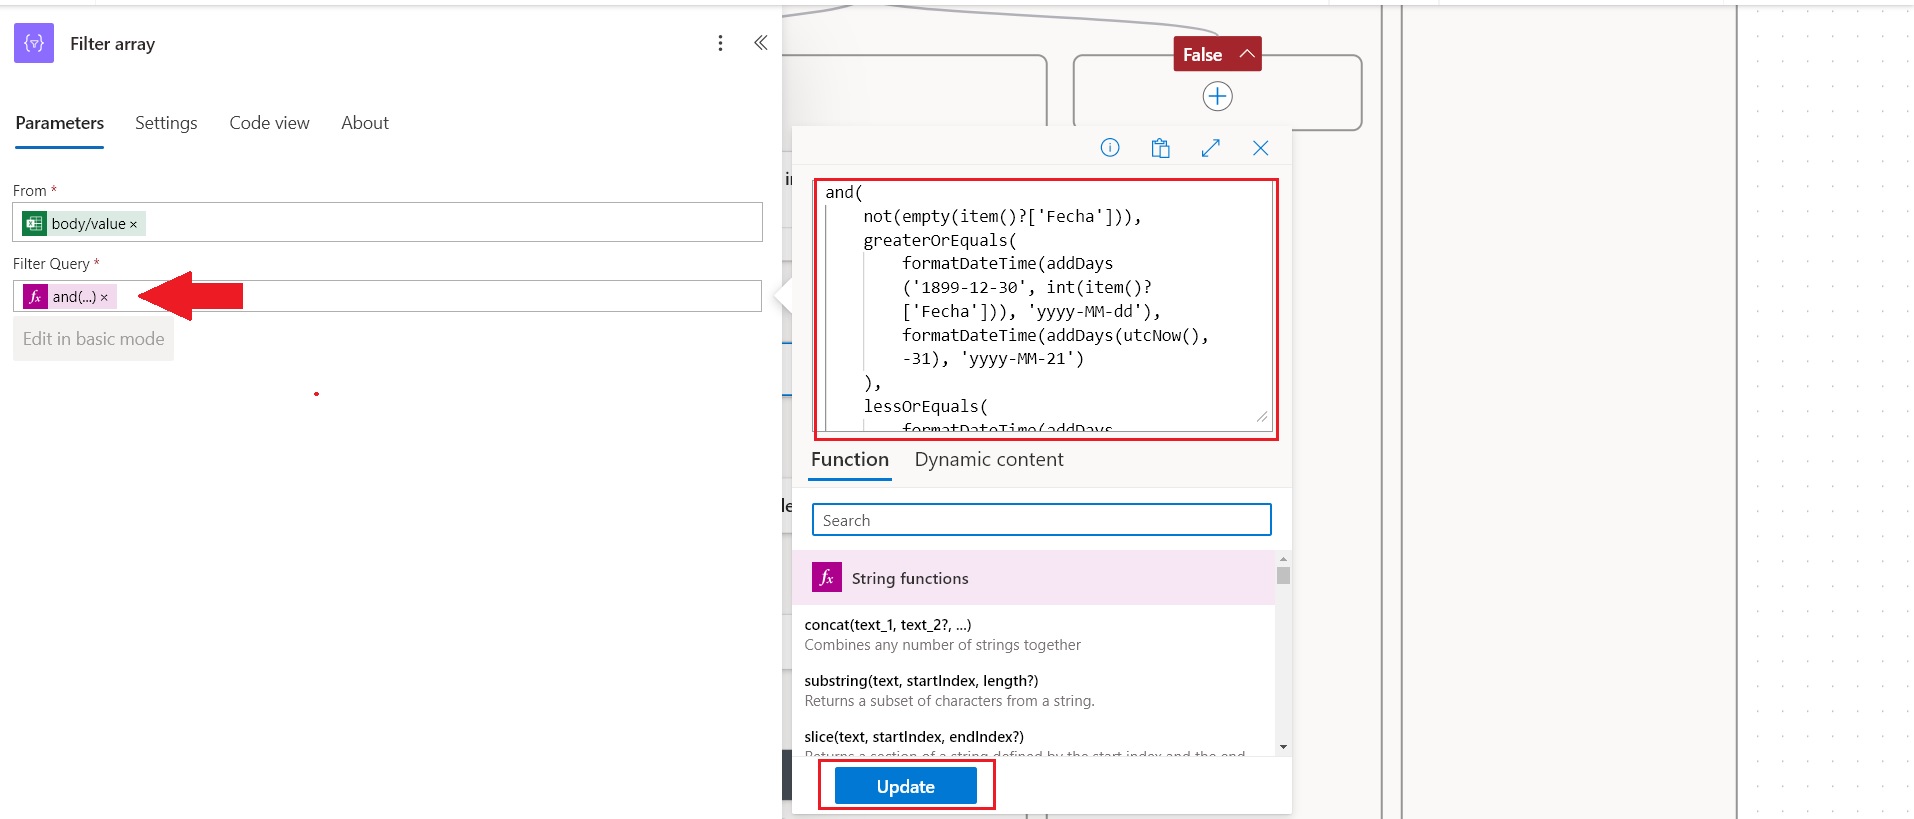
Image 18
Next, add the “Create HTML Table” action:
- In the From field, select the outputs generated by the Filter Array action from the dynamic content (Image 19).
- In the Advanced Options, under Columns, select Custom.
- Create two fields for the table:
a) Header: Enter the names of the columns you want to include.
b) Value: Use the following expression:
plaintext
Copy code
item()?[‘ColumnName’]
Replace ColumnName with the actual names of the columns from your data source (Image 20).
This setup will generate an HTML table with the filtered data.
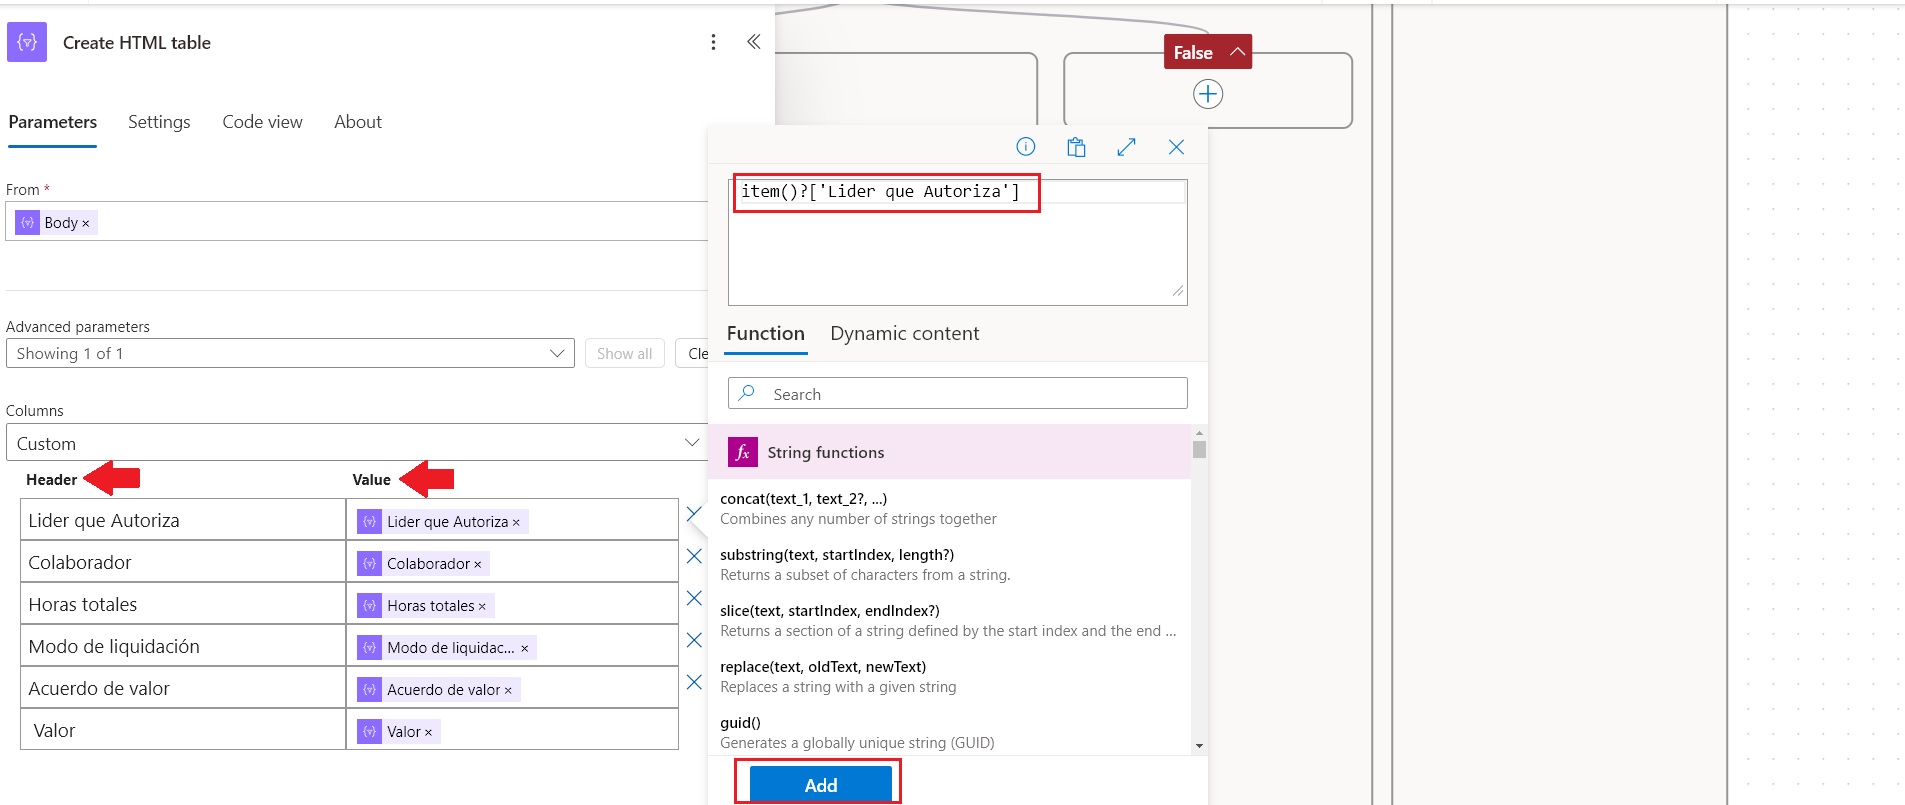
Image 20
The next action is a Compose (Image 9) to style the table sent to accounting in case overtime hours are reported.
In the INPUT field of the action, you need to add the following text to format the table (Image 21)
Regarding the highlighted text:
- background-color: You can replace the HEX code with the color code of your choice, based on the individual or company’s preference.
- {outputs(‘Create_HTML_Table’)}: Select the outputs generated by the dynamic content from the Create HTML Table action (Image 21).
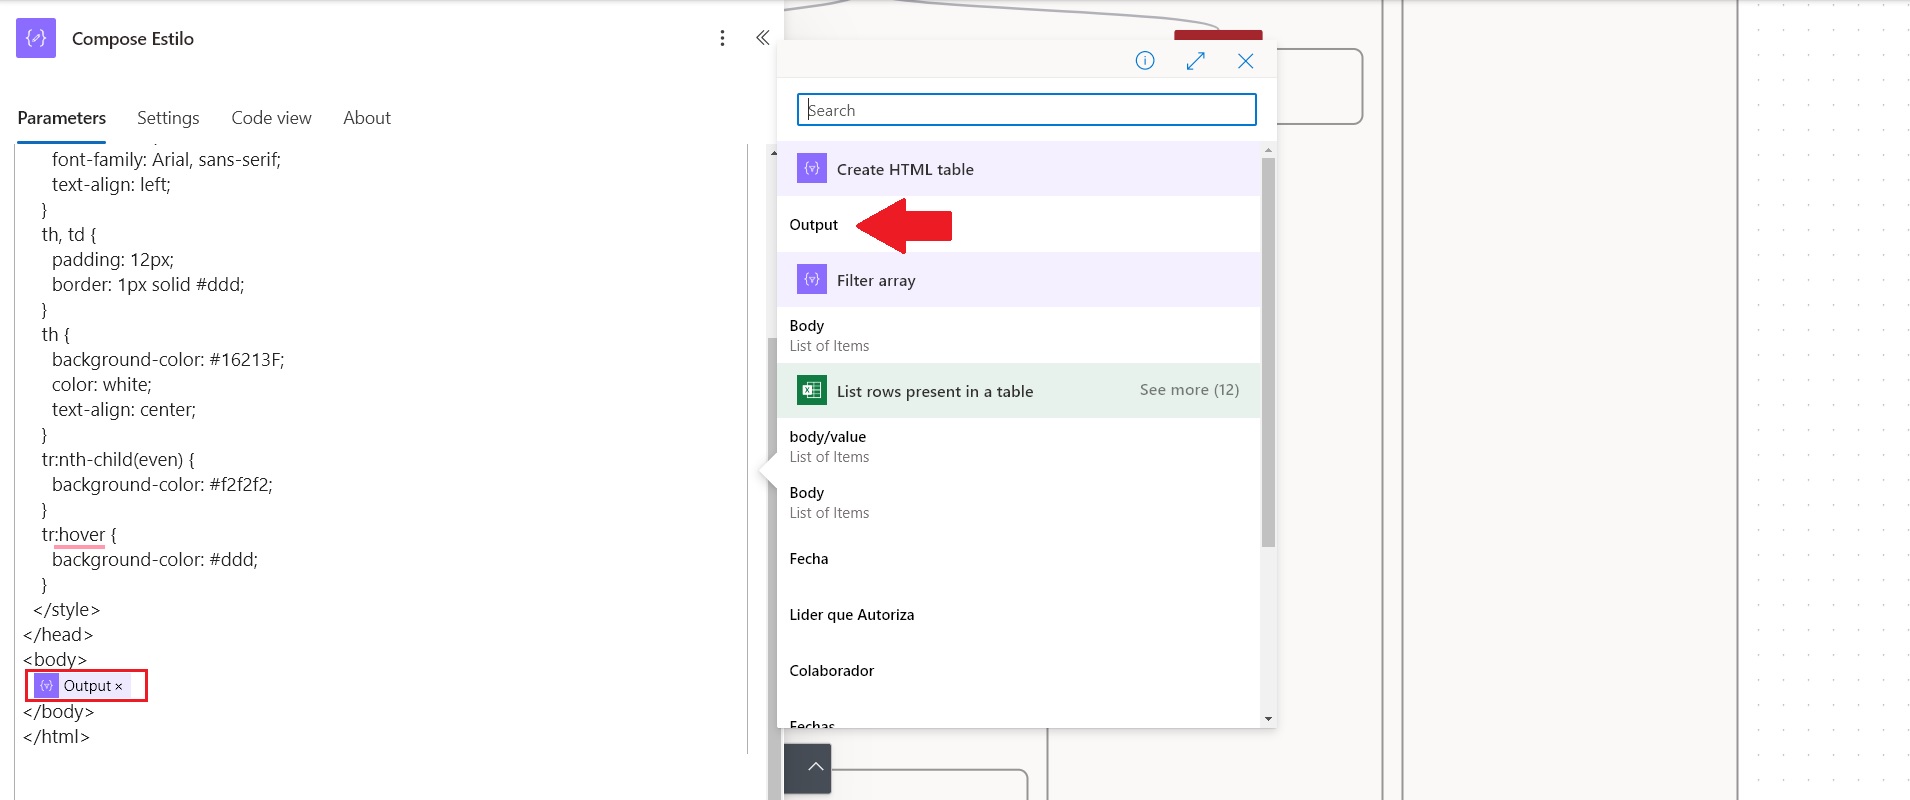
Image 21
The next action is an AND condition that checks whether the result of Filter Array contains at least one element, meaning it is not empty.
- In the first value, write the following expression by clicking on fx:
plaintext
Copy code
length(body(‘Filter_array’))
(Image 22).
- Set the operator to Is greater than.
- In the second value, enter 0.
This ensures the condition evaluates as true only if the array has one or more elements (Image 23).
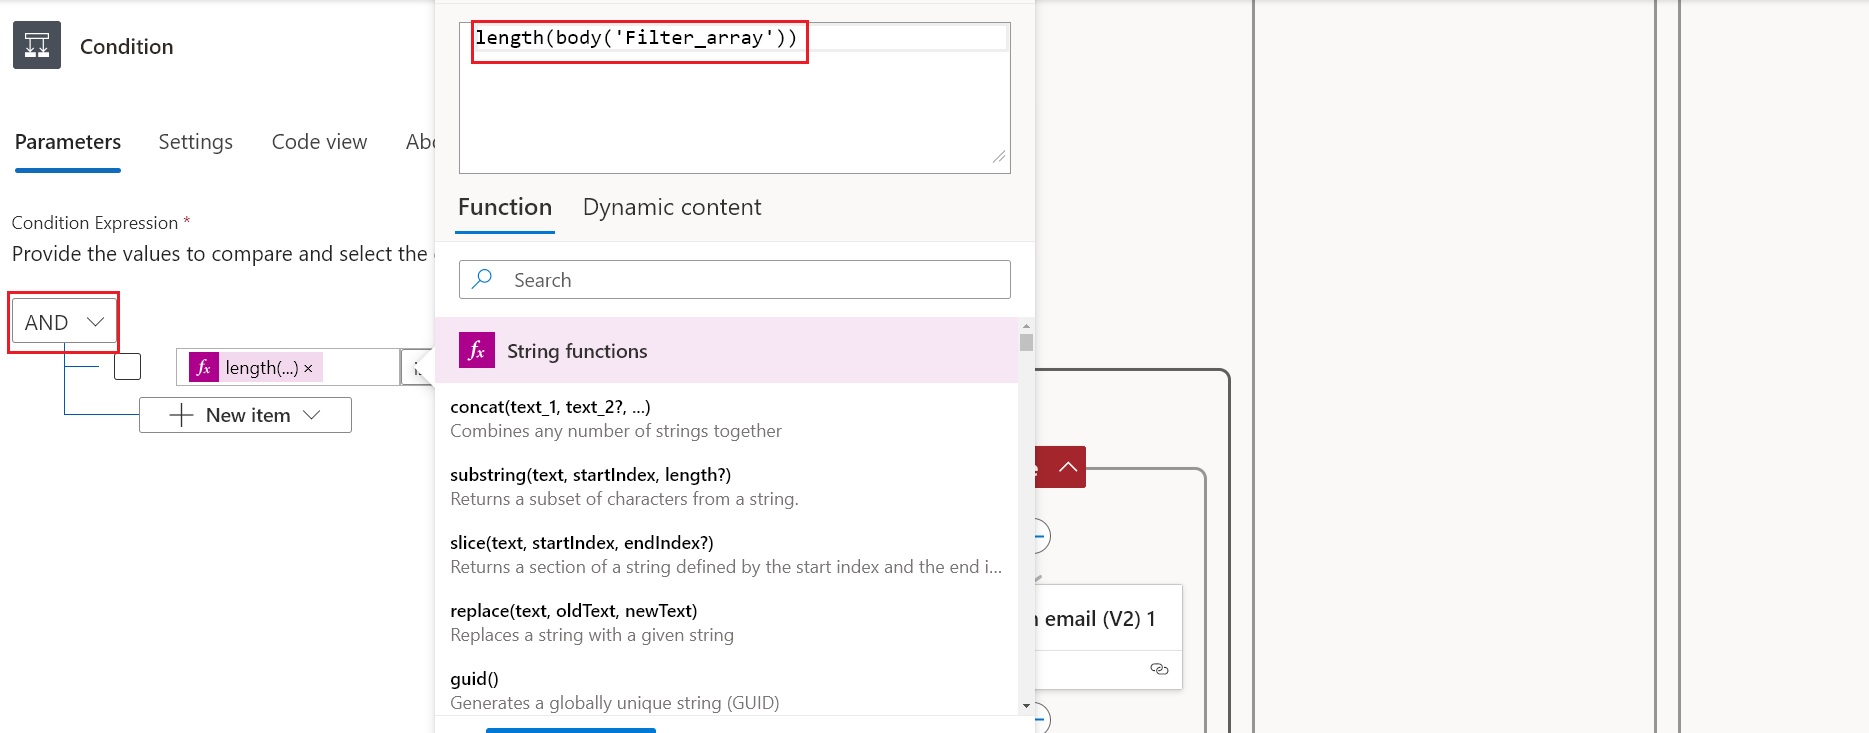
Image 22
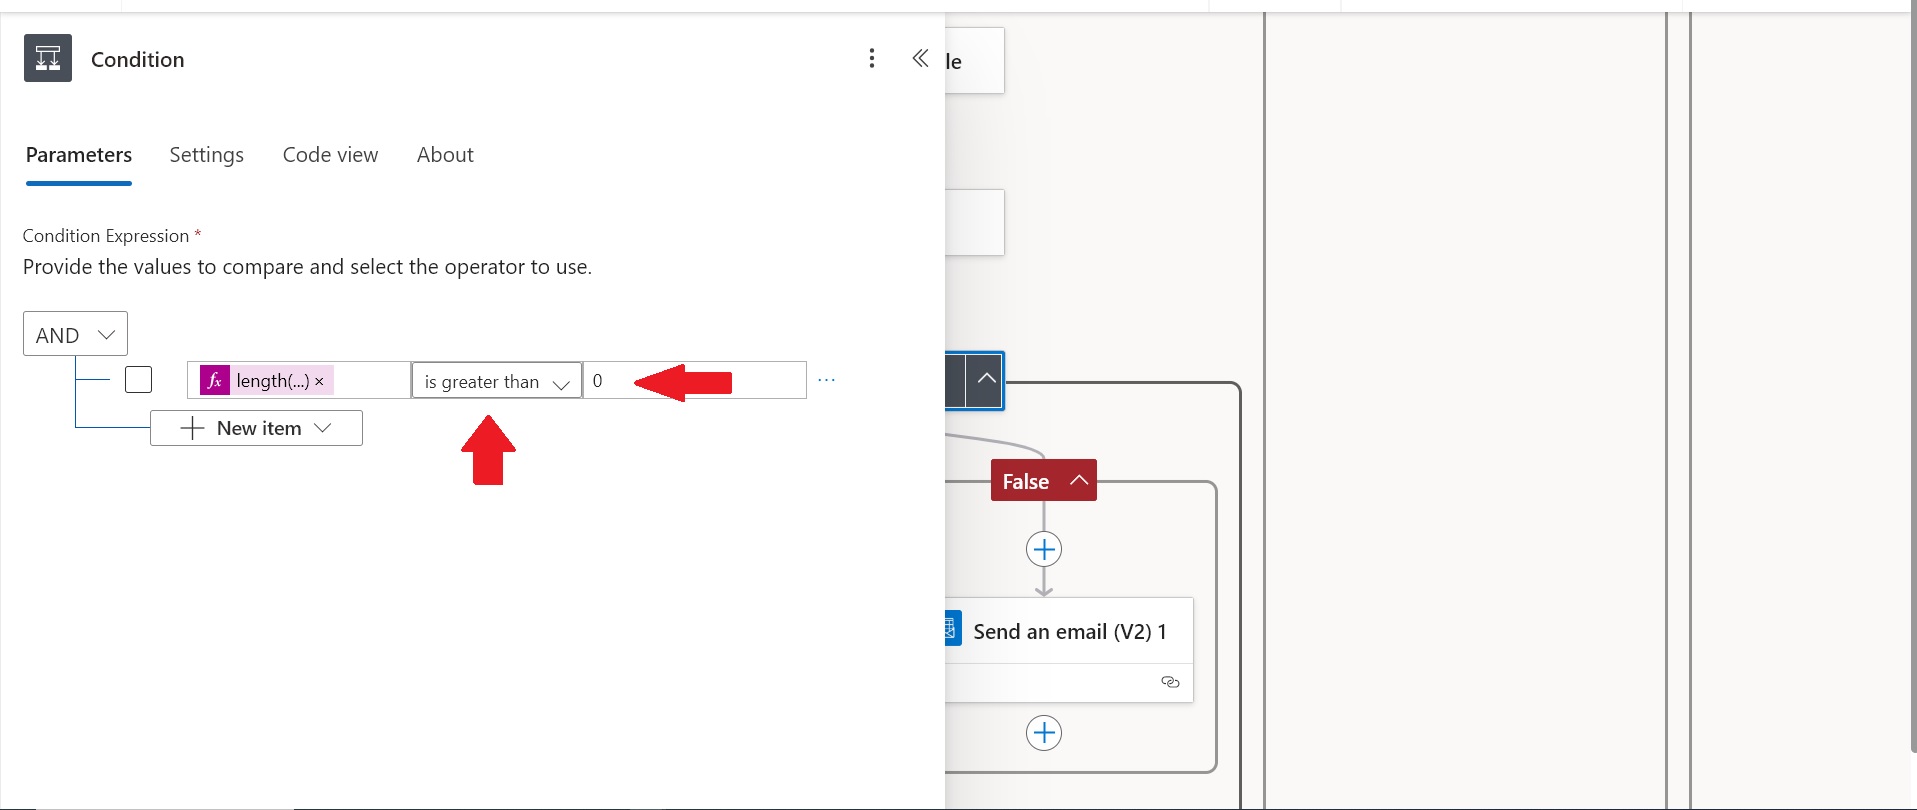
Image 23
If the condition is true (data is present):
Send an email with the records found by selecting the outputs from the Compose Style action in the dynamic content (Image 24).
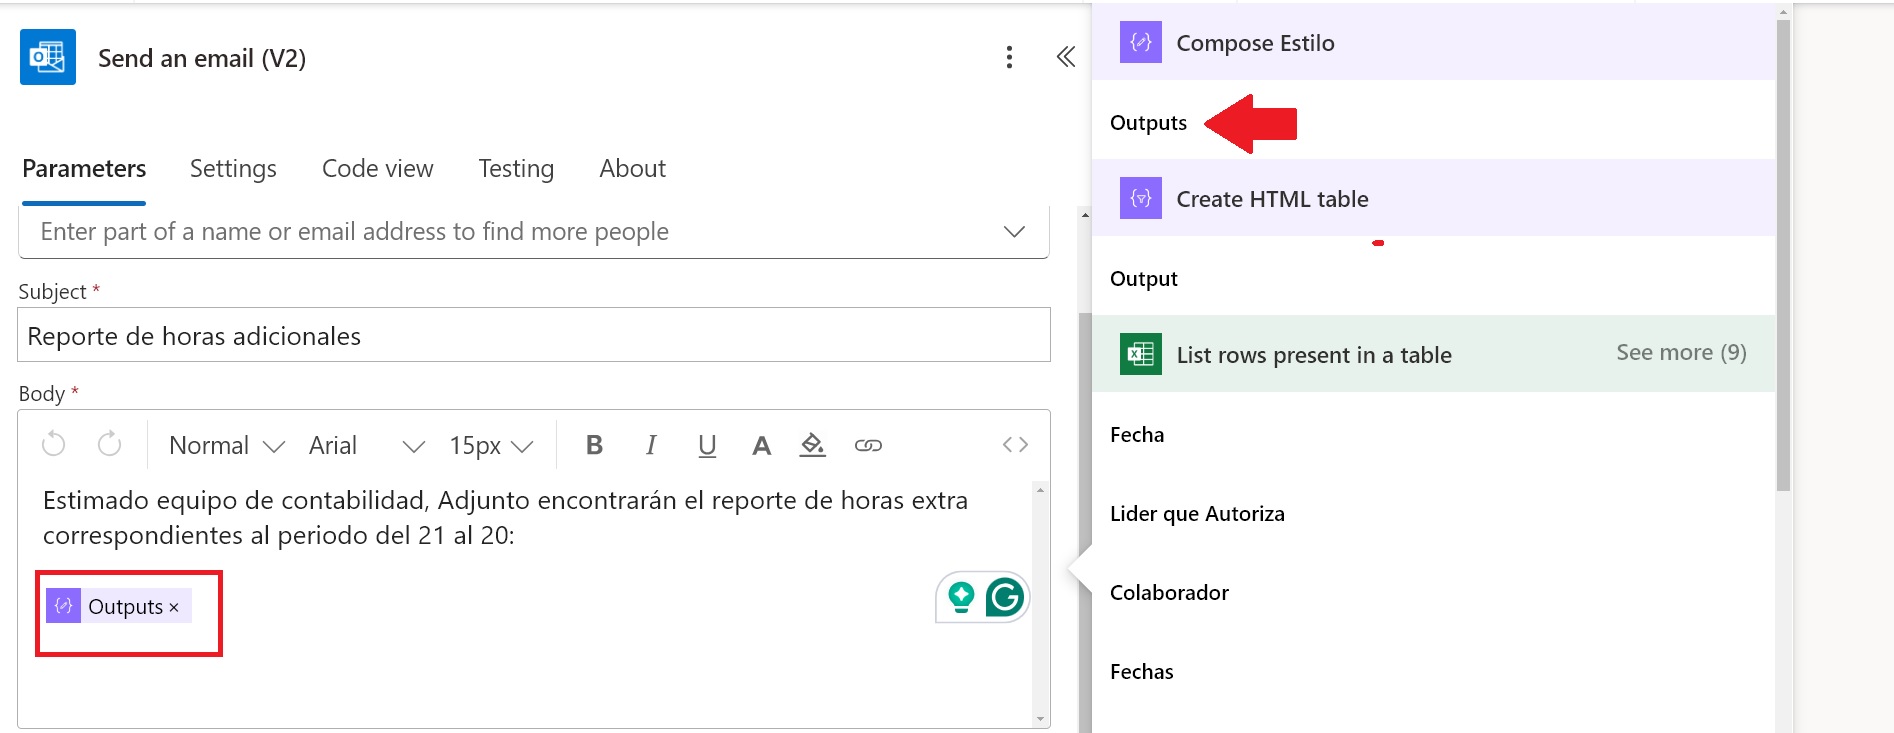
Image 24
If the condition is false (no data is present):
Send an email indicating that no reports were registered during the period (Image 25).
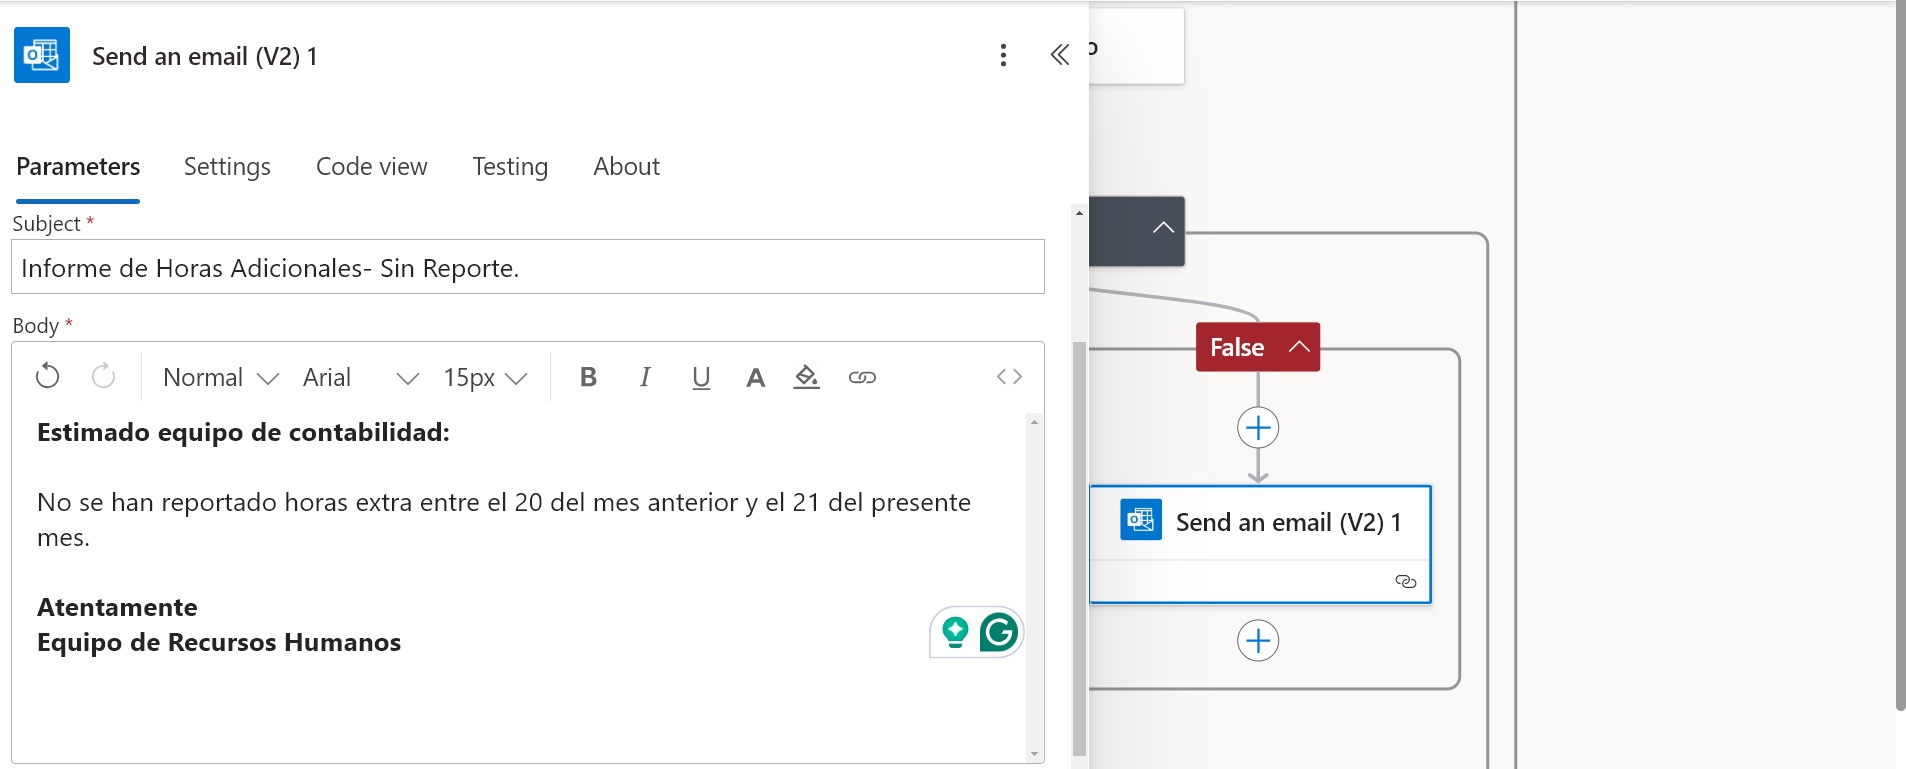
Transform Overtime Management with Custom Building Automation Systems
Efficiently managing overtime is no longer a challenge with the right automation systems. By automating processes like data collection, approvals, and notifications, you can save time, reduce errors, and improve operational efficiency.
At Pevaar, we specialize in creating tailored building automation systems, custom software solutions, and web development services to meet the unique needs of your business. Whether you’re looking to streamline overtime management, implement personalized automations, or enhance your digital infrastructure, our team of expert developers is here to help.
Ready to elevate your operations? Contact us today to discuss how we can design the perfect automation system for your business. Let’s build smarter workflows and solutions together with Pevaar!


Leave a Reply