Streamlining Leave Requests with an Automated Process in 17 steps
Managing leave requests can often feel like an overwhelming task, especially when manual workflows are in place. These traditional methods are prone to errors, delays, and miscommunication, leading to frustration for both employees and administrators. In today’s fast-paced work environment, it’s crucial to adopt solutions that streamline these processes while ensuring adherence to company policies. This is where implementing an automated process becomes a game-changer.
By using tools like Power Automate, you can design an automated process that simplifies the submission, review, and approval of leave requests. Not only does this save valuable time, but it also reduces the likelihood of human error, ensuring that all leave requests are handled quickly, accurately, and in line with organizational guidelines. An automated process eliminates bottlenecks and keeps everyone informed, fostering a more productive and stress-free workplace.
This guide takes you step-by-step through creating an automated process that specifically addresses leave requests submitted outside of specified deadlines. For organizations, ensuring compliance with submission timelines is vital to maintain fairness and efficiency. The automated process we’ll build ensures that employees are notified whenever they fail to adhere to these deadlines, helping them stay informed while keeping the system running smoothly.
With this comprehensive walkthrough, you’ll learn how to create an automated process that not only triggers notifications but also identifies leave request types, calculates submission timelines, and sends personalized reminders to employees. Whether the leave request is for a medical appointment, a vacation, or a personal errand, the system will handle each scenario seamlessly, ensuring clear communication and adherence to company policies.
Implementing an automated process for leave management has several key benefits:
- Improved Efficiency: The submission, review, and approval stages are streamlined, reducing administrative workload.
- Policy Compliance: The system ensures requests align with your company’s guidelines and deadlines.
- Enhanced Communication: Employees receive timely, personalized notifications about their leave requests.
- Time Savings: Both employees and administrators can focus on more critical tasks rather than being bogged down by manual processes.
This solution leverages the power of automation to transform the way your organization handles leave requests. Instead of relying on outdated methods, you’ll have a modern, tech-driven approach that ensures no leave request is missed or mishandled. With tools like Power Automate, you can customize the workflow to fit the unique needs of your organization, making the automated process as effective and user-friendly as possible.
Let’s dive into the details of how this automated process can revolutionize your leave management system. From designing workflows that calculate submission timelines to setting up email notifications for non-compliance, this guide will walk you through every step to create a reliable, efficient, and error-free solution. Say goodbye to the hassle of manual workflows and embrace the efficiency of an automated process today!
Workflow for Sending Emails When Leave Requests Are Submitted Outside the Required Dates
Step 1: Creating the Workflow
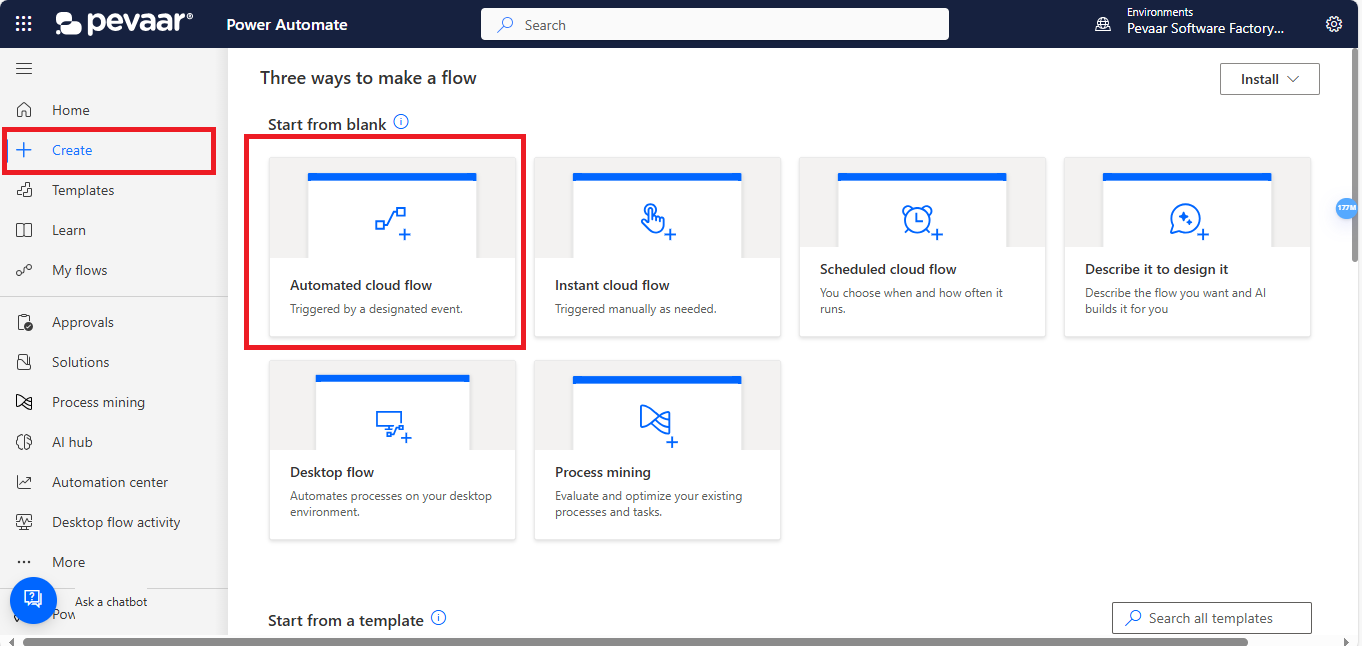
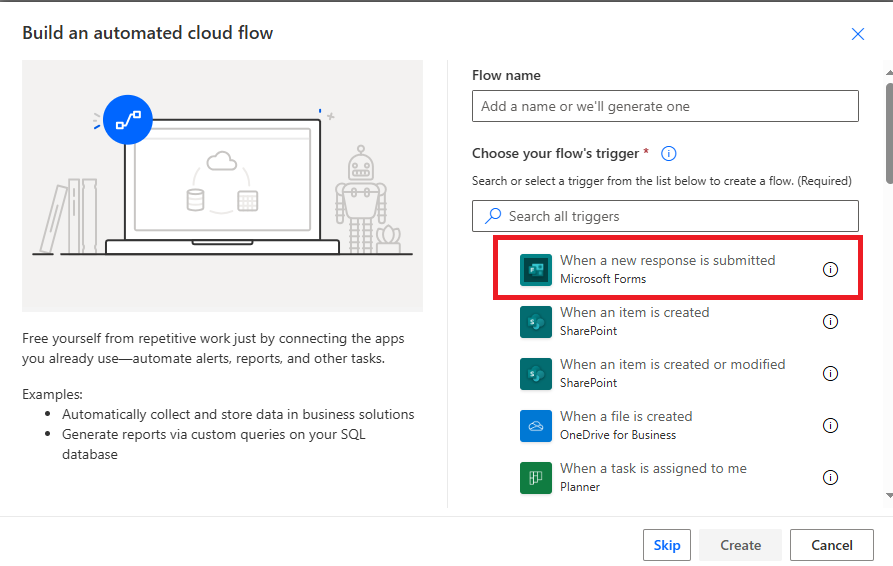
To get started, access Power Automate from the Microsoft 365 app panel. Once inside the environment, click on the Create option. Then, select Automated Cloud Flow.
Step 2: Adding the Workflow Trigger
Now you need to select the action that will initiate the workflow. In this case, choose the option “When a new response is submitted”, as this will ensure the workflow runs every time someone submits a new response in a Microsoft Form.
Step 3: Selecting the Form
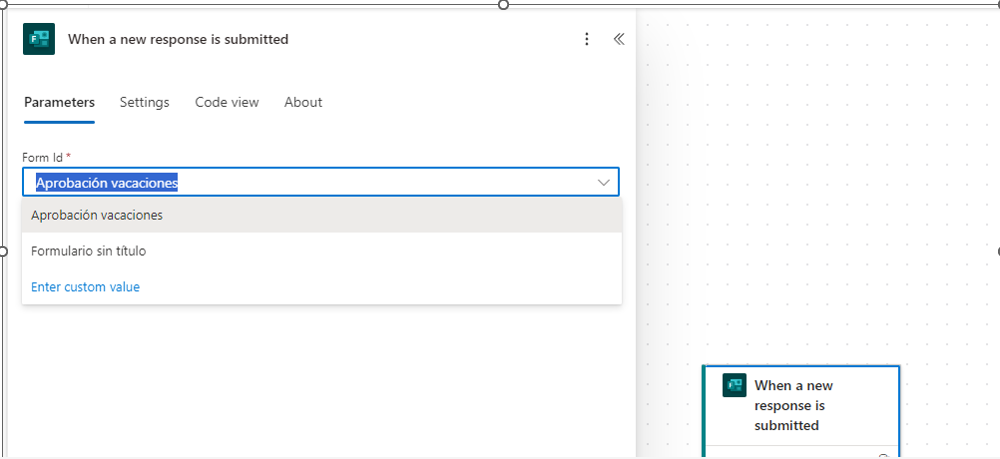
Within the trigger options, under the property “Form ID”, select your form. At this stage, all the forms you have previously created in Microsoft Forms will be displayed.
Step 4: Retrieve Form Response Details
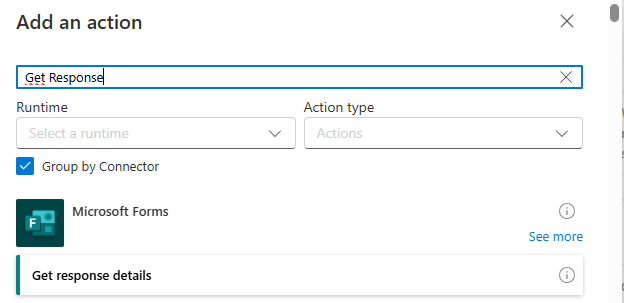
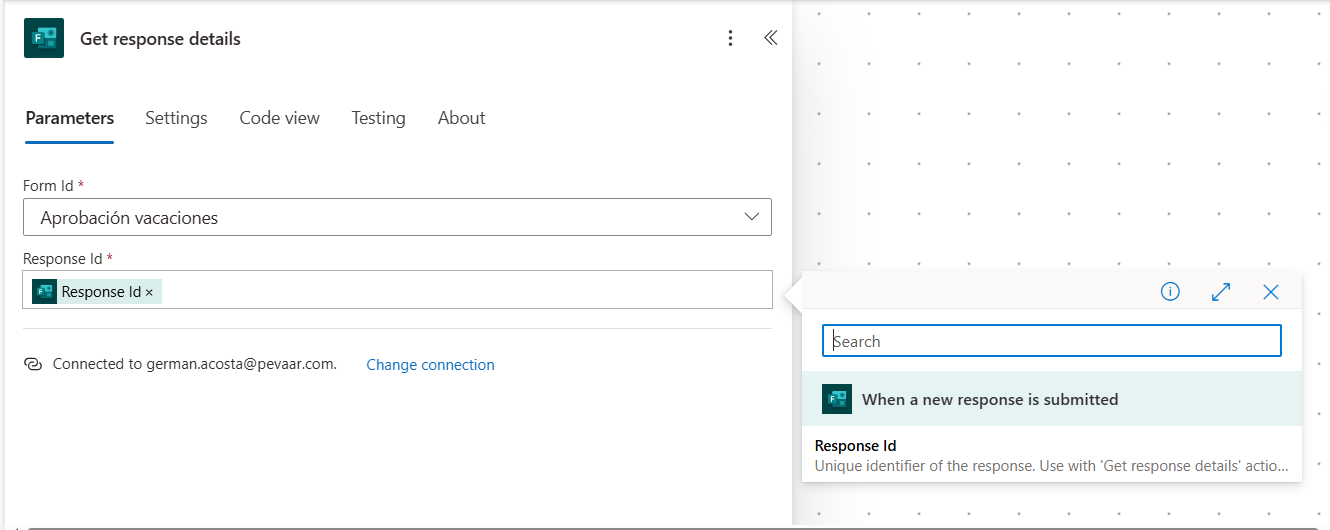
Next, add the action “Get response details” to extract all the information from the response submitted through the form. In the Form ID field, select the form you want to extract information from. In the Response ID field, choose the output from the action “When a new response is submitted”.
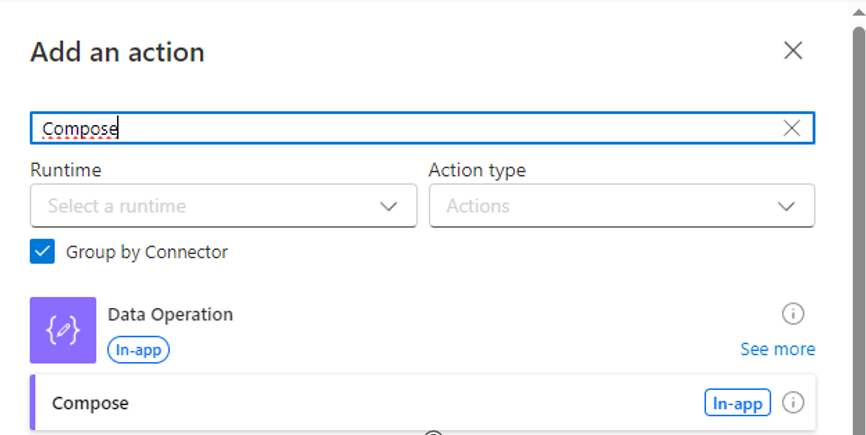
Step 5: Add a Compose Action to Store Dates
Add a Compose action to store the dates provided in the form response. In the Inputs field, select the dynamic variable from the output of Get Response Details, and choose the start date of the leave request.
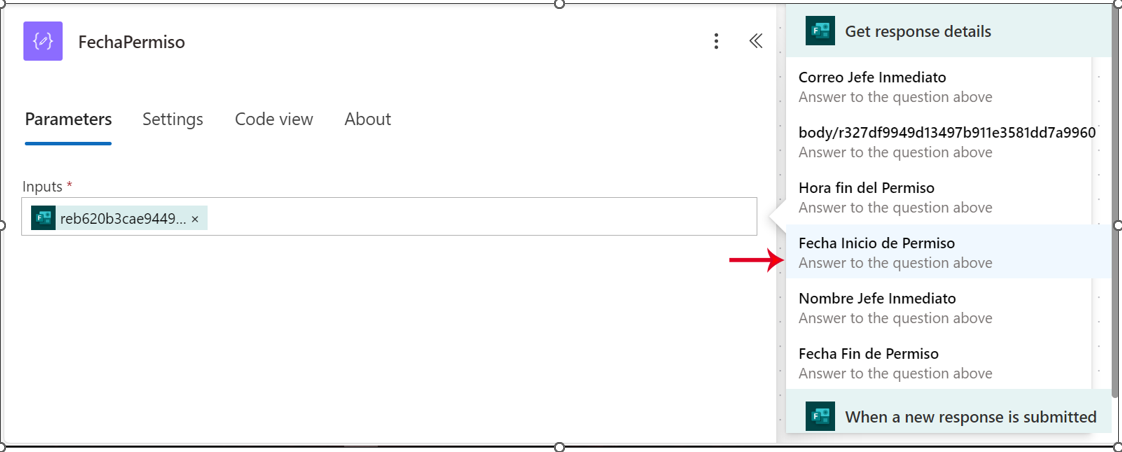
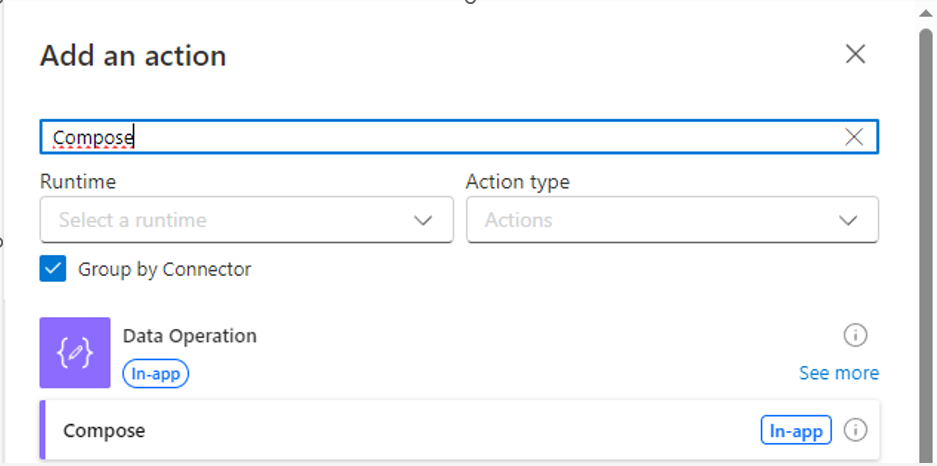
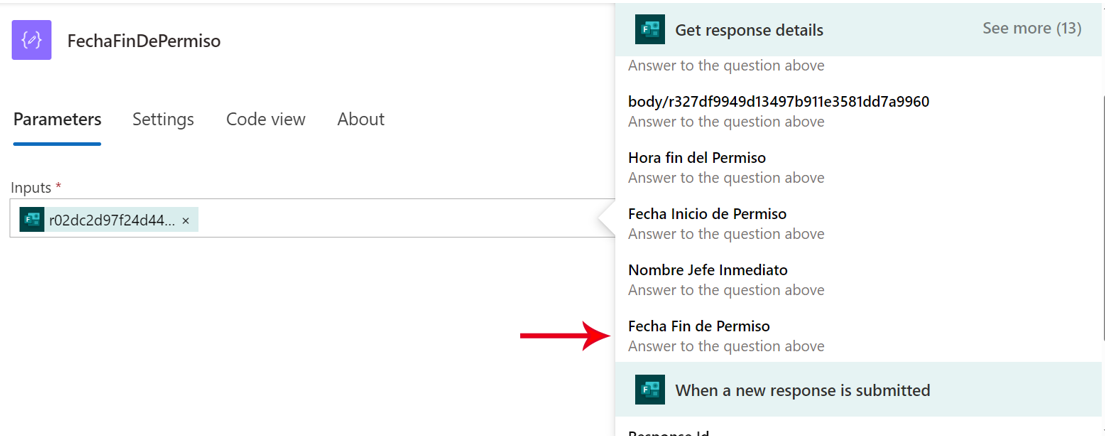
Additionally, create another Compose action to store the end date of the leave request. In this step, follow the same process by selecting the dynamic variable from the output of Get Response Details and choosing the end date.
Step 6: Convert Dates to Ticks Values
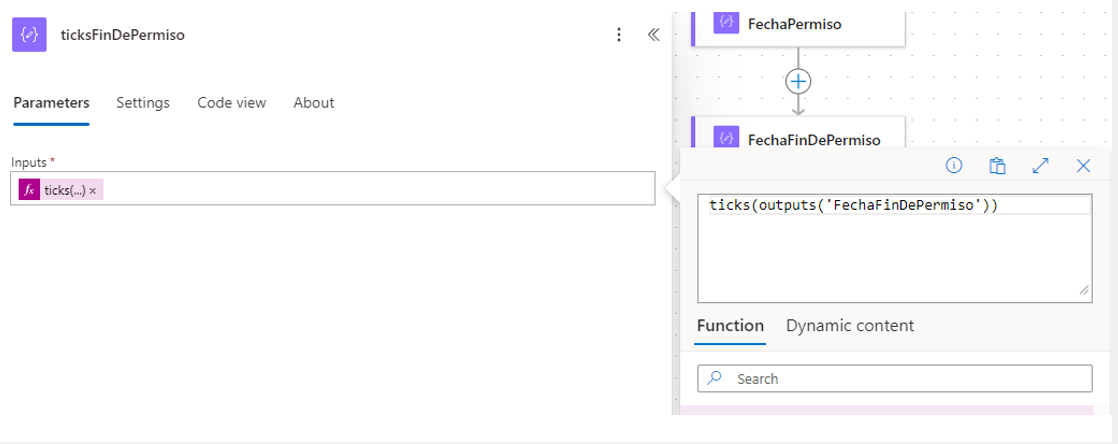
Add two Compose actions to process the dates stored in the previously created Compose actions. Each Compose will include an expression in the Inputs field to convert the dates into ticks (a numeric time value) for calculations.
- In the first Compose, use this expression:
plaintext
Copy code
ticks(outputs(‘Fecha_Permiso’))
- In the second Compose, use this expression:
plaintext
Copy code
ticks(outputs(‘FechaFinDePermiso’))
These expressions convert the dates into ticks, which are essential for performing date calculations.

Step 7: Retrieve the Current Date
Add a new Compose action, and in the Inputs field, include the following expression:
plaintext
Copy code
utcNow()
This expression retrieves the current date and time.

Step 8: Calculate the Difference Between the Current Date and the Leave Start Date
Add another Compose action. This Compose will compare the current date with the start date of the leave request. This step is essential to determine if the leave is being requested within the timeframe specified by the company.
In this Compose, use the following expression:
plaintext
Copy code
div(sub(ticks(outputs(‘FechaPermiso’)), ticks(outputs(‘FechaActual’))), 864000000000)
This expression calculates the difference in days between two dates by converting them into ticks and performing the necessary subtraction and division.

Step 9: Add Leave Type to a Compose Action
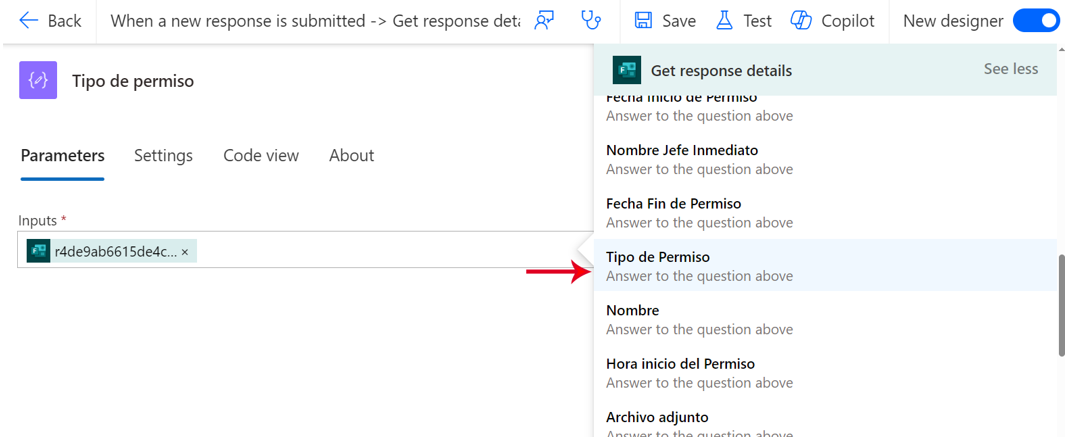
Add another Compose action, and select the “Leave Type” property from the output of the Get Response Details action. This will store the type of leave requested, allowing further conditions and processing based on the leave type.
Step 10: Compare Leave Start Date with End Date
Add a Compose action and include the following expression in the Inputs field:
plaintext
Copy code
div(sub(outputs(‘ticksFinDePermiso’), outputs(‘ticks’)), 864000000000)
This expression compares the leave start date with the end date to calculate the number of days being requested. This Compose action is primarily used to determine how many days of leave are being requested in the form.

Step 11: Calculate the Required Submission Deadline Based on the Number of Leave Days
Add another Compose action and use the following expression:
plaintext
Copy code
if(lessOrEquals(outputs(‘NumeroDeVacaciones’), 2), 15, 30)
This expression determines the number of days in advance the leave request must be submitted:
- If the number of leave days is 2 or fewer, the required submission deadline is 15 days.
- If the number of leave days is more than 2, the required submission deadline is 30 days.
This Compose action helps ensure the leave request adheres to the company’s policy based on the number of requested days.

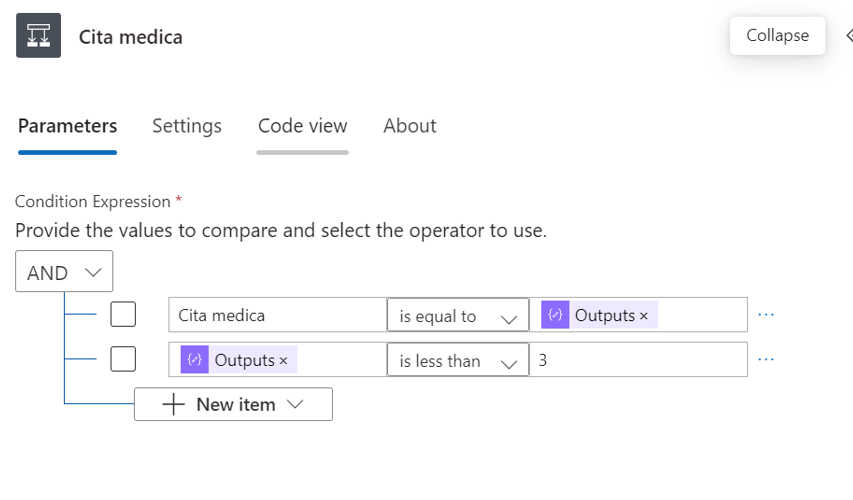
Step 12: Add a Condition to Detect If the Leave Type Is “Medical Appointment”
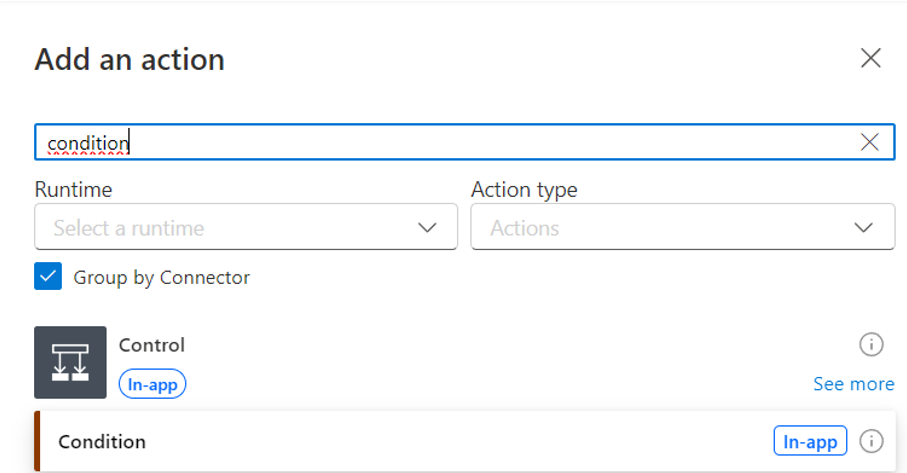
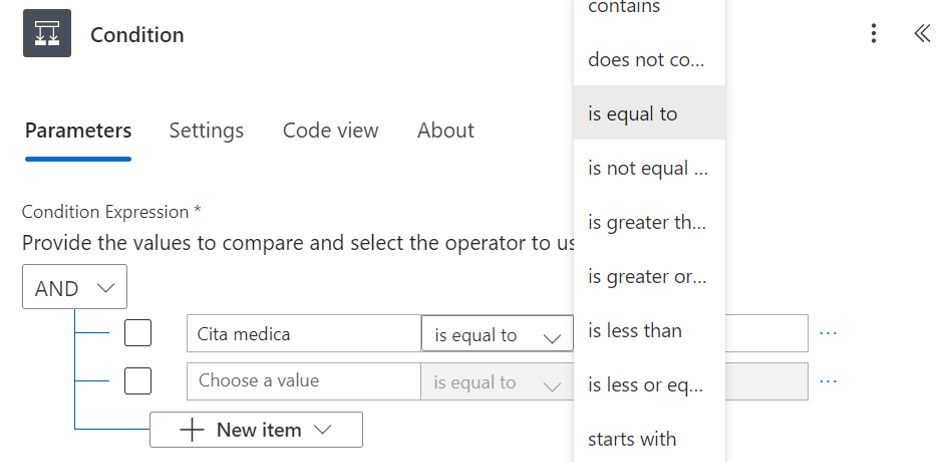
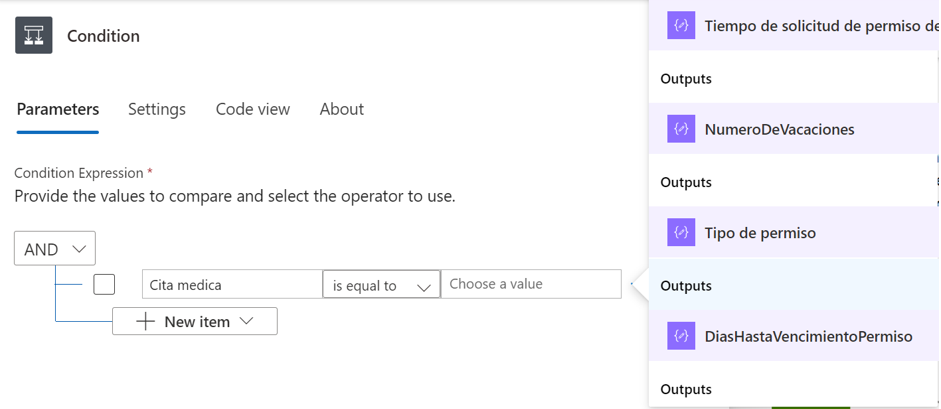
Add a condition to the workflow. Once the condition is added, click on “New item”.
- In the field labeled “Choose value”, type “Cita médica”.
- From the dropdown menu, select “Is equal to”.
- In the field on the right labeled “Choose a value”, select the output from the Compose action labeled “tipo de permiso”.
This condition will identify if the leave type is categorized as a “Medical Appointment” to allow for further processing specific to this type of leave.
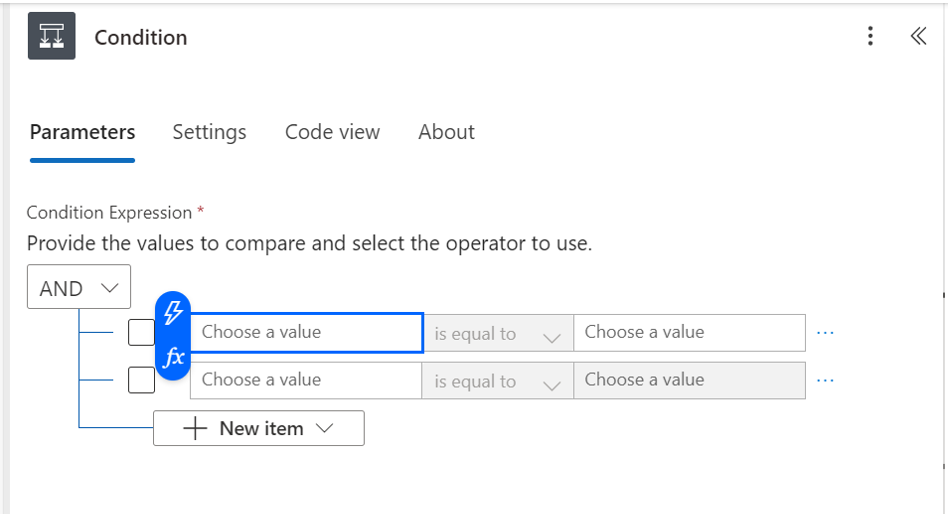
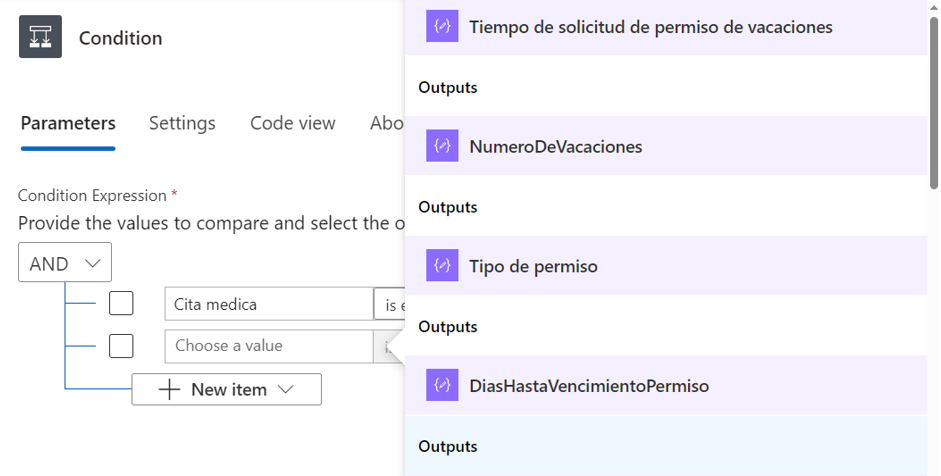
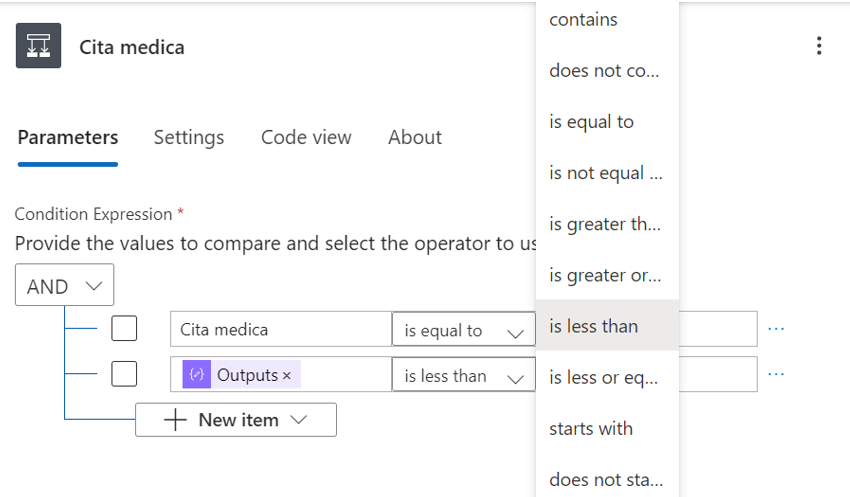
In the next row of the condition:
- In the field labeled “Choose value”, select the output from the Compose action named “DiasHastaVencimientoDePermiso”.
- From the dropdown menu, choose “Is less than”.
- In the field labeled “Choose value”, enter the number 3.
This additional condition checks if the leave request is being made less than 3 days before the medical appointment date, ensuring it adheres to the policy for medical appointment leave submissions.
Step 13: Add an Action to Send an Email
Once the condition for “Medical Appointment” leave is verified:
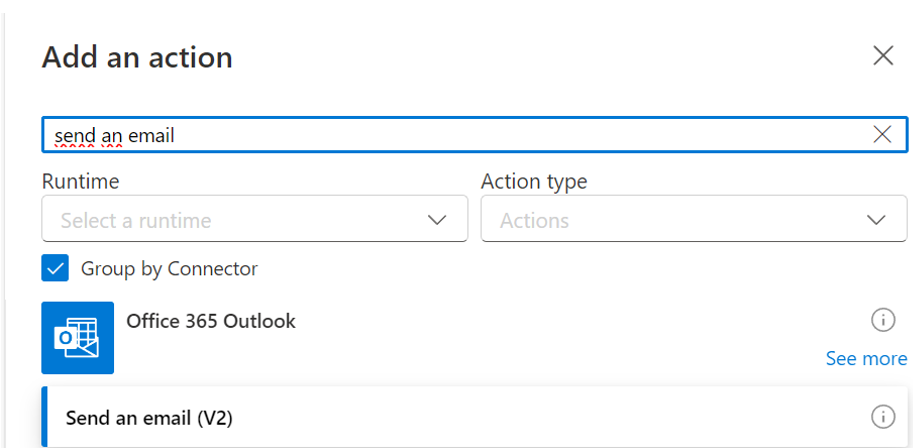
- Add the “Send an Email” action to the workflow.
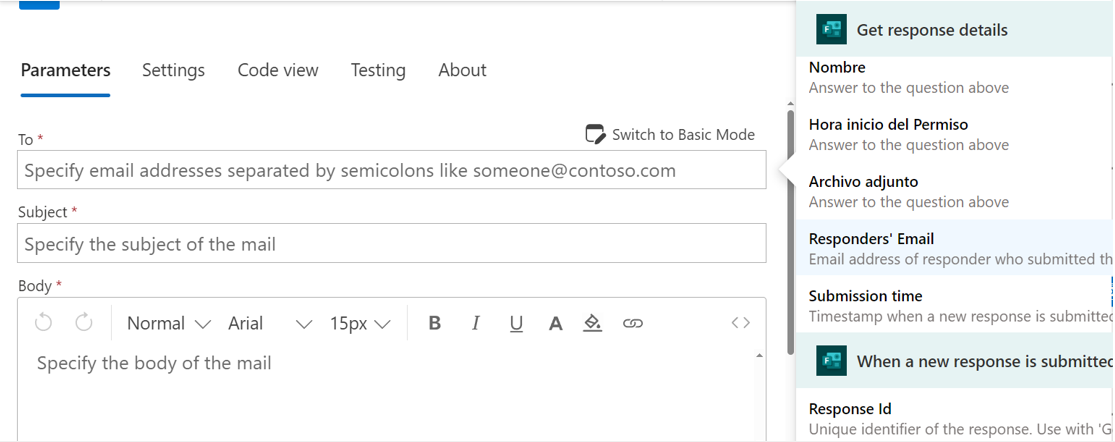
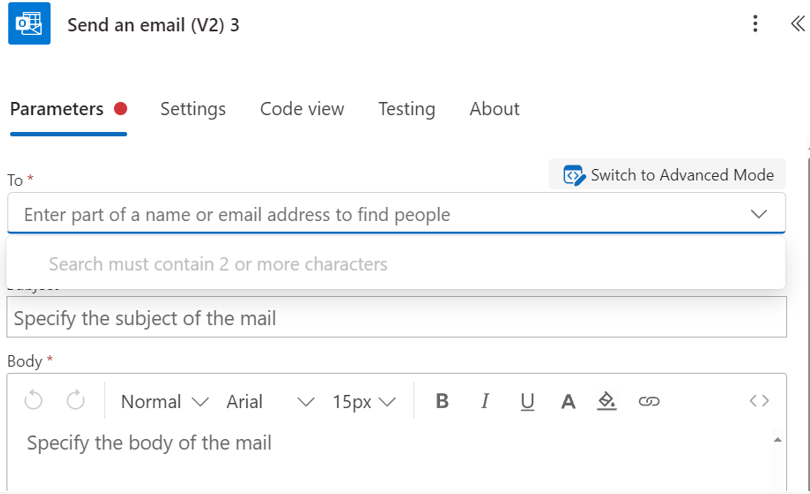
- Click the button labeled “Switch to advanced mode” to access more configuration options.
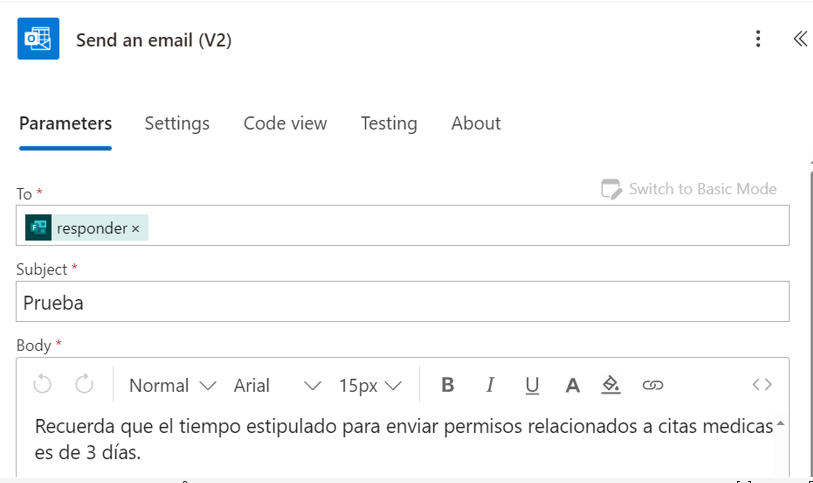
- In the “To” field, select the “Responders Email” property from the dynamic content.
- In the “Subject” field, write the email subject, clearly explaining the purpose of the notification.
- In the “Body” field, draft the email message to remind the user that medical appointment leave requests must be submitted at least 3 days in advance.
This ensures that the person who filled out the form receives clear guidance on the company’s policy regarding medical appointment leave submissions.
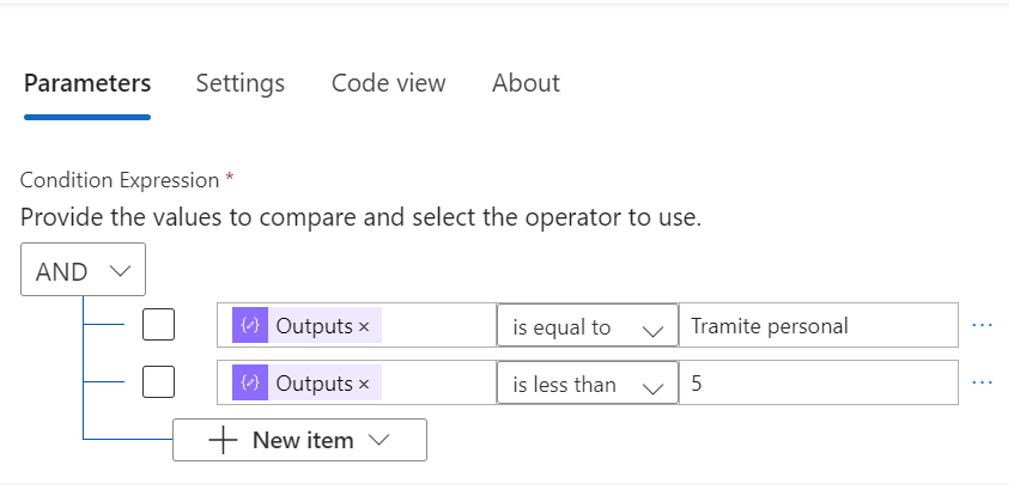
Step 14: Add a Condition for “Personal Errand” Leave Type
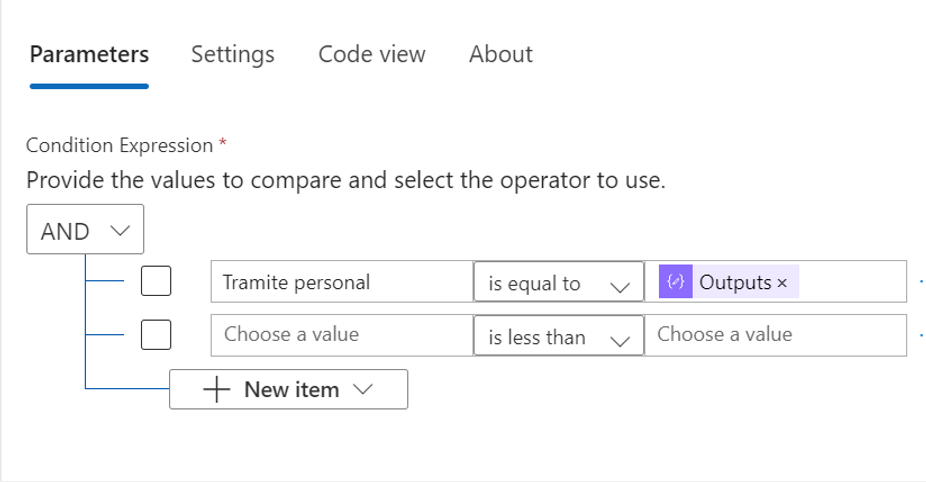
Add a condition to handle leave requests for “Personal Errand” leave type:
- Add a new condition and click “New item”.
- In the “Choose value” field, type “Tramite personal”.
- From the dropdown menu, select “Is equal to”.
- In the field on the right labeled “Choose a value”, select the output from the Compose action named “tipo de permiso”.
This condition ensures that the workflow can identify and process leave requests categorized as “Personal Errand.”
In the next row of the condition:
- In the “Choose value” field, select the output from the Compose action labeled “DiasHastaVencimientoDePermiso”.
- From the dropdown menu, choose “Is less than”.
- In the “Choose value” field, enter the number 5.
This additional condition checks if the leave request for “Personal Errand” is being submitted less than 5 days in advance, ensuring compliance with the company’s policy for this type of leave.
Step 15: Add an Email Action for the “Personal Errand” Condition
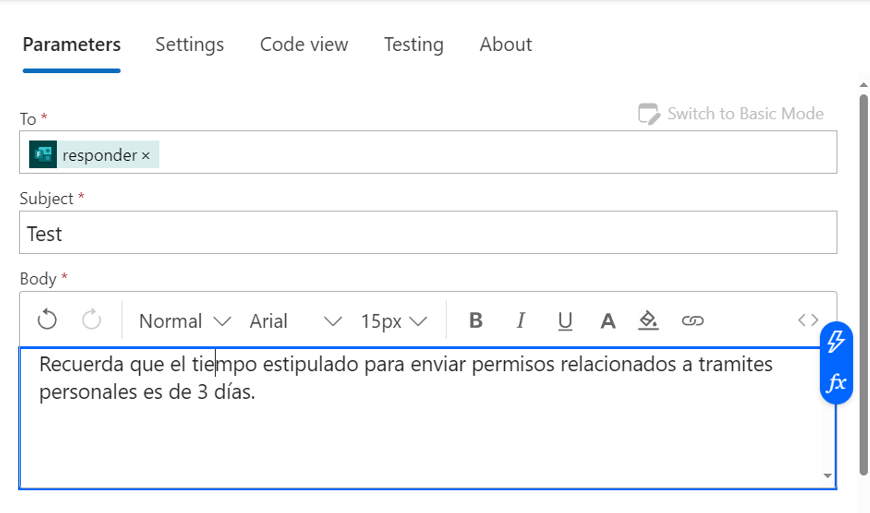
Once the condition for “Personal Errand” leave is verified:
- Add the “Send an Email” action to the workflow.
- Click the “Switch to advanced mode” button to access advanced configuration options.
- In the “To” field, select the “Responders Email” property from the dynamic content.
- In the “Subject” field, write the subject of the email, clearly indicating the purpose of the notification.
- In the “Body” field, draft the email message to inform the user about the required submission timeline for a “Personal Errand” leave.
This email will serve as a reminder to the person who filled out the form, ensuring they are aware of the company’s policy regarding “Personal Errand” leave requests.
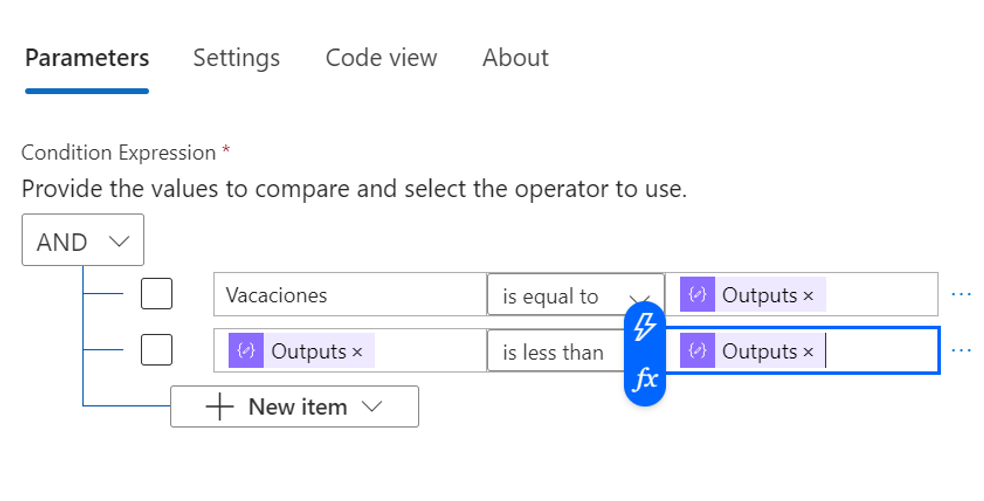
Step 16: Add a Condition for “Vacation” Leave Type
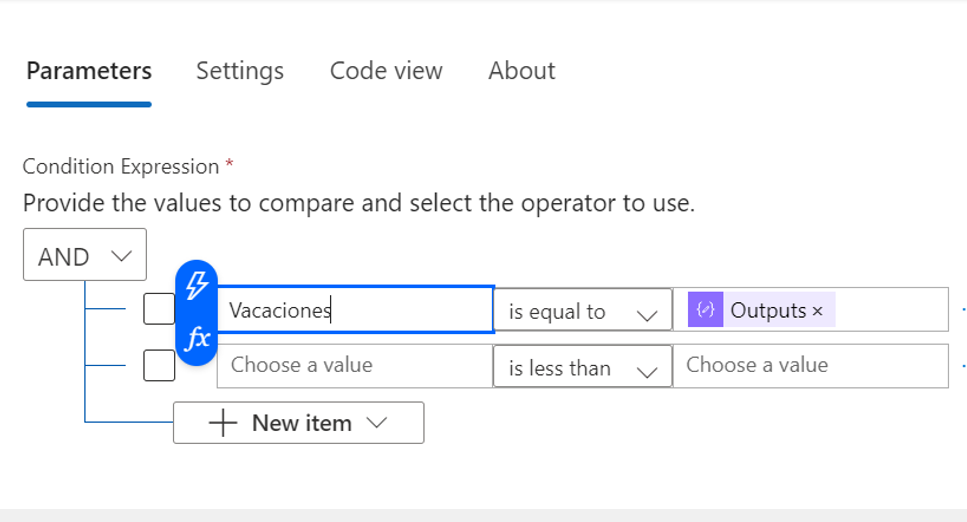
To handle requests for “Vacation” leave:
- Add a new condition to the workflow and click “New item”.
- In the “Choose value” field, type “Vacaciones”.
- From the dropdown menu, select “Is equal to”.
- In the field labeled “Choose a value”, select the output from the Compose action labeled “tipo de permiso”.
This condition identifies leave requests for the “Vacation” type, allowing the workflow to handle them based on the specified policies.
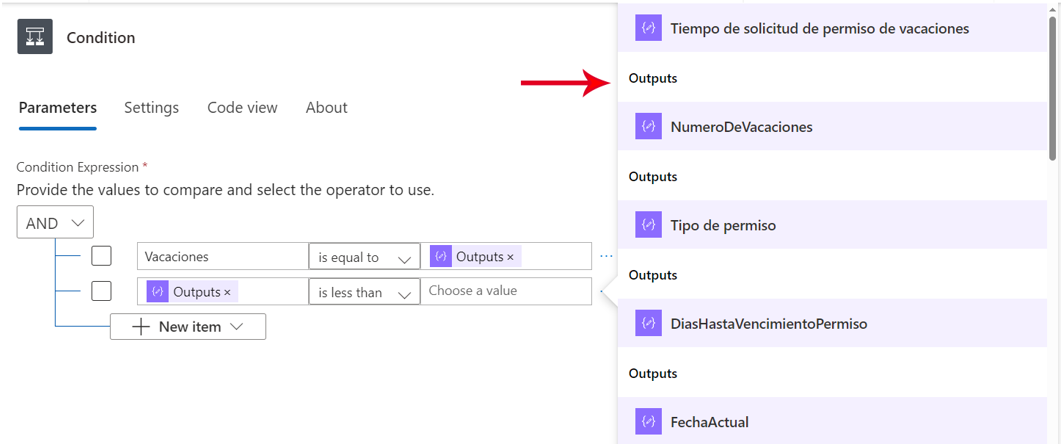
In the next row of the condition:
- In the “Choose value” field, select the output from the Compose action labeled “DiasHastaVencimientoDePermiso”.
- From the dropdown menu, select “Is less than”.
- In the “Choose value” field, select the output from the Compose action labeled “Tiempo de solicitud de permiso de vacaciones”.
This condition checks if the leave request for “Vacation” is being submitted fewer days in advance than the required timeline defined in the “Tiempo de solicitud de permiso de vacaciones” Compose action. This ensures adherence to the company’s vacation leave submission policy.
Step 17: Add an email action for the condition that checks if the leave type is “vacation”.
Add the action “Send an Email.” After that, click the button labeled “Switch to advanced mode.” In the “To” field, select the property “Responder’s Email.” In the “Subject” field, write the subject for the email. In the “Body” field, draft the message to be sent to the person who filled out the form. In this case, remind them of the estimated number of days required to request vacation leave. Instead of manually entering the number of days in the message, include the output from the compose action titled “Vacation Leave Request Time.”
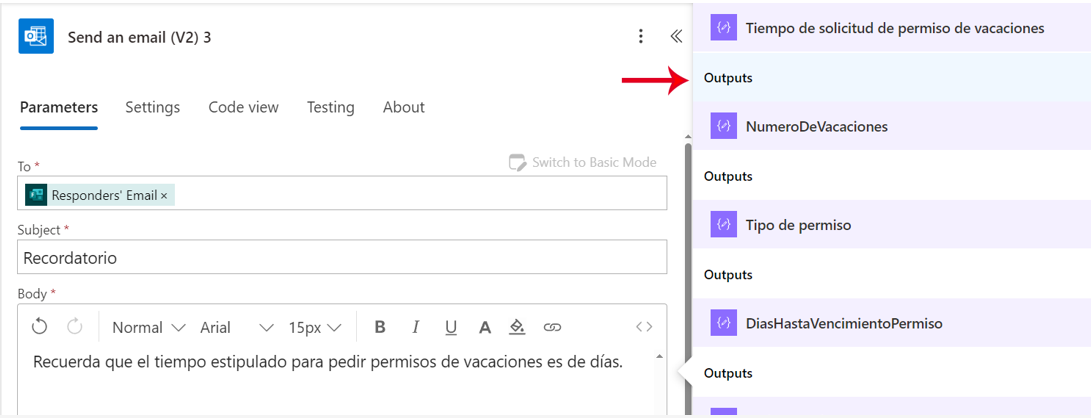
This is done because the stipulated time to request vacation leave varies depending on whether the number of vacation days is less than or equal to 2. If the number of vacation days is 2, the stipulated time to request the leave is 15 days. If the vacation days are more than 2, the stipulated time to request the leave is 30 days.
Transform Your Leave Management with an Automated Process
Implementing an automated process for leave requests not only ensures compliance with company policies but also saves valuable time for both employees and administrators. By streamlining workflows, automating calculations, and sending personalized notifications, your team can focus on what truly matters without getting bogged down by manual tasks. Whether it’s managing vacation requests, personal errands, or medical appointments, an automated process guarantees clear communication and seamless workflow management.
At Pevaar, we specialize in crafting tailored solutions for workflow automation and process optimization. With our expertise in tools like Power Automate and staff augmentation services, we help businesses implement automated processes that drive efficiency and foster growth.
Are you ready to transform your operations with an automated process tailored to your specific needs? Contact Pevaar today and let us help you take the next step toward smarter, hassle-free leave management.









Leave a Reply