
Expense Control in Power Apps: The Complete Guide to the Expenses Module
Keeping track of expenses can be a nightmare when everything’s scattered across spreadsheets, emails, or random notes. But with the expense control inside the Power Apps Economic Control of Projects App, that problem turns into something simple, quick, and even fun to manage.
This module helps you record, categorize, and visualize every project expense in real time. That means you can instantly see how much you’re spending, where your money is going, and how to optimize your budget — all without losing control.
Forget manual calculations or lost receipts:
With just a few clicks, you can add expenses, assign them to specific projects, and get clear reports that help you make smart decisions.
And the best part? Everything is inside a clean, modern interface that’s super easy to use. Because when expense control is simple, your workflow becomes more efficient.
1. Purchases
This section works just like the Previous Income Module — the only difference lies in the controls added to the gallery. These adjustments allow users to manage purchase data more efficiently while keeping the same intuitive workflow.
Where control begins
We start by adding a label with the title “Expenses” in its Text property. That way, you’ll always know where you are: the section where money goes out — but control stays in your hands.
Your financial radar
We insert a text box with a search icon — like a radar that tracks every expense. Just type the provider, expense type, or project, and the expense control app instantly shows what you need. Efficiency in one click.
Back to zero
Made a wrong search? No problem. With the clear button, everything resets. It’s like restarting your expense control dashboard for a clean, new view.
Everything in order
Here’s where the magic happens: the gallery organizes your expenses into a clean, modern layout. We insert a vertical gallery with the Items property:
Sort(
Search(
Expenses;
TextInput_ExpenseSearch.Text;
Provider; Project; ExpenseType; Date; ExpenseValue; PurchaseOrderNumber; PaymentMethod
);
'Created On';
SortOrder.Descending
)
This results in an organized list where the most recent expenses always appear first. Everything flows clearly, without confusion, and with complete expense control.
Data Source
Behind every great module, there’s an even better foundation.
In this case, everything starts with Expenses, the table that stores every recorded cost.
Here you’ll find essential fields like Provider, Project, Expense Type, Date, Expense Value, Purchase Order Number, and Payment Method.
Think of it as your digital accounting book — organized, clean, and ready to answer in seconds.
Search Functions
The radar that tracks every penny:
Search(Expenses; TextInput_ExpenseSearch.Text; …)
This function allows you to search across multiple fields at the same time (supplier, expense type, project, etc.).
You just type in one piece of data and, in less than a second, you get the exact matches. The expense control never fails: it finds everything you need in the blink of an eye.
It will help you see the most recent expenses at the top of the list. Thus, the information flows logically, without losing control or time.
Inside the Gallery
Here’s where the expense control becomes fully interactive and smart.
Information Labels
Each expense displays its details clearly through labels linked to the data source.
We add labels for the most relevant columns: Provider, Project, Expense Type, Date, and Value.
Each label connects directly using properties like:
ThisItem.Provider
ThisItem.ExpenseType
ThisItem.ExpenseValue
That way, you always know where the money went, with no guessing involved.
Icons with attitude
Delete: OnSelect property triggers:
Set(varExpenseDeletionRecord; ThisItem);;
UpdateContext({ popDelete: true })
Edit: OnSelect property triggers:
Set(ExpenseItemRecord; ThisItem);;
Navigate(EditExpense)
With these icons, you can access, update, or delete records in seconds. No long processes: just smart clicks.
Create Button
Need to add a new expense? Just tap the Create button with this property:
Navigate(CreateExpense; ScreenTransition.None)
It’s like opening a new tab for your finances: simple, straightforward, and functional.
This way, the gallery becomes an interactive dashboard where you can view, edit, delete, or create new records instantly. Exactly what makes expense control more modern and efficient.
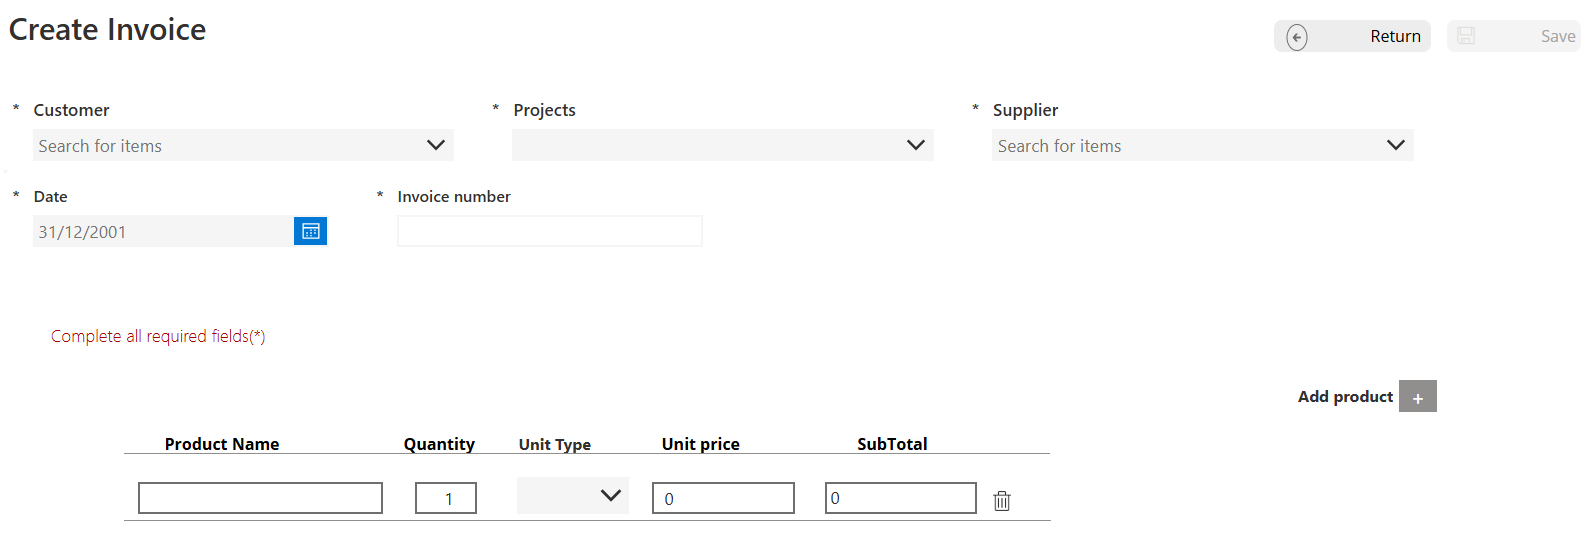
Img.1
“Create Purchase” Screen
Back Button
Because every good workflow needs a quick exit.
With a single click, this button takes you back to the main module without losing data or breaking the flow:
OnSelect = Back()
Save Button
Your ally for closing the purchase cycle.
This button ensures that all the information entered is saved correctly in the database:
OnSelect = SubmitForm(Form_CreatePurchase_1)
Title Label
Clarity above all.
The screen title is defined with a clear, visible text so the user always knows where they are:
Text = "Create Purchase"
The Magic Form
The heart of the process. This is where all the action happens: the app records the purchase, displays a success notification, and resets the form for the next entry.
Notify("Purchase created successfully"; NotificationType.Success);;
NewForm(Form_CreatePurchase_1);;
Navigate(Purchases; ScreenTransition.Fade)
The result? Each purchase is recorded with style, instant validation, and a built-in notification. The app confirms that your entry was successful while keeping your workflow clean and efficient.
“+” Button to Add Purchases
Because there are always more purchases to record, this “+” button is your gateway to adding new transactions to the module.
With just one tap, a new record is created with basic default values that can later be completed:
Collect(TemporaryPurchases;
   {
      Purchase_Date: Today();
      Purchase_Value: 0;
      Supplier: "";
      TotalPurchase: 0
  }
)
What Does This Formula Do?
Collect
The star function that stores and accumulates records in a local collection.
In this case, the collection is called TemporaryPurchases, and it works like a dynamic draft where purchases are saved before being officially submitted.
Initial Record
When the button is pressed, the app automatically generates a new record with these default values:
- Purchase_Date → filled with the current date thanks to Today().
- Purchase_Value → starts at 0, waiting for the real purchase amount.
- Supplier → starts empty (“”), ready for the supplier’s name to be entered.
- TotalPurchase → begins at 0 and later updates based on the entered data.
To guide the user, a label is also inserted with the text:
Text = "Add product"
This keeps the module dynamic — registering new purchases becomes as easy as a click, while the app handles the rest smoothly.
Img.2
Because nothing beats a clear reminder of what the button actually does.
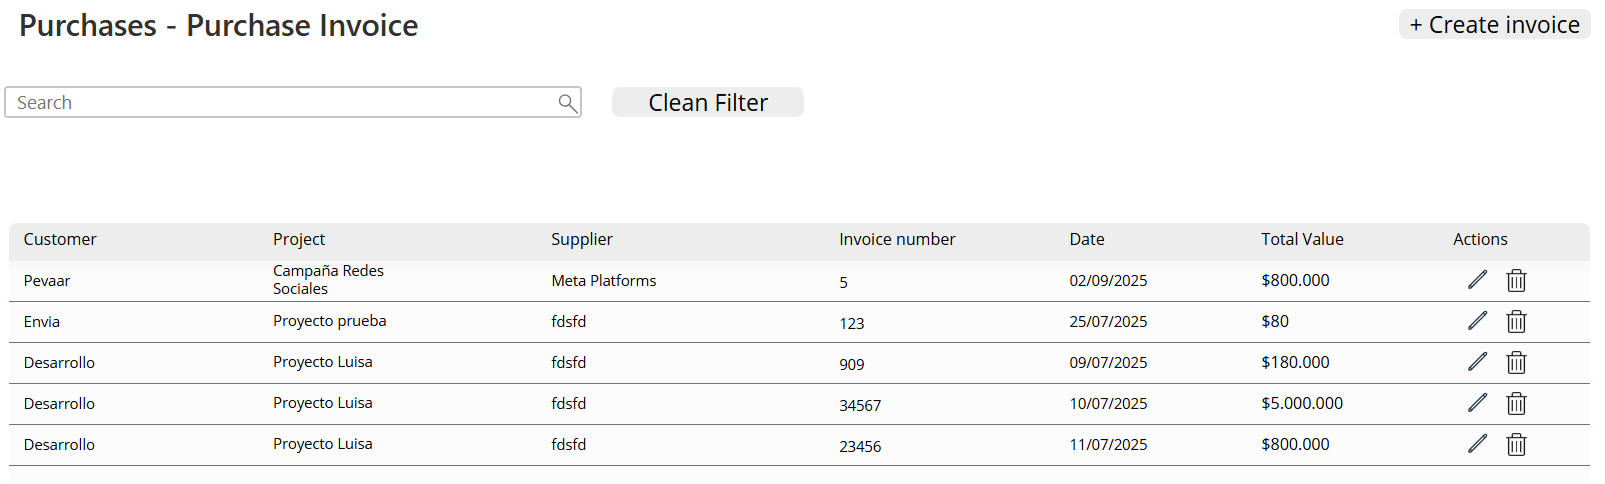
Purchases Gallery
This is where every purchase comes to life — turning into a visible, editable, and easy-to-understand record.
We insert a blank vertical gallery and set its Items property to:
TemporaryPurchases
Inside this gallery, we add the controls that make the everyday magic happen:
- DatePicker →
DefaultDate = ThisItem.Purchase_DateSo that each purchase displays the correct date.
- InputText →
Default = ThisItem.Purchase_ValueHere the user can enter or update the actual purchase value.
- Dropdown →
[""; "Approved"; "Pending"; "Rejected"]Perfect for indicating the purchase status within its process.
- Delete icon (trash can) →
OnSelect = Remove(TemporaryPurchases; ThisItem)One click and the record is gone — as simple as that.
With this set of controls, the expense control becomes as dynamic as it is intuitive.
Each expense stays organized, clean, and easy to edit — just as it should be in an expense control.
Calculating Totals Like a Pro
Because no budget manages itself, the app does the math instantly with a couple of smart labels:
Label “Total Purchases”
Text = "$" & Text(Sum(TemporaryPurchases; Value(Purchase_Value)); "#,##0.00")
Displays the total value of all recorded purchases. That way, you can forget about calculators (or Excel headaches).
Label “Remaining Budget”
Text = "$" & Text(Value(DataCardValue24.Text) - Sum(TemporaryPurchases; Value(Purchase_Value)); "#,##0.00")
Shows how much of the project’s budget is still available — perfect for knowing if you can keep buying… or if it’s time to say, “budget’s gone.”
Save and Celebrate in Style
After recording each purchase, it’s time to save the data and let the app work its organizational magic.
If(
    CountRows(TemporaryPurchases) = 0;
    Notify("You must add at least one purchase"; NotificationType.Error);

    With(
        {
            newPurchaseRecord: Patch(
                ProjectPurchases;
                Defaults(ProjectPurchases);
                {
                    PurchaseDate: DatePicker1.SelectedDate;
                    Supplier: SupplierDropdown.Selected;
                    PurchaseValue: Value(InputText_PurchaseValue.Text);
                    Status: StatusDropdown.Selected;
                    ProjectRelation: ProjectDropdown.Selected
                }
            )
        };

        If(
            !IsBlank(newPurchaseRecord);
            Clear(TemporaryPurchases);
            Notify("Purchase saved successfully"; NotificationType.Success)
        )
    )
);;

ResetForm(Form_CreatePurchase);;
Navigate(PurchasesScreen; ScreenTransition.Fade)
What Does This Formula Do?
Initial Validation
First, the app checks that you’ve added at least one purchase:
If(CountRows(TemporaryPurchases) = 0; Notify("You must add at least one purchase"; NotificationType.Error))
If the collection is empty, a friendly alert appears reminding you to record at least one purchase before continuing.
Purchase Registration
Using the Patch function, the app saves all the information in the ProjectPurchases table — keeping track of the supplier, value, date, status, and project relation. One click and done! Safe, centralized purchases in just seconds.
Cleanup and Confirmation
Once everything is saved, the app clears the temporary data and displays a success message:
Clear(TemporaryPurchases);
Notify("Purchase saved successfully"; NotificationType.Success)
This way, you know your record was successfully stored and your budget remains under control.
Final Actions
The app resets the form and takes you back to the main screen with a sleek fade transition — because nothing says efficiency like wrapping up a task in style.
2. Direct Payroll or direct labor
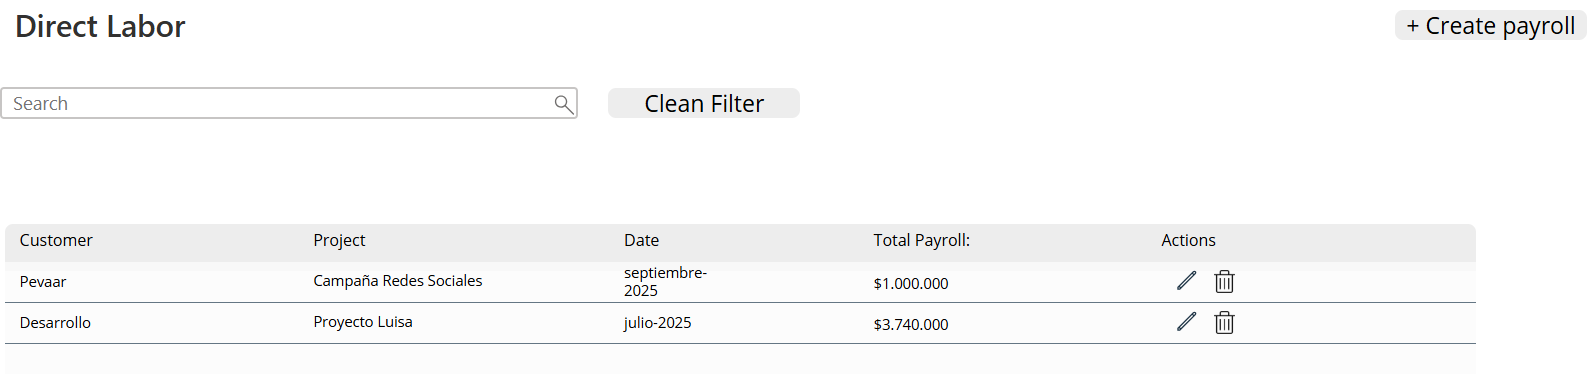
Img.3
Controls Inside the Gallery
Each project worker appears as an individual record within the gallery, where we insert the following controls:
- Label (Item): displays a consecutive number that automatically increases every time a new worker is added — so you never lose track.
- ComboBox: with the property Items = WorkerApp, allows you to select the assigned employee or collaborator.
- InputText (Worked Days): an editable field to enter the number of days worked during the month.
- InputText (Payroll Value): where the total amount corresponding to that worker is defined.
- Label (Calculated Value): automatically shows the total based on the worked days and the daily or agreed rate.
- Trash Icon: removes the worker from the list (OnSelect = Remove(Collection; ThisItem)).
In Action
With these controls, expense control becomes as agile as it is practical:
- Allows you to create complete monthly payrolls without errors.
- Automatically calculates totals per employee.
- Keeps everything connected to the main project database.
It’s like having a small accounting office inside your app — but without the paperwork.
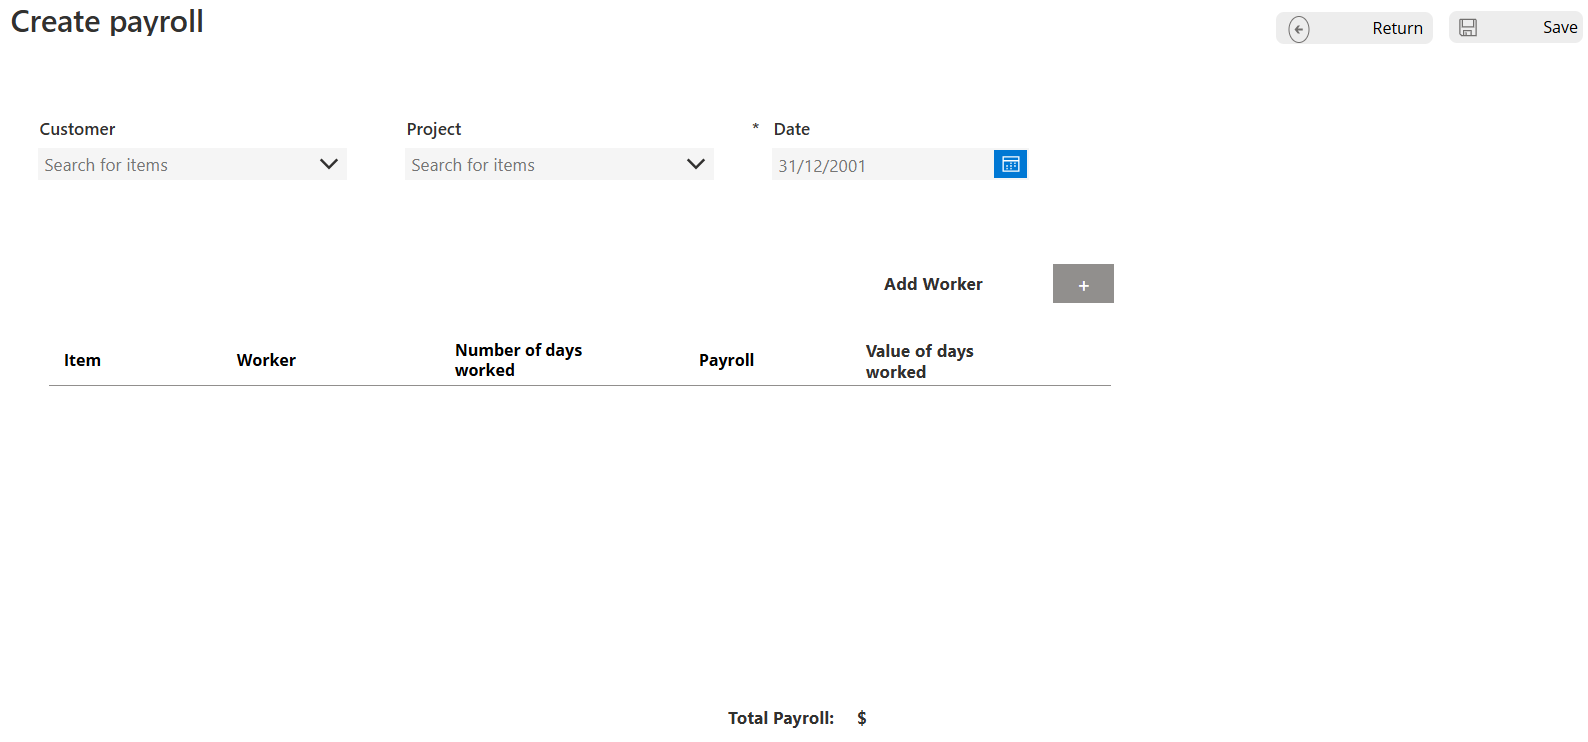
Img.4
3. Indirect Labor: Contracts
This section manages the contracts of suppliers or external staff involved in the project. Each contract is displayed in an interactive table showing the most relevant data: contract number, supplier, project, value, and status.

Img.5
Action Controls
In the Actions column, two icons are added to make the module as functional as it is intuitive (see Image 6):
- Eye icon ️: allows users to view the selected contract details without leaving the main screen.
- “+” icon: opens the option to add payments or installments related to that contract.
Img.6
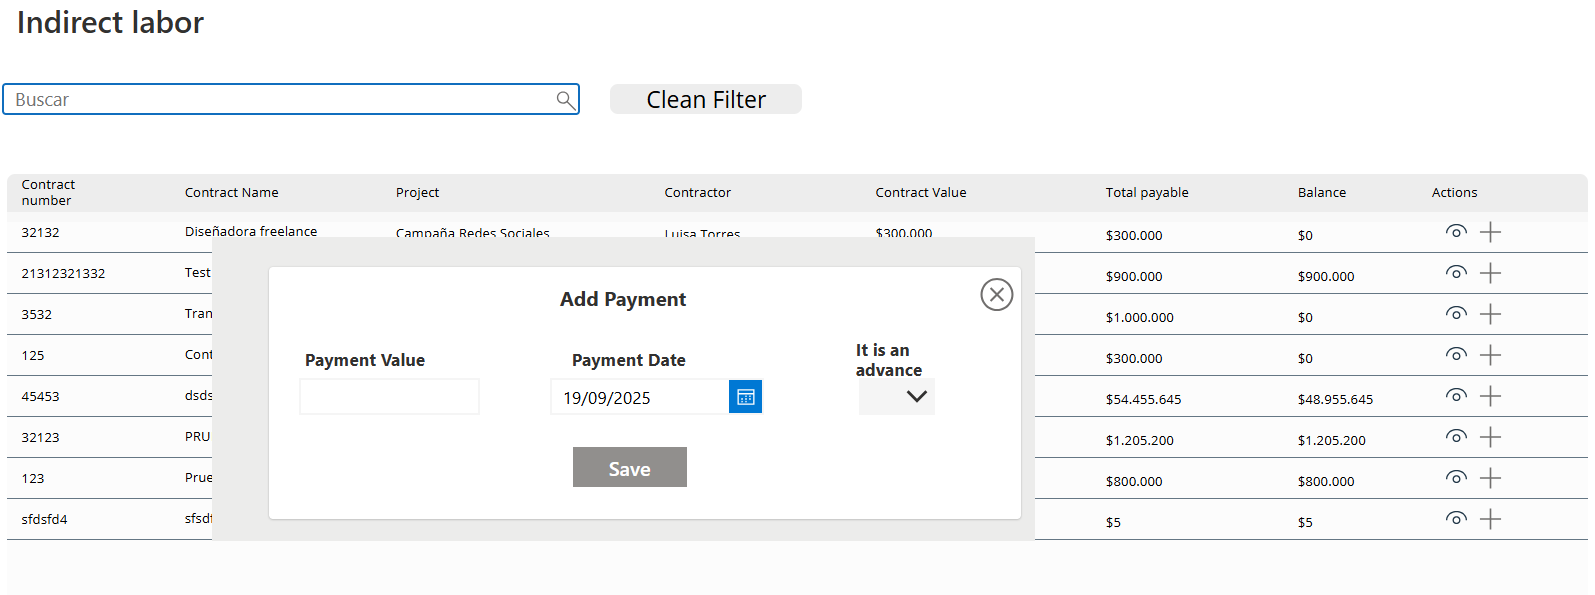
Dynamic Properties
The “+” icon includes the following formula in its OnSelect property:
Set(SelectedContract; ThisItem);
Set(ShowPaymentPopup; true)
This formula performs the following actions:
- Stores the selected contract in the SelectedContract variable so the app knows exactly which record the payment will be added to.
- Displays a pop-up window (popup) that allows users to quickly and directly register the payment details without interrupting the workflow.
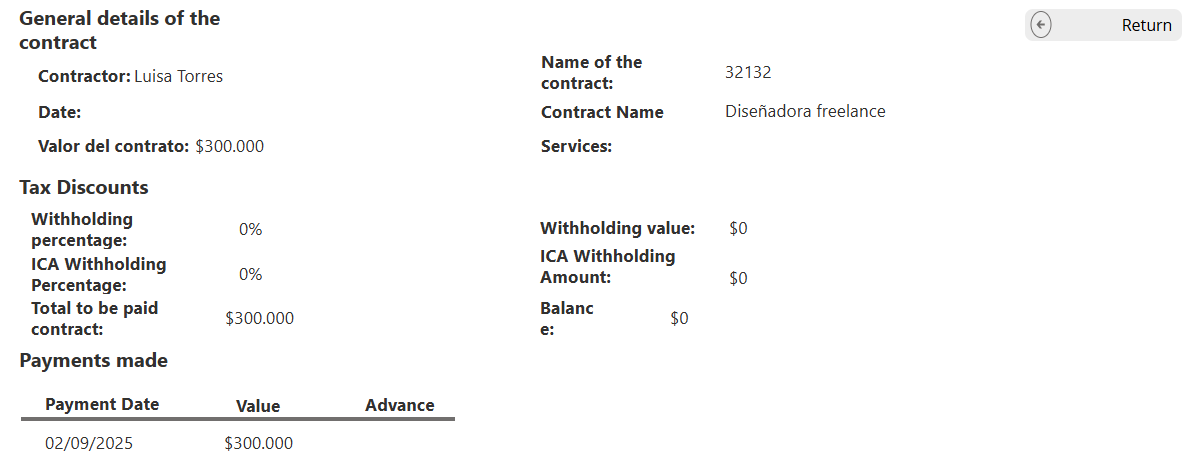
Img.7
In a nutshell
The Contracts submodule within Expenses not only organizes information but also makes it interactive and accessible.
You can review a contract’s details or add a payment with just one click — keeping everything synchronized and crystal clear.
A tool so simple that even signing a contract feels effortless.
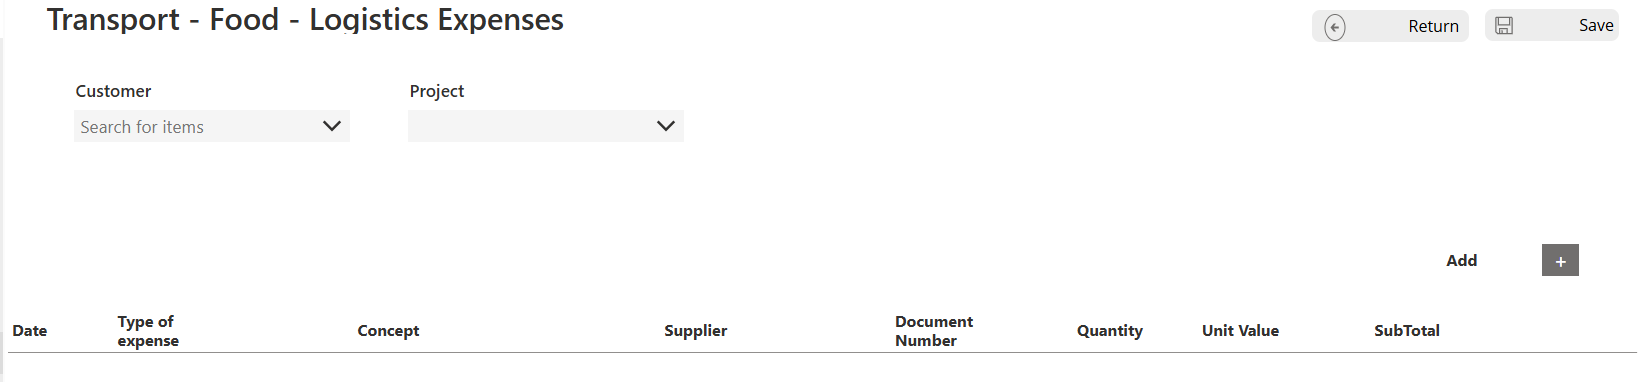
4. Other Expenses
This screen manages additional expenses related to transportation, food, logistics, and other project needs. (Image 8).

Img.8
The structure is similar to the Purchases screen but includes specific controls within the gallery for recording expenses:
- DatePicker: to select the expense date.
- DropDown: to choose the type of expense.
- InputText: to enter the expense concept or description.
- ComboBox: to select the supplier.
- InputText: to enter the document number.
- InputText: to specify the quantity.
- InputText: to input the unit value.
- Label: to display the subtotal.
- Trash icon: to delete the recorded expense.
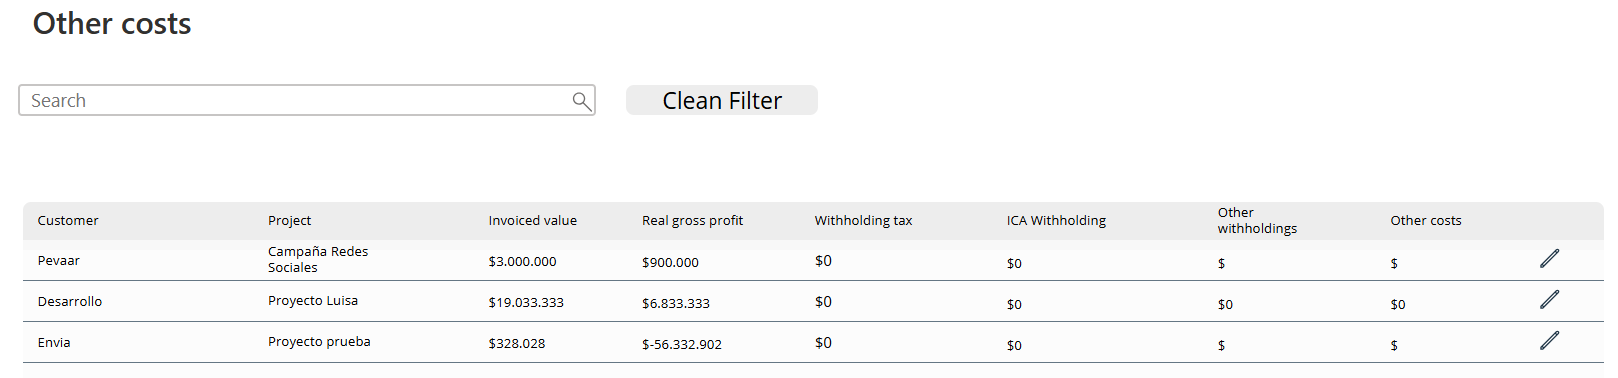
Img.9
In addition, this screen includes a summary table that displays information related to:
- Invoiced amount
- Actual profit
- Withholding tax
- ReteICA
- Other withholdings
- Other costs
All this information is filtered by project, allowing for a clear, organized, and accurate control of expenses.
Img.10
The Expenses module completes the financial management cycle within the application, allowing you to record and have expense control of each project with accuracy and efficiency. From managing direct and indirect payrolls to handling additional costs, this module ensures clear and centralized tracking of all financial movements.
We invite you to continue exploring our other articles by visiting our website, where you’ll find step-by-step guides for the other modules—such as Administration and Income—each designed to optimize your system’s operation and simplify decision-making.
If you’d like to implement or learn more about these features, click the button at the end of this article to get in touch with us. Our team is ready to help you take your project management to the next level.


Leave a Reply